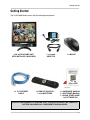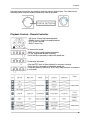
1
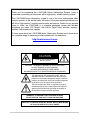
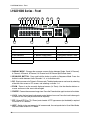
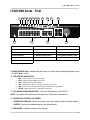
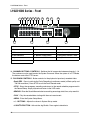
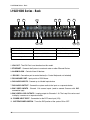
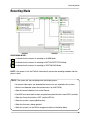
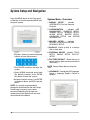
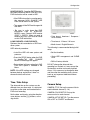
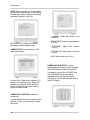
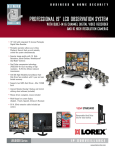
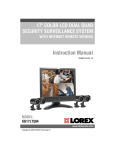
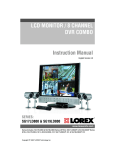
19" LCD COLOR
OBSERVATION SYSTEM
With Built-In 16 Channel Triplex
Digital Video
Instruction Manual
English Version 1.0
MODEL:
L19LD1600 Series
www.lorexcctv.com
Copyright © 2008 LOREX Technology Inc.
Thank you for purchasing the L19LD1600 Series Observation System. Lorex is
committed to providing our customers with a high quality, reliable security product.
The L19LD1600 Series observation system is one of the most sophisticated video
security systems on the market today with many of the same advanced features you
will find in “high security” systems used in banks and casinos. Perfect for any upscale
home or office, the L19LD1600 is a complete packaged system that includes
everything you need; LCD Monitor with built-in Digital video recorder, cameras,
brackets, cables and power supplies.
To learn more about this L19LD1600 Series Observation System and to learn about
our complete range of accessory products, please visit our website at:
http://www.lorexcctv.com
CAUTION
RISK OF ELECTRIC SHOCK
DO NOT OPEN
CAUTION: TO REDUCE THE RISK OF ELECTRIC SHOCK
DO NOT REMOVE COVER (OR BACK).
NO USER SERVICEABLE PARTS INSIDE.
REFER SERVICING TO A QUALIFIED SERVICE PERSONNEL
The lightning flash with arrowhead symbol, within an
equilateral triangle, is intended to alert the user to the
presence of uninsulated “dangerous voltage” within the
product’s enclosure that may be of sufficient magnitude
to constitute a risk of electric shock to persons.
The exclamation point within an equilateral triangle is
intended to alert the user to the presence of important
operating and maintenance (servicing) instructions in
the literature accompanying the appliance.
WARNING: TO PREVENT FIRE OR SHOCK HAZARD,
DO NOT EXPOSE THIS UNIT TO RAIN OR MOISTURE.
CAUTION: TO PREVENT ELECTRIC SHOCK, MATCH WIDE BLADE
OF PLUG TO WIDE SLOT, FULLY INSERT.
2
Important Safeguards
Important Safeguards
In addition to the careful attention devoted to quality standards in the manufacture process of your video
product, safety is a major factor in the design of every instrument. However, safety is your responsibility too.
This sheet lists important information that will help to assure your enjoyment and proper use of the video
product and accessory equipment. Please read them carefully before operating and using your video product.
Installation
1. Read and Follow Instructions - All the safety and
operating instructions should be read before the
video product is operated. Follow all operating
instructions.
2. Retain Instructions - The safety and operating
instructions should be retained for future reference.
3. Heed Warnings - Comply with all warnings on the
video product and in the operating instructions.
4. Polarization - Do not defeat the safety purpose of
the polarized or grounding-type plug.
A polarized plug has two blades with
one wider than the other.
A grounding type plug has two blades
and a third grounding prong.
The wide blade or the third prong are
provided for your safety.
If the provided plug does not fit into
your outlet, consult an electrician for
replacement of the obsolete outlet
5. .Power Sources - This video product should be
operated only from the type of power source
indicated on the marking label. If you are not sure of
the type of power supply to your location, consult
your video dealer or local power company. For video
products intended to operate from battery power, or
other sources, refer to the operating instructions.
6. Overloading - Do not overload wall outlets of
extension cords as this can result in the risk of fire
or electric shock. Overloaded AC outlets, extension
cords, frayed power cords, damaged or cracked wire
insulation, and broken plugs are dangerous. They
may result in a shock or fire hazard. Periodically
examine the cord, and if its appearance indicates
damage or deteriorated insulation, have it replaced
by your service technician.
8.
Ventilation - Slots and openings in the case are
provided for ventilation to ensure reliable operation
of the video product and to protect it from
overheating. These openings must not be blocked
or covered. The openings should never be blocked
by placing the video equipment on a bed, sofa, rug,
or other similar surface. This video product should
never be placed near or over a radiator or heat
register. This video product should not be placed in
a built-in installation such as a bookcase or rack
unless proper ventilation is provided or the video
product manufacturer’s instructions have been
followed.
9. Attachments - Do not use attachments unless
recommended by the video product manufacturer as
they may cause a hazard.
10. Water and Moisture - Do not use this video product
near water. For example, near a bath tub, wash bowl,
kitchen sink or laundry tub, in a wet basement, near
a swimming pool and the like.
Caution: Maintain electrical safety. Powerline
operated equipment or accessories connected to
this unit should bear the UL listing mark of CSA
certification mark on the accessory itself and should
not be modified so as to defeat the safety features.
This will help avoid any potential hazard from
electrical shock or fire. If in doubt, contact qualified
service personnel.
11. Accessories - Do not place this video equipment
on an unstable cart, stand, tripod, or table. The video
equipment may fall, causing serious
damage to the video product. Use
this video product only with a cart,
stand, tripod, bracket, or table
recommended
by
the
manufacturer or sold with the video
product. Any mounting of the product
should follow the manufacturer’s
instructions and use a mounting accessory
recommended by the manufacturer.
7. Power-Cord Protection - Power supply cords should
be routed so that they are not likely to be walked on
or pinched by items placed upon or against them,
paying particular attention to cords at plugs,
convenience receptacles, and the point where they
exit from the video product.
3
Important Safeguards
Service
Use
13. Servicing - Do not attempt to service this video
equipment yourself as opening or removing covers
may expose you to dangerous voltage or other
hazards. Refer all servicing to qualified service
personnel.
19. Cleaning - Unplug the video product from the wall
outlet before cleaning. Do not use liquid cleaners or
aerosol cleaners. Use a damp cloth for cleaning.
14. Conditions Requiring Service - Unplug this video
product from the wall outlet and refer servicing to
qualified service personnel under the following
conditions.
A. When the power supply cord or plug is
damaged.
B. If liquid has been spilled or objects have fallen
into the video product.
C. If the video product has been exposed to rain
or water.
D. If the video product does not operate normally
by following the operating instructions. Adjust
only those controls that are covered by the
operating instructions. Improper adjustment of
other controls may result in damage and will often
require extensive work by a qualified technician
to restore the video product to its normal
operation.
E. If the video product has been dropped or the
cabinet has been damaged.
F. When the video product exhibits a distinct
change in performance. This indicates a need for
service.
15. Replacement Parts - When replacement parts are
required, have the service technician verify that the
replacements used have the same safety
characteristics as the original parts. Use of
replacements specified by the video product
manufacturer can prevent fire, electric shock or other
hazards.
16. Safety Check - Upon completion of any service or
repairs to this video product, ask the service
technician to perform safety checks recommended
by the manufacturer to determine that the video
product is in safe operating condition.
17. Wall or Ceiling Mounting - The cameras provided
with this system should be mounted to a wall or
ceiling only as instructed in this guide, using the
provided mounting brackets.
18. Heat - The product should be situated away from
heat sources such as radiators, heat registers,
stoves, or other products (including amplifiers) that
produce heat.
4
20. Product and Cart Combination - Video and cart
combination should be moved with care. Quick
stops, excessive force, and uneven surfaces may
cause the video product and car combination to
overturn.
21. Object and Liquid Entry - Never push objects for
any kind into this video product through openings as
they may touch dangerous voltage points or
“short-out” parts that could result in a fire or electric
shock. Never spill liquid of any kind on the video
product.
22. Lightning - For added protection for this video
product during a lightning storm, or when it is left
unattended and unused for long periods of time,
unplug it from the wall outlet and disconnect the
antenna or cable system. This will prevent damage
to the video product due to lightning and power line
surges.
General Precautions
NOTE
This equipment has been certified and found to comply with the limits regulated by FCC, EMC, and LVD. Therefore, it
is designated to provide reasonable protection against interference and will not cause interference with other appliance
usage.
However, it is imperative that the user follows this manuals guidelines to avoid improper usage which may result in
damage to the unit, electrical shock and fire hazard injury
In order to improve the feature functions and quality of this product, the specifications are subject to change without
notice from time to time.
FCC CLASS B NOTICE
Note:
This equipment has been tested and found to comply with the limits for a Class B digital device, pursuant to Part
15 of the FCC Rules. These limits are designed to provide reasonable protection against harmful interference in
a residential installation. This equipment generates, uses, and can radiate radio frequency energy and, if not installed and used in accordance with the instruction, may cause harmful interference to radio communications.
However, there is no guarantee that interference will not occur in a particular installation. If this equipment does
cause harmful interference to radio or television reception (which can be determined by turning the equipment on
and off), the user is encouraged to try to correct the interference by one or more of the following measures:
z
z
z
z
Reorient or relocate the receiving antenna
Increase the separation between the equipment and receiver
Connect the equipment into an outlet on a circuit different from that to which the receiver is
connected
Consult the dealer or an experienced radio or television technician for assistance
General Precautions
1. All warnings and instructions of this manual should be followed
2. Remove the plug from the outlet before cleaning. Do not use liquid aerosol detergents. Use a water dampened cloth
for cleaning
3. Do not use this unit in humid or wet places
4. Keep enough space around the unit for ventilation. Slots and openings in the storage cabinet should not be blocked
5. During lightning storms, or when the unit is not used for a long time, disconnect the power supply, antenna, and cables
to protect the unit from electrical surge
LOREX TECHNOLOGY INC.
http://www.lorexcctv.com
5
L19LD1600 Series Feature List
L19LD1600 Series Feature List
Monitor
• Multiple easy to use control options: front panel buttons, Remote Control (included) and mouse
(included).
• On Screen Display: Date, Time, Sequence, Alarm status, Motion, Video loss, Camera title.
• Multi-Lingual on screen display (English, French, Spanish, Chinese and Russian)
• Industry standard BNC connector with 16 loop out ports.
• Stand or Wall mountable (VESA Standard)
Built-In Digital Video Recorder (DVR)
• Dual Codec Compression Technology: JPEG 2000 for local recording at high resolution.
H.264 for efficient network transmission
• Records up to 480 FPS (Frames Per Second) for NTSC @ 360x120 resolution. Supported
resolutions: 720x240 (2CIF); 360x240 (CIF); 360x120
• 500GB ‘Surveillance Certified’ Hard Drive Included (expandable to 750GB)
• Supports two SATA Hard Drives: Max 750GB each; one in the removable HDD bay and one
internal. Maximum total capacity of 1.5 TB.
• HDD Designed for Surveillance: Hard drive is specifically designed for optimal performance
in the commercial video security market
• Covert Camera function: The camera will not be viewable on the monitor, but video images
will still be recorded
• Multiple Recording Modes (Schedule, Holiday and Scheduled event recording)
• Panic Recording, by pressing the panic button the system will start recording at the highest
resolution
• Multiple Search Engines (Date/Time, Percent, Event)
• Programmable motion-detection
• Four channel audio recording and selectable one channel audio playback
• Automatic Daylight savings time change function
• USB 2.0 Port (flash backup, firmware upgrade, mouse, HDD)
• PTZ (Pan/Tilt/Zoom) control capable (multi-protocol)
• Multiple screen modes: single, split 6, 8, 9, 13, 16
6
Table of Contents
Table of Contents
Getting Started .......................................................................................... 9
L19LD1600 Series - Front ................................................................. 10~12
L19LD1600 Series - Side ........................................................................ 13
L19LD1600 Series - Back ....................................................................... 14
Remote Control ....................................................................................... 15
Camera Installation ................................................................................. 16
Installation Warnings: ................................................................................................................ 16
Camera Stand Installation: ........................................................................................................ 16
Connecting Cameras ................................................................................................................. 17
Connecting the Mouse ............................................................................ 19
Playback Controls ...................................................................................................................... 20
Display Modes ........................................................................................ 20
Initial Loading Sequence ........................................................................................................... 20
General Display Overview ......................................................................................................... 21
Screen Display .......................................................................................................................... 22
PIP Display Mode ...................................................................................................................... 22
Freeze in Split Mode.................................................................................................................. 23
Freeze in Full Mode ................................................................................................................... 23
Sequence View .......................................................................................................................... 23
Zoom View ................................................................................................................................. 24
Key Lock .................................................................................................................................... 24
Switch Audio Channel ............................................................................................................... 24
Recording Mode ...................................................................................... 25
Playback ................................................................................................. 26
Starting Playback Mode ............................................................................................................. 26
Stopping Playback Mode ........................................................................................................... 26
Switch Audio Channel ............................................................................................................... 26
Search Mode ............................................................................................................................. 27
Search Bar ................................................................................................................................. 27
Time/Date Search ...................................................................................................................... 27
Event List Search ...................................................................................................................... 28
Playback Speed Control ............................................................................................................ 28
Using the JOG Shuttle in Playback ........................................................................................... 28
Playback Controls - Remote Controller ..................................................................................... 29
System Menu - Overview .......................................................................................................... 30
Display Setup .......................................................................................... 31
Screen Display .......................................................................................................................... 31
Configuration ........................................................................................... 32
Hard Drive Management ........................................................................................................... 32
Time / Date Setup ...................................................................................................................... 33
Camera Setup ........................................................................................................................... 33
Record Setup .......................................................................................... 38
Record Configuration ................................................................................................................. 38
Schedule record ..................................................................................................................................... 40
7
Table of Contents
Table of Contents
BACKUP ................................................................................................. 41
USB BACKUP SUBMENU ........................................................................................................ 41
Data Backup ........................................................................................... 41
EXTERNAL DEVICE ............................................................................... 42
TCP/IP SETUP - IP SETUP ...................................................................................................... 42
TCP/IP SETUP - DDNS SETUP ................................................................................................ 42
TCP/IP SETUP - SPEED ........................................................................................................... 43
PAN/TILT SETUP - COMMAND SETUP ................................................................................... 43
PAN/TILT SETUP - SPEED SETUP ......................................................................................... 44
SPOT SETUP ............................................................................................................................ 44
RS232C SETUP ........................................................................................................................ 44
Observation System Specifications - Appendix #1 ................................. 45
Observation System Specifications - Appendix #1 ................................. 46
Full Connectivity Diagram - Appendix #2 ................................................ 47
Connecting a Slave (Spot-Out) Monitor - Appendix #3 ........................... 48
Connecting Motion / Alarm Device - Appendix #4 .................................. 49
Connecting PTZ Cameras - Appendix #5 ............................................... 50
Connecting to a PC using the Serial Port - Appendix #6 ........................ 51
Hard Drive Replacement - Appendix #7 ........................................... 52~53
Play Only Mode - Appendix #8 ............................................................... 54
Optional Accessories .............................................................................. 55
LOREX PRODUCT LIMITED WARRANTY ............................................ 56
Warranty Exclusions .................................................................................................................. 56
Obtaining Service ...................................................................................................................... 57
8
Getting Started
Getting Started
The L19LD1600 Series comes with the following components:
LCD & DVR COMBO UNIT
WITH INSTALLED 160 GB HDD
1 x 10’ ETHERNET
CABLE
1 x POWER
ADAPTOR
1 x REMOTE CONTROL
2 x AA BATTERIES
1 x MOUSE
1 x HARDWARE MANUAL
1 x SOFTWARE MANUAL
1 x QUICK START GUIDE
1 x SOFTWARE CD
CHECK YOUR PACKAGE TO CONFIRM THAT YOU HAVE RECEIVED THE COMPLETE
SYSTEM, INCLUDING ALL COMPONENTS SHOWN ABOVE.
9
L19LD1600 Series - Front
L19LD1600 Series - Front
1
2
13
3
4
5
6
7
8
9
10
11
12
15
14
16
1. Mode
2. SEQ / Audio
3. PIP
4. Zoom
5. Freeze
6. Lock
7. PTZ
8. Next
9. Panic Record LED
10. LED Indicators
11. Monitor Power Button
12. Navigation Controls / Enter
13. Speaker
14. Channels / PTZ Controls
15. Playback Controls
16.JOG Shuttle
1. DISPLAY MODE - Changes the onscreen camera display between Single, Quad (4 Channel),
6 Channel, 8 Channel, 9 Channel, 13 Channel and 16 Channel Split Screen views.
2. SEQ/AUDIO BUTTON - Press and hold the button to switch to Sequence Mode. Press the
button to switch between Audio Channels 1~4, or to disable audio.
3. PIP - Displays cameras in Picture in Picture mode. The displayed cameras can be set by selecting
either the main screen or PIP screen, and selecting a number 1~4.
4. ZOOM - Zooms in on the currently displayed camera (1x Zoom). Use the direction buttons or
mouse and move to the area to be enlarged.
5. FREEZE - Freezes the onscreen image view. Press the Freeze button again to return to live video.
6. LOCK - Locks the front panel and remote control buttons from use. Press the Lock button again
to return to live view (the password will be required).
7. PTZ - Enters PTZ (Pan / Tilt / Zoom) control mode. A PTZ type camera (not included) is required
to use the PTZ Functions.
8. NEXT - Switch to the next camera in full screen mode, the next quad view in Quad View Mode,
and to the next screen in PTZ Mode.
10
L19LD1600 Series - Front
L19LD1600 Series - Front
1
2
13
3
4
5
6
7
8
9
10
11
12
15
14
16
1. Mode
2. SEQ / Audio
3. PIP
4. Zoom
5. Freeze
6. Lock
7. PTZ
8. Next
9. Panic Record LED
10. LED Indicators
11. Monitor Power Button
12. Navigation Controls / Enter
13. Speaker
14. Channels / PTZ Controls
15. Playback Controls
16.JOG Shuttle
9. PANIC RECORD LED - Indicates that the system is in Panic (Manual Recording) Mode. Press
the REC Button to exit.
10. LED STATUS INDICATORS:
z
z
z
z
z
z
REC - Indicates that the system is recording.
FULL - Indicates that the HDD storage is full.
PLAY - Displayed during video playback.
NET - Displayed when there is a remote connection to the system.
RUN - Flashes when video playback is being controlled with the Jog Shuttle.
ACTIVE - Displayed when the Jog Shuttle is ready to use.
11. LCD MONITOR POWER BUTTON - Turns the LCD Monitor Power ON/OFF.
NOTE: The system will continue to record when the LCD Monitor is powered off.
12. NAVIGATION CONTROLS & ENTER:
• DIRECTION ARROWS - Moves the mouse cursor and navigates within the System Menu.
• ENTER- Confirms the selected options in the System Menu.
13. SPEAKERS - Produces sound from the system.
11
L19LD1600 Series - Front
L19LD1600 Series - Front
1
2
13
3
4
5
6
7
8
9
10
11
12
15
14
16
1. Mode
2. SEQ / Audio
3. PIP
4. Zoom
5. Freeze
6. Lock
7. PTZ
8. Next
9. Panic Record LED
10. LED Indicators
11. Monitor Power Button
12. Navigation Controls / Enter
13. Speaker
14. Channels / PTZ Controls
15. Playback Controls
16.JOG Shuttle
14. CHANNEL BUTTONS / CONTROLS - Switches the full screen view between channels 1~16.
The numbers are also used to enter the System Password. When the system is in PTZ Mode,
the buttons control the PTZ Camera.
15. PLAYBACK CONTROLS - Button controls for the playback of previously recorded video:
• Panic REC - Press to activate the Panic Recording in continuous mode (at Best quality and
720*240 resolution). Press STOP to exit the Panic Record mode.
• STOP - Stops the emergency recording and returns to the record schedule programmed in
the Record Setup. Stops playback and return to the LIVE mode.
• SEARCH - Enter the Search Menu window to search by percentage, date / time, or by event list.
• PLAY - Play the recorded data starting with the most recent event.
• MENU - Enter the System Setup Menu.
• + / - BUTTONS - Adjusts the values in System Set-up mode.
• J SHUTTLE BUTTON - Activate the Jog Shuttle. Press again to deactivate.
12
L19LD1600 Series - Side
16. JOG SHUTTLE - Use to control video playback or adjust values in the System Menu:
• Press the J SHUTTLE button to activate the Jog Shuttle.
• The ACTIVE LED will flash indicating the Jog Shuttle is active.
• In playback: Twist the inner rim to display video frame-by-frame. Twist the
outer rim to play video in fast forward and fast reverse. Turn clockwise to
play fast forward, and counterclockwise to play fast reverse.
• Turn the Jog Shuttle to change values in System Setup.
• Press the J SHUTTLE button to exit Jog Shuttle mode.
NOTE: This System is PAL Supported. It will automatically detected when PAL type cameras
have been connected, and switch to PAL Mode.
L19LD1600 Series - Side
1
1. Removable Drive Bay
2
2. USB Backup Port
3
4
3. Additional Device Port
4. Volume +/-
1. REMOVABLE DRIVE BAY - Drive bay to install a removable Hard Drive.
2. USB BACKUP PORT - Connect a USB memory stick or USB HDD for data backup
3. DEVICE PORT - Connect to a PC for firmware upgrade.
4. VOLUME +/- - Increase or Decrease the system volume.
13
L19LD1600 Series - Back
L19LD1600 Series - Back
1
2
4
3
8
5
6
9
7
10
1. VGA Out Port
2. Ethernet Port
3. Alarm Block
4. RS-232C Port
5. PS/2 Mouse Port
6. RCA Audio IN
7. RCA Audio Out
8. 16 Channel BNC IN
9. 16 Channel Loop OUT
10. Power Adaptor Port
11. System Power Switch
11
1. VGA OUT - The VGA Port is not functional on this model.
2. ETHERNET - Connects the System to a network router or other Ethernet Device
3. ALARM BLOCK - Controls Alarm IN devices.
4. .RS-232C - Connection port to control devices(i.e. Control Keyboard, not included)
5. PS/2 MOUSE PORT - Input port for a PS/2 Mouse.
6. RCA AUDIO INPUTS - Connect up to 4 Audio input devices
7. RCA AUDIO OUTPUT - Connect the system audio to the input on a separate device.
8. BNC VIDEO INPUTS - Channel 1-16 camera inputs (used to connect Cameras with BNC
connection type).
9. BNC VIDEO LOOP OUTPUTS - Looping output for Channels 1-16. The Loop Out can be used
to display a camera on a separate monitor.
10. POWER INPUT PORT - Connection for the DC Power Input (12V).
11. SYSTEM POWER SWITCH - Turns the DVR portion of the system ON or OFF.
14
Remote Control
Remote Control
Listed below is a quick reference for the Remote Control.
1. MENU: Press the Menu Button to display the
System Configuration.
2. NUMBER KEYPAD: Use to switch between
Cameras in live view mode.
3. SEQUENCE MODE: Changes the Monitor Display to
Sequence through channels.
4. FREEZE: Freezes the onscreen image.
5. 4S BUTTON: Switches the screen view to Quad (4
Channel) View Mode.
6. 9S BUTTON: Switches the screen to view 9
Channel Split Screen.
7. NAVIGATION CONTROLS / ENTER: Press the
Navigation Controls to move Up, Down, Left or Right
in System and Mode menus. Press the Enter Button to
1
2
3
13
4
14
5
15
6
select an option in the System Menu.
7
8. REC BUTTON: Begins Panic recording on the
system.
8
9. NAVIGATION CONTROLS: Use the Playback
controls to Pause, Play, Reverse or Fast-forward,
step a single frame forward or reverse, or slow down
the playback.
9
10. SEARCH BUTTON: Displays the Video Search
menu.
12
16
10
17
11
18
11. DISPLAY MODE: Switches the display to single,
quad and multi-display views.
12. P/T MODE: Switches into Pan / Tilt Mode.
13. AUDIO CHANNEL SELECT: Switches between live
audio channels (up to 4 audio channels).
1. Menu
10. Search
14. PIP MODE: Displays a camera in the lower right corner
2. Channel Selection
11. Display Mode
of the screen.
3. Sequence Mode
12. Pan / Tilt Mode
15. 16S: Switches the screen to view 16 Channel Split
4. Freeze Screen
13. Audio Channel
5. 4S (Quad View)
14. Picture in Picture
6. 9S (9 Channel View)
15. 16S (16 Channel View)
7. Navigation / Enter
16. Stop Recording
8. Record Button
17. Next Button
9. Playback Controls
18. Volume +/-
Screen.
16. STOP: Stops the Panic Recording on the system,
and stops video playback.
17. NEXT: Switches between channels in full screen
mode.
18. VOL +/-: Increase or Decrease the volume of the
camera currently broadcasting live audio.
15
Camera Installation
Camera Installation
Before you install the camera, carefully plan where and how you will position the camera, and
where you will route the cable that connects the camera to the System.
Installation Warnings:
• Select a location for the camera that provides a clear view of the area you want to monitor,
which is free from dust, and is not in line-of-sight to a strong light source or direct sunlight.
• Plan the cables’ route so that it is not close to power or telephone lines, transformers,
microwave ovens or other electrical equipment that could interfere with the system.
• Select a location for the camera that has an ambient temperature between 14°F~113°F
(-10°C~45°C)
• If you plan to install the camera in a location that has conditions not recommended in this
manual, consult with a professional installer and consider use of a separate camera cover
or housing
• Before starting permanent installation, have another person hold the camera for you while
you verify its performance by observing the image on the monitor.
Camera Stand Installation:
1. Attach the pedestal to the ceiling, wall or other
surface by the base using the provided
screws.
2. The mounting bracket must be attached to a
structural device such as a wall stud or ceiling
rafter using the supplied screws.
3. Attach the camera to the pedestal. Adjust the
angle of the camera, and tighten the
thumbscrew to set the position
NOTE: The Camera can be attached to the stand
using the screw point on the top or the bottom (to
maintain proper camera alignment). This prevents the
image from becoming inverted.
* Camera may not be exactly as shown.
16
*
Camera Installation
Connecting Cameras
1. Connect the Female BNC end of the extension cable to the camera. Connect the male Power
end of the extension cable to the camera.
* Camera may not be exactly as shown.
IMPORTANT NOTE: The ends of the extension cable are NOT the same - one end has a Male
power port, and the other has a Female power port. Before permanently running the Camera
Extension Cable, make sure that the cable has been oriented between the Camera and the unit
correctly
Male Power Port - The male power port
end of the Extension cable connects to
the Camera.
Female Power Port - The female power
port end of the Extension cable
connects to the System.
17
Camera Installation
2. Connect the Female end of the extension cable to an open BNC camera input on the back of
the System. Connect the female Power end of the extension cable to the power adaptor.
NOTE: To access the Connection Ports for the System, the monitor can be tilted
forward (for easier access).
* Camera may not be exactly as shown.
18
Connecting the Mouse
Connecting the Mouse
Connect the supplied mouse to the PS/2 Port on the back of the unit.
PS/2 Connection - A mouse can be
connected to the PS/2 Port on the back
of the unit.
• LEFT MOUSE BUTTON - Double click in Viewing Mode to display a camera in Full Screen.
Used to adjust values in MENU Mode.
• RIGHT MOUSE - Right click to open the Mouse Menu in Viewing Mode. Click the Right Button
to exit a menu.
• SCROLL WHEEL - Press and hold to exit the Mouse Menu.
Mouse Menu
Double right-click with the Mouse to display the Mouse Menu. The mouse menu controls the
functions:
To change the screen display using the mouse,
select the desired display type from the Mouse
Menu.
19
Display Modes
Playback Controls
Click PLAY icon to switch to the playback interface.
Click the SEARCH icon to switch back to the playback interface once playback has started.
During Playback, the mouse
buttons function as the following
controls:
Click the PTZ Button to enter PTZ Mode.
Display Modes
Initial Loading Sequence
• Connect the POWER cable located on the back of
the Observation System. The unit will automatically
power on.
• The System will load the firmware
• The System will perform a Hard Drive check.
• The unit will initially load to a split screen view,
displaying all 16 cameras (if available).
NOTE: If a new HARD DRIVE is detected, the system
will prompt you to FORMAT the drive. If you do not
choose to format the HARD DRIVE, the drive will not
be detected by the system.
20
Display Modes
General Display Overview
1.TIME - Displays the Current system time, or the recorded time in playback
2.DATE - Displays the Current system date, or the recorded date in playback
3.CAMERA TITLE - Displays the Camera title for the channel. The Camera title can be modified
in the SYSTEM MENU ==> CONFIGURATION ==> CAMERA SETUP ==> CAMERA TITLE.
4.RECORDING MODE INDICATORS - The Recording Mode Indicators appear in YELLOW
when a camera is recording:
• Indicates that the camera is recording in ALARM Mode.
• Indicates that the camera is recording in MOTION DETECTION Mode.
• Indicates that the camera is recording in CONTINUOUS Mode.
5.RECORDING RESOLUTION • 50IPS@720X288/60IPS@720X240
• 100IPS@360X288/120IPS@360X240
• 200IPS@360X144/480IPS@360X120
6.QUALITY - Displays the Recording Quality:
• Normal
• High
• Best
21
Display Modes
7. NETWORK CONNECTION - The Network Indicators appear when a remote connection is
made to the unit:
• Indicates that there is no client connection.
• Indicates that a client is connected to the system.
8.HDD RECORD / SEARCH PERCENTAGE - In LIVE Viewing mode, the percentage indicates
the amount of HDD space used for recording. In PLAYBACK mode, the percentage indicates the
amount of data played back.
9. RECORD STATUS - Displays the Recording status of the channel:
• Panic Record (Red Exclamation)
• Scheduled Record (Red Circle)
• Stopped Record (White Circle)
10.AUDIO OUTPUT CHANNEL - Indicates the current Audio output channel.
Screen Display
Press the number buttons to switch to the corresponding
channel for full screen view
• MODE: press to switch among different split modes:
4/6/8/9/16 splits.
• +/-: button to adjust the order
PIP Display Mode
When in full screen mode, press the PIP button to enter PIP mode. The Picture in Picture will be
displayed in the lower right corner. Press PIP again to cancel.
22
Display Modes
Freeze in Split Mode
In a split screen mode, press
the FREEZE button then select
a number button to choose the
corresponding channel to
freeze. Press the number again
to cancel.
Freeze in Full Mode
In full screen mode, press the
FREEZE button to freeze the
channel, and press FREEZE
again to cancel.
Sequence View
Sequence is only functional in full screen mode. Hold the
SEQ Button for 2~3 seconds and enter sequence mode,
and hold the SEQ Button again for 2~3 seconds to cancel
it.
Sequence order A => B => C => D … A => B …
The Sequence time is adjustable in the system setup.
Please see SYSTEM MENU ==> CONFIGURATION ==> INTERVAL SETUP for details.
23
Display Modes
Zoom View
Select a channel to zoom, and press the ZOOM button to enlarge to 200%. Use the direction
buttons to move the enlarged part.
Use the direction buttons to choose an area and press ENTER to zoom. Press ZOOM again to
cancel
Key Lock
After pressing the LOCK Button, the word LOCK will be displayed on screen, and all buttons are
disabled at this time. To unlock, press and hold LOCK and enter Admin’s password.
NOTE: Rebooting the DVR will not deactivate the LOCK function. Only the ADMIN password will
unlock the keys.
Switch Audio Channel
Press the AUDIO Button to display the AUDIO
Symbol. The number indicates the current audio
output channel.
To go to the next audio channel, press AUDIO again.
Press Once to play channel 1; press twice to play
channel 2; press three times to play channel 3; press
four times to play channel 4 and five times to turn the
Audio OFF.
24
Recording Mode
Recording Mode
RECORDING MODE:
• Indicates that the camera is recording in ALARM Mode.
• Indicates that the camera is recording in MOTION DETECTION Mode.
• Indicates that the camera is recording in CONTINUOUS Mode.
NOTE: If the power is lost, the DVR will automatically resume the recording schedule after the
power is back.
NOTE: The system will stop recording when the following occur:
• No camera video inputs are detected (the cameras are not attached to the system).
• Motion is not detected (when the record mode is set to MOTION).
• When the record schedule is set to Not Record.
• If the HDD is not formatted, or when using the factory defaults after a new HDD is installed.
• When the Overwrite function is OFF, and the HDD full.
• When the system is copying Backup data.
• When the firmware is being updated.
• When the system is in the HDD management section of the Setup Menu.
25
Playback
Playback
Starting Playback Mode
Press the PLAY button on the front panel of the System,
or click the onscreen PLAY icon to start playback, starting
from the most recent recording.
Stopping Playback Mode
Press the STOP button on the front panel of the System,
or click the onscreen STOP icon to stop the playback.
Switch Audio Channel
Press “SEQ/AUDIO” to switch to other audio channels
The number represents the audio output channel
26
Playback
Search Mode
Press the SEARCH button on the front panel of the System, or click the onscreen SEARCH icon
to search through previously recorded data.
There are 3 modes for search:
PERCENT BAR - Search by
location a recording point on
the bar.
TIME/DATE SEARCH Search by appointing a time
and date
EVENT SEARCH - Search by
Event list.
Search Bar
• Using Jog-shuttle or +/- keys to
select
the
recording
percentage of the search bar.
• Press “ENTER “key to confirm
and start the playback.
Time/Date Search
• START - Set the start time and date for the recording.
• END - Set the end time and date
for the recording.
• TARGET - Enter the target time
and date to start playback.
Select the time and date using
the Mouse wheel to adjust the
numbers. Click PLAY to start
playback, or ESC to cancel.
27
Playback
Event List Search
• TIME/DATE - Displays the event
time and date.
• CHANNEL - Displays the
channel in which the event
occurred.
• EVENT - Displays the event
type:
z
z
z
MOT - Motion detection
LOS - Image lost
ALM- Alarm trigger
The system keeps up to 1000 events in its EVENT LIST.
• Use the Left Mouse button to select the events, and use the Mouse wheel to switch pages.
• Use the Arrow Buttons key to select events and the +/- key to switch pages.
Playback Speed Control
When in playback mode, Click the onscreen playback icons to adjust the
playback speed:
z
z
z
z
UP Arrow: Speed up the playback
DOWN Arrow: Slow down the playback
RIGHT Arrow: Rewind the playback
LEFT Arrow: Play
• The speed can also be adjusted: 1/16X~1X, 1X~64X.
• Press the SHUTTLE key to pause the playback. Press the SHUTTLE Key again to continue
the playback.
NOTE: The mouse wheel can be used to adjust the speed as well.
The playback speed can also be adjusted using the Front Panel buttons or Remote Control:
Using the JOG Shuttle in Playback
Use the outer circle of Jog-shuttle to adjust the playback speed. Turn clockwise for forward
playback, and turn counter-clockwise for reverse playback.
28
Playback
Using the inner circle of the Jog-shuttle to playback video in single frames. Turn clockwise for
forward playback and turn counter-clockwise for reverse playback.
Playback Controls - Remote Controller
• UP Arrow: X times high-speed playback.
• DOWN Arrow: X times low speed playback.
• LEFT Arrow: Rewind.
• RIGHT Arrow: Play
To increase the speed:
• REW key (High-speed backward playback)
• FF key (High-speed forward Playback).
• Press the keys repeatedly to adjust the speed rate.
To decrease the speed
• Use the STEP keys to Slow playback (in reverse or forward).
• Press the keys repeatedly to adjust the speed rate.
• Playback picture by picture by STEP keys (Step playback in backward
or in forward).
29
System Setup and Navigation
Press the MENU button on the Front panel
or Remote, or click the onscreen MENU icon
to log into system:
System Menu - Overview
1. DISPLAY SETUP - Includes
SCREEN SETUP for Live View and
Playback.
2. CONFIGURATION - Includes HDD
MANAGEMENT, TIME/DATE SETUP,
CAMERA SETUP, INTERVAL SETUP,
ALARM SETUP, BUZZER SETUP,
PASSWORD SETUP, and SYSTEM
INFORMATION.
3. RECORD SETUP - Includes
RECORD CONFIGURATION and
SCHEDULE SETUP.
4. BACK-UP - Backs up data to a memory
stick or hard drive.
• Click the 1~0 icons (or use the front panel
buttons) to enter the password.
5. EXTERNAL DEVICE - Includes TCP/IP
SETUP, RS232C SETUP, PAN-TILT
SETUP.
6. FACTORY DEFAULT - Resets the unit to
default settings (does not erase hard drive
video data).
• Click ENTER to confirm and enter the
system.
• Default ADMIN password: leave blank
(No default password. Press ENTER
key directly to enter the system)
• Navigate using the arrows. Use ENTER
to accept an option, and ESC to exit the
menu.
NOTE: It is strongly recommended to
change the password after the initial setup.
Please keep a record of your current
password. Rebooting the System and
resetting the factory defaults will not reset
the password to the default.
30
NOTE: Factory Reset does not reset the
Time.
7. LANGUAGE - Change the OSD language.
Select a language: English, French or
Spanish.
Display Setup
Display Setup
• TIME/DATE - Display (ON) or hide (OFF)
the Time and Date on the screen.
• ICON DISPLAY - Display (ON) or hide
(OFF) the cue icons on the screen.
• DVR STATUS - Display (ON) or hide
(OFF) the recording status on the
screen.
• REC/PLAY BAR - Display (ON) or hide
(OFF) the recording percentage of
HDD.
• CAMERA TITLE - Display (ON) or hide
(OFF) the camera title.
SCREEN DISPLAY: Controls the settings
for the screen in Live and Playback
Information display modes.
PLAYBACK: Configure the display settings
for the following information (to be displayed
onscreen in Playback mode):
• TIME/DATE- Display (ON) or hide (OFF)
the time and date.
• DVR STATUS- Display (ON) or hide
(OFF) the cue icons on the screen.
Screen Display
Use the UP and DOWN Arrows to select an
option, and press the ENTER button to
switch between ON and OFF.
• REC/PLAY BAR- Display (ON) or hide
(OFF) the recording percentage of
HDD.
• CAMERA TITLE- Display (ON) or hide
(OFF) the camera title.
LIVE: Configure the display settings for the
following information (to be displayed
onscreen in Live mode):
31
Configuration
Configuration
Hard Drive Management
1. HDD MANAGEMENT - Includes HDD
SETUP (HDD Clear), and HDD
INFORMATION.
2. CAMERA SETUP - Includes CAMERA
TITLE and CAMERA COLOR SETUP.
3. MOTION SETUP - Includes SENSITIVITY,
DURATION, DETECT CELL NUMBER.
4. ALARM SETUP - Set up the Alarm mode
(N.C. or N.O) and the Alarm Output
Duration.
5. INTERVAL SETUP - Set up the switch
interval of the Full screen and the PIP
screen.
6. TIME/DATE SETUP - Program the system
date and time.
7. PASSWORD
password.
SETUP
-
Setup
the
8. BUZZER SETUP - Set the Buzzer ON or
OFF at a certain condition.
32
HDD SETUP:
• BEGIN- Indicates the start Date/Time of
recorded video on the HDD (Master/Slave).
• RECORD- Indicates the end Date/Time of
recorded data on the HDD (Master/Slave).
• PLAY- Indicates the previous playback Date/
Time on the HDD (Master/Slave).
• STATUS- Indicates the HDD status as
empty/normal/overwrite
• CLEAR HDD- To clear the HDD data, enter
the ADMIN's password to execute this
function.
HDD INFORMATION: This menu shows the
physical information of HDD (Master/Slave).
HDD REPLACEMENT SETUP: Without
losing data, user can use HDD from other
DVRs, and the HDD installed current DVR
can be used to other DVRs.
Configuration
SAVE DVR INFO: Once the ENTER button
has been pressed on SAVE DVR INFO, the
DVR information will be saved to HDD.
• If the DVR information is saved properly,
the message NOW CHANGE HDD
DISK will be shown on the system.
• Then power off the DVR and change with
new HDD.
• Be sure to write down the DVR
information such as NTSC/PAL,
MODEL name, Channel, HDD location
(PORT 1, PORT2). When you want to
retrieve the Data), you must do based
on this DVR information.
LOAD DVR INFO: LOAD DVR INFO:
Retrieves the data recorded on a HDD from
other system.
HDD retrieval procedure:
• Install the HDD with new system and
power on.
• Press the [STOP] button when the DVR
is
booting.The
HDD
CHANGE
MODE-ON message will appear.
• Data retrieval will occur when the LOAD
DVR INFO option is selected in the
Menu.
NOTE: If the HDD settings are changed
between backup and retrieval, there is a
chance that data will be lost.
Time / Date Setup
The date and time on the system may be
different from your time zone. It is important
to set the system date and time before the
DVR starts recording.
Set the date and time by using the direction
arrow buttons and the [-][+] buttons, or the
Jog shuttle.
• Date format- American / European /
Asian formats
• Time format- 12 hours / 24 hours
• Month format- English/Numeric
The following is recommended during initial
setup:
• Set the time/date,
• Go to HDD management and CLEAR
HDD
• RUN all factory defaults.
DO NOT change the date and time
recording has started, as it may corrupt the
System data archive and cause playback
errors. If it is necessary to change the date
and time after the recording starts, please
back up any important video data before
proceeding.
Camera Setup
CAMERA TITLE: Set up the camera title for
each individual channel (1~16).
CAMERA COLOR SETUP: Set up the
camera color for each channel.
CAMERA ACTIVE SETUP: Turn the camera
ON or OFF at COVERT and Record.
33
Configuration
NOTE: When a camera is in Covert Mode,
no picture is displayed when in live viewing,
however the camera images are still being
recorded if Record is set to ON.
• CHANNEL: Select the camera to be
modified.
MOTION SETUP: Program the motion
parameters and the detection area
CAMERA TITLE: Input the camera Title
(max. 8 characters).
• BRIGHTNESS: Adjust image brightness
(-32~31).
• CONTRAST: Adjust color contrast
(-32~31).
• SATURATION: Adjust color saturation
(-32~31).
• HUE: Adjust color hue (-32~31).
CAMERA ACTIVE SETUP: Use the
direction buttons to select an item and press
the ENTER button to select ON and OFF.
Use the Left or Right arrows and the [-][+]
buttons to change the values. When the
changes are complete, press the Enter
button. To return to the previous menu,
press the MENU button.
CAMERA COLOR SETUP: Adjust the
image color
Use the directional arrows to select an item
and use [-] and [+] or Jog shuttle to adjust
the values.
34
If a channel is set to ON at COVERT and
ON at RECORD, the channel will be
recorded and will be displayed during
Playback, but will not be displayed when in
the LIVE Display.
Configuration
• STATUS: Indicates the camera status.
ACTIVE means the video input status is
normal, and LOSS means the video is
lost.
• COVERT: Set up the channel to be
displayed or hidden when on the LIVE
screen.
MOTION MASK SETUP:
Note: Please go to RECORD SETUP >
SCHEDULE RECORD and change the
record mode to MOTION to activate the
MOTION settings.
• REC: Set up the channel to be record.
MOTION SETUP
Users can configure the detection area for
motion. The area that is marked not to
detect motion is Grey.
• CHANNEL: Select a channel for the
setup.
• SENSITIVITY GRADE: Adjusts the
motion detection sensitivity. 1 (LOW)~4
(VERY HIGH)
• MOTION DISPLAY TYPE: Setup the
display type that marks the motion area:
BOX shows blocks / CELL shows green
grid.
• RECORD DURATION: The DVR record
for duration from the time motion is
detected. If the DVR detects motion
continuously, the DVR keeps recording
through out the event, and the duration
after the last motion event. For example,
the duration is set to 10 seconds and
the motion last for 3 minutes. The DVR
records for 3 minutes and 10 seconds.
• NUMBER OF CELLS TO DETECT: It will
only be triggered when the cells in
motion are MORE THAN the number
the user has set.So the smaller the
number is, the more sensitive the
detection is.
• Press the number button to select the
channel.
• Set motion detection area. Use the
Direction buttons to move the cursor
and press [ENTER] to mark the area.
• Press [Mode] to change the editing
mode. The editing modes are as below:
1.Cell: Move to the desired location and
press [ENTER] to activate or deactivate the
motion detection in the marked area cell by
cell.
2.ALL ON: Change the mode to ALL ON and
press ENTER to activate the motion
detection in the whole window.
3. ALL OFF: Change the mode to ALL OFF
and press ENTER to deactivate the motion
detection in the whole window.
4.BLOCK ON: Block an area to activate the
motion detection in the desired area. Move
the cursor to a corner cell of the desired area
and press ENTER to mark the starting cell of
the block. Then, move the cursor to the cell
at the diagonal end of the desired area and
press ENTER to finish marking the block.
35
Configuration
When the window is at the ALL OFF mode,
you can activate the motion detection in the
block.
Alarm setup
5.BLOCK OFF: Block an area to deactivate
the motion detection in the desired area. The
setup steps are the same as BLOCK ON. If
the window is at the ALL ON mode, you can
deactivate the motion detection in the block
you make.
Interval setup
1. CHANNEL - Use [+] and [-] to select a
channel.
2.ALARM INPUT- Set up the Alarm Input
type.
• N.C- when the alarm is triggered, the
circuit turns closed (ON).
• N.O- when the alarm is triggered, the
circuit turns opened (OFF).
SWITCH INTERVAL: FULL- Full Screen
Sequence Interval setup. (Range: 1~99
SEC)
PIP- Picture in Picture, the sub-picture's
sequence interval setup. (Range: 1~99
SEC)
2.[EVENT RECORD]
The Event Update Time prevents the DVR
from recording the event logs from the same
event. The event types include alarm,
motion and video loss.
When an event is triggered, it is possible
that the same event will continue to be
triggered for a period of time. With the help
of Event Update Time, whenever there is an
event, the DVR records the starting time and
information of the event in the Event Log,
and ignores the following events within the
duration set in the Event update time. The
setting range of the Event Update time is
from 10 seconds to 990 seconds.
36
3.DURATION - Set up a post- alarm
recording duration and the alarm output
duration. The duration setting is applied to
both functions. The setting range is from 1
second to 300 seconds.
NOTE: Alarm output can be triggered by
alarm input. Motion and video loss cannot
trigger an alarm output.
Event Popup Setup
Configuration
1.CHANNEL - Use [+] and [-] to select a
channel.
2. KEY BEEP - Turns on/off the beep while
operating the front panel.
2. POPUP ON/OFF - Set up the POPUP
function ON/OFF: Use [+] and [-] to select
ON or OFF. When there is an event, the
screen display will switch to a full screen of
the corresponding channel.
3. VIDEO LOSS - Turns on/off the beep at
the video loss.
3.EVENT - Use [+] and [-] to select the event
type that will trigger the POPUP:
5. MOTION DETECT - Turns on/off the beep
when motion is detected.
z
z
z
A- Alarm
M- Motion
AM- Alarm or Motion.
4.DURATION - Use [+] and [-] to set up a
duration of the POPUP. The setting range is
from 1 second to 60 seconds. When the
Event POPUP finishes, 4CH DVR returns to
its Quad screen display, 8CH DVR 9 -Split
screen display, and 16CH DVR 16-Split
screen display.
4. ALARM ACTIVE - Turns on/off the beep
when an alarm is triggered.
• When the buzzer is triggered to beep,
press any button on the front panel to
turn off the Beep.
• The beeping can only be turned off
manually. There is no time out setup to
turn off the beeping automatically.
Password Setup
Buzzer Setup
Set up the condition that triggers the buzzer
to beep. Use [UP] and [DOWN] to select an
item and press ENTER to turn ON or OFF
the selection.
1.ALL - Turn ON or OFF of all the conditions
that trigger the buzzer to beep.
You can also setup the buzzer by the
conditions. Move the cursor to the desired
selection and press ENTER to turn ON or
OFF the selection.
The password consists of 1 to 8 digits. Press
the number keys on the front panel to enter
the password and you can use any
combination of the numbers from 1 to 10.
Default Admin User: Admin / (Blank)
Default Manager: (Manager / 1)
Default Users: (user2~8 / 2~9)
1. USER ID - Press ƒ or “to set User ID.
2. USER PW - Key in the current password.
3.NEW PW - Key in the new password.
4. CONFIRM PW - Enter the new password
again for confirmation.
37
Record Setup
The three user levels have different
authorities to operate the DVR.
Record Setup
System Information
1. RECORD CONFIGURATION - Set up
overwrite, recording mode, picture quality,
resolution, and recording speed.
2. SCHEDULE SETUP - Program the
recording schedule.
3. HOLIDAY SETUP - Set up holidays, max.
100 days.
Indicate the system information and its
status.
S/W version: Indicate the firmware version
H/W version: Indicate the PCB version
Product ID: Indicate the product ID number
MASTER 1: Indicate the information of the
first HDD
MASTER 2: Indicate the information for the
second HDD
The product ID is not the DVR's MAC
address. MAC address can be found in
EXTERNAL DEVICE > TCP/IP setup.
38
Record Configuration
Use [UP] and [DOWN] to select an item. Use
[+] and [-] to change the value.
Record Setup
1. OVERWRITE - Sets the Hard Drive to
overwrite older data when full.
• ON: When the hard drive is full, the
system will overwrite the earliest
recorded video. If the DVR has two hard
drives, the overwriting starts from the
Master drive.
• OFF: The system stops recording when
the hard drive is full. If the DVR has two
hard drives, the system stops recording
when the Master and Slave drive both
are full.
2. MULTIPLEX - Set up the multiplex mode
• Duplex: allows the system to record and
use remote connection simultaneously.
The DVR stops recording while the DVR
enters playback either locally or
remotely.
During
the
remote
connection, the DVR keeps recording if
the client stays at the LIVE mode. It
stops recording when the client enters
the playback mode.
•
Triplex: record and playback
simultaneously. The DVR keeps
recording while the DVR enters
playback either locally or remotely.
5. RECORD IN ALARM - Set the recording
speed when an alarm is triggered.
6. RECORD IN MOTION - Set the recording
speed when motion is detected.
7. CONTINUOUS RECORD - Set the
recording speed under the continuous
recording mode.
The recording speed is expressed in
fractions. 1/ 1 is to record at the full
recording speed, which you set in
RESOLUTION. 1 / 2 is to record at half of
the recording speed. 1 /3 is to record at one
third of the recording speed. You can set up
the parameter from 1/1, 1/2, 1/3, 1/4,… to 1/
999.
By lowering the recording speed, the DVR
records less frames but gains a longer
recording duration. If you set the DVR's
recording speed at 1/2, the recording
duration will be two times longer. 1/3 will
make the recording duration three times
longer, and so on.
NOTE: The system is set to Triplex by
default. To playback audio on the System,
perform the following steps:
When the RESOLUTION is set to QUAD
Mode, the selection of the recording speed
is limited to 1/1, 1/2, and 1/3.
i. Turn the Audio Setting to ON
All active cameras share the recording
speed. To turn off the recording on a specific
channel, please refer to [SYSTEM
MENU] ’[CONFIGURATION] ’[CAMERA
SETUP] “[CAMERA ACTIVE SETUP].
Please note that channels with video loss
are still active and recording. In other words,
those channels are still sharing the
recording speed.
ii. Set the unit to DUPLEX MODE
iii. Playback the selected video.
3. QUALITY - Set up the recording picture
quality to Normal, High or Best.
4. RESOLUTION - By lowering the
resolution, the DVR gains the recording
speed but the recorded pictures become
smaller.
Changing the RESOLUTION will NOT
change the recording time on DVR. To
change the DVR's recording duration,
please adjust the DVR's recording speed in
the following three settings.
39
Record Setup
Schedule record
CLEAR ALL: Clear all the schedule settings
Program a recording schedule throughout
the week.
NEXT: Go to the next page. The first page
is from 00-12, and the second page is from
12-24.
MODE: Press MODE to select an editing
mode. Use the direction keys 3456 to move
the cursor, and then press [+] and [-] to
select a recording mode.
Set up a recording mode:
The editing modes are as below:
A- ALARM REC / M- MOTION REC / CCONTINUOUS REC
TIME CELL: Program the schedule at a
two-hour interval.
---: No schedule recording
A--: Set as Alarm record. When there is an
alarm triggered, the DVR records at the
speed set in RECORD IN ALARM.
Time Cell
-M-: Set as motion record when there is
motion detected, the DVR records at the
speed set in RECORD IN MOTION.
--C: Set as continuous record. The DVR
records continuously at the speed set in
CONTINUOUS RECORD.
Time Zone
TIME ZONE: Program the schedule by time
zone. There are 12 Time Zones in the
setting. A time zone is a two-hours interval
from Sunday to Saturday.
WEEK: Program the schedule day by day.
Week
AM-: Set as Alarm + Motion record. The
DVR records at the speed set in RECORD
IN ALARM when there is an alarm triggered,
and at the speed set in RECORD IN
MOTION where there is motion detected.
A-C: Set as Alarm + Continuous record. The
DVR records continuously at the speed set
in CONTINUOUS RECORD, and switches
to the speed set in RECORD IN ALARM
when there is an alarm triggered.
MC: Set as Motion+ Continuous record. The
DVR records continuously at the speed set
in CONTINUOUS RECORD, and switches
to the speed set in RECORD IN MOTION
when there is motion detected.
Holiday setup
ALL: The DVR records at one recording
mode, 24 hours a day, 7 days a week.
40
Set up the holidays through out the year.
You can program up to 100 days as
holidays. The recording schedule of the
holidays is the same as the settings of
Sunday.
BACKUP
1. HDD - Indicates the start and the end
recording date and time on the Hard Drive.
2. USB - Select a starting date and time for
backup. Use Mouse wheel to change the
value, then select the SIZE to choose a
backup size.
3. SIZE - Insert the USB device, and the
system will automatically check the disk
size and display the available space
onscreen. Use Mouse wheel to change the
value. The system will automatically
calculate the end date and time for backup.
Press MODE and set the editing mode as
EDIT HOLIDAY. Use direction key 5634to
select and press ENTER to mark the day as
a holiday.
To clear the settings, press MODE to set
the editing mode to CLEAR ALL DATA or
CLEAR MON DATA (clear data month by
month). Press ENTER to clear the settings.
4. BACK-UP - Move the cursor to BACK-UP
and Click it to begin the backup process.
The System will save the file in AJP format.
Users have to install the LorexPlayer 2.0
Backup Software to playback the file.
Please refer to the provided Software
Guide for further details.
Data Backup
System status messages:
• USB STATUS - Insert USB Key - the
system will check the available space.
BACKUP
USB BACKUP SUBMENU
• When choosing a backup size, leave
20MB as a buffer and do not use the full
space of the USB Stick.
NOTE: The External Backup Hard Drive
must be formatted with FAT32. Each
partition cannot exceed 31GB.
41
EXTERNAL DEVICE
EXTERNAL DEVICE
1. MAC ADDRESS - Displays the MAC
address. MAC address cannot be changed
and is unique to each system.
2. DHCP MODE - Set the DHCP mode to
Manual or Automatic.
• When DHCP is set to Automatic, the
settings will be retrieved from the
network router - and settings cannot be
changed manually.
• To turn off the DHCP automatic
detection, set the DHCP MODE to
DISABLE.
3. IP PORT - Manually Enter an IP Port
number. The default port is 50000
1. TCP/IP SETUP - Configure the system
Networking information.
2. PAN/TILT SETUP - Set up the parameters
of the PTZ control.
3. SPOT SETUP - SPOT output setup.
4. IP ADDRESS - Manually set the IP
address.
5. GATEWAY - Manually set the GATEWAY.
6. SUBNET - Manually set the SUBNET
MASK.
4. RS232C SETUP - Set up the parameters
of the RS232 port.
TCP/IP SETUP - DDNS SETUP
TCP/IP SETUP - IP SETUP
1. DDNS ENABLE - Turns the DDNS
Function ON/OFF.
2. DNS SERVER - Enter the DNS Server’s IP
address. Use Mouse Wheel to change the
value. The default IP is 202.133.244.128
3. INTERVAL - Set the interval for the system
to report its IP address to the DDNS server
automatically. (D- day / H- hour / M-
42
EXTERNAL DEVICE
minute). Use the Mouse Wheel to change
the value.
PAN/TILT SETUP - COMMAND
SETUP
4. REGISTER - Connect to the DDNS server
and register the system information to the
server. Click REGISTER to start the
registration.
5. DNS STATUS - Indicates the current status
of DDNS connection
• IP ADDRESS: Indicates the current IP
address recorded in the server
• IP PORT: Indicates the current IP port
recorded in the server.
• REMAIN TIME: Indicates the remaining
time until the next connection to the
server.
6. LAST REGISTRATION DATE - Displays
the time of the last registration.
1. CHANNEL - Select the channel for PTZ
(PAn/TILT/ZOOM) Camera control. PTZ
Camera is not included with the system.
2. MODEL - Select PTZ protocol.
3. PTZ ID - Select PTZ ID.
TCP/IP SETUP - SPEED
Controls the system bandwidth use (network
speed). Settings between 1 (low) ~ 9 (high)
4. BAUDRATE - Select Baud Rate of PTZ
control code.
5. CMD DELAY - Set up a delay time to run
the command.
6. COMMAND - Pick up PTZ CMD.
7. LENGTH - Displays the length of PTZ
control code.
8. CODE - The control code of PTZ CMD.
43
EXTERNAL DEVICE
PAN/TILT SETUP - SPEED
SETUP
(connected to the Alarm sensor block) pops
up onscreen.
3. MOTION POP UP - Sets the MOTION
detection pop-up to ON/OFF.
4. EVENT POP UP DURATION - If ALARM
or MOTION events occur concurrently on
several channels, then Channel 1 has first
priority for onscreen POP UP.
1. PAN SPEED - Set the PANing speed (0
low ~ 7 high).
2. TILT SPEED - Set the TILTing speed (0
low ~ 7 high).
3. ZOOM SPEED - Set the speed of ZOOM
IN/OUT (0 low ~ 7 high).
• For example, if an events occurs on
Channel 1, Channel 2 and Channel 4 at
the same time, Channel 1 pops up. If
motion stops on channel 1, then channel
2 pops up for the set duration. If motion
occurs on Channel 1 again (within the
duration), Channel 2 continues to
display. If motion on Channel 1 keeps
on going even after the duration,
Channel 1 pops up again.
RS232C SETUP
SPOT SETUP
1. SWITCH INTERVAL - Sets the sequence
switching time (01 ~ 99 sec.).
2. ALARM POP UP - When an Alarm is
detected, the corresponding channel
Users can connect the System to a PC
through the RS232 port. Other system
control devices can also be connected
through the RS232 port. The ASCII-Code
information is in Serial port setup (Users
cannot change value in this setting).
1. BAUDRATE - The transmission baudrate
is 19200bps.
2. LENGTH - The transmission length is 8
bits.
3. STOP BIT - The stop bit is 1.
4. PARITY - The parity is none.
44
Observation System Specifications - Appendix #1
Observation System Specifications - Appendix #1
45
Observation System Specifications - Appendix #1
Observation System Specifications - Appendix #1
46
Full Connectivity Diagram - Appendix #2
Full Connectivity Diagram - Appendix #2
The following diagram outlines a general set of connections available with the Observation
System.
ROUTER
(Not Included)
PC
(Not Included)
PTZ CAMERA
(Not Included)
PS/2
MOUSE
OBSERVATION
SYSTEM
BNC CAMERAS
(CONNECT UP TO
16 CAMERAS)
SENSOR
(Not Included)
SLAVE / SPOT OUT
MONITOR
(Not Included)
47
Connecting a Slave (Spot-Out) Monitor - Appendix #3
Connecting a Slave (Spot-Out) Monitor - Appendix #3
Connections to a Slave Monitor / Spot-Out Monitor (not included with the System) can be made
through the MONITOR OUT and/or the SPOT OUT ports on the back of the Observation System.
A slave monitor can be a TV or Observation System Monitor.
A Slave Monitor is used as a View Only device. A Slave Monitor can only display camera data as
it is sent from the Observation System (based on settings in the Spot Out Menu options).
• MONITOR OUT - Connect the MONITOR OUT port on the back of the Observation System
to the VIDEO IN port on the back of the Slave Monitor. This will output all onscreen video to
a secondary monitor.
• SPOT OUT - Connect the SPOT OUT port on the back of the Observation System to the
VIDEO IN port on the back of the Slave Monitor
NOTE: The Video OUT and Slave out can be used at the same time, however separate
monitors will need to be used.
OBSERVATION SYSTEM
SLAVE MONITOR
(Not Included)
48
SPOT OUT
MONITOR
(Not Included)
Connecting Motion / Alarm Device - Appendix #4
Connecting Motion / Alarm Device - Appendix #4
Motion detection and Alarm controls are enabled through the Menu system on the Observation
System. Additional motion sensor devices can be connected to the system (Motion Sensors,
Door/Window Sensors).
A motion detection or sensor unit can be used to send a signal to the Observation System to
begin camera viewing on the matching Video Channel (when enabled in the Menu, see page 39):
• Example: A Window sensor unit has been installed on Alarm Block port #4. When this sensor
is activated, the camera on DIN or BNC VIDEO port #4 will become active (if enabled in the
MENU on the Observation System)
Installing a Sensor
1. Connect the GROUND Cable to the GND port on the Alarm Block on the Observation System.
2. Connect the SIGNAL Cable to a numbered port.
To start ALARM RECORDING on the System, configure the Alarm Settings in the System Menu.
OBSERVATION SYSTEM
SENSOR
(Not Included)
49
Connecting PTZ Cameras - Appendix #5
Connecting PTZ Cameras - Appendix #5
PTZ Cameras (not included with this system) can be connected to the PTZ Control Block on the
back panel of the System. The PTZ Controls are enabled through the Menu system on the
Observation System. Additional PTZ Cameras are available at http://www.lorexcctv.com
Installing a PTZ (RS-485 Type) PTZ Camera:
1. Connect the Transmit Cable to the D+ port on the PTZ Control Block on the Observation System.
2. Connect the Receive Cable to the D- port on the PTZ Control Block on the Observation System.
3. Connect the Camera to BNC Channel 1 (DIN Channel 1 must be empty).
OBSERVATION SYSTEM
PTZ CAMERA
(Not Included)
4. Configure PTZ Menu options. The PTZ Camera Settings will depend on the Type of Camera refer to the specific Camera Manual for your brand and model of PTZ Camera.
• MODEL - Select a PTZ protocol
• PTZ ID - Enter the PTZ’s ID / address.
• BAUD RATE - Enter the PTZ’s transmission baud rate
• CMD DELAY - Set the delay time of the command transmission between bytes. Please refer
to the PTZ user manual for the manufacturer’s recommendations.
50
Connecting to a PC using the Serial Port - Appendix #6
Connecting to a PC using the Serial Port - Appendix #6
The Observation System can be connected directly to a PC COM Port by using the Serial Port
located on the back of the system.
• To connect DVR to a PC, users must use a twisted RS232 cable (See below).
• The RS232 settings (baudrate/ parity/ length/ stop bit) are NOT adjustable. The transmission
baudrate is 19200bps, length 8 bits, stop bit 1, and the parity is none. ASCII-CODE is 1 BYTE.
OBSERVATION SYSTEM
PC (Not Included)
Twisted RS232 Cable Configuration
RS232 Port Diagram
51
Hard Drive Replacement - Appendix #7
Hard Drive Replacement - Appendix #7
The System comes with a pre-installed Hard Drive (located in the removable drive bay). This
system will work with two (2) installed hard drives (at a max 750GB each). The steps below
outline installing a drive in the removable bay - if installing an internal drive, it is recommended to
speak with a PC Hardware Technician for assistance.
NOTE: Make sure that the System is OFF and the power cable has been disconnected before
changing the Hard Drive.
STEP 1: Remove the Drive Cartridge from
the System:
• Lift the lever to gain access to the Lock
Mechanism. Use the provided key to
unlock the drive bay.
STEP 2: Remove the Cover from the
Cartridge:
• Un-clip the release latch with the word
“OPEN” printed beside it by gently
pushing on the latch.
• Slide the cover off to where it locks or
catches the stopper and lift the
Cartridge Casing to remove it.
• Pull upwards on the lever to loosen the
Drive Cartridge. Pull the drive cartridge
out of the System to access the SATA
Hard Drive.
STEP 3: Connecting the SATA Cables:
• Confirm the SATA Cable is securely
connected within the System.
• Connect the SATA Data Cable to the
Drive (Cable with two black, one red and
one yellow wire).
• Connect the SATA Power Cable to the
Drive (single red cable).
52
Hard Drive Replacement - Appendix #7
STEP 6: New Drive Format
The New Hard Drive MUST be formatted. If
a new HARD DRIVE is detected, the system
will prompt you to FORMAT the drive. If you
do not choose to format the HARD DRIVE,
the drive will not be detected by the system.
If you choose to FORMAT a drive in this
way, the drive will no longer be readable by
a regular PC.
STEP 4: Reinsert the Cartridge Casing
into the DVR
NOTE: Do NOT turn off the System while
the drive is formatting. This can cause
problems with the Hard Drive.
• Close the cover on the Drive Case. Fully
insert the Cartridge Case into the DVR.
STEP 5: Lock the Cabinet
Lock the cabinet by turning the key
clockwise.
Locked
NOTE: This system will accept a second
internal hard drive (to a maximum 750GB).
To install the second drive, remove the case
from the DVR, and set the drive to Slave.
Follow the steps outlined above.
Installing an internal hard drive may require
the assistance of a PC Hardware
Technician.
Unlocked
NOTE: If you do not lock the cabinet, the
system will NOT DETECT THE HARD
DRIVE and will not function properly.
53
Play Only Mode - Appendix #8
Play Only Mode - Appendix #8
PLAY ONLY MODE can be used in the following situations:
• When you need to playback a hard drive from another System
• When you need to playback the video which you deleted by running HDD CLEAR
Entering “PLAY ONLY MODE”:
1. Turn on the System. At the initial screen that says HDD DETECT, press [PLAY] and System
enters “PLAY ONLY MODE”.
2. To exit PLAY ONLY MODE, reboot the System and DO NOT press PLAY at the initial screen.
Search
• Use Search Bar to search the data by percentage.
• You cannot use Time/Date and EVENT LIST to search the data.
54
Optional Accessories
Optional Accessories
The following accessories are available to add to your existing system:
SLAVE / SPOT OUT
MONITOR
BNC TYPE
CAMERAS
EXTENSION
CABLE
Slave / Spot Out Monitors View selected Cameras on a
second Monitor
Additional BNC Type
Cameras
Extends the length
between the CAMERA
and MONITOR.
Available in 60’ length.
PTZ
CAMERAS
Accessory PTZ Cameras
for additional view control.
PRO SERIES
CAMERAS
Additional BNC Type
Cameras
CAMERA
ACCESSORIES
Night Vision Accessory
with 68 LED
illuminators for viewing in
total darkness
TO ORDER THESE ACCESSORY ITESMS OR FOR A COMPLETE LISTING OF AVAILABLE
PRODUCTS, PLEASE VISIT US ON THE WEB AT:
WWW.LOREXCCTV.COM
55
LOREX PRODUCT LIMITED WARRANTY
LOREX PRODUCT LIMITED WARRANTY
LOREX warrants, to the original retail purchaser only (the “Purchaser”), that this item (the
“Product”) is free from manufacturing defects in material and workmanship, provided the Product
is used in normal conditions and is installed and used in strict accordance with the instructions
contained in the Product's Owner's Manual. This warranty shall be for the following warranty
periods (the “Warranty Period”), commencing on the date the Purchaser buys the Product at
retail in an unused condition.
Parts and Labor: 1 year (Warranted parts do not include Bulbs, LED's and Batteries)
LOREX's obligations under this warranty shall be limited to the repair or replacement of any
warranted parts found by LOREX to be defective in the Product, or, in LOREX sole discretion, the
replacement of the Product found be LOREX to be defective. Any replacement parts furnished be
LOREX in connection with this warranty shall be warranted to the Purchaser for a period equal to
the unexpired portion of Warranty Period for the Product.
Warranty Exclusions
This warranty does not apply to Bulbs, LED's and Batteries supplied with or forming part of the
product. This warranty is invalidated if other than LOREX accessories are or have been used in
or in connection with the Product or in any modification or repair is made to the Product be other
than a service depot authorized by LOREX. This warranty does not apply to defects or damages
arising by use of the Product in other than normal (including normal atmospheric, moisture and
humidity conditions) or by installation or use of the Product other than in strict accordance with
the instructions contained in the Product's owners Manual. This warranty does not apply to
defects in or damages to the Product caused by
(i) negligent use of the Product,
(ii) misuse or abuse of the Product,
(iii) electrical short circuits or transients,
(iv) Purchaser adjustments that are not covered in the Owner's Manual,
(v) use of replacement parts not supplied by LOREX
(vi) improper Product maintenance, or (viii) accident, fire, flood or other Acts of God.
LOREX reserves the right to make change in design or to make additions to or improvements in
its products without incurring any obligation to modify any product which has already been
manufactured. This warranty is in lieu of other warranties, express or implied, and LOREX
neither assumes nor authorizes any person to assume for it any other obligation or liability in
correction with the sale or service of the Product. In no event shall LOREX be liable for any
special or consequential damages arising from the use of the Product or arising from the
malfunctioning or non-functioning of the Product, or for any delay in the performance of this
warranty due to any cause beyond its control. This warranty shall not apply to the appearance or
accessory items including, but not limited to cabinets, cabinets parts, knobs etc., and the
uncrating, setup, installation or the removal and reinstallation of products after repair.
56
LOREX PRODUCT LIMITED WARRANTY
LOREX does not make any claims or warranties of any kind whatsoever regarding the Product's
potential, ability or effectiveness to prevent minimize, or in any way affect personal or property
damage or injury. LOREX is not responsible for any personal damage, loss or theft related to the
Product or to its use for any harm, whether physical or mental related thereto. Any and all claims
or statements, whether written or verbal, by salespeople, retailers, dealers or distributors to the
contrary are not authorized by LOREX, and do not affect this provision of this warranty. The
purchaser may have other rights under state, provincial, or federal laws and where the whole or
part of any item of this warranty is prohibited by such laws, it shall be deemed null and void, but
the remainder of the warranty shall remain in effect.
Obtaining Service
In order to obtain service, please make sure that you have registered your product on-line at
http://www.lorexcctv.com (located in the warranty registration section). Please contact our
customer service department to obtain a return authorization number. The Purchaser must
provide LOREX with a copy of his/ her original, dated bill of sale, receipt or invoice, failing which
LOREX will not perform any of its obligations under this warranty. To claim on this warranty,
proceed with the following steps:
Pack the Product in a well-padded sturdy carton.
i.) If the unit was purchased in the United States proceed as follows:
Contact our customer service department to obtain a return authorization number.
Return the unit to: Lorex Service Center
2375 Hadely Road, Plainfield, IN 46168
ii) If the unit was purchased in Canada proceed as follows:
Contact our customer service department to obtain a return authorization number.
Return the unit to: Lorex Service Center
300 Alden Road, Markham, Ont. L3R 4C1
iii) If the unit was purchased in Europe please visit: http://www.lorexinternational.com/ for
return instructions.
TOLL FREE CUSTOMER SERVICE
North America: 1-888-42-LOREX (1-888-425-6739)
International: 1-800-42-LOREX 0 (1-800-425-67390)
Local: 905-940-5355
http://www.lorexcctv.com
Always use discretion when installing video and/or audio surveillance equipment especially when there is perceived
privacy. Inquire regarding federal, state and/or local regulations applicable to the lawful installation of video and or
audio recording or surveillance. Party consent may be required.
57
It’s all on the web
Product Information
Specification Sheets
User Manuals
Software Upgrades
Quick Start Guides
Firmware Upgrades
VISIT
www.lorexcctv.com
www.lorexcctv.com
Lorex Technology Inc.