1
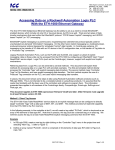
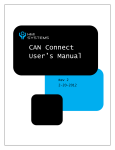
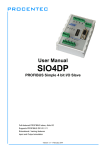
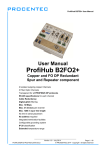
UBox™ 4100 Quick Start Guide
UBox 4100
Distributed by:
Grid Connect Inc. 1841 Centre Point Cr. #143 Naperville, IL 60563
+1 630 245-1445, +1 630 245-1717 FAX
www.gridconnect.com | www.ipenabled.com | www.factorycomm.com
©2005 Copyright. Lantronix is a registered trademark, and UBox is a trademark of Lantronix, Inc. All rights reserved.
900-377 Rev. A 6/05
UBox 4100 QUICK START GUIDE CONTENTS
What’s in the Box . . . . . . . . . . . . . . . . . . . . . . . . . . . . . . . . . . . . . . . . . . . . . . . . . . . . . . .2
Getting Started . . . . . . . . . . . . . . . . . . . . . . . . . . . . . . . . . . . . . . . . . . . . . . . . . . . . . . . . .3
Connecting the USB Device . . . . . . . . . . . . . . . . . . . . . . . . . . . . . . . . . . . . . . . . . . . . .5
UBox 4100
Configuring the UBox . . . . . . . . . . . . . . . . . . . . . . . . . . . . . . . . . . . . . . . . . . . . . . . . . .10
Contact Information . . . . . . . . . . . . . . . . . . . . . . . . . . . . . . . . . . . . . . . . . . . . . . . . . . .11
Quick Start Guide
UBox 4100
WHAT’S IN THE BOX
GETTING STARTED CONTINUED…
The package includes:
• Lantronix UBox USB Device Server
• Quick Start Guide
STEP 2: INSTALL THE SOFTWARE
• Power Supply
• CD with software and User Guide
The Lantronix UBox USB Device Server makes it possible for computers on a Local
Area Network (LAN) to connect and share USB devices such as printers, scanners,
and storage drives. This Quick Start will get you up and running with your new
UBox. For more detailed instructions, please refer to the UBox USB Device Server
User Guide on the product CD or the Lantronix web site.
GETTING STARTED
1. Connect the UBox to your network using an RJ45 Ethernet cable.
2. Connect the power supply included in the package to the UBox.
You should now see lights on your UBox.When the left-most (green) SYSTEM light starts
blinking slowly (once every 3 seconds), you are ready to install the UBox software.
If the CD does not launch automatically:
a. Open My Computer.
b. Click on the CD Drive Letter.
c. Double-click Launch.exe.
Note: During or after the software installation, the Windows New Hardware Wizard
may ask you to install software several times. Select Install the software
automatically. If you see an additional prompt regarding logo testing, click
Continue Anyway to proceed. The UBox application opens automatically once
the installation is complete.
4. To verify that the application sees the UBox Device Server, click the Servers tab.
If you do not see the left-most (green) SYSTEM light
blinking slowly, please read the detailed troubleshooting
instructions in the User Guide.
2
The following procedure summarizes the steps for installing the UBox software.
1. Insert the product CD into your CD drive. The CD should start automatically.
2. Click the UBox Software Installation button to install the application.
3. Follow the on-screen instructions.
STEP 1: INSTALL THE HARDWARE
Note: Do not connect USB Devices to the UBox until after
UBox hardware and software have been installed.
Requirements: Windows 2000/XP or later
Note: Initially, the UBox displays as Unnamed. During configuration, you can assign
a name to it.
Power Supply
Network
Connection
W W W. L A N T R O N I X . C O M
3
Quick Start Guide
UBox 4100
GETTING STARTED CONTINUED…
CONNECTING THE USB DEVICE
If the software does not see the UBox hardware, please see the Users Guide
on the CD for more detailed troubleshooting information.
1. Connect your USB device to any USB port on the Lantronix UBox.
Note: If you want additional users to connect to your UBox, you need to install the
UBox software on each client computer.
Servers tab
UBox is
listed
➞
➞
➞
UBox Details
USB Ports
➞
4
Computers
currently
connected
to the UBox
➞
Above each USB port is a green LED light. This light indicates whether your USB
device is supported in the current software/firmware. A solid green light
indicates that your device is supported. A slowly blinking light indicates that
your USB device is not currently supported. Please contact Lantronix if you
have a slowly blinking light.
W W W. L A N T R O N I X . C O M
5
Quick Start Guide
UBox 4100
CONNECTING THE USB DEVICE CONTINUED…
CONNECTING/DISCONNECTING VIA SOFTWARE
2. On the Start menu, click Programs➞Lantronix UBox USB Device
Server➞UBox USB Device Server. The USB Devices tab of the Lantronix
UBox USB Device Server window opens. Your networked USB device displays
in the Device Name column.
Now that the USB Device is physically connected, you must connect to it
through the UBox software.
USB Device
attached to
the UBox
1. Click the USB Devices tab.
2. Select your device by clicking its name.
3. Click the Connect icon
in the Action column to the left of the device.
You can now use your device as if it were directly connected to your computer.
➞
USB
Connected
to the UBox
➞
Notes:
• If you do not see your USB device, please read the detailed troubleshooting
instructions in the User Guide.
• If you have installed a software or hardware firewall, you may need to configure
it to allow access to your UBox. Please refer to the User Guide for details.
6
W W W. L A N T R O N I X . C O M
7
Quick Start Guide
UBox 4100
CONNECTING/DISCONNECTING CONTINUED…
CONNECTING/DISCONNECTING CONTINUED…
4. When you are finished using your USB device, select the device and click
the Disconnect icon
in the Action column. This makes the USB device
available to other UBox users.
5. Repeat this procedure for additional USB devices.
3. Select Connect to devices. A submenu lists the devices physically
connected to the UBox. A checkmark indicates that the device is connected
by the software.
Shortcut: Connect and Disconnect USB Devices Without
Opening the Software
Connect and disconnect USB devices without opening the UBox software by
using the UBox System Tray.
To use the system tray:
1. Find the UBox icon
on the System Tray. The System Tray is in the
lower right corner of your screen (next to the time).
4. Select the device you want to connect or disconnect.
Note: You can use the system tray for other purposes. For example, to open the
UBox application instead of using the Start menu, right-click the system tray
and select UBox Settings.
2. Right-click the UBox icon
8
. A menu displays.
W W W. L A N T R O N I X . C O M
9
Quick Start Guide
UBox 4100
CONFIGURING THE UBOX
CONTACT
The UBox package has two components: the UBox hardware and the
UBox software. Both have their own settings and configuration options.
You modify the settings for the UBox on the Servers tab; these settings are
stored in the UBox hardware. You modify the settings of the UBox software
on the Local Settings tab; these settings are stored on your computer.
Technical Support US
Check our online knowledge base or send a question to Technical Support at
www.lantronix.com/support.
Refer to the User Guide for details on configuring the UBox hardware
and software.
Technical Support Europe, Middle East, Africa
Phone: +49 (0) 89 31787 817
Email: [email protected] or [email protected]
Lantronix
15353 Barranca Parkway
Irvine, CA 92618, USA
Phone: (949) 453-3990
Fax: (949) 453-3995
www.lantronix.com
Distributed by:
Grid Connect Inc. 1841 Centre Point Cr. #143 Naperville, IL 60563
+1 630 245-1445, +1 630 245-1717 FAX
www.gridconnect.com | www.ipenabled.com | www.factorycomm.com
10
W W W. L A N T R O N I X . C O M
11