1
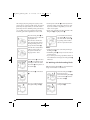
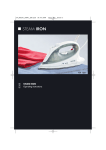
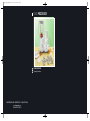
CV_KH700_E41968_LB6.qxd
17.11.2008
13:21 Uhr
Seite 1
FOOD PROCESSOR
KH 700
FOOD PROCESSOR
Operating instructions
KOMPERNASS GMBH · BURGSTRASSE 21 · D-44867 BOCHUM
www.kompernass.com
ID-Nr.: KH700-11/08-V2
CV_KH700_E41968_LB6.qxd
17.11.2008
13:21 Uhr
Seite 4
KH 700
1
r
2
e
t
z
3
w
u
I
q
II
4
0
III
IV
V
9
VI
5
i
6
7
8
o
IB_KH700_E41968_LB6
17.11.2008
14:33 Uhr
Seite 1
CONTENT
PAGE
1. Appliance description
2
2. Intended Use
2
3. Technical data
2
4. Safety instructions
2
5. Before starting the appliance
3
6. Assembling the food processor
3
6.1 Fitting the mixing bowl..............................................................................................................3
6.2 Fitting the lid...............................................................................................................................3
6.3 Insert the ingredient by filling shaft and pusher .....................................................................4
7. Working with the mixing bowl
4
7.1 Working with the cutting blade................................................................................................4
7.2 Remove the cutting and grating blades from the accessory clip..........................................5
7.3 Insert the cutting and grating discs back into the accessory clip.........................................5
7.4 Working with the cutting and grating discs ............................................................................5
7.5 Working with the kneading blade...........................................................................................6
8. Working with the blender
7
9. Cleaning & Care
8
10. Malfunctioning
8
11. Disposal
9
12. Warranty and service
9
13. Importer
9
14. Table for ingredients
10
Read these operating instructions carefully before using the appliance for the first time and preserve this
maual for later reference. Pass this manual on to whoever might acquire the appliance at a future date.
-1-
IB_KH700_E41968_LB6
17.11.2008
14:33 Uhr
Seite 2
FOOD PROCESSOR
KH 700
3. Technical data
Power supply:
Power consumption:
Capacity blender jug:
KB-time blender jug:
Capacity mixing bowl:
KB-time mixing bowl:
1. Appliance description
1 Splash protection cap
2 Blender lid
3 Accessory clip
4 Blender jug max. 1.5 l
5 Motor block cover
6 Motor block
7 Speed controller
8 Drive shaft
9 Mixing bowl max. 1.5 l
0 Lid for mixing bowl
q Filling shaft
w Pusher
e Measuring cup
r Retainer
t Kneading blade
z Blade
u Protective case for blades
I. Potato slurry disc
II. Fine cutter
III. Coarse cutter
IV. Coarse shredder
V. Fine shredder
VI. Potato-chips disc
i Disc holder
o Spatula
230 V / 50 Hz
700 Watt
1.5 l
3 miutes
1.5 l
1 minute
CO Time
The CO Time (Continuous Operation Time) details
how long an appliance can be operated without
the motor overheat-ing and becoming damaged.
After the appliance has run for this period it must be
switched off until the motor has cooled itself down.
4. Safety instructions
• Please read all safety instructions carefully.
• Make sure that the power cord never becomes
wet or damp during operation. Lay the cord such
that it cannot be pinched or otherwise damaged.
Do not leave it dangling from the working surface.
• Arrange for defective power plugs and/or
cables to be replaced as soon as possible by a
qualified technician or by our Customer Service
Department to avoid the risk of injury.
• Pull the plug from the socket when you do not use
the appliance, before changing the attachments
and before cleaning the appliance. Switching off
the appliance is not sufficient because the appliance receives power as long as the power plug is
connected to the socket. In this way you will also
prevent inadvertent switching on of the appliance.
• This appliance is not intended for use by persons
(including children) with reduced physical, sensorial or mental cabilities, or lack of experience and
knowledge, unless they have been given supervision or instruction concerning use of the appliance by a person responsible for their safety.
• Children should be supervised to ensure that they
do not play with the appliance.
2. Intended Use
This appliance is intended for the processing of
foodstuff in household quantities and only for private use in closed rooms protected from rain. This appliance is not intended for commercial or industrial
use or for operation in the open.
-2-
IB_KH700_E41968_LB6
17.11.2008
14:33 Uhr
Seite 3
6. Assembling the food
processor
• Use only the supplied original accessories since
these have been optimised for interaction with the
appliance.
• Do not operate the appliance without ingredients.
Overheating hazard!
6.1 Fitting the mixing bowl
Caution:
• Place the cover 5 on the motor
block 6 so that the arrow on
the cover 5 points towards the
open lock on the motor block
6. Turn the cover 5 anticlockwise until it is firmly seated.
The arrow now points towards
the closed lock.
• Position the mixing bowl 9
so that the arrow on the mixing bowl 9 points towards
the open lock on the motor
block 6. Take hold of the mixing bowl 9 with the handle
and turn it clockwise as far as
it will go. The arrow now points towards the closed lock.
The blade z is very sharp! Exercise special care when
inserting and removing or cleaning the blade z!
Caution:
While the machine is in use, only put those ingredients in the mixing bowl 9 or blender 4, which
are to be processed. Do not put hands and foreign
objects in the filling shaft q or blender 4 to avoid
the risk of injury or damage to the machine.
• Do not attempt to open the lid 0 of the mixing
bowl 9 while in operation.
5. Before starting the appliance
• Before starting the device ensure that...
- the device and all accessories and the power plug
and the power cord are in perfect condition and...
– all packaging materials have been removed
from the appliance.
• Prior to initial use clean all device components as
described in the “Cleaning” chapter.
• Assemble the food processor and note that…
- The food processer is in a firm and stable position. Secure the food processor on the working
surface with the four suction cups.
- the mixing bowl 9 works only when the cover
5 for the motor block 6, the mixing bowl 9
and the lid 0 for the mixing bowl 9 have
been properly fitted and engaged.
- the blender works only when the blender jug
4 and the blender lid 2 have been correctly
fitted and engaged.
- when blender jug 4, mixer lid 2, mixing bowl
9 and the lid 0 of the mixing bowl 9 have
been fitted, only the blender will work.
6.2 Fitting the lid
Note:
Always ensure that the lid 0 is properly engaged
before switching on the appliance!
• Fit the lid 0 on the mixing
bowl 9 so that the recesses
of the lid 0 match the slots of
the bowl 9. The marks on
the lid 0 and the bowl 9
must match.
• Turn the lid 0 clockwise until
you hear an impact. The lug
of the lid 0 now rests on the
handle of the bowl 9.
-3-
IB_KH700_E41968_LB6
17.11.2008
14:33 Uhr
Seite 4
6.3 Insert the ingredient by
filling shaft and pusher
7.1 Working with the cutting blade
Caution! Risk of injury!
Caution:
• The cutting edges are very sharp! Exercise special care when inserting and removing or cleaning
the cutting blade z!
• The bowl 9 must first be properly locked in position before inserting the cutting blade z. Risk of
injury!
• Never use your fingers, spatula, spoon handles
or similar objects for pushing foodstuff through
the filling shaft q!
Never use your fingers, spatula, spoon handles or
similar objects for pushing foodstuff through the
filling shaft q! Risk of injury!
• You can add liquid and solid
foodstuffs to the mixing bowl
9 through the filling shaft q.
You can close the filling shaft
q with the pusher w while
the appliance is in use, in order to avoid splashing or
flour (e.g. while kneading
flour) from coming out.
• Use the pusher w to force
food stuffs through the filling
shaft q.
The cutting blade z can be used to mix, chop or
knead dough. Use the cutting blade z, for instance, for chopping meat, cheese, onions, herbs and
nuts.
• Remove the cutting blade z
from the protective case u.
• Fit the mixing bowl 9 to the
food processor.
• Fit the cutting blade z on the
retainer r and place the latter on the drive shaft 8.
• The pusher w is equipped
with a measuring cup e. If
you remove it you can reduce
size of the filling shaft q. This
can be useful when cutting or
grating foodstuffs.
• Place the lid 0 on the mixing
bowl 9.
• Insert the ingredients into the
mixing bowl 9 through the
loading shaft q.
• Place the stodger w in the loading shaft q.
• Now switch on the appliance by setting the
speed controller 7 to the level recommended in
the table.
7. Working with the mixing
bowl
The supplied accessories for the mixing bowl 9
consist of 6 grating and cutting discs (I-VI), a
kneading blade t and a chopping blade z. The
mixing bowl 9 is very versatile to use: grating or
cutting, mixing or cutting, kneading or stirring.
If you are uncertain about the speed, use the fastest
level (3).
-4-
IB_KH700_E41968_LB6
17.11.2008
14:33 Uhr
Seite 5
Hints:
7.3 Insert the cutting and grating discs
back into the accessory clip
• Cut the ingredients into approx. 3 cm size pieces
before adding them to the bowl 9.
• The appliance chops the ingredients very fast,
therefore allow the appliance to run only briefly.
• Do not allow the appliance to run for more than
1 minute at a time.
• Should the ingredients get caught up in the bowl
9 or between the blades z:
- Switch off the appliance.
- Remove the lid 0 from the mixing bowl 9.
- Remove the ingredients with a spatula o.
• Insert the cutting discs (II/III)
in the retainer slots. Begin
with the inner retainer
slots.The lateral flaps with the
elevation in the middle must
point upwards.
Make sure that all the cutting edges are pointing inwards.
• Place the shredder (IV/V),
grater (I) and potato-chips
disc (VI) in the storage slot on
the outside.
7.2 Remove the cutting and grating
blades from the accessory clip
• Remove the lid 2 from the
blender jug 4 by turning it
clockwise.
• Place the accssory clip 3
back in the blender jug 4.
• Grasp the accessory clip 3
on the handle at the centre of
the retainer 3 with the thumb
and index finger.
• Place the cover 0 on the liquidiser 4 so that the arrows
on the handle of the liquidiser
4 and on the cover 0 point
towards each other. Turn the
cover 0 anti-clockwise until it
sits firmly.
• Pull the accessory clip 3 with the cutting and
grating discs (I-VI) out of the blender jug 4.
• Remove the cutting and
grating discs (I-VI) from the
holder 3.
7.4 Working with the cutting and grating discs
Caution:
• The cutting edges are very sharp! Exercise inserting and removing or cleaning the discs!
• Never use your fingers, spatula, spoon handles
or similar objects for pushing foodstuff through
the filling shaft q!
-5-
IB_KH700_E41968_LB6
17.11.2008
14:33 Uhr
Seite 6
The cutting (II/III) and grating discs (IV/V) can be
used to slice or grate food stuffs quickly. The special
potato-chip disc (VI) enables you to make uniform
potato-chips at home. With the potato grater disc (I)
you can finely chop raw potatoes for the mixture,
and finely grate other vegetables or fruits as well.
• Set the speed controller 7 to level 3 (maximum
speed) for cutting and grating. Should you wish
to process soft fruit or vegetables you can also
select a lower speed.
• Slowly and gradually push the ingredients in the
filling shaft q using the pusher w.
• Place the mixing bowl 9 on
the food processor. Select the
appropriate disc.
• Place the disc with the leading edge (the side without
the ring marking on the corners) in the disc holder i.
• Push the other side (marked
with two circles at the corners) down until the disc
engages with a “click”.
• To remove the disc from the
disc holder i, remove the
disc from the disc holder i
by pushing on the marked
side in an upward direction.
Hints:
• Cut the food into pieces so that they fit through
the filling shaft q.
• Fill the filling shaft q evenly and do not exert excessive pressure.
• If you wish to process large quantities of food do
it in small batches and empty the mixing bowl 9
inbetween.
• Fit the retainer r to the drive
shaft 8. Insert thumb and index finger in the holes of the
disc holder i and place it on
the retainer r.
7.5 Working with the kneading blade
With the kneading blade t you can knead bread
dough and mix batter or cake mixture.
• Place the lid 0 on the bowl
9.
• Place the mixing bowl 9 on
the food processor.
• Place the kneading blade t
on the retainer r and fit on
the drive shaft 8.
• You can now fill ingredients
through the filling shaft q.
• Add the ingredients to the
mixing bowl 9.
-6-
IB_KH700_E41968_LB6
17.11.2008
14:33 Uhr
Seite 7
• Place the lid 0 on the bowl
9 and the pusher w in the
filling shaft q.
You can use the blender to finely puree and mix ingredients. You can use the blender for preparing
soups, sauces, milkshakes, baby food or process vegetables and fruit into a puree
• First remove the cover 5 for
the motor block 6 by turning
it clockwise.
• Set the speed controller 7 to
the level recommended in the
table.
• Now place the liquidiser 4 in
the opening, so that the arrow
marking on the liquidiser 4 points towards the open lock on
the motor block 6. Turn the liquidiser 4 anti-clockwise until it
is firmly seated. Ensure that the
arrow marking is pointing towards the closed lock.
• Place the cover 0 on the liquidiser 4 so that the arrows
on the handle of the liquidiser
4 and on the cover 0 point
towards each other. Turn the
cover 0 anti-clockwise until it
sits firmly.
• Fill the ingredients in the blender jug 4. Cut them into
smaller pieces beforehand if
required.
Hints:
• Put liquid ingredients into the bowl 9 last and
start mixing at low speed to avoid splashing.
• Never fill the mixing bowl 9 above the
MAX.mark (1.5l).
• For mixing “water like” liquids only use the speed
1 with maximum volume of 1 l to avoid liquid
spilling out.
8. Working with the blender
Caution:
• Never switch on the blender when empty.
• Never insert the plug in the socket before the
blender jug 4 and the blender lid 2 have been
correctly assembled.
• Always pull the plug from the socket before
removing the blender jug 4.
• Do not fill ingredients hotter than 80°C in the
blender jug 4.
• To avoid splashing, never add more than 1.5l of
liquid in the blender jug 4.
• Never remove the blender lid 2 during operation.
• First remove the blender lid 2 before removing
the blender jug 4.
• Never run the blender continuously for more than
3 minutes.
• If required, insert the splash
protection cap 1 and turn it
anti-clockwise to secure.
• Switch on the blender by setting the speed
controller 7 to the desired level.
-7-
IB_KH700_E41968_LB6
17.11.2008
14:33 Uhr
Seite 8
• When you have finished,
switch off the blender and first
remove the lid 2 by turning it
clockwise.
• Exercise special care when cleaning the blades
z, the blender jug 4 with installed blade and
the cutting discs (I-VI). The blades and cutting edges are extremely sharp! Risk of injury!
• Wipe the housing with a clean, damp cloth after
each use.
Warning regarding appliance
• Then remove the blender jug
4 by turning it clockwise.
damage:
NONE of the appliance components are designed
for cleaning in a dishwashing machine! Additionally, do not use abrasive cleansers for cleaning appliance components.
Hints:
• You can clean the mixing bowl 9 and the lid 0
in hot soapy water.
• Always remove the plug from the socket before
cleaning the appliance. Otherwise, you are at
risk of receiving an electric shock!
• Clean all appliance components that have come
in contact with foodstuff with detergent and hot
water after use.
• Use an appropriate dishwashing brush for places
that are difficult to access.
• You can add your ingredients to the blender jug
4 through the opening in the lid 2 during operation. To do so, simply remove the splash protection cap 1.
• If you process hot liquids, remove the splash
protection cap 1 to allow the steam to escape.
• Should ingredients be trapped in the blender jug
4 during operation, proceed as follows:
- Switch off the device (speed controller 7 to level 0) and pull the plug from the socket.
- Remove the splash protection cap 1 and the
lid 2.
- Remove the trapped ingredients in the blender
jug 4 using the spatula o. Ensure you do not
damage the spatula o with the blade z!
10. Malfunctioning
If the food processor suddenly stops functioning:
It means that the appliance has overheated and the
integrated safety cut off has switched off the food
processor.
• Pull the plug from the socket
• Set the speed controller 7 to level 0
• Allow the device to cool down for 15 minutes
• If the appliance has not cooled off completely
after 15 minutes, it will not start. Wait another
15 minutes before switching it on again.
9. Cleaning & Care
Caution:
Never immerse the device in water or other
liquids. There could be potential hazard of
life-threatening electric shock, if moisture enters the voltage conducting parts upon operating the appliance again.
If the food processor does not switch on:
• Check whether the power plug is inserted in the
socket.
-8-
IB_KH700_E41968_LB6
17.11.2008
14:33 Uhr
Seite 9
DES Ltd
Units 14-15
Bilston Industrial Estate
Oxford Street
Bilston
WV14 7EG
Tel.: 0870/787-6177
Fax: 0870/787-6168
e-mail: [email protected]
• Check whether the cover 5 for the motor block 6,
mixing bowl 9 and lid 0 are inserted and engaged
properly.
11. Disposal
Do not dispose of the appliance in your
normal domestic waste. This product is
subject to the European guideline
2002/96/EC.
Irish Connection
Harbour view
Howth
Co. Dublin
Tel: 00353 (0) 87 99 62 077
Fax: 00353 18398056
e-mail: [email protected]
Dispose of the appliance through an approved
dis-posal centre or at your community waste facility.
Observe the currently applicable regulations.
In case of doubt, please contact your waste disposal
centre.
Dispose of all packaging materials in an
environmentally responsible manner.
13. Importer
KOMPERNASS GMBH
BURGSTRASSE 21
44867 BOCHUM, GERMANY
12. Warranty and service
The warranty for this appliance is for 3 years from the
date of purchase. This appliance has been
manufactured with care and meticulously examined
before delivery. Please retain your receipt as proof of
purchase date. Should a claim need to be made under the warranty, please make contact by telephone
with our service department. Only in this way can a
post-free despatch for your goods be assured.
The warranty covers ONLY claims for material and
maufacturing defects, not for wearing or consumable or for damage to fragile components. This product is for private use only and is not intended for
commercial applications.
The warranty will become void in the event of abusive and improper handling, use of force and internal
tampering not carried or approved by our authorized service branch. Your statutory rights are not
restricted in any way by this warranty.
www.kompernass.com
-9-
IB_KH700_E41968_LB6
17.11.2008
14:33 Uhr
Seite 10
14. Table for ingredients
The following tables should serve you as examples
for orientation as regards which ingredients should
be processed in what quantities and at what speed
level.
Do not exceed the specified operating period to
avoid overheating of the appliance.
In addition to the 3 levels, a short powerful spurt of
operation is available with the pulse stage “P”. The
switch does not engage in pulse position. Hold the
switch in this position or repeatedly turn it to pulse
position.
Ingredients
Max. quantity
Speed level
Accessory
Operating duration
Sweetened dough
250 g flour
10 g yeast
125 ml milk
1 egg, 25 g butter
15 g sugar
3
Kneading blade
1 minute
Waffle dough
125 g butter
100 g sugar
1 pack vanilla sugar, 4
eggs
70 g flour
80 g corn starch
2 teaspoons baking
powder
125 g cream
3
Kneading blade
1 minute
hard fruit
(apple)
500 gr.
3
Cutter attachment/
grater attachment
45 seconds
hard vegetables
(potatoes/carrots)
500 gr.
3
Potato-chips disc
45 seconds
Meat / Fish
500 gr.
3/P
Blade
30 seconds
soft vegetables
(tomatoes)
500 gr.
2
Blade
30 seconds
soft fruit
(grapes)
500 gr.
2
Blade
15 seconds
- 10 -