1
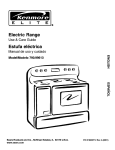
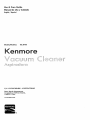
Use & Care Guide
Manual de Usa V Cuidado
English/ EspaBoi
Madels/Modelos:
116.31100
Ke
P/N COIZDKFII_UOg
re
- KC_IZDKFZ_}U_
Sears Brands Management
Corporation, Hoffman Estates,
IL 60179 U,S,A
wwvc,
sears_com
Before Using Your New
Vacuum Cleaner .................
Packing List ...................
Vacuum Cleaner Help Line .........
i(enmore Vacuum Cleaner Warranty
Important Safety Instructions .......
Parts and Features ...............
6
6
7
B
Operating Instructions .............
Power Cord ...................
9
9
...........
Switch .....
............
Settings .....
...........
12
13
Vacuuming Tips ...............
13
Performance/Safety
Features . . 14-15
Vacuum Cleaner Care ............
16
Vacuum Cleaner Storage ........
16
Cleaning Exterior and Attachments .16
Dust Bag Replacement ..........
17
Motor Safety Filter Cleaning ......
18
Exhaust Filter Replacement .......
18
Dust Bag Cover Replacement
.....
19
Agitator Cleaning
.............
19
Clog Removal ..............
19-20
Troubleshooting
.................
21
Master Protection Agreements
......
22
Requesting Assistance
Or Service ...............
Back page
2
3
.3
4
5
Assembly Instructions .............
Handle ......................
Tools ........................
Power Cord ...................
Releasing the Handle
OFF/FLOOR/CARPET
Pile Height Selection
Suggested Pile Height
Performance Indicator
Attachments ..................
Attachment Use Table ..........
2
10
10
1t
11
11
Please read this guide, it will help you assemble and operate your new Kenmore vacuum
cleaner in the safest and most effective way.
For more information about vacuum cleaner care and operation, call your nearest Sears
Parts and Repair Center or the Vacuum Cleaner Help Line listed on the cover of this guide.
You will need the complete model and serial numbers when requesting information. Your vacuum cleaner's model and serial numbers are located on the Model and Serial Number Plate.
Use the space below to record the model number and serial number of your new Kenmore
vacuum cleaner.
Model No.
Serial No.
Date of Purchase
Keep this book and your soles check (receipt) in a safe place for future reference.
PACKING
LIST
Your KENMORE VACUUM CLEANER is packaged with the following parts and components assembled separately in the carton:
1
1
!
1
Upright Vacuum Cleaner
Handle
Crevice Tool
Combination Brush
1
I
t
1
Pet Handi Mate TM
Telescoping Wand
Use & Care Guide
Repair Parts List
Each of the above assemblies are shown in detail inside the Repair Parts List.
2
Vacuum Caeaner Help Line:
1.877.531-7321
8:00am-5:00pm
EST, M-F
(IJ.S.A. and Canada)
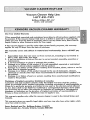
One Year Limited Warranty
When assembled, operated and maintained
according
to all instructions supplied with
the product, if this vacuum cleaner fails due to a defect in material or workmanship
within one year from the date of purchase, return it to any Sears store, Sears Parts &
Repair Center or other Kenmore outlet for free repair.
If this vacuum cleaner is used for other than private family purposes, this warranty
applies for only 90 days from the date of purchase.
This warranty covers only defects in material and workmanship. Sears will NOT pay
for:
!.
Expendable items that can wear out from normal use, including but
filters, belts, light bulbs, and bags.
2. A service technician to instruct the user in correct product assembly,
maintenance.
A service technician to clean or maintain this product.
4. Damage to or failure of this product if it is not assembled, operated
according to all instructions supplied with the product.
5. Damage to or failure of this product resulting from accident, abuse,
other than its intended purpose.
6.
Z
not limited to
operation or
or maintained
misuse or use for
Damage to or failure of this product caused by the use of detergents, cleaners,
chemlcals or utensils other than those recommended in all instructions supplied with
the product.
Damage to or failure of parts or systems resulting from unauthorized modifications
made to this product.
Disclaimer of implied warr.anties_ limitation of remedies
Customer's sole and excluswe remedy under this limited warranty shall be product
repair as provided herein. Implied warranties, including warranties of merchantability or
fitness for a particular purpose, are limited to one year or the shortest period allowed
by law. Sears shall not be liable for incidental or consequential damages. Some states
and provinces do not allow the exclusion or limitation of incidental or consequential
damages, or limitations on the duration of implied warranties of merchantabd_ty or
fitness, so these exclusions or limitations may not apply to you.
This warranty
Canada.
applies only while this vacuum cleaner is used in the United States and
This warranty gives you specific legal rights, and you may also have other rights which
vary from state to state.
Sears, Roebuck and Co., Hoffman Estates, IL 60179
Sears Canada Inc., Toronto, Ontario, Canada M5B 2B8
Roadall instructionsin thisgui_de_i_-efore
assembiingor using
your Vacuu-mcleaner.
NG:
Your safety is important to us. To reduce the risk of fire, electrical shock, injury to
persons or damage when using your vacuum cleaner, follow basic safety precautions including the following:
Use your vacuum cleaner only as
described in this guide. Use only with
Sears recommended attachments.
Keep hair, loose clothing, fingers, and
all parts of body away from openings
and moving parts.
Disconnect electrical supply before
servicing or cleaning out the brush area.
Failure to do so could result in the brush
unexpectedly
starting, causing personal
injury from moving parts.
Turn off all controls
unplugging.
Use extra care when cleaning on stairs.
Do not put on chairs, tables, etc. Keep
on floor.
Do not leave vacuum cleaner when
plugged in. Unplug from outlet when
not in use and before performing
maintenance.
Do not use vacuum cleaner to pick up
flammable
or combustible
liquids
(gasoline, cleaning fluid, perfumes, etc.),
or use in areas where they may be
present. The fumes from these
substances can create a fire hazard or
explosion.
To reduce the risk of electrical shock Do not use outdoors or on wet surfaces.
Do not allow to be used as a toy. Close
attention is necessary when used by or
near children.
Do not pick up anything that is burning
or smoking, such as cigarettes, matches,
or hot ashes.
Do not use with a damaged cord or
plug. If vacuum cleaner is not working
as it should, has been dropped,
damaged, left outdoors, or dropped in
water, return it to a Sears Service
Center.
Do not use vacuum cleaner without dust
bag and/or filters in place°
Always replace the dust bag after
vacuuming carpet cleaners or freshener,
powders, and fine dust. These products
clog the filters, reduce airflow and can
cause damage to the vacuum cleaner.
Failure to replace the dust bag could
cause permanent damage to the
vacuum cleaner.
Do not pull or carry by cord, use cord
as a handle, close a door on cord, or
pull cord around sharp edges or corners.
Do not run vacuum cleaner over cord.
Keep cord away from heated surfaces.
Do not use the vacuum cleaner to pick
up sharp hard objects, small toys, pins,
paper clips, etc. They may damage the
vacuum cleaner or dust bag.
Do not unplug by pulling on cord. To
unplug, grasp the plug, not the cord.
Do not handle plug or vacuum
with wet hands.
before
cleaner
Do not put any objects into openings.
Unplug before
Mate TM.
connecting
Pet Handi
Do not use with any opening blocked;
keep free of dust, lint, hair, and anything
that may reduce air flow.
You are responsible for making sure that
your vacuum cleaner is not used by
anyone unable to operate it properly.
SAVE THESE iNSTRUCTIONS
Proper assembly and safe use of your vacuum cleaner are your responsibilities. Your
vacuum cleaner wsintended for Household use. Read this Use & Care Guide carefully for
important use and safety information. This guide contains safety statements under
warning and caution symbols.
4
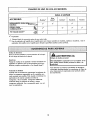
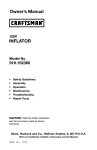
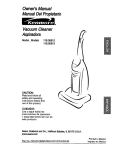
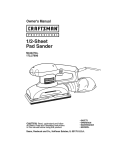
It is important to know your vacuum cleaner's parts and features to assure its proper and
safe use. Review these before using your vacuum cleaner.
Object
Exhaust Filter
Dust Bag
Style No.
Part No.
in USA
Par! No.
in Canada
EF-1
20-86889
20-40324
O
20-50690
20-50510
OFF/FL OORJCARPET
Power
Cord
Check Bag
Tool
Quick
Release
Upper
Dust Bag
Cover
(Dust Bag
I
Inside) _.
HOSeHandle Headlight-_
Pet
Handi
Agitator Reset
X
-Handle
Release
Pedal
Carrying
Combination
Brush
Nozzle
Exhaust
Filter Cover
Telescopic
Wand
Hose
Release
L_
Model/Serial
Numbers
Wand
Holder
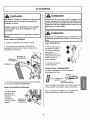
Please pay special attention to these hazard alert boxes, and follow
any
instructions given°
WARNING
statements alert you to such hazards as fire,
electric shock, burns and personal injury. CAUTION statements alert you to
such hazards as personal injury and/or property damage.
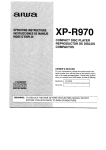
Before assembling the vacuum cleaner,
check the PACKING LIST. Use this list to
verify that you have received all the
components of your new Kenmore
vacuum cleaner.
WARNING
Electrical Shock Hazard
Do not plug into the electrical supply
until the assembly is complete. Failure
to do so could result in etetrical shock or
injury.
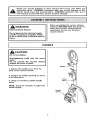
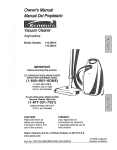
HANDLE
CAUTION
Do not overtlghten.
Overtightening
could strip the screw
holes.
Do not operate
the vacuum cleaner
without the screw in place.
i ......
i
! ,l!,l
Hand_
1. Remove the handle screw from the
body of the vacuum cleaner.
2. Position the handle
in the illustration.
3. Using a screwdriver,
assembly as shown
tighten
Screw
Hole
handle
screw.
NOTE= it may be necessary to adjust the
handle slightly°
Handle
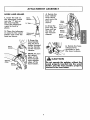
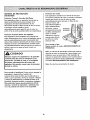
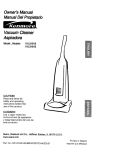
ATTACHMENT
HOSE AND WAND
4. Rotate the
hose release
lever down
and route the
hose as
shown.
1. Insert the tab on
the telescopic wand
into the 'U" slot on
the hose handle.
Twist the telescopic
wand to lock in
place.
5. Snap the
hose into the
hose cuff on
the side of
the vacuum
cleaner
2. Place the telescopic wand tn the wand
holder and route the
hose as shown.
\
o
Hose
Raised
Edge
Hose
ASSEMBLY
J
Hose
Cuff ..-_,.
Telescopic
Wand
Hose
Release
3. Snap the
hose handle
, into the hose
holder located
on the handle
of the vacuum
cleaner.
6, Rotate the hose
release lever
upwards to lock
the hose in place.
1
NOTE: Be sure
the raised
edge of the
hose handle
rests against
edge of the
hose holder.
CAUTION
Do not operate the agitator witheu! the
wand properly mserled into Ihe wand
holder and the hose handle properly
secured in Ihe hose holder
7
PET HAND|
MATE T_
COMBINATION
BRUSH
For operation of Pet Handi Mate T'_see
separate Use & Care Guide.
1. Place Pet
Handi Mate TM
into the storage
area.
Pet
Handi
1. Insert the
combination
brush into
the holder
on the back
of the
vacuum
cleaner as
shown.
Mate 7=
2. Rotate the Pet
Handi Mate TM
back until it
snaps into place.
Combination
CREVICE TOOL
1. Insert the crevice
tool into the holder
on the side of the
vacuum cleaner as
shown.
[
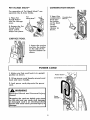
POWER CORD
1. Make sure that cord hook is in upright
position as shown.
2. Wrap power cord loosely
hook and carry handle.
Power Cord--_
around cord
3. Lock power cord plug onto the power
cord.
_u,,,,, ,,, ,,,,,
,_
WARNING
Electrical
Hazard
Shock
and Personal
Injury
Carry
Wrapping the cord too tightly puts stress
on the cord and can cause cord damage.
A damaged cord is an electrical shock
hazard and could cause personal injury or
damage.
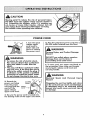
CAUTION
Moving parts! To reduce the risk of personal injury,
DO NOT touch the agitator when vacuum cleaner is
on. Contacting the agitator while it is rotating can
cut, bruise or cause other injuries. Always turn off
and unplug from electrical outlet before servicing.
Use caution when operating near children.
r
POWER CORD
1. Turn the quick
release upper
cord hook to
either side and
down to release
the power cord.
4. Plug the polarized power cord into a
120 Volt outlet located near the floor.
WARNING
Personal Injury and Product Damage
Hazard
DO NOT use outlets above counters.
Damage from cord to items in
surrounding area could occur.
WARNING
• To reduce the risk of electric shock,
this vacuum cleaner has a polarized
plug (one blade is wider than the
other).
° The plug will fit in a polarized outlet
only one way. If the plug does not fit
fully in the outlet, reverse the plug. If
it still does not fit, contact a qualified
technician to install the proper outlet.
Do not change the plug in any way.
5. To store cord, turn upper cord hook to
the up position, then wrap cord loosely
around quick release cord hook and
carrying handle.
WARNING
Electrical
Hazard
\
2. Detach the
power cord plug
from the power
cord and pult the
cord off the
quick release
upper cord hook.
Shock
And
Personal
Injury
Locking
Wrapping the cord too tightly puts stress
on the cord and can cause cord damage.
A damaged cord is an electrical shock
hazard and could cause personal injury
or damage.
3. Be sure the power cord is locked into
the locking notch of the upper cord hook.
9
[
1
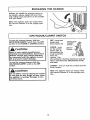
RELEASING THE HANDLE
Release the handle by pressing down on
the handle release pedal with your foot
and pulling back and down on the handle
with your hand.
Note: The agitator does not rotate when
the vacuum cleaner is in the upright position.
t
OFF/FLOOR/CARPET
To start the vacuum cleaner, slide the
OFF/FLOOR/CARPET switch from the OFF
position to the FLOOR or CARPET position.
OFF - turnsboth
suction and
brush motors off.
OFF/FLOOR/
CARPET
FLOOR - turns
Selector
on the suction
motor only. In
this position the
brush assembly
does not
revolve. Use
this setting for cleaning hardwood and tile
floors and when any attachments (tools)
are used.
CAUTION
Refer to your carpet manufacturers
cleaning recommendations.
Some more
delicate carpets may require that they
be vacuumed with the agitator turned
offr to prevent carpet damage.
To stop the vacuum cleaner, slide the
ON/FLOOR/CARPET
switch to the OFF
position.
CARPET - turns on both the suction and the
brush motors°
CAUTION
Note: The agitator does not rotate when
the vacuum cleaner is in the upright position.
Do not allow vacuum cleaner to remain
in one spot for any length of time when
the agitator is turning. Damage to carpel may occur.
..............................
SWHTCH
II
I
10
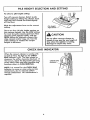
PILE HEIGHT SELECTION AND SETTING
To select a pile height setting:
Turn off vacuum cleaner. Select a pile
height setting by tilting the cleaner back
until the front wheels are lifted slightly
off the floor.
Slide the adjustment lever to the correct
setting°
Pile Height
Adjustment
There are four (4) pile height settings on
the vacuum cleaner. Use the LOW setting
for most low-pile carpets and bare floor
cleaning (with agitator OFF), and the
HIGH setting for high-pile carpets like
shag carpet, scatter rugs, etc. Use the
other settings as needed for carpet
heights in between.
I
CAUTION
Do not allow vacuum cleaner to
remain in one spot for any length of
time when the agitator is turning.
Damage to carpet may occur.
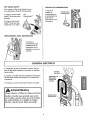
CHECK BAG iNDICATOR
When the vacuum cleaner is running with
normal air flow, the light on the CHECK
BAG indicator is off. The light comes on
whenever the airflow becomes blocked, if
that occurs, check the disposable dust bag,
motor safety filter and other possible clog
locations shown in CLOG REMOVAL.
CHECK
NOTE: It is normal for the CHECK BAG
indicator to come on when using certain
attachments, due to reduced airflow
through attachment. No maintenance is
required.
BAG
Indicator
11
_
__
l
t
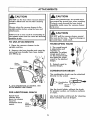
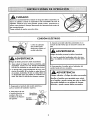
ATTACHMENTS
CAUTION
CAUTRON
DO NOT use the hose when vacuum
cleaner
When using attachments, be careful not to
overextend the stretch hose when reaching.
handle is tilted back into the floor cleaning
position.
Trying to reach beyond the hose stretch
capability could cause the vacuum cleaner
to tip over.
Always return the vaccum cleaner to the
upright position before using the hose and
altachmenls_
CAUTION
Failure to do so may result in overheating of
the agitator motor and can cause the thermal
protector to trip
DO NOT pull the vacuum cleaner around
the room by the hose. Property damage or
personal injury could result.
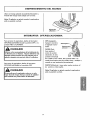
TO USE ATTACHMENTS
TELESCOPING
1. Place the vacuum cleaner in the
upright position.
WAND
1. The wand length
is adjustable and
requires no
assembly. To adjust,
simply push down
on the wand handle
and slide the upper
wand to the desired
height.
2. Remove the hose handle and wand by
removing hose handle from hose holder
and lifting up.
Hose
Hose
Handle
2. Extend wand to
desired length.
COMBINATION
BRUSH
The combination brush can be attached
directly to the wand°
_-Cornbinafion
Brush
3. Use attachments as needed.
ATTACHMENT
USE TABLE.
FOR ADDITIONAL
Rotate hose
release lever
down to release
hose for
maximum hose
reach.
See
_
Brush J
Holder
Use the brush holder without the brush
for greater suction on furniture cushions
or stairs.
REACH
Use brush holder with brush for cleaning
loose surfaces such as drapes.
Hose
Release
Lever
12
i
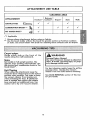
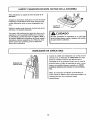
ATTACHMENT USE TABLE
I
CLEANING AREA
Between
ATTACHMENT
Furniture_
Cushions*
CREVICE TOOL
v"
V"
COMBINATION
BRUSH 3,
PET HANDI MATE
TM
_
v"
_
V"
Drapes*
Stairs
Walls
v"
v"
v"
v"
V/
¢'= Applicable
_
Always clean attachments
before using on fabrics.
Use the brush holder without the brush for greater suction on furniture cushions
or stairs. Use brush holder with brush for cleaning loose surfaces such as drapes.
Carpet edges
Guide either side or the front
nozzle along the wall baseboard.
WARNING
of the
Personal Injury Hazard
Use care if vacuum cleaner is placed on
stairs, if it falls, personal injury or property damage could result.
Stairs
Set handle in full upright position. The
agitator stops rotating automatically. Use
the crevtce tool, combination
brush or Pet
Handi Mate TM.
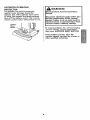
For best cleaning results, keep the airflow
passage clear. Unplug the vacuum
cleaner from the outlet before checking.
Unit Tipping
When .using the attachmentskeep
the
extension hose release lever m the locked
position when possible. This helps to keep
the vacuum cleaner from tipping over
when stretching the hose. If additional
hose is needed then unlock the release
lever and pull out additional hose. Use
caution not to tip over vacuum cleaner°
See CLOG REMOVAL section of this Use
& Care Guide.
13
MOTOR
Motor Protector
This vacuum cleaner has a motor protector
by-pass valve which prevents motor
overheating
and damage. The valve opens
to provide cooling
air when a clog
prevents normal
air flow to the
I
Motor
vacuum cleaner
suction motor. You Protecfol
will notice a
change of sound
as air rushes
through the valve
opening.
PROTECTHON SYSTEM
Thermal Protector - Suction Motor
This vacuum cleaner has a thermal
protector which automatically trips to
protect the vacuum cleaner suction motor_
If a clog prevents the normal flow of air
to the motor, the thermal protector turns
the motor off automatically. This allows
the motor to cool in order to prevent
possible damage to the vacuum cleaner.
Thermal Protector - Agitator Motor
This vacuum cleaner has a thermal
protector which automatically trips to
protect the agitator motor. The thermal
protector turns the motor off
automatically. This allows the motor to
cool in order to prevent possible damage
to the vacuum cleaner.
To correct
problem, install a
new dust bag. If using attachments,
to allow for greater air flow.
adjust
NOTE: The motor protector may open
when using attachments
or when cleaning
new carpet due to reduced airflow caused
by the attachments themselves or by new
carpet lint filling the dust bag quickly_
To reset thermal protector: Turn the
vacuum cleaner off and unplug the power
cord from the outlet to allow the vacuum
cleaner to cool and the thermal protector
to reset.
Note: Do not block motor protector.
CAUTION
Always return the vaccum cleaner to the
upright position before using the hose and
attachments. Failure to do so may result in
overheating of the agitator motor and can
:ause the thermal protectors to trip.
Check for and remove clogs, and replace
bag if necessary. See CLOG REMOVAL
section. Also checkand replace any
clogged filters. Wa_t approximately
4050 minutes before restarting vacuum
cleaner.
14
AGITATOR OVERLOAD
PROTECTOR
WARNING
The agitator has built-in protection
against motor damage should the
agitator jam. If the agitator slows down
or stops, the agitator overload protector
shuts off the agitator motor. The vacuum
cleaner suction motor will continue to run.
Electrical Shock And Personal
Hazard
injury
Disconnect electrical supply before performing maintenance
to Ihe vacuum
cleaner. Failure to do so could resull in
electrical shock or personal injury from
vacuum cleaner suddenly starhng.
Agitator
Reset
To correc! problem: Turn off and unplug
vacuum cleaner, remove obstruction,
then press AGITATOR RESET BUTTON.
If the problem persists, have the
vacuum cleaner serviced by a Sears or
other qualified technician.
15
Always follow all safety precautions
when performing maintenance to the
vacuum
cleaner.
WARNING
Electrical Shock And Personal
Hazard
Injury
Disconnect electrical supply before
servicing or cleaning the vacuum
cleaner. Failure to do so could result in
electrical shock or personal injury from
vacuum cleaner suddenly starling.
[
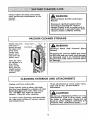
VACUUM CLEANER STORAGE
Gather the cord
and wrap it
loosely around
the upper and
lower cord
hooks. Lock
power cord
plug onto the
power cord.
WARNING
Electrical
Hazard
CLEANING
And
Personal
Injury
Wrapping the cord too tightly puts stress
on the cord and can cause cord damage.
A damaged cord is an electrical shock
hazard and could cause personal injury
or damage.
Store the vacuum cleaner in a
dry, indoor
area, on the
floor with the
handle locked
in the upright
position.
[
Shock
EXTERIOR AND ATTACHMENTS
Wash attachments in warm soapy water,
rinse and air dry. Do not clean in
dishwasher.
Unplug cord from wall outlet.
Clean exterior using a clean, soft cloth
that has been dipped in a solution of mild
liquid detergent and water, then wrung
dry. DO NOT drip water on vacuum
cleaner. Wtpe dry after cleaning.
CAUTION
Do not use attachments if they are wet.
Attachments used in dirty areas, such
as under a refrigerator_ should not be
used on other surfaces until they are
washed. They could leave marks.
To reduce static electricity and dust buildup_ wipe outer surface of vacuum cleaner
and attachments.
16
l
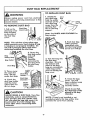
DUST BAG REPLACEMENT
TO REPLACE DUST BAG
WARNING
Always
unplug
outlet before
power
performing
cord from
1. Unfold the
new dust bag.
electrical
maintenance
Bag
to the
vacuum cleaner.
seal tab on the
new dust bag
Fold the safety
TO REMOVE DUST BAG
1. Pule on the
dust bag cover
latch located
on the side of
the dust bag
Dust
opening that
fits
on from
the bag
away
the
support.
Dust Bag
Cover
fYbTa
_/t__.__a
////
See PARTS AND
Bag number.
Note:
/
_
_--_
FEATURES for
cover.
2. Push dust bag
collar opening
completely over
the dust bag holder
as far as it will go.
NOTE: This unit has a bag safety stop
which prevents cover from closing if bag
is missing or not properly installed. Do
not pull on the bag safety stop when
removlng/installing
the dust bag.
2. Grasp the
dust bag collar
and pull
gentlyr
carefully
removing the
dust bag from
the dust bog
holder.
Bag
Safety Stop
Bag
Dust Bag
3. Throw away
the used dust
bag. Do not
reuse dust bag.
4. Check the
dust bag holder
and the motor
safety filter for
dirt or clogs,
3. Tuck the bag into
the dust bag
chamber. Be sure
the bottom and
sides of the dust
bag are completely
within bag cavity
rior to closing the
ag cover.
Dust Bag
Dust Bag
4. Close the bag
cover. You will
hear a distinct snap
when cover is
securely closed.
Motor
Safety
Check to see that
the dust bag is fully
placed in the bag
chamber.
CAUTION
NEVER REUSE A DUST BAG. Very fine
materials, such as carpet freshener,
face powder, fine dust, plaster, soot,
etc. can clog the bag and cause it to
burst before it is full. Change bag
more often when vacuuming these
materials.
NOTE: If bag is not installed or not
installed properly the bag safety stop
prevents the cover from closing.
17
E
1
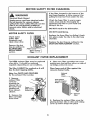
MOTOR SAFETY FILTER CLEANING
If the filter, located in the bottom of the
dust bag chamber, is dirty, remove it by
pulling forward out from under the ribs.
WARNING
Electrical Shock Hazard
Unplug power cord from electrical outlet.
Do not operate the vacuum cleaner
without the motor safety filler. Be sure the
filter is dry and properly installed to
prevent motor Failure and/or electrical
shock.
MOTOR
Wash the foam filter in warm soapy
water, rinse and dry thoroughly by
squeezing the filter in your hand and
letting it air dry.
DO NOT wash in the dishwasher.
DO NOT install damp.
SAFETY FILTER
Replace the foam filter by sliding it back
into place under the ribs in the dust bag
chamber.
Check motor
safety filter
frequently and
clean when dirty.
Remove the dust
bag as outlined in
the DUST BAG
REPLACEMENT
section.
Replace the dust bag as outlined in the
DUST BAG REPLACEMENT section.
Filter
Motor Safety
FilteJ
EXHAUST FILTER REPLACEMENT
The HEPA exhaust filter must be replaced
when dirty, it should be replaced
regularly depending on use conditions.
3. Place new filter cartridge into cover
making sure that airflow arrow on side of
cartridge points into cover.
The filter CANNOT be washed as it will
lose its dust trapping ability.
Place foam seal of filter against the
vacuum cleaner body.
Exhaust
Filter
Note: See PARTS AND FEATURES
for the exhaust filter number.
1. Remove
exhaust filter
cover by
pressing the
release tab on
the cover and
rotating out
from vacuum
cleaner.
Seat Against
Vacuum Cleaner
Body---,...
Filter Cover
Release Tab
Exhaust
Filter
2. Remove the
filter cartridge
from cover.
4. Replace the exhaust filter cover by
placing bottom tabs in slots and raising
cover up until it snaps into place
18
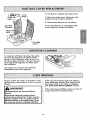
To reinstall or replace
Cover
dust bag cover.
1. Align dust bag cover hinge pin with
hinge pin hole in dust container.
Hinge Pin
Hole
2. Rotate dust bag cover into place.
3. You should hear a noticeable click
when hinge pin snaps into place.
Dust Bag
Hinge Pin
Hole
Dust Bag
Cover
To maintain efficient cleaning, the agitator must be kept free of carpet fiber,
string, or hair build-up. After every 7 to
10 uses, unplug and turn vacuum cleaner
over and check agitator for fiber and
hair build-up.
Use scissors to remove any build-up
entangled around the agitator_
Always follow all safety
performing
maintenance
cleaner.
........
,
,,,,,
If the vacuum cleaner does not seem to
have adequate suction, first check if the
dust bag is full or if a filter is clogged.
See DUST BAG REPLACEMENT section.
precautions when
to the vacuum
,,,,, ,,,,,, u.....
WARNING
If the dust bag and filter areas are free of
clogs, check the extension hose.
Electrical Shock Or Personal Injury
Hazard
Disconnect electrical supply before
performing maintenance to the vacuum
cleaner. Failure to do so could result in
electrical shock or personal injury from
the vacuum cleaner suddenly starting.
19
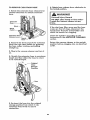
6. Rotate hose release lever clockwise
the locked position.
TO REMOVE CLOG FROM HOSE
to
1. Rotate the extension hose release lever
counter-clockwise to release extension
WARNING
hose.
Personal
Injury Hazard
DO NOT place hands or feet underneath the vacuum cleaner at any
time.
Extension
Hose
Wand
If the
areas
nozzle
check
Wand
Extension Hose
Release
Clean the agitator according to the
instructions in the AGITATOR CLEANING
section,
Nozzle
Hose
Return the vacuum cleaner to the upright
position before plugging into an electrical
outlet.
2. Remove the lower end of the extension
hose from the wand holder by grasping
the hose collar, twisting, and pulling
straight up.
3. Plug in the vacuum
dust bag, filter areas and the hose
are free of clogs, disconnect the
hose from the wand holder and
the nozzle for clogging.
cleaner
and turn it
on,
4. Stretch the extension hose to maximum
length and then allow the hose to return
to its natural length.
Hose
Storage
Position
t
1
t
t
I
I
I
I
5. Re-insert the hose into the original
storage position from which it was
removed, Press firmly to assure
connection.
2O
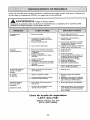
Review this table to find do-it-yourself solutions for minor performance problems. Any
service needed, other than maintenance
described in this Use & Care Guide, should be
_erformed by a Sears or other qualified service agent.
WARNING
Disconnect electrical supply before performing maintenance 1o the vacuum cleaner.
Failure to do so could result m electrical shock or personal injury.
Vacuum cleaner
wonWt
I, Unplugged at vail outlet.
run.
2. Tripped circuit breaker/blown
at household service panel,
3. Thermal protector tripped,
4. Defective wall outlet,
Poorjob of dirt
pick-up.
1. Plug in firmly, select the
desired setting on the touch
contmL
fus_ 2. Resetcircuit breaker or replace
fuse.
3o Allow vacuum cleaner to cool
40-50 minutes.
4o Check wffh a good appliance or
lamp. Have outlet properly
serviced.
1_ Ful! or clogged dust bag.
2. Wrong pile height setting.
3_
W'orn agitator.
4. Clogged nozzle or bag holder_
5.
6.
7.
8o
Clogged hose,
Hole in hose_
Hose not inserted fulty_
Motor protection system
activated°
9o Dirty filters.
Vacuum cleaner picks
up moveable rugs or
pushestoo hard.
Agitator does not
turn.
9. Clean or change motor
safety filter and exhaust filter.
Wrong pile height setting.
1. Handle in full upright position°
2. Agitator overload tripped_
3_ Thermal protector tripped.
Airflow restricted
with attachment use;
sound changes.
1, Change bag°
2° Adjust setting°
3o Replace agitator.
4. See CLOG REMOVAL
sectionof this Use & Care Guide.
5, Check for clogs_
6. Replace hose.
7. Insert base fully.
8. Check for clogs.
1_ Adjust setting_
1. Move handle from upright
position.
2. Reset agitator overload protector_
3. Allow vacuum cleaner to cool
40.50 minutes,
1. Attachment use restrictsair flow.
2. New carpet fuzz clogged air path
I. Check attachements for fuzz,
lint, pet hair or other debris.
2. Clean out hose. See CLOG
REMOVAL sectionof this Use &
Care Guide.
Vacuum Cleaner Help Line:
1-877-531-7321
8:00am-5:00pm
EST, M-F
(UoS.Ao and Canada)
21
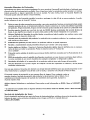
Master
Protection
Agreements
Congratulations
on making a smart purchase. Your new I(enmore_
product is designed
and manufactured
for years of dependable operation.
But like all products, it may
require preventive maintenance
or repair from time to time. That's when having a
Master Protection Agreement
can save you money and aggravation.
The Master Protection Agreement
what the Agreement*
includes:
[]
also helps extend the life of your new product. Here's
[]
Parts and labor needed to help keep products operating properly under normal
use, not just defects. Our coverage goes well beyond the product warranty.
No
deductibles, no functional failure excluded from coverage-real protection.
Expert service by a force of more than 10,000 authorized Sears service
technicians, which means someone you can trust wilt be working on your product.
Unlimited service calls and nationwide service, as often as you want us, whenever
[]
you want us.
"No-lemon"
guarantee - replacement
of your covered product if four or more
product failures occur within twelve months.
Product replacement if your covered product can't be fixed.
Annual Preventive Maintenance Check at your request - no extra charge.
[]
[]
i_
[_
[]
Fast help by phone - we call it Rapid Resolution - phone support from a Sears representative on all products. Think of us as a "talking Use & Care Guide."
Power surge protection against electrical damage due to power fluctuations.
$250 Food Loss Protection annually for any food spoilage that is the result of
mechanical failure of any covered refrigerator
or freezer.
Rental reimbursement if repair of your covered product takes longer than
promised.
10% discount off the regular price of any non-covered repair service and related
installed parts.
Once you purchase the Agreement, a simple phone call is all that it takes for you to
schedule servme. You can call anytime day or night, or schedule a service appointment
online.
The Master Protection Agreement is a risk free purchase. If you cancel for any reason
during the product warranty period, we will provide a full refund. Or, a prorated refund
anytime after the product warranty period expires. Purchase your Master Protection
Agreement
todayl
Some limitations and exclusions apply. For prices and additional
U.S.A. call 1-800-827-6655.
* Coverage in Canada
800-361..6665.
information
in the
varies on some items. For full details call Sears Canada
at 1-
Sears Installation Service
For ,Sears professional installation of home appliances, garage door openers, water
heaters, and other major home items, in the U.S.A. or Canada call 1-BO0-4-MY-HOME®.
22
Antesdeusarsuaspiradora
nueva...........
Usta de embalaje ........................
Linea de ayuda de aspiradoras .............
Garanlia de la aspiradora de l(enmore
Instrucciones importanles de
seguridad ................................
......
Piezas y caracterislicas de aspiradora
vertical .................................
Inslrucciones de ensamble
...............
Indlcador de CHECK BAG .................
Accesorios .............................
Cuadro de usa de los accesorios ...........
1
1
2
2
Sugerencias para aspirar .................
Caracteristicasde rendimiento ...........
3
Cuklado de la asplradora .................
Almacenamlento de la asptradora ..........
Limpieza del exterior y de losaccesoHos .....
4
5-6
Montaje del mango ......................
5
Montaje del accesorios ...................
Cord6n el6ctrico ........................
6
7
instrucciones de operaci6n .................
Cord6n el6ctrico ........................
8
8
Desprendimtentodel mango ...............
interruptor OFF/PISO/ALFROMBRA ..........
9
9
Ajuste y selecct6nde n|vet de pelo de la
alfrombra ..............................
!0
Sugerenciassebre el aiuste de nivelde pelo
de la aIffombra .........................
10
10
11
t2
12
t3-14
15
15
t5
Camblo de la balsa para polvo ............
Cambio fiitro de protecci6n al motor ........
Camblo filtro de escape ..................
Come reinstalar la cubierta de [a balsa .......
16
17
17
18
Limpieza del agitador ....................
CBmo ellmJnarlos residuos de basura
en los conductos........................
18
19
Reconocimiento de problemas .............
20
Acuerdos maestros de prolecci6n
Informaci6n de assistancla
21
o servicio
....................
..........
pagina posterior
Par favor lea esta guia que Je ayudara a assemblary operar su aspIradora nuevade Kenmore en unamanera m6s segu_
ray efectiva.
Para mas infermaci6nacerca del culdadoy operaci6n de esta aspirador, flame a sucentro de partesy serviciom6s cercano o Ifamea la llneade ayuda al cllenteque se encuentraen la primerapagina_Cuandopregunlepar informaci6n
usted necisitar6el n0merode serte completo y modelode la aspiradora que estanen la placa de losn_merosde modeb
y serie.
Use el espacio de abajo para registrar el nOmero de modelo y serle de su nueva asplradora de Kenmore,
N_mero de Modelo
N_mero de Serle
Fechade Compra
Marengoeste libra y su reclbo en un lugar seguropara referencias futuras_
l
LISTA DE EMBALAJE
Su ASPIRADOR
do.*
KENMORE
1
1
1
1
se empaca
con las siguientes piezas y componentes
Asptradora
Ceptllo para sacudtr
Herramienta para
hendiduras
Cepfflo para combinaci6n
1
t
I
I
1
par separa-
Pet Handi Mate TM
Tuba telescopico
Manual de usa y cuidado
Lista de partes
Cada uno de estos ensambles es mostrado detalladamente en la lista de piezas para
reparaci6n.
1
Linea de ayuda de aspiradora
1.877-531-7321
8:00am-5:OOpm
EST, M-F
(U.S.Ao andCanada)
Garantia limitada de un aria
Si esta aspiradora falla par un defecto en sus materiales o fabricaci6n en el per[ado de un aria
desde la fecha de compra, cuando se instala, maneja y mantiene sigufendo todas las
instrucciones incluidas con el producto, devu_lvala a cualquier tienda Sears, Sears Parts & Repair
Center (Centre de Reparaciones y Piezas Sears) u a otro distribuldor Kenmore para que reparen
el aparato de farina gratuita.
St esta aspiradora se utiliza para otros fines que no sea usa familiar
vdlida solamente durante 90 dlas desde la fecha de comprao
privado, esta garant|a es
Esta garantia cubre exclusivamenfe los defectos de maleriales y fabrlcaci6n. Sears NO pagar6:
t.
Los elementos desechables que puedan desgastarse con un usa normal, lncluyendo sin
cardcter excluyente, filtros, correas, l_mparas y balsas.
2. A un t_cnico dei servicio t6cnico para que ense_e al usuarto a instalar, manejar o mantener
correctamente el producto.
3. A un t_cntco del serviclo t6cnico para limpiar o mantener este producto.
4. Dafios o averla de este producto si no se ha instalado_ manejado
o mantenido siguiendo
todas las instrucciones incluidas con el producto.
50 Dafios o averia de este producto orJginados par accidente, abuso, usa incorrecto u usa del
producto para otros fines dJstintos de los indicados.
6o Dafios o averia de este producto causados par el use de detergentes_ Iimpiadores, productos
quimicos o utensJltos diferentes a Jos recomendados en todas las instrucclones que se inciuyen
con el producto.
7. Dafios o averia de las piezas o sistemas causados par modificaciones
no autorizadas que se
hayan
hecho
a este producto.
Limilaci6n de responsabilidad de las garantias implicitas; limitaci6n de remedios
El Onicoy exclusivo remedio del cliente bajo esta cjarantta limitada ser6 ia reparaci6n del
producto secjOn!o indicado en este documento. Lascjarantfas implfcitas, incluyendo las garantias
de comerciabitidad o idoneldad para un prop6sito especffico, se limitan a un aria o el periodo
m6s corto permitido per la ley. Sears no serd responsabte par dafios incidentales ni
consecuencialesoAIcjunosestados o provincias no permiten la exclusi6n o limitaci6n de dafios
incidentales o consecuenciales, ni Ifmitaciones en la duraci6n de tas cjarantias impllcitas de
comerciabilidad o tdoneidad, par Io que estas exctustoneso limitactones podr_an no aplicar en su
caso_
Esta 9arantia
aplica solamente
cuando esta aspiradora
se utiliza en Estados Unidos o Canadd°
Esta garantfa le otorga derechos legales especfficos, y usted podria tener otros derechos que
ration en funci6n de cada estado0
Sears, Roebuck and Co., Hoffman Estates, IL 60179
Sears Canada Inc., Toronto, Ontario, Canada M5B 2BB
2
Lea todas las instruccbnesren
, kADV
este manuai"an'i'e_"_de arrnar o usar su aspiradora.
NCmA
Suseguridades muyimportuntepara nosotros.
Parareduclrel riesgode incendio,choqueel_ctrico,lesi6ncorporal o dafiosal ulilizarsuasplradora,actOede acuerdoconlasprecauclones
b6sicasde seguridad, enfreeBas:
Mantenga el peio, ropas sueltas, dedos, y
todas las partes dei cuerpo lejos de
aberturas y partes en movimiento°
Use su aspiradora solamente coma se
describe en este manual. Use solamente
con los accesorios recomendados par
Sears.
Apague todos los controles antes de
desenchufar.
Desconecte la fuente de electricidad antes
de hacer et servicio o limpiar el 6rea del
cepillo. La faita de hacer esto puede
resultar en el sObito arranque del cepdlo.
Causando lesiones personales par partes
en movimiento.
Use cuidado extra cuando limpie
escaleras° No la ponga sabre sillas, mesas,
etc. Mant_ngala sabre el piso.
Para reducir el riesgo de choque el_ctrico
- No la use afuera o sabre superficres
mojadas.
No use ta aspiradora para levantar
i[quidos inflamables o combustibles
(gasolina, fluido de limpiar, perfumes, etc.),
o la use en 6reas donde puedan estar
presentes. Los vapores de estas
substancras pueden crear un peligro de
incendio o explos[6n.
No permita que se la use coma un juguete.
Ponga especial atenci6n cuando es usada
par o cerca de ni_os.
No levante nada que est_ ardiendo o
echando humo, tal coma cigarrillos,
f6sforos, o cenizas calientes.
No la use con un cord6n o clavrja
dafiados. Si la aspiradora no est6
trabajando coma debe, se la ha dejado
caer, da_ado, dejada afuera, o volteada
en el agua, ret6rnela a un Centro de
Servicio Sears.
No use la aspiradora sTn la botsa de polvo
y/o fiitros en su lugar.
No deje la aspiradora cuando est6
enchufadao Desenchufe del tomacorriente
cuando no est6 en usa y antes de hacer el
servicioo
Siempre cambie la botsa de polvo despu6s
de limpiar la alfombra, limpiadores o
refrescantes, polvos, y poivo fino. Estos
productos obstruyen los filtros, reducen la
circulaci6n del aire y pueden causar dafio
a la aspkadora. La falla en cambiar la
balsa de polvo puede causar dafio
permanente a la aspiradora.
No la jale o arrastre del cord6n, use el
cord6n coma una manija, cierre una
puerta sabre el cord6n, o tire del cord6n
alrededor de bordes afilados o esquinas.
No pase la aspiradora sabre el cord6n.
Mantenga el cord6n lejos de superficies
calientes.
No use la aspiradora para levantar
objetos duros afilados, peque_os juguetes,
alfileres, sujetapapeles, etc. Elias pueden
dafiar ]a aspiradora o la balsa de polva.
No desenchufe tirando det cord6no Para
desenchufar, tome la clavija, no el cord6n.
No tome la clavija o la aspiradora
manos mojadas.
No ponga ninggn objeto
con las
Desenchufe antes de conectar
Mate TM
en las aberturas.
el Pet Hand1
Usted es responsable de estar seguro de
que su aspiradora no es usada par
alguien incapaz de operarla
correctamente.
No la use con ninguna abertura
bloqueada; mant_ngala libre de poivo,
hitachas, pelo, y cualquier cosa que pueda
reducir la ckculaci6n
del aire.
GUARDE ESTASINSTRUCCIONES
El armada y usa seguro de su aspiradora son su responsabilidad. Esta aspiradora ha sido disefiada exclusivamente para usa dom_stico. Lea este Manual del prop_etario detenidamente, pues
contiene informaci6n importante sabre s.egur!dad y uso. Esta guia contiene informaci6n sabre
seguridad debajo de simbolos de adverhencla o culdado.
3
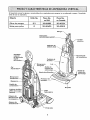
EsImportonte concerlas ptezasy carocteristleasde suaspffadora para asegurarsu usoadecuado y seguro, Examinelas
antes de usersu aspiradora.
Objecto
Estilo No.
Pieza No.
Pieza No.
en USA
en Canada
Filtro de escape
EF-1
20-86889
20-4032,4
Bolsa pare polvo
O
20-50690
20-50510
Mane
lnterruptor
OFFiFL OOR/CARPET-_--_
et_ctrico
Indicator de
CHECK BAG
Sujetador
superior
de liberaciOn
de hendiduras
r_pida
Cubierta
manguera
Pet
de
Bot6n de
reejuste de
sobrecarga
de
liberaci6n
def mango
alfrombra
Mango pare
Protector de
muebles
Cepillo de
combina
Boquitla
Cubierfo de filtro
(Filtro de escape
(dentro)
Tubo
Telesc6pico
Palanca de
liberacion de
ta manguera
N_mero de
Porta tubo
Porfavor ponga atenci6nespeciala loscuadros que le alertaran de posiblespeligros
Advertencla:Estelnformaci6n le alertar_ de petlgrode fuegotchoques electrtcost quemadasy
lesionesoCuidaclo: Esteinformaci6n le alertara de petigroscomo lesionesy dafiosde
proptedad.
,,r,rr_,_
' '
'
" ""'_
.................................
ADVERTENCIA
Peligro de lesi6n personal y dafio al producto
Antes de armar la asptradora, revise la LISTA
DE EMBALAJE. Use esta lista para verificar
que ha recibido todos los componentes de su
nueva asptradora Kenrnore.
No conecfe la aspiradora hasta que termine
de armada. De Io contrario podria causar un
choque el_ctrico o lesi6n corporal.
MONTAJE
DEL MANGO
CUnDADO
No apriele demasiado el tornilloo
Si Io aprleta demaslado podria arruinar los
orificios para el torniilo.
No opere la aspiradora sin tener instalado el
tornillo.
Mango
1_ Remover el tormitlo del mango que se
encuentra en la parte superior de la aspiraclora.
2. Coloque el mango como se ve en el dlaOrtficio para
grama.
tornitlo
3. Apriete
el tornillo con un destornilladoro
Quiz_ sea necesarioajustarun pocoel
I
MONTAJE
MANGUERA Y TUBO
1. tnsertar el perno del
tubo en las ranuras "J" del
Mango _.\
4, Rotar el
l!berador do la
manguera hacia
\.,
I
mango de ta manguera,
Devuelta a el tubo para
hasta que atore,
abajo y co!oque la
manguera como
de muestra.
Ranuras
2. Co!ocar el tubo
telesc6pl¢o en et porta
tubo y coloque la
manguera como se muesira,
manguera en la
boquilla de la
manguera on el
lado de la
¢_
telescopico__
Soporle
manl
Mango
para
Boquil/a de la
manguera.._._,
asplradora.
Porta
Liberador
de/a
3. Insertar el mango do la manguera en la soporte
para manguera Iocallzado on el mango de la
manguera.
6oRote el liberador de
la manguera hacia
ardba para asegurar la
manguera el sulugar.
NOTA:
AsegOresede
levantar la orItla
!
del mango do ta
manguera_
Desc6nselo sobre
CUIDADO
e! soporte para
la manguera,
la
pare
Manguera--_,.,
Tube
5. Insertar la
Tube
1
DEL ACCESORIOS
No
use
el
agiiador
sin.
el
tubo
telesc6plco
mser/ado apropladamente
denlro del porta fubo y la manguera
as egurada
apropladamente
en el
sujelador de la manguera.
Mango
pare
6
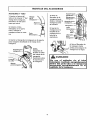
PET HANDI
MATE _M
CEPILLO DE COMBINACION
Para operar el Pet Hand_MateTMvea su
correspondtente Manual del Operador,
1. Cotoque el Pet Handt
Mate T_an al 6rea para
guardar
1. lnsarte el
cep!llo de
Pet
Handi Mate _"
Cepilto para
combinafi6n
el contenedor de
atr6s de la an
comblnaci6n
]
asptradora como
se muestra_
2. Rotar el Pet Handt
Mate _ hasta que este
quede fljo en su lucjar
HERRAMIENTA PARA HENDIDURA5
I. Inserte el
herramlenta para
hendlduras an el
contenedor de la
aspffadora como se
muestra.
CORDON
1. Aseg_rese de qua el sujetador superior del cord6n de liberaci6n r6plda se encuentre en postct6n
hada ardba,
2. Enrolle el cord6n electrTcoalrededor del gancho
de Ilberacl6n raplda det cord6n y la manUa para
transportar_
EL :CTRICO
Cord6n
Sujefador de
liberaci6n
rapida del
cord6n
3. Preslane la ranura del enchufe sobre el cord6n,
ADVERTENCIA
Choque el_ctrlco y Peligro de daEos personales
Enrotlar el corcl6n muy apretado
pone eslr_s
en el ¢ord6n y puede causar clue este de daEe,
Un cord6n daEado es un peligro de choque
el_ctrlco y puede causar €lafios personales.
Mango para
]
CUIDADO
iPartes en movimlentol Para teducir el r;esgo de da_os corporate;, no
toque e! ag;tador cuando la a_plradora est6 encendida. El tocar el
agffador mlentras que est6 glrando puede cortar, contus|onar o
causar arras leBiones. Siempre desconecle del tomacorr|ente antes de
dar mantenlmlento.
Tenga cu;dado al aspirar cerca de niEos.
I
CORDON
ELECTR|CO
4. Conecte e! cord6n el_ctdco poladzado en un
1. Glre el sujetador
del cord6n hacla
enchufe de 120 voltlos que re encuentre cerca del
plso.
abajo para Iiberar el
cord6n eiSctr;coo
ADVERTENCIA
Peligro de les;6n personal y dafie al producto
N I use los enchufes
ADVERTENCgA
bles.
dos.
Iocallzados
sabre los mue-
fos objelos cercanos podr_an resulfar daFm-
Pellgro de lesi6n personal y daEo al producto
v 3ara reduclr el rlesgo de choTue el_ctrlco, esta
aspiradota cuenta con una clavlja polarlzada
(uno de los conlactos es m6s ancho que et otto).
v La clavUa sSto suede introduc|rse de una panera en el enchufe. 51 ta ctavlja no cabe bten en
el enchufe, invi_rtala. 51 a_n no cabe, ilame a
un electr|cisla para que Instale un enchufe cotrecto. No allere la clavija de ninguna manera.
, , ,,, ,.,.................
5. Para guardar el cord6n, glre el sujetador del
cord6n hacla ardva y onredelo.
ADVERTENC|A
Cheque el_ctrico y Pellgro de dafios personales
Enrollar el cordGn muy apretado pone estr_s
en el cordGny puede causar que este se da_e.
Un cordGn dafiado es un peligro de cheque
el_ctrico y puede causar daFmspersonales.
2. Desprenda el enchufe del cord6n el_ctrtco y
quite et cord6n del suJetadorsuperior.
3. Est6seguro de que
et cord6n electrlco re
mantlern flJoen la
hend;dura de fijaclon
del gancho_
Hendidura
de
Cerd6n
ef_ctrico
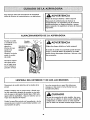
DESPRENDIMIENTO
DEL MANGO
Ubere el mango plsando el pedal de Itberaci6n y
tlrande del mango hacla abaje con ta manoo
Nora: El acjitador no glrar6 cuando la asp_radora
est6 en poslct6n vertical.
I
INTERRUPTER
Para arrancar la asplradora_desllce el interrupter
OFF/PISO/ALFOMBRA desde la poslct6nOFF a la
_esici6n PtSO o ALFOMBRA_
bbCUIDADO
Refi_rasea losrecomendaclonesde losFabrlcanlesde
su alfombra para _u limpleza0 A|gunasalfombrasm6s
delicadaspuedenrequer|rque seanaspiradas conel
agilador apagada, para prevenirdaEo a la affembra_
Para parar la aspiradora, deslJceel interrupter
OFF/PISO/ALFOMBRA a la posici6nOFF.
CUHDADO
Ne permffa que la asplradora esle en un sole
lugar durante nlngOn fiempo cuando el =gitador
est6 rotando. Se puede da_ar la alfombra.
OFF/PISO/ALFOMBRA
OFF (Apagado),
Apaga la suction y
el acjitader motorizado_
Ventana
del
FLOOR (Plso)hace andar el
motor de succi6n
solamente. En esta
posici6net mentaje
det cepi!lo ne da vueltas. Esta posicl6n debe set
usada para ilmplar plsosde madera dura y azulejos y
cuando se usan accesarios(herramlentas),
CARPET(Alfombra) -hace andar ambas motores, el
de succibny el del ceptfloo
Nora= Ei agitador no cjlmr6 cuando la asplradora
est6 en posict6n vertical.
AJUSTE Y SELECCION DE NIVEL DE PELO DE LA ALFOMBRA
Pare seleccionar un ajuste de nivel de pelo de la
alfombra:
Apague !a aspiradora, Setecclone un ntvel de ajuste
lnclinando la asplradora hacra atr6s haste que las
ruedas de,an|eras est_n un poco despegadas de_
plso.
Ajuste de
aifombra
Desltce la palanca de ajuste de nivel de pelo de la
alfombra ala poslct6n deseada.
CUIDADO
Hay cuatro (4) poslciones de ajuste de altura en ta
asplradora. Use la posici6n LOW pare la mayor_a
de alfombras y suelos lisos (con el agltador OFF), y
la podcl6n HiGH pare alfombras de fibras largas o
abundosast tapetes pequefiost etc. Uflltce io_ arras
ajustes coma sea necesado para las dlferentes
alturas do la alfombra.
[
INDICADOR
No deje permanecer la aspiradora en un sol0 lugar
durantening0nliemp0 cuandoel agffudorestE=
rolando.
5e puededafter la alfombra.
DE CHECK BAG
Cuando ]a untdad esta trabajando con un flujo de afre
normal, la luz en Indicador de CHECK SAG esta apa-
Indicador de
_
CHECKBAG_
_,
gada_ Encualquier momenta que flujo de aire es
restrlngido la luz se enclende. SI esto ocurre_revise la
Ioolsade| polvo, el filtro de seguddad al motor y otros
_
lugares con poslblesbtoqueosmostrados en COMa
ELIMINAR RESIDUOSDE BASURAEN LOS CONDUCTOS_
No|a: Esnormal que el indtcador de balsa Ilena se
active cuando se ufllizan clertosaccesortos debido ala
reducci6n de aire. No es necesarionlng0n
mantentmiento_
10
ACCESORIOS
i
CUIDADO
CUIDADO
Cuando use los accesorios, tenga cutdado de no
esflrar demasiada la manguera expansible para
tratar de atcanzar m6s lejos. S| trata de esfirar |a
manguera m6s de Io debldo_ podrfa causar que la
aspiradora se venga abajo.
NO USE la manguera cuando el mango de la
aspiradora este en posici6n horizontal de
limpieza en pizos.
Siempre regrese la aspiradora a la posici6n
vertical antes de usar la manguera V los
accesorios.
Esto puede causar que el protector termal
active.
CUIDADO
se
NO tire de la asplradora par la manguera en la
hab_laci6n. Podrfan ocurrir dafios a sus pertenenc|as.
PARA USAR ACCESORtO5
I. Colocar la asplradora en posici6nvertical
TUBO TELESC6PICO
2. Para remover ta manguera y et tuba de la
aspiradora. Jalando hacta arrlba et mango de la
boquilla de la manguera.
I. El tuba telescopio es
ajustable a| ramada y
no requiere ensamble,
\
\J'
A
,_
11==
mira
para ajustar
slmplemente tome el
mango de{ tuba y estire
hasta encontrar Ja
Boquilla de
la
Mango de
la manguera ._.
altura deseada
2_ Extenderel tuba al
tamafio deseado.
Mang
I
CEPILLO PARA COMBINACIC)N
Elcep111ocombinado se puede conectar
dlrectamente al tubo_
3, Use losaccesortosde acuerda a coma losnecesffe_
Ver ta tabia de usa DE ACCESOR|OS,
Use el sujetador del ceplllo sin el ceplllo para una
PARA UN ALCANCE ADICIONAL
mayor succT6nen muebles, cojlnes o escateros_
Gire hacla abajo
Use el suJetador del ceplllo con el ceplllo para
ltmp_ar superficies sueltas coma corflnas_
la palanca de
liberaci6n de la
manguera
expansible si
necesffa m6ximo
alcance.
Pa/anca de
tiberaci6n
manguera
11
CUADRO DE usa DE LOS ACCESORIOS
1
AREA A LIMPIAR
ACCESORIO
HERRAMIENTA PARAIHE
DIDURAS
v/
CEPILLO PARAN**
COMBINACIC)
_
,/"
PET HANDI
_
V"
MATE TM
Entre
cojines*
Mueble_*
Corilna_*
Escalones
./
Parede_
v/
./
./
./
vt"
V/= Apllcable
* Siemprelimplelosoccesoriosantesde usarsabre telaso
** Use el sujetador del ceptllo stn el cep;llo para una mayor succl6n en muebtes, cajines o escaleras. Use el
sujetador del cepfllo con el ceplllo para Ilmptar superficies sueltas coma cortinas,
Orillas de alfombras
Gu_eunode loscostadoso la parte anterior de la boqu;lie a io Fargodel horde de la pared.
J ADVERTENCIA
Pellgro de led6n personal
Escaleras
NO COLOQUE la aspiradora en la escalera. Sl se
cae, podrfa causer lest6n personal o daFJoa lu
prop_edad.
Ponga la mantja en ta posicS6nverflcaf completao El
agltador se deflene. Use la herramlenta para hen_
drdurasncepilto comblnacl6n o Pet Handi Mate_%
Para obtener
Volcando la Unldad
Cuando use los accesodos mantenga
tos mejores
resultados de llmpteza,
mantenga desbloqueados
los conductos de fluJo de
aire. Desconecte la asplradora
del enchufe antes
la palanca de
de examlnaria.
sottar la manguera expansible en la postci6n cerrada cuando sea posible, Estoayuda a mantener la
aspffadora sin caerse cuando se esttra la
manguerao Sl se necesita manguera adlclona!
entonces abra ta palanca de soltar y saque
manguera adlclonaL Use precaud6n pare no voltear la asplradorao
12
Protector de motor
SISTEMA DE PROTECTION
DE MOTOR
Protector
Termal
Esta asplradora contlene una v61vula de alre ctue
sffve como protector de motor y cuando un btoqueo
|mplda que clrcule el alre at motor se abre
automdttcamente para proveer un flu]o de alre
fresco al motor. As!
- Succi6n dei Motor
Esta osptradora ttene un protector termal que se
aJustoautom6tlcamente para protecjer a io
asplradora det sobrecalentamlento. St una
obstruccl6n Imp|de el flu]o normal de alre al motor,
el protector termal apaga el motor
autom6tlcamente para porto|fir que el motor se
enfr|e a fin de evttor poslbles dories a ta asplradora.
Protector Termal-
esta v61vulaImplde et
sobre calentamlento
del roofer y como
consecuencla que esta
se do_e. Usted podr_
notar un sonido
dlferente al norman
cuando esta v61vula
Motor det agitador
Esta asptradora esta equtpada con protector de
sobre calentamlento en el motor c/el agltador que se
actlvan automcfflcamente para la protecct6n del
motor. Este protector desconectan de todo corriente
el_ctrlca al motor autom6ticamente cuondo extste
de motor
se actlva y el atre
posa por ella.
Para corregir el problema, consulte el cuadro RECONOCIMIENTO DE
PROBLEMAS_
un sobrecalontamlento. Esto pc|mite que el motor se
enfrren y que no se vayan a fundlr o sufrlr un
desperfecto°
Nola: La v61vula de desvIaci6n puede estar abierta
mlentras se uson los accesorlos o para ltmplar una
alfombra nuevo o causa de un flujo reductdo de
CUIDADO
$1empre regrese la aspiradora a la posici6n
vertical antes de usar la manguera y los
accesorios. La folio de este es el resultado
del sobre calentamiento
Protector
alre pot los accesorlos mtsmos o por la pelusa de la
alfombra que Ilene la bolsa raptdomente. Consulte
el cuadro RECONOCIMIENTO DE PROBLEMA5_
dei motor dei
Nora: No obstruya el protector de motor_
agitactor. Esto puede causar que el protector
termal se active.
Para correglr e! problema: Si esto ocurre, opague ia
asplradora y clesenchufe el cord6n del
tomacorriente paro permltir que la aspiradora se
enfri'e y que el protector to|mat se reaJuste_ Busque
y saque los obstrucclones o camble la bo|sa, sl es
necesario, Examine tambi6n y reemplace cualquier
filtro obstruldo. Espere aproxlmadamente 40..50
minutos y enchufe la aspiradora y pr_ndala para
vet si el protector del motor so ha reajustado.
13
Para corregir el problema: Apagu6 y desconect6 Ha
aGpiradoro, llrnpie la obstrucci6n,y despu6_
pres|one el bot6n del protector de sobrecarga.
ADVERTENCIA
Peligro de choque el_ctrico o lesi6n corporal
Para reajustar: Empuje el bot6n de protecci6n de
sobrecarga del agttadoro
Desconecle ta unldad antes de limpiarla o darle
servlclo. De to contrar|o podrJa producirse un
cheque ei6ctrico o causar |esi6n corporal st ia
aspiradora orranca de manera Imprevlsta.
$1 el probiema persiste, busque un t6cnico
calificado qua haga el servlcio de la
aspJradora,
PROTECTOR DE SOBRE..
CARGA DEL AGITADOR
El motor del
agttador
tlene una
protecci6n
Incorporada
¢ontra
Botbn para reajustar
el protector se
sobrecarga det
daao del motor an
caso de qua el
agttador
se
bloquee.
Sl el
acjffador
se pone
agttador
lento o se detlene_ e! protector de sobrecarga del
agltador apacja el motor del agltador. El motor de
succi6n contlnuar6 funclonando.
14
Sigaslempre
todas las tnstrucclonesde seguridad
antes de efectuar el mantenlmtento a su aspiradora.
ADVERTENCnA
Peligro de cheque el_cfrico o lesi6n corporal
Desconecle 14 unldad antes de efecluar el
mantenimienfo a su aspiradora. De Io contrar;o
podda produclrse un choque el6ctrico o causer
les;6n corporal slla asplrador= arranca de manera
Imprev[sta.
ALMACENAMIENTO
Recoja el cord6n
y enrr611eloen los
suJetadores
superior e
lnferlor_sin qua
quede muy
apretado.
Asegure la ciaviJa
sabre el cord6n
DE LA ASPIRADORA
Cord6n
I
ADVERTENCIA
Peltgro de choque eI_ctr]co o lesi6n corporal
liberacl6n
rapida del
cord6n
St enrolla el cord6n muy apretada puede tensarlo
mucha y causarle daEos. De daEarse, el cord6n
causar descarglas el4cfflcas y les[onesa danos personales.
de poder_
Guarde la asptradora baJo techa
en un lugar seco,
con et mango en
podct6n vertical
[
LIMPIEZA DEL EXTERIOR Y DE LOS ACCESORIOS
Desconecte et cord6n el6ctrico de la clavlja de la
1
Lave los accesortos en acjua tibia ]abonosa,
enjuague y deJe secar al atre. No los lave en
tavadora de plalos.
pared.
Umple el exterior con un trapo suave y IImplo, qua
ha ddo expdmldo despu_s de remoJar en una soluc;6n de agua y detergente ffquldo flcjerooNO rocfe
ague sabre la aspiradora. Seque el exterior con un
trapo seco despu6sde Itmplar.
CUIDADO
No use los accesorios sl estan mojdos. Losaccesorios qua se ufiffcen en 6reas =ucias, debajo de!
refrigerador, no deben usarse en altos superficies sin antes set lavados. Podrfan dejar marcas.
Limpte la superflcte exterior del recept6culo y de los
accesodos para reductr la electrictdad est6tlca y la
acumulact6n de polvo_
t5
CAMBIO
............................
,,
,LJ,,_,',L',J
:.
PARA CAMBiAR
JA'DVERTE
para polvo nueva,
Doble la lengUeta de
segurldadde ;a nueva
balsa para polvo en
dtrecci6ncontraria a
la abertura que va en
el sujetador de la
bolsa,
LA BALSA PARA
$eguro d_
la
LA BALSA
1. Desdoble la balsa
! Siempredesconecteel cord6n _lectrico antes de reparar
PARA CAMBIAR
POLVO
}
DE LA BALSA PARA POLVO
1. Jale de! seguro
de la cubterta
locallzado en el
_costado de la
Bolsa para
p olvo
Leng_Jefa de
seguridad
NOTA: Consultelas Pli:ZAS Y CARACTERJSTICASpara
determtnar el N°. de la balsa para polvo.
2, inserte la balsa para
polvo completamente
sabre el soporte de la
balsa sujetando la balsa
NOTA; Esta unldad tlene un df;po6itivo de segurldad
que se actlva no permitlendo cerrar la tapa de la
unidad si"esta no tlene la balsa o esta instatada de
manera lncorrec!a_ No jale del mecanismo de
par el collar,
segurldad de la bol;a cuando remueva o instale una
balsa para polvo nueva.
2. Tome e! coltar de
Mecanismo _ /-'_
de seguridad "_
de la bolsa _
la balsa para polvo y
tire con cuidado
para retffar la balsa
para polvo.
Collar de !
la bolsa "_
3. Tire la balsa usada
a la basura, NO
vuelva a usar ia
botsa,
polvo° Aseg0resede que
la parte inferior de la
balsa para polvo est_
comptetamente dentro de
la cavidad para la balsa
antes de cerrar la
cubterta de la balsa.
_
_"a_l
para
polvo
Balsa
_'_
4, Cterre ia cub|erta de
la balsa. AI escucharun
Suporte de
la bolsa
Cavidad
la bolsa
3, Coloque la balsa en la
c6mara de la balsa de
chasqu|do caracterisfico
ser6 indlcaci6n de que la
cul01ertaha cerrado bten,
4. Revise el soporte
de la balsa y el flltro
de segurldad al
_ motor.
de
--
Filtro de
seguridad
del
Aseg0rese
de que lu
balsa para
polvo est6
instalada par complete
en la cavidad de la
balsa.
ACUIDADO
NUNCA
REUTILICE
maleriales
mw
alfombras,
talco
NOTA: St la balsa para polvo no esta tnstalada o no
esta Instaiada correctamente el mecanlsmo de
UNA BOLSA PARA POLVO_ Los
fines, tales come desodorantes
facial,
pelusa de atfombras
polvo
fino,
yeso,
para
segurldad de !a balsa Impedff6 que la cublerta
clerre,
holEn_
nuevas, etc_, pueden atascar la
balsa y causar que se rompa antes de que est_ [lenao
Cambie la balsa m6s seguido cuando aspire este tlpo
de materiales_
.......
,11
I 'III"III_I'!',I,I_'L
............
16
I
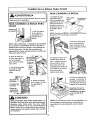
FILTRO DE PROTECCION
AL MOTOR
ADVERTENCnA
Lave el flltro con ague
caflente y ]ab6n,
enju6guelo y s_quelo
bten apret6ndolo con
la mane y de]ando
que se seque al atre
Ilbre.
Peligro de cheque el_ctrlco
Desenchufe el cable de poder del
tomacorriente. No apere la aspiradora sin el
fillro primarlo o el filtro de escape. Est_
seguro que el fiitros esl_ inslalado
propiamente para prevenir folio del motor
via cheque el_ctrlca.
Cubierta
filtro de protecion
al motor
Filtro
de protreccion
NO ]o lave en |a lavadora de plato_.
NO te Instale hOmedo,
FILTRO DE PROTECCION
Vuelva a colocar el flltra desliz6ndolo de nuevo en
Revise el fittro de proteccl6n al motor frecuentemente y ffmptelo cuando este suctooSf el flltra esta
suclo, xaque exte Jalando hada afuera.
xu lugar debajo de lax estr[as en la cavidad parala
bolxa_
Vuelva a colocar la balsa de potvo y la cublerta de
polva.
I
FILTRO DE ESCAPE
El ftltro del escape HEPA se debe reemplazar cuando este xuclo_ Se debe reemplazar recjularmente
dependtendo de lax condlclones usa,
,i
3. Ponga el nuevo fittro adentro de la cublerta
estando xeguro de que la flecha de flujo de alre al
coxtado de! flltro apunta hada la cubierla,
Cubierta
det
El filtro no se puede laver puesperdertc_sucapacidad
para atrapar polvo,
El sel/o va centre
et cuerpo de la
aspiradora
Nolo: Ver PARTESY CARACTERJSTICAS para el
nOmero del fiitro de escape,
1, Presionehacia
abajo el seguro de la
cublerta del ffltro de
escape y ffrela hacla
afuera para remover Presione
seguro de
de la ospiradora,
la cub|erie
de/fiitro
2. Remueva el filtro
Filtro de
escape
E! sello gris del fiilra €lebeset puesto centre et
cuerpo de la asplradera.
de escape.
4. Reemplace
la cubterta dei ffltro de escape
poniendo los lencjUetas en los hendlduras y
empuiando haste que la cubierta este en su lugar.
17
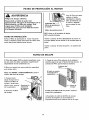
COMO
REINSTALAR LA CUBIERTA DE LA BOLSA
]
Para relnstalar o remplazar la cubterta de la bolsa
de polvo.
Perno de
Agujero de
bisagra
I. Allnee el perno de blsagra de la cubterta de la
bolsa con el aguJero en la cavldad de la ioolsa,
Cavidad
de la
bolsa
2_ Glre ta cubterta de la bolsa a su lugar_
3. Usted debe escuchar un chasquldo cuando el
perno de blsagra se encaJa a pres16n en su lugar.
Agujero de
bisagra
Cubierta
de ta
bolsa
f
LIMPIEZA
DEL AGITADOR
Para un aspiradoeficiente,el agitador deber ser mantenido IIbre de fibras de alfombra, hiIos,o acumulaci6n
de pelo. Luegode 7 a 10 usos,desenchufey d_ vuelta a
la asplradoray reviseel ogitador para ver si tiene acumulaci6nde hilos_
fibras o pelo.
Usetljeraspara sacar cualquleracumulaci6nalorada
alrededor del agitador_
18
I
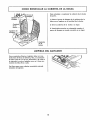
Precede
slempre
conprecauctones
deseguridad
antes de efectuar el mantentmlento
4. Esflre al m6xlmo la mancjuera y luego permtta
que se encoja haste su tamafio normal de almacenam|entoo
a su asplrado-
ra,
Posici6n
original
dep6sito
manguera
ADVERTENCIA
Peligrode cheque e!_clrlcoo ]ed6n corporal
Desc0necfeta unidadantes de efecluar el manlenimlen*
to a su aspiradora.De lo contrarlopodr[a produclrseun
choclueel6ctricoo causerlesi6ncorporalsl la asplradora
arranc_ de manera imprevisfao
SIta asptradora no parece tenor suftc_ente succl6n,
revise st la balsa del polvo est6 Ilena o d el flffro
est6 tapadoo Vet CAMBIO DE LA BALSA PARA
POLVO y FILTRO DE PROTECCt6N AL MOTOR.
Manguera
SIla balsa de! polvo y 6reas dol flltro est6n IIbres
de trabas, revlce la mancjuera expansible.
PARA REMOVER LA OBSTRUCCK3N DE LA
MANGUERA
5. Reinserte la manguera adentro de la abertura en
el cuerpo de la cual rue sacada.
1. Gffe la palanca de saltar la manguera expandhie an direction de los agujas del reio] pare soltar
la mancjuera expanstble_
ADVERTENCIA
Peligrede lesi6npersonal
NO coloquenuncalos manesni los pies debajo de la
unidad_
Manguera
expansible
6. Apriete ftrmemente pare asegurar la conext6n.
Slla balsa det poivo y 6roas del flltra est6n tibres
de trabas, desconecte la boqutlla de ia manguera
det porto-tuba y revise _a boqullla par abst6cuios.
Gire la palanca de liberacr6nde ia manguera hacia la
dorecha a [a posici6ncerradao
Tuba
Porta-tubo
Palanca escape
manguera extensi6n
Umpte et acjitador de acuerdo a los Instruciones en
la secct6n LIMPIEZA DEL AGITADOR.
Manguera
Retome la asplradora ala posic|6n vertical antes de
enchufarla en un tomacodente_
2. Remueva et extreme inferior de la mancjuora
expanslbIe del porta-tubo tomando del cuello de Ja
mancjuera, gffando, y tlrando derecho hacla ardba.
3_ Enchufe la aspiradora y encl_ndala.
19
Revise este recuadro
para
encontrar
servicio debe ser reaiizado
_, ..........................
,,
,,,,,,,,,
soluciones a problemas
par SEARS u otro agente
,,
,,,,,,_,,,_,
,,_j, ,,_
que puede correglr
usted mlsmo. Cualquier
de servlc|o calificado.
...................
L,,,_L,,,L,,,,,,,,,,,J,,,,,,,
....
|a aspiradora
antes de
ADVERTENCUA
Desconecte
produclrse un choque
La aspiradora no
en=iende
No aspffa
satlsfoctofiamenle.
elicit|co
I.
efectuar
manfen|miento
Pellgro deel cheque
el&ctrlco a su aspiridora.
o cau_ur |esi6n corporal.
Est6 desconectada
2, Cortacffcuhos botado o fusible
quemado en el tab|era de serv|clo
de la resldenoia,
3. Protector lerma| acflvado.
2o Restabfezca el cortacircuttos o
eatable el fusible.
4,
4.
Toma*corrtente defectuosoo
3_
Desconecte la aspiradora y permita
que se enfri6, el protector t6rmtco
se acflvara par s| solo.
Pru_belo con otto aparato o |6mpara,
Hbga|o reparar apropiadamenteo
I. Cambie la balsa.
2_ Ajuste el niveL
I. Balsa para polvo Ilena o atascada,
2o Ajuste Incorrecto de nive! de pelo de
la alfombrao
3. Agitador desgastado
4_ Boqullla, o sujetador de ¿a balsa,
atascacla,
3. Cambte el agitador.
4. Ver la secc16n de coma ellmtnar los
restduos de basura en los conductos
5_
6.
7.
B.
5_
6.
7.
8,
1. Ajuste incorrecto de nlvel de pelo
de la alfombra,
El agltador
nofunclena.
Mango en poslct6n vertical.
Sobrecarga del agilador acflvado.
3. Protector t_rmtco acflvado.
Resfflc¢i6n de| flu,io
con el use de los
De Io contrar_o podr_a
1° Conecte bten, seleccione la
functon deseada en el control manual
Manguera atascada_
Manguera rotao
La manguera no est6 bien tnsertada.
Acflvaci6n del sistema de protecti6n
del motor.
9o Rttros de seguridado
La asplractora levanta
lapeles o es dificil
empujar,
otro
I,
El usa de los accesorlos limlta el
flujo de alre.
9_
en manual de Use y Cutdado.
Revise la mangura
par reslduoso
Cambte la mar_guerao
|nserte bien la manguera,
Determine si extsten bloqueos,
Cambte el filtro de protecci6n a!
motor y el flltro del escape,
1. Ajuste el nivelo
1_ Mueva el mango de la posTel6n
vertical
2. Rea.iustela sobrecarga del ag|taclor_
3, Desconecte la aspiradora y permffa
que se enfrt6 par A0_O mfnutoso
I,
Revise use
DE LOS ACCESORIOS
accesof'iol_,
Cambto de sonldo,
2, La pelusa de una alfombra nueva
obstruye el paso de affe.
2_
Limple la manguera. Ver la seccl6n de
coma eltminar los residues de basura
en los conductos en este manuel de
Usa y Cutdado.
Linea de ayuda de aspiradora
1-877-531-7321
8=00am-5:00pm
EST, M-F
(UoS.A. and Canada)
2O
Acuerdos Maestros de Protecci6n
Enhorobuena par hacer una compro fntellgente. Su nuevo praducto Kenmore® est6 dlsefiado y fabrlcado para
ofrecerle arias de funclonamlenta confiable_ Pete al icjua! que todos los productos pueden preclsar un mantenlmlento preventlvo o alguna reparacl6n de vez en cuando. Par este motlvo, tenet un Acuerdo Maestro de
Proteccl6n puede ahorrade dtnero e Inconvententes.
El Acuerdo Maestro de Protecct6n tambl_n le ayuda a prolonger la vide 0tll de su nuevo producto_ A cant|nuacl6n Indlcamos Io que el Acuerclo* Incluye:
[_
Partes y mane de obra necesarlos para ayudar a que estas productos funclone correctamente bajo candiclonales normalei de usa, no stmplemente defectos. Nuestra cobertura va touche m6s all6 de la garanffa
del producto. Nlncj0n deducible, nlnguna aver[a functonal queda exclutcla de Io cobertura- pmtecct6n real
5ervlclo experlo ofrecldo par una ffsta de m6s de 10.000 t_cnlcos aulorlzadas del servlclo t_cnTco de
5ears, Io que slgnIflca que alguten en qulen usted puede conflar ester6 traba]ando en su producto.
N_mero ilimltado de Ilamadal ai servlc|o t_cntco y servlcio en toda la naci6n, tan continua coma usted
has io sollclte, sin Importar deride est6_
Garanlfa serla de suslltuct6n det praducto. La sustltucl6n de su pmducto cublerto sl se producen cuatro o
m6s averias en dace meses_
_l
5ustffuci6n del preducto par otto nuevo st su producto cublerto no puede repararse.
IZl
Rev|si6n y mantenlmlento anual preventive slempre que 1odesee y sin cargo alcjuno.
_]
Ayuda r6pida par tel6fono - Nosotros Io Hamamos Resoluci6n r6plda. Soporte telef6nlco de un representante de Sears en todos los productos. Ptenseen nosotros coma un "manual de
usa y culdado"_
Prolecc|6n €onffa subldas de tensi6n que provoquen dafios el_ctrlcas causados par 1asfluctuaciones de la
corrlente.
[_
$250 de protecci6n centre la p_rdlcla de atlmentos anualmente en case de que se estropee alcjOnallmento coma resuffado de una averfa mec6nlca de cualquter concjelador o refrtgerador cublerto_
[]
Reembolso del alquiler st la reparacl6n
[]
10% de descuente en el precto regular de cualqu[er servlcio de reparacI6n no cub_erto y de las plezas
lnstalaclas relactonados.
de su producto cublerto lama m6s tlempo €lel promettdo.
Una vez que compre et Acuerdo, s61obastar6 una simple tlamada telef6nlca para que pueda programar un servlclo. Puede Ilamar a cualquter hera del dra o de la noche, o concertar una clta de servlcio en i[nea.
El Acuerdo maestro de proteccl6n es una compra ltbre de rlesgos. S1par cualquler raz6n se
cancela durante el per[ode de garanffa del praducto, le devolveremos todo el dlnero. O, un
reembolso prorrateado despu_s del pervade de venclmlento de la garanfia, tCompre su
Acuerdo maestro hoyl
Aplican alguna5 limltac|ones y exclu6iones. Para prec|os y m6s informaci6n en EE_UU., Ilame al 1.800.8276655_
* La coberlura en Caned6 varfa en algunos arffculos. Pare obtener lodes los detaites, flame a Sears Canada
al 1.800-361-6665.
Servicio de instalaci6n
de Sears
Pare la lnstalac|6n profes|onal par parte de Sears de electrodom_stlcos_ abrldores de puertas de cjarajes, calentadores de agua y otros arffcu!as pHnclpales pare el hogar, en EE.UU. o Caned6 llame al
1-800-4-MY-HOME®.
21
!::i::'i::i_!_;:;
::Z?:;?;_
:
For troubleshooting,
Your Home
product manuals and home solutions advice:
manage
A, 4 ::b
:,
home
www,managemyhome.com
_
i!_:ii_,i_i:i!:i;:iFor repair - in your home - of all major brand appliances,
_ii!::ii!'i!i!
lawn and garden equipment, or heating and cooling systems,
no matter who made it, no matter who sold it!
::i
_:i::::i
i Y;::I::L;,
ii
For the replacement
parts, accessories
and
owner's
manuals
that you need to do-it-yourselL
:iii::i_
?!
.......
For Sears professional installation of home appliances
and items like garage door openers
1-800-4-MY-HOME ®
4 _:::/}:::i
(1-800-469.4663)
wwwosears.com
and water heaters°
ca,anytime,
day ornight
(U.S.A, and Canada)
wv_v.sears.ca
ii::::::::;i!
::::11:1
:._:;_
:i:::i':!i
::ii
Our Home
;i__'ii?ii:!i
::>iiii:!i_ii
For repair of carry-in items like vacuums, lawn equipment,
,_:::;:::_
and electronics,
:::::_!;:,:ii
:;?::!;1i
call anytime
for the location
Sears Parts & Repair
!iii_,:;;!il;_!,i!
1-800-488-1222
(U,S.A,.)
www.sears.com
Service
of the nearest
Center
1-800-469-4663
(Canada)
www.sears .ca
: : :::,_:_
: ::::!! :: i
To purchase a protection agreement
1-800-827-6655
_,_i_,i
_!'!_II_
(USA,)
Para pedir servicio de reparaciSn
a domicilio, y para ordenar piezas:
1.888.SU-HOGAR®
on a product serviced by Sears:
1,.800-361-6665
(Canada)
Au Canada pour service en frangais:
1-800-LE-FOYER _c
(t4388-784-6427)
,:z:
:_:::i:
i_
(14300-533-.6937)
www.sears.ca
:; :d :>,
® Registered Trademark / TM Trademark of KCD IP, LLC in the United States. or Sears Brands, LLC in other countries
® Marca Registrada ! -n_Marca de F_brica de KCD IP, LLC en Estados Unidos, e Sears Brands, LLC in otros paises
_c Marque de commerce 1 _ Marque d_posde de Sears Brands, LLC
'