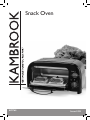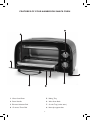
1
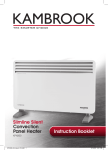
KAMBROOK 12 MONTH REPLACEMENT WARRANTY Kambrook warrants the purchaser against defects in workmanship and material for a period of 12 months from the date of purchase (3 months commercial use). Guarantee and purchase receipt for this product are to be retained as proof of purchase and must be presented if making a claim under the Kambrook guarantee. Kambrook reserves the right to replace or repair the appliance within the warranty period. If the product includes one or a number of accessories only the defective accessory or product will be replaced. In the event of Kambrook choosing to replace the appliance, the guarantee will expire at the original date, i.e. 12 months from the original date of purchase. In Australia, this KAMBROOK Guarantee is additional to the conditions and guarantees which are mandatory as implied by the Trade Practises Act 1974 and State and Territory legislation. Warranty does not apply to any defect, deterioration, loss, injury or damage occasioned by, or as a result of the misuse or abuse, negligent handling or if the product has not been used in accordance with the instructions. The guarantee excludes breakages and consumable items such as kneading blades. For service, spare parts or product information in Australia, please call KAMBROOK on the Customer Service Line; 1300 139 798. This warranty is void if there is evidence of the product being tampered with by unauthorised persons. If claiming this guarantee the product must be returned freight prepaid. For service, spare parts or product information in New Zealand, please call KAMBROOK New Zealand; 0800 273 845. For spare parts phone 0800 273 845. KAMBROOK 12 MONTH REPLACEMENT WARRANTY YOUR PURCHASE RECORD (Please complete) Attach a copy of the purchase receipt here. DATE OF PURCHASE MODEL NUMBER SERIAL NUMBER PURCHASED FROM (Please don’t return purchase record until you are making a claim) Register your warranty at www.kambrook.com.au/service.asp Kambrook - Australia Building 2, Port Air Industrial Estate 1A Hale Street, Botany NSW 2019, Australia Customer Service Line 1300 139 798 Customer Service Fax 1800 621 337 Kambrook - New Zealand Private Bag 94411, Greenmount, Auckland, New Zealand Customer Service Line/Spare Parts 09 271 3980 Customer Service Fax 0800 288 513 Due to continual improvement in design or otherwise, the product you purchase may differ slightly from the illustration in this book. Issue 1/09 Snack Oven KOT65 Issue 1/09 FEATURES OF YOUR KAMBROOK SNACK OVEN 1. Glass Oven Door 5. Baking Tray 2. Door Handle 6. Wire Oven Rack 3. Element Selection Dial 7. Crumb Tray (under oven) 4. 15 minute Timer Dial 8. Non-slip support feet Kambrook Safety Welcome to Kambrook and your new Snack Oven. At Kambrook, we believe that the safe performance is the first priority in any consumer product so that you, our valued customer, can confidently use and trust our appliances. We ask that any electrical appliance that you use be operated in a sensible fashion with due care and attention placed on the following important operating instructions. IMPORTANT SAFEGUARDS FOR YOUR KAMBROOK SNACK OVEN • Carefully read all instructions before operating the appliance and save for future reference. • Always wear protective, insulated oven mitts when inserting, removing or handling items from the snack oven when hot. • Remove and safely discard any packaging material and promotional labels before using the appliance for the first time. • Always use extreme caution when the appliance contains hot food and liquids. Do not move the appliance during cooking. • To eliminate a choking hazard for young children, remove and safely discard the protective cover fitted to the power plug of this appliance. • Always use extreme caution when removing any of the accessories, hot food and disposing of hot grease. Allow the snack oven to cool before handling. • Do not place the appliance near the edge of a bench or table during operation. Ensure the surface is level, clean and free of water and other substances. • Do not place hands inside the snack oven during operation. • Do not use the snack oven on a sink drain board. • The glass of the oven door has been specially treated to make it stronger, more durable and safer than ordinary glass, however, it is not unbreakable. If struck extremely hard, it may break or weaken, and could at a later time shatter into many small pieces without apparent cause. • Do not leave the glass oven door standing open for extended periods of time. • Do not place this appliance on or near a hot gas or electric burner, or where it could touch a heated oven. • Position the snack oven at a minimum distance of 20cm away from walls and provide adequate space above and all sides for air circulation. • Do not insert over-sized foods into the snack oven as they create risk of fire or electric shock. • Always operate the snack oven on a stable and heat resistant surface. Do not use on a cloth-covered surface, near curtains or other flammable materials. • The snack oven is designed for reheating, toasting/cooking or grilling small portions of suitable foods as described in this booklet. Frozen foods such as frozen pies and frozen pizzas should not be placed into the appliance. • Do not place cardboard, plastic, paper or other flammable materials into the snack oven. • Do not cover the crumb tray or any other part of the snack oven with metal foil. This will cause overheating of the oven. • It is recommended to use only the accessories supplied with the snack oven. Using other accessories may cause hazard or injury. Do not store any materials other than the supplied accessories in the snack oven when not in use. • Always ensure the crumb tray is thoroughly dried after cleaning and is re-inserted into position before operating the snack oven. • Do not clean the interior of the snack oven with metal scouring pads as pieces can break off the pad and touch electrical parts creating risk of electric shock. • The temperature of accessible surfaces will be high when the appliance is operating and for some time after use. • Do not attempt to operate the snack oven by any method other than those described in this book. • The snack oven should not be left unattended at any time when in use. • Always ensure the snack oven has cooled, the element selection dial and the timer dial are in the off position, the power cord is switched off at the power outlet and is unplugged, if appliance is not in use, before cleaning, before attempting to move the appliance, disassembling, assembling and when storing the appliance. • Always ensure the snack oven is properly assembled before use. Follow the instructions provided in this book. • The appliance is not intended to be operated by means of an external timer or separate remote control system. • Do not place anything on top of the snack oven when in use and when stored. • Keep the appliance clean. Follow the cleaning instructions provided in this book. IMPORTANT SAFEGUARDS FOR ALL ELECTRICAL APPLIANCES • Unwind the power cord fully before use. • Any maintenance other than cleaning should be performed at an authorised Kambrook Service Centre. • Do not let the power cord hand over the edge of a bench or table, touch hot surfaces or become knotted. • The installation of a residual current device (safety switch) is recommended to provide additional safety protection when using electrical appliances. It is advisable that a safety switch with a rated residual operating current not exceeding 30mA be installed in the electrical circuit supplying the appliance. See your electrician for professional advice. • To protect against electric shock do not immerse the power cord, power plug or appliance in water or any other liquid. • The appliance is not intended for use by persons (including children) with reduced physical, sensory or mental capabilities, or lack of experience and knowledge, unless they have been given supervision or instruction concerning use of the appliance by a person responsible for their safety. CAUTION: HOT SURFACES DURING AND AFTER USE. • Children should be supervised to ensure that they do not play with the appliance. • This appliance is for household use only. Do not use this appliance for anything other than its intended use. Do not use in moving vehicles or boats. Do not use outdoors. Misuse may cause injury. • It is recommended to regularly inspect the appliance. Do not use the appliance if power cord, power plug or appliance becomes damaged in any way. Return the entire appliance to the nearest authorised Kambrook Service Centre for examination and/or repair. OPERATING YOUR KAMBROOK SNACK OVEN BEFORE FIRST USE Remove and safely discard any packaging material and promotional labels before using the appliance for the first time. Wash the baking tray and crumb tray in warm, soapy water, rinse and dry thoroughly. Wipe the wire oven rack, glass door and exterior with a soft, damp cloth then dry thoroughly. ASSEMBLY AND OPERATION 5. Turn the Element Selection Dial to the required function: 1. Insert the crumb tray into position under the snack oven and ensure it easily slides in and out. To avoid heat transfer to the bench top, the snack oven should never be used without the crumb tray in position. 2. Open the oven door and ensure the wire oven rack, which is attached to the two hooks on either side of the glass door, slides out easily and is positioned above the opened door. GRILL Top Element REHEAT Bottom Element TOAST/COOK Top and Bottom Element OFF To switch off the element selection 7. Turn the Timer Dial from the OFF position to a required cooking time between 0 and 15 minutes. The Timer Dial is marked in 5-minute increments up to maximum of 15 minutes. 3. Insert the baking tray, if required, onto the wire oven rack. The glass door will not remain in the open position unless the baking tray is placed onto the wire oven rack. 8. Both the Element Selection Dial and Timer Dial have to be selected for the snack oven to operate. 4. Insert the food to be cooked onto the wire oven rack or baking tray and close the glass oven door. The glass oven door should be closed during operation so the wire oven rack slides back into the central position between the top and bottom heating elements. USING THE FUNCTIONS OF YOUR KAMBROOK SNACK OVEN Grill (Top Element only - suitable for Sandwich Melts, Cheese on Toast, Open Sandwiches, or similar) 1. Preheating of the snack oven is not required. 2. Place food to be grilled onto the baking tray, then place baking tray onto the wire oven rack and close the door. 3. Turn the Element Selection Dial to the GRILL function. 4. Turn the Timer Dial to the required cooking time. Both the Element Selection Dial and the Timer Dial have to be selected for the snack oven to operate. 5. Grilling will begin and the Timer Dial will count down. 6. At the end of the selected grilling time a short bell will sound when the Timer Dial reaches ‘0’. If further grilling is required, turn the Timer Dial to the time required. If further grilling is not required, turn the Timer Dial to the OFF position and the Element Selection Dial to the OFF position. Switch off at the power outlet and unplug the power cord. 7. Open the oven door and remove the food carefully as the oven and the food will be hot. Tips for Grilling • Always place sandwiches, melts, etc. for grilling into the baking tray. • Ensure food does not fall onto bottom element or touch top element during grilling by not overfilling the sandwich tops with ingredients. Ensure food does not overlap the edges of the baking tray. • If desired melting/grilling has been achieved before the end of the selected grilling time, turn the Element Selection Dial and the Timer Dial to OFF. • If additional heat is required to the bottom of the food in the baking tray, select the TOAST/COOK function instead of the GRILL function. • If unsure of correct grilling time, select a shorter time initially and add extra time if required. USING THE FUNCTIONS OF YOUR KAMBROOK SNACK OVEN REHEAT (Bottom Element only - suitable for reheating small portions of foods already thawed and cooked) 1. Preheating of the snack oven is not required. 2. Place food to be reheated onto the baking tray, then place baking tray onto the wire oven rack and close the door. 3. Turn the Element Selection Dial to the REHEAT function. 4. Turn the Timer Dial to the required cooking time. Both the Element Selection Dial and the Timer Dial have to be selected for the snack oven to operate. 5. Reheating will begin and the Timer Dial will count down. 6. At the end of the selected reheating time a short bell will sound when the Timer Dial reaches ‘0’. If further reheating is required, turn the Timer Dial to the time required. If further reheating is not required, turn the Timer Dial to the OFF position and the Element Selection Dial to the OFF position. 7. Switch off at the power outlet and unplug the power cord. 8. Open the oven door and remove the food carefully as the oven and the food will be hot. Tips for Reheating • Always ensure food for reheating has been properly thawed and/or precooked before using the REHEAT function. • Always place food for reheating into the baking tray. Ensure food does not overlap the edges of the baking tray. • Ensure food does not fall onto bottom element or touch top element during reheating by selecting suitably sized portions. • All wrappers, cardboard, foil, etc. should be removed from the food before placing in the snack oven. • If desired reheating has been achieved before the end of the selected reheating time, turn the Element Selection Dial and the Timer Dial to OFF. • If additional heat is required to the top of the food in the baking tray, select the TOAST/COOK function instead of the REHEAT function. • If unsure of correct reheating time, select a shorter time initially and add extra time if required. USING THE FUNCTIONS OF YOUR KAMBROOK SNACK OVEN TOAST/COOK (Top and Bottom Elements – suitable for toasting bread, bagels or crumpets, and cooking small portions of thawed foods, such as lamb cutlets, bacon rashers, fish fillets, fish pieces, etc.) 1. Preheat the snack oven for 2-3 minutes by turning the Element Selection Dial to the TOAST/ COOK function and the Timer Dial to the required time. Both the Element Selection Dial and the Timer Dial have to be selected for the snack oven to operate. 2. For toasting: Open oven door and carefully place suitably-sized bread, bagels or crumpets directly onto the wire oven rack so that both sides of the food can be toasted. Do not place any spreads, toppings, etc. onto the food being toasted. For cooking: Place suitably-sized, small portions of food into the baking tray. Open the oven door and carefully insert the baking tray onto wire oven and close the door. 3. Toasting/cooking will begin and the Timer Dial will count down. 4. At the end of the selected toasting/cooking time a short bell will sound when the Timer Dial reaches ‘0’. If further toasting/cooking is required, turn the Timer Dial to the time required. If further toasting/cooking is not required, turn the Timer Dial to the OFF position and the Element Selection Dial to the OFF position. 5. Switch off at the power outlet and unplug the power cord. 6. Open the oven door and remove the food carefully as the oven and the food will be hot. Tips for Toasting/Cooking • Always ensure food for toasting/cooking has been properly thawed before using the TOAST/COOK function. • All wrappers, cardboard, foil, etc. should be removed from the food before placing in the snack oven. • Always place food for cooking into the baking tray, then the baking tray onto the oven rack. Ensure food does not overlap the edges of the baking tray. • Ensure food does not fall onto bottom element or touch top element during cooking by selecting suitably sized portions. • Some foods release fat/oil during cooking, so to avoid overflowing from the baking tray, interrupt the cooking process, remove the baking tray and carefully drain fat away. • Items for toasting can be placed directly onto the wire oven rack. Do not use any spreads, etc. when toasting. • If desired toasting/cooking has been achieved before the end of the selected toasting/cooking time, turn the Element Selection Dial and the Timer Dial to OFF. • Dry or stale foods, bread, etc. will toast faster than fresh. • If unsure of correct toasting/cooking time, select a shorter time initially and add extra time if required. CARE, CLEANING AND STORAGE Cleaning after use Storage Before cleaning, always ensure the snack oven is cool, the element selection dial and the timer dial are in the OFF position, the appliance is switched off at the power outlet and the power cord is unplugged. Before storing, the element selection dial and the timer dial should be in the OFF position, the appliance switched off at the power outlet and the power cord unplugged. Ensure the snack oven is completely cool, clean and dry. Insert the accessories into position in the snack oven and close the door. Do not place anything on top and store the snack oven upright on the non-slip support feet. After each use remove the baking tray and crumb tray and carefully discard any food residue. Wash the baking tray and crumb tray in hot, soapy water. A soft plastic scouring pad can be used to avoid build-up of stains. Rinse and dry thoroughly. DO NOT IMMERSE POWER CORD, POWER PLUG OR APPLIANCE INTO WATER OR ANY OTHER LIQUID. Wipe the interior with a soft damp cloth, lightly wetted with hot water and mild detergent, or soft plastic scouring pad. Wipe again with a soft damp cloth, lightly wetted with hot water, then with a dry cloth. DO NOT USE METAL SCOURING PADS TO CLEAN THE OVEN. PIECES OF METAL CAN BREAK OFF THE PAD AND TOUCH ELECTRICAL PARTS OF THE SNACK OVEN CREATING RISK OF ELECTRIC SHOCK. Wipe the exterior with a soft damp cloth then dry thoroughly. The glass oven door can be cleaned with a glass cleaner. Do not use an abrasive cleaner or pad as these may scratch the surface. Do not wash any parts or accessories in a dishwasher. Allow all parts and surfaces to dry thoroughly before reassembling and reusing. NOTES 10 NOTES 11