1
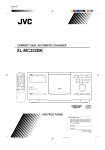
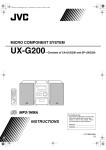
COMPACT COMPONENT SYSTEM
COMPACT DISC AUTOMATIC CHANGER
XL-MC2000BK
OPEN/CLOSE
XL-MC2000 COMPACT DISC AUTOMATIC CHANGER
200
STOP/CLEAR
PLAY/PAUSE
EXCHANGE
RANDOM
INTRO
REPEAT
PLAY MODE
MEMORY
CALL
CANCEL
POWER
DISC/TRACK
OPEN/
CONTINUE ONE DISC PROGRAM CLOSE
REPEAT EXCHANGE
RANDOM
INTRO
DISC
TRACK
1
2
3
4
5
6
7
8
9
0
CALL
CANCEL
DOWN
UP
STANDBY
200
POWER
OPTICAL DIGITAL OUTPUT
MEMORY
ENHANCED COMPULINK CONTROL SYSTEM
'
DISC EJECT
DISC
TRACK
–1 DISC +1 DISC
RM-SXLMC2000JR REMOTE CONTROL
'
INSTRUCTIONS
For Customer Use:
Enter below
belowthe
theModel
Model
Serial
No.No.
andand
Serial
No.
No.
which
are located
either
onbottom
the rear,
which
are located
on the
rear,
or
bottom
or side
of the
cabinet.
Retain this
side of the
cabinet.
Retain
this information
information
for future reference.
for future reference.
Model No.
Serial No.
LVT0359-001B
[J]
WARNING AND CAUTIONS
CAUTION
RISK OF ELECTRIC SHOCK
DO NOT OPEN
CAUTION:
TO REDUCE THE RISK OF ELECTRIC SHOCK.
DO NOT REMOVE COVER (OR BACK)
NO USER SERVICEABLE PARTS INSIDE.
REFER SERVICING TO QUALIFIED SERVICE PERSONNEL.
The lightning flash with arrowhead symbol,
within an equilateral triangle is intended to
alert the user to the presence of uninsulated
"dangerous voltage" within the product's
enclosure that may be of sufficient
magnitude to constitute a risk of electric
shock to persons.
The exclamation point within an equilateral
triangle is intended to alert the user to the
presence of important operating and
maintenance (servicing) instructions in the
literature accompanying the appliance.
For U.S.A.
U.S.A.
For
This equipment has been tested and found to comply with the limits
for a Class B digital device, pursuant to part 15 of the FCC Rules.
These limits are designed to provide reasonable protection against
harmful interference in a residential installation.
This equipment generates, uses and can radiate radio frequency
energy and, if not installed and used in accordance with the
instructions, may cause harmful interference to radio
communications. However, there is no guarantee that interference
will not occur in a particular installation. If this equipment does cause
harmful interference to radio or television reception, which can be
determined by turning the equipment off and on, the user is
encouraged to try to correct the interference by one or more of the
following measures:
Reorient or relocate the receiving antenna.
Increase the separation between the equipment and receiver.
Connect the equipment into an outlet on a circuit different from that
to which the receiver is connected.
Consult the dealer or an experienced radio/TV technician for help.
WARNING: TO REDUCE THE RISK OF FIRE
OR ELECTRIC SHOCK, DO NOT EXPOSE
THIS APPLIANCE TO RAIN OR MOISTURE.
Caution –– POWER switch!
Disconnect the mains plug to shut the power off completely.
ThePOWER switch in any position does not disconnect
the mains line. The power can be remote controlled.
G-1
IMPORTANT FOR LASER PRODUCTS
1. CLASS 1 LASER PRODUCT
2. DANGER: Invisible laser radiation when
open and interlock failed or defeated. Avoid
direct exposure to beam.
3. CAUTION: Do not open the top cover.
There are no user serviceable parts inside
the unit; leave all servicing to qualified
service personnel.
CAUTION
To reduce the risk of electrical shocks, fire, etc.:
1. Do not remove screws, covers or cabinet.
2. Do not expose this appliance to rain or
moisture.
INTRODUCTION
Thank you very much for purchasing the JVC product. We sincerely
hope it proves its quality and performance to your full satisfaction.
Please read the instructions contained in this manual in order to get
the most of the product’s capability and performance. If there are
any questions concerning the product, please consult your JVC
dealer .
Feature of XL-MC2000
• This component is designed to store up to 200 compact discs,
change and play them automatically in three different playback
modes.
• This component features a digital optical output jack for direct
digital audio transmission to an MD, CD-R, amplifier or
receiver.
CONTENTS
Precautions ........................................................ 2
Installation ................................................................................. 2
Compact discs ........................................................................... 2
Operation ................................................................................... 2
Setting Up .......................................................... 3
Connecting the unit ................................................................... 3
Installing batteries in the remote control .................................. 4
Control Panel and Remote Control ................. 5
Control panel ............................................................................. 5
Display ....................................................................................... 6
Remote control .......................................................................... 6
Basic Operation ................................................ 7
Turning the power on ................................................................ 7
Loading compact discs .............................................................. 7
Unloading/changing discs ......................................................... 7
Playing discs .............................................................................. 8
CONTINUE Mode Playback ........................... 9
Basic mode ................................................................................ 9
Playing discs in random order .................................................. 9
Playing a track repeatedly ......................................................... 9
Playing only the beginning of each disc's first track ................ 9
ONE DISC Mode Playback ........................... 10
Basic mode .............................................................................. 10
Playing the tracks in random order ......................................... 10
Playing the disc repeatedly ..................................................... 10
Playing a track repeatedly ....................................................... 10
Playing only the beginning of each disc's first track .............. 10
PROGRAM Mode Playback .......................... 11
Basic mode .............................................................................. 11
Playing program steps in random order .................................. 11
Playing the program repeatedly .............................................. 12
Playing a program step repeatedly .......................................... 12
CompuLink-3 Remote Control System ........ 12
Handling and Taking Care of Discs .............. 13
Handling compact discs .......................................................... 13
Cleaning compact discs ........................................................... 13
Storing compact discs ............................................................. 13
Specifications & Packing List ........................ 13
Troubleshooting .............................................. 14
2
1
English
PRECAUTIONS
Installation
• Select the best location
Select a level location to install this component, where it is free
from extremes of temperature (5 to 35°C, or 41 to 95°F),
humidity, dust, or vibration.
If noise interference is caused during AM broadcast reception
by a tuner/receiver located nearby, relocate it or this component,
or turn off either one.
• Moving the unit
Before moving the unit, first remove all the discs. Turn the power
off, making sure the standby indicator is lit. Then remove the
AC power cord from the AC outlet.
Compact discs
• Use only compact digital audio discs
Only the audio compact discs identified by
the logo shown on the right can be used with
this component.
'
Operation
• Keep the disc storage free of obstacles
Do not put anything other than discs in slots of the disc storage.
• Turn the power off if a problem occurs
If an unusual condition arises, turn the power off immediately. If
the condition persists whenever the power is turned on, consult
your JVC dealer.
• Do not pull the AC power cord
Do not pull the cable when unplugging the AC cord from the
wall socket or this component — hold and pull the plug body.
• Set the sound volume carefully
Be careful in setting the sound volume on your amplifier/receiver
when playing a CD, which has almost none of background noise
unlike analog records and tapes. Find out the right setting starting
with a low level setting. Setting the level too high and starting a
CD could damage the speakers.
• Protect the component against condensation
Condensation inside the component could disrupt the proper
transmission of the disc-reading laser beam, causing noise or
malfunction. If condensation ever ensues due to excessive
humidity or sudden temperature change, leave the component
turned on for a couple of hours to dry up — consult your JVC
dealer if this does not correct the condition.
3
2
SETTING UP
Connecting the unit
System control connections
This compact disc changer/player needs to be connected to an
amplifier/receiver for audio reproduction.
If you are connecting the unit to a JVC audio component using the
CompuLink-3 remote control system, connect the units with the
accessory CompuLink cord. Either one of the COMPULINK-3
(SYNCHRO) jacks in the back of this unit can be used.
CAUTION
Do not connect the AC power cord until all other necessary connections have been made.
COMPULINK-3
(SYNCHRO)
CompuLink cord
Analog audio connections
First connect the OUTPUT jacks in the back of this unit with the
CD or AUX input jacks of the amplifier/receiver using the accessory
audio cord. Be sure to insert the audio cord plugs firmly into the
proper jacks matching the output and input channels — RIGHT to
RIGHT and LEFT to LEFT.
Audio cord
(White)
RIGHT
(Red)
When you use this system, you can remote-control this CD unit
from the connected JVC amplifier/receiver. (See Page 12 for more
information.)
NOTE: JVC components equipped with two COMPULINK-3
(SYNCHRO) ports can be connected in series; a component with only one jack may only be connected at
the end of the series.
OUTPUT
LEFT
To CompuLink jack
Power connection
To input audio jack of
the amplifier/receiver
Digital audio connections
Connect the accessory AC power cord into the socket in the back
of this unit. Then insert the plugs into an AC outlet. (Do not connect
the power cord to a switched AC outlet of a component if the
CompuLink system is used.)
If the MD, CD-R, amplifier or receiver you are making connections
to has a digital optical input jack, connect the DIGITAL OUT
OPTICAL jack in the back of this unit to the CD or AUX digital
input jack on the MD, CD-R, amplifier or receiver using a
commercially available optical fiber cable.
DIGITAL OUT
Optical fiber cable
(not supplied)
OPTICAL
AC power cord
Wall outlet
To digital input jack
of the MD/CD-R/amplifier/
receiver
Be sure to pull off the caps before you make any connections, as
shown above. Place the caps in a safe place.
4
3
English
Installing batteries in the remote
control
1. Remove the rear cover
of the remote control unit.
2. Install batteries. Be sure that
the batteries are installed with
correct polarity, (+) and (-).
3. Attach the rear cover.
CAUTION
• Install the batteries with their polarities correctly set.
• Remove the batteries if the remote control is not
going to be used for an extended period of time.
• Do not expose the remote control to heat, flame, or
direct sunlight.
Replacing the batteries
The service life of batteries normally lasts for about one year though
it is dependent on the use of the remote control (it is shortened in
low temperatures, too). Replace the batteries any time if the
controllable range is reduced (max. range: 7 meters or 23 feet and
30 degrees away from the component).
CAUTION
• Be sure to replace them with the correct batteries (1.5V,
R6P, AA).
• Do not use new and old batteries in combination.
5
4
CONTROL PANEL AND REMOTE CONTROL
Control panel
Alphabetic letters in brackets following button names indicate their
counterparts on the remote control.
XL-MC2000 COMPACT DISC AUTOMATIC CHANGER
4
5
OPEN/CLOSE
STOP/CLEAR
EXCHANGE
2
RANDOM
7
8
REPEAT
10
6
PLAY/PAUSE
15
INTRO
16
9
PLAY MODE
11
3
CALL
MEMORY
12
CANCEL
13
14
DISC/TRACK
DOWN
UP
STANDBY
17
200
POWER
OPTICAL DIGITAL OUTPUT
1
ENHANCED COMPULINK CONTROL SYSTEM
1
POWER button [
a
DISC EJECT
'
]
18
11
Turns the power on and off. The STANDBY indicator above
lights when the power is turned off and the unit is in the standby
state; it goes out when the power is turned on. (To turn off the
unit completely, unplug the power cord from the wall socket.)
2
Display
12
Disc storage
13
OPEN/CLOSE button [
e
]
5
STOP/CLEAR button [
p
6
PLAY/PAUSE button [
q
,
r
7
EXCHANGE button [
i
RANDOM button [
f
16
INTRO button [
17
g
10
REPEAT button [
18
6
5
19
]
CALL button [ m ]
CANCEL button [
n
]
(track skip/search backward) button [
s
(track skip/search forward) button [
t
,
u
]
,
v
]
DISC/TRACK jog dial
DISC EJECT button
DISC button [ j ]
Selects the DISC/TRACK jog dial function for discs.
]
Selects or deselects the REPEAT or REPEAT 1 playback
function (see the description of playback modes).
o
Raises the disc in the load/unload position of the disc storage
when the door is open.
Pressing this button when the door is closed retrieves the disc
from the play position and brings it to the load/unload position.
The disc will then be popped up when the door is opened.
]
h
MEMORY button [
Used to select a disc or track — the DISC or TRACK button
located below the dial determines the dial function. “JOG” and
“DISC” or “TRACK” will be shown on the display when the
function is selected.
]
Selects or deselects the INTRO playback function (see the
description of playback modes).
]
Skip tracks or search for a track forward. Holding down this
button causes playback to fast forward.
Selects or deselects the RANDOM playback function (see the
description of playback modes).
9
d
Skip tracks or search for a track backward. Holding down this
button causes playback to fast reverse.
]
Opens the disc storage door without retracting the disc currently
in the play position, and permits to change discs in the slots
positioned in the front.
8
15
]
Retrieves a disc from its carousel slot, places it in the play
position, and starts playing the disc; or interrupts the playing
temporarily, or restarts the interrupted playing.
,
Deletes the currently displayed program step (disc and track
numbers) in the PROGRAM mode.
]
Stops playing the disc. Pressing the button in the PROGRAM
mode clears all program steps if the unit is stopped.
c
Displays the programmed steps for review or deletion in the
PROGRAM mode.
14
Opens or closes the disc storage door. The disc in the play
position will be retracted into its carousel slot when the door is
opened using this button.
,
20
Enters specified disc and track numbers as a program step in
the PROGRAM mode.
Holds up to 200 discs in slots of a carousel, which rotates inside
the disc storage.
4
b
TRACK
19
Selects in turn a mode of playing successive discs continuously
(CONTINUE), one disc only (ONE DISC), or according to a
program (PROGRAM). Refer to the description of each
playback mode for details.
Shows the current operation status (see next page for more
information).
3
PLAY MODE button [
DISC
20
TRACK button [
k
]
Selects the DISC/TRACK jog dial function for tracks.
The information shown on the display of the control panel includes:
current playback mode, function, disc (slot) and track numbers,
program step number, track and total playing times, jog dial
function, operation status, and track number table. The display with
all elements shown is illustrated below:
a
POWER button [
b
CONTINUE button
1
English
Display
]
Directly selects the mode of playing successive discs
continuously — instead of selecting the CONTINUE mode
using the PLAY MODE button 11 on the front panel.
c
ONE DISC button
Directly selects the mode of playing one disc only — instead
of selecting the ONE DISC mode using the PLAY MODE button
11 on the front panel.
d
PROGRAM button
Directly selects the mode of playing discs and tracks according
to a program — instead of selecting the PROGRAM mode using
the PLAY MODE button 11 on the front panel.
The track number table shows the tracks selected for the currently
selected/displayed disc. When a track is specified as the starting
track, all track numbers following the specified track will be shown.
The track number display is available only up to 20, however.
Remote control
Numbers in brackets following button names indicate their
counterparts on the control panel.
200
c
b
g
POWER
OPEN/
OPEN/CLOSE button [
f
RANDOM button [
g
INTRO button [
h
REPEAT button [ 10 ]
i
EXCHANGE button [
j
DISC button [ 19 ]
k
TRACK button [ 20 ]
l
Numeric buttons (0 through 9)
CALL button [ 13 ]
n
CANCEL button [ 14 ]
o
MEMORY button [
12
p
INTRO
DISC
TRACK
REPEAT EXCHANGE
(stop) button [
]
h
7
]
5
]
i
1
q
2
j
n
]
Stops playing the disc. Pressing the button in the PROGRAM
mode clears all program steps if the unit is stopped.
e
RANDOM
]
]
m
a
d
9
8
4
Used to specify a disc or track number.
CONTINUE ONE DISC PROGRAM CLOSE
f
k
e
(pause) button
Temporarily interrupts the playing of the disc.
3
4
5
6
7
8
9
0
CALL
CANCEL
l
s
o
p
r
t
u
s
(play) button
Starts playing the disc, or restarts the interrupted playing.
MEMORY
m
q
r
(search reverse) button
Search through a track in reverse.
t
(search forward) button
Searches through a track forward.
v
–1 DISC +1 DISC
w
u
x
(track skip backward) button
Skips tracks backward.
v
RM-SXLMC2000JR REMOTE CONTROL
(track skip forward) button
Skips tracks forward.
w
– 1 DISC (disc skip backward) button
Skips discs backward.
x
+ 1 DISC (disc skip forward) button
Skips discs forward.
76
BASIC OPERATION
3. Place the disc in a slot, with its label facing to the left.
Turning the power on
OPEN/CLOSE
Check that the standby indicator on the control panel is lit. Then
press the POWER button either on the control panel or remote
control.
EXCHANGE
REPEAT
PLAY/PAUSE
STOP/CLEAR
RANDOM
PLAY MODE
INTRO
MEMORY
CALL
CANCEL
DISC/TRACK
DOWN
TRACK
STANDBY
DISC
DISC EJECT
POWER
STANDBY
ENHANC
POWER
POWER
or
(Remote control)
To turn the power off, press the button again lighting the standby
indicator.
NOTE: Keeping the unit in the standby state consumes a minimal 6.5 watts. If necessary, unplug the power cord from
the wall socket to turn off the power completely.
Loading compact discs
Also see Page 13 for the manner of handling and taking care of
compact discs.
1. Press the OPEN/CLOSE button either on the control panel or
remote control, opening the disc storage door and exposing
carousel slots. “d-OP” is shown in the display.
ED COMPU
LINK CONTRO
L SYSTEM
'
CD Label
CAUTION
• Do not put anything except CDs in the storage area.
• 8 cm CDs cannot be played back in this unit.
• Be careful not to touch the playback mechanism in the
unit.
• Up to 25 discs can be accessed at one time. Trying to
insert or remove a disc which is not in the loading area
may result in damage to the discs and unit.
• The disc needs to be placed vertically in the storage slot
of this component. After taking the disc out of its case,
grip the rim of the disc between your thumb and middle
finger — be sure to keep the fingers on the narrow, outermost strip where the surface is solidly bright.
• Do not try to put more than one disc in a single slot. The
unit will be damaged.
4. Repeat step 3, or steps 2 and 3, to load additional discs in the
storage. Up to 200 discs can be loaded.
5. When all necessary discs have been loaded, press the OPEN/
CLOSE button to close the storage door. “d-CL” is shown in
the display.
OPEN/CLOSE
OPEN/
CLOSE
or
CAUTION
Make sure to remove your hand from the storage opening
before pressing the OPEN/CLOSE button.
(Remote control)
2. To select a specific slot to load a disc, press the DISC button
and turn the DISC/TRACK jog dial, to specify the required
slot number, which is shown as “DISC” number on the display.
The carousel rotates to bring the specified slot to the load/unload
position, which is in the center of the storage area.
DISC
Unloading/changing discs
1. Press the OPEN/CLOSE button to eject a disc in the playback
position for unloading or changing.
2. To unload or change discs in other slots, press the DISC button
and specify the slot number using the jog dial. The specified
disc will be brought to the load/unload position. Then press the
DISC EJECT button to raise the disc up.
Repeat this step to unload or change any additional discs.
3. When unloading or changing is completed, press the OPEN/
CLOSE button to close the door. The disc in the load/unload
position at this time will then be shifted to the play position.
8
7
English
• Interrupting the playback
Playing discs
1 Selecting a playback mode
There are three main playback modes, namely CONTINUE, ONE
DISC, and PROGRAM; each has selective playback functions. (See
the following pages for the description of the playback modes and
functions.)
Select the mode using the PLAY MODE button on the control panel,
or the CONTINUE, ONE DISC, or PROGRAM button on the
remote controller.
PLAY MODE
Press the PLAY/PAUSE button or the button on the remote
control to temporarily interrupt the playing, which can be resumed
by pressing the PLAY/PAUSE button or the button on the remote
control.
PLAY/PAUSE
or
(Remote control)
• Skipping to the different track in the same disc
during playback
Proceed to steps 3 and 4. Press
respectively.
or
buttons to skip tracks
• Skipping to the begining of the different disc
during playback
2 Selecting a disc to play
To select a disc for playing, press the DISC button and then use the
DISC/TRACK jog dial, or use the – 1 DISC or + 1 DISC buttons or
numeric buttons on the remote control, showing the DISC (slot)
number on the display.
Proceed to steps 2, then press PLAY/PAUSE button on the front
panel or the
button on the remote control.
• Skipping to a track in the different disc during
playback
Proceed to steps 2 to 4.
DISC
DISC
or
(Remote control)
NOTE: When you use the numeric buttons to specify the disc
or track numbers, press the button in the order of larger
digit. For example, press “5,” then “2” for “52.” Press
“1,” “4,” and then “8” for “148.”
button acts
NOTE: When “JOG” is shown in the display, the
as the ENTER function and the pause function is disabled.
• Changing discs during playback
The carousel slots positioned in the front behind the disc storage
door are accessible for loading, unloading, or changing discs while
a disc is being played. Press the EXCHANGE button to open the
door. Press the EXCHANGE or OPEN/CLOSE button to close the
door.
EXCHANGE
3 Selecting a track
To select a track of the selected disc, from which the disc is to be
played instead of starting from the beginning, press the TRACK
button and then use the DISC/TRACK jog dial,
or
buttons
or use the numeric buttons on the remote control, showing the
required TRACK number on the display.
TRACK
TRACK
or
(Remote control)
4 Starting the disc
Press the PLAY/PAUSE button or the
disc or track.
button to play the selected
PLAY/PAUSE
EXCHANGE
or
(Remote control)
CAUTION
• Insert or remove discs very carefully at this time — the
slots other than the center one are radially slanted toward the center of the carousel. Never try to rotate the
carousel forcibly — it cannot be rotated when a disc is
being played.
• Do not insert a disc outside of the loading area.
• A disc placed outside of the loading area is not registered and playback will not start.
• When you want to rotate the carousel, press the OPEN/
CLOSE button after closing the disc storage door.
• After loading/unloading discs, promptly close the disc
storage door. Playback will not occur with the door is in
the open position.
Stopping the playback
Press the
or
(Remote control)
NOTE: • If the disc storage door is open when playback starts,
the door closes automatically.
• After specifying the disc to be played and pressing
the TRACK button, playback will begin automatically.
• Once disc playback is started, in order to specify a
track number to be played, the PLAY/PAUSE button
or the
button on the remote control must be
pressed within five seconds.
button to stop and cancel the playing.
NOTE: When “JOG” is shown in the display, the button acts
as the CLEAR button and the stop function is disabled.
STOP/CLEAR
or
(Remote control)
9
8
CONTINUE MODE PLAYBACK
Every loaded disc can be played entirely in the numerical order in
the CONTINUE mode. After the playback of the last disc ends,
the playback begins again from the first disc.
Discs and tracks can be selected randomly from all the loaded discs
and played (RANDOM function).
One track can be played repeatedly in the basic mode as well as
when the RANDOM function is selected (REPEAT-1 function).
The beginning of the first track of every loaded disc can be played
for 15 seconds (INTRO function).
Basic mode
Playing discs in random order
To play every disc in the storage in random order, press the
RANDOM button showing “RANDOM” on the display. Then start
the disc.
Playback order is continuous and discs and tracks are randomly
selected. There is an approximately fifteen second pause between
tracks.
Press the RANDOM button again while playback is stopped to
cancel the function, clearing the indication from the display.
Playing a track repeatedly
1. Select the mode.
Use the PLAY MODE button, or press the CONTINUE button
on the remote control, to show “CONTINUE” on the display.
PLAY MODE
CONTINUE
or
A track of the selected disc can be played repeatedly. With a disc
selected, press the REPEAT button, and select to show “REPEAT
1” on the display. Then start the disc to play the selected track
repeatedly until you stop it.
This function can be used in the basic CONTINUE mode as well
as when the RANDOM function is on.
(Remote control)
Press the REPEAT button once to cancel the function, clearing the
indication from the display.
2. Select a disc you want to start playing. The discs following the
specified disc will be played in succession.
Press the DISC button and then use the DISC/TRACK jog dial,
or use the –1 DISC or + 1 DISC button or numeric buttons on
the remote control.
Playing only the beginning of
each disc's first track
DISC
3. Select the track if you want to start playing the disc from a
specific track.
Press the TRACK button and then use the DISC/TRACK jog
dial, or use the
or
button or numeric buttons on the
remote control.
4. Press the PLAY/PAUSE button or the
control to start playing.
button on the remote
NOTE: If you press the TRACK button after a disc is specified, playback starts automatically, however in order
to play the specified track, you should press the
button.
5. Discs and tracks can be skipped forward or backward during
the playback using the
or
buttons. The playback can
be paused or stopped in the normal manner. For further
information, see [BASIC OPERATION] on pages 7 and 8.
10
9
NOTE: The REPEAT function is not available in the CONTINUE mode, as all discs are already being played
back continuously.
To scan the first tracks of all discs, press the INTRO button to
show “INTRO” on the display and the
button. The beginning
part of the first track of each disc will be played for 15 seconds
successively.
Press the INTRO button again to cancel the function, clearing the
indication from the display. This function will continue until the
button is pressed.
One disc can be selected and played entirely in the ONE DISC
mode. The starting track may be specified.
Every track of the disc can be played once in a random order
(RANDOM function).
The entire disc can be played repeatedly (REPEAT function) or
one selected track can be played repeatedly (REPEAT-1 function)
in the basic mode as well as when the RANDOM function is
selected.
The beginning part of every track of the disc can be played for 15
seconds (INTRO function).
Playing the tracks in random
order
English
ONE DISC MODE PLAYBACK
To play every track of the disc, which has been selected in Step 2,
press the RANDOM button following Step 2, to show “RANDOM”
on the display. Then press the PLAY/PAUSE button or
button
on the remote control. The playback will be stopped when all tracks
have been played.
Press the RANDOM button again to cancel the function, clearing
the indication from the display during stop.
Playing the disc repeatedly
Basic mode
1. Select the mode.
Use the PLAY MODE button, or press the ONE DISC button
on the remote control, to show “ONE DISC” on the display.
PLAY MODE
ONE DISC
or
To repeatedly play the entire disc selected in Step 2 above, press
the REPEAT button, and select and show “REPEAT” on the display.
Then start the disc to play it repeatedly until stopped.
This function can be used in the basic ONE DISC mode as well as
when the RANDOM function is effective.
Press the REPEAT button twice to cancel the function, clearing the
indication from the display.
(Remote control)
2. Select a disc you want to play.
Press the DISC button and then use the DISC/TRACK jog dial.
The –1 DISC or +1DISC buttons as well as the numeric buttons
on the remote control can also be used.
DISC
3. Select the track if you want to start playing the disc from a
specific track.
Press the TRACK button and then use the DISC/TRACK jog
dial. The
or
buttons as well as the nemeric buttons on
the remote control can also be used.
Playing a track repeatedly
To repeatedly play the track selected in Step 3 above, press the
REPEAT button, and select to show “REPEAT 1” on the display.
Then start playing the disc to play the selected track repeatedly
until stopped.
This function can be used in the basic ONE DISC mode as well as
when the RANDOM function is effective.
Press the REPEAT button once to cancel the function, clearing the
indication from the display.
Playing only the beginning of
each disc's first track
TRACK
To scan the tracks of the selected disc, press the INTRO button to
show “INTRO” on the display and the
button. The beginning
part of each track will be played for 15 seconds, The playback will
be stopped when the scan is completed.
4. Press the PLAY/PAUSE button or the
button on the remote
control to start the disc, playing it from the first track or from
the specified track through the last track.
Press the INTRO button again to cancel the function, clearing the
indication from the display.
NOTE: If you press the TRACK button after a disc is specified, playback starts automatically, however in order
to play the specified track, you should press the
button.
5. Tracks can be skipped forward or backward during the playback
using the
or
button. The playback can be paused or
stopped in the normal manner. For further information, see
[BASIC OPERATION] on pages 7 and 8.
11
10
PROGRAM MODE PLAYBACK
Discs and tracks can be selectively specified in a program and played
according to the program in the PROGRAM mode.
The steps in the program can be played in a random order
(RANDOM function).
The entire program can be played repeatedly (REPEAT function)
or one program step can be selected and played repeatedly
(REPEAT-1 function) in the basic mode as well as when the
RANDOM function is selected.
Reviewing the steps:
Press the CALL button. One step is displayed each time the button
is pressed.
Deleting a step:
Press the CALL button and display the necessary step. Then press
the CANCEL button.
Adding a step:
An added step is placed in the last step automatically.
Deleting all steps:
Press the STOP/CLEAR button. The entire program will be cleared.
Basic mode
1. Select the mode.
Use the PLAY MODE button, or press the PROGRAM button
on the remote control, to show “PROGRAM” on the display.
PLAY MODE
PROGRAM
or
The program reviewing and modification procedures described
above can only be performed when the playback is stopped.
The program will be retained and available whenever the
PROGRAM mode is selected again as long as the unit is kept in
the standby state.
If the AC power cord is disconnected from the outlet, the program
will be erased.
(Remote control)
2. Specify disc or track numbers in the order you want to play in
the following manner:
(a) Specify a disc number and a track number.
Press the DISC or TRACK button and then use the DISC/
TRACK jog dial. The – 1DISC or +1DISC buttons and the
or
buttons as well as the numeric buttons on the
remote control can also be used.
DISC
DISC
or
(Remote control)
The track number can be omitted when programming a
whole disc to be played.
Press the CANCEL button to cancel the specified disc and
track numbers shown on the display.
(b) Press the MEMORY button to register the specification as
program step 1.
MEMORY
MEMORY
or
(Remote control)
Up to 32 steps can be entered in one program. Each disc,
when the whole disc is to be played, or each track
programmed is counted as one step.
(c) Repeat Steps (a) and (b) above to program additional the
remaining steps.
3. Press the PLAY/PAUSE button or the
button on the remote
control to start playing according to the program.
12
11
Playing program steps in random
order
To play every step in the program once in random order, press the
RANDOM button, showing “RANDOM” on the display. Then start
playing.
The playback will be stopped when all program steps have been
played.
If the disc specified in the program is not in the disc storage, the
playback stops. The playback starts again after you load the disc
and press the PLAY/PAUSE button or the
button on the remote
control.
Press the RANDOM button again to cancel the function, clearing
the indication from the display during stop.
Playing the program repeatedly
To repeat playback according to the program, press the REPEAT
button, and select to show “REPEAT” on the display. Then start
playing, which will be repeated until stopped.
This function can be used in the basic PROGRAM mode as well as
when the RANDOM function is effective.
Press the REPEAT button twice to cancel the function, clearing the
indication from the display during stop.
Playing a program step
repeatedly
To repeatedly play a specific program step, select the step using
or
buttons during playback, press the REPEAT button
twice to show “REPEAT 1” on the display. The selected step is
played back repeatedly.
This function can be used in the basic PROGRAM mode as well as
when the RANDOM function is effective.
Press the REPEAT button once to cancel the function, clearing the
indication from the display.
The CompuLink system, which is a JVC-developed remote control
system, links JVC audio components to establish systematized
operation control of the linked components.
English
COMPULINK-3
REMOTE CONTROL
SYSTEM
NOTE: There are three versions of the CompuLink system:
CompuLink-1, -2, and -3. Although they are basically
compatible, some functions may not be available with
the older versions (refer to the instructions manual of
the component for the information).
The CompuLink-3 Remote Control System provides the following
functions:
Automatic power on/off
Turning a linked component on or off will automatically turn the
amplifier/receiver on or off.
Selecting a source on the amplifier/receiver will turn on the relevant
component.
CAUTION
• Be sure to use the accessory CompuLink cable for the
connection.
• The operation may be disrupted if the power supply to a
component is interrupted, in which case turn off all linked
components and turn them on again.
Automatic source selection
Selecting a source on the connected amplifier/receiver will
automatically turn on the relevant component and start its operation.
Starting a linked component will automatically select the relevant
source on the amplifier/receiver.
Synchronized recording
This function is effective when a JVC cassette deck or MD recorder
is linked in the CompuLink system, allowing simple, synchronized
recording.
NOTE: Refer to the instruction manual of your cassette deck
or MD recorder for the detail of the synchronized recording.
Some functions are disabled in order to prevent the
recording trouble during the synchronized recording.
13
12
HANDING AND TAKING
CARE OF DISCS
SPECIFICATIONS &
PACKING LIST
Handling compact discs
General
Protect the disc from being scratched, warped, or damaged in any
other way — the plastic disc can easily be damaged and the damaged
disc disrupts sound reproduction and the player function.
Other
Readable discs:
Power requirements:
Power consumption:
Keep every disc in its case
AC 120V
, 60Hz
11 W (POWER ON),
6.5 W (STANDBY mode)
7.8 kg (17.2 lbs)
435 x 199.5 x 482.5 mm
17-3/16 x 7-7/8 x 19 inch
Be sure to keep every disc in its case whenever it is taken out of the
player. Placing one disc upon another without putting them in their
cases will damage their recorded tracks.
Mass:
Dimensions (W x H x D):
Keep the label side clean
Audio output
Do not attempt to put adhesive tape or paper nor write anything
even on the label side of a disc.
ANALOG OUT (pin jack x 2): 2.0 Vrms (1 kHz, 0dB)
DIGITAL OUT
(square optical connector jack): -24 ∼-15dB
Cleaning compact discs
The package contains the following items:
If the underside of a disc is soiled with fingerprints, etc., use a
piece of soft, dry cloth and wipe clean the surface from the inside
to the outside in straight strokes. If that does not clean the surface,
try with a piece of soft cloth moistened with water.
Never use alcohol, record cleaners, or anti-static agents.
Storing compact discs
Do not store compact discs where they may be exposed to direct
sunlight or extremes of temperature and humidity. Also, avoid
leaving them in the car.
14
13
CD
1
1
2
1
1
1
XL-MC2000 Compact Disc Automatic Changer
RM-SXLMC2000JR Remote Control
Remote control batteries (1.5V, R6P, AA)
Instructions manual
CD booklet file
Audio cord
1
CompuLink cord
1
AC power cord
What appears to be a malfunction may not always be serious and can easily be corrected. The table below describes some typical problems
and their remedies. Check them before calling your JVC dealer.
Symptom
The CD is not played.
The sound is intermittent or harsh.
The remote controller does not
properly work.
The component does not operate.
Possible Cause
English
TROUBLESHOOTING
Remedy
The CD is not loaded.
Load the disc.
The CD is not placed in the slot with its
label on the left side.
Reload the disc correctly.
A disc has been placed outside of the
loading area
Specify the slot number and open the disc
storage door. Then close the door.
The CD is damaged.
Replace the disc with a new one.
The AC power cord is disconnected.
Connect the cord securely.
The audio cord is disconnected.
Connect the cord securely.
The CD is soiled.
Clean the surface using a piece of soft cloth.
The CD is scretched or warped.
Replace the disc with a new one.
A piece of paper or adhesive tape is stuck
to the CD surface.
Remove it cleanly.
The audio cord is placed close to the AC
powercord.
Separate them.
The batteries are exhausted.
Replace the batteries.
The remote control is not properly used.
Its maximum range is 7 meters (23 feet) and
30 degrees away from the component.
The internal circuitry is not properly
functioning due to static electricity or other
disturbance.
Disconnect the AC power cord and connect
it again.
15
14
TO OUR VALUED CUSTOMER
THANK YOU FOR PURCHASING THIS JVC PRODUCT.
WE WANT TO HELP YOU ACHIEVE A PERFECT EXPERIENCE.
NEED HELP ON HOW TO HOOK UP?
NEED ASSISTANCE ON HOW TO OPERATE?
NEED TO LOCATE A JVC SERVICE CENTER?
LIKE TO PURCHASE ACCESSORIES?
IS HERE TO HELP!
TOLL FREE: 1(800)252-5722
http://www.jvc.com
Remember to retain your Bill of Sale for Warranty Service.
Do not attempt to service the product yourself
Caution
To prevent electrical shock, do not open the cabinet.
There are no user serviceable parts inside.
Please refer to qualified service personnel for repairs.
16
15
BT-51018-5
(0306)
LIMITED WARRANTY
1-1 USA ONLY
ONLY FOR PRODUCT PURCHASED IN U.S.A.
JVC Americas Corp. (JVC) warrants this product and all parts thereof, except as set forth below ONLY TO THE
ORIGINAL RETAIL PURCHASER to be FREE FROM DEFECTIVE MATERIALS AND WORKMANSHIP from the date of
original purchase for the period shown below. ("The Warranty Period")
PARTS
1
LABOR
YR
1
YR
THIS LIMITED WARRANTY IS VALID ONLY IN THE FIFTY (50) UNITED STATES, THE DISTRICT OF COLUMBIA AND
IN THE COMMONWEALTH OF PUERTO RICO.
WHAT WE WILL DO:
If this product is found to be defective within the warranty period, JVC will repair or replace defective parts with new or
rebuilt equivalents at no charge to the original owner. Such repair and replacement services shall be rendered by JVC
during normal business hours at JVC authorized service centers. Parts used for replacement are warranted only for the
remainder of the Warranty Period. All products may be brought to a JVC authorized service center on a carry-in basis.
Color televisions with a screen size of 27" or greater qualify for in-home service. In such cases, a technician will come
to your home and either repair the TV there or remove and return it if it cannot be repaired in your home.
WHAT YOU MUST DO FOR WARRANTY SERVICE:
Please do not return your product to the retailer
Instead, return your product to the JVC authorized service center nearest you. If shipping the product to the service
center, please be sure to package it carefully, preferably in the original packaging, and include a brief description of
the problem(s). Please call 1-800-252-5722 to locate the nearest JVC authorized service center. Service locations
can also be obtained from our website http://www.jvc.com. If your product qualifies for in-home service, the service
representative will require clear access to the product.
If you have any questions concerning your JVC Product, please contact our Customer Care Center at 800-252-5722
WHAT IS NOT COVERED:
This limited warranty provided by JVC does not cover:
1. Products which have been subject to abuse, accident, alteration, modification, tampering, negligence, misuse, faulty
installation, lack of reasonable care, or if repaired or serviced by anyone other than a service facility authorized by
JVC to render such service, or if affixed to any attachment not provided with the products, or if the model or serial
number has been altered, tampered with, defaced or removed;
2. Initial installation, installation and removal from cabinets or mounting systems.
3. Operational adjustments covered in the Owner's Manual, normal maintenance, video and audio head cleaning;
4. Damage that occurs in shipment, due to act of God, and cosmetic damage;
5. Signal reception problems and failures due to line power surge;
6. User Removal Memory Devices/Video Pick-up Tubes/CCD Image Sensors are covered for 90 days from the date of purchase;
7. Accessories;
8. Batteries (except that Rechargeable Batteries are covered for 90 days from the date of purchase);
9. Products used for commercial purposes, including, but not limited to rental.
10. Loss of data resultant from malfunction of hard drive or other data storage device;
There are no express warranties except as listed above.
THE DURATION OF ANY IMPLIED WARRANTIES, INCLUDING THE IMPLIED WARRANTY OF MERCHANTABILITY, IS
LIMITED TO THE DURATION OF THE EXPRESS WARRANTY HEREIN.
JVC SHALL NOT BE LIABLE FOR ANY LOSS OF USE OF THE PRODUCT, INCONVIENCE, OR ANY OTHER
DAMAGES, WHETHER DIRECT, INCIDENTAL OR CONSEQUENTAL (INCLUDING, WITHOUT LIMITATION,
DAMAGE TO TAPES, RECORDS OR DISCS) RESULTING FROM THE USE OF THIS PRODUCT, OR ARISING OUT
OF ANY BREACH OF THIS WARRANTY. ALL EXPRESS AND IMPLIED WARRANTIES, INCLUDING THE
WARRANTIES OF MERCHANTABILITY AND FITNESS FOR PARTICULAR PURPOSE, ARE LIMITED TO THE
WARRANTY PERIOD SET FORTH ABOVE.
Some states do not allow the exclusion of incidental or consequential damages or limitations on how long an
implied warranty lasts, so these limitations or exclusions may not apply to you. This warranty gives you specific
legal rights and you may also have other rights which vary from state to state.
JVC AMERICAS CORP.
1700 Valley Road, Wayne, New Jersey 07470
http://www.jvc.com
REFURBISHED PRODUCTS CARRY A SEPARATE WARRANTY, THIS WARRANTY DOES NOT APPLY. FOR DETAIL
OF REFURBISHED PRODUCT WARRANTY, PLEASE REFER TO THE REFURBISHED PRODUCT WARRANTY
INFORMATION PACKAGED WITH EACH REFURBISHED PRODUCT.
For customer use:
Enter below the Model No. and Serial No. which is located either on the rear, bottom or side of the cabinet.
Retain this information for future reference.
Model No. :
Serial No. :
Purchase date :
Name of dealer :
17
16
VICTOR COMPANY OF JAPAN, LIMITED
EN.
© 1999 Victor Company of Japan, Limited
0806SKMSANJEIN