1
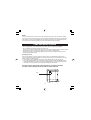
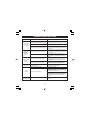
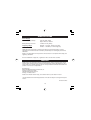
DOCKING MUSIC SYSTEM FOR
iPod® and iPhoneTM
ALARM 1
FM STEREO
ALARM 2
PM
OWNER’S MANUAL
JiMS-198i
(iPod/iPhone Not Included)
PLEASE READ THIS OPERATING MANUAL COMPLETELY BEFORE
OPERATING THIS UNIT AND RETAIN THIS BOOKLET FOR FUTURE REFERENCE.
DEAR JENSEN® CUSTOMER
Selecting fine audio equipment such as the unit you've just purchased is only the start of
your musical enjoyment. Now it's time to consider how you can maximize the fun and
excitement your equipment offers. This manufacturer and the Electronic Industries
Association's Consumer Electronics Group want you to get the most out of your
equipment by playing it at a safe level. One that lets the sound come through loud and
clear without annoying blaring or distortion and, most importantly, without affecting your
sensitive hearing.
Sound can be deceiving. Over time your hearing "comfort level" adapts to higher volumes
of sound. So what sounds "normal" can actually be loud and harmful to your hearing.
Guard against this by setting your equipment at a safe level BEFORE your hearing adapts.
To establish a safe level:
• Start your volume control at a low setting.
• Slowly increase the sound until you can hear it comfortably and clearly, and without
distortion.
Once you have established a comfortable sound level:
• Set the dial and leave it there.
Taking a minute to do this now will help to prevent hearing damage or loss in the future.
After all, we want you listening for a lifetime.
We Want You Listening For a Lifetime:
Used wisely, your new sound equipment will provide a lifetime of fun and enjoyment.
Since hearing damage from loud noise is often undetectable until it is too late, this
manufacturer and the Electronic Industries Association's Consumer Electronics Group
recommend you avoid prolonged exposure to excessive noise.
Customer's Record:
The serial number of this product is found on its bottom cover. You should note the serial
number of this unit in the space provided as a permanent record of your purchase to aid
in identification in the event of theft of loss.
Model Number: JiMS-198i
Serial Number:
1
IMPORTANT SAFETY INSTRUCTIONS
When used in the directed manner, this unit has been designed and manufactured to
ensure your personal safety. However, improper use can result in potential electrical
shock or fire hazards. Please read all safety and operating instructions carefully before
installation and use, and keep these instructions handy for future reference. Take special
note of all warnings listed in these instructions and on the unit.
1.
2.
3.
4.
5.
6.
7.
8.
9.
10.
11.
12.
13.
14.
Read these instructions
Keep these instructions
Heed all warnings.
Follow all instructions.
Do not use this apparatus near water.
Clean only with dry cloth.
Ventilation – Slots and openings in the cabinet are provided for ventilation and to
ensure reliable operation of the product and to protect it from overheating, and these
openings must not be blocked or covered. The openings should never be blocked by
placing the product on a bed, so far, rug, or other similar surface. This product should
not be placed in a built-in installation such as a bookcase or rack unless proper
ventilation is provided or the manufacturer’s instructions have been adhered to.
Do not install near any heat sources such as radiators, heat registers, stoves, or other
apparatus (including amplifiers) that produce heat.
Grounding or Polarization – This product may be equipped with a polarized alternating
-current line plug (a plug having one blade wider than the other). This plug will fit into
the power outlet only one way. This is a safety feature. If you are unable to insert the
plug fully into the outlet, try reversing the plug. If the plug should still fail to fit, contact
your electrician to replace your obsolete outlet. Do not defeat the safety purpose of
the polarized plug.
Protect the power cord from being walked on or pinched particularly at plugs,
convenience receptacles, and the point where they exit from the apparatus.
Only use attachments / accessories specified by the manufacturer.
Unplug this apparatus during lightning storms or when unused for long periods of time.
Refer all servicing to qualified service personnel. Servicing is required when the
apparatus has been damaged in any way, such as power-supply cord or plug is
damaged, liquid has been spilled or objects have fallen into the apparatus, the
apparatus has been exposed to rain or moisture, does not operate normally, or has
been dropped.
This appliance shall not be exposed to dripping or splashing water and that no object
filled with liquids such as vases shall be placed on the apparatus.
2
15. Use only with the cart, stand, tripod, bracket, or table specified by the manufacturer,
or sold with the apparatus. When a cart is used, use caution when moving the
cart/apparatus combination to avoid injury from tip-over.
16. The MAINS plug is used as the disconnect device, the disconnect device shall remain
readily operable.
17. Battery pack or battery installed shall not be exposed to excessive heat such as
sunshine, fire or the like.
18. Name plate is located on bottom of product.
IMPORTANT NOTES
Avoid installing the unit in locations described below:
• Places exposed to direct sunlight or close to heat radiating appliances such as
electric heaters.
• Dusty places.
• Places subject to constant vibration.
• Humid or moist places.
3
COMPLIANCE WITH FCC REGULATIONS
This device complies with Part 15 of the FCC Rules. Operation is subject to the
following two conditions:
(1) this device may not cause harmful interference, and
(2) this device must accept any interference received, including interference that
may cause undesired operation
This equipment has been tested and found to comply with the limits for a Radio Receiver,
pursuant to Part 15 of the FCC Rules. These limits are designed to provide reasonable
protection against harmful interference in a residential installation. This equipment
generates, uses and can radiate radio frequency energy and, if not installed and used in
accordance with the instructions, may cause harmful interference to radio communications.
However, there is no guarantee that interference will not occur in a particular installation.
If this equipment does cause harmful interference to radio or television reception, which
can be determined by turning the equipment off and on, the user is encouraged to try to
correct the interference by one or more of the following measures:
- Reorient or relocate the receiving antenna.
- Increase the separation between the equipment and receiver.
- Connect the equipment into an outlet on a circuit different from that to which the receiver
is connected.
- Consult the dealer or an experienced radio technician for help.
Caution
Changes or modifications to this unit not expressly approved by the party responsible for
compliance could void the user’s authority to operate the equipment.
4
POWER SOURCE
AC-DC ADAPTOR CONNECTION
The unit is powered by an external AC - DC Power Adaptor with an output of 10V DC 1400mA (included).
(1) Firmly and securely plug the adaptor's AC plug into a household AC wall adaptor.
(2) Insert the adaptor's DC output plug into the DC -IN jack on the back of the unit.
Operating this unit from any other power source may cause damage to the unit and will
void your warranty.
BATTERY BACK – UP SYSTEM
The radio is also pre-loaded with 2 x “AA” batteries for the battery back-up and for the
Auto Time Set clock system.
The Battery Back-up System ensures the clock and alarm settings will be retained during
a power interruption or power outage (in order to preserve the battery life the Display will
not light). All clock settings will be kept in memory, however, the clock time may require
adjustment for exact accuracy once the power returns. If the batteries are not installed,
the Display will blink ”12:00” when the power is restored. This will indicate that you have
to reset the time and alarm settings.
5
BATTERY INSTALLATION
1.
2.
3.
4.
5.
6.
7.
8.
9.
10.
Open the battery compartment door on the bottom of the cabinet.
Insert 2 “AA” size batteries into the battery compartment according to the polarity
diagram engraved inside the compartment.
Replace the battery compartment Door.
IMPORTANT:Be sure that the batteries are installed correctly. Wrong polarity may
damage the unit.
Alkaline-type batteries are recommended. For optimum performance, these batteries
should be replaced after every year or when batteries become exhausted.
Old or leaking battery can cause damage to the unit and will void the warranty.
Use only the size and type of batteries specified.
Do not mix old and new batteries.
Do not mix alkaline, standard (carbon-zinc) or rechargeable (nickel-cadmium)
batteries.
Do not try to recharge batteries not intended to be recharged; they can overheat,
rupture and leak. (Follow battery manufacturer’s directions).
Do not dispose of batteries in fire, batteries may leak or explode.
POWER FAILURE INDICATOR
If there are no batteries installed in the unit or if the batteries installed are weak or dead,
the time and alarm settings will be lost if the AC power is interrupted. When the AC power
is restored the display will blink”12:00”. This indicates that the time displayed is incorrect
and needs to be reset.
IMPORTANT:
After you reset the time, be sure to reset your alarm settings as well.
NOTE:
This unit is not magnetically shielded and may cause color distortion on the
screen of some TVs or video monitors. To avoid this, you may need to move the unit
further away from the TV or monitor if unnatural color shifts or image distortion occurs
6
LOCATION OF CONTROLS AND INDICATORS
2
13
4
14
5
8 10 11 1 12 6 16 3 15 7 9
17
18
1. SHUFFLE / PRESET- BUTTON
10. SLEEP BUTTON
2. REPEAT / PRESET+ BUTTON
3. MEMORY / SET BUTTON
11. ON / OFF BUTTON
12. FUNCTION(FM / AM / iPod / AUX IN) BUTTON
4. TUNE+ / UP BUTTON
13. VOLUME + BUTTON
5. TUNE- / DOWN BUTTON
14. VOLUME - BUTTON
6. SNOOZE BUTTON
7. NAP BUTTON
15. MONO / STEREO / PLAY / PAUSE BUTTON
8. ALARM 1 BUTTON
16. DIMMER BUTTON
17. DAY LIGHT SAVING TIME SWITCH
9. ALARM 2 BUTTON
18. RESET BUTTON
7
LOCATION OF CONTROLS AND INDICATORS
1
3
4
ALARM 1
FM STEREO
ALARM 2
2
PM
5
6
6
7
8
1. ALARM 1 INDICATOR
2. ALARM 2 INDICATOR
3. MULTI FUNCTION DISPLAY
4. FM STEREO INDICATOR
5. PM CLOCK INDICATIOR
6. SPEAKER
7. DC INPUT JACK
13
9 10 11 12
8. HEADPHONE OUTPUT JACK
9. TIME ZONE SWITCH
10. AM LOOP ANTENNA JACK
11. AUX IN JACK
12. FM ANTENNA
13. BATTERY COMPARTMENT
8
OPERATING INSTRUCTIONS
AUTO TIME SET
This unit features an Automatic Time Set system powered by 2 X “AA” batteries (3V DC)
(Included), so you will not need to set the clock time when first plugged in. After the unit is
plugged in, the LED display will show the time automatically. You will only need to set the
correct time zone and daylight saving time for your area.
SETTING THE TIME ZONE
Change to your time zone area by sliding the TIME ZONE switch on the back of the unit
to the appropriate time zone you live in. The default time zone is set to Eastern Standard
Time (EST). Please refer to the time zone map below when setting the switch position on
the back.
PST MST CST EST
1. Eastern Standard Time (EST)
2. Central Standard Time (CST)
3. Mountain Standard Time (MST)
4. Pacific Standard Time (PST)
DAYLIGHT SAVING TIME
Slide the DST (Daylight Saving Time) switch on side of the unit to turn Daylight saving
time on/off. The clock comes with DST in the ON position as the default. This setting is
correct unless you live in Arizona or parts of Indiana where DST is not observed.
IMPORTANT: Do not change this setting unless you live in an area which does not
observe the Daylight Saving time change.
NOTE: The batteries will become weak after time, so replace the batteries as needed.
To avoid re-program the time and alarm settings, we recommend leaving the unit
plugged in when changing the batteries.
9
SETTING THE CLOCK
In case the back-up batteries are accidentally removed. You will need to set the clock
manually.
If the LED display is blinking
1. In standby mode, press the UP button to increase or press the DOWN button to
decrease the minutes setting.
2. Press and hold the UP / DOWN button to fast forward/backward the clock setting.
3. Press the MEM/SET button to confirm the setting.
If the LED display is steady
1. In standby mode, press and hold MEMORY/SET button for 3 seconds, Time flashes
on LED display when the time is AM,”PM” and time flashes on LED when time is PM.
2. Press the UP button to increase or press the DOWN button to decrease the minutes
setting.
3. Press and hold the UP / DOWN button to fast forward/backward the clock setting.
4. Press the MEMORY/SET button again to confirm the setting.
NOTE:
There is a PM indicators located in the right-hand corner of the clock display. If it
turns off, that means the time is AM. Be sure to observe the correct AM / PM time
when setting the alarm to make sure the wake time is set correctly for AM or PM.
RADIO OPERATIONS
LISTENING TO RADIO
1. Press the power ON/OFF button to turn on the unit.
2. Press the FUNCTION button to select AM or FM radio mode. The AM or FM band
radio frequency will appear on the display.
3. To manually tune the radio station, press the TUNE + or TUNE − button repeatedly.
4. To automatically scan to the next radio station with the strongest signal, press and
hold the TUNE + or TUNE − button for 1-2 seconds until frequency readout on the
display begins to scan and then release the button. The tuner will stop scanning when
it receives the next strongest station signal.
5. Press the VOLUME+/VOLUME – button to ajust the volume to your desired listening
level.
6. When you have finished listening, press the “ON/OFF” button to turn off the unit.
10
FM STEREO / MONO RECEPTION
1. This unit provides FM STEREO and FM MONO settings. In stereo mode, the unit will
automatically switch to stereo when a FM stereo broadcast is received. The FM ST
indicator turns on.
2. To receive a weak (noisy) FM station, press the MONO/STEREO button once to switch
the FM mode to “MONO”. The FM ST indicator turns off, the reception may be
improved, but the sound is now monaural (MONO).
Note:
1. When listening to an FM program, fully extend the Wire Antenna to insure maximum
tuner sensitivity.
2. The AM receiver uses an external AM loop antenna. If the AM reception is weak,
slightly rotating or re-positioning the loop antenna will usually improve the AM reception.
3. Automatic tuning depends on the signal strength of the broadcasting station, so weak
stations may be skipped. You can manually tune to find the weak stations if a station
gets skipped. With strong signals, the tuner may stop before it reaches the actual
broadcast frequency, so you may need to manually tune for the best reception.
PRESET MEMORY CHANNELS
1. Turn on the radio and press TUNE+ / TUNE- buttons to select the desired channel,
2. Press the MEMORY/SET button once, LED will flash, press PRESET+ / PRESETbutton to select location P01 ~ P10 for setting the channel, press MEMORY/SET button
to confirm.
3. Repeat steps 1 ~ 2 to set more channels. Both AM and FM stations can be pre-set
(up to 10 channels).
RECALL PRESET MEMORY CHANNELS
In AM / FM radio mode, recall the pre-set channels by pressing the
PRESET+ / PRESET – button.
11
LISTENING TO iPod AND iPhone
PLAYBACK
1. To play your iPod, insert the adaptor included with your iPod into the docking bay area.
To play your iPhone, insert the included adaptor into the docking bay area.
Your iPod / iPhone can now be docked by placing the connector on the bottom of the
iPod / iPhone onto the connector in the docking bay.
Note: 1. Please be careful when docking the iPod / iPhone. Excessive force or pressure
can damaging the 30-pin connector on iPod or on the docking system.
2. Use the right iPhone adaptor (2G or 3G) before plugging in your iPhone.
2. Press the power ON/OFF Button to turn on the unit.
3. Press the FUNCTION button to select “ iPod ” mode, “IPod” shows on LED display and
the system will start playback automatically.
4. Press the PLAY/PAUSE button to pause or resume iPod playback.
5. Press the UP or DOWN button to skip to next or previous track.
6. Adjust volume control to the desire volume level.
Note: The volume level cannot be adjusted using the volume control on your
iPod / iPhone after being docked.
7. To remove the iPod / iPhone from the unit, press and hold the PLAY/PAUSE
button
for five seconds to switch off the device and then gently remove ot form the docking
connector.
Note: 1. When playing your iPhone, playback will be suspended if there is an incoming
call, the iPhone will ring. Touch the Answer icon on your iPhone once to pick up
the call, touch the Speaker button once to answer the call in handsfree mode,
press the End Call Icon when you have finished your call. Music will resume.
2. To enhance sound quality in handsfree mode, you should always use the dock
adaptor when docking the iPhone.
CHARGING
When an iPod or iPhone is docked in the docking bay it will be charged in all function modes.
OTHER iPod / iPhone CONTROL FUNCTION KEYS
1. SHUFFLE : Press the “SHUFFLE/PRESET-“ button to play music from your iPod or
iPhone randomly.
2. REPEAT: Press the “REPEAT/PRESET+“ button to repeat a single track or repeat all
tracks from your iPod or iPhone.
Note: 1. To prevent damaging the dock connector, never twist the iPod / iPhone when
inserting or removing it. Make sure the connector in the dock is lined up with the
connector on the iPod before attaching.
2. Be careful not to knock over the iPod when it is inserted in the dock.
12
USING HEADPHONES (NOT INCLUDED)
Insert the plug of your headphones (not included) into the Headphone jack, on the back
of the unit and you can now listen in private. When using headphones, the speakers will
be disconnected automatically.
NOTE: READ THIS IMPORTANT INFORMATION BEFORE USING YOUR
HEADPHONES
1. Avoid extended play at very high volume as it may impair your hearing.
2. If you experience ringing in your ears, reduce the volume or shut off your unit.
3. Keep the volume at a reasonable level even if your headset is an open-air type
designed to allow you to hear outside sounds. Please note that excessively high
volume may still block outside sounds.
ALARM OPERATIONS
SETTING THE WAKE UP TIME
This unit has Dual Alarm function. Each ALARM can be set to wake to RADIO,
iPod / iPhone or ALARM. To set alarm time:
1. In standby mode, press and hold ALARM1 or ALARM2 button for 3 seconds to enter
the ALARM setting mode, LED shows the default alarm time 12:00 AM and the
ALARM1 or ALARM2 indicator flashing on the display.
2. Press UP / DOWN button to adjust minutes of you desired ALARM time. Press and hold
the button for fast forward / backward setting the alarm time.
3. Press ALARM1 or ALARM2 button again to confirm the ALARM time setting.
4. Press ALARM1 or ALARM2 repeatedly to select wake to ALARM (buZ) , RADIO (rAd),
iPod / iPhone (IPod) or turn off the alarm.
CHECKING THE WAKE UP TIMES
To check the wake up time, simply press and hold the ALARM 1 or ALARM 2 button for 3
seconds. The display will change from current time to wake up time. Release the ALARM
button, it will return to current time after 5 seconds.
WAKE TO RADIO
1. To select wake to radio mode, press the ALARM button you want to set repeatedly until
the display shows “rAd”.
2. Release the ALARM button and waiting about 3 seconds to confirm.
13
NOTE: The last radio station you listen to will be the same station you will wake to.
3. The radio will automatically turn on and the ALARM indicator will flash when the alarm
time is reached. The volume starts softly and becomes gradually louder.
4. The radio alarm will keep sounding for 60 minutes and then automatically shut off and
resets for wake up at the same time the following day.
5. To stop the alarm immediately, press the ON/OFF button once. The radio will stop but
the alarm remains set and will turn on again at the same time the following day.
6. To turn off the alarm completely, press the ALARM button repeatedly until the ALARM
indicator turns off.
WAKE TO iPod or iPhone
1. To select wake to iPod or iPhone mode, in standby mode, dock your iPod / iPhone into
the docking of the unit properly.
2. Press the ALARM button you want to set repeatedly until display shows “IPod”.
3. Release ALARM button and waiting about 3 seconds to confirm.
4. The iPod / iPhone will automatically turn on and ALARM indicator flashing when alarm
time is reached. It starts softly and becomes gradually louder.
5. The iPod / iPhone alarm will keep playing for 60 minutes and then automatically shut off
until same time on the following day.
6. To stop the alarm immediately, press the ON/OFF button once. The radio will stop but
the alarm remains set and will turn the unit on again at the same time on the following
day.
7. To turn off the alarm completely, press the ALARM button repeatedly until ALARM
indicator turns off.
NOTED: When “wake to iPod or iPhone” is selected but you iPod or iPhone has not been docked,
the alarm source will be redirected to the Bazzer automatically when the alarm time is reached.
WAKE TO BUZZER
1. To select wake to ALARM mode, press the ALARM button repeatedly until the display
shows “buZ”.
2. Release the ALARM button and wait about 3 seconds to confirm the setting.
3. The buzzer alarm will automatically turn on and the ALARM indicator will flash when
alarm time is reached. It starts softly and becomes gradually louder.
4. The buzzer alarm will keep sounding for 60 minutes and then automatically shut off and
resets for wake up at the same time the following day.
5. To stop the alarm immediately, press the ON/OFF button once. The buzzer alarm will
stop but the alarm remains set and will turn on again at the same time the following day.
6. To turn off the buzzer alarm completely, press the ALARM button repeatedly until
ALARM indicator turns off.
NOTE: If the second alarm time is set to go off before the first alarm period (60 minutes)
expires, first alarm will be turned off automatically when second alarm time is
reached.
14
SNOOZE OPERATION
You may active the SNOOZE function manually after the alarm sounds by pressing the
SNOOZE button. The snooze time can be adjusted from 1 ~ 30 minutes. The default
snooze time setting is 9 minutes.
SNOOZE TIME SETTING:
1. In standby mode, press and hold the SNOOZE for 3 seconds, the display shows current
snooze time and flashes.
2. Press the UP / DOWN button to increase / decrease the snooze time.
3. Snooze function only effective in 59 minutes., the alarm will not sound after that period.
SNOOZE FUNCTION
1. When the ALARM sounds, press the SNOOZE button to temporally pause the ALARM.
The ALARM will come again after the pre-set SNOOZE time is reached.
2. Pressing the SNOOZE button will display the remaining SNOOZE time left.
3. Manual SNOOZE operation can be repeated again within alarm duration (59 mins).
Actual buzzer duration will be 59 minutes minus SNOOZE time. E.g. after buzzing for
30 mins, 9 mins SNOOZE time selected, remaining buzzing duration will be 20 mins.
NAP OPERATION
You can set the alarm to go off for short catnaps up to two hours without disturbing the
regular alarm settings. The NAP function will wake you up after a short preset period of
time. You can set the NAP alarm time from 10 to 120 minutes.
1. Press the “NAP” button to enter NAP mode, the LED flashes showing ”20”, on the
display. Press the NAP button to show 20-30-60-120-OFF (showing normal clock).
2. Press the UP/DOWN buttons to set exact NAP alarm time you desired between
10 ~ 120 minutes.
3. Wait for 3 seconds to confirm, NAP time will stop flashing and return to normal clock
display.
4. When the countdown time has been reached, there will be a “beeping” alarm sound.
5. Press the snooze button to pause the NAP alarm. Alarm will sound again after snooze
expired.
6. NAP will stop automatically after sounding for 60 minutes if the SNOOZE button is not
pressed. Press the power ON/OFF button once if you want to cancel the NAP alarm
immediately.
15
SLEEP TIEMR OPERATION
The Sleep Timer allows you to set the unit automatically power off after a selected sleep
time duration is set. Sleep time function can be set from 1 minute to 120 minutes.
1. In unit power ON mode, press the SLEEP button to enter SLEEP setting. LED flashing
and showing “90”. Press the SLEEP button repeatedly, it shows 90-60-30-15-OFF
(display showing normal clock) for selection.
2. Press the UP / DOWN buttons to select exact minutes you desired.
3. Wait for 3 seconds to confirm, sleep time will stop flashing and return to normal clock
display. If sleep set successful, unit will automatically turns to standby mode when
pre-set sleep timer expired.
4. Press the sleep button once to check remained sleep time if necessary during sleep
timer count down.
5. To switch off the unit before the selected sleep time, press the power ON/OFF button
once.
Note :
If you are falling asleep to music from an external device connected to the AUX input,
the sleep timer will shut off the power to this system but it will not turn off the external
device.
BACKLIGHT BRIGHTNESS OPERATION
Press the DIMMER button to adjust the LED display Hi / Lo brightness. The brightness
default setting is Hi.
AUXILIARY INPUT
This unit provides an auxiliary audio signal input jack for connecting external audio
devices like MP3 players, CD players and older, non-dockable iPods and listen to your
external source through the speakers of this system.
1. Use an audio cable (not included) with one 3.5 mm stereo plug on each end of the cable.
2. Plug one end into the Aux-in jack on the main unit and the other end of the cable into the
Line-out Jack or Headphone Jack of your external audio device.
3. Turn on the external audio device.
4. To select auxiliary audio input, press the FUNCTION button to select Aux In mode. LED
display will show “AuH”
5. The volume level can now be controlled through the main unit. Operate all other
functions on the auxiliary device as usual.
16
Note:
If you connected the Line Out Jack of your external device then you only need to adjust
the volume control of this system. If you connected the Headphone Jack of your external
device then you may need to adjust both the volume control of your external device and
the volume control of this system to find the most desirable volume setting.
CARE AND MAINTAINANCE
- Do not subject the unit to excessive force, shock, dust or extreme temperature.
- Do not tamper the internal components of the unit.
- Clean your unit with a damp (never wet) cloth. Solvent or detergent should never be used.
- Avoid leaving your unit in direct sunlight or in hot, humid or dusty places.
- Keep your unit away from heating appliances and sources of electrical noise such as
fluorescent lamps or motors.
Resetting the Unit
If the unit is subject to a power surge or electric shock, it is possible that the internal
micro-controller may lock up and the unit will not respond to any commands from the top
panel controls or remote control.
1. In this event, unplug and then reconnect the AC power plug into the wall outlet.
2. Use a straightened paper clip, toothpick or similar objects to press the RESET button
located on the side of the main unit (see the below figure). The reset operation clears
the system memory and all of your previous settings will be erased.
CAUTION: DO NOT USE SHARP, POINTED OBJECT TO PRESS THE RESET
BUTTON. IT MAY DAMAGE THE RESET SWITCH INSIDE THE UNIT.
RESET
17
TROUBLESHOOTING GUIDE
Symptom
The unit does
not respond
(no power)
iPod / iPhone
does not
respond to
the speaker
system
iPod / iPhone
does not
charge up
AM band is
too noisy
Sound is
distorted
Solution
Possible Problem
AC Adaptor is not plugged into a wall outlet
or the connector is not plugged into the
power supply jack on the back of the unit.
Plug the AC adaptor into a wall outlet and plug
the connector into the supply jack on the unit.
Wall outlet is not functioning.
Plug another device into the same outlet to
confirm the outlet is working.
iPod / iPhone does not install properly.
Remove your iPod / iPhone from the dock and
check for obstruction on the connectors in the
dock and on your iPod/iPhone. Then reseat it
in the dock.
iPod / iPhone is not installed properly.
Remove your iPod / iPhone from the dock and
check for obstruction on the connectors in the
dock and on your iPod / iPhone. Then reseat
it on the dock.
Your iPod / iPhone is locked up.
Please make sure that your iPod/iPhone is
working properly before docking into the unit.
Please refer to your iPod / iPhone manual for
details.
iPod / iPhone is not installed properly.
Remove your iPod / iPhone from the dock and
check for obstruction on the connectors in the
dock and on your iPod / iPhone. Then reseat
it in the dock.
iPod / iPhone is locked up/ frozen.
iPod / iPhone battery has problem.
Please make sure your iPod / iPhone is working
properly before docking into the unit. Please
refer to your iPod ® manual for details.
The reception at the
set location is poor.
Slightly rotate the AM loop
antenna for the best reception.
Volume level is set too high.
Decrease the volume.
If the iPod original sound source is of poor
quality, distortion and noise are easily noticed
with high-power speakers. Try a different audio
source such as a music CD.
Sound source is distorted.
If you are using an external sound source like
older generation of iPod / iPhone, try reducing
the output volume on the device itself. Also try
turning bass boost OFF or change the EQ
setting.
Unit gets warm
after extended
This is normal.
play at high volume
Turn the unit off for a period of time or lower
volume.
18
SPECIFICATIONS
Power Supply
Power Adaptor (included):
Input: AC120V ~60Hz
Output: DC10V, 1400mA
Battery Back-up for Clock:
2 X DC1.5V ‘AA’ (UM-3)
Frequency Range
AM 520 – 1710 kHz, 10 kHz tuning step
FM 87.5 – 108 MHz, 0.1 MHz tuning step
"Made for iPod" means that an electronic accessory has been designed to connect
specifically to iPod and has been certified by the developer to meet Apple performance
standards.
Apple is not responsible for the operation of this devise or its compliance with safety and
regulatory standards.
iPod is a trademark of Apple Inc., registered in the U.S. and other countries.
SERVICE
Please refer to the instructions on the enclosed warranty card for returning your unit for
service. When returning the unit, please remove batteries to prevent damage to the unit in
transit and/or from possible leakage. We are not responsible for batteries returned with the
product or for the cost of replacement.
Distributed by:
SPECTRA Merchandising International, Inc.
Chicago Industry Tech Park
4230 North Normandy Avenue
Chicago, IL 60634, U.S.A.
Please have model number ready, for Customer Service, call 1-800-777-5331.
*The specification and external appearance of the set are subject to change without prior
notice.*
Printed in China
19