1
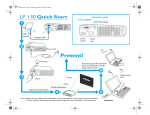
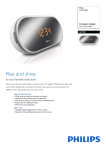
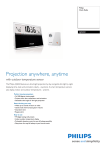
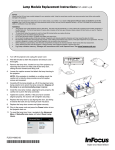
Lamp Module Replacement Instructions: SP-LAMP-084
NOTES:
Always use the InFocus lamp module designed for your projector model. Using the wrong lamp module may cause premature lamp failure and possible
damage to the projector.
SP-LAMP-084 – Used in IN134UST, IN136UST
You can order new lamps from www.infocus.com (in select areas), your retailer or your dealer. Only genuine InFocus lamps are tested for use in this
projector. Use of non InFocus lamps may cause electrical shock and fire, and may void the projector warranty. InFocus is not liable for the performance,
safety or certification of any other lamps.
WARNINGS:
•
The projector uses a high-pressure mercury glass lamp. The lamp may fail prematurely, or it may rupture with a popping sound if jolted, scratched, or
handled while hot. The risk of lamp failure or rupture also increases as the lamp age increases; please replace the lamp when you see the “Replace
Lamp” message.
•
To avoid burns, allow the projector to cool for at least 60 minutes before you replace the lamp.
•
Unplug the power cord before replacing the lamp.
•
Do not drop the lamp module. The glass may shatter and cause injury.
•
Do not touch the glass surface of the lamp module. Fingerprints can obscure projection sharpness and may cause the glass to shatter.
•
Be extremely careful when removing the lamp module. In the unlikely event that the lamp ruptures, small glass fragments may be generated. The lamp
module is designed to contain most of these fragments, but use caution when removing it.
•
Before replacing a ruptured lamp, clean the lamp compartment and dispose of cleaning materials. Wash hands after lamp replacement.
•
When replacing the lamp while the projector is ceiling-mounted, wear protective eyewear to prevent eye injury.
•
Hg-Lamp contains mercury. Manage with accordance with local disposal laws. See www.lamprecycle.org
1.
Turn off the projector and unplug the power cord.
2.
Wait 30 minutes to allow the projector and lamp to cool
thoroughly.
3.
Remove the screw on the lamp door.
4.
Remove the lamp door.
5.
Loosen the two captive screws that attach the lamp
housing to the projector.
NOTE: If the projector is installed on a ceiling mount, be
careful not to drop the lamp module once the captive
screws are loosened.
6.
Using the handle, carefully lift the lamp straight up, off of
the alignment pins; being careful not to pinch the lamp
connector. Dispose of the lamp in an environmentally
proper manner.
7.
Install the new lamp module, aligning the pins properly.
Be careful not to pinch the lamp connector.
8.
Tighten the screws. (NOTE: If the pins have not been
aligned properly, the screws will not tighten securely.)
9.
Replace the lamp door by putting the lamp door down
(the hinges should be aligned) and sliding it back into
place.
10. Replace the lamp door screw and tighten securely.
11. Plug in the power cord and press the Power button to
turn the projector back on.
Lamp Module Replacement Instructions: SP-LAMP-084
12. To reset the lamp hour timer, navigate to the
Installation II > Advanced menu and select Lamp
Hour Reset.
13. Press the ► or Enter button. The “Please See User
Manual…” message displays.
14. Press the arrow keys in the following order: ▼▲◄►.
15. Press the Menu button to return to the Installation II
menu.