1
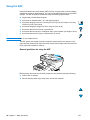
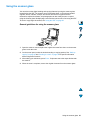
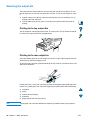
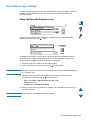
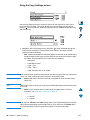
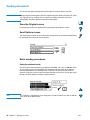
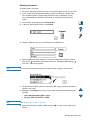
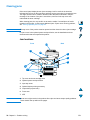
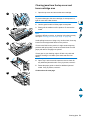
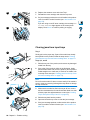
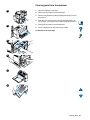
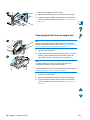
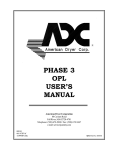
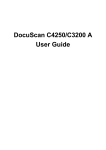
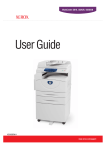
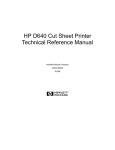
hp LaserJet 4100 mfp
use
2
Basic operations
Overview
This chapter introduces the basic copying, sending, and printing operations of the
HP LaserJet 4100 mfp series. Specific information about each of these functions is
presented in later chapters. This chapter includes these topics:
●
using the ADF
●
using the scanner glass
●
selecting the output bin
●
loading Tray 1
●
loading Trays 2, 3, and 4
●
printing and copying on both sides of paper (duplexing)
●
using special media, such as envelopes, letterhead, and transparencies
●
understanding job-handling priorities
Overview 19
Using the ADF
Using the automatic document feeder (ADF) is a fast, convenient way to feed multipage
originals for copying or digital-sending. You can load the ADF with as many as 30 sheets
of paper. The ADF accepts documents that meet the following specifications:
Note
●
single-sided or double-sided originals
●
documents on standard letter-, A4-, and legal-size paper
●
documents ranging in size from 148.5 by 210.0 mm (5.9 by 8.3 inches) to 215.9 by
355.6 mm (8.5 by 14.0 inches)
●
documents ranging in weight from 60 to 135 g/m2 (16 to 36 lb)
●
documents that are free of tears or perforations
●
documents that are square or rectangular and in good condition (not fragile or worn)
●
documents that are free of glue, correction fluid, or wet ink
Do not use multipart forms.
The ADF passes the original document across the scanner glass, and returns it to the
upper-level tray located to the right of the ADF. Copies made using the ADF are delivered
to the output bin beneath the scanner.
General guidelines for using the ADF
Before placing documents into the ADF, prepare the documents by doing the following:
●
Flatten curls or wrinkles.
●
Remove staples, paper clips, sticky notes, and similar materials.
20 Chapter 2 – Basic operations
EN
Using the scanner glass
You can also use the digital-sending and copying features by using the scanner glass,
located below the ADF. The scanner can accommodate letter- or A4-size and smaller
originals, books, manuals, receipts, and similar documents. Irregular and worn
documents, stapled documents, and photographs can also easily be sent or copied
using the scanner glass. Multiple-page, letter-size documents can be fed using the ADF.
To send or copy larger documents, see “Using the ADF” on page 20.
General guidelines for using the scanner glass
1
Open the scanner cover and place the original document face down on the scanner
glass. Lower the cover.
2
On the control panel, select the desired sending or copying options. See “Walk-up
copying” on page 43 and “Sending to e-mail” on page 49 for specific information
about using these functions.
3
After making your selections, press START. Copies are sent to the output bin beneath
the scanner.
4
When the scan is complete, remove the original document from the scanner glass.
Using the scanner glass 21
Selecting the output bin
The printer has two output locations: the rear output bin and the top output bin. To use
the top output bin, be sure the rear output bin is closed. To use the rear output bin, open
it.
●
If paper coming out of the top output bin has problems, such as excessive curl, try
printing to the rear output bin.
●
To avoid paper jams, do not open or close the rear output bin while the printer is
printing.
Printing to the top output bin
The top output bin collects paper face-down, in correct order. The top output bin should
be used for most print jobs and for transparencies.
Printing to the rear output bin
The printer always prints to the rear output bin if the bin is open. Paper printed to this bin
will be face-up, with the last page on top.
To open the rear output bin, grasp the handle at the top of the bin. Pull the bin down, and
slide out the extension.
Printing from Tray 1 to the rear output bin provides the straightest paper path (which can
reduce curl). Opening the rear output bin might improve performance with the following:
Note
●
envelopes
●
labels
●
small custom-size paper
●
postcards
●
paper heavier than 105 g/m2 (28 lb)
Opening the rear output bin disables the duplexer (if installed) and the top output bin.
22 Chapter 2 – Basic operations
EN
4
Walk-up copying
Overview
You can easily make black-and-white copies by using the HP LaserJet 4100 mfp series.
This chapter provides instructions for making copies and changing copy settings.
The MFP functions as a standalone walk-up copier—you do not have to have software
installed or a computer turned on to make copies. You can adjust copy settings at the
control panel. Originals can be copied using either the ADF or the scanner. Copy, print,
and send jobs can be processed simultaneously.
The topics in this section include the following:
●
using the system defaults
●
using one-touch copying
●
using the Describe Original and Copy Settings screens
●
duplexing a copy job
It is helpful to review the chapter entitled “Control panel and control panel menus” on
page 33 before using the copying functions. For information about changing the default
copy settings, see the “System administrator guide” on page 137.
Overview 43
Performing basic copying
Copy defaults
The preset default copy settings for the HP LaserJet 4100 mfp series are:
●
single-copy output
●
letter-sized original and letter-sized copy (in North America only; otherwise, the
default is A4)
●
single-sided original and single-sided copy
●
mixed text, and graphic photo document content
●
normal brightness
●
no reduction or enlargement (100%)
●
one page per sheet (1-up) copying
One-touch copying
If you wish to make a single copy using the product’s default settings, place your
document in the ADF or on the scanner glass and press START.
Multiple copies
To make multiple copies, use the numeric keypad to type the desired number of copies
(1 to 99), and then press START.
44 Chapter 4 – Walk-up copying
EN
User-defined copy settings
To make copies at settings other than the system defaults, navigate through the Describe
Original and Copy Settings screens. The use of these screens is explained in the
following sections.
Using the Describe Original screen
From the top-level screen, enter the Describe Original screen by clicking Describe
Original and then pressing the
button.
To change the description of your original, use the up and down navigation buttons to
move through the Describe Original screen to the desired setting box. Confirm your
choices by pressing
when the correct setting is highlighted.
Note
1
Place the original in the ADF or on the scanner glass.
2
While in the Describe Original screen, press
to view options.
If the original is Letter-size or A4-size and you plan to use the copier defaults, simply press
START to make a copy.
3
Review the options by using the navigation buttons and select the items that
describe your original by pressing
. The options are:
• Size: select Letter, Legal, Executive, A4, A5, or B5
• Sides: select 1 or 2
• Content: select Text, Mixed or Photo
4
Note
When you have made your selections, navigate to and click OK. This returns you to
the top-level screen.
Changes made are reflected in the “original” graphic.
User-defined copy settings 45
Using the Copy Settings screen
Use the Copy Settings screen to select the options for the copies to be made if onetouch copying is not used. This screen allows you to scroll through various options,
pressing
to select features. Additional copy features are available through the Copy
and Send menus.
1
Navigate to the Copy Settings screen and press
. Scroll downward through the
menu options to select the characteristics of the copies to be made. Available
options include the following:
• Size: media sizes available for selection depend on the sizes of the media that is
actually loaded into the trays, since the MFP senses media sizes when the trays
are loaded. Scroll through the list to select from the following:
Note
•
Auto-Letter
•
Letter-Manual Feed
•
Legal - Tray 1
•
Letter - Tray 2
•
Legal, Executive, A4, A5, or JISB5
Auto means that the output size will match the size of the original. When you select AutoLetter, your Letter-sized original will be copied to Letter-sized media.
• Scale to Fit: source document contents are adjusted to fit the selected media
output size.
Note
Other media sizes are listed, but a tray must be loaded with these media sizes for them
to be used.
• Sides: choose whether input is printed single or double-sided. For further
information, see “Duplexing a copy job” on page 47.
Note
•
1
•
2 - Normal
•
2 - Flipped
If you select 2 - Normal in the Sides setting option in the Copy Settings screen, the back
side of the two-sided page is printed right-side up. If you select the 2 - Flipped option,
the back-side image is printed upside down relative to the front-side image.
46 Chapter 4 – Walk-up copying
EN
• Quality: select output quality of an image. “Best” optimizes the output quality.
Note
•
Normal
•
Best
If you select Best, scanning speed will be somewhat slower than when operating in
Normal mode.
• Pages per sheet: select the number of originals pages on each output sheet.
•
1 (one sheet per page, with no border)
•
2 or 2 Borders (two sheets per page, without or with borders)
•
4 or 4 Borders (four sheets per page, without or with borders)
• Background: allows removal of shading when copying an original with a colored
background, or removal of bleedthrough from the second side of a two-sided
original. Using the right or left navigation buttons, slide the slider bar to the
desired setting.
• Collate: allows printing multiple copies in sets or page number groupings. For
example, if you are making two collated copies of a three-page document, the
copies print in this order: 1,2,3; 1,2,3. Collate it the default for this MFP.
Note
•
Collate (123, 123, 123)
•
Uncollate (111, 222, 333)
2
When you are finished, navigate to and click OK and press
.
3
Make any necessary adjustments to the contrast using the light/dark buttons and
enlarge/reduce buttons at the right-hand side of the control panel to zoom in onedegree increments.
4
Use the numeric keypad to indicate the desired number of copies, and then press
START.
The Copy Settings screen shows an image that represents modifications made to achieve
the desired output.
Duplexing a copy job
Any copy job can be duplexed. See “Duplex copying and printing” on page 29 for general
information. These duplexing options are available:
Note
●
One side to two sides. If a duplexer is installed and you are using the ADF, this
duplexing is done automatically. If you are using the scanner glass, you are
prompted to place the next original on the glass.
●
Two sides to one side. When this option is selected, you are prompted to turn the
page over to copy the second side. Either the scanner glass or the ADF can be used.
A duplexer is not required.
●
Two sides to two sides. This option requires that a duplexer be installed. When you
select this option, you are prompted to turn the originals over to copy the second
side whether you are using the ADF or the scanner glass.
When copying two sides to two sides, the MFP scans each page and stores the page
images on the hard disk until both sides of each original have been scanned and placed
into the correct order. For this reason, you will experience a slight delay before the copy
job starts to print. After copying begins, output will be at normal speed.
User-defined copy settings 47
Adjusting the contrast
Press the light/dark buttons on the right side of the control panel to lighten or darken your
copies. After your copies are made, the contrast setting returns to the default setting.
Improving copy quality
When you establish your copy parameters on the Copy Settings screen, select Best from
the Quality options.
You can also modify the copy quality with the Content option on the Describe Original
screen. The default setting is Mixed. When copying a photograph or graphic, you can
select Photo to improve copy quality, or select Text for a document that contains only
text.
Reducing or enlarging copies
By using the enlarge/reduce buttons on the right side of the control panel, you can
reduce copies to 25 percent of the original size or enlarge them up to 400 percent (up to
200 percent from the ADF), in one-percent increments. Also, if you specify a standard
sized document on the Describe Original screen and a different standard size on the
Copy Settings screen, the image will be scaled automatically.
Note
The HP LaserJet 4100 mfp series printer has reduce/enlarge presets for standard media
sizes. For example, if a Legal sized original is copied onto a Letter sized paper, the image
is automatically reduced to fit. Likewise, an A5 original is enlarged to fit on A4 media.
48 Chapter 4 – Walk-up copying
EN
5
Sending to e-mail
Overview
The HP LaserJet 4100 mfp series can scan documents to any e-mail address.
Note
The MFP can send color images, although it cannot copy or print in color.
The following topics are addressed in this chapter:
●
introduction
●
sending documents
●
available file formats
●
using and managing address books
Introduction
Send to email (part of the Digital-sending suite) is similar to faxing information, but offers
these advantages:
●
sends mail to multiple e-mail addresses simultaneously, saving time and delivery
costs
●
ensures privacy by sending information directly to e-mail in-boxes rather than to a fax
machine, which might have many users
●
delivers files at near-original quality in black and white or in color
●
sends files in JPEG, PDF, and TIFF file formats, which can be modified by the
recipient in computer programs
Documents are scanned and sent as attachments to an e-mail address. Digital
documents can be sent in the formats shown above, enabling recipients to manipulate
the document in various programs to meet their specific needs. The e-mailed document
can be printed for your records.
By using HP Smart Compression technology, digital-sending keeps file sizes small,
minimizing the impact on the network. Documents arrive in near-original quality. Like
other e-mail messages, the documents can be printed, stored, or forwarded.
The HP LaserJet 4100 mfp series connects directly to the LAN, so that you can send
digital documents without a dedicated computer. E-mail processing is done entirely
within the product, from scanning through communicating with the network SMTP
gateway. E-mail addresses can be acquired from an at-device address book or an LDAP
server. The system administrator can configure e-mail parameters either over the
network using the embedded Web server or HP Web JetAdmin, or at the control panel.
Overview 49
Sending documents
You can use the digital-sending feature with either the scanner glass or the ADF.
Note
When using the scanner glass, place the original face down. When using the ADF, place
the originals face up. Irregular, worn, or previously folded documents, as well as
photographs, should be scanned using the scanner glass.
Describe Original screen
If necessary, describe your original before entering the Send Options screen.
Send Options screen
The Send Options screen on the control panel display allows you to describe parameters
for sending a document to an e-mail address.
Basic sending procedures
Using the address books
Use the control panel keyboard to type data into the From:, To:, CC:, or Subject: fields.
As you begin to type e-mail addresses, the MFP automatically searches the address
book and displays the first matching name or address. You can select that name, or
continue to type the name until auto-complete finds the correct entry. You can also scroll
through the name listings to locate the desired names.
Note
If a recipient’s e-mail address is not recognized, you will be asked if you wish to add the
entry to the local address book.
50 Chapter 5 – Sending to e-mail
EN
Sending a document
To digitally send a document:
Note
1
Place your original document face-down on the scanner glass or face-up in the ADF.
2
If your original matches the default settings (mixed text and photo, default media
size, standard resolution, single-sided), proceed to step 3. Otherwise, use the
control panel display to describe the document by using the Describe Original
screen.
3
On the control panel display, select Send Options.
4
In the main Send Options screen, select E-mail.
5
Using the keyboard, type your e-mail address in the From: field.
6
Type the addresses of the recipient(s), or select the addressees from the address
book. Press
to add the names to the recipient list. Navigate to OK and press
.
The main e-mail screen appears.
You can review and edit the recipient list using the View List option, shown below.
7
Using the same method, enter the names of any CC: (copy) recipients, and type the
subject of the e-mail.
8
Navigate to the Settings field. Here you can select document parameters from the
following:
• Color: Black and white (B/W) or Color
• File type: PDF, TIFF, M-TIFF, or JPEG
Note
See “Available file formats” on page 52.
9
Make your selections, navigate to OK, and press
screen.
. You then return to the e-mail
Sending documents 51
8
Problem solving
Overview
This chapter will help you troubleshoot and solve problems that might occur while using
the HP LaserJet 4100 mfp series.
Clearing jams
Occasionally, media might jam during copying and printing. This section
helps you locate jams, properly clear them from the product, and solve
repeated jams.
Understanding
control panel error
messages
Many of the messages that appear on the control panel are selfexplanatory. However, some messages indicate a problem that requires
intervention, or request further action. This section lists these messages
and recommends corrective actions.
Correcting output
quality problems
The product should produce high-quality jobs. If copy or print jobs do not
look sharp and clear; if defects such as lines, specks, or smears appear
on the page; or if media is wrinkled or curled; use this section to
troubleshoot and solve the output quality problem.
Understanding
error messages for
the hard disk, FIR
port, and PS
Additional messages are shown on the control panel to help you
troubleshoot issues that involve the hard disk, the FIR port connection,
and PS.This section lists these types of messages and recommends what
to do.
Overview 77
Clearing jams
If the control panel display shows a jam message, look for media in the locations
indicated in the figure on the next page, and then see the procedure for clearing the jam.
You might need to look for media in locations other than those indicated in the jam
message. If the location of the jam is not obvious, look first in the top cover area
underneath the toner cartridge.
When clearing jams, be very careful not to tear the media. If a small piece of media
remains in the product, it could cause additional jams. If jams are a recurring problem,
see “Solving repeated jams” on page 85.
Note
The top cover of the product must be opened and then closed to clear a jam message.
If a jam occurs in the optional power envelope feeder, see the installation and use
documentation that accompanied the product.
Jam locations
Front
7
Back
1
5
6
5
4
2
3
Note
1
Top cover and toner cartridge area
2
Optional power envelope feeder
3
Input tray areas
4
Optional duplex printing accessory
5
Output bins (top and rear)
6
Fuser area
7
ADF
Loose toner might remain in the product after a jam and cause output quality problems.
These should clear up within a few pages.
78 Chapter 8 – Problem solving
EN
Clearing jams from the top cover and
toner cartridge area
1
1
Open the top cover and remove the toner cartridge.
CAUTION
To prevent damage to the toner cartridge, do not expose it to
light for more than a few minutes.
2
2
Use the green handle to lift the paper-access plate.
3
Slowly pull the media out of the product. Do not tear the
media.
Note
If media is difficult to remove, try clearing it from the input tray
area (see “Clearing jams from input trays” on page 80).
3
Avoid spilling loose toner. Using a dry, lint-free cloth, clean any
loose toner that might have fallen into the product.
If loose toner falls into the product, it might cause temporary
problems with print quality. Loose toner should clear from the
paper path after a few pages are printed.
4
If toner gets on your clothing, wipe it off with a dry cloth and
wash the clothing in cold water. (Hot water sets toner into
fabric.)
4
Open Tray 1 and remove the entrance cover to check for
any additional jammed media. If any is present, remove it.
5
Rotate the paper guide to check for additional jammed
media. If any is present, remove it.
Continued on the next page.
5
Clearing jams 79
6
6
Replace the entrance cover and close Tray 1.
7
Reinstall the toner cartridge and close the top cover.
8
If a jam message persists, there is still media in the product.
Look for media in another location (see “Jam locations” on
page 78).
If you are using a non-HP toner cartridge, the message NON
HP TONER DETECTED might appear on the control panel
display. Press START to continue printing or copying.
7
Clearing jams from input trays
1
Tray 1
Slowly pull out the paper tray. If part of the media has already
been pulled into the product, follow the steps under “Clearing
jams from the top cover and toner cartridge area” on page 79.
Trays 2, 3, and 4
2
3
5
80 Chapter 8 – Problem solving
1
Slide the tray out of the product, and remove any damaged
media from the tray.
2
If the edge of the media is visible in the feed area, slowly
pull the media down and out of the product. (Do not pull the
media straight out or it will tear.) If media is not visible, look
in the top cover area (see “Clearing jams from the top cover
and toner cartridge area” on page 79).
Note
Do not force the media if it does not move easily. If the media is
stuck in a tray, try removing it through the tray above or through
the top cover area.
3
Make sure the media lies flat in the tray at all four corners
and is tucked below the front and back tabs. Make sure that
all three paper size adjustments are correct (see “Loading
Tray 2 and optional Trays 3 and 4” on page 24).
4
Slide the tray back into the product.
5
Open and close the top cover to clear the jam message.
6
If the jam message persists, media remains in the product.
Look for media in another location (see “Jam locations” on
page 78).
EN
Clearing jams from the duplexer
1
2
1
Open the duplexer’s rear door.
2
Slowly pull any media out of the duplexer.
3
Remove the duplexer by lifting it slightly and pulling it out of
the product.
4
From the rear of the product, remove any media that is on
top of Tray 2. (You might need to reach inside the product.)
5
Slowly pull any media out of the duplexer.
6
Turn the duplexer over and remove any media.
Continued on the next page.
3
4
5
6
Clearing jams 81
7
7
Reinsert the duplexer into the product.
8
Open and close the top cover to clear the jam message.
9
If a jam message persists, media remains in the product.
Look for media in another location (see “Jam locations” on
page 78).
Clearing jams from the rear output slot
1
Note
If most of the media remains inside the product, it is best to
remove it through the top cover area. (See “Clearing jams from
the top cover and toner cartridge area” on page 79.)
1
Open the rear output slot.
2
Grasp both sides of the media, and slowly pull it out of the
product. (There might be loose toner on the media. Be
careful not to spill it on yourself or into the product.)
4
Note
If media is difficult to remove, try opening the top cover
completely to release pressure on the media.
If the media has torn or if you still cannot remove the media, see
“Clearing jams from the fuser area” on page 83.
82 Chapter 8 – Problem solving
3
Close the rear output slot.
4
Open and close the top cover to clear the jam message.
5
If a jam message persists, media remains in the product.
Look for media in another location (see “Jam locations” on
page 78).
EN