1
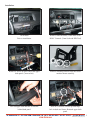
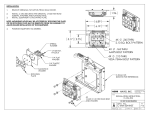
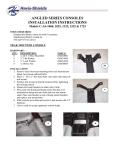
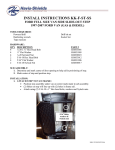
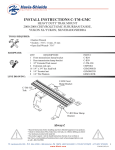
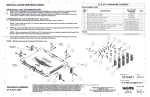
INSTALL INSTRUCTIONS S-DMM-XXX-CV-SO
1996-2008 CROWN VICTORIA
SWING-OUT DASH MONITOR MOUNT
**Does not work on 2008 Police Package Crown Vic with optional CD player**
TOOLS REQUIRED:
• Ratchet Wrenches
• Sockets - 7mm, 7/16”, 9/16”
• Open End Wrenches - 7/16”, 9/16”
• Phillips Screwdriver
• T-20 Torx Driver
• AM/FM (DIN) Removal Tool
HARDWARE:
QTY:
1
2
1
4
1
1
1
DESCRIPTION:
3/8”-16 x 1 Hex Bolt
3/8” Flat Washer
3/8” Nylock Nut
1/4-20 Hex Flange Serrated Nut
3/8” Self Adhesive Loom Clip
6” Wire Tie
Monitor Adapter Hardware
PART #:
GSM33028B
GSM31007B
GSM30018B
GSM30023
GSM20032
GSM20034
Varies (monitor specific)
LINE DRAWING:
This instruction
shows installation of a
Data-911 computer
Always!
• Read all instructions before installing any Havis-Shields Equipment Corp products.
• Check for obstructions (Wire, brake lines, fuel tank, etc.) before drilling any holes!
• Use hardware provided with install kit
• For product support: visit the Install Instructions Section of our website at
http://havis.com/Installation/Installation.html, email [email protected]
or call 1-800-524-9900.
1
S-DMM-XXX-CV-SO_INST_3-08a
Installation:
OEM Dash
Prior to installation.
Remove AM/FM Radio, Center Dash Trim,
HVAC Controls. (7mm Socket & DIN Tool)
#1
#2
#3
Remove 4 screws at lower end of the upper
dash panel. (7mm socket)
Remove mounting brackets from new dash
monitor mount assembly.
Pull out upper dash and tuck #2 bracket
behind dash panel.
Hole in #2 bracket will line up with large
hole in dash steel frame. Reattach upper dash
panel.
2
S-DMM-XXX-CV-SO_INST_3-08a
Attach #2 bracket to dash frame with 3/8”
hex bolt, washers, and nut.
Tighten 3/8 bolt.
(9/16 socket and wrench)
Slip #1 bracket over plastic AM/FM radio
support.
Reattach center dash trim and run computer
wires.
Run computer wiring through notch (top
passenger side) and place monitor mount into
dash cavity.
Attach monitor mount to #1 and #2 brackets
with 1/4” bolts provided.
3
S-DMM-XXX-CV-SO_INST_3-08a
Position assembly and tighten bolts.
Attach top & bottom dash clamps (#3 bracket)
with #8x1” phillips machine screws.
Dash mount installed. Check computer
wiring length and find AM/FM wiring.
Attach computer wiring and monitor adaptor
bracket.
Note: Some computers require wiring to be
connected prior to attaching adaptor bracket.
Determine desired position of monitor.
4
S-DMM-XXX-CV-SO_INST_3-08a
Attach monitor bracket to dash mount with
1/4” nuts.
Position and wire tire wiring.
Wiring complete.
Connect AM/FM radio harness and antenna
cable. Check radio operation. Snap radio into
mount bracket.
Dash monitor mount and console installation complete.
5
S-DMM-XXX-CV-SO_INST_3-08a