1
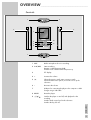
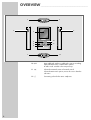
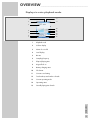
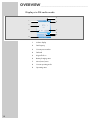
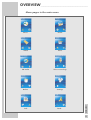
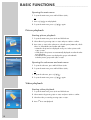
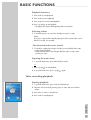
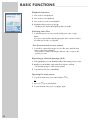
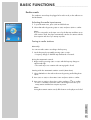
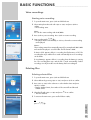
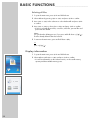
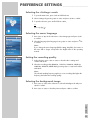
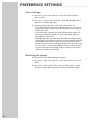
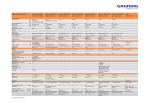
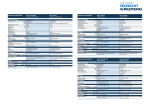
PORTABLE
MEDIA PLAYER
MPixx 2001 FM/1GB
MPixx 2002 FM/2GB
CONTENTS
4
_____________________________________________________________________
MPixx 2001/2 FM/1/2GB
Supplied accessories
Special features
Safety
Environmental note
5
Overview
Controls
Displays in music playback mode
Displays in video mode
Displays in voice playback mode
Displays in FM radio mode
Menu pages in the main menu
12
Connection and Preparation
Power supply
Connecting to the computer
Disconnecting from the computer
Connecting earphones
14
General functions
Switching on and off
Adjusting the volume
Unlocking the buttons
Selecting the operating modes
Opening the main menu
Resetting the player
16
Basic functions
Music playback
Picture playback
Video playback
Voice recording playback
Radio mode
Voice recordings
Deleting files
Display information
25
Preference settings
Selecting the »Settings« mode
Selecting the menu language
Setting the recording quality
Selecting the background image
Timer settings
Resetting the player
2
CONTENTS
27
_____________________________________________________________________
Operating with a computer
System requirements
Installing the player
Connecting to the computer
MP3/WMA data transfers
Transferring DRM-protected WMA data
Converting video files to SMV format
Disconnecting from the computer
Information
Technical data
ENGLISH
30
3
MPixx 2001/2 FM/1/2GB
___________________________
Supplied accessories
1 Installation CD
3
USB charger
2 Stereo earphones
4
Brief instructions
Note:
The accessory components supplied can change.
Special features
MP3/WMA player, player for picture and video files, recording device, FM
radio and USB removable disc in one.
Safety
This device is intended for the reproduction of music, picture, video and voice
files and serves as a removable disc. Any other use is expressly prohibited.
Do not drop the device. Avoid pressing on the display. Do not place the device
near magnetic objects.
Make sure that the equipment is protected from moisture (dripping or splashing
water), sunlight and heat.
Never open the device casing. No warranty claims are accepted for damage
caused by incorrect handling.
Do not expose the battery to extreme heat, caused for example by direct sunlight, heaters or fire.
Environmental note
This product has been made from high-quality parts and materials which can be
re-used and recycled.
Therefore, do not throw the product away with normal household waste at the
end of its service life. Take it to a collection point for recycling electrical and
electronic devices. This is indicated by this symbol on the product, in the operating manual and on the packaging.
Please find out about collection points operated by your local authority.
Help protect the environment by recycling used products.
4
OVERVIEW
_____________________________________________________________________
Controls
1
8
2
9
3
4
10
5
11
6
1 MIC
Built-in microphone for voice recording.
2 A-B/REC
Starts recording.
Repeats a selected passage (A-B).
In radio mode: switches to the next preset up.
3
TFT display.
4 +
Increases the volume.
5
Selects the previous track; starts a reverse search.
Selects the main menu options, moves the cursor up the
sub-menu.
8
6 –
Decreases the volume.
7
USB port for connecting the player to the computer or USB
charger using a USB cable.
8 RESET
Resets the player.
9 9/7/
Switches the player on and off; ends playback or the
recording.
Switches back a menu level in the sub-menu.
Switches the key lock off.
ENGLISH
12
7
5
OVERVIEW
_____________________________________________________________________
1
8
2
9
3
4
10
5
11
6
12
7
10 sII
Starts playback; switches to playback or pauses recording.
Opens the main menu; confirms menu options.
In radio mode: switches to the next preset up.
11
Selects the next track; starts a forwards search.
Selects the main menu options, moves the cursor down the
sub-menu.
9
12 0
6
Connecting socket for the stereo earphones.
OVERVIEW
_____________________________________________________________________
Displays in music playback mode
1
8
2
9
3
4
11
12
5
6
13
14
7
15
1
Playback mode
2
Volume display
3
Name of file or track
4
Level display
5
Bit rate
6
Sampling frequency
7
Elapsed playing time of track
8
Keypad lock on
9
Battery charging status
10
File format
11
Current sound setting set (e.g. JAZZ)
12
Track number, total number of tracks
13
Current operating mode (e.g. music)
14
Operating status (playback s, pause II, standby 7, recording •)
15
Overall playing time of track
ENGLISH
10
7
OVERVIEW
_____________________________________________________________________
Displays in video mode
1
6
2
7
3
8
9
10
11
12
13
4
5
8
1
Playback mode
2
Volume display
3
Video file name
4
Sampling frequency
5
Elapsed playing time
6
Keypad lock on
7
Battery charging status
8
File format
9
Current sound setting
10
Track number, total number of tracks
11
Current operating mode
12
Operating status
13
Overall playing time of track
OVERVIEW
_____________________________________________________________________
Displays in voice playback mode
1
8
2
9
3
4
11
5
6
12
13
14
7
15
1
Playback mode
2
Volume display
3
Name of voice file
4
Level display
5
Bit rate
6
Sampling frequency
7
Elapsed playing time
8
Keypad lock on
9
Battery charging status
10
File format
11
Current sound setting
12
Track number, total number of tracks
13
Current operating mode
14
Operating status
15
Overall playing time of track
ENGLISH
10
9
OVERVIEW
_____________________________________________________________________
Displays in FM radio mode
5
1
6
2
7
3
8
9
4
10
1
Volume display
2
FM frequency
3
Current preset number
4
FM band
5
Keypad lock on
6
Battery charging status
7
Mono/mute/stereo
8
Current operating mode
9
Operating status
OVERVIEW
_____________________________________________________________________
Music
Photo
Video
Voice
FM radio
Voice recordings
Delete
Settings
Info
Back
ENGLISH
Menu pages in the main menu
11
CONNECTION/PREPARATION
___________________
Power supply
The player operates with the integrated lithium-polymer battery 1 x 3.7 V,
500 mA.
Charging the battery
Charge the battery using the computer or with the charger supplied. You can
also charge the player by connecting it to a USB compatible hi-fi system using a
USB cable.
Note:
When charging the battery with the charger supplied, the player is still ready
for operation.
1 Connect the USB interface of the player via the USB cable with the appropriate interface on the computer, the charger or hi-fi system.
2 Switch on the computer or hi-fi or connect the charger to the power supply.
– The display indicates the charging progress. The charging time is approximately four hours. You can see in the »P« display when the battery is
fully charged.
Notes:
The display of the player tells you about the state of the battery. If you see
»Ä« in the display, the battery is running low.
The playing time of the device with batteries is up to twenty hours in audio
mode and up to six hours in video mode.
Note:
There is a risk of explosion if the battery is not replaced properly. Only use
the same type of battery or an equivalent.
Connecting to the computer
1 Switch on the computer.
2 Switch off the player.
3 Connect the USB interface of the player to the respective interface on the
computer via a USB cable.
– A display will appear as soon as the connection is made.
12
CONNECTION/PREPARATION
___________________
Disconnecting from the computer
If there is no data transfer in progress, you can disconnect the player from the
computer.
Before you disconnect the player's cable connection to the computer, you must
remove the player from the Windows desktop by following the Windows instructions for “Removing hardware”.
Note:
Do not disconnect the player from the computer while a data transfer is in
progress. This can damage the data irreparably.
1 Double-click on the symbol for removing hardware.
– The “Remove hardware” window appears.
2 To continue, follow the instructions on the screen.
Note:
The circuits of the player and the computer can be seriously damaged if you
do not follow the instructions for Windows ME / 2000 / XP.
Connecting earphones
1 Plug the earphones into the »0« socket of the player.
ENGLISH
Note:
Prolonged listening at loud volumes can damage your hearing.
13
GENERAL FUNCTIONS
_______________________________________
Switching on and off
1 Switch the player on by pressing »9/7/ « down until the logo appears
on the display.
– Display: »Waiting...«. The player then switches to the most recently
selected operating mode.
2 Switch on the player by pressing »9/7/ « until »Bye Bye!« appears in
the display.
Adjusting the volume
1 Adjust the volume by pressing »+« or »–« during music playback.
Unlocking the buttons
The software controls the key lock. During music playback, voice file and FM
radio playback, the key lock switches on automatically. When the buttons are
locked, the » « display appears. If you press a button, the »Key Locked!« display appears.
1 To unlock the buttons, press »9/7/ «.
– Display: » «.
Selecting the operating modes
1 To open the main menu, press and hold down »sII«.
– The »Music« mode appears.
2 Press »8« or »9« to select the playback mode, and then press »sII« to
activate.
– »Music«: Music playback.
– »Photo«: Picture playback.
– »Movie«: Video playback.
– »Voice«: Voice file playback.
– »FM radio«: FM radio reception.
14
GENERAL FUNCTIONS
_______________________________________
Opening the main menu
1 To open the main menu, press and hold down »sII«.
– The »Music« menu appears.
2 Open the »Music« menu by pressing »sII« and select the sub-menu (such
as, »Play All« or »Folder Navigation«) with »8« or »9« and press
»sII« to activate.
3 To exit the sub-menu, briefly press »9/7/ «.
4 To exit the main menu, press »9/7/ « again
or
select »8« or »9« »Exit« and confirm with »sII«.
– The player returns to the operating mode last used.
Resetting the player
In the event of a malfunction during operation or the player no longer responds
to key commands, you can reset the player.
1 To reset, use a pointed object, such as a paper clip, to press »RESET«.
ENGLISH
Note:
When resetting, the player should not be connected to the computer or the
USB charging device.
15
BASIC FUNCTIONS
________________________________________________
Music playback
Starting music playback
1 To open the main menu, press »sII« and hold it down.
2 Select »Music« by pressing »8« or »9« and press »sII« to confirm.
3 Press »8« or »9« in the sub-menu to select »Play All« and press »sII«
to confirm.
– All the music files are played in succession.
Opening the navigation mode
In the navigation mode, all the files and folders are displayed.
1 To open the main menu, press »sII« and hold it down.
– The »Music« menu appears.
2 Open the sub-menu with »sII«.
3 Press »8« or »9« in the sub-menu to select »Folder Navigation« and
press »sII« to confirm.
4 Press »8« or »9« to select the folder or file and confirm with »sII«.
– Playback starts.
Note:
Open individual folders by pressing »+« and exit with »–«..
Playback functions
1 Press »sII« to start playback.
2 Press »sII« to pause playback.
3 Press »sII« to resume normal playback.
4 Press »9/7/ « to end playback.
Selecting tracks
1 To select the previous or next track, briefly press »8« or »9«.
Note:
If you press »8« and the elapsed playing time of the current track is more
than five seconds, it is repeated.
Fast forward and reverse search
1 To search for a particular passage of a track, press and hold down »8« or
»9« during playback.
– Fast forward or reverse search begins. Release »8« or »9« at the
position you want.
16
BASIC FUNCTIONS
________________________________________________
Repeating a selected passage (A-B)
1 During playback, press »A-B/REC« briefly at the starting point you want.
2 Briefly press »A-B/REC« again when the end point is reached.
– The selected passage is continuously repeated.
3 To quit this function, press »A-B/REC«.
Select playback mode.
1 To open the main menu, press »sII« and hold it down.
2 Select the »Settings« menu with »8« or »9« and press »sII« to confirm.
3 Press »8« or »9« in the sub-menu to select »Play Mode« and press
»sII« to confirm.
4 Press »8« or »9« to select the playback mode, and then press »sII« to
confirm.
– »Normal«: all the tracks in the current folder and its sub-folder are played
in the usual order.
– »Repeat One«: the current track is repeated constantly.
– »Repeat All«: all the tracks in the current folder and its sub-folder are
repeated constantly.
– »Random«: all the tracks in the current folder and its sub-folder are
played in random order.
– »Random & Repeat All«: all the tracks in the current folder and its
subfolder are played continuously in random order.
Selecting sound settings
You can choose between various preset sound settings.
1 To open the main menu, press »sII« and hold it down.
2 Select the »Settings« menu with »8« or »9« and press »sII« to confirm.
3 Press »8« or »9« in the sub-menu to select »EQ« and press »sII« to
confirm.
4 Select the sound setting (Normal, Rock, Jazz, Classical, Pop, Ultra Bass,
ENGLISH
Blues, Club, Dance, Full Bass & Treble, Full Treble, Large Hall, Live, Party,
Reggae, Ska, Soft Music, Soft Rock or Techno) by pressing »8« or »9«
and press »sII« to confirm.
17
BASIC FUNCTIONS
________________________________________________
Opening the main menu
1 To open the main menu, press and hold down »sII«,
or
1 Press »9/7/ « to end playback.
2 To open the main menu, press »9/7/ « again.
Picture playback
Starting picture playback
1 To open the main menu, press »sII« and hold it down.
2 Select »Photo« by pressing »8« or »9« and press »sII« to confirm.
3 Press »8« or »9« in the sub-menu to select the option (»Manual«, »Slide
Show« or »Thumbnail«) and confirm with »sII«.
– »Manual«: the pictures are displayed one by one. Select a picture with
»8« or »9«.
– »Slide Show«: the pictures are automatically displayed one after the other
as a slide show.
– »Thumbnail«: the pictures are displayed in groups as thumbnails.
Select the picture groups with »8« or »9«.
Opening the sub-menu and main menu
1 To open the sub-menu, press and hold down »sII«.
2 To open the main menu, press and hold down »sII«,
or
1 To open the sub-menu, press »9/7/ «.
2 To open the main menu, press »9/7/ « again.
Video playback
Starting video playback
1 To open the main menu, press »sII« and hold it down.
2 Select »Movie« by pressing »8« or »9« and press »sII« to confirm.
3 Select the video you want by pressing »8« or »9«.
4 Press »sII« to start playback.
18
BASIC FUNCTIONS
________________________________________________
Playback functions
1 Press »sII« to start playback.
2 Press »sII« to pause playback.
3 Press »sII« to resume normal playback.
4 Press »9/7/ « to end playback.
– The player goes back to the beginning of the current video.
Selecting videos
1 To select the previous or next video, briefly press »8« or »9«.
Note:
If you press »8« and the elapsed playing time of the current video is more
than five seconds, it is repeated.
Fast forward and reverse search
1 To search for a particular passage of a video, press and hold down »8«
or »9« during playback.
– Fast forward or reverse search begins. Release »8« or »9« at the
position you want.
Opening the main menu
1 To open the main menu, press and hold down »sII«,
or
1 Press »9/7/ « to end playback.
2 To open the main menu, press »9/7/ « again.
Voice recording playback
Starting playback
1 To open the main menu, press »sII« and hold it down.
2 Select the »Voice« mode by pressing »8« or »9« and press »sII« to
confirm.
3 Press »8« or »9« to select the file.
ENGLISH
4 Press »sII« to start playback.
19
BASIC FUNCTIONS
________________________________________________
Playback functions
1 Press »sII« to start playback.
2 Press »sII« to pause playback.
3 Press »sII« to resume normal playback.
4 End playback by pressing »9/7/ «.
– The player goes back to the beginning of the current file.
Selecting voice files
1 To select the previous or next voice file, briefly press »8« or »9«.
Note:
If you press »8« and the elapsed playing time of the current voice file is
more than five seconds, it is repeated.
Fast forward and reverse search
1 To search for a particular passage of a voice file, press and hold down
»8« or »9« during playback.
– Fast forward or reverse search begins. Release »8« or »9« at the
position you want.
Repeating a selected passage (A-B)
1 During playback, press »A-B/REC« briefly at the starting point you want.
2 Briefly press »A-B/REC« again when the end point is reached.
– The selected passage is continuously repeated.
3 To quit this function, press »A-B/REC«.
Opening the main menu
1 To open the main menu, press and hold down »sII«,
or
1 Press »9/7/ « to end playback.
2 To open the main menu, press »9/7/ « again.
20
BASIC FUNCTIONS
________________________________________________
Radio mode
The earphones must always be plugged in for radio mode, as the cable acts as
the FM antenna.
Selecting the radio input source
1 To open the main menu, press »sII« and hold it down.
2 Select »FM radio« by pressing »8« or »9« and press »sII« to confirm.
Note:
If you are using radio as the input source for the first time and there are no
radio stations saved, the player automatically searches for stations with the
best reception and saves up to twenty as presets.
Tuning to radio stations
Manually
You can tune radio stations according to the frequency.
1 Set the frequency by repeatedly pressing »8« or »9«.
– Frequency changes in 100 kHz steps backwards or forwards.
Using the automatic search.
1 Begin search by pressing »8« or »9« until the frequency changes to
rapid run-through.
– The search stops once a station with a strong signal is found.
Storing with the automatic station search (Auto Scan)
1 Select »FM Radio« in the radio mode menu by pressing and holding down
»sII«.
2 Press »8« or »9« to select »Auto Scan« and press »sII« to confirm.
3 Press »8« or »9« to select »Yes« or »No« and press »sII« to confirm.
– If »Yes« is selected the automatic station search begins and saves up to
twenty stations with the best reception as presets.
ENGLISH
Note:
During the automatic station search, all the buttons on the player are locked.
21
BASIC FUNCTIONS
________________________________________________
Opening presets
1 Select the presets forwards (»CH 01 ... CH 20«) by pressing »sII«
repeatedly.
2 Select the presets backwards (»CH 20 ... CH 01«) by pressing »A-B/REC«
repeatedly.
Note:
If you continue to switch through the reception frequency, the player saves
the current frequency automatically on the current preset.
The »FM Radio« sub-menu
–
–
–
–
»FM Record«: you can start recording radio stations.
»FM Band«: you can select FM bands in USA, Japan or Europe.
»Auto Scan«: you can start the automatic station search.
»FM Radio«: you can return to radio mode.
Recording radio stations
1 Select »FM Radio« in the radio mode menu by pressing and holding down
»sII«.
2 Press »8« or »9« to select »FM Record« and press »sII« to confirm.
– Starts recording the current radio station.
Note:
You can also start recording with »A-B/REC«.
3 Press »sII« to pause recording. Press »sII« to resume recording.
4 Stop recording by pressing »9/7/ «.
– The player goes back to the radio mode. The recorded radio station can
be played in »Voice« mode.
Notes:
The recording material is automatically named, for example with F001.WAV
and saved in the player's FM folder. The file format is WAV.
If »Device Full« appears while it is recording, the flash memory is full. The
recording then stops and the file is saved automatically. No more recordings
can be made.
If »Low Battery!« appears while it is recording, then the battery is running
low. The recording then stops and the file is saved automatically. Further
recordings can only be made once the battery has been recharged.
22
BASIC FUNCTIONS
________________________________________________
Voice recordings
Starting voice recording
1 To open the main menu, press »sII« and hold it down.
2 Select »Microphone Record« with »8« or »9« and press »sII« to
confirm.
– The recording starts.
Note:
You can also start recording with »A-B/REC«.
3 Press »sII« to pause recording. Press »sII« to resume recording.
4 Stop recording with »9/7/ «.
– The player switches automatically to »Voice«, where the current recording
can be played.
Notes:
The recording material is automatically named, for example with V001.WAV
and saved in the player's voice file folder. The file format is WAV.
If »Device Full« appears while it is recording, the flash memory is full. The
recording then stops and the file is saved automatically. No more recordings
can be made.
If »Low Battery!« appears while it is recording, then the battery is running
low. The recording then stops and the file is saved automatically. Further
recordings can only be made once the battery has been recharged.
Deleting files
Deleting selected files
1 To open the main menu, press »sII« and hold it down.
2 Select »Delete« by pressing »8« or »9« and press »sII« to confirm.
3 Press »8« or »9« in the sub-menu to select »Delete One« and press
»sII« to confirm.
– Display: »Delete One?«, the number of the current file and the total
number of files.
4 Select the file with »8« or »9« and press »sII« to confirm.
– The file is deleted.
5 To return to the main menu, press and hold down »sII«,
or
ENGLISH
press »9/7/ «.
23
BASIC FUNCTIONS
________________________________________________
Deleting all files
1 To open the main menu, press »sII« and hold it down.
2 Select »Delete« by pressing »8« or »9« and press »sII« to confirm.
3 Press »8« or »9« in the sub-menu to select »Delete All« and press »sII«
to confirm.
4 Press »8« or »9« to select »Yes« or »No« and press »sII« to confirm.
– If »Yes« is selected all music files, voice files, video files, personal files and
picture files are deleted.
Note:
You can abort the deleting process, if you press and hold down »9/7/ «.
The files already deleted cannot be restored.
5 To return to the main menu, press and hold down »sII«,
or
press »9/7/ «.
Display information
1 To open the main menu, press »sII« and hold it down.
2 Select »About« with »8« or »9« and press »sII« to confirm.
– You will see information on the software version, on the overall memory
capacity and the available memory space.
24
PREFERENCE SETTINGS
_____________________________________
Selecting the »Settings« mode
1 To open the main menu, press »sII« and hold it down.
2 Select »Settings« by pressing »8« or »9« and press »sII« to confirm.
3 To quit the sub-menu, press and hold down »sII«,
or
press »9/7/ «.
Selecting the menu language
1 Press »8« or 9« in the sub-menu to select »Language« and press »sII«
to confirm.
2 Select the language (nine languages) using »8« or »9« and press »sII«
to confirm.
Note:
If you change the menu language (default setting »English«), the names in
the menu will no longer correspond to the English terms in the operating
manual.
Setting the recording quality
1 In the sub-menu, press »8« or »9« to select the »Rec. Setting« and
confirm with »sII«.
2 Select the recording quality (8000 Hz, 11025 Hz, 16000 Hz, 22050 Hz,
32000 Hz, 44100 Hz, 48000 Hz) by pressing »8« or »9« and confirm
with »sII«.
Note:
The selected sampling frequency applies to voice recordings (the higher the
frequency, the better the recording quality).
Selecting the background image
1 Press »8« or »9« in the sub-menu to select the »Background« and press
»sII« to confirm.
ENGLISH
2 Press »8« or »9« to select the picture and press »sII« to confirm.
25
PREFERENCE SETTINGS
_____________________________________
Timer settings
1 Press »8« or »9« in the sub-menu to select »Timer Off « and press
»sII« to confirm.
2 Press »8« or »9« to select »Stop Off«, »Sleep Off«, »Backlight Off« or
»Key Lock« and confirm with »sII«.
3 Set the time setting with »8« or »9« and confirm with »sII«.
– »Stop Off« refers to the time span in which the player is in stop mode or
in pause, after which it switches itself off. This function does not apply to
the FM radio mode.
– »Sleep Off« refers to the time span, after which the player switches off
from any operating mode. When you switch on the player again, the
Sleep Off time is reset to zero.
– »Backlight Off« refers to the time span, after which the backlight display
switches itself off, provided you have not pressed any buttons beforehand.
The backlight switches itself on again once you have pressed a button.
– »Key Lock« refers to the time span, after which the key lock switches itself
on in the »Music«, »Voice« and »FM Radio« modes, provided you have
not pressed any buttons beforehand. In other operating modes, the key
lock does not switch on automatically.
Resetting the player
This function restores the default settings to the player.
1 Press »8« or »9« in the sub-menu to select »Reset« and press »sII« to
confirm.
2 Press »8« or »9« to select »Yes« or »No« and press »sII« to confirm.
– If »Yes« is selected: all the settings are restored to their default settings.
26
OPERATING WITH A COMPUTER
___________
System requirements
When connected to the computer, the player appears as a removable disc drive.
This corresponds to the player's flash memory. Your computer should meet the
following requirements:
– Windows 98 SE / 2000 / ME / XP / Vista
– Microsoft DirectX 9.0 or higher
– Microsoft Media Player 9.0 or higher
– Integrated codec packet *
– CD-ROM drive 4x or higher
– Pentium MMX 200 or higher
– Minimum 100 MB available memory on the hard disc
– USB interface
* Recommended codec: K-Lite Mega Codec Pack (obtainable at www.freecodecs.com or www.k-lite.tk)
The Codec pack is available on the installation CD supplied.
Installing the player
The driver must be installed with Windows 98 SE and Windows 2000,
if Windows Service Pack 3 has not been installed.
1 Insert the installation CD supplied into the CD ROM drive.
2 Press »Setup« to begin installing.
3 Carry out the installation by following the instructions on the screen.
Connecting to the computer
1 Switch on the computer.
2 Switch off the player.
3 Connect the USB interface of the player to the respective interface on the
ENGLISH
computer via a USB cable.
– A display will appear as soon as the connection is made.
27
OPERATING WITH A COMPUTER
___________
MP3/WMA data transfers
1 Select the MP3/WMA files on your computer for copying.
2 Highlight the files.
3 Right-click the mouse to select »Copy«.
4 Open a removable disc drive (e.g. H:) on your computer.
5 Right-click the mouse to transfer the files onto the removable disc drive
(e.g. H:)
Note:
DRM (Digital Right Management)-protected WMA files can only be played if
they are transferred to the device using the Windows Multi Media Player.
Notes:
All voice recordings are stored as individual files in the voice directory.
Recordings from FM radio are stored as individual files in the FM directory.
Transferring DRM-protected WMA data
For Windows 98 SE / 2000 / ME / XP, you should update the Windows Media
Player with versions 9.0 or 10.0 (version 10.0 only applies to Windows XP). The
following steps only apply to the Windows Media Player 10.0, i.e. Windows XP.
1 Select the DRM-protected WMA files on your computer for copying.
2 Highlight the files.
3 Right-mouse click to select the »Add the Sync. list«.
4 Select »Sync.« in the window.
5 In the »Sync.« window, select the DRM-protected WMA files, then select the
player.
6 Click on »Start Sync.«.
– The DRM-protected WMA files are transferred to the player.
28
OPERATING WITH A COMPUTER
___________
Converting video files to SMV format
The player only supports video files in SMV format. However, you can convert
video files to SMV from other formats (MPG, MP4, DVD, Quick time, Real
player, AVI, WMV) on the CD ROM provided, using the Transcoder Software
“video2smv.exe”.
1 To open the folder, double-click on »video2smv.exe«.
2 Double-click on the »video2smv.exe« program.
3 To select the files you want to convert, click on »Add«. You can also adjust
the size and quality of the files. The player's picture resolution is 128 x 160
pixels. Select a smaller size. The fundamental rule applies: the higher the
quality, the larger the file and the higher the quality, the better the picture.
4 Select the folder where you want to store the converted files, by clicking on
»Set«.
5 Start converting by clicking on »Convert«.
– A progress bar shows the conversion status. Once this has finished, you
can transfer the new SMV files to the player.
Disconnecting from the computer
If there is no data transfer in progress, you can disconnect the player from the
computer.
Before you disconnect the player's cable connection to the computer, you must
remove the player from the Windows desktop by following the Windows instructions for “Removing hardware”.
Note:
Do not disconnect the player from the computer while a data transfer is in
progress. This can damage the data irreparably.
1 Double-click on the symbol for removing hardware.
– The “Remove hardware” window appears.
2 To continue, follow the instructions on the screen.
ENGLISH
Note:
The circuits of the player and the computer can be seriously damaged if you
do not follow the instructions for Windows ME / 2000 / XP.
29
INFORMATION
__________________________________________________________
Technical data
This product fulfils the European directives 89/336/EEC, 2006/42/EC and 93/68/EEC.
The type plate is located on the back of the device.
Power supply
Picture
Rechargeable battery: 1 x 3.7 V
lithium polymer 500 mA
Formats: BMP, JPEG
Output
Formats: SMV (with Transcoder Software)
2 x 5 mW/16 Ω (earphones)
Noise voltage ratio
≥ 85 dB
Internal memory
1 GB (Mpixx 2001 FM/1GB)
2 GB (Mpixx 2002 FM/2GB)
MP3/WMA
Formats: MP3, WMA, WAV
MPEG bit rates: 32-320 kbps
WMA: 32-192 kbps
File system: FAT/FAT 32
ID3 tag-versions: V1 tag, V2 2.0,
V2 3.0, V3 4.0
Video
FM radio
Frequency range: 87.5 MHz ... 108 MHz
USB
USB PC: 2.0 Full Speed
Frequency response
20 Hz ... 20 kHz
Dimensions and weight
L x W x H: 80 x 42 x 13.5 mm
Weight approx. 45 g
Technical and design modifications reserved.
30
Grundig Multimedia B.V.
•
Atrium, Strawinskylaan 3105 • NL-1077 ZX Amsterdam • http://www.grundig.com