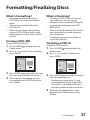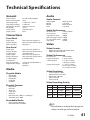
1
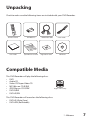
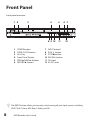
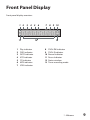
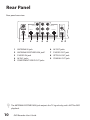
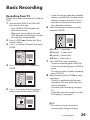
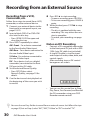
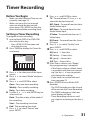
����� ������������ ������������ 1 Congratulations! Congratulations on your purchase of this R6750 DVD Recorder. We know you will enjoy this product for many years to come. In case service is required, please take a moment to write down your serial number located on the rear panel of the DVD Recorder: ______________________________________________________ FCC Notice ���������������������������������������� ����������������������������������� ��������������������������������������������� ��������������������������� ��������������������������������������������� �������������������������������������� �������������������������������������������� ��������������������������������������������� ������������������������������� ��������������������������������������������� ���������������������������������������� ������������������������������������������� �������������������������� CAUTION THIS PRODUCT UTILIZES A LASER. USE OF CONTROLS OR ADJUSTMENTS OR PERFORMANCE OF PROCEDURES OTHER THAN THOSE SPECIFIED HEREIN MAY RESULT IN HAZARDOUS RADIATION EXPOSURE. DO NOT OPEN THE COVER AND DO NOT REPAIR YOURSELF REFER SERVICING TO QUALIFIED PERSONNEL. WARNING TO REDUCE THE RISK OF FIRE, ELECTRIC SHOCK OR PRODUCT DAMAGE, DO NOT EXPOSE THIS APPARATUS TO MOISTURE AND ENSURE THAT OBJECTS FILLED WITH LIQUIDS, SUCH AS VASES, SHALL BE PLACED AWAY FROM THE APPARATUS. Power Notice Disconnect the AC plug to shut the power off completely. The POWER button in any position does not disconnect the main line. Power can be controlled from the remote. Laser Product Notice 1 CLASS 1 LASER PRODUCT 2 DANGER: Visible and invisible laser radiation when open and interlock failed or defeated. Avoid direct exposure to beam. 3 CAUTION: Do not open the top cover. There are no user serviceable parts inside the unit; leave all servicing to qualified service personnel. 2 DVD Recorder User’s Guide This equipment has been tested and found to comply with the limits for a Class B digital device, pursuant to part 15 of the FCC Rules. These limits are designed to provide reasonable protection against harmful interference in a residential installation. This equipment generates, uses and can radiate radio frequency energy and, if not installed and used in accordance with the instructions, may cause harmful interference to radio communications. However, there is no guarantee that interference will not occur in a particular installation. If this equipment does cause harmful interference to radio or television reception, which can be determined by turning the equipment off and on, the user is encouraged to try to correct the interference by one or more of the following measures: • Reorient or relocate the receiving antenna. • Increase the separation between the equipment and receiver. • Connect the equipment into an outlet on a circuit different from that to which the receiver is connected. • Consult the dealer or an experienced radio/TV technician for help. 525P Progressive Scan Notice CONSUMERS SHOULD NOTE THAT NOT ALL HIGH DEFINITION TELEVISION SETS ARE FULLY COMPATIBLE WITH THIS PRODUCT AND MAY CAUSE ARTIFACTS TO BE DISPLAYED IN THE PICTURE. IN CASE OF 525 PROGRESSIVE SCAN PICTURE PROBLEMS, IT IS RECOMMENDED THAT THE USER SWITCH THE CONNECTION TO THE “STANDARD DEFINITION” OUTPUT. IF THERE ARE QUESTIONS REGARDING OUR TV SET COMPATIBILITY WITH THIS MODEL 525P DVD PLAYER, PLEASE CONTACT OUR CUSTOMER SERVICE CENTER. Macrovision Notice U.S. Patent Nos. 4,631,603; 4,577,216; 4,819,098; 4,907,093; and 6,516,132. This product incorporates copyright protection technology that is protected by U.S. patents and other intellectual property rights. Use of this copyright protection technology must be authorized by Macrovision, and is intended for home and other limited viewing uses only unless otherwise authorized by Macrovision. Reverse engineering or disassembly is prohibited. Table of Contents 1 - Welcome Unpacking / 7 Compatible Media / 7 Front Panel / 8 Front Panel Display / 9 Rear Panel / 10 Remote Control / 11 2 - Connections BASIC Antenna/Basic Cable Connections / 13 Cable Box Connections / 14 Basic TV Connections / 15 ADVANCED Enhanced Video Options / 16 Enhanced Audio Options / 17 Rear AV Connections / 18 Front AV Connections / 19 3 - Setup Setup Menu Overview / 21 About Menu Navigation / 21 System Settings / 22 Language Settings / 23 Playback Settings / 24 Record Settings / 25 Audio Settings / 26 TV Tuner Settings / 27 4 - Operations RECORD Basic Recording / 29 Recording from an External Source / 30 Timer Recording / 31 PLAY DVD Playback / 32 Special Playback Options / 33 Other Disc Playback / 34 EDIT Editing Options / 35 Channel Editing / 36 Formatting/Finalizing Discs / 37 5 - Help Customer Support / 39 Troubleshooting / 39 Technical Specifications / 41 Warranty / 42 Index / 43 ©2004 GoVideo. All rights reserved. Manufactured under license from Dolby Laboratories. “Dolby” and the double-D symbol are trademarks of Dolby Laboratories. “DTS” and “DTS Digital Surround” are trademarks of Digital Theater Systems, Inc. All other brand and product names are trademarks or registered trademarks of their respective companies. 3 Important Safety Instructions 1 Read Instructions - All the safety and operating instructions should be read before the product is operated. 2 Retain Instructions - The safety and operating instructions should be retained for future reference. 3 Heed Warnings - All warnings on the product and in the operating instructions should be adhered to. 4 Follow Instructions - All operating and using instructions should be followed. 5 Cleaning - Unplug this product from the wall outlet before cleaning. Do not use liquid cleaners or aerosol cleaners. Use a damp cloth for cleaning. 6 Attachments - Do not use attachments not recommended by the product manufacturer as they may cause hazards. 7 Water and Moisture - Do not use this product near water - for example near a bath tub, wash bowl, kitchen sink, or laundry tub; in a wet basement; or near a swimming pool; and the like. 8 Accessories - Do not place this product on an unstable cart, stand, tripod, bracket, or table.The product may fall, causing serious injury to a child or adult, and serious damage to the product. Use only with a cart, stand, tripod, bracket, or table recommended by the manufacturer or sold with the product. Any mounting of the product should follow the manufacturer’s instructions and should use a mounting accessory recommended by the manufacturer. 9 A product and cart combination should be moved with care. Quick stops, excessive force, and uneven surfaces may cause the ��������������������� product and cart �������������������������� combination to overturn. 10 Ventilation - Slots and openings in the cabinet are provided for ventilation and to ensure reliable operation of the product and to protect it from overheating. These openings 4 DVD Recorder User’s Guide 11 12 13 14 15 must not be blocked or covered. The openings should never be blocked by placing the product on a bed, sofa, rug, or other similar surface. This product should not be placed in a built-in installation such as a bookcase or rack unless proper ventilation is provided or the manufacturer’s instructions have been adhered to. Power Sources - This product should be operated only from the type of power source indicated on the marking label. If you are not sure of the type of power supplied to your home, consult your product dealer or local power company. For products intended to operate from battery power, or other sources, refer to the operating instructions. Grounding or Polarization - This product may be equipped with a polarized alternating - current line plug (a plug having one blade wider than the other). This plug will fit into the power outlet only one way. This is a safety feature. If you are unable to insert the plug fully into the outlet, try reversing the plug. If the plug should still fail to fit, contact your electrician to replace your obsolete outlet. Do not defeat the safety purpose of the polarized plug. Alternate Warnings - This product is equipped with a three-wire grounding-type plug, a plug having a third (grounding) pin. This plug will only fit into the outlet, contact your electrician to replace your obsolete outlet. Do not defeat the safety purpose of the grounding-type plug. Power-Cord Protection - Power-supply cords should be routed so that they are not likely to be walked on or pinched by items placed upon or against them, paying particular attention to cords at plugs, convenience receptacles, and the point where they exit from the product. Outdoor Antenna Grounding - If an outside antenna or cable system is connected to the product, be sure the antenna or cable system is grounded so as to provide some protection against voltage surges and built-up static charges. Section 810 of the National Electrical Code, ANSI/NFPA 70 provides information with regard to proper grounding of the Important Safety Instructions mast and supporting structure, grounding of the lead-in wire to an antenna discharge unit, size of grounding conductors, location of antenna-discharge unit, connection to grounding electrodes, and requirements for the grounding electrode. 16 Lightning - For added protection for this product during a lightning storm or when it is left unattended and unused for long periods of time, unplug it from the wall outlet and disconnect the antenna or cable system. This will prevent damage to the product due to lightning and power-line surges. 17 Power Lines - An outside antenna system should not be located in the vicinity of overhead power lines or other electric light or power circuits, or where it can fall into such power lines or circuits. When installing an outside antenna system, extreme care should be taken to keep from touching such power lines or circuits as contact with them might be fatal. 18 Overloading - Do not overload wall outlets, extension cords, or integral convenience receptacles as this can result in a risk of fire or electric shock. 19 Object and Liquid Entry - Never push objects of any kind into this product through openings as they may touch dangerous voltage points or short-out parts that could result in a fire or electric shock. Never spill liquid of any kind on the product. 20 Servicing - Do not attempt to service this product yourself as opening or removing covers may expose you to dangerous voltage or other hazards. Refer all servicing to qualified service personnel. 21 Damage Requiring Service - Unplug this product from the wall outlet and refer servicing to qualified service personnel under the following conditions: a When the power-supply cord or plug is damaged. b If liquid has been spilled or objects have fallen into the product. c If the product has been exposed to rain or water. d If the product does not operate normally by following the operating instructions. Adjust only those controls that are covered by the operating instructions as an improper adjustment of other controls may result in damage and will often require extensive work by a qualified technician to restore the product to its normal operation. e If the product has been dropped or damaged in any way. f When the product exhibits a distinct change in performance-this indicates a need for service. 22 Replacement Parts - When replacement parts are required, be sure the service technician has used replacement parts specified by the manufacturer or that have the same characteristics as the original part. Unauthorized substitutions may result in fire, electric shock, or other hazards. 23 Safety Check - Upon completion of any service or repairs to this product, ask the service technician to perform safety checks to determine that the product is in proper operating condition. 24 Heat - The product should be situated away from heat sources such as radiators, heat registers, stoves, or other products (including amplifiers) that produce heat. 25 Wall or Ceiling Mounting - The product should be mounted to a wall or ceiling only as recommended by the manufacturer. 5 1 6 Welcome This Chapter provides a basic introduction to the DVD Recorder, including an overview of the front panel, rear panel, and remote control. DVD Recorder User’s Guide Unpacking Check to make sure the following items are included with your DVD Recorder: POWER LOSE OPEN/C 3 2 1 CH 6 5 4 Y DISPLA 9 8 7 DISC MENU TITLE 0 PREV REW STOP SETUP NEXT FF PLAY PAUSE/ STEP R ENTE PLAY S OPTION GUIDER D INPUT RECOR TIMER EDIT �������������� ������������� ������������ ��������������������� ����������������� ����������������� ����������� ���������� Compatible Media This DVD Recorder will play the following discs: • DVD • Audio CD • Video CD/Super Video CD • MP3 files on CD-R/RW • JPEG files on CD-R/RW • DVD-R/RW • DVD+R/RW �������������������� This DVD Recorder will record on the following discs: • DVD+R (Write Once) • DVD+RW (ReWritable) 1 - Welcome 7 Front Panel Front panel overview: � � � � � � � R6750 DVD+R/RW RECORDER POWER OPEN/CLOSE INPUT LINE IN 2 DV IN � � �� 1 2 3 4 5 6 ��� 8 POWER button OPEN/CLOSE button Disc Tray Front Panel Display PREV/NEXT buttons RECORD button 7 8 9 10 11 12 �� VIDEO L - AUDIO - R �� INPUT button* PLAY button STOP button PAUSE button DV Input AV IN 1 jacks • The INPUT button allows you to easily switch among all your input sources, including DVD, TV, AV1-Front, AV2-Rear, S-Video, and DV. DVD Recorder User’s Guide Front Panel Display Front panel display overview: � � DVD � � � � SVCD VCD CD MP3 � � � �� JPEG RW R TIMER �� 1 2 3 4 5 6 7 Play indicator DVD indicator SVCD indicator VCD indicator CD indicator MP3 indicator JPEG indicator �� �� 8 9 10 11 12 13 DVD+RW indicator DVD+R indicator Record indicator Pause Indicator Status window Timer recording mode 1 - Welcome 9 Rear Panel Rear panel overview: AUDIO IN Y R R L ANTENNA IN S-VIDEO IN ANTENNA PASSTHROUGH (NO DVD OUTPUT) � � 1 2 3 4 5 ��� 10 AUDIO OUT S-VIDEO OUT Pb VIDEO COMPONENT OUT � � ANTENNA IN jack ANTENNA PASSTHROUGH jack* S-VIDEO IN jack AV IN 2 jacks COMPONENT VIDEO OUT jacks OPTICAL VIDEO Pr AV IN 2 � COAXIAL L AV OUT � � 6 7 8 9 DIGITAL OUT � � AV OUT jacks S-VIDEO OUT jack OPTICAL OUT jack COAXIAL OUT jack • The ANTENNA PASSTHROUGH jack outputs the TV signal only, and is NOT for DVD playback. DVD Recorder User’s Guide Remote Control Remote control overview: � �� 1 � 4 7 � � � � 2 3 5 CH �� DISPLAY �� 6 8 9 TITLE DISC MENU SETUP 0 PREV STOP REW FF PLAY NEXT PAUSE/STEP �� ENTER PLAY OPTIONS GUIDER �� � �� �� �� �� �� � � 1 2 3 4 5 6 7 8 9 10 11 12 13 14 15 16 17 18 19 20 21 POWER OPEN/CLOSE INPUT RECORD TIMER EDIT OPEN/CLOSE button 0-9 buttons TITLE button PREV/NEXT buttons STOP button PLAY button ARROW buttons GUIDER button INPUT button RECORD button POWER button CH buttons DISPLAY button DISC MENU button SETUP button REW/FF buttons PAUSE/STEP button ENTER button PLAY OPTIONS button EDIT button TIMER RECORD button �� �� ��� • The GUIDER button is a fun and easy way to record, play, format, and finalize discs; see pages 29, 30, and 37. 1 - Welcome 11 2 Connections This Chapter shows you how to connect the DVD Recorder to your TV and other home theater components. • • 12 For basic connections, see pages 13-15. For advanced connections, see pages 16-19. DVD Recorder User’s Guide Antenna/Basic Cable Connections If you are using an antenna or basic cable TV service to receive TV programs: 1 Connect the RF coaxial cable from the antenna or cable wall outlet to the rear panel of the DVD Recorder as shown. 2 Connect the DVD Recorder to your TV; see page 15. ���������� ����������� ������������ AUDIO IN R Y L ANTENNA IN ANTENNA PASSTHROUGH (NO DVD OUTPUT) S-VIDEO IN VIDEO AUDIO OUT COAXIAL L Pb AV IN 2 R Pr COMPONENT OUT S-VIDEO OUT OPTICAL VIDEO AV OUT DIGITAL OUT NOTE: • Do not connect the AC power cord until all other connections have been made. • The DVD Recorder receives broadcast channels 1-69 and cable TV channels 1-125. 2 - Connections 13 Cable Box Connections If you are using a cable box or satellite receiver to receive TV programs: 1 Connect an RF cable from the wall outlet to the cable box. 2 Connect an RF cable from the cable box to the DVD Recorder. 3 Connect the DVD Recorder to your TV; see page 15. ������������ ���������� ������������������ ��� �� ������������ AUDIO IN R Y L ANTENNA IN ANTENNA PASSTHROUGH (NO DVD OUTPUT) S-VIDEO IN VIDEO AUDIO OUT COAXIAL L Pb AV IN 2 R Pr COMPONENT OUT S-VIDEO OUT OPTICAL VIDEO AV OUT DIGITAL OUT NOTE: • With this connection, you will set the DVD Recorder to channel 2, 3, or 4 and then select channels on the cable box. 14 DVD Recorder User’s Guide Basic TV Connections If your TV has standard audio/video inputs (red, white, and yellow RCA jacks): 1 Connect the supplied audio/video cables from the DVD Recorder to your TV as shown. 2 Connect the supplied power cable from the DVD Recorder to a standard wall outlet. 3 Press POWER to turn on the DVD Recorder. 4 Turn on your TV and select the Video input to view the DVD Recorder. • The GoVideo splash screen appears. 5 Continue with Chapter 3 to set up your DVD Recorder. ������������ AUDIO IN R Y R L ANTENNA IN ANTENNA PASSTHROUGH (NO DVD OUTPUT) S-VIDEO IN AUDIO OUT S-VIDEO OUT Pb VIDEO AV IN 2 COAXIAL L VIDEO Pr COMPONENT OUT ������������� OPTICAL AV OUT DIGITAL OUT �������� �� NOTE: • The ANTENNA PASSTHROUGH cannot be used to view the DVD Recorder. This output only passes the antenna or cable signal through to your TV. • If your TV has S-Video or Component Video inputs, see page 16. 2 - Connections 15 Enhanced Video Options If your TV has S-Video or Component Video inputs, you can enjoy superior picture quality. 1 Connect an S-Video cable OR set of Component Video cables from the DVD Recorder to your TV as shown. 2 Select the S-Video or Component Video input on your TV to view the DVD Recorder. 3 Activate the S-Video or Component/Progressive Scan Video output in the Setup menu; see page 22. ���������������������� ���������������� ��������������������� ������������������ ������������ AUDIO IN Y R R L ANTENNA IN ANTENNA PASSTHROUGH (NO DVD OUTPUT) COAXIAL AUDIO OUT L S-VIDEO IN S-VIDEO OUT Pb VIDEO VIDEO Pr AV IN 2 COMPONENT OUT AV OUT ��������������� �� �� OPTICAL � DIGITAL OUT �� ������� ���������� �� NOTE: • If you use one of these enhanced video connections, you must enable the Video Output in the menu system; see page 22. • Be sure to choose one of the audio connection options on page 17. 16 DVD Recorder User’s Guide Enhanced Audio Options If you have a stereo system or digital audio receiver, you can enjoy superior sound quality. 1 Connect stereo audio cables from the DVD Recorder to your stereo system as shown. OR Connect a digital optical OR coaxial cable from the DVD Recorder to your digital audio receiver as shown. 2 Select the appropriate audio input on your stereo or receiver to hear the DVD Recorder. • If you used either of the digital connections, you just activate the digital audio output in the Setup menu; see page 26. AUDIO IN R Y L ANTENNA IN ANTENNA PASSTHROUGH (NO DVD OUTPUT) S-VIDEO IN VIDEO ������������ AUDIO OUT ��������������� ��������������� COAXIAL L Pb AV IN 2 R ������������� Pr COMPONENT OUT S-VIDEO OUT OPTICAL VIDEO AV OUT ������ ������������� DIGITAL OUT ������� ���������� �� ������� ���������� ������������ NOTE: • If you use the Optical or Coaxial connection, you must set the DVD Recorder’s Audio Output settings to match the capabilities of your receiver; see page 26. • If your receiver is equipped with a Dolby Digital and/or DTS decoder your can enjoy 5.1 surround sound playback while watching DVD movies. 2 - Connections 17 Rear AV Connections You can view and record from an external device, such as a VCR, connected to the rear AV or S-Video inputs. 1 Connect standard audio/video cables from the outputs of the external device to the inputs of the DVD Recorder as shown. OR Connect an S-Video cable and audio cables from the outputs of the external device to the inputs of the DVD Recorder as shown. 2 Press INPUT until AV2-Rear or S-Video appears on the screen. ������������ AUDIO IN Y R L ANTENNA IN Pb VIDEO AV IN 2 ��������������� ����������� ��������� AUDIO OUT COAXIAL L S-VIDEO IN ANTENNA PASSTHROUGH (NO DVD OUTPUT) R Pr COMPONENT OUT �� S-VIDEO OUT OPTICAL VIDEO AV OUT DIGITAL OUT ����������������������� ������������� ������������������ ����������� NOTE: • To view the external device, press INPUT on the remote control until AV2-Rear or SVideo appears on screen. • To record from the external device, see page 30. 18 DVD Recorder User’s Guide Front AV Connections You can view and record from an external device, such as a camcorder or video game, connected to the front panel AV or DV inputs. 1 Connect standard audio/video cables from the outputs of the external device to the inputs of the DVD Recorder as shown. OR Connect a DV cable from the external device to the front panel of the DVD Recorder as shown. 2 Press INPUT until AV1-Front or DV appears on the screen. ������������ R6750 DVD+R/RW RECORDER INPUT LINE IN 1 DV IN VIDEO ������ ������ L - AUDIO - R �� ��������� ����������������������� ������������� ������������������ ���������������� NOTE: • To view the external device, press INPUT on the remote control until AV1-Front or DV appears on screen. • To record from the external device, see page 30. 2 - Connections 19 3 Setup This Chapter shows you customize the DVD Recorder to meet your personal requirements and preferences. Key settings: • • • 20 To set the date and time, see page 22. To set your TV aspect ratio, see page 24 To search for TV channels, see page 27. DVD Recorder User’s Guide Setup Menu Overview The Setup menu allows you to customize your DVD Recorder. Choose from six categories: • System Settings – see page 22 SETUP • Language Settings – see page 23 • Playback Settings – see page 24 • Record Settings – see page 25 • Audio Settings – see page 26 • TV Tuner Settings – see page 27 System Language Playback Record Video Output S-Video Date 11/14/2004 Time 11:32:55AM Auto-sleep Off Default ----------- Audio TV Tuner Exit About Menu Navigation • • • • • • Press POWER to turn on the DVD Recorder. Press SETUP to display the Setup menu. Use the keys to move up and down. Use the keys to move left and right. Press ENTER to confirm your selections. Press SETUP again to exit the Setup menu. POWER OPEN/CLOSE 1 2 3 4 5 6 7 8 9 TITLE DISC MENU CH DISPLAY SETUP 0 PREV STOP REW FF PLAY ����� NEXT PAUSE/STEP ����� ENTER PLAY OPTIONS GUIDER INPUT RECORD TIMER EDIT 3 - Setup 21 System Settings Video Output Activates the S-Video, Component Video, or Progressive Scan output to your TV. 1 Press SETUP. 2 Select System > Video Output. 3 Choose from the following: S-Video - Activates the S-Video output. Component - Activates the Component Video output. Progressive - Activates the Progressive Scan output. NOTE: • Do NOT choose Progressive unless you have connected the DVD Recorder to a TV equipped with a 480p Progressive Scan input. • If you select Progressive accidentally and the picture is distorted, press ENTER to cancel, or wait a few seconds for the screen to revert to normal. Date & Time Sets the date and time. This is necessary if you wish to record TV shows with the timer record feature. 1 Press SETUP. 2 Select System > Date 3 Set the month, day, and year. • Use to move the cursor. • Use to change each setting. 4 Select System > Time. 5 Set the hour, minutes, seconds, and AM/PM. • Use to move the cursor. • Use to change each setting. SETUP System Language Playback Record Video Output S-Video Date 11/14/2004 Time 11:32:55AM Auto-sleep Off Default ----------- Audio TV Tuner Exit Sleep Timer Sets the sleep timer. 1 Press SETUP. 2 Select System > Auto-sleep. 3 Set the timer from 30 to 120 minutes. • The DVD Recorder will power off automatically after the specified time has elapsed. • To disable the sleep timer, select Off. Factory Settings Restores the DVD Recorder to its original factory settings. 1 Press SETUP. 2 Select System > Default > Restore. • The DVD Recorder will restart with all menu settings restored to their factory defaults. SETUP ENTER ���������� ��������������� 22 DVD Recorder User’s Guide Language Settings On-Screen Display Language Sets the default language for On-Screen Displays and the Setup menu. 1 Press SETUP. 2 Select Language > OSD. 3 Select your preferred OSD language (English, Français, or Español). SETUP System Language Playback OSD English Menu English Audio English Subtitle English Record Audio TV Tuner Exit Menu Language Sets your preferred language for DVD Disc Menus. 1 Press SETUP. 2 Select Language > Menu. 3 Select your preferred DVD Disc Menu language. Audio Language Sets your preferred language for DVD audio soundtracks. 1 Press SETUP. 2 Select Language > Audio. 3 Select your preferred DVD Audio language. Subtitle Language Sets your preferred language for DVD subtitles. 1 Press SETUP. 2 Select Language > Subtitle. 3 Select your preferred DVD Subtitle language. • To disable subtitles, choose Off. SETUP ENTER ��� • If YourDVD is turned on (see page 24), the DVD Recorder will search and select your preferred Audio and Subtitle languages automatically whenever you load a DVD movie. ���������� ��������������� 3 - Setup 23 Playback Settings YourDVD YourDVD automatically searches for your playback preferences (including Audio language, Subtitle language, and Surround mode) every time you load a DVD disc. It then selects those preferences if they are available on the disc. 1 Press SETUP. 2 Select Playback > YourDVD. 3 Turn YourDVD on or off. AutoPlay AutoPlay skips the ads and trailers and starts DVD playback automatically when you load a disc. 1 Press SETUP. 2 Select Playback > AutoPlay. 3 Turn AutoPlay on or off. Aspect Ratio Sets your preferred aspect ratio for DVD movies. 1 Press SETUP. 2 Select Playback > Aspect Ratio. 3 Choose from the following: 16:9 Wide - Select if you have a widescreen TV. 4:3 L. Box - Select if you have a standard TV and prefer to watch widescreen movies with black bars above and below the picture. 4:3 Pan - Select if you have a standard TV and prefer to have widescreen movies cropped (“Pan & Scan”) to fit the screen. 24 DVD Recorder User’s Guide Parental Control Blocks playback of rated DVDs based on their content. Not all discs are rated. 1 Press SETUP. 2 Select Playback > Parental. 3 Select the desired Parental Control rating from 1 (Kid Safe) to 8 (Adult). • Choose Off to disable the Parental Control feature. 4 Enter your password using the 0-9 keys. • The factory default password is 0000. Password Changes the Parental Control password. 1 Press SETUP. 2 Select Playback > Password. 3 Enter your old password using the 0-9 keys. 4 Enter your new password. 5 Re-enter your new password. Slideshow Time Sets the slide show interval (the time between slides) when a JPEG Picture CD is playing. 1 Press SETUP. 2 Select Playback > Slide Time. 3 Choose a slide interval from 3~99 seconds. • To disable automatic slideshows, select Off. SETUP ENTER ���������� ��������������� Record Settings Record Quality Sets the default quality for DVD recording. 1 Press SETUP. 2 Select Record > Quality. 3 Choose from the following: HQ (best) – 1 hour/disc SP (better) – 2 hours/disc EP (good) – 4 hours/disc SLP (fair) – 6 hours/disc SETUP System Language Quality SP (2 Hrs) Chapter Mark 5 minutes Playback Record Audio TV Tuner Exit Auto Chapter Marking Enables automatic chapter marking at regular intervals during DVD recording. 1 Press SETUP. 2 Select Record > Chapter Mark. 3 Choose from the following: Off – Disables automatic chapter marking. 5~30 minutes - Chapters will be created automatically every 5~30 minutes during recording. SETUP ENTER ��� • Automatic Chapter Marking makes it easy to browse your DVD recordings later using the PREV/NEXT buttons. ���������� ��������������� 3 - Setup 25 Audio Settings Digital Out Sets the format of the digital audio signal from the rear panel Optical and Coaxial jacks. 1 Press SETUP. 2 Select Audio > Digital Out. 3 Choose from the following: PCM – Select if the DVD Recorder is connected to a 2-channel (stereo) digital amplifier. Bit Stream - Select if the DVD Recorder is connected to a 5.1 channel amplifier/receiver with a Dolby Digital decoder. DTS Out Enables the DVD Recorder to output a DTS (Digital Theater Sound) signal to an external receiver with a DTS decoder. 1 Press SETUP. 2 Select Audio > DTS Out 3 Turn DTS Out on or off. SETUP System Language Playback Digital Out Bit Stream DTS Out Off Surround DOLBY Record Audio TV Tuner Exit Surround Sound Sets your preferred surround sound format when watching DVD movies. 1 Press SETUP. 2 Select Audio > Surround 3 Choose from the following: Stereo – Select if you prefer to hear the stereo soundtrack on DVD movies (if available). Dolby - Select if you prefer to hear the Dolby Digital 5.1 soundtrack on DVD movies (if available). DTS - Select if you prefer to hear the DTS 5.1 soundtrack on DVD movies (if available). SETUP ENTER ��� 26 • If you are not using the digital audio outputs (Optical or Coaxial), you do not need to adjust these settings. DVD Recorder User’s Guide ���������� ��������������� TV Tuner Settings TV Signal Specifies whether the DVD Recorder is connected to an antenna or cable TV source. 1 Press SETUP. 2 Select TV Tuner > TV Signal 3 Choose from the following: Antenna - Select if the DVD Recorder is connected to an antenna. Cable - Select if the DVD Recorder is connected to a cable TV source. Auto - Select to have the DVD Recorder automatically detect if you are using an antenna or cable. Auto Channel Search Automatically searches for all available TV stations from antenna or cable TV. 1 Press SETUP. 2 Select TV Tuner > Utilities > Start Scan. • The DVD Recorder searches for all available stations. This may take several minutes to complete. • When finished, press SETUP to exit. Add/Delete Channels Allows you to manually add or remove channels. 1 Press SETUP. 2 Select TV Tuner > Utilities > Add/Delete. SETUP System Language TV Signal Auto Start Scan Uilities ----------- Add/Delete Swap Playback Record CH:15 Audio TV Tuner Exit 3 Add or delete channels: • Use to select the desired channel. • Press ENTER to add or delete the channel. • When finished, select Exit and press ENTER. Swap Channels Allows you to swap the TV channel order stored in the DVD Recorder to match the channel order stored in your TV set. 1 Press SETUP. 2 Select TV Tuner > Utilities > Swap. 3 Select the channel to be swapped, and press ENTER. 4 Select the new channel position, and press ENTER. • The channels will swap positions. • Repeat as necessary. • When finished, select Exit and press ENTER. SETUP ENTER ��� • If you are using a cable box or satellite receiver, you do not need to adjust these settings. ���������� ��������������� 3 - Setup 27 4 Operations This Chapter shows you how to use the most common features of the DVD Recorder, including recording, playback, and editing DVDs. • • • 28 For recording features, see pages 29-31. For playback features, see pages 32-34. For editing features, see pages 35-37. DVD Recorder User’s Guide Basic Recording Recording from TV Follow these steps to record a TV show to DVD. 1 Insert a blank DVD+R or DVD+RW disc into the disc tray. • Press OPEN/CLOSE to open and close the disc tray. • When you insert a blank disc, the DVD Recorder will format (or “initialize”) the disc automatically. 2 Press GUIDER to display the “Easy Guider” menu. 3 Use to select “Record”, then press ENTER. 6 1hr HQ 2hr SP 4hr EP Record EXIT Finalize 4 8 TV AV2 S-Video EXIT DV 5 7 Use to select “TV”, then press ENTER. AV1 Use to select the channel you want to record, then press ENTER. CH EXIT 6hr SLP Playback Erase • If you are using a cable box/satellite receiver, set the DVD recorder to the receiver’s output channel (2, 3 or 4) and select the desired channel on the cable box/receiver. Select the desired recording quality and press ENTER. HQ (best) – 1 hour/disc SP (better) – 2 hours/disc EP (good) – 4 hours/disc SLP (fair) – 6 hours/disc Press ENTER to start recording. • To pause recording, press PAUSE. • To resume recording, press PAUSE again. • To view the status of your recording, press DISPLAY. When finished, press STOP to stop recording. • The disc is updated with the new recording. This may take a few minutes to complete. • To watch your recording, see page 32. • To finalize your disc to play on other DVD players, see page 37. 25 EXIT NOTE: • You cannot change channels or record quality during recording. 4 - Operations 29 Recording from an External Source Recording from a VCR, Camcorder, etc. Follow these steps to record from a VCR, camcorder, or other external device. 1 Connect your external device to the front panel or rear panel inputs; see pages 18-19. 2 Insert a blank DVD+R or DVD+RW disc into the disc tray. • Press OPEN/CLOSE to open and close the disc tray. 3 Press INPUT repeatedly to select: AV1-Front - For a device connected to the front Audio/Video Input. AV2-Rear - For a device connected to the rear Audio/Video Input. S-Video - For a device connected to the rear S-Video Input. DV - For a device (such as a digital camcorder) connected to the front DV Input with a DV cable. 4 Set the desired Record Quality. • Press SETUP, then select Record>Quality; see page 25 for details. 5 Cue the device and start playback at the beginning of the scene you wish to record. 6 7 Notes on DV Recording • • • • ��� 30 Press REC to start recording. • To pause recording, press PAUSE. • To resume recording, press PAUSE again. When finished, press STOP to stop recording. • The disc is updated with the new recording. This may take a few minutes to complete. • To watch your recording, see page 32. Connect a DV-compatible camcorder to the front panel DV jack with a IEEE1394 4-pin DV cable (not included). A single DV cable is used for input and output of audio, video, data, and control signals. After recording stops, a DV control bar appears on screen: You can use this control bar to Stop, Play, Pause, Fast-Forward, and Rewind the DV camcorder using your DVD Recorder remote control. • You can also use Easy Guider to record from an external source. Just follow the steps on page 29, but on Step 4, select “AV1”, “AV2”, “S-Video” or “DV” instead of “TV”. DVD Recorder User’s Guide Timer Recording Before You Begin • • 8 Make sure the Date and Time are set correctly; see page 22. Make sure your disc has enough space to record the desired program (press DISC MENU to view the amount of available recording time). Setting a Timer Recording To program a timer recording: 1 Insert a blank DVD+R or DVD+RW disc into the disc tray. • Press OPEN/CLOSE to open and close the disc tray. 2 Press TIMER to display the Timer Record menu: EXIT 3 4 5 6 7 Mode Date Start End Source Quality Status Reset ----- ----- ----- ----- ----- ----- ----- Reset ----- ----- ----- ----- ----- ----- ----- Reset ----- ----- ----- ----- ----- ----- ----- Reset ----- ----- ----- ----- ----- ----- ----- Reset ----- ----- ----- ----- ----- ----- ----- Press to select one of the timer events. Press to select “Mode” and press ENTER. Press and ENTER to select: Once - For a one-time recording. Weekly - For a weekly recording. Daily - For a daily recording. Use the and ENTER keys to select and set: Date - The date or day of the week of the recording. Start - The recording start time. End - The recording stop time. Press to select “Source” and press ENTER. Press and ENTER to select: TV - To record from TV (use to select the desired channel). AV1-Front - To record from the front Audio/Video Input. AV2-Rear - To record from the rear Audio/Video Input. S-Video - To record from the rear SVideo Input. DV-Front - To record from the front DV Input. 9 Press to select “Quality” and press ENTER. 10 Press and ENTER to select: HQ (best) – 1 hour/disc SP (better) – 2 hours/disc EP (good) – 4 hours/disc SLP (fair) – 6 hours/disc 11 If the Status column says “Ready,” then programming is complete. • If the Status column is blank, there is a problem with the timer recording. Use the keys to go back and change the settings. • If you have not set the date and time; see page 22. 12 Press POWER to turn off the DVD Recorder. • The DVD Recorder must be turned off to activate the Timer Recording. • The TIMER indicator on the front panel display will light. • Timer Recording continues until you stop the recording or the disc is full. 4 - Operations 31 DVD Playback Playing a DVD Playing a DVD+R/+RW Follow these steps to play a DVD. 1 Press POWER to turn on the DVD Recorder. 2 Load your DVD in the disc tray with the label side up. • Press OPEN/ CLOSE to open and close the disc tray. 3 Press PLAY to start playback. • Many DVD discs start playback automatically when loaded. • If the DVD has a Disc Menu, or more than one Title, the Disc Menu may appear. If so, use to highlight options, and press ENTER to make selections. • For special playback options, see page 33. Follow these steps to play a DVD that you’ve recorded on the DVD Recorder. 1 Press POWER to turn on the DVD Recorder. 2 Load your DVD+R/RW in the disc tray with the label side up. • Press OPEN/CLOSE to open and close the disc tray. 3 Press PLAYor DISC MENU to view the DVD Disc Menu. • All Titles (recorded programs) on the DVD+R/RW are displayed. ��� 32 TITLE 01 20:29:37 09/11/03 00:26:41 HQ TITLE 02 08:30:00 09/12/03 00:08:05 SP TITLE 03 09:30:00 09/12/03 00:05:32 HQ TITLE 04 18:59:00 09/12/03 00:30:02 SLP TITLE 05 20:00:37 09/12/03 00:10:30 EP TITLE 06 23:00:00 09/12/03 00:21:00 HQ Text View 4 Press to select the Title you want to play and press ENTER. • For special playback options, see page 33. • To switch to a text based menu, select the “Text View” icon and press ENTER. • To switch back to the graphical menu, select the “Thumbnail View” icon and press ENTER. • You can also press GUIDER and select “Playback” to view the DVD Disc Menu. DVD Recorder User’s Guide Special Playback Options Special Options During Playback DISC MENU Displays the DVD Disc Menu (if available). Use the and ENTER keys to select options in the Disc Menu. TITLE Displays the DVD Title Menu (if available). DISC MENU TITLE DISPLAY PREV REW NEXT FF DISPLAY Displays playback information, including the disc type, the current Title and Chapter number, and the elapsed playback time. PREV/NEXT Skips to the next or previous chapter. FF/REW Scans forward or backward at 2x, 4x, 8x, or 16x normal speed. PAUSE/STEP PLAY OPTIONS PAUSE/STEP Pauses playback. While in Pause mode, press repeatedly to step forward one frame at a time. PLAY OPTIONS Shortcut to a variety of special playback features; see right column. Play Options Menu Press PLAY OPTIONS during playback to display the Play Options menu. Use the and ENTER keys to select from the following options: Slow Motion Search A-B Repeat Subtitle Audio Angle Information Exit Slow Motion Plays slow motion forward or backward at 1/2 or 1/4 normal speed. Press PLAY to resume normal play. Search Jumps to a specific Title, Chapter, or Time. Use the 0-9 keys and press ENTER to start playback from the specified time. A-B Repeat Sets two points (A and B) to repeat in a loop. Select Cancel to resume normal play. Subtitle Displays available subtitles on the DVD. Audio Displays available soundtracks/audio formats on the DVD. Angle Displays available camera angles on the DVD. Information Displays current playback information, including Title, Chapter, elapsed playback time, and more. 4 - Operations 33 Other Disc Playback Audio CD Playback Photo CD Playback To play an Audio CD: 1 Load the Audio CD in the disc tray. • The disc will begin playback automatically. 2 Press PREV/ NEXT to browse the tracks. 3 Press PAUSEto pause playback. 4 Press STOP to stop playback. 5 Use the 0-9 keys to select a specific audio track, then press ENTER. • Playback will start from the selected track. To play JPEG files on CD-R/RW: 1 Load the JPEG disc in the disc tray. • The slideshow will begin automatically. 2 Press to browse the pictures. 3 Press to rotate the pictures clockwise/counter-clockwise. MP3 CD Playback To play MP3 files on CD-R/RW: 1 Load the MP3 disc in the disc tray. • The disc will begin playback automatically. 2 Press PREV/ NEXT to browse the MP3 files. 3 Press PAUSEto pause MP3 playback. 4 Press STOP to stop MP3 playback. ��� 34 4 5 Press PAUSEto pause the slideshow. Press STOP to stop the slideshow. Notes on MP3/JPEG Playback • • • • Files must have the “JPG” or “MP3” file extensions. It may take several minutes to load the disc, depending on the numbers of files and/or folders. FF and REW do not work during JPEG/MP3 disc playback. Supports bitrates 32~320Kbps. • If your CD-R/RW has both MP3 and JPEG files, use PREV and NEXT to browse the MP3 files, and to browse the pictures. DVD Recorder User’s Guide Editing Options About Title Editing Protecting a Title Once you have recorded a Title to a DVD+R/RW disc, you can name, protect, overwrite, or erase it using the Title Editor menu. 1 Press PLAY or GUIDER to display the DVD Disc Menu. 2 Use the keys to select the desired Title, then press EDIT to display the “Title Edit” menu. You can protect a title on your disc from being accidentally erased or overwritten. 1 Select Protection, then press ENTER. 2 Turn Protection on or off, then press ENTER. Title Name : TITLE 01 EDIT Protection: Off Overwrite : Off Date: 09/11/03 Time: 21:03:56 Duration: 00:00:11 Quality: HQ Erase Exil Overwriting a Title You can choose to overwrite an existing title (DVD+RW discs only). • On DVD+R discs, each new recording is always placed immediately after the previous recording, so the original recordings cannot be overwritten. 1 Select Overwrite, then press ENTER. 2 Turn Overwrite on or off, then press ENTER. Erasing a Title Naming a Title You can give your Title a name (up to 8 characters). 1 Select Title Name > Edit, then press ENTER. • The keypad appears. You can erase recorded titles from both DVD+R and DVD+RW discs. 1 Select Erase, then press ENTER. 2 The selected title is deleted. • After erasing a title from a DVD+R discs, the erased space cannot be utilized. Title Name TITLE 02 A Symbol a International 1 2 3 4 5 6 7 8 9 . A D G J M P T W - B E H K N Q U X : C F I L O R V Y Cancel 1 2 3 4 5 6 S 8 Z Flnish 7 2 3 0 Back 0 Clear 9 Select the desired characters from the keypad, pressing ENTER after each entry. When finished, select ”Finish” and press ENTER. NOTE: • Be sure to finish all editing before finalizing the disc. You cannot edit a finalized disc.. 4 - Operations 35 Channel Editing About the Channel Editor The DVD Recorder includes a special Channel Editor that allows you to add, delete, reorder, name, insert, or swap channels while watching TV. 1 Press INPUT to select TV mode. 2 Press EDIT to display the Channel Editor menu. Add/Delete Channels Allows you to manually add or remove channels. 1 Use to select the channel you wish to delete, and press ENTER. 2 To restore a deleted channel, select it and press ENTER again. Reorder Channels Allows you to change the order of the channels in your channel list. 1 Use to select the channel you wish to move and press . 2 Press to select “Move Up” or “Move Down” and press ENTER. • The channel moves up or down the list. Rename Channels Allows you to name your stored channels. 1 Use to select the channel you wish to name and press . 2 Press to select “Rename” and press ENTER. • The character palette appears. 3 Use to select the desired characters, pressing ENTER after each entry. 4 When finished, select “Finish” and press ENTER. 36 DVD Recorder User’s Guide Move Up GCN NAME 009 000 ---010 000 ---011 000 ---- CHANNEL EDITOR Move Up Move Down Insert To... 012 000 ---- Swap With... 013 000 ---- Rename 014 000 ---- EXIT 015 000 ---- Insert Channels Allows you to reinsert a channel anywhere in the channel list. 1 Use to select the channel you wish to insert and press . 2 Press to select “Insert To...” and press ENTER. 3 Use to enter the new Channel Number and press ENTER. • The channel moves to the new position. Swap Channels Allows you to swap the TV channel order stored in the DVD Recorder to match the channel order stored in your TV set. 1 Use to select the channel to be swapped and press . 2 Press to select “Swap With” and press ENTER. 3 Use to enter the new Channel Number and press ENTER. • The channels will swap positions. • Repeat as necessary. • When finished, select Exit and press ENTER. Formatting/Finalizing Discs What is Formatting? • • • Formatting completely erases a DVD+RW so it can be recorded on again. You cannot erase and reformat a DVD+R disc. Make sure you have safely backed up your DVD+RW disc before reformatting because all contents will be erased. Erasing a DVD+RW To erase a DVD+RW disc: 1 Press GUIDER to display the Easy Guider menu. 2 Press to select “Erase” and then press ENTER. What is Finalizing? • • • Finalizing a DVD+R locks its recordings in place so the disc can be played on most standard DVD players or computers equipped with DVDROM drives. After you have finalized a DVD+R disc, you cannot edit or record anything else on that disc. Finalizing is not necessary when using a DVD+RW disc. Finalizing a DVD+R To finalize a DVD+R disc: 1 Press GUIDER to display the Easy Guider menu. 2 Press to select “Finalize” then press ENTER. Playback Playback Record Erase Record EXIT Erase Finalize EXIT Finalize 3 4 Press ENTER again to confirm that you wish to erase and reformat the disc. When the disc formatting process is complete, press ENTER to exit the Easy Guider. 3 4 Press ENTER again to confirm that you wish to finalize the disc. • Finalizing can take up to 3-4 minutes depending on the type of disc, how much is recorded on the disc, and the number of titles on the disc. When the disc finalization is complete, press ENTER to exit the Easy Guider. 4 - Operations 37 5 38 Help This Chapter shows you how to get help, including troubleshooting, customer support, and warranty information. DVD Recorder User’s Guide Customer Support The Troubleshooting section below will help you solve common issues with your DVD Recorder. If you don’t find the answers you need here, you can contact our Customer Service Department as follows: Phone (800) 736-7679 E-Mail [email protected] Web www.govideo.com Troubleshooting SYMPTOM CAUSE SOLUTION No power. The power cord is disconnected. Plug the power cord into the rear panel and wall outlet securely. No picture. The TV is not set to receive DVD Recorder signal output. Select the appropriate video input on the TV so the picture from the DVD Recorder appears on the TV screen. The video cable is not connected securely. Connect the video cable securely. The TV power is turned off. Turn on the TV. The equipment connected with the audio cable is not set to receive DVD Recorder signal output. Select the correct input mode on the audio receiver so you can listen to the sound from the DVD Recorder. The audio cables are not connected securely. Connect the audio cable securely. The power of the equipment connected with the audio cable is turned off. Turn on the equipment connected with the audio cable. No sound. The audio cables are damaged. Replace with new ones. No disc is inserted. Insert a disc. Check that the disc indicator on the front panel display is lit. An unplayable disc is inserted. Insert a playable disc. Check the disc type, color system, and regional code. The disc is placed upside down or is not placed within the guide. Place the disc with the playback side down inside the guide. The disc is dirty. Clean the disc. The Parental Control is set. Cancel the Parental Control function or change the rating level. Picture from external input is distorted The video signal from the external component is copy-protected. Connect the component directly to your TV. Some channels are skipped over when using CH The skipped channels were deleted with the Add/Delete feature. See “Add/Delete Channels” on page 27 or page 36. DVD Recorder does not start playback. 5 - Help 39 Troubleshooting SYMPTOM CAUSE SOLUTION Picture or sound of broadcasting channel is weak or missing. Antenna or cables are loose. Tighten connections or replace cable. Wrong TV Signal is selected in the DVD Recorder Setup menu. See “TV Signal” on page 27. Camcorder is off. Turn camcorder on and operate properly. DVD Recorder’s input is not set to AV1-Front, AV2-Rear, S-Video, or DV. Press INPUT to select the correct input. The DVD+R disc was not finalized. Finalize the disc; see page 37. Some players will not play even a finalized disc. No solution. The remaining blank space on the disc is insufficient. Use another disc. The source you are trying to record is copy- protected. You cannot record the source. When setting the recording channel, the channel is tuned to the TV’s own tuner. Select the channel on the DVD Recorder’s built-in TV tuner. DVD Recorder is not set to the correct time. Set date and time; see page 22. Camcorder image via A/V input or DV IN to DVD Recorder is not shown on TV screen. Can’t play disc recorded on this DVD Recorder on another DVD player. Cannot record or did not record successfully. Timer Recording does not work. Timer has been programmed Reprogram Timer; see page 31. incorrectly. TIMER indicator light does not appear after programming timer. Stereo Audio Recording and/or Playback not present. DVD Recorder is on. Turn off the DVD Recorder. TV is not Stereo-compatible. No solution. Broadcast program is not in stereo format. No solution. DVD Recorder A/V Out jacks are not connected to TV A/V In jacks. Make A/V connections. Stereo is available only via A/V output from DVD Recorder. DVD Recorder Audio/Video Out is not Select AUX or A/V source as TV input. selected for viewing at the TV. Remote control does not work properly. The remote control is not pointed at the remote sensor of the DVD Recorder. Point the remote control at the remote sensor of the DVD Recorder. The remote control is too far from the Operate the remote control within DVD Recorder. 10 ft (3 m). 40 There is an obstacle in the path of the remote control and the DVD Recorder. Remove the obstacle. The batteries in the remote control are exhausted. Replace the batteries with new ones. DVD Recorder User’s Guide Technical Specifications General Power Supply Power Consumption Operating Temp. Operating Humidity Dimensions (W/H/D) Net Weight Tuner Signal Tuner System Audio AC 100~240V, 50/60 Hz 36 W 5~40°C (36°~104°F) 5~80% RH 420 x 66 x 268 mm 2.8 kg UHF/VHF/CATV NTSC Connections Front Panel Video Input Audio L/R Input IEEE 1394 Input RCA Connector (yellow) x1 RCA Connector (white/red) x1 Mini jack x1 Rear Panel Video Input Audio L/R Input S-Video Input Video Output Audio L/R Output S-Video Output Component/ Prog. Scan Output Digital Audio Output RCA Connector (yellow) x1 RCA Connector (white/red) x1 4-Pin Mini DIN x1 RCA Connector (yellow) x1 RCA Connector (white/red) x1 4-Pin Mini DIN x1 Y, Pb, Pr (Green/Blue/Red) x1 Coaxial x1 Optical x1 Media Playable Media • • • • • DVD-R/RW DVD+R/RW DVD-ROM CD-R/RW CD-ROM Playable Formats • • • • • • • DVD-Video DVD+VR Video CD Super VCD Audio CD MP3 (Max. files: 1000, 32~320 kbps) JPEG (Max. files: 1000) Audio Formats Dolby Digital MPEG1 MPEG2 PCM Multi-channel 2-channel Multi-channel 2-channel Audio Performance DA Converter AD Converter Signal-Noise (1kHz) Dynamic Range (1kHz) Ch. Separation (1kHz) THD (1kHz) 24-bit/192KHZ ≤24-bit ≥90dB ≥80dB ≥80dB ≤65dB Video Video Formats • • MPEG2 for DVD+VR, DVD-Video, SVCD MPEG1 for DVD+VR, VCD Video Performance DA Converter Composite Output S-Video Output Component Output 10-bit/54MHz 1 Vp-p 75 Ohm Y : 1 Vp-p 75 Ohm C: 0.3 Vp-p 75 Ohm Y : 1 Vp-p 75 Ohm Pb : 0.7 Vp-p 75 Ohm Pr : 0.7 Vp-p 75 Ohm Video Resolution • • • • • Scan Frequency: 60Hz Number of lines: 525 lines DVD Video: 720x480 SVCD: 352x480 VCD: 352x240 Video Recording Quality Mode Hrs Bit Rate Encode Resolution HQ 1 9.5Mbps MPEG2 720X480 SP 2 5.1Mbps MPEG2 720X480 EP 4 2.5Mbps MPEG2 352X480 SLP 6 1.7Mbps MPEG1 352X240 Recordable Media • • DVD+R (DVD+VR Mode) DVD+RW (DVD+VR Mode) NOTE: • Specifications and product design are subject to change without notice. 5 - Help 41 Warranty GoVideo Limited Warranty Who Provides the Limited Warranty During the warranty period, the GoVideo Warranty Administrator will honor service for 90 days labor, 1 year parts from the original date of consumer purchase. See below for Commercial, Industrial or Educational use coverage. Remote controls are warrantied for 90 days from the date of purchase. Who is Protected This warranty protects the original consumer owner of this GoVideo product. What is Covered and How Long This warranty covers internal operating parts and service/labor to repair or replace covered parts in this GoVideo product for 90 days labor, 1 year parts, from the date of purchase, defined as follows: (1) Original Consumer Retail Purchase; (2) First Rental Purchase Agreement; or (3) First Lease Purchase Agreement (the “Warranty Period”). Labor and replacement parts supplied during the Warranty Period are covered only for the remaining portion of the original Warranty Period. The GoVideo Warranty Administrator shall have no liability for service under this warranty if non-OEM (Original Equipment Manufacturer) replacement parts are used in the repair of your GoVideo product. What the Owner Must Do If Service is Required Please contact our customer service department at 1-800-736-7679 to repair or replace your product, at GoVideo’s option, if it proves to be defective in material or workmanship under normal use, during the warranty period listed above, effective from the date of original consumer purchase of the product. Repaired or replacement units are warrantied for the remaining period of the original warranty. Please retain dated sales receipt. Within the warranty period, the customer pays for inbound shipping charges and GoVideo pays return shipping charges. 42 DVD Recorder User’s Guide Other Warranty Coverage Commercial, Industrial or Educational use has the same warranty coverage as stated in this warranty. What are the Exceptions This warranty does not cover: (1) Normal maintenance service, such as cleaning. (2) Damage from misuse, abuse neglect or accident, natural disasters or Acts of God. (3) Cabinetry, decorative parts, A/C adapters, knobs or buttons. (4) The foreign country use of this product. (5) GoVideo product which has been electronically or mechanically modified in any way or incorporated into other products. (6) Installation and setup service adjustments. (7) Owner instruction. Your Owner’s Guide provides information regarding operating instructions and user controls. For additional information, contact your authorized GoVideo dealer. GoVideo is not responsible for any shipping, handling or insurance charges. This Exclusive Limited Warranty excludes all incidental and consequential damages. Some states do not allow the exclusion of incidental and consequential damages, so the above exclusion may not apply to you. ALL IMPLIED WARRANTIES, INCLUDING IMPLIED WARRANTIES OF MERCHANTABILITY AND FITNESS FOR A PARTICULAR PURPOSE ARE LIMITED IN DURATION TO THE DURATION OF THIS WARRANTY PERIOD. Some states do not allow limitations on how long an implied warranty lasts, so the above limitation may not apply to you. This Exclusive Limited Warranty gives you specific legal rights and you may also have other rights which vary from state to state. GoVideo Warranty Administrator 7835 East McClain Drive Scottsdale, Arizona 85260-1732 [email protected] 1-800-736-7679 Index A A-B Repeat 33 Add/Delete Channels 27, 36 Angle 33 Aspect Ratio 24 Audio 33 Audio CD Playback 34 Audio Language 23 Audio Settings 26 AutoPlay 24 Auto Channel Search 27 Auto Chapter Marking 25 C Channel Editor 36 Compatible Media 7 Connections Antenna/Basic Cable 13 Basic TV 15 Cable Box 14 Component Video 16 Digital Audio 17 External Device 18, 19 S-Video 16 Stereo 17 Customer Support 39 D Date 22 Digital Out 26 Disc Menu 33 Disc Menu Language 23 DTS Out 26 E Editing 35 Erasing a Title 35 F Factory Settings 22 Finalizing 37 Formatting 37 Front Panel 8 Front Panel Display 9 I Information 33 Insert Channels 36 L Language Settings 23 M MP3 CD Playback 34 N Naming a Title 35 O OSD Language 23 Overwriting a Title 35 P Parental Control 24 Password 24 Photo CD Playback 34 Playback Audio CD 34 DVD 32 DVD+R/+RW 32 MP3 34 Photo CD 34 Special Options 33 Playback Settings 24 Play Options 33 Protecting a Title 35 T Technical Specifications 41 Time 22 Title 33 Title Editing 35 Troubleshooting 39, 40 TV Signal 27 TV Tuner Settings 27 U Unpacking 7 V Video Output 22 W Warranty 42 Y YourDVD 24 R Rear Panel 10 Recording Basic 29 External Source 30 Timer Recording 31 Record Quality 25 Record Settings 25 Remote Control 11 Rename Channels 36 Reorder Channels 36 S Safety Instructions 4, 5 Search 33 Setup Menu Navigation 21 Overview 21 Sleep Timer 22 Slideshow Time 24 Slow Motion 33 Subtitle 33 Subtitle Language 23 Surround 26 Swap Channels 27, 36 System Settings 22 5 - Help 43