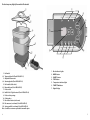
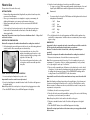
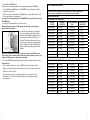
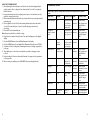
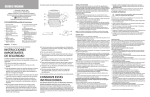
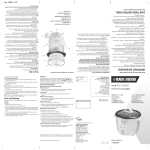
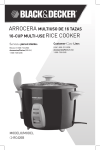
1
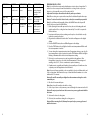
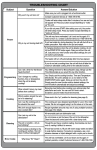
CUSTOMER CARE LINE: USA/Canada 1-800-231-9786 Accessories/Parts (USA/Canada) 1-800-738-0245 For online customer service and to register your product, go to www.prodprotect.com/applica 3-year limited warranty MODELS Find additional healthy recipes at www.georgeforemancooking.com ❑ RC0995P ❑ RC0995PQ Please Read and Save this Use and Care Book IMPORTANT SAFEGUARDS When using electrical appliances, basic safety precautions should always be followed, including the following: ❑ Read all instructions. ❑ Do not touch hot surfaces. Use handles or knobs. ❑ To protect against electrical shock do not immerse cord, plugs or appliance in water or other liquid. ❑ Close supervision is necessary when any appliance is used by or near children. ❑ Unplug from outlet when not in use and before cleaning. Allow to cool before putting on or taking off parts, and before cleaning. ❑ Do not operate any appliance with a damaged cord or plug, or after the appliance malfunctions or has been damaged in any manner. Return appliance to the nearest authorized service facility for examination, repair or adjustment. Or, call the appropriate toll-free number on the cover of this manual. ❑ The use of accessory attachments not recommended by the appliance manufacturer may cause injuries. ❑ Do not use outdoors. ❑ Do not let cord hang over edge of table or counter, or touch hot surfaces. ❑ Do not place on or near a hot gas or electric burner or in a heated oven. ❑ Extreme caution must be used when moving an appliance containing hot oil or other hot liquids. ❑ Always attach plug to appliance first, then plug cord into wall outlet. To disconnect, turn any control to OFF, then remove plug from wall outlet. ❑ Do not use appliance for other than intended use. ❑ To reduce the risk of fire, cook only in removable container. ❑ Make sure base is properly assembled to cooking vessel. See instructions regarding assembly on page 6. POLARIZED PLUG (120V Models Only) This appliance has a polarized plug (one blade is wider than the other). To reduce the risk of electric shock, this plug is intended to fit into a polarized outlet only one way. If the plug does not fit fully into the outlet, reverse the plug. If it still does not fit, contact a qualified electrician. Do not attempt to modify the plug in any way. TAMPER-RESISTANT SCREW Warning: This appliance is equipped with a tamper-resistant screw to prevent removal of the outer cover. To reduce the risk of fire or electric shock, do not attempt to remove the outer cover. There are no userserviceable parts inside. Repair should be done only by authorized service personnel. ELECTRICAL CORD a)A short power-supply cord (or detachable power-supply cord) is to be provided to reduce the risk resulting from becoming entangled in or tripping over a longer cord. b)Longer detachable power-supply cords or extension cords are available and may be used if care is exercised in their use. c) If a long detachable power-supply cord or extension cord is used, 1) The marked electrical rating of the detachable power-supply cord or extension cord should be at least as great as the electrical rating of the appliance, 2) If the appliance is of the grounded type, the extension cord should be a grounding-type 3-wire cord, and 3) The longer cord should be arranged so that it will not drape over the countertop or tabletop where it can be pulled on by children or tripped over. Note: If the power supply cord is damaged, it should be replaced by qualified personnel; in Latin America, by an authorized service center. Save These Instructions. This product is for household use only. 2 3 Product may vary slightly from what is illustrated. 1. Lid handle † 2. Tempered glass lid (Part # RC0995P-01) 3. Adjustable steam vent † 4. Steaming basket (Part # RC0995P-02) 5. Pan handles (both sides) † 6. Removable pan (Part # RC0995P-03) 7. Probe socket † 8. Intelli-Probe™ digital controls (Part # RC0995P-04) 9. Probe socket opening 10. Cooking base 11. Pan release button (not shown) †12. Rice measure (not shown) (Part # RC0995P-05) †13. Serving paddle (not shown) (Part # RC0995P-06) Note: † indicates consumer replaceable/removable parts 4 1. Mode indicator lights 2. MODE button 3. ON/OFF button 4. TEMP button 5. Temperature indicator lights 6.TIMER ▼/▲ buttons 7. Digital display 5 How to Use This product is for household use only. GETTING STARTED • Remove all packing material and, if applicable, any stickers from the product; remove and save literature. • Please go to www.prodprotect.com/applica to register your warranty; for additional information go to www.georgeforemancooking.com. • Wash all removable parts and/or accessories as instructed in CARE AND CLEANING. • Select a dry, level location where unit is to be used, leaving enough space between back of unit and wall to allow heat to flow without damage to cabinets and walls. Important: This product is not a fryer. Do not cook with more than 1 – 2 tbsp. of oil or other fat at a time. INSERTING THE REMOVABLE PAN Caution: Do not operate the multicooker without the cooking base attached. 1. Before placing the removable pan onto the base, be sure the heating plate and outside surface of the removable pan are clean and dry. 2. Insert removable pan onto base of the multicooker, making sure the probe socket is fitted correctly inside the opening on the right side of the base (B). 3. Press down on the pan release button on the cooking base and the removable pan clicks into place. B USING THE INTELLI-PROBE™ DIGITAL CONTROLS 1. Insert control probe firmly into the probe socket. Important: Be sure the control is securely inserted. 2. Uncoil cord and plug into standard electrical outlet. Two dashes will appear on the digital display. Note: Always attach the control probe to the pan before plugging into an outlet. 3. Press the ON/OFF button; the word ON will appear in the display. 6 4. Select the desired setting based on what you would like to prepare. • To steam or cook rice, fill the removable pan with desired amount of rice and liquid. Tap the MODE button until the light under the desired function is illuminated. OR • To prepare other foods, tap the TEMP button until the light under the desired temperature is illuminated: • 180°F Warm • 250°F Low • 350°F Medium • 450°F High • 500°F Sear 5. The red light under the selected temperature will flash until the appliance has reached the set temperature. It will then become constant and you are ready to begin cooking. MAKING RICE Important: As the rice expands and cooks, steam will come out of the vent in the lid. Do not place the multicooker directly under your cabinets. Caution: To reduce the risk of electric shock, cook only in removable pan provided. Caution: Do not operate the multicooker without the cooking base attached. 1. Measure desired amount of rice with the rice measure provided. Note: The rice measure provided is based on 5½ oz. Your multicooker can cook a maximum of 11 measures of dry rice–yielding approximately 8 oz. (by volume) or 6 oz. (by weight) for each cup of cooked rice. 2. Place rice in the removable pan. Add water or other liquid, such as stock, broth or fruit juice. Use the water level markings inside the removable pan as a guide for adding the right amount of water. Use the "BROWN RICE" markings when cooking brown rice and "WHITE RICE" for all other varieties. Important: Be careful not to add too much water as it may cause the unit to boil over. Note: Taste/hardness will vary depending on the quality/type of rice, the amount of water used and length of time the rice is cooked. For softer, fluffier rice, add a little more water. For firmer, crunchier rice, add a little less water. You may need to experiment to suit your taste. 3. Add butter, oil and/or seasonings as desired. 4. Place the lid on the removable pan with the opening of the vent on the lid facing away from you, and not toward your cabinets. Note: Always keep the lid on the multicooker while cooking rice. 5. Plug into a standard electrical outlet. Two dashes will appear on the digital display. 6. Press the ON/OFF button; the word ON will appear in the display Caution: Do not put your hand over the steam vent as you may get burned with the hot steam. 7 7. Select WHITE or BROWN rice. 8. Once rice is cooked, the multicooker automatically switches to WARM and the red light above WARM turns on. The WARM function will operate until the appliance is turned off. 9. Let rice rest for about 15 minutes on WARM before serving. Fluff rice with a fork before removing from the appliance. Important: Do not immediately press the ON/OFF button again after it has begun the WARM cycle. 10. Remove the lid and fluff the rice before serving. Caution: When removing the lid, tilt away from your body to avoid getting burned with the hot steam. 11. To take the removable pan to the table for serving, unplug the probe from the wall, then remove the digital control probe. Press the pan release button on the left side of the base. Tilt the removable pan up on the opposite side of the probe to disengage the probe socket from the base (C). Using pot holders, lift the removable pan up by both C handles. Caution: Be careful when removing the pan for serving, as it will still be warm from cooking. Do not remove the pan from the base when making a stew or any other food which contains a large amount of liquid. 12. Press the ON/OFF button and unplug the multicooker when finished cooking. Important Tips: • Do not keep small amounts of rice on WARM for extended periods of time. • During cooking, a thin crust may develop on the rice at the bottom of the bowl. • Fluff the rice before serving. • Use the plastic serving scoop (rubber spatula or a wooden spoon) to stir and remove rice. Do not use metal utensils that can scratch the nonstick removable pan. 8 rice cooking guide If desired, add seasoning and oil or butter with rice before adding water. Allow rice to rest in appliance at least 15 minutes before serving. For Long Grain Rice: use markings for OTHER RICE Amount of Rice Amount of Water Approx. Cooking Time Yield (in 8-oz. measures) 2 rice measures to 2 mark 18 – 22 minutes 4 – 5 cups 3 rice measures to 3 mark 23 – 27 minutes 6 – 7 cups 4 rice measures to 4 mark 28 – 32 minutes 8 – 9 cups 5 rice measures to 5 mark 32 – 36 minutes 11 – 12 cups 6 rice measures to 6 mark 36 – 40 minutes 13 – 14 cups 7 rice measures to 7 mark 37 – 41 minutes 15 – 16 cups 8 rice measures to 8 mark 38 – 42 minutes 17 – 19 cups 9 rice measures to 9 mark 40 – 44 minutes 18 – 20 cups 10 rice measures to 10 mark 44 – 48 minutes 21 – 23 cups 11 rice measures to 11mark 46 – 50 minutes 23 – 25 cups For brown Rice: USE MARKINGS FOR BROWN RICE 2 rice measures to 2 mark 41 – 43 minutes 4 – 5 cups 3 rice measures to 3 mark 49 – 51 minutes 6 – 7 cups 4 rice measures to 4 mark 53 – 55 minutes 8 – 9 cups 5 rice measures to 5 mark 55 – 57 minutes 10 – 12 cups 6 rice measures to 6 mark 63 – 65 minutes 13 – 14 cups 7 rice measures to 7 mark 66 – 70 minutes 14 – 16 cups 8 rice measures to 7 mark 70 – 74 minutes 17 – 19 cups 9 rice measures to 7 mark 72 – 76 minutes 19 – 21 cups 10 rice measures to 7 mark 78 – 82 minutes 22 – 24 cups 11 rice measures to 7 mark 82 – 86 minutes 24 – 26 cups 9 USING THE STEAMING BASKET 1. Before placing the removable pan onto the base, be sure the heating plate and outside surface of the cooking bowl are clean and dry. Do not let loose particles fall into the base. 2. Insert removable pan onto base, making sure the probe socket is fitted correctly inside the opening on the base. 3. Fill the removable pan with at least 2 cups of water, broth or juice using a standard measuring cup. 4. Place vegetables or other food in the steaming basket and position the basket on top of the removable pan. Season food with salt, pepper and desired seasonings. 5. Place the lid on the removable pan. Note: Always keep the lid closed while cooking. 6. Plug unit into a standard electrical outlet. Two dashes will appear on the digital display. 7. Press the ON/Off button; the word ON will appear in the display. 8. Press the MODE button; the red light will be illuminated below the word steam. 9 Set timer to desired cooking time. Steaming times vary according to vegetable or food type. 10 Timer will begin to count down once liquid in removable cooking pan comes to a boil. 11 Begin checking for doneness after initial 5 minutes. You may need to experiment to suit your taste. 12 When cooking is complete, press the ON/OFF button and unplug the unit. 10 steaming guide Steam using 2 cups of cold tap water, stock or room-temperature vegetable broth. Vegetable Amount Preparation Time Suggestions Fresh asparagus 1 lb. Wash; break off 7 – 9 woody base minutes where spears snap easily. Season with salt, pepper and grated lemon peel. 1 lb. Fresh green beans or waxed beans Leave whole, trim end or cut into 2” pieces. 7– 9 minutes Season with salt, pepper and freshly snipped dill. Fresh beets 1. lb (about 5 medium) Remove stem and root ends, peel and cut into wedges. 20 – 24 minutes Fresh broccoli 1 bunch (about 8 cups) Cut into florets. 7 – 9 minutes Season with salt, pepper and grated lemon peel. Brussels sprouts 4 cups Cut a cross in the base of each sprout. 10 – 12 minutes Garnish with chopped toasted hazelnuts. Cabbage 1 lb. Cut in wedges. 10 – 12 minutes Garnish with crumbled cooked bacon. Carrots 12 oz. Cut in thick slices. 16 – 18 minutes Season with salt, pepper and grated orange peel. Cauliflower 12 oz. Cut into florets. 16 – 18 minutes Garnish with buttered toasted bread crumbs. Celery 12 oz. (about 2½ cups) Cut in 3” pieces. Toss with butter, salt and pepper. 7–9 minutes 11 Vegetable Amount Preparation Time Suggestions Corn 1½ lb. (about 4 ears) Cut in 2” pieces. 8 – 10 minutes. Garnish with finely chopped tomatoes and parsley. Sugar snap peas 8 oz. (about 2 cups) Trimmed and left whole. 6–8 minutes. Season with salt, pepper and minced dill. Snow peas 8 oz. Trimmed and left whole. 6–8 minutes. Serve drizzled with soy sauce and minced green onions. 12 PREPARING SOUPS & STEWS Note: Use only boneless meats and poultry that are cut into cubes no larger than 1½ inches. It is not necessary to brown the meats before cooking. As the soup or stew begins to cook, steam will come out of the vent in the lid. Important: Do not place the multicooker directly under your cabinets. Note: When cooking rice or pasta in the stew, allow for additional liquid in the recipe. Caution: To reduce the risk of electric shock, cook only in removable pan provided. Note: Do not fill removable pan with oil above the MAX fill line inside the pan. Oil should only be used up to the MAX fill line. 1. Before placing the removable pan onto the base, be sure the heating plate and outside surface of the cooking bowl are clean and dry. Do not let loose particles fall into the base. 2. Insert removable pan onto base, making sure the probe socket is fitted correctly inside the opening on the base. 3. Plug unit into a standard electrical outlet. Two dashes will appear on the digital display. 4. Press the ON/OFF button; the word ON will appear in the display. 5. Press the TEMP button; the red light below the lowest temperature will flash until the set temperature is reached. 6. You can change the temperature at any time. Temperature settings go up only; if a lower temperature is desired, continue to tap the TEMP button until the red light is flashing or illuminated below the desired temperature setting. 7. If desired, you can brown meats or sauté vegetables in the appliance. Once the appliance is turned on, select the desired temperature. (For browning and sautéing, select 350ºF.) Do not crowd meats to prevent steaming. 8. Combine meats, vegetables and liquids in the removable pan. Stir with a wooden or plastic spoon until ingredients are well blended. Note: Since most frozen vegetables cook very quickly, it is best to add them at the end of the cooking time. Stir them into the soup or stew and allow the mixture to cook an additional 5 to 10 minutes. Caution: Do not fill removable pan higher than the maximum cooking line on the removable pan. 9. Place the lid on removable pan. Note: Always keep lid on multicooker while cooking. 10. As the soup or stew cooks, steam may come out through the steam vent on the lid. Caution: Do not put your hand over the steam vent as you may get burned with the hot steam. 11. Set timer for desired cooking time. 12. If desired, stir several times during the cooking process. Caution: When removing the lid, tilt away from your body as you may get burned with the hot steam. 13 13. Place lid back on the removable pan when stirring is done. 14. If desired, check seasoning level during cooking and add additional seasoning to taste. 15. When cooking is complete, press the ON/OFF button and unplug the unit. Caution: Always unplug the unit when cooking is complete. Important Tips: • Always use the timer and monitor cooking carefully. • Use only boneless meats and poultry that are cut into cubes no larger than 1½ inches. It is not necessary to brown the meats before cooking. • When cooking rice or pasta in the soup, allow for additional liquid in the recipe. • Since most frozen vegetables cook very quickly, it is best to add them at the end of the cooking time. Stir them into the soup or stew and allow the mixture to cook an additional 5 to 10 minutes. 14 Care and Cleaning This appliance contains no user-serviceable parts. Refer service to qualified service personnel. CLEANING 1. Unplug the cord and let multicooker cool completely. 2. Make sure the digital control probe is removed. 3. Wash the removable pan and lid with warm sudsy water. The lid can also be washed in the dishwasher, top-rack only. Important: Do not immerse the removable pan in water. For hard stains, use a sponge or nylon scouring pad with liquid detergent. Important: Do not use any abrasive cleaners or metal pads as they can damage the nonstick coating. 4. Rinse and dry all parts thoroughly. 5. Wipe the base with a damp cloth and dry thoroughly. STORAGE Store the skillet in a dry place and wind electric cord into a coil securing it with a twist tie. 15 Recipes TROUBLESHOOTING Problem Possible cause solution Some kernels of rice do not seem fully cooked. The rice was not allowed to finish cooking. Allow rice to rest for 15 minutes after cooking before serving. Removable pan is not as clean as I would like. Starch builds up on sides and bottom of removable pan. Fill pan with hot, soapy water and let stand several minutes; then use a nylon scrubber along sides and bottom; rinse well and dry thoroughly. Rice boils over. Too much rice is being cooked. Make sure to cook no more than the maximum amount suggested. The amount of rice to be cooked should match the water markings on the bowl. Rice is too dry. Too much rice or not enough water. Use the rice measure that comes with the multicooker. The rice measure provided holds about 5½ oz. Rice is gummy. Too much water or not enough rice. Add water to match markings on the rice bowl. Do not use a liquid measuring cup. Mixture cooking is boiling and I want to simmer. Temperature selection may be too high. Tap the TEMP button to select a lower temperature (we suggest 250ºF to simmer). 16 FEIJOADA, BRAZILIAN PORK STEW 3 ounces pancetta, diced 1 lb. pork loin, cubed ½ lb. ham, cubed ½ lb. linguica, thickly sliced ½ lb. smoked pork sausage 1 large onion, chopped 4 large cloves garlic, chopped 1½ cups beef broth 1 can (14 ½ oz.) diced tomatoes 1 can (16 oz.) black beans, rinsed and drained 1 cup coarsely chopped green pepper 2 oz. rinsed dried beef, cut into 1-inch pieces ¼ cup chopped cilantro 1 bay leaf 1 tsp. dried oregano ½ tsp. seasoned pepper 2 tbsp. cornstarch ¼ cup beef broth or water Hot cooked rice 6 oranges, sectioned Preheat multicooker at 350ºF. Add pancetta and sauté until golden, stirring often. Remove and set aside. Add pork and ham and brown well on all sides. Remove to bowl with pancetta. Add sausages and brown on cut sides. Add to pancetta. Add onion and garlic and cook until onion is softened. Add broth, tomatoes, black beans, dried beef, cilantro, bay leaf, oregano and pepper into removable pan. Return meats to pan. Cover and bring to a boil. Reduce temperature to 250ºF and cook for 20 minutes. Blend cornstarch into beef broth. Stir into stew and cook until mixture is thickened and smooth. Serve over rice and garnish with orange segments. Makes about 12 cups (about 3 quarts; 2.8 liters). 17 MOROCCAN BEEF STEW 3 lb. top round, cut in 1½-inch cubes 1 tbsp. olive oil 1 large purple onion, cut in wedges 3 large cloves garlic, minced 4 cups beef broth or stock ½ cup dry red wine 1½ tsp. ground cumin 1½ tsp. salt 1 tsp. ground cinnamon ½ tsp. coarse ground black pepper 1 lb. sweet potatoes, peeled and cut into 1-inch chunks 1 pkg. (7 oz.) dried apricots 3 cups baby spinach Hot cooked rice Greek yogurt Preheat multicooker at 350ºF. Add enough beef cubes to pan without any touching and brown on all sides. Remove and set aside. Repeat with remaining beef until all pieces are browned. Add onion and garlic and cook until onion is softened. Add broth and seasonings. Return meats to pan. Cover and bring to a boil. Reduce temperature to 250ºF and cook for 40 minutes. Add sweet potatoes and apricots and cook 15 minutes or until sweet potatoes are tender. Add spinach and cook 2 minutes. Serve over rice and garnish with yogurt. Makes about 10 cups (about 2.5 quarts; 2.4 liters). 18 BROWN RICE AND SQUASH BLEND 1 pkg. (8 oz.) mushrooms, sliced 2 tbsp. butter or margarine 1 large onion, chopped 3 large cloves garlic, minced 4 cups white wine and culinary broth 1½ cups brown rice blend (such as Lundberg) 1 medium butternut squash, peeled, seeded and cubed ½ cup dried cranberries 1 tsp. salt ½ tsp. coarse ground pepper Preheat multicooker at 350ºF. Brown mushrooms in butter in pan. Add onion and garlic and cook until onion is softened. Add broth and bring to boil. Add rice, cranberries, salt and pepper. Set temperature control to BROWN rice. Cover and cook until rice is done and all liquid is absorbed. Makes about 7 cups (about 1.25 quarts; 1.7 liters). SPAGHETTI WITH MEATBALLS 1 jar (1 lb., 10 oz.) marinara sauce 3½ cups water ½ lb. spaghetti rigati or linguini 1 lb. frozen meatballs (½-inch size) 2 large cloves garlic, minced 2 tbsp. chopped parsley 1 tsp. dried Italian herbs Preheat multicooker at 350ºF. Combine all ingredients in removable pan in order listed. Once mixture comes to a boil, reduce heat to 250ºF and cook for 20 minutes. Test pasta for doneness. Place the lid back on the multicooker. If necessary, cook several minutes longer until pasta is tender. Serve immediately. If desired, garnish each serving with freshly grated Parmesan cheese and serve with Texas toast. Makes about 8 cups / 4 servings (about 2 quarts; 1.9 liters). 19 SPICED SHRIMP AND RICE 1 pkg. (16 oz.) yellow rice mix 2 cups chicken or vegetable broth 1 bottle (8 oz.) clam juice 1 can (14½ oz.) diced tomatoes with green chilies 2 tbsp. olive oil 1½ lb. shrimp, shelled and deveined 1 large onion, chopped 2 large cloves garlic, minced ¼ cup chopped cilantro ½ tsp. coarsely ground black pepper 1½ cups frozen peas Combine all ingredients, except peas in removable pan in order listed. Place pan onto base and plug in the appliance. Set temperature at 350ºF. Place the lid on the cooker. Set timer and cook for 26 minutes. Stir in frozen peas; place the lid back on the cooker and cook an additional 10 minutes. Serve immediately. Makes about 9 cups / 4 to 5 servings (about 2.25 quarts; 2.1 liters). Note: One can (14½ oz.) diced tomatoes and 1 can (4 oz.) diced green chilies can be substituted for the canned tomatoes with green chilies. CLASSIC CHICKEN STEW 1½ lb. boneless chicken cut into 1-inch cubes 2 cans (10¾ oz, each) condensed cream of chicken with herbs soup 1 cup water 4 medium carrots, cut in 1-inch pieces (about 1½ cups) 4 medium red skin potatoes, quartered 3 stalks celery, thickly sliced (about 1½ cups) 2 medium leeks, halved and sliced ½ tsp. coarsely ground black pepper 1½ cups frozen cut green beans Combine all ingredients, except frozen vegetables in removable pan in order listed. Place pan onto base and plug in the appliance. Place the lid on the cooker. Set temperature at 350ºF. Once mixture comes to a boil, reduce heat to 250ºF and cook for 45 minutes. Stir in frozen green beans; place the lid back on the cooker and cook an additional 10 minutes. Serve immediately. Makes about 10 cups / 5 to 6 servings (about 2 ½ quarts; 2.4 liters). 20 TERIYAKI SALMON 1 lb. salmon fillets 1/3 cup teriyaki or toasted sesame marinade 1 can (8 oz.) mandarin oranges 1 cup snow peas 4 green onions cut in 1-inch pieces 1 tsp. kosher salt ¼ tsp. seasoned pepper ¼ cup toasted sliced almonds Place filets in shallow baking dish. Pour marinade over all. Turn fish to coat both sides. Cover and refrigerate for at least 30 minutes. Drain oranges, saving liquid. Set oranges aside. Add water to orange liquid to make 1 cup. Pour into rice cooking bowl. Remove salmon from dish and place in steamer basket. Top with snow peas and green onions. Season with salt and pepper. Insert steamer basket into removable pan. Cover and plug appliance into electric outlet. Select steam function and set timer for 18 minutes. Top with reserved mandarin oranges. Cook 3 minutes longer or until salmon tests done. If desired, serve over cooked rice and drizzle cooking liquid over all. Garnish with almonds. Makes 4 servings. CHILI SHRIMP 1 lb. shrimp, shelled and deveined 1½ cups thinly sliced yellow squash 1½ cups thinly sliced zucchini 1 medium red pepper, seeded and cut into 2-inch strips 2 large cloves garlic, thinly sliced 1 tbsp. chopped fresh basil ¼ tsp. chili powder ¼ tsp. salt In large bowl, combine all ingredients; toss to blend. Add 1¼ cups cold tap water to rice cooking bowl. Place cooking bowl in rice cooker. Spoon shrimp mixture into steamer basket. Insert steamer basket into rice cooker over rice cooking bowl. Cover and plug appliance into electric outlet. Select steam function and set timer for 18 minutes. Set timer and cook for 20 minutes; test shrimp and vegetables for doneness. If necessary cook several more minutes. If desired, garnish with chopped cilantro and lemon wedges. Makes 4 servings. 21 NEED HELP? For service, repair or any questions regarding your appliance, call the appropriate 800 number on cover of this book. Please DO NOT return the product to the place of purchase. Also, please DO NOT mail product back to manufacturer, nor bring it to a service center. You may also want to consult the website listed on the cover of this manual. Three-Year Limited Warranty (Applies only in the United States and Canada) What does it cover? • Any defect in material or workmanship provided; however, Applica’s liability will not exceed the purchase price of product. For how long? • Three years from the date of original purchase with proof of such purchase. What will we do to help you? • Provide you with a reasonably similar replacement product that is either new or factory refurbished. How do you get service? • Save your receipt as proof of date of sale. • Check our on-line service site at www.prodprotect.com/applica, or call our toll-free number, 1-800-231-9786, for general warranty service. • If you need parts or accessories, please call 1-800-738-0245. What does your warranty not cover? • Damage from commercial use • Damage from misuse, abuse or neglect • Products that have been modified in any way • Products used or serviced outside the country of purchase • Glass parts and other accessory items that are packed with the unit • Shipping and handling costs associated with the replacement of the unit • Consequential or incidental damages (Please note, however, that some states do not allow the exclusion or limitation of consequential or incidental damages, so this limitation may not apply to you.) How does state law relate to this warranty? • This warranty gives you specific legal rights, and you may also have other rights that vary from state to state or province to province. Made in People’s Republic of China Printed in People’s Republic of China 22 23 © 2010 Applica Consumer Products, Inc. R4 2010/6-7-36E