1
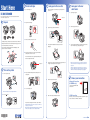
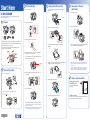
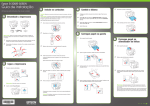
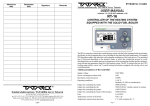
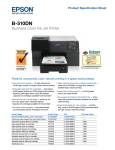
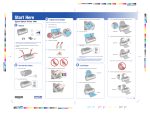
Start Here
3
1
4
Install cartridges
1
Open the cartridge cover.
Load paper in the cassette
Pull out the front paper cassette. Make sure you don’t pull out the
cassette cover.
B-300/B-500DN
Before using the printer, make sure you read the safety instructions in the
User’s Guide on your printer CD.
1
Load paper in the rear
sheet feeder
1
Open the paper support.
2
Slide the edge guide to the left.
3
Insert paper with the printable side up, against the right side of the
feeder. Then slide the edge guide against the paper.
Note: You can load up to 150 sheets of plain, letter-size paper in
the rear sheet feeder. Do not load paper above the arrow on the
edge guide.
Using the optional legal-size paper support, you can load up to
60 sheets of plain, legal-size paper. See the back of this sheet for
information on ordering the optional legal-size paper support.
Cassette cover
Unpack
B-500DN
5
2
Unpack the 4 ink cartridges.
2
Squeeze the edge guides and slide them out.
3
Load paper with the printable side down (up to 500 sheets of
plain paper).
4
Squeeze the edge guides and slide them against the paper. Make sure
the paper is stacked against the front edge guide.
B-300
3
Shake each cartridge for about 5 seconds.
If anything is missing, contact Epson as described on the back of this sheet.
Although the B-500DN is shown, the following instructions apply to both the
B-300 and B-500DN, unless otherwise noted.
Remove all the tape and other packing material, including tape on the
duplexer at the back of the B-500DN.
4
Make sure the cartridge lever is all the way up, then install each
cartridge in the correct slot for its color.
The arrow mark should be on top and pointing toward the printer.
Push each cartridge in until it clicks.
Cartridge lever
2
1
Turn on the printer
Connect the power cable.
5
After you install all 4 cartridges, lower the cartridge lever to the
locked position.
5
Reinsert the cassette into the printer.
6
Choose your connection
Network Connection
(B-500DN only)
See the Network Installation Guide
for instructions.
6
Close the cartridge cover.
Note: Do not connect to the computer at this time.
2
Press the
button.
6
Slide out the output tray and flip up the extension.
USB Connection
Make sure you have a USB cable (not included). Then follow the steps on
the back of this sheet for Windows or Macintosh.
®
*411608800*
*411608800*
The printer starts charging the ink. This takes about 3 minutes.
Caution: Don’t turn off the printer or open any covers while it is
charging or you’ll waste ink.
Note: The printer ships with full cartridges and part of the ink from
this first set of cartridges is used for charging the printer.
®
Windows USB connection
5
When prompted, connect the USB cable. Use any open port on
your computer.
6
Need ink or accessories?
Click Local and follow the on-screen instructions.
For the right supplies at the right time, you can purchase them at Epson
Supplies CentralSM at www.epson.com/ink3 (U.S. sales) or www.epson.ca
(Canadian sales). You can also purchase supplies from an Epson authorized
reseller. To find the nearest one, call 800-GO-EPSON (800-463-7766).
Your software works with Windows 2000, Server 2003, XP, XP Professional
x64 Edition, and Windows Vista .
®
Make sure you have a USB cable (not included).
1
The following supplies and accessories are available for your printer:
Item
Make sure the printer is NOT CONNECTED to your computer.
Product Code
Extra High Capacity Ink Cartridge (Black) (B-500DN only) T6181
7
8
Note: If you see a Found New Hardware screen, click Cancel
and disconnect the USB cable.
6
7
Note: If installation doesn’t continue after a moment, make sure you
securely connected and turned on the printer.
Continue following the on-screen instructions to install the software
and manuals and register your printer.
Click Exit, then remove the CD.
9
Do one of the following:
For Mac OS X 10.5, select Print & Fax from System Preferences. Click
the + button, then select your printer and click Add.
Follow the on-screen instructions to install the rest of the software
and register your printer.
High Capacity Ink Cartridge (Black) (B-500DN only)
T6171
High Capacity Ink Cartridge (Cyan) (B-500DN only)
T6172
High Capacity Ink Cartridge (Magenta) (B-500DN only)
T6173
High Capacity Ink Cartridge (Yellow) (B-500DN only)
T6174
Standard Capacity Ink Cartridge (Black)
T6161
Standard Capacity Ink Cartridge (Cyan)
T6162
Standard Capacity Ink Cartridge (Magenta)
T6163
Standard Capacity Ink Cartridge (Yellow)
T6164
Maintenance Box
T619000
Legal-size Paper Support
C12C815341
Duplex unit (B-300 only)
C12C802531
When you’re done, remove the CD.
You’re ready to print! See your on-screen User’s Guide for instructions.
2
Insert your printer CD.
Macintosh USB Connection
For Mac OS X 10.4 or 10.3.9, open the Print Center or Printer Setup
Utility. Click Add. You see your printer in the Printer Browser:
Your software works with Mac OS X 10.3.9, 10.4.11,
and 10.5.x.
®
Select printer
Make sure you have a USB cable (not included).
1
With Windows Vista, if you see the AutoPlay window, click
Run Epsetup.exe. When you see the User Account Control screen,
click Continue.
3
Click Easy Install.
4
Connect the cable to the printer and to any open USB port on your
Macintosh.
Select your printer and wait while your Macintosh finds the driver
and the Add button becomes available. Then click Add. You see your
printer in the Printer List.
You’re ready to print! See your on-screen User’s Guide for instructions.
2
Turn on your Macintosh and your printer.
3
Insert your printer CD.
Any questions?
On-screen User’s Guide
Click the B-300/B-500DN User’s Guide desktop icon for easy access to
instructions on printing, maintaining your printer, and solving problems.
On-screen Network Guide
Click Local and follow the on-screen instructions.
Click the Network Guide desktop icon for instructions on configuring the
printer for network use (B-500DN only).
Network Installation Guide
Follow the instructions in this booklet to install the B-500DN on a network
(Windows and Macintosh).
4
Double-click the
5
Click Easy Install.
installer icon.
On-screen help with your software
Select Help or ? when you’re using your software.
Epson Technical Support
Internet Support
Visit Epson’s support website at epson.com/support and select your
printer for solutions to common problems. You can download drivers and
documentation, get FAQs and troubleshooting advice, or e-mail Epson with
your questions.
Speak to a Support Representative
Call (562) 276-7202 (U.S.) or (905) 709-2567 (Canada), 6 AM to 6 PM,
Pacific Time, Monday through Friday. Days and hours of support are subject
to change without notice. Toll or long distance charges may apply.
Epson is a registered trademark, Epson Exceed Your Vision is a registered logomark, and Supplies Central is a service mark
of Seiko Epson Corporation.
General Notice: All other trademarks are the property of their respective owners. Epson disclaims any and all rights
in those marks.
This information is subject to change without notice.
© 2008 Epson America, Inc. 12/08
Printed in XXXXXX
CPD-25598R1