1
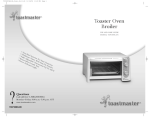
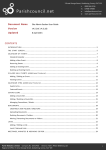
SPEAK & BREW
SAB-3001
10-CUPS COFFEE MAKER
USER MANUAL
IMPORTANT SAFEGUARDS
When using an electrical appliance, basic safety precautions should always be
followed to reduce the risk of fire, electric shock , and/or injury to persons
including the following:
1. READ AL L I N STRUC T IO NS.
2. Do not touch hot surface. Use handles or knobs.
3. To protect against electric shock , do not place cord, plugs, or appliance in
water or other liquid.
4. Close supervision is necessary when any appliance is used by or near
children.
5. Unplug from outlet when not in use and before cleaning. Allow to cool before
putting on or taking off parts, and before cleaning the appliance.
6. Do not operate any appliance with a damaged cord or plug or after the
appliance malfunctions, or has been damaged in any manner. Return appliance
to an authorized service facility for examination, repair or adjustment.
7. The use of an accessory not evaluated for use with this appliance may cause
injuries.
8. Do not use outdoors.
9. Do not let cord hang over edge of table or counter, or touch hot surfaces.
10. Do not place on or near a hot gas or electric burner, or in a heated oven.
11. Do not use appliance for other than intended use.
12. Snap carafe lid securely onto glass carafe before serving any beverages.
13. The glass carafe is designed for use with this appliance. It must never be used
on a range of top. Do not set a hot carafe on a wet or cold surface. Do not use a
cracked carafe or a carafe having a loose or weakened handle. Do not clean
carafe with cleansers, steel wool pads or other adhesive material. Do not place
in microwave oven.
14. Scalding may occur if the carafe lid is removed during the brewing cycle.
15. This appliance has a polarized plug (one blade is wider than the other). To
reduce the risk of electric shock , this plug is intended to fit into a polarized
outlet only one way. If the plug does not fit fully into the outlet, reverse the
plug. If it still does not fit, contact a qualified electrician. Do not attempt to
modify the plug in any way.
16. To avoid an electrical circuit overload do not use a high wattage appliance
on the same circuit with the coffee maker.
17.SAVE TH E SE INST RU C T I ON S
HOUSEHOLD USE ONLY.
NOTE:
A
A short power-supply cord (or detachable power-supply cord) is provided
to reduce risks resulting from becoming entangled in or tripping over a longer
cord.
B
Longer detachable power-supply cords or extension cords are available
and may be used if care is exercised in their use.
C
If a long detachable power-supply cord or extension cord is used,
1) the marked electrical rating of the detachable power-supply cord or
extension cord should be at least as great as the electrical rating of the
appliance,
2) if the appliance is of the grounded type, the extension cord should be
a grounding-type 3-wire cord, and
3) the longer cord should be arranged so that it will not drape over the
counter top or table top where it can be pulled on by children or tripped
over.
WARN I N G:
TO REDUCE THE RISK OF FIRE OR ELECTRIC SHOCK , DO NOT REMOVE
ANY COVERS. NO USER-SERVICEABLE PARTS INSIDE. REPAIR SHOULD BE
DONE BY AUTHORIZED SERVICE PERSONNEL ONLY. DO NOT IMMERSE IN
ANY LIQUIDS.
PRIMULA SPEAK N BREW
Model No.: SAB-3001
Power: 120Vac 60Hz 900W
Max. Brewing quantities: 1.5L(10cups)
Note: The amount of brewed coffee will measure slightly less than the original
water due to absorption of water by the coffee grounds.
This appliance is for HOUSEHOLD USE ONLY. It may be plugged into an AC
electrical outlet (Ordinary household current). Do not use any other electrical
outlet.
B ef ore First Us e
Wash the glass carafe and carafe lid in warm, soapy water, rinse well and dry
thoroughly, then wipe unit with a soft cloth or sponge.
Ne ve r im me r s e un i t or c ord in w ater or other liqu id, an d do n ot allo w
w ate r to g e t i nto th e u n i t .
Fill carafe with cool water and pour into the water reservoir, Place carafe on the
warming plate. Plug unit into electrical outlet and switch ON by pressing Start/
Stop button. Allow water to cycle through without coffee, this will clean the
water reservoir and filter basket prior to initial use.
S e tti ng th e Clo ck Man u a l l y
On the front panel of the coffee maker there are buttons showing minutes and
LID
LC D
TA LK F EATU RE
WATE R LEV EL
G L A S S C AR AF E
WAR MING P L AT E
hours. Push or hold these buttons and the time will go up. Match the clock with
the current time.
S e tti ng th e Clo ck b y Voice
Push the Talk button.
Sp e ak n ' Bre w : Would you like to set the clock or set the coffee brewing time.
YO UR A N SW E R : Set the clock
Sp e ak n ' Bre w : Please say the time including am or pm.
YO UR A N SW E R : Three twenty pm. (or whatever the current time is)
Sp e ak n ' Bre w : The clock is set for 3:20 pm
Note: There is no programming needed to teach the coffee maker how to
recognize your voice. The chip inside is made to understand you already.
Pre p ar i ng You r Coffe e
Be sure the power is off. Lift the reservoir lid. Fill the carafe with cold water and
pour the water into the water reservoir. The water level is indicated on the
water gauge.
Place filter in the basket. Add grounds of coffee into the coffee basket. Close
Reservoir Lid.
2 Choices are now available. You can:
1) Start the brewing process immediately.
2) Brew the coffee at a programmed time.
Bre w i ng you r Coffe e at O nce
After preparing your Coffee Maker with coffee and water, make sure the lid is
closed securely. Check to see that your carafe is sitting centered on the
warming plate.
Push the Start/ Stop button. This will start the brewing process. The coffee
maker will continue to brew until finished.
Bre w i ng you r Coffe e at a P ro g ra mme d Ti me
Make sure the clock is set to the correct time. You can do this manually or using
the voice feature. (See above)
Push the Talk button.
Sp e ak n ' Bre w : Would you like to set the clock or set the coffee brewing time.
YO UR A N SW E R : Set the coffee brewing time
Sp e ak n ' Bre w : Please say the time you would like to brew your coffee
including am or pm.
YO UR A N SW E R : Six ten am. (or whatever time you would like your coffee)
Sp e ak n ' Bre w : Your coffee is set for 6:10 am
The confirmed time and the auto icon will show up on the LCD screen
indicating that the coffee time has been programmed.
R e s e tti ng th e Brew Time
To reset the brew time, push the talk button and answer the prompts again.
Canc e l lin g the Brew Time
The Start/ Stop button is also the cancel button. If you decide that you want to
cancel the programmed time, simply push the start/ stop button 2 times.
The first time you push the button the coffee maker will turn on.
The second time you push the button the coffee maker will turn off and the
program time will be canceled.
Che c k i n g th e S et Brew Ti me
To double check what time the coffee maker is set for press the talk button.
This will visually show you what time the brew time is set for. Simply push the
talk button again and the brew time will not be changed.
Bre w i ng Complete
To know the coffee maker has completed brewing, the red LED will turn off. The
“keep warm” symbol will be displayed. After 2 hours, the coffee maker will
automatically turn off. If you want to terminate the function before, just press
Start/ Stop.
R e s e tti ng You r Coffe e Ma ker
Know that your coffee maker contains a very sophisticated chip. Sometimes,
just as a computer, the coffee maker chip will need to be reset. To reset the
coffee maker, simply unplug the coffee maker, wait 10 seconds and plug the
coffee maker back in. Do this if the display or voice set do not work as
expected. There is nothing wrong with the unit.
C offe e B re win g S u g g e s t i o n s
Advice for Great Taste
Fresh Coffee Beans
The best coffee comes from fresh grind coffee beans. To preserve the freshness
of your coffee beans, keep the beans in an opaque, air-tight container and store
them in a cool, dry place. Refrigeration is not recommended. For standard
American-style coffee, a use one rounded scoop of coffee for every cup of brew
water as measured with the carafe. This results in about one ounce of coffee
being used for every 16 ounces of brew water.
Cof f e e Maker Clean lin e s s
Coffee oils build up quickly within the brew basket and carafe. Over time,
these oils will impair the flavor of freshly brewed coffee. Daily cleaning of the
brew basket and carafe is recommended.
Us er Mai n te n an c e
Op e ratin g
Be sure the power is off. Lift the reservoir lid. Fill the carafe with cold water and
pour the water into the water reservoir. The water level is indicated on the
water gauge.
Place filter in the basket. Add grounds of coffee into the coffee basket. There is
no correct amount of grounds and you should adjust the amount according to
your taste. For stronger taste, add more grounds. We suggest adding 1 table
spoon of coffee grounds per 1 cup of water. Close Reservoir Lid.
2 Choices are now available. You can:
1) Start the brewing process immediately.
2) Brew the coffee at a programmed time.
C a re an d Cle an in g
Cleaning the Coffee Maker
1) Unplug the Coffee Maker and allow it to cool before cleaning.
2) Remove the brew basket and carafe from the Coffee Maker.
3) Wash the brew basket, carafe, and permanent filter in hot, soapy water
and rinse with hot water. Do not use abrasive cleansers or scouring pads.
4) Wipe the Coffee Maker housing with a warm, soapy cloth. Then wipe
clean with a damp cloth and dry with a soft cloth. Do not use abrasive
cleansers or scouring pads.
Descaling the Coffee Maker/Maintaining
Calcium buildups (“scale”) from water will collect in the Coffee Maker over
time. The Coffee Maker should be descaled using a packaged descaling agent
or vinegar. Always mix the descaling solution using cool water.
• When using a descaling agent, follow the directions on the package for
the recommended amounts of descaling agent and water to use.
• When using vinegar, fill the carafe with a solution consisting of 1⁄2
vinegar and 1⁄2 water.
Descaling Steps:
1) Make sure the brew basket contains no coffee or coffee filters.
2) Run the Coffee Maker through a complete brewing cycle using a full
carafe of descaling solution.
3) Rinse the Coffee Maker by running it through two brewing cycles using
a full carafe of fresh, cool water each time.
After the Warranty Expires, consult your local Primula retail dealer where you
purchased the Coffee Maker for information on how to obtain service.
WARNING: SERVICE SHOULD BE PERFORMED BY AN AUTHORIZED SERVICE
FACILITY.
40E Cotters Lane
East Brunswick NJ 08816
E p o c a , In c
Li m i te d War ra nt y
9 0 Da y s L a b o r, One Year Par t s
E p o c a , In c . (Epoca) warrants the product to be free from “Defects” in materials under
normal use for a period of “One Year” from the date of the original purchase. The Warranty is
“Not” transferable. Epoca agrees, within the initial “90 Day” period, to repair the product if it
is determined to be defective at “No Charge”. It is further agreed that Epoca will cover the
cost to repair or replace damaged “Parts” only for a total period of “One Year” from the date
of the original purchase. The warranty does not cover cosmetic damage, glass breakage, AC
cords, cabinets, filter, carafe, water damage or damage due to line power surges, connection
to improper voltage supply or settings, misuse, mishandling, accident, acts of God or
attempted repair by an unauthorized service agent.
To obtain service, the original purchaser must present a sales receipt / proof of purchase
indicating date of purchase, amount paid, and place of purchase. Send the unit prepaid to
the address below in the original packaging or reasonable substitute to prevent damage. You
must include your full name, shipping address and telephone number. No return will be
shipped back to a PO Box. Please include your check or money order in the amount of
$12.00, payable to Epoca, Inc. to cover handling and return shipping charges. Epoca will not
be responsible for delays or unprocessed claims resulting from a purchaser’s failure to
provide any or all of the necessary information.
S e n d a l l i nq uire s o r ret ur ns to :
Customer Service Dept.
Epoca, Inc.
40E Cotters Lane
East Brunswick NJ 08816
P. 732-390-5600
E. [email protected]
There are no express warranties except as listed above.
REPAIR OR REPLACEMENT AS PROVIDED UNDER THIS WARRANTY IS THE EXCLUSIVE
REMEDY OF THE CUSTOMER , (IT) SHALL NOT BE LIABLE FOR ANY INCIDENTAL OR
CONSEQUENTIAL DAMAGES FOR BREACH OF ANY EXPRESS OR IMPLIED WARRANTY ON
THIS PRODUCT EXCEPT TO THE EXTENT PROHIBITED BY APPLICABLE LAW. ANY IMPLIED
WARRANTY OF MERCHANTABILITY OR FITNESS FOR A PARTICULAR PURPOSE ON THIS
PRODUCT IS LIMITED IN DURATION TO THE DURATION OF THIS WARRANTY.
Some states do not allow the exclusion or limitation of incidental or consequential damages,
or limitations on how long an implied warranty lasts, so the above exclusions or limitations
may not apply to you. This warranty gives you specific legal rights and you may also have other
rights, which vary from state to state