1
1
3
2
4
6
8
10
5
7
9
12
11
14
13
16
15
18
17
19
20
22
21
FRANÇAIS
…………………………………………………………………………..
ENGLISH
…………………………………………………………………………..
DEUTSCH
…………………………………………………………………………..
ESPAÑOL
…………………………………………………………………………..
ITALIANO
…………………………………………………………………………..
NEDERLANDS …………………………………………………………………………..
PУCCКИЙ
…………………………………………………………………………..
1
13
24
36
48
60
72
Télécommande universelle 8en1
1. Consignes de sécurité
Toute manipulation technique du produit ou tout changement du produit sont interdits, à cause des normes
de sécurité et de conformité.
Veuillez installer correctement le produit - pour ce faire, consultez le guide d’utilisation. Ne pas laisser les
enfants utiliser ce produit sans la surveillance d’un adulte.
Evitez d’exposer le produit aux situations suivantes:
- frottement mécanique excessif
- température élevée
- vibrations importantes
- humidité élevée
Veuillez également respecter toute autre consigne de sécurité comprise dans les chapitres suivants de ce
guide. Pour toute information complémentaire, contactez les techniciens de notre service d’assistance
téléphonique ou tout autre spécialiste.
Pour garantir une programmation correcte, lisez ce manuel ainsi que les consignes de sécurité avec
attention.
1.2 Changement des piles :
Cette télécommande ne peut fonctionner qu’avec deux piles alcalines de type AAA.
Ne tentez jamais de l’utiliser avec une autre alimentation. Lorsque vous insérez les piles, faites en sorte que
la polarité soit respectée.
Otez les piles lorsque la télécommande ne doit pas être utilisée pendant une longue période. Veillez à ce
que les piles ne soient pas court-circuitées ou exposées au feu (danger d’explosion).
Ne pas laissez les piles à la portée des enfants. Un animal ou un enfant pourrait les avaler. Dans ce cas,
consultez immédiatement un médecin. Des piles endommagées ou qui fuiraient peuvent provoquer des
lésions sur la peau, telles que des brûlures, notamment à cause de l’acide. Utilisez des gants si
nécessaire.
1.3 Mise au rebut des piles:
Conformément aux lois en vigueur, les piles ne peuvent pas être jetées avec les ordures ménagères de la
maison. Veuillez rapporter vos piles dans un des points de collecte proche de chez vous.
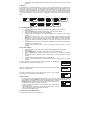
2. Description du produit
La Télécommande universelle possède 4, 6 ou 8 touches de mode (en fonction du modèle que vous avez
acheté). Elle peut remplacer jusqu’à 8 télécommandes (4 en 1, 6 en 1 ou 8 en 1).
Elle contient une bibliothèque de codes infrarouges préprogrammés couvrant la plupart des équipements
audiovisuels du marché.
Les labels de touches de mode proposés tel que TV, VCR, DVD, SAT, AMP, AUX ne sont qu’un aperçu de
ce qui est possible de faire. A l’exception du mode TV, vous pouvez assigner n’importe quel périphérique
Audio Vidéo à n’importe quelle touche de mode.
2.1 Mise en place des batteries pour la première fois
2 piles alcalines LRO3 neuves AAA sont fournis.
¾
Retirer le couvercle du logement des piles au dos de votre télécommande.
¾
Insérez 2 piles neuves de même marque en vérifiant bien la polarité des piles (signes + et –
gravés dans le logement).
¾
Remettre le couvercle.
¾
Choisir la langue
¾
Un écran d’aide apparaîtra pour vous indiquer les touches à utiliser lorsque
vous êtes dans les écrans de programmation.
¾
Appuyez et relâchez n’importe quelle touche, l’écran “Language?” apparaît
avec la langue utilisée par défaut. Utilisez les touches Haut/Bas (,) pour choisir la langue
que vous souhaitez utiliser. La langue par défaut est l’anglais. Appuyez et relâchez la touche
OK.
¾
L’écran "Confirm French" s’affiche (si vous avez choisi le Français). Appuyez et relâchez la
touche OK pour confirmer.
¾
L’écran “Opération réussie” s’affiche et la télécommande reste en mode programmation et
retourne à l’écran “Réglage des codes”.
SET
2.2 Etat de la mémoire après le remplacement des piles
Tous les paramètres définis par l’utilisateur à l’exception des paramètres Heure, Jour, Date et Macros
seront sauvegardés indéfiniment même si un changement de pile est effectué. L’heure, le jour, la date et les
MACROS seront effacés et seront remis à leur valeur par défaut.
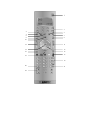
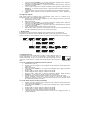
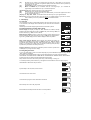
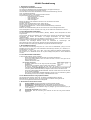
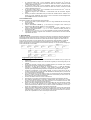
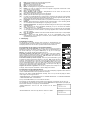
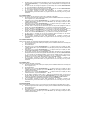
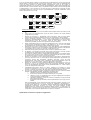
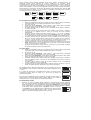
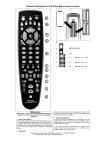
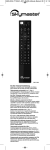
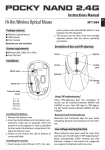
3. Description des touches de la télécommande
[1]
[2]
[3]
[4]
[5]
[6]
[7]
[8]
Power: Permet d’éteindre ou de mettre en veille le dernier appareil sélectionné.
Maintien du télétexte : fige la page du Télétexte à l’écran
TV, VCR, DVD, SAT… : Permettent de sélectionner l’appareil que l’on souhaite commander. Le
nombre de touche de mode dépend du modèle de votre télécommande (4en1, 6en1 ou 8en1).
Teletexte ON: Affichage du télétexte: le Télétexte apparaît à l’écran.
Teletext MIX: Permet d'afficher le télétexte sur l'image présente à l'écran.
INFO: Affichage d’informations sur l’appareil sélectionné.
Teletexte OFF: Suppression du télétexte.
Menu: Affichage du menu.
-1-
[9]
[10]
[11]
Exit: Sortie du Menu.
Mute: Permet de couper ou de remettre le son de l’appareil présélectionné.
Prog +/-: En mode TV, VCR ou SAT : Sélection de la chaîne précédente ou suivante. En mode
DVD : sélectionne le chapitre suivant ou précédent.
[12]
Vol +/-: Réglage du volume sonore.
[13]
Haut, Bas, Gauche et Droite: Touches de navigation, ces touches permettent de se déplacer à
l’intérieur du menu de l’appareil sélectionné
[14]
OK: Permet de confirmer une sélection dans un menu.
[15]
Guide: Donne accès au guide électronique de programme.
[16]
S: Permet de programmer la télécommande avant la première utilisation. Cela vous permet aussi
d’avoir accès aux fonctions secondaires de certains appareils (Shift). Appuyez et relâchez la
touche "S" suivi par la touche de fonction que vous souhaitez activer.
[17]
Touches de couleur: permettent de contrôler le télétexte (FastText) ou des fonctions spéciales
sur certains équipements
[18]
Macro: La touche MACRO en association avec les touches numériques 1, 2, ou 3 permet de
programmer et de mémoriser jusqu’à 3 séquences de commandes.
[19]
Clavier de touches numériques 0 - 9: Elles fonctionnent de la même manière que celles de votre
télécommande d’origine.
[20]
A/V: Sélection d’une source extérieure (prise Péritel, pour visualiser le film du DVD, du satellite,
magnétoscope… sur l’écran de votre téléviseur, par exemple).
[21]
--/-: Utilisée avec les touches numériques (19), elle permet sur certains appareils de sélectionner
directement les chaînes supérieures à 9.
[22]
Play , FF , Stop, Rew , Pause : Ces touches fonctionnent de la même Manière que celles de
votre télécommande d’origine.
REC (record ): Cette touche travaille de la même manière que celle de votre télécommande d’origine VCR
ou DVD… Afin d’éviter toute erreur vous devez appuyer 2 fois sur cette touche pour activer cette
action.
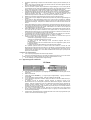
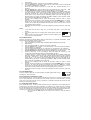
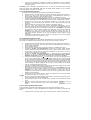
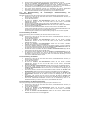
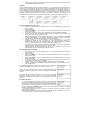
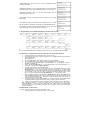
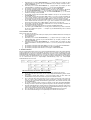
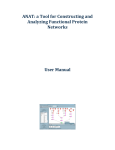
4. Ecran LCD
4.1 Présentation générale
L’écran LCD fournit une interface visuelle entre l’utilisateur et la télécommande. L’écran LCD dispose de 23
caractères, de 3 lignes d’affichage dont 2 lignes de 9 caractères sur les lignes du haut et du centre et d’une
ligne de 5 caractères sur la ligne basse de l’écran.
L’écran affiche aussi une horloge et des symboles d’indication comme décrit plus bas.
SET
Z
PM
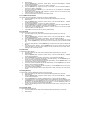
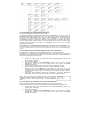
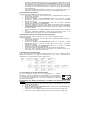
4.2 Affichage de l’écran en mode normal
Affichage de base: L’écran est toujours actif à partir du moment où les piles ont été
installées. L’écran affiche le mode séléctionné actif comme par exemple dans le cas
présent DVD, le jour de la semaine Par ex. Lun, et l’heure du jour par ex. 23:58, dans
un format 24 heures.
Affichage en cas de pression sur la touche mode: En appuyant sur la touche de
mode l’afficheur vous indique le mode actif comme par exemple DVD et le code sur 4
digits programmés pour ce mode ex.: 0768. L’afficheur revient au mode d’affichage
normal dès que vous relâchez la touche de mode.
Affichage en cas de pression sur la touche S (shift): En appuyant brièvement sur la
touche de Setup (S) et en la relâchant l’afficheur indique le mode actif de la
télécommande comme par exemple dans le cas.présent DVD, la date par ex.: 9.10
(Jour:Mois) et indique que le mode “Shift” est activé avec le symbole “(S)” affiché.
Appuyez et relâchez la touche EXIT pour revenir à l’affichage normal. Le mode
"SHIFT" permet d'avoir accès à des fonctions secondaires. Pour l'utiliser, appuyez et
relâcher la touche “(S)” puis appuyez sur la touche correspondant à la fonction désirée.
Indication d'appui sur une touche: L'appui sur une touche est indiqué soit par le
symbole "transmission" sur l'écran soit par un changement d'affichage sur l'écran.
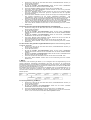
4.3 Naviguer à travers les menus
Pour ouvrir le menu Réglage de Code, appuyez et maintenez appuyé la touche S (Setup) jusqu’à voir
apparaître la fenêtre "Réglage des Code" avec le symbole “SET” affiché.
Lorsque “Réglage des Code” est affiché, appuyez plusieurs fois sur la touche S (Setup) de manière à avoir
accès aux autres Menus:
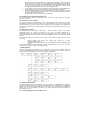
REGLAGE DES CODES ÆREGLAGE des OPTIONS Æ REGLAGE TIMER ÆAPPRENTISSAGE
ÆDEFINIR LES MACRO ÆSORTIR
Appuyez sur la touche OK pour valider l’étape de programmation souhaitée.
Les routines de réglages sont utilisées pour l’apprentissage, la recherche de code, etc…
Pour sortir des routines de réglages, appuyez sur la touche EXIT ou naviguer à travers les écrans pour
atteindre l’écran "Sortir" et appuyer sur la touche OK.
-2-
SET
REGLAGE DES CODES: sert à attribuer un code aux appareils
REGLAGE DES OPTIONS: Permet de régler l’heure, la date, le contrôle du volume
SET
REGLAGE TIMER: Permet d’accéder aux réglages des minuteries
SET
APPRENTISSAGE: Accès à l’apprentissage des touches
SET
DEFINIR LES MACROS: Consiste à définir des séquences de commandes
automatiques
SET
SORTIR: Permet de quitter le mode de programmation en confirmant par la touche OK.
SET
La sortie du mode de programmation se fait automatiquement après 15 secondes
d’inactivité clavier. Un écran “Hors Délai” s’affichera.
Quand la télécommande est occupée à gérer une tâche de recherche de code ou
attend une information alors un écran “Patientez SVP” apparaîtra.
SET
5. Programmation: Réglage des codes
SET
SET
SET
SET
SE T
SET
SET
SET
SE T
SET
SET
SE T
SET
SET
SET
SET
SE T
SET
OR
SET
SE T
SET
SET
SET
SE T
SET
SET
OR
SE T
Lorsque l’écran "REGLAGE DES CODES" apparaît, validez par la touche OK. Le Réglage des codes peut
se faire suivant 4 méthodes différentes.
5.1 Méthode A: Programmation par défilement
a.
b.
c.
d.
e.
f.
g.
h.
i.
Mettez en marche l’appareil que vous souhaitez commander (ex.: Allumer votre TV)
Appuyer sur la touche S jusqu’à l’apparition de l’écran “Réglage des Codes” (Cela prend
approximativement -3 secondes)
Relâchez la touche S.
Appuyez et relâchez la touche OK. L’écran “Faire Défiler Codes” apparaît.
Appuyez et relâcher la touche OK. L’écran “Attribuer la Touche MODE” s’affiche
Appuyez et relâchez la touche de mode choisi (TV, VCR, DVD, etc). L’écran “Choix Appareil?
TV” s’affiche.
A l'aide des touches Haut / Bas (,), sélectionnez le type d’appareil que vous souhaitez
programmer: TV, VCR, DVD,... Voir note "Choix appareil?" ci-dessous.
Appuyez et relâchez la touche OK pour valider votre choix.
Le premier code de la première marque s'affiche à l'écran (ex: Admiral 0000). Utilisez les
touches Haut/Bas (,) pour accéder à la marque de votre choix ou pour accéder plus vite à
celle-ci, utilisez les touches numériques 2 à 9 de votre télécommande (comme sur un téléphone
mobile: 2=abc,3=def, etc.). Par exemple pour accéder à la marque VIETA (Marque DVD)
appuyez sur la touche 8 (8=tuv) 3 fois et utilisez les touches Haut/Bas (,) pour accéder à la
marque. Testez le premier code affiché à l'aide des touches Volume +/-, Mute, Prog +/-,
-3-
j.
k.
Power, AV, Teletext, Play, Stop, FF, Rewind et Pause. Si le premier code correspondant à la
marque de votre équipement de fonctionne pas passer au deuxième code à l'aide des touches
droite/gauche, etc… Une fois le bon code trouvé, appuyez sur la touche OK pour mémoriser ce
code.
“Patientez SVP” puis "Opération réussie” s'affiche sur l'écran, la télécommande quitte le mode
programmation pour revenir à son mode de fonctionnement normal.
Essayez alors votre télécommande. Procédez de la même manière pour vos autres
équipements.
Note “Choix appareil?”: Les choix possibles sont: TV, VCR, LD, DVD, DVR, HDD, SAT,
CABLE, DVBT, STB, AUDIO, AMP, RECR, HTIB, MP3, CD, TAPE, TUNER et PHONO quelle
que soit la touche de mode sélectionnée excepté le mode TV. Pour le mode TV, seul TV peut
être sélectionné (Le mode TV ne peux commander qu'un téléviseur).
5.2 Méthode B: Saisir le Code
Pour saisir le code directement à l'aide de la liste de codes.
a.
Mettez en marche l’appareil que vous souhaitez commander (ex.: Allumer votre TV)
b.
Appuyer sur la touche S jusqu’à l’apparition de l’écran “Réglage des Codes” (Cela prend
approximativement -3 secondes)
c.
Relâchez la touche S.
d.
Appuyez et relâchez la touche OK. L’écran “Faire Défiler Codes” apparaît.
e.
A l'aide des touches Haut/Bas (,) naviguez jusqu'à l'écran “Saisir le Code Voir Doc"
.Appuyez et relâchez la touche OK. L’écran “Attribuez la Touche Mode” apparaît avec le mode
et le code actuellement programmés.
f.
A l'aide des touches numériques 0-9 et de la liste de code, composez le premier code à 4
chiffres correspondant à la marque de votre appareil .Après l'entrée du quatrième chiffre
"Opération Réussie” s'affiche sur l'écran, la télécommande quitte le mode programmation pour
revenir à son mode de fonctionnement normal.
g.
Essayez alors votre télécommande, Si certaines fonctions ne répondent pas, cela signifie que le
code entré n’est pas le bon. Dans ce cas répétez la procédure ci-dessus avec le code suivant
correspondant à votre marque.
h.
Répétez cette procédure pour vos autres équipements.
5.3 Méthode C: Recherche de Code
Au cas où l’ensemble des codes proposés dans la liste ne permettrait pas de commander vos appareils
audiovisuels (TV, VCR, SAT…), nous vous conseillons de procéder par la méthode de recherche cidessous.
a.
Mettez en marche l’appareil que vous souhaitez commander (ex.: Allumer votre TV)
b.
Appuyer sur la touche S jusqu’à l’apparition de l’écran “Réglage des Codes” (Cela prend
approximativement -3 secondes)
c.
Relâchez la touche S.
d.
Appuyez et relâchez la touche OK. L’écran “Faire Défiler Codes” apparaît.
e.
A l'aide des touches Haut/Bas (,) naviguez jusqu'à l'écran “Recherche de Codes". Appuyez
et relâchez la touche OK. L’écran “Attribuez la Touche Mode” apparaît.
f.
Appuyez et relâchez la touche de mode choisi (TV, VCR, DVD, etc). L’écran “Choix Appareil?
TV” s’affiche.
g.
A l'aide des touches Haut / Bas, sélectionnez le type d’appareil que vous souhaitez
programmer: TV, VCR, DVD,... Voir note "Choix appareil?" plus haut. Appuyez et relâchez la
touche OK pour valider votre choix.
h.
“Lancer la Recherche par
" s'affiche sur l'écran. Appuyez plusieurs fois sur la touche
(Power) ou Prog+ (ou Play, VCR et DVD seulement) jusqu'à ce que l'appareil que vous
essayez de contrôler s'éteigne ou change de chaîne (ou se mette en lecture suivant la touche
sur laquelle vous appuyez). Appuyez alors sur OK pour mémoriser le code. Si vous dépassez le
code recherché vous pouvez retourner en arrière avec la touche Prog-. Appuyez sur Prog+ (ou
Power ou Play) pour repartir de nouveau vers l'avant. Pendant cette procédure, "Recherche
pour" ainsi que le mode sont affichés sur l'écran.
i.
"Opération Réussie” s'affiche sur l'écran, la télécommande sort de programmation pour
retourner à son mode de fonctionnement normal.
j.
Essayez alors votre télécommande, Si certaines fonctions ne répondent pas, cela signifie que le
code entré n’est pas le bon. Dans ce cas répétez la procédure ci-dessus.
k.
Répétez cette procédure pour vos autres équipements.
Notes:
1.
2.
3.
(Power) ou la
Si votre équipement ne possède pas de fonction Prog+, utilisez la touche
touche Play.
La recherche commence par le dernier code enregistré. Si celui-ci est 030, la recherche
commencera à 031 jusqu’au dernier code possible, puis recommencera de
000 jusqu’à 029.
Quand tous les codes ont été testés, "Recherche terminée" s'affiche sur
l'écran et la télécommande quitte le mode programmation pour revenir à
son mode de fonctionnement normal.
SET
5.4 Méthode D: Code par marque
Si la marque de votre équipement se trouve dans la liste des marques se trouvant en tête de la brochure
des codes, vous avez la possibilité d’utiliser la recherche par marque (plus rapide que la recherche
manuelle de codes):.
a.
Mettez en marche l’appareil que vous souhaitez commander (ex.: Allumer votre TV)
-4-
b.
c.
d.
e.
f.
g.
h.
i.
j.
k.
l.
Appuyer sur la touche S jusqu’à l’apparition de l’écran “Réglage des Codes” (Cela prend
approximativement -3 secondes)
Relâchez la touche S.
Appuyez et relâchez la touche OK. L’écran “Faire Défiler Codes” apparaît.
A l'aide des touches Haut/Bas (,) naviguez jusqu'à l'écran “Code par Marque". Appuyez et
relâchez la touche OK. L’écran “Attribuez la Touche Mode” apparaît.
Appuyez et relâchez la touche de mode choisi (TV, VCR, DVD, etc). L’écran “Choix Appareil?
TV” s’affiche.
A l'aide des touches Haut / Bas (,), sélectionnez le type d’appareil que vous souhaitez
programmer: TV, VCR, DVD,... Voir note "Choix appareil?" plus haut. Appuyez et relâchez la
touche OK pour valider votre choix.
"Code de la Marque 1-8" s'affiche sur l'écran. Appuyez et relâchez la touche numérique 1 à 8
correspondant à la marque de votre appareil (voir la liste des marques dans la brochure des
codes).
“Lancer la Recherche par
" s'affiche sur l'écran. Appuyez plusieurs fois sur la touche
(Power) ou Prog+ (ou Play, VCR et DVD seulement) jusqu'à ce que l'appareil que vous
essayez de contrôler s'éteigne ou change de chaîne (ou se mette en lecture suivant la touche
sur laquelle vous appuyez). Appuyez alors sur OK pour mémoriser le code. Si vous dépassez le
code recherché vous pouvez retourner en arrière avec la touche Prog-. Appuyez sur Prog+ (ou
Power ou Play) pour repartir de nouveau vers l'avant. Pendant cette procédure, "Recherche
pour" ainsi que le mode sont affichés sur l'écran.
"Opération Réussie” s'affiche sur l'écran, la télécommande quitte le mode programmation pour
revenir à son mode de fonctionnement normal.
Essayez alors votre télécommande, Si certaines fonctions ne répondent pas, cela signifie que le
code entré n’est pas le bon. Dans ce cas répétez la procédure ci-dessus.
Répétez cette procédure pour vos autres équipements.
5.5 Identification du Code mémorisé
Appuyez sur la touche de mode dont vous désirez connaître le code mémorisé. Le code s'affiche à l'écran
Ex: "DVD Code 0768”.
5.6 Programmation des Combo
Pour certains combos (appareil combinant un TV/VCR ou un TV/DVD ou un DVD/VCR, etc.), vous serez
amené à actionner deux touches de mode différentes pour commander les deux appareils réunis dans le
combo. Par exemple, si vous avez un Combo TV/DVD, vous pourrez être amené à programmer un code
avec la touche TV pour le téléviseur et un code séparé (avec une autre touche de mode) pour commander
le lecteur DVD.
5.7 Contrôle des Combo
Les télécommandes originales de certains Combos (par ex.: TV/VCR, TV/DVD, DVD/VCR, etc.) possèdent
des touches séparées, pour sélectionner la partie du combo devant être contrôlé. Par exemple si votre
combo réunit un DVD et un VCR (magnétoscope) il se peut, alors, que sa télécommande originale possède
2 touches séparées DVD et VCR pour sélectionner l'appareil du combo que vous souhaitez commander. La
fonction équivalente est disponible à l'aide des touches Mode et S.
En supposant que votre combo associe un DVD et un VCR et que son code est programmé sous le mode
DVD:
Appuyez et maintenez appuyé la touche DVD pendant plus d'une seconde pour envoyer la
commande DVD
Appuyez brièvement sur la touche S puis sur la touche DVD pour envoyer la commande
VCR.
Cette méthode est valable quel que soit le type de combo (TV/VCR, TV/DVD, DVD/VCR, etc) et est
disponible pour tous les modes. Cette fonction n'est pas supportée par tous les codes.
6. Réglage Options
Appuyez sur OK lorsque l'écran "Réglage Options" s'affiche pour programmer les fonctions système telle
que l'heure, la date, la langue, la durée du rétro éclairage, le fonctionnement du volume et la réinitialisation
de la télécommande.
-5-
SET
SET
SET
SE T
SET
SET
SET
SE T
SET
SET
SET
SE T
SET
SE T
SET
SET
SE T
SET
SET
SE T
SET
SET
SE T
SET
SET
SE T
SET
SET
SE T
SE T
SET
SE T
6.1 Réglage Vol. Mute
Cette télécommande vous permet de définir le mode que les touches Vol+/- et Mute vont commander. En
sortie usine, la télécommande est programmée de façon à ce que les touches Volume et Mute commande
le mode dans lequel se trouve la télécommande. Si ce mode ne possède pas de gestion de volume, ces
touches commanderont alors le mode TV.
6.1.1 Gestion Unique Vol.
Cette fonction permet d'affecter les touches Vol+/- et Mute à un seul mode: les touches Volume et Mute
commanderont toujours le même équipement quel que soit le mode sélectionné. Avant d'utiliser cette
fonction, assurez vous que le mode souhaité possède bien une gestion du volume (dans le code d'origine
ou par apprentissage), dans le cas contraire les touches Vol+/- et Mute n'auront aucune action.
a.
Appuyer sur la touche S jusqu’à l’apparition de l’écran “Réglage des Codes” (Cela prend
approximativement -3 secondes)
b.
Relâchez la touche S.
c.
A l'aide des touches Haut/Bas (,) naviguez jusqu'à l'écran “Réglage Option". Appuyez et
relâchez la touche OK. L’écran “Réglage Vol. Mute” apparaît.
d.
Appuyez et relâchez la touche OK. L’écran “Gestion Unique Vol.” apparaît
e.
Appuyez et relâchez la touche OK. L’écran “Choix appareil?” apparaît.
f.
Appuyez et relâchez la touche de mode souhaité (TV, VCR, DVD, etc). Les touches Volume et
Mute viendront toujours contrôler cet appareil quel que soit le mode sélectionné sur la
télécommande.
g.
“Patientez SVP” puis "Opération réussie” s'affiche sur l'écran, la télécommande quitte le mode
programmation pour revenir à son mode de fonctionnement normal.
Si le mode choisi ne possède pas de gestion du volume, "Erreur Contrôle Vol." s'affiche
sur l'écran et la télécommande sort de programmation pour retourner à son mode de
fonctionnement normal.
SET
6.1.2 Gérer Vol. par Mode
Cette fonction permet d'affecter les touches de gestion du son à chaque mode souhaité. Par exemple si
vous avez programmé votre télécommande pour que les touches de gestion du son commande toujours
votre téléviseur (voir ci-dessus),.vous pouvez décider que pour un (ou plusieurs) mode particulier (par ex
AMP), les touches Vol+/- et Mute commande l'appareil associé à ce mode lorsque la télécommande se
trouve dans ce mode: dans tous les modes les touches Vol+/- et Mute commanderont le téléviseur sauf
lorsque la télécommande est en mode AMP, les touches Vol+/- et Mute commanderont alors l'appareil
associé au mode AMP.
a.
Appuyer sur la touche S jusqu’à l’apparition de l’écran “Réglage des Codes” (Cela prend
approximativement -3 secondes)
b.
Relâchez la touche S.
c.
A l'aide des touches Haut/Bas (,) naviguez jusqu'à l'écran “Réglage Option". Appuyez et
relâchez la touche OK. L’écran “Réglage Vol. Mute” apparaît.
d.
Appuyez et relâchez la touche OK. L’écran “Gestion Unique Vol.” apparaît
e.
A l'aide des touches Haut/Bas (,) naviguez jusqu'à l'écran “Gérer Vol. par Mode". Appuyez
et relâchez la touche OK. L’écran “Choix Appareil” apparaît.
f.
Appuyez et relâchez la touche de mode souhaitée (TV, VCR, DVD, etc). Lorsque la
télécommande se trouvera dans ce mode, les touches Volume et Mute viendront contrôler
l'appareil associé à cette touche de mode.
g.
“Patientez SVP” puis "Opération réussie” s'affiche sur l'écran, la télécommande sort de
programmation pour retourner à son mode de fonctionnement normal.
-6-
6.1.3 Vol. Mute Contrôle Reset
Cette fonction permet d'annuler les réglages effectués au cours des 2 paragraphes précédents (retour au
réglage par défaut pour la gestion du volume).
a.
Appuyer sur la touche S jusqu’à l’apparition de l’écran “Réglage des Codes” (Cela prend
approximativement -3 secondes)
b.
Relâchez la touche S.
c.
A l'aide des touches Haut/Bas (,) naviguez jusqu'à l'écran “Réglage Option". Appuyez et
relâchez la touche OK. L’écran “Réglage Vol. Mute” apparaît.
d.
Appuyez et relâchez la touche OK. L’écran “Gestion Unique Vol.” apparaît
e.
A l'aide des touches Haut/Bas (,) naviguez jusqu'à l'écran “Vol. Mute Contrôle Reset".
Appuyez et relâchez la touche OK. L’écran “Confirmer par OK” apparaît.
f.
Appuyez et relâchez la touche OK, la télécommande reprends ses réglages usine pour la
gestion du volume.
g.
“Patientez SVP” puis "Opération réussie” s'affiche sur l'écran, la télécommande sort de
programmation pour retourner à son mode de fonctionnement normal.
6.2 Réglage Heure
Permet de régler l'heure affiché sur l'écran LCD.
a.
Appuyer sur la touche S jusqu’à l’apparition de l’écran “Réglage des Codes” (Cela prend
approximativement -3 secondes)
b.
Relâchez la touche S.
c.
naviguez jusqu'à l'écran “Réglage Option". Appuyez et relâchez la touche OK. L’écran “Réglage
Vol. Mute” apparaît.
d.
A l'aide des touches Haut/Bas (,) naviguez jusqu'à l'écran “Réglage Heure ". Appuyez et
relâchez la touche OK.
e.
L’écran “Régler Heure” apparaît, avec le format actuel de l'heure (12 Heures ou 24 Heures)
clignotant. A l'aide des touches Haut/Bas (,) choisissez le format (12HR ou 24HR) et
validez avec la touche OK.
f.
Les chiffres des heures se mettent à clignoter. A l'aide des touches Haut/Bas (,) réglez
l'heure et validez avec la touche OK.
g.
Les chiffres des minutes se mettent à clignoter. A l'aide des touches Haut/Bas (,) réglez les
minutes et validez avec la touche OK.
h.
“Patientez SVP” puis "Opération réussie” s'affiche sur l'écran, la télécommande retourne à
l'écran "Réglage des Codes".
6.3 Réglage de la Date
Permet de régler l'année, le mois, la date et le jour de la semaine affiché sur l'écran LCD.
a.
Appuyer sur la touche S jusqu’à l’apparition de l’écran “Réglage des Codes” (Cela prend
approximativement -3 secondes)
b.
Relâchez la touche S.
c.
A l'aide des touches Haut/Bas (,) naviguez jusqu'à l'écran “Réglage Option". Appuyez et
relâchez la touche OK. L’écran “Réglage Vol. Mute” apparaît.
d.
A l'aide des touches Haut/Bas (,) naviguez jusqu'à l'écran “Réglage de la date". Appuyez
et relâchez la touche OK.
e.
L'écran "Avec &OK Choisir Année" s'affiche avec les 2 derniers chiffres de l'année clignotant.
A l'aide des touches Haut/Bas (,) réglez l'année et validez avec la touche OK.
f.
L'écran "Avec &OK Choisir Mois" s'affiche avec les chiffres du mois clignotant. A l'aide des
touches Haut/Bas (,) réglez le mois et validez avec la touche OK.
g.
L'écran "Avec &OK Choisir Date" s'affiche avec les chiffres de la date clignotant. A l'aide des
touches Haut/Bas (,) réglez la date et validez avec la touche OK.
h.
L'écran "Avec &OK Choisir " s'affiche avec le jour clignotant. A l'aide des touches Haut/Bas
(,) réglez le jour et validez avec la touche OK.
i.
Patientez SVP” puis "Opération réussie” s'affiche sur l'écran, la télécommande retourne à
l'écran "Réglage des Codes".
6.4 Réglage éclairage
Permet de régler la durée d'éclairage de l'écran après une action sur une touche.
a.
Appuyer sur la touche S jusqu’à l’apparition de l’écran “Réglage des Codes” (Cela prend
approximativement -3 secondes)
b.
Relâchez la touche S.
c.
A l'aide des touches Haut/Bas (,) naviguez jusqu'à l'écran “Réglage Option". Appuyez et
relâchez la touche OK. L’écran “Réglage Vol. Mute” apparaît.
d.
A l'aide des touches Haut/Bas (,) naviguez jusqu'à l'écran “Réglage éclairage". Appuyez et
relâchez la touche OK.
e.
L'écran "Eclairage Actif en Sec.?" s'affiche avec la durée actuellement en mémoire clignotante.
A l'aide des touches Haut/Bas (,) réglez la durée, celle-ci s'incrémente par pas de 5 s
jusqu'à un maximum de 60 secondes. La valeur par défaut est de 10s. Pour ne jamais éclairer
l'écran LCD, réglez cette durée à 0s. Validez avec la touche OK.
f.
Patientez SVP” puis "Opération réussie” s'affiche sur l'écran, la télécommande retourne à
l'écran "Réglage des Codes".
6.5 Définir la langue
Permet de choisir la langue d'affichage.
a.
Appuyer sur la touche S jusqu’à l’apparition de l’écran “Réglage des Codes” (Cela prend
approximativement -3 secondes)
b.
Relâchez la touche S.
-7-
c.
d.
e.
f.
g.
A l'aide des touches Haut/Bas (,) naviguez jusqu'à l'écran “Réglage Option". Appuyez et
relâchez la touche OK. L’écran “Réglage Vol. Mute” apparaît.
A l'aide des touches Haut/Bas (,) naviguez jusqu'à l'écran “Définir la Langue". Appuyez et
relâchez la touche OK.
L'écran "Langue?" s'affiche avec la langue actuellement active clignotante. A l'aide des touches
Haut/Bas (,) choisissez la langue désirée. La langue par défaut est l'Anglais. Validez avec
la touche OK.
"Confirmer Français" (si le Français a été choisi) s'affiche. Appuyez et relâchez la touche OK.
"Opération réussie” s'affiche sur l'écran, la télécommande retourne à l'écran "Réglage des
Codes".
6.6 Supprimer Options
Cette fonction permet de supprimer toute la programmation (codes, macro, etc.) effectuée sur la
télécommande et de revenir à la programmation usine.
a.
Appuyer sur la touche S jusqu’à l’apparition de l’écran “Réglage des Codes” (Cela prend
approximativement -3 secondes)
b.
Relâchez la touche S.
c.
A l'aide des touches Haut/Bas (,) naviguez jusqu'à l'écran “Réglage Option". Appuyez et
relâchez la touche OK. L’écran “Réglage Vol. Mute” apparaît.
d.
A l'aide des touches Haut/Bas (,) naviguez jusqu'à l'écran “Supprimer Options". Appuyez
et relâchez la touche OK.
e.
L'écran "Supprimer par OK" s'affiche. Validez avec la touche OK.
f.
Patientez SVP” s'affiche pendant que les paramètres sont effacés, puis la télécommande sort
du mode programmation pour revenir à son fonctionnement normal.
7. Réglage Timer
En appuyant sur la touche OK lorsque "Réglage Timer" est affiché à l'écran, vous accédez à la
programmation des différents timers (minuteries) disponibles: mise en veille programmée de la télé et
jusqu'à 4 minuteries qui vous permettent d'envoyer une séquence de 3 commandes à l'un de vos appareils.
SET
SE T
SET
SET
SET
SET
SET
SET
SET
SET
SET
SET
SET
SET
OR
SE T
X= 1,2,3,4
SET
SET
Y=1,2,3
OR
7.1 Réglage Veille TV
La télécommande peut être programmée pour mettre en veille la télévision après une
certaine temporisation: à la fin de la temporisation, la télécommande envoie la
commande infrarouge de mise en veille vers la télé. Cette temporisation peut être
réglée entre 1 et 90 minutes. Le symbole "Zzz" est affiché lorsque cette minuterie est
active.
Z
7.1.1 Pour programmer la minuterie de mise en veille TV
a.
b.
c.
d.
e.
f.
g.
h.
i.
Sélectionnez le mode TV
Appuyez sur la touche S jusqu'à ce que “réglage des Codes” s'affiche sur l'écran (après environ
3 secondes).
Relâchez la touche S.
A l'aide des touches Haut/Bas (,) naviguez jusqu'à "Réglage Timer". Appuyez et relâchez
la touche OK.
“Réglage Veille TV” s'affiche. Appuyez et relâchez la touche OK
“Veille TV Réglage” s'affiche. Appuyez et relâchez la touche OK
“Heure de Veille?” s'affiche avec le nombre de minutes qui clignotent. Utilisez les flèches
Haut/Bas (,) pour régler ces minutes et validez avec la touche OK.
“Opération Réussie” s'affiche et la télécommande revient à l'écran “réglage des Codes”.
Appuyez et relâchez la touche "Exit" 2 fois pour revenir en mode normal Vérifiez que le
symbole Zzz est affiché sur l'écran. Posez votre télécommande face à votre téléviseur, l'avant
de la télécommande pointant vers celui-ci.
7.1.2 Pour effacer la mise en veille programmée
a.
b.
c.
d.
e.
f.
Appuyez sur la touche S jusqu'à ce que “réglage des Codes” s'affiche sur l'écran (après environ
3 secondes). Relâchez la touche S.
A l'aide des touches Haut/Bas (,) naviguez jusqu'à "Réglage Timer". Appuyez et relâchez
la touche OK.
“Réglage Veille TV” s'affiche. Appuyez et relâchez la touche OK
“Annuler Veille TV ” s'affiche. Appuyez et relâchez la touche OK
“Supprimer par OK” s'affiche. Appuyez et relâchez la touche OK
““Opération Réussie” s'affiche et la télécommande reviens à l'écran “Réglage des Codes”. Le
symbole Zzz disparaît.
-8-
7.2 Réglages des timers
4 Timers (minuterie) peuvent être programmés (Timer1, 2, 3 & 4). 4 touches (commandes) peuvent être
attribuées à chacun de ces timers pour qu'ils se déclenchent à une heure prédéfinie (par exemple pour faire
passer le SATelitte sur la chaîne 123 à 22h35mn. La première touche a être mémorisée doit toujours être
une touche de Mode. Les touches suivantes ne peuvent pas inclure ,,,, OK,
Exit, Macro, S ou une touche de Mode. Les Timers ne peuvent être réglés que pour
une activation dans les prochaines 24 heures. Les Timers sont automatiquement
effacés après leur déclenchement. Le symbole
programmé.
est affiché dés qu'un Timer est
7.2.1 Réglage Timer
Programmation d'un Timer (Note: Le timer doit être effacé s'il avait été préalablement programmé – voir
paragraphe "Annuler Timer X" ci-dessous)
a.
Appuyez sur la touche S jusqu'à ce que “Réglage des Codes” s'affiche sur l'écran (après
environ 3 secondes).
b.
Relâchez la touche S.
c.
A l'aide des touches Haut/Bas (,), naviguez jusqu'à "Réglage Timer". Appuyez et relâchez
la touche OK. “Réglage Veille TV” s'affiche.
d.
A l'aide des touches Haut/Bas (,), naviguez jusqu'à "Timer X Réglage" (ou X correspond à
un des 4 Timers 1, 2, 3 ou 4). Appuyez et relâchez la touche OK.
e.
"Réglage Timer X" s'affiche. Appuyez et relâchez la touche OK.
f.
"Entrer Heure?" s'affiche avec les chiffres des heures qui clignotent. A l'aide des touches
Haut/Bas (,) réglez les heures et validez avec la touche OK.
g.
Les chiffres des minutes se mettent à clignoter. A l'aide des touches Haut/Bas (,) réglez les
minutes et validez avec la touche OK.
h.
"Choix appareil" s'affiche. Appuyez et relâchez la touche de mode choisi (TV, VCR, DVD, etc).
i.
L’écran “Choix de la Touche 1" s’affiche. Appuyez brièvement sur la 1ère touche correspondant à
la 1ère commande devant être envoyé. Si aucune autre touche n'est requise, validez avec OK et
allez directement au point l.
j.
L’écran “Choix de la Touche 2" s’affiche. Appuyez brièvement sur la 2ème touche correspondant
à la 2ème commande devant être envoyé. Si aucune autre touche n'est requise, validez avec OK
et allez directement au point l
k.
L’écran “Choix de la Touche 1" s’affiche. Appuyez brièvement sur la 3ème touche correspondant
à la 3ème commande devant être envoyé.
l.
Opération Réussie” s'affiche et la télécommande revient à l'écran “Réglage des Codes”.
m. Appuyez et relâchez la touche Exit 2 fois pour revenir en mode normal. Vérifiez que le symbole
est affiché à l'écran. Posez votre télécommande face à l'équipement devant être commandé,
l'avant de la télécommande pointant vers celui-ci.
7.2.2 Annuler Timer
Permet d'effacer un timer.
a.
Appuyez sur la touche S jusqu'à ce que “Réglage des Codes” s'affiche sur l'écran (après
environ 3 secondes).
b.
Relâchez la touche S.
c.
A l'aide des touches Haut/Bas (,) naviguez jusqu'à "Réglage Timer". Appuyez et relâchez
la touche OK. “Réglage Veille TV” s'affiche.
d.
A l'aide des touches Haut/Bas (,), naviguez jusqu'à "Timer X Réglage" (ou X correspond au
timer que vous voulez annuler 1, 2, 3 ou 4). Appuyez et relâchez la touche OK.
e.
"Annuler Timer X " (où X=1, 2, 3 ou 4)) s'affiche. Appuyez et relâchez la touche OK.
f.
"Opération Réussi" et la télécommande revient à l'écran “Réglage des Codes”.
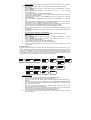
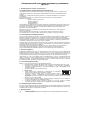
8. Apprentissage
Votre télécommande universelle dispose dans sa bibliothèque des codes permettant de commander la très
grande majorité des équipements présents sur le marché. Cependant, si votre appareil ne marche toujours
pas, vous pouvez apprendre, à partir de la télécommande originale, son code de fonctionnement. De même
si certaines fonctions de commande demeurent inopérantes malgré le test de tous les codes disponibles,
vous pouvez enseigner ces fonctions à votre télécommande. La télécommande peut mémoriser jusqu'à 150
touches (en fonction du format du code infrarouge des télécommandes à apprendre). Une seule
télécommande d'origine peut être mémorisée dans un Mode.
OR
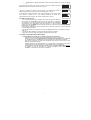
Conseils sur l’apprentissage:a.
Dans la mesure du possible, l’utilisation de piles neuves est fortement conseillée pour chacune
des télécommandes.
-9-
b.
c.
d.
e.
f.
g.
h.
i.
j.
k.
l.
m.
Seulement l’apprentissage complet d’une télécommande d’origine peut être affectée pour un
Mode.
Aller à l’écran “Oter tous Modes appris” pour effacer toutes les commandes apprises avant de
lancer un apprentissage quel qu’il soit.
Exercez-vous dans un premier temps seulement sur l’apprentissage de 2 ou 3 touches (afin de
vous familiariser et d’en vérifier la compatibilité) puis effacer ces codes appris (“Oter tous modes
appris”) avant de procéder à l’apprentissage complet de votre télécommande d’origine.
Confirmer la suppression de "Oter un mode appris” afin de s’assurer que toutes commandes
précédemment apprises ont bel et bien été effacées avant de lancer un nouvel apprentissage.
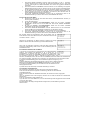
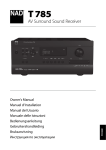
Positionnez les télécommandes face à face de manière à ce que les LEDs infrarouges soient
directement alignées entre elles. Il est aussi nécessaire d’ajuster les hauteurs de ces
télécommandes pour être sûr d’être bien dans le même axe (vertical et horizontal).
Maintenez une distance approximativement de 25mm entre les 2 télécommandes.
Soyez vigilant à ne pas déplacer les télécommandes pendant les phases d’apprentissage des
touches.
Ne pas tenter de faire l’apprentissage lorsque vous vous trouvez à proximité d’un éclairage
incandescent ou à basse consommation d’énergie qui pourrait créer des interférences avec les
transmissions infrarouges. Respectez une distance d’au moins un mètre de toutes sources de
lumière
Evitez l’apprentissage des touches Volume/Mute de votre télécommande d’origine tant que vous
n’êtes pas sûr qu’elles adressent bien le même appareil cible. Par exemple des télécommandes
de DVD utilise aussi des touches de contrôle Volume/Mute de TV et dans ce cas Il se peut qu’il
y ait 2 différents types de codes associés.
Evitez l’apprentissage des touches d’un appareil VCR de votre télécommande d’origine tant que
vous n’êtes pas sûr que celles-ci adresse bien votre appareil cible. Par exemple il existe des
télécommandes d’origine de type TV qui incluent des touches de contrôle d’un VCR et dans ce
cas Il se peut qu’il y ait 2 différents types de codes associés.
L’apprentissage d’une touche peut prendre jusqu’à 3 secondes. Ne relâchez pas la touche à
apprendre avant que le message “Opération réussie” ou “Echec” ne s’affiche.
Si vous ne rencontrez lors de l’apprentissage de la première ou seconde touche que des
messages d’erreurs, alors essayez ce qui suit:i. Mettez fin à l’apprentissage en appuyant sur la touche Exit.
ii. Effacer les commandes apprises pour ce mode
iii. Vérifiez que les LED Infrarouges soient correctement alignées entre les 2
télécommandes.
iv. Ajustez la distance entre les 2 télécommandes soit en les rapprochant (15mm) soit en
les éloignant (50mm)
v. Essayez à nouveau l’apprentissage de votre télécommande originale.
Si le problème persiste encore sur la même touche alors vérifiez si la touche de votre
télécommande d’origine transmet correctement ? Cela affecte t-il votre appareil cible? Essayez
l’apprentissage de la touche à travers un autre mode. Si l’apprentissage se passe bien sous ce
nouveau mode cela signifie que le code utilisé est différent des autres et qu’il ne peut pas être
appris sous le même mode.
Remarques sur l’apprentissage: a.
Vous ne pouvez pas apprendre les touches Setup et Macro.
b.
Toutes les commandes apprises pour un Mode sont effacées si le même ou un nouveau code à
4 chiffres est entré pour ce Mode (quelque soit le mode de programmation du code).
c.
Le rétro éclairage est supprimé pendant l’apprentissage.
8.1 L’apprentissage des commandes
15-50mm
a.
b.
c.
d.
e.
f.
g.
h.
Appuyez sur la touche S jusqu'à ce que “Réglage des Codes” s'affiche sur l'écran (après environ
3 secondes).
Relâchez la touche S.
A l'aide des touches Haut/Bas (,) naviguez jusqu'à “Apprentissage”. Appuyez et relâchez
la touche OK.
L’écran “Apprendre un Mode” apparaît. Appuyez et relâchez la touche OK.
L’écran “Quel Mode apprendre?” s’affiche. Appuyez et relâcher la touche de Mode choisi (TV,
VCR, DVD, etc.).
Le message “Touche de stockage?” apparaît. Appuyez et relâchez la touche de la
télécommande LCD qui va être apprise à partir de la télécommande originale. “Patientez SVP”
s’affiche. Appuyez et relâchez la touche de la télécommande originale jusqu’à l’apparition du
message à l’écran “Opération réussie” ou “Echec” (voir conseil sur l’apprentissage) suivi du
message “OK- encore ou sortir?” (cette opération peut prendre jusqu’à 2-3 secondes). Relâchez
la touche de la télécommande originale.
“OK- encore ou sortir?”apparaît à l’écran. Appuyez sur la touche OK si vous avez d'autres
touches à apprendre et reprenez la procédure du point "f". Appuyer sur la touche Exit si vous
avez terminez l'apprentissage.
“Patientez SVP” apparaît brièvement et la télécommande sort du mode de programmation pour
revenir à son mode de fonctionnement normal.
- 10 -
8.2 Effacer toutes les commandes apprises sous un Mode:a.
b.
c.
d.
e.
f.
g.
Appuyez sur la touche S jusqu'à ce que “Réglage des Codes” s'affiche sur l'écran (après
environ 3 secondes).
Relâchez la touche S.
A l'aide des touches Haut/Bas (,) naviguez jusqu'à “Apprentissage”. Appuyez et relâchez
la touche OK. L’écran “Apprendre un Mode” apparaît
A l'aide des touches Haut/Bas (,) naviguez jusqu'à “Oter un Mode appris”. Appuyez et
relâchez la touche OK.
“Choisir la Touche de Mode?” s’affiche. Appuyez et relâchez la touche de Mode choisie (TV,
VCR, DVD, etc.).
“Supprimer par OK” apparaît à l’écran. Appuyez et relâchez la touche OK.
“Patientez” apparaît brièvement suivi du message “Opération réussie” et la télécommande sort
du menu de réglage pour retourner au mode de fonctionnement normal.
8.3 Effacer toutes les commandes apprises: (opération recommandée de faire avant le premier
apprentissage)
a.
b.
c.
d.
e.
f.
Appuyez sur la touche S jusqu'à ce que “Réglage des Codes” s'affiche sur l'écran (après
environ 3 secondes)..
Relâchez la touche S.
A l'aide des touches Haut/Bas (,) naviguez jusqu'à “Apprentissage”. Appuyez et relâchez
la touche OK. L’écran “Apprendre un Mode” apparaît
Avancez à l’écran “Oter tous Modes appris”. Appuyez et relâchez la touche OK.
“Supprimer par OK” apparaît à l’écran. Appuyez et relâchez la touche OK.
“Patientez SVP” apparaît brièvement et la télécommande sort du menu de réglage et retourne
en mode de fonctionnement normal.
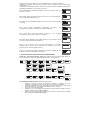
9. Macros
La touche MACRO en association avec les touches 1, 2 et 3, vous permet de programmer et de mémoriser
jusqu'à 3 séquences de commande (appuis sur des touches) de votre choix. Un appui sur la touche
MACRO suivis de la touche numérique 1, 2 ou 3 déclenchera la transmission de la séquence de commande
correspondante. Toute séquence de commande que vous réalisez régulièrement peut être ainsi réduite à
l'appui sur 2 touches (MACRO suivi de 1, 2 ou 3). Par exemple en appuyant sur MACRO puis sur la touche
1, 2 ou 3, vous pouvez allumer votre TV, allumer votre décodeur satellite, sélectionner votre chaîne favorite,
allumer votre magnétoscope et déclencher l'enregistrement, etc. Un total de dix touches (commandes
infrarouges) peut être mémorisés sous chacune des 3 Macro disponibles.
X=1,2,3
9.1 Programmation d'une macro
a.
b.
c.
d.
e.
f.
g.
h.
i.
Appuyez sur la touche S jusqu'à ce que “Réglage des Codes” s'affiche sur l'écran (après
environ 3 secondes).
Relâchez la touche S.
A l'aide des touches Haut/Bas (,) naviguez jusqu'à l'écran “Définir les macro”. Appuyez et
relâchez la touche OK.
L’écran “Ecrire une macro” apparaît. Appuyez et relâchez la touche OK.
"Affecter N° macro" apparaît sur l'écran. Appuyez et relâchez la touche numérique 1, 2, ou 3
sur laquelle vous voulez mémoriser la macro.
"Affecter Mode à la Macro" s'affiche sur l'écran. Appuyez et relâchez la touche de Mode
souhaitée (TV, DVD, SAT…) pour sélectionner l'appareil sur lequel la commande va être
effectué. La première touche d'une séquence de macro doit toujours être une touche de mode.
"Entrer commande X" (X= N° de la Macro en programmation 1, 2 ou3) s'affiche à l'écran avec
le N° de la commande en cours de programmation. Appuyez et relâchez successivement les
touches que vous voulez inclure dans la séquence de Macro dans l'ordre où vous voulez
qu'elles soient transmises (jusqu'à 10 possible)
Pour mémoriser la Macro, appuyez et relâchez la touche Macro. La Macro sera aussi
automatiquement mémorisé au dixième appui sur une touche.
"Opération réussie" apparaît brièvement à l'écran et la télécommande sort du menu de réglage
et retourne en mode de fonctionnement normal.
9.2 Effacement d'une macro
a.
b.
c.
d.
e.
f.
Appuyez sur la touche S jusqu'à ce que “Réglage des Codes” s'affiche sur l'écran (après
environ 3 secondes).
Relâchez la touche S.
A l'aide des touches Haut/Bas (,) naviguez jusqu'à l'écran “Définir les macro”. Appuyez et
relâchez la touche OK
A l'aide des touches Haut/Bas (,) naviguez jusqu'à l'écran “Supprimer une macro”.
Appuyez et relâchez la touche OK
"N) de macro à oter" apparaît à l'écran. Appuyez et relâchez la touche 1, 2 ou 3 correspondant
au N° de la macro à effacer.
"Supprimer par OK" s'affiche à l'écran. Appuyez et relâchez la touche OK.
- 11 -
g.
"Opération réussie" apparaît brièvement à l'écran et la télécommande sort du menu de réglage
et.
En fonctionnement normal, pour activer une macro, appuyez et relâchez la touche
Macro suivi dans les 20 secondes de la touche 1, 2 ou 3.
“Macro X” est affiché sur l'écran durant l'exécution de la séquence de Macro, la
télécommande retourne ensuite à son mode de fonctionnement normal.
Si aucune Macro n'a été mémorisée sur la touche numérique que vous avez choisie,
alors "Macro X invalide" (X=1, 2 ou3) s'affiche brièvement sur l'écran et la
télécommande retourne ensuite à son mode de fonctionnement normal.
9.3 Notes sur les macros
1. Les commandes infrarouges constituant une macro sont envoyées toutes les
0,5 secondes. Une temporisation supérieure à 0,5 secondes entre 2 commandes
peut quelque fois être nécessaire (par exemple pour permettre le préchauffage
d'un téléviseur). Une temporisation peut être ajoutée de la façon suivante:
appuyez sur la touche PAUSE suivi du nombre de secondes de 1 à 9. Il n'est pas possible d'entrer une
temporisation de 0 seconde.
2. Pour changer d'appareil au cours de la séquence de commande, appuyez sur la touche mode du
nouvel appareil à commander.
3. La première touche d'une séquence de macro doit obligatoirement être une touche de mode.(TV,
VCR, etc.).
4. Les touches Setup et Macro ne peuvent pas être incluses dans une Macro.
5. Appuyez sur la touche Setup pour quitter la programmation d'une Macro.
SET
10. Pannes et problèmes de fonctionnement
La Télécommande ne marche pas ou a tendance à perdre les codes entrés:
·
Vérifiez avec la télécommande d’origine que l’équipement fonctionne correctement
·
Vérifiez que vous avez tout d’abord appuyé sur la touche correspondant au mode (téléviseur
TV, magnétoscope VCR, satellite SAT, etc.) de l’équipement que vous désirez commander
·
Si le code de la liste que vous avez entré ne fonctionne pas, essayez le code suivant, ou bien
utilisez la recherche automatique.
·
Vérifiez la polarité de vos piles (indications +/-) et qu’elles soient correctement insérées dans le
compartiment (voir le contact des piles sur les ressorts logés dans le compartiment).
·
La programmation de la télécommande nécessite l’insertion de 2 piles LR 03 alcalines neuves.
Si l'affichage du LCD est très faible ou inexistant, généralement après plusieurs mois
d’utilisation, cela signifie que les piles sont à remplacer.
- 12 -
8/6/4in1 Universal Remote Control
1. Safety instructions
1.1 General Security Note
Technical manipulations of the product or any changes to the product are forbidden, because of security and approval
issues.
Please take care to set up the device correctly – consult your user guide.
Children should use the device only under adult supervision.
Avoid the following:
Strong mechanical wear and tear
High temperature
Strong vibrations
High Humidity
Please also respect the additional notes in the various user guide chapters. For questions not covered from the user
guide please contact our technical hotline or another specialist.
To ensure correct set up please read the manual and security notes carefully.
Keep the instructions in a safe place for future reference or in case you need to pass them on to someone else.
1.2 Battery instructions
The device may only be used with 2 AAA Alkaline batteries – never try to connect to another power supply. When
inserting batteries be sure the right polarity is used. Remove the batteries when the device is not used for a longer
period. Make sure that the batteries are not short circuited and are not disposed in fire (danger of explosion)
Batteries do not belong in children hands. Don’t let batteries lay around openly – they might be swallowed by children
or animals. If this happens see a doctor immediately.
Leaking or damaged batteries can upon contact with skin cause burning or acid damage – if necessary use suitable
gloves.
Please dispose of batteries in accordance with local bylaws.
2. Product description
This universal remote control has four, Six or eight mode keys (depend of the model you have) can replace up to eight
normal remote control (“4in1 function, 6in1 function or 8in1 function”). These may be remote controls for practically
every type of remote-controlled consumer electronics (see supplied code list).
The labels “TV” “VCR” ”DVD” “SAT” “AMP” “AUX” on the mode keys are the overviews purposes. Except the TV
key mode, you can assign any device to any other key modes.
2.1 Inserting Batteries for the first time
2 LR03 AAA micro batteries are supplied.
Open the battery compartment cover on the back of the universal remote control.
Insert both batteries into the compartment; verify that they are placed correctly with the + on the
battery in the same position as marked inside the battery compartment.
¾
Replace the cover.
Select Language
¾
A help screen will be displayed to indicate the keys used during Setup
routines.
¾
Press and release any key, the “Language?” screen is displayed with the
current language. Use the Up/Down Keys to select the desired language. The default language
is English. Press and release the OK key.
¾
The “confirm language” screen is displayed. Press and release the Okay key to confirm.
¾
“Success” will be displayed and the remote will remain in Setup mode, returning to the “CODE
SETUP” screen.
¾
¾
2.2 Battery replacement and Memory
All user programmed parameters except Time, Day, Date and MACROS will be retained indefinitely in the
event of battery replacement. Time, Day, Date and Macros will be cleared to factory defaults.
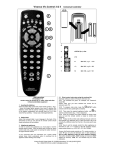
3. Functions of the keys
[1]
[2]
[3]
[4]
[5]
[6]
[7]
[8]
[9]
[10]
[11]
[12]
[13]
[14]
[15]
POWER: Allows you to switch off the last selected appliance.
Teletext Hold: Stop page change in teletext mode.
TV, VCR, DVD, SAT...: These keys allow you to select the appliance you wish to control. The
number of mode keys depends of the model of your remote (4in1, 6in1 or 8in1)
Teletext ON: Start/stop Teletext.
Teletext MIX : Allows to mix the Teletext and the picture of the selected channel
INFO: Displays information of the selected appliance.
Teletext OFF: Stop Teletext.
Menu: Menu On.
Exit: Menu OFF.
Mute: allows you to turn on/off the sound.
Prog +/-: Select the next or the previous channel of your TV, SAT…, in DVD mode: next or
previous chapter.
Vol +/-: Allows you to control the volume.
Up, Down, Left and Right: menu navigation keys, allows you to navigate into a menu.
OK key: confirms menu selection.
Guide: Turn on the electronic Program Guide.
- 13 -
[16]
[17]
[18]
S: Allows you to program your remote before the first use. It also allows you to access to
secondary functions of certain A/V appliances (Shift). Press and release the "S" key followed by
the function key you want.
Coloured keys: control of videotext or special equipment functions.
Macro: The MACRO key in coordination with one of the digit keys 1, 2, or 3 allows the
programming and memorisation of up to 3 command sequences.
[19] Numeric keys 0 - 9: Work the same way as your original remote.
[20]
A/V: Selection of an external source (SCART input).
[21]
--/-: In connection with the numeric keys, this button allows you with some equipment to select
directly channels higher than 9.
[22] Play , FF , Stop, Rew , Pause : These buttons work the same way as in your original remotes.
REC (record ): This key works the same way as the one on your original remote for your VCR. In order to
avoid a mistake you have to press this key twice to activate this feature.
4. LCD Display
4.1 Overview
The LCD display provides a visual interface between the User and the remote. LCD
is a 23 character, 3-line display with 9-character top and central line and 5-character
bottom line.
Additionally LCD includes 4-Digit segmented clock and indicator symbols.
4.2 Default readouts in Normal display mode
Normal display: the display is always on when batteries are installed, normally
displaying the active Mode and its code e.g. DVD, the day of the week e.g. Mon, and
the time of the day e.g. 23:58, in 24 hour format.
Mode Keypress display: Pressing a mode Key changes remote operation to that
Mode and displays the active mode and its code e.g. DVD and the programmed 4digit code e.g. 0768. Display returns to Normal display on Mode Key release.
Setup (shift) Keypress Display: Briefly pressing and releasing the Setup key
displays the active Mode of the remote e.g. DVD, the date e.g. 9:10 (Day:Month)
and indicate “Shift” operation with “(S)”. Press and release Exit to return to normal
display. To use Setup key for Shift, press and release (normal keypress) the Setup
key followed by the desired secondary function key.
Keypress indication: Keypresses are indicated by either a “transmit” symbol in the
LCD display or by change of screen display.
4.3 Navigating the menus
To open the Setup Menu, press and hold the S (Setup) key until CODE SETUP appears along with the
“SET” symbol on the display.
If the display shows CODE SETUP continue to press the S (Setup) key to access to the other Menus:
CODE SETUP ÆSYSTEM SETUP ÆTIMER SETUP ÆLEARN SETUP ÆMACRO SETUP ÆEXIT SETUP
Press the Okay Key to select the desired programming step required.
Setup routines are used for direct Library Code entry, code Searching, Learning, etc…
To exit Setup routines, press the EXIT key or navigate to the “EXIT SETUP” screen and press okay key.
CODE SETUP to affect Code entry to Devices
SET
System Setup to set Time, Date, Volume control
SET
SET
Timer SETUP to set Timer events
SET
Learn SETUP to program a mode with learned commands
SET
Macro Setup to set a macro Key sequences
SET
EXIT SETUP to exit Setup routines and return to normal operation.
- 14 -
Exit from Setup will also occur automatically after approximately 15 seconds if no key is
pressed. “Timeout” will be displayed.
When the remote is busy processing in Setup routines, “Please Wait” will be displayed.
5. Programming CODE SETUP
Code Setup options: Pressing Okay at CODE SETUP presents 4 options for programming a mode with
codes.
5.1 Scroll a list of codes
First method to enter the code
a.
Turn on the device to be controlled (i.e.: for TV turn on your TV device)
b.
Press and Hold the S key until “Code Setup” is displayed (takes approximately -3 seconds)
c.
Release Setup key
d.
Press and release OK key. “SCROLL A LIST OF CODES” is displayed.
e.
Press and release OK key. “SELECT A MODE KEY?” is displayed
f.
Press and release desired mode key (TV, VCR, DVD, etc). “SELECT DEVICE? TV” is
displayed.
g.
Using the Up/Down (,) keys, select the device type to be programmed: TV, VCR, DVD,...
See the note "Select Device?" bellow.
h.
Press and release OK key to confirm selection.
i.
The first Code List Brand and Code will now be displayed (e.g. Admiral 0000). To access
quicker to the brand name of your device, you can use the numeric keys 2 to 9 (as on a mobile
phone: 2=abc,3=def, etc.). For example to access to VIETA Brand (DVD Brand) push the
numeric key 8 (8=tuv) 3 times and use Up/Down keys to select your brand and Left/Right keys
to select the code. Codes can be functionally tested on the target device using, Volume, Mute,
Channel, Power, AV, Teletext, Play, Stop, FF, Rewind and Pause keys. Once the correct code
has been found, press and release OK key to store the Code.
j.
“Please Wait” followed by "Success” will be displayed and the remote will exit the Setup routine
and return to normal operation.
k.
Test your remote control with your equipment. Repeat this procedure from step "a" for the other
equipment you want to control.
Note: “Select Device?” selections are TV, VCR, LD, DVD, DVR, HDD, SAT, CABLE, DVBT, STB,
AUDIO, AMP, RECR, HTIB, MP3, CD, TAPE, TUNER and PHONO. For TV Mode, only TV
“Device” can be selected.
5.2 Enter the Codes
To enter codes directly from library code tables.
a.
Turn on the device to be controlled (for TV turn on your TV device)
b.
Press and Hold the S key until “Code Setup” is displayed (takes approximately 3 seconds)
c.
Release S key.
d.
Press and release OK key. “Scroll a list of Codes” is display.
e.
Use Up/Down Key to reach “Enter codes” screen. Press and release the OK key. “Select a
Mode Key?” is displayed.
f.
Press and release desired mode Key (TV, VCR, DVD, etc.). The mode key is displayed along
with its currently programmed code.
g.
Enter the 4-digit code number using the digit 0-9 keys.
h.
On the 4th digit entry. “Success” will be displayed and the remote will exit the Setup routine and
return to normal operation.
i.
Point the remote in the direction of your equipment and press the POWER button. Your device
should turn off. Check other functions (for example for a DVD : FF or REW etc.). If certain
functions are not responding this indicates that the entered code is not the correct one. In that
case repeat the above procedure with the next corresponding code of your brand.
j.
Repeat this procedure from step "a" for the other equipment you want to control (TV, VCR, DVD,
SAT, etc.)
5.3 Search for the Codes
Facility to manually search the entire Code Library for a particular device that may not be listed in the
Library or listed under a different Manufacturer.
a.
b.
Turn on the device to be controlled (for TV turn on your TV device)
Press and Hold the S key until “Code Setup” is displayed (takes approximately 3 seconds)
- 15 -
c.
d.
e.
f.
g.
h.
i.
j.
k.
Notes:
1.
2.
3.
Release S key
Press and release OK key. “SCROLL A LIST OF CODES” is displayed.
Using the Up/Down keys, navigate to “Search for the Codes” screen. Press and release OK
key. “SELECT A MODE KEY?” is displayed
Press and release desired mode key (TV, VCR, DVD, etc). “SELECT DEVICE? TV” is
displayed.
Using the Up/Down keys, select the device type to be programmed (TV, VCR, DVD…) . See
the note "Select Device?" above. Press and release OK key to confirm selection.
“To Search Press P+ or Power" is displayed. Press the Prog+ key (or Power or Play (VCR,
DVD only)) repeatedly until the device to be controlled changes channel, turns off or responds
accordingly. “Searching for:-“ will be displayed (along with the device selection) during the
search process. If the required Code is accidentally passed then press the Prog- key to
backtrack through the Library. Press Prog+ (or Power or Play) to change direction forward
again. Press and release OK key to store the Code.
“Success” will be displayed and the remote will exit Setup routine and return to normal
operation.
Point the remote in the direction of your equipment and press the POWER button. Your device
should turn off. Check other functions (for example for a DVD : FF or REW etc.). If certain
functions are not responding this indicates that the entered code is not the correct one. In that
case repeat the above procedure.
Repeat this procedure from step "a" for the other equipment you want to control (TV, VCR, DVD,
SAT, etc.)
If the Device does not have a Prog+ key, use the Play (VCR, DVD...) or the Power keys
instead.
Code Search starts from the currently stored 4-digit number under that
Mode.
When all codes have been searched “Search End” will be displayed and
remote returns to normal operation.
5.4 Use Brand Codes
Facility to manually search specific Brands within the Code Library for a particular manufacturer. Brand
Search Library table typically consists of 30-40 codes.
a.
Turn on the device to be controlled.
b.
Press and hold S key until “Code Setup” is displayed (takes approximately 3 seconds).
c.
Release S key.
d.
Press and release the OK key. “Scroll a List of Codes” is displayed.
e.
Using the Up/Down keys, navigate to “Use Brand Codes”. Press and release the OK key.
“Select a Mode Key?” is displayed.
f.
Press and release desired Mode key (TV, VCR, DVD, etc.). “Select Device? TV” is displayed.
g.
Using the Up/Down keys, select the Device type to be programmed (TV, VCR, DVD, etc. – See
the note "Select Device?" above). Press and release the OK key to confirm selection.
h.
“Enter the Brand Key 1-8” is now displayed. Press and release the numeric key (1-8)
corresponding to desired Manufacturer from separate Brand code table.
i.
“To Search Press P+ or Power” is displayed. Press the Prog+ key (or Power or Play (VCR,
DVD only)) repeatedly until the Device to be controlled changes channel, turns off or responds
accordingly. “Searching for:-” will be displayed (along with the Device selection) during the
search process. If the required Code is accidentally passed then press the Prog- key to
backtrack through the Library. Press Prog+ (or Power or Play) to change direction forward
again. Press and release OK key to store the Code.
j.
“Success” will be displayed and the remote will exit Setup routine and return to normal
operation.
k.
Point the remote in the direction of your equipment and press the POWER button. Your device
should turn off. Check other functions (for example for a DVD : FF or REW etc.). If certain
functions are not responding this indicates that the entered code is not the correct one. In that
case repeat the above procedure with the next corresponding code of your brand.
l.
Repeat this procedure from step "a" for the other equipment you want to control (TV, VCR, DVD,
SAT, etc.)
5.5 Code Identification
Press the respective Mode key in normal operation to display programmed code for
that Mode e.g. “DVD Code 0768”.
5.6 Programming Combo Device Codes
Some Combo devices (e.g. TV/VCR, TV/DVD, DVD/VCR, etc) will require you to set up two different Mode
keys to control both parts of the Combo device. For example, if you have a TV/DVD Combo, you might
need to set up one code under the TV key to control the TV part AND a separate code (under any other
Mode key) to control the DVD part.
5.7 Controlling Combo Devices
Some Combo devices (e.g. TV/VCR, TV/DVD, DVD/VCR, etc) have separate keys on the original remote to
select the part of the Combo device to be controlled. For example, if your Combo device is a DVD/VCR
then its original remote may have separate DVD and VCR keys for selection of the Combo part you would
control. The equivalent key functions can be found on your remote by using the Mode and Setup keys.
Assuming your Combo device is a DVD/VCR and its code is programmed under DVD Mode:
press and hold the DVD Mode key for more than one second to send the DVD key
command,
- 16 -
quickly press and release the S key followed by pressing and releasing the DVD Mode key
to send the VCR key command.
This method can be applied similarly to all Combo devices (e.g. TV/VCR, TV/DVD, DVD/VCR, etc) and is
available for all Modes. This feature is not supported by all codes.
-
6. System Setup Options
Pressing OK at SYSTEM SETUP accesses the System Setup Options for Volume Punch-Through control
Setup, Time Setup, Date Setup, Backlight Setup and System Reset.
6.1 Vol/Mute Control Setup
Volume/Mute Control and Punch-Through Feature:- This remote allows you to select which Mode controls
your Volume/Mute keys. The remote is initially set (factory default) for all Modes programmed with “Visual”
codes (e.g. TV, VCR, DVD, PVR, SAT & CABLE) and “Audio” codes (e.g. CD & AUDIO) to use their own
Volume/Mute control if present. If the programmed “Visual” code has no Volume/Mute operation of its own
then those keys will punch-through control to the TV Mode device without needing to change to TV Mode.
Setting Volume/Mute Control and Punch-Through - Any Mode chosen for Volume/Mute control MUST have
its own Volume/Mute function either in the programmed code or learned otherwise the Volume/Mute keys
will do nothing.
6.1.1 Set All Vol. to one Mode
Setting ALL Volume/Mute Control to any one Mode e.g. TV :- This routine will set all Modes to punchthrough to any one chosen Mode for Volume/Mute key control without the needing to change to that Mode.
a.
b.
c.
d.
e.
f.
g.
h.
Press and hold S key until “Code Setup” is displayed (takes approximately 2-3 seconds).
Release S key.
Using the Up/Down keys, navigate to “System Setup”. Press and release OK key. “Vol/Mute
Control Setup” is displayed.
Press and release OK key. “Set All Vol. to 1 Mode” is displayed.
Press and release the OK key. “Set All Vol. to Mode?” is displayed.
Press and release desired Mode key (TV, VCR, DVD, etc.) for Volume/Mute control.
“Please Wait” will be displayed briefly followed by “Success” and the remote will exit Setup and
return to normal operation.
All Modes will now punch-through to your chosen Mode for Volume/Mute control.
If the chosen Mode has no Volume/Mute commands of its own, “Volume Control Error” will
be shown in the display and the remote will exit Setup routine and return to normal
operation.
6.1.2 Set Vol. for one Mode
This routine will set any Mode to use only its own Volume/Mute control i.e. Volume/Mute punch-through is
disabled for this Mode. Note: before using this routine, check that the chosen Mode has its own
Volume/Mute functions, either in the code or by learning, otherwise the Volume/Mute keys will do nothing.
a.
Press and hold S key until “Code Setup” is displayed (takes approximately 3 seconds).
- 17 -
b.
c.
d.
e.
f.
g.
h.
Release S key.
Using the Up/Down keys, navigate to “System Setup”. Press and release OK key. “Vol/Mute
Control Setup” is displayed.
Press and release OK key. “Set All Vol. to 1 Mode” is displayed.
Using the Up/Down keys, navigate to “Set Vol. for one Mode”. Press and release the OK key.
“Set All Vol. to Mode?” is displayed.
Press and release desired Mode key (TV, VCR, DVD, etc.) to be disabled for Volume/Mute
punch-through control.
“Please Wait” will be displayed briefly followed by “Success” and the remote will exit Setup
routine and return to normal operation.
The chosen Mode will now use its own Volume/Mute control.
6.1.3 Vol/Mute Control Reset
This routine will reset Volume/Mute control back to its Factory default settings.
a.
Press and hold S key until “Code Setup” is displayed (takes approximately 3 seconds).
b.
Release S key.
c.
Using the Up/Down keys, navigate to “System Setup”. Press and release OK key. “Vol/Mute
Control Setup” is displayed.
d.
Press and release OK key. “Set All Vol. to 1 Mode” is displayed.
e.
Using the Up/Down keys, navigate to “Vol/Mute Control Reset”. Press and release the OK key.
f.
“Confirm OK to Reset” is displayed. Press and release the OK key.
g.
“Please Wait” will be displayed briefly followed by “Success” and the remote will exit Setup
routine and return to normal operation.
h.
Volume/Mute control is now rest to its Factory default settings.
6.2 Time Setup
To set the Time of day for normal LCD time display.
a.
Press and hold S key until “Code Setup” is displayed (takes approximately 3 seconds).
b.
Release S key.
c.
Using the Up/Down keys, navigate to “System Setup”. Press and release OK key. “Vol/Mute
Control Setup” is displayed.
d.
Using the Up/Down keys, navigate to “Time Setup”. Press and release the OK key.
e.
The “Time?” screen is displayed showing current format (12 or 24 hour) flashing and current
time. Use the Up/Down keys to set the format (12Hr or 24Hr) then press and release the OK
key.
f.
The “hours” will be flashing. Use the Up/Down keys to set the hours then press and release the
OK key.
g.
The “minutes” will be flashing. Use the Up/Down keys to set the minutes then press and
release the OK key. “Success” will be displayed and the remote will remain in Setup routine,
returning to the “Code Setup” screen.
6.3 Date Setup
To set the Month, Date and Day.
a.
Press and hold S key until “Code Setup” is displayed (takes approximately 2-3 seconds).
b.
Release S key.
c.
Using the Up/Down keys, navigate to “System Setup”. Press and release OK key. “Vol/Mute
Control Setup” is displayed.
d.
Using the Up/Down keys, navigate to “Date Setup”. Press and release the OK key.
e.
The “Year?” screen is displayed with the last 2 year digits flashing. Use the Up/Down keys to
set the Year then press and release the OK key.
f.
The “Month?” screen is displayed with the Month digits flashing. Use the Up/Down keys to set
the Month then press and release the OK key.
g.
The “Date?” screen is displayed with the Date digits flashing. Use the Up/Down keys to set the
Date then press and release the OK key.
h.
The “Day?” screen is displayed with the Day flashing. Use the Up/Down keys to set the Day
then press and release the OK key.
i.
“Success” will be displayed and the remote will remain in Setup, returning to the “Code Setup”
screen.
6.4 Backlight Setup
To set the length of time the Backlighting remains on after a keypress.
a.
Press and hold S key until “Code Setup” is displayed (takes approximately 3 seconds).
b.
Release S key.
c.
Using the Up/Down keys, navigate to “System Setup”. Press and release OK key. “Vol/Mute
Control Setup” is displayed.
d.
Using the Up/Down keys, navigate to “Backlight Setup”. Press and release the OK key.
e.
The “Backlight Time?” screen is displayed with the current Backlight On time digits flashing. Use
the Up/Down keys to set the Backlight On time in increments of 5 seconds up to a maximum of
60 seconds. The default Backlight On time is 10 seconds. To turn the Backlighting feature off,
set the time to “00” (zero). Press and release the OK key.
f.
“Success” will be displayed and the remote will remain in Setup routine, returning to the “Code
Setup” screen.
6.5 Language Setup
To set the remote display language.
a.
Press and hold S key until “Code Setup” is displayed (takes approximately 2-3 seconds).
b.
Release S key.
- 18 -
c.
d.
e.
f.
g.
Using the Up/Down keys, navigate to “System Setup”. Press and release OK key. “Vol/Mute
Control Setup” is displayed.
Using the Up/Down keys, navigate to “Language Setup”. Press and release the OK key.
The “Language?” screen is displayed with the current language flashing. Use the Up/Down keys
to select desired language. The default language is English. Press and release the OK key.
The “Confirm English” screen is displayed. Press and release the Okay key.
“Success” will be displayed and the remote will remain in Setup, returning to the “Code Setup”
screen.
6.6 System Reset
To reset the LCD remote back to factory default settings. All User programmed parameters e.g. code
settings, learned commands, Macros, etc., are cleared to their respective default settings.
a.
Press and hold S key until “Code Setup” is displayed (takes approximately 3 seconds).
b.
Release S key.
c.
Using the Up/Down keys, navigate to “System Setup”. Press and release OK key. “Vol/Mute
Control Setup” is displayed.
d.
Using the Up/Down keys, navigate to “System Reset”. Press and release the OK key.
e.
“Confirm OK to Reset” is displayed. Press and release the OK key.
f.
“Please Wait” will be displayed while all parameters are Reset then the remote will exit Setup
and return to normal operation.
7. Timer Setup
Pressing OK at TIMER SETUP accesses the available Timer Options. These are a TV Sleep Timer and 4
Timers that can send a sequence of up to 3 key commands at the preset time.
OR
X=1,2,3,4
X=1,2,3,4
Y=1,2,3
OR
7.1 TV Sleep Setup
The LCD remote can be programmed with a TV Sleep Timer. At the end of the set
Timer period, the LCD remote sends the Power command for the TV Mode device.
The TV Sleep Timer can be set for a period of 1-90 minutes. The “Zzz” symbol is
displayed when a TV Sleep Timer is set.
a.
b.
c.
d.
e.
f.
g.
h.
i.
a.
b.
c.
d.
e.
f.
To set a TV Sleep Timer (no “Zzz” in normal display)
Turn on the TV Mode device.
Press and hold S key until “Code Setup” is displayed (takes approximately 3 seconds).
Release S key.
Using the Up/Down keys, navigate to “Timer Setup”. Press and release OK key.
“TV Sleep Setup” is displayed. Press and release the OK key.
“TV Sleep Set” is displayed. Press and release the OK key.
“TV Sleep Time?” is displayed with “minutes” flashing. Use the Up/Down keys to set the
minutes then press and release the OK key.
“Success” will be displayed and the remote will remain in Setup routine, returning to the “Code
Setup” screen.
Press and release Exit key to return to normal operation. Leave the remote pointing at the TV
device.
To clear a TV Sleep Timer (“Zzz” in normal display)
Press and hold S key until “Code Setup” is displayed (takes approximately 2-3
seconds).Release Skey.
Using the Up/Down keys, navigate to “Timer Setup”. Press and release OK key.
“TV Sleep Setup” is displayed. Press and release the OK key.
“TV Sleep Clear” is displayed. Press and release the OK key.
“Confirm OK to Clear” is displayed. Press and release the OK key.
“Success” will be displayed and the remote will remain in Setup routine, returning to the “Code
Setup” screen.
7.2 Timer Setup
The LCD remote can be programmed with up to 4 Timers (Timer1, 2, 3 & 4). Each
Timer can be assigned up to 4 keys to activate at the set time (e.g. to change SAT
Mode channel to 123 at 22:35). The first key must always be a Mode key. Subsequent
keys cannot include Up, Down, Left, Right, OK, Exit, Macro, Setup or any Mode key.
Timers can only be set to activate within the following 24-hour period. Timers are
automatically cleared after activation. The “Timer Bell
any Timer is set.
- 19 -
” symbol is displayed when
To set a Timer (Note the Timer must be cleared first if it was previously set – see To Clear a
Timer below)
a.
Press and hold S key until “Code Setup” is displayed (takes approximately 2-3 seconds).
b.
Release S key.
c.
Using the Up/Down keys, navigate to “Timer Setup”. Press and release OK key. “TV Sleep
Setup” is displayed.
d.
Using the Up/Down keys, navigate to “Timer X Setup” (where “X” is 1, 2, 3 or 4). Press and
release the OK key.
e.
“Timer X Set” is displayed. Press and release the OK key.
f.
“Timer X Time?” is displayed with the “hours” flashing. Use the Up/Down keys to set the hours
then press and release the OK key.
g.
The “minutes” will be flashing. Use the Up/Down keys to set the minutes then press and
release the OK key.
h.
“Select Timer X Mode?” is displayed. Press and release the desired Mode key (TV, VCR, DVD,
etc.).
i.
“Select Timer X Key1?” is displayed. Press and release the first key required. If only one key is
required, press and release OK at this point and go to Step “l” below.
j.
“Select Timer X Key2?” is displayed. Press and release the second key required. If only two
keys are required, press and release OK at this point and go to Step “l” below.
k.
“Select Timer X Key3?” is displayed. Press and release the third key required.
l.
“Success” will be displayed and the remote will remain in Setup routine, returning to the “Code
Setup” screen.
m. Press and release the Exit key to return to normal operation. Leave the remote pointing at the
target device.
a.
b.
c.
d.
e.
f.
g.
To clear a Timer (“Timer Bell” in normal display)
Press and hold S key until “Code Setup” is displayed (takes approximately 3 seconds).
Release S key.
Using the Up/Down keys, navigate to “Timer Setup”. Press and release OK key. “TV Sleep
Setup” is displayed.
Using the Up/Down keys, navigate to the desired “Timer X Setup” (where “X” is 1, 2, 3 or 4)
screen. Press and release the OK key.
“Timer X Clear” is displayed. Press and release the OK key.
“Confirm OK to Clear” is displayed. Press and release the OK key.
“Success” will be displayed and the remote will remain in Setup routine, returning to the “Code
Setup” screen.
8. Code Learning
Facility to Learn and store the IR Commands from your original remote under the Mode and key of your
choice. The Remote can store up to 150 original remote key commands (this depends upon the format of
the IR Code to be learned). Only one original remote type should be stored under any one Mode (see Tips
on Learning). The Remote can also be pre-programmed with one of the library codes and then have
Learned keys “overlaid “ in key positions of your choice i.e. the Remote can be customised using a preprogrammed code and then learning key functions from their original IR remote.
OR
Tips On Learning :
a.
b.
c.
d.
e.
f.
g.
h.
Where possible, use of fresh batteries for both remotes is recommended.
Only one original remote type can be learned per individual Mode.
Carry out a “Clear All Learn Modes” (clear all learned commands) before attempting any
Learning.
Experiment by Learning 2 or 3 keys initially (to ensure compatibility and familiarity) and then
carry out a “Clear All Learn Modes” (clear all learned commands) before completely Learning
your original remote’s keyboard.
Carry out a “Clear One Learn Mode” before learning a Mode to make sure there are no
previously learned commands for that Mode.
Place the remotes end-to-end so the IR LED’s on both remotes are directly in line with each
other. You may need to adjust the height of either remote to achieve this.
Keep the distance between the two remotes to approximately 25mm.
Do not move or change the distance between the two remotes while learning all the required
keys for that Mode.
- 20 -
i.
j.
k.
l.
m.
Do not attempt to Learn directly under an incandescent or low-energy light as these can cause
interference with the IR transmissions. Keep at least one metre away from any such light
sources.
Avoid learning the Volume/Mute keys on your original remote unless you are sure these operate
the same target device e.g. some original DVD remotes also include TV Volume/Mute key
control – these can be two different types of code.
Avoid learning the VCR keys on your original remote unless you are sure these operate the
same target device e.g. some original TV remotes also include VCR key control – these can be
two different types of code.
Learning a key can take up to 3 seconds. Do not release the key being Learned until the
“Success” or “Key Learn Error” screens have been displayed.
If learning the first or second keys for a Mode results in continuous errors then try the following :i. End the Learn session by pressing the Exit key.
ii. Clear out the learned commands for that Mode.
iii. Check the IR LEDs are correctly aligned between the two remotes.
iv. Adjust the distance between the two remotes to be closer (e.g. 15mm) or further away
(e.g. 50mm) from each other.
v. Try learning the original remote for that Mode again.
If the problem occurs again with the same key check the original remote key being learned –
does it transmit? Does it operate the target device? Try learning that key under a different clear
Mode. If it learns okay then it is likely to be a different code type from the others and cannot be
learned under the same Mode.
Learning Notes :
a.
You cannot learn under the Setup, Home Cinema or Macro keys.
b.
All learned commands for a Mode are deleted if the same or a new 4-digit code is entered for
that Mode (includes Direct Code Entry, Code Search and Brand Search entries).
c.
The Backlighting is turned off for Learning.
8.1 To Learn Commands
15-50mm
a.
b.
c.
d.
e.
f.
g.
h.
i.
Press and hold S key until “Code Setup” is displayed (takes approximately 2-3 seconds).
Release S key.
Using the Up/Down keys, navigate to “Learn Setup”. Press and release OK key.
“Learn One Mode” is displayed. Press and release OK key.
“Select a Mode Key?” is displayed. Press and release the desired Mode key (TV, VCR, DVD,
etc.).
“Select a Key to Learn?” is displayed. Press and release the LCD remote key to be taught with
original remote code.
“Learning: Please Wait” is displayed. Press and hold original remote key until the “Success” or
“Key Learn Error” screens have been displayed (see Tips on Learning) followed by the “OKLearn More or Exit?” screen (this process can take up to 2 or 3 seconds to complete). Release
the original remote key.
“OK-Learn More or Exit?” screen is still displayed. To learn more keys, press and release the
OK key and repeat from step “f”. To exit at this point, press and release the Exit key.
“Please Wait” will be displayed briefly and the remote will exit Setup and return to normal
operation.
8.2 To Clear all stored Learned Commands under a Mode :a.
b.
c.
d.
e.
f.
g.
Press and hold S key until “Code Setup” is displayed (takes approximately 3 seconds).
Release S key.
Using the Up/Down keys, navigate to “Learn Setup”. Press and release OK key. “Mode Learn”
is displayed.
Using the Up/Down keys, navigate to “Clear One Learn Mode”. Press and release OK key.
“Select a Mode Key?” is displayed. Press and release the desired Mode key (TV, VCR, DVD,
etc.).
“Confirm OK to Clear” is displayed. Press and release OK key.
“Please Wait” will be displayed briefly and the remote will exit Setup and return to normal
operation.
8.3 Master Clear
To Clear all stored Learned Commands (recommended on first time Learning):a.
b.
c.
d.
e.
Press and hold S key until “Code Setup” is displayed (takes approximately 2-3 seconds).
Release S key.
Using the Up/Down keys, navigate to “Learn Setup”. Press and release OK key. “Mode Learn”
is displayed.
Using the Up/Down keys, navigate to “Clear All Learn Modes”. Press and release OK key.
“Confirm OK to Clear” is displayed. Press and release OK key.
- 21 -
f.
“Please Wait” will be displayed briefly and the remote will exit Setup routine and return to normal
operation
9. Macros
The MACRO key, in conjunction with digits 1, 2 and 3, lets you to program and store up to 3 sequences of
key-presses of your choice. One press of the respective Macro digit key results in that sequence of keypresses (IR commands) being sent. Any sequence of key-presses that you regularly perform can be
reduced to two keypresses (MACRO key followed by digit 1, 2 or 3 key). For example pressing MACRO
followed by a single key can turn on your TV, turn on your cable box, change to your favourite channel, turn
on your VCR, and tell it to record, etc. A total of 10 keypresses can be stored under each of the 3 Macro
digits.
X=1,2,3
X=1,2,3
9.1 To Setup a Macro
a.
b.
c.
d.
e.
f.
g.
h.
i.
Press and hold S key until “Code Setup” is displayed (takes approximately 3 seconds).
Release S key.
Using the Up/Down keys, navigate to “Macro Setup”. Press and release OK key.
“Macro Key Set” is displayed. Press and release OK key.
“Select a Macro Key” is displayed. Press and release digit key 1, 2 or 3 where you want to store
the Macro.
“Select Macro X Mode” (where “X” is 1, 2 or 3) is displayed. Press and release the desired
Mode key (TV, VCR, DVD, etc.). The first key in a Macro sequence must always be a Mode key.
“Select Macro X Key?” is displayed along with the key count (initially “02”). Press and release
the keys you want to be included in the Macro, in the order you want them to be sent (up to
“10”).
To store the Macro at any point, press and release the Macro key. Note the Macro will be stored
automatically on the 10th keypress.
“Success” will be displayed and the remote will exit Setup routine and return to normal
operation.
9.2 To Clear a Macro
a.
b.
c.
d.
e.
f.
g.
Press and hold S key until “Code Setup” is displayed (takes approximately 2-3 seconds).
Release S key.
Using the Up/Down keys, navigate to “Macro Setup”. Press and release OK key.
Using the Up/Down keys, navigate to the “Macro Key Clear” screen. Press and release OK
key.
“Select a Macro Key” is displayed. Press and release digit key 1, 2 or 3 for the Macro you want
to delete.
“Confirm OK to Clear” is displayed. Press and release OK key.
“Success” will be displayed briefly and the remote will exit Setup routine and return to normal
operation.
In normal operation, to activate the Macro press and release the MACRO key
followed (within 20 seconds) by the digit key 1, 2 or 3.
“Macro X” is displayed while the Macro sequence is being carried out then remote
returns to normal operation.
If no Macro is stored under the chosen digit key then “Macro X Void” is briefly
displayed and the remote returns to normal operation.
9.3 Macro Notes
1.You might want to add "delays" in a Macro sequence (e.g. to allow for your TV warm-up time). Delays
can be added by using the PAUSE key followed by the number of seconds delay required at Step “g” in
setting a Macro. For example, to enter a delay of 3 seconds, press and release
PAUSE followed by 3. Maximum delay is 9 seconds. It is not possible to have a
"0" digit entered after Pause i.e. there is no zero delay.
2. There is an automatic delay of half a second between each IR transmission
in a Macro sequence.
3. The first key stored in a Macro sequence MUST be a Mode key (TV, VCR, etc.).
4. Setup and Macro keys cannot be included in a Macro.
5. Press Setup to quit Macro Setup.
10. Problems and troubleshooting
The remote doesn’t work or loses codes entered
- 22 -
Confirm with your original remote that the equipment works correctly.
Make sure that you have pressed the corresponding mode key of the equipment or device that
you want to control.
If the listed code does not work, try the AUTOSEARCH method or enter the next code of that
brand.
To find the corresponding code for your equipment use the automatic search.
Check that the batteries have the correct polarity position.
The programming of the remote requires 2 AAA alkaline batteries (new). If the remote loses
codes within a few days/weeks the problem can be solved by using 2 new batteries from the
same brand.
If the backlight of the LCD screen is very weak, in general it will be necessary to replace the
batteries.
- 23 -
8/6/4IN1 Fernbedienung
1. Sicherheits-vorschriften
1.1 Allgemeine Sicherheitsvorschriften
Aus Gründen der Betriebssicherheit und Betriebszulassung sind jegliche Änderungen
oder Anpassungen des Gerätes oder Eingriffe untersagt.
Achten Sie bitte auf die korrekte Inbetriebnahme Ihrer Universal Fernbedienung, lesen Sie
hierzu Ihre Bedienungsanleitung.
Kinder sollten das Gerät nur unter Aufsicht ihrer Eltern benutzen.
Folgende Einwirkungen sind zu vermeiden:
Grosse Beanspruchung und Stöße
Hohe Temperaturen
Starke Erschütterungen
Starke Feuchtigkeit
Befolgen Sie bitte auch die zusätzlichen Hinweise in den verschiedenen Abschnitten
der Benutzeranleitung.
Bezüglich darin nicht beantworteter Fragen, wenden Sie sich
bitte an unseren Telefondienst oder an einen anderen Spezialisten.
Für eine optimale Inbetriebnahme, nehmen Sie bitte die Betriebsanleitung und Hinweise
sorgfältig zur Kenntnis.
Bewahren Sie die Betriebsanleitung bitte an einen sicheren Ort um bei zukünftigen Bedarf leicht
darauf zurückgreifen zu können oder diese, wenn nötig, an eine dritte Person weiterreichen zu können.
1.2 Die Inbetriebnahme der Batterien
Das Gerät funktioniert nur mit 2 AAA Nickeleisen, (Alkalien) Batterien; andere Stromquellen sind strikt
ausgeschlossen.
Achten Sie beim Anschluss der Batterien auf die richtige Polung. Entfernen Sie die Batterien bei längerer
Einsatzpause des Gerätes. Die Batterien vor etwaigen Kurzschlüssen und Feuer schützen
(Explosionsgefahr).
Batterien vor Kindern schützen; lassen Sie Batterien nicht offen liegen, sie können von Kindern oder Tieren
verschluckt werden; in diesen Fällen; wenden Sie sich sofort an einen Arzt.
Auslaufende oder beschädigte Batterien können bei Hautkontakt zu Verbrennungen oder
Säureverletzungen führen; falls notwendig, berühren Sie diese mit geeigneten Handschuhen.
Beachten Sie bitte bei der Entsorgung der Batterien die geltenden Gemeindeverordnungen.
2. Die Produktbeschreibung
Diese universelle Fernbedienung verfügt über vier, sechs oder acht Betriebsarten, (Hängt von Ihrem
Modelltyp ab) und kann daher bis zu acht herkömmliche Fernbedienungen ersetzen („4 in 1 Funktion, 6 in 1
Funktion oder 8 in 1 Funktion“).
Die Aufschriften „TV“, VCR“, „DVD“, „SAT“, „AMP“, „AUX“ dienen lediglich der Definition der Betriebsarten.
Mit Ausnahme der TV Betriebsart können Sie frei jedes beliebige Gerät jeder der anderen Betriebsart
zuordnen.
2.1 Die Inbetriebnahme der Batterien
2 LR03 AAA Mikrobatterien werden mitgeliefert
Öffnen Sie das Batteriefach auf der Rückseite der Universal Fernbedienung
Legen Sie die beiden Batterien hinein und achten Sie darauf , dass die + Pole genau wie im
Fach angegeben, liegen.
Schließen Sie das Fach wieder
Die Auswahl der Sprache
Ein Display schaltet sich ein und zeigt die jeweils ausgewählte
Betriebsart an.
Drücken Sie auf eine beliebige Taste und lassen diese wieder los;
die Anzeige „SPRACHE?“ erscheint auf jeden Fall in der gerade verwendeten Sprache.
Verwenden Sie die Vorwärts/Rückwärts Tasten um die gewünschte Sprache auszuwählen. Die
vom Werk gelieferte Standardeinstellung ist Englisch. Drücken Sie kurz auf die OK Taste.
Das Fenster „BESTÄTIGEN SIE DIE SPRACHE?“ erscheint. Drücken Sie kurz auf die OK Taste
um die Auswahl zu bestätigen.
Das Fenster „ERFOLGREICH ABGESCHLOSSEN“ erscheint und die Fernbedienung Modus
der Einstellung und kehrt zu der Anzeige „CODE INSTELLEN“ zurück
2.2 Der Batterieaustausch und gespeicherte Daten
Alle programmierten Parameter, außer: Zeit, Tag, Datum und MAKROS bleiben, selbst bei
Batterieaustausch, gespeichert. Die Zeit, der Tag, das Datum und Makros werden gelöscht und
auf die vom Werk gelieferten Standardwerte zurückgestellt.
3. Die Funktionen der einzelnen Tasten
[1]
[2]
[3]
[4]
[5]
Ein/Aus, (POWER): Dient der Abschaltung des zuletzt gewählten Gerätes.
Teletext Auswahl: (Teletext Hold) Hält die Seitenauswahl im Teletextmodus fest
TV,VCR,DVD,SAT… Diese Tasten dienen der Auswahl der Geräte die Sie fernsteuern
möchten. Die Anzahl der Auswahltasten hängt vom jeweiligen Typ Ihrer Fernsteuerung ab, (4in
1; 6 in 1 oder 8 in 1)
Teletext EIN, (Teletext ON): Ein/Aus Teletext
Teletext MIX: Dient der Verbindung des Teletextes mit dem Film des gerade laufenden
Programms
- 24 -
[6]
[7]
[8]
[9]
[10]
[11]
INFO: Zeigt Informationen über das gerade gewählte Gerät
Teletext AUS, (Teletext OFF): Schaltet den Teletext ab
Menu: Menu EIN
Abgang ,(EXIT),: Menu AUS
Stummschaltung, (Mute): Dient der Ab- und Einschaltung des Tones
Prog +/-: Wählt das nächste oder das vorherige Programm ihres TV, SAT …Gerätes aus, bei
DVD Geräten die nächste oder vorherige Spur.
[12]
Ton +/-: Regelt die Lautstärke
[13]
Vorwärts, Rückwärts, links und rechts, (Up, Down, Left and Right): Es sind Tasten für die
Menuführung, sie dienen der Menusuche.
[14]
OK Taste. Bestätigt die jeweilige Menuauswahl
[15]
Betriebanleitung, (GUIDE): Schaltet die elektronische Betriebanleitung ein
[16]
S: Dient der Programmierung Ihrer Fernbedienung vor dem ersten Einsatz. Ermöglicht
ebenfalls den Zugang zu Nebenfunktion bestimmter A/V, (Audio, Video), Geräte (Von einem
zum anderen wechseln). Drücken Sie kurz auf die Taste S und dann auf die Funktionstaste die
Sie auswählen.
[17]
Die farbigen Tasten,(Coloured Keys): Dienen der Kontrolle des Videotextes oder spezieller
Gerätefunktionen.
[18]
Makro, (Macro): Die MAKRO Taste und die Zahlentasten 1,2 oder 3 dienen der
Programmierung und Speicherung von bis zu 3 unterschiedlichen Befehlsabfolgen.
[19]
Zahlentasten 0-9: Funktionieren genau so wie Ihre Original Fernsteuerung
[20]
A/V: Auswahl einer extern gelegenen Stromquelle ( SKART Schalter).
[21]
+/- : Wenn Sie gerade in der Betriebsart Programmierung sind- bei der automatischen Kode
Suche, können sie Kodes auswählen und diese den zu steuernden Geräten zuordnen. In
Verbindung mit den numerischen Tasten, ermöglichen es diese Tasten, bei bestimmten
Geräten, direkt Programme mit Nummern die höher als 9 sind, auszuwählen.
[22]
Play, FF, Stop, Rew, Pause: Diese Tasten bewirken dieselben Funktionen wie in
den üblichen Fernsteuerungen.
REC (record): Diese Taste dient genau so wie die üblichen Fernsteuerungen der Aufnahmefunktion
Ihres Videorekorders.
Um Irrtümer bei dieser Funktion zu vermeiden, müssen Sie diese Taste zweimal drücken.
4. DIE LCD ANZEIGE
4.1 Allgemeine Merkmale
Die LCD Anzeige ist eine visuelle Schnittstelle zwischen dem Benutzer und der Fernsteuerung. Die LCD
besteht aus einem Display mit 23 Zeichen; es hat 3 Display Zeilen mit 9 Zeichen auf
den ersten zwei Zeilen und 5 auf der dritten Zeile. Zusätzliche LCD zeigen,
vierstellig, die Uhrzeit, sowie verschieden Hinweissymbole.
4.2 Die Standardanzeige bei normaler Display Betriebsart.
Standard Display Betriebsart: Bei eingelegten Batterien ist das Display immer in
Betrieb. Es zeigt die eingeschaltete Betriebsart mit dessen Kode an; zum Beispiel:
DVD, sowie den Wochentag, wie Montag und die Uhrzeit wie : 22:58 im 24 Stunden
Format
Bei eingedrückter Taste: Das Drücken einer Taste der Betriebsarten, stellt die
Fernbedienung auf die neue Betriebsart um und zeigt diese entsprechend an; zum
Beispiel: DVD mit dem entsprechenden programmierten vierstelligen Kode, wie:
0768. Das Display kehrt zur Standardanzeige beim Loslassen der Taste zurück.
Display bei Tastendruck für die Einstellung: Kurzes drücken der
Einstellungstaste führt zur Anzeige der aktuellen Betriebsart der Fernbedienung,
zum Beispiel: DVD, das Datum, zum Beispiel: 9:10 und zeigt die Funktion S für die
erste Einstellung. Drücken Sie kurz auf release, um zum normalen Display Modus
zurückzukehren. Für die Einstellung der Fernbedienung per Taste, drücken Sie kurz
auf die
Einstelltaste, anschließend sofort auf die gewünschte zusätzliche
Funktionstaste.
Tastaturtypen.
Die unterschiedlichen Betriebsarten der Tastatur, zum Beispiel Einstelltaste,
Abfragetaste, werden entweder durch eigene Übertragungsanzeigen im Display
oder durch unterschiedliche Färbungen des Displays angezeigt.
4.3 DIE MENUFÜHRUNG
Um mit dem Einstellmenu zu beginnen, drücken sie solange auf die Taste S, (Einstelltaste) bis das Fenster
„KODES EINSTELLUNG“ zusammen mit dem Symbol „EINSTELLUNG“ auf dem Display erscheint.
Sobald das Display „KODES EINSTELLUNG“ zeigt, drücken Sie weiter auf S, (Einstelltaste)
bis die weiteren Menus erscheinen.
Die möglichen Schritte sind:
KODE EINSTELLUNG → SYSTEM EINSTELLUNG → ZEIT EINSTELLUNG → LERN PROGRAMM →
MAKRO ERSTELLUNG → ABSCHALTUNG.
Im Einzelnen haben diese die folgenden Funktionen,
Code Einstellen: Ordnet den zu steuernden Geräten Kodes zu.
- 25 -
SYSTEMEINSTELLUNG: Bestimmt die Zeit, das Datum und die Lautstärke
TIMER EINSTELLEN: Programmiert zeitlich im Voraus eingestellte Abfolgen
von Steuerung Befehlen
LEARNMODUS EINSTELLEN: Stellt eine Betriebsart unter Verwendung
gelernter Befehlsabläufe ein.
MAKROS DEFINIEREN: Dient der Programmierung von Makro Steuerketten.
VERLASSEN: Dient dazu die Einstellprogramme zu verlassen und zur
normalen Betriebsart zurückkehren
Ein Programmaustritt erfolgt automatisch, wenn innerhalb von 15 Sekunden
kein Tastaturbefehl eingegeben wird. Das Fenster „ZEITÜBERSCHREITUNG“
erscheint im Display.
Während der Programmierung der Fernbedienung, erscheint im Display Das
Fenster: “BITTE WARTEN“
5. Die Programmierung der Kodes
Die Programmierung der Kodes : Die OK Taste der KODES PROGRAMMIERUNG lässt die Wahl
zwischen vier möglichen Programmiertechniken zu
Drücken Sie jeweils auf die OK Taste um die gewünschte Programmiertechnik auszuwählen.
Die Einstellprogramme werden direkt in die Kodebibliothek eingegeben und dienen der Kodesuche,
Lernprogrammen u.a.m. Um die Einstellprogramme zu verlassen, drücken Sie auf die EXIT Taste oder,
gelangen Sie zum Fenster der „ABGANG“ und drücken dann auf die OK Taste.
5.1 Die Programmierung durch Abrollen einer Kodeliste.
Dies ist die erste Möglichkeit der Kodierung.
a.
Schalten Sie das zu steuernde Gerät ein, (zum Beispiel: im Falle des Fernsehers, schalten Sie
diesen ein).
b.
Drücken Sie so lange auf die Taste S bis Das Fenster „CODE EINSTELLEN“ erscheint, (es
dauert ungefähr 3 Sekunden)
c.
Lassen Sie die Taste Einstellung los
d.
Drücken Sie kurz auf die OK Taste. Das Fenster „SUCHE IN 1 CODELISTE“ erscheint.
e.
Drücken Sie kurz auf die OK Taste. Das Fenster „ WAHL. 1 MODE-TASTE“ erscheint.
f.
Drücken Sie kurz auf die gewünschte Taste der Betriebsart, (TV, VCR, DVD, u.s.w.), das
Fenster „WAHL 1 GERAETS? TV“ erscheint.
g.
Mit Hilfe der Vorwärts- und Rückwärtstasten(,), wählen Sie das zu programmierende
Gerät aus: TV, VCR, DVD, . Nehmen Sie hierzu die unten angefügte Anmerkung „WAHL
1 GERAETS“ zur Kenntnis.
h.
Drücken Sie kurz auf die OK Taste um die Auswahl zu bestätigen.
i.
Nun wird die erste Liste der Kodeliste der Marken ,(Typen) und Kodes abgerollt:
Zum Beispiel: (Marke Admiral , Kode 0000). Um den Zugriff auf die Markenbezeichnung Ihres
Gerätes zu beschleunigen, können Sie die Zahlentastatur 2 bis 9 verwenden; (Genau wie bei
einem Handy:2= a, b, c; 3=d, e, f;…). Um, zum Beispiel, auf die Marke Vieta zuzugreifen (DVD
Marke), drücken Sie 3-mal auf die numerische Taste 8, (8=tuv) und mit Hilfe der Vor- und
Rückwärtstasten, und mittels der Links- und Rechtstasten wählen Sie den Kode aus. Die
Richtigkeit der Kodes, das heißt, das Zutreffen auf Ihr ausgewähltes Gerät kann durch Testen
ermittelt werden. Für diese Tests, verwenden Sie die Funktionstasten der Lautstärke/,der
Stummschaltung, der Kanalauswahl, Ein/Aus Schalter, A/V Auswahl, Teletext, Wiedergabe,
Stopp, Vorwärts, Rückwärts und Pause. Nachdem der richtige Kode festgestellt ist, drücken Sie
kurz auf die OK Taste um den Kode zu speichern.
j.
Das Fenster „BITTE WARTEN“ und anschliessend das nächste „OPERATION GEGLUEKT“ und
die Fernsteuerung verlässt automatisch die Betriebsart Einstellung und kehrt in die normale
Betriebsart zurück.
- 26 -
k.
Testen Sie die Richtigkeit der Einstellung mit Hilfe Ihrer Fernbedienung und Ihres Gerätes.
Wiederholen Sie diese Prozedur, beginnend mit dem ersten Schritt „a“, für andere Geräte die
Sie steuern möchten.
Anmerkung: „WAHL 1 GERAETS“ .Die Geräte können sein: TV, VCR, LD, DVD, HDD, DVR, SAT, Kabel,
DVBT, STB, AUDIO, AMP, REKORDER, HTIB, MP3, CD, BAND, RADIO, PHONO. Für den TV Betrieb
steht Nur der Begriff TV “GERÄT” zur Verfügung
5.2 Die direkte Eingabe der Kodes:
Es ermöglicht die direkte Übertragung der Kodes aus Kodetabellen der Bibliothek.
a.
Schalten Sie das zu steuernde Gerät ein; (Im Falle des Fernsehers, schalten Sie Ihr Gerät ein)
b.
Drücken Sie so lange auf die Taste S bis Das Fenster „CODE EINSTELLEN“ erscheint, (es
dauert ungefähr 3 Sekunden). Lassen Sie die S Taste los.
c.
Drücken Sie kurz auf die OK Taste. Das Fenster „SUCHE IN 1 CODELISTE“ erscheint.
d.
Mit Hilfe der Vorwärts- und Rückwärtstasten erreichen Sie das Fenster „CODE EINGABE“
erscheint. Drücken Sie kurz auf die OK Taste. Das Fenster „WAHL 1 MODETASTE“ erscheint.
e.
Drücken Sie kurz auf die Taste des gewünschten Gerätes; (TV, VCR, DVD, u.s.w.) Die
betreffende Taste der Betriebsart wird, zusammen mit dem gerade programmierten Kode
angezeigt
f.
Geben Sie mittels der numerischen Tasten von 0-9 einen vierstelligen Kode ein.
g.
Beim der vierten Zahl erscheint das Fenster „OPERATION GEGLUECKT“ und die
Fernedienung steigt aus der Routine Einstellung aus und kehrt zur normalen Betriebsart zurück.
h.
Richten Sie die Fernsteuerung auf ihr Gerät und drücke Sie die Taste POWER. Ihr Gerät sollte
sich abschalten. Prüfen Sie andere Funktionen (zum Beispiel für DVD: die Funktion FF oder
ZURÜCK; u.s.w.). Falls manche Funktionen nicht ansprechen, bedeutet dies, dass der
eingegebene Kode fehlerhaft ist. In diesem Fall müssen Sie auf den nachfolgenden Kode, der
Ihrer Marke entspricht, übergehen und die obig beschriebene Prozedur Schritt für Schritt
wiederholen.
i.
Wiederholen Sie diese Prozedur Schritt für Schritt, mit a beginnend für all die anderen Geräte
die Sie Steuern möchten; (TV, DVD, SAT, u.s.w.).
5.3 Die Manuelle Eingabe der Kodes
Dies ermöglicht die manuelle Suche in der gesamten Kode Bibliothek nach einem besonderen Gerät,
das entweder in der Bibliothek überhaupt nicht, oder unter einem anderen Hersteller, erfasst ist.
a.
b.
c.
d.
e.
f.
g.
h.
i.
j.
k.
Schalten Sie das zu steuernde Gerät ein; (Im Falle des Fernsehers, schalten Sie Ihr Gerät ein)
Drücken Sie so lange auf die Taste S bis Das Fenster „CODE EINSTELLEN“ erscheint, (es
dauert ungefähr 3 Sekunden).
Lassen Sie die S Taste los.
Drücken Sie kurz auf die OK Taste. Das Fenster „SUCHE IN 1 CODELISTE“ erscheint.
Mit Hilfe der Vorwärts- und Rückwärtstasten erreichen Sie das Fenster „KODE -SUCHE“
erscheint. Drücken Sie kurz auf die OK Taste. Das Fenster „WAHL 1 MODE-TASTE“ erscheint.
Drücken Sie kurz auf die Taste der gewünschten Betriebsart; (TV, VCR, DVD, u.s.w.)? das
Fenster „WAHL 1 GERAETS? TV“ erscheint.
Mit Hilfe der Vorwärts- und Rückwärtstasten(,), wählen Sie das zu programmierende
Gerät aus: TV, VCR, DVD, . Nehmen Sie hierzu die unten angefügte Anmerkung „WAHL 1
GERAETS“ zur Kenntnis.Drücken Sie kurz auf die OK Taste um die Wahl zu bestätigen.
Das Fenster „SUCHE STARTEN MIT “ erscheint. Drücken Sie so lange auf die Prog + Taste,
(nur bei: VCR und DVD Geräten auf Power ( ) oder Play Taste), bis das zu steuernde Geräte
zu einem anderen Kanal übergeht, sich abschaltet oder im gewünschten Sinn reagiert. Während
der Suche erscheint, zusammen mit dem gesuchten Gerät das Fenster „SUCHE NACH“. Falls
versehentlich der gesuchte Kode übersprungen wird, drücken Sie auf die Prog- Taste und dann
erneut auf Prog + (or Power or Play) um die Suche neu zu starten. Drücken Sie auf die OK
Taste um den betreffenden Kode zu speichern.
Das Fenster „OPERATION GEGLUEKT“ erscheint und die Fernedienung steigt aus der Routine
Einstellung aus und kehrt zur normalen Betriebsart zurück.
Richten Sie die Fernsteuerung auf ihr Gerät und drücken Sie die Taste POWER.Ihr Gerät sollte
sich abschalten. Prüfen Sie andere Funktionen (zum Beispiel für DVD: die Funktion FF oder
ZURÜCK; u.s.w.). Falls manche Funktionen nicht ansprechen, bedeutet dies, dass der
eingegebene Kode fehlerhaft ist. In diesem Fall müssen Sie die obig beschriebene Prozedur
Schritt für Schritt wiederholen.
Wiederholen Sie diese Prozedur Schritt für Schritt, mit a beginnend für all die anderen Geräte
die Sie Steuern möchten; (TV, DVD, SAT, u.s.w.).
Hinweise:
1)
Falls die zu steuernden Geräte keine Prog + Tasten haben, so drücken Sie auf die Taste Power
oder die Taste Spiel ( Für VCR und DVD Geräte)
2)
Die Kode Suche beginnt mit dem 4 Stellen Kode der gerade Für diese Betriebsart definiert
wurde.
3)
Nach dem Abschluss aller Kodes, erscheint das Fenster „SUCHE
BEENDET“ und die Fernbedienung kehrt in die normale Betriebsart
zurück.
5.4 Die Kodierung mittels Markennamen
Es ist die Möglichkeit, innerhalb der Kodebibliothek nach einer bestimmten Marke oder eineml
Gerätetyp eines Herstellers zu suchen. Die Bibliotheken der Markennamen enthalten in der Regel 30-40
Kodes
a.
Schalten Sie das zu steuernde Gerät ein; (Im Falle des Fernsehers, schalten Sie Ihr Gerät ein)
- 27 -
b.
c.
d.
e.
f.
g.
h.
i.
j.
k.
l.
Drücken Sie so lange auf die Taste S bis Das Fenster „CODE EINSTELLEN“ erscheint, (es
dauert ungefähr 3 Sekunden).
Lassen Sie die S Taste los.
Drücken Sie kurz auf die OK Taste. Das Fenster „SUCHE IN 1 CODELISTE“ erscheint.
Mit Hilfe der Vorwärts- und Rückwärtstasten erreichen Sie das Fenster „CODE NACH
MARKE“ erscheint. Drücken Sie kurz auf die OK Taste. Das Fenster „WAHL 1 MODE-TASTE“
erscheint.
Drücken Sie kurz auf die Taste der gewünschten Betriebsart; (TV, VCR, DVD, u.s.w.)? das
Fenster „WAHL 1 GERAETS? TV“ erscheint.
Mit Hilfe der Vorwärts- und Rückwärtstasten wählen Sie das zu steuernde Gerät aus.(TV,
VCR, DVD u.s.w. Beachten Sie hierzu die obig angeführten Hinweise über die Geräte
Auswahl) Drücken Sie kurz auf die OK Taste um die Wahl zu bestätigen.
Das Fenster“ MARKENKODES 1-8?“ erscheint. Drücken Sie auf genau die Tastennummer, (18), die dem gewünschten Herstellernamen aus der unabhängigen Liste der Markennamen.
entspricht.
Das Fenster „SUCHE STARTEN MIT “ erscheint. Drücken Sie so lange auf die Prog + Taste,
(nur bei: VCR und DVD Geräten auf Power ( ) oder Play Taste), bis das zu steuernde Geräte
zu einem anderen Kanal übergeht, sich abschaltet oder im gewünschten Sinn reagiert. Während
der Suche erscheint, zusammen mit dem gesuchten Gerät das Fenster „SUCHE NACH“. Falls
versehentlich der gesuchte Kode übersprungen wird, drücken Sie auf die Prog- Taste und dann
erneut auf Prog + (or Power or Play) um die Suche neu zu starten. Drücken Sie auf die OK
Taste um den betreffenden Kode zu speichern.
Das Fenster „OPERATION GEGLUEKT“ erscheint und die Fernedienung steigt aus der Routine
Einstellung aus und kehrt zur normalen Betriebsart zurück.
Richten Sie die Fernsteuerung auf ihr Gerät und drücken Sie auf die Taste POWER. Ihr Gerät
sollte sich abschalten. Prüfen Sie andere Funktionen (zum Beispiel für DVD: die Funktion FF
oder ZURÜCK; u.s.w.). Falls manche Funktionen nicht ansprechen, bedeutet dies, dass der
eingegebene Kode fehlerhaft ist. In diesem Fall müssen Sie auf dien nachfolgenden Kode der
Ihre Marke bezeichnet übergehen und die obig beschriebene Prozedur Schritt für Schritt
wiederholen.
Wiederholen Sie diese Prozedur Schritt für Schritt, mit a beginnend für all die anderen Geräte
die Sie Steuern möchten; (TV, DVD, SAT, u.s.w.).
5.5 Die Kode Identifizierung
Bei normaler Betriebsart drücken Sie auf die entsprechende Kode Taste um den für
diese gewählte Betriebsart programmierten Kode anzuzeigen; zum Beispiel: „DVD
KODE 0768“
5.6 Die Kode Programmierung für die Steuerung kombinierter Geräte
Manche kombinierte Geräte, wie, zum Beispiel: (TV/DVD, DVD/VCR) erfordern zwei unterschiedliche
Steuerkodes um beide Funktionen des Kombigerätes zu steuern. Bei einem TV/DVD Kombigerät kann es
sein, dass Sie einen Kode unter der TV Taste um eben den Fernseher steuern zu können und einen
zweiten, (unter jeder beliebigen Funktionstaste) zur Steuerung des DVD setzen müssen.
5.7 Die Steuerung von Kombigeräten.
Manche Kombigeräte, zum Beispiel TV/VCR, TV/DVD, DVD/VCR, u.a.) verfügen bereits auf ihrer originellen
Fernsteuerung über getrennte Kodes, die die Auswahl des gerade zu steuernden Gerätes ermöglichen.
Falls Ihr Kombigerät zum Beispiel ein DVD/VCR Gerät ist, kann es sein, dass die dazugehörige originelle
Fernsteuerung unabhängige DVD und VCR Tasten hat mit denen gerade dasjenige Gerät, das Sie Steuern
möchten, ausgewählt wird. Genau dieselben Funktionstasten können Sie auf Ihrer Universal Fernsteuerung
mit Hilfe ihrer Funktionstasten für die Wahl der Betriebsart und der Einstellung aktivieren. Nehmen wir an,
Ihr Kombigerät sei ein DVD/VCR und der Betriebscode, (der Fernbedienung) sei DVD Betrieb:
Drücken Sie etwas länger als eine Sekunde auf der Fernbedienung die Taste DVD Mode um
den DVD Tastenbefehl zu übertragen.
Drücken Sie kurz auf die Taste S, anschliessend kurz auf die Taste DVD Mode um den VCR
Befehl zu übertragen.
Dieses Verfahren kann analog für alle Kombigeräte angewendet werden, (zum Beispiel: TV/VCR, TV/DVD,
DVD/VCR u; a;) und ist für alle Betriebsarten verfügbar. Diese Eigenschaft ist nicht mit allen Kodetypen
kompatibel.
6. Mögliche Zusatzfunktionen der Betriebseinstellung
Mit Hilfe der OK Taste im Menu BETRIEBSEINSTELLUNG aktivieren Sie die Zusatzfunktionen der
Betriebseinstellung der Lautstärke Regler, der Uhrzeit, des Datums, der Eins der Display Beleuchtung und
der System Initialisierung.
- 28 -
6.1 Die Einstellung der Lautstärke/Stummschaltung.
Die Funktion Lautstärke/Stummschaltung und Durchschlag:
- Die Universal Fernsteuerung ermöglicht Ihnen die freie Wahl der Betriebsart in der Sie die Tasten der
Lautstärke/Stummschaltung programmieren wollen. Die werksmäßige Standard Programmierung der
Fernsteuerung sieht für alle möglichen Geräte „optische“ Kodes, (zum Beispiel: TV, VCR, DVD, PVR, SAT
und Kabel), und „Audio“ Kodes, (zum Beispiel: CD und AUDIO) vor, damit die eigenen
Lautstärke/Stummschaltung der originellen Fernsteuerung, soweit vorhanden, verwendet werden können.
Wenn die programmierten „optischen“ Kodes auf keine entsprechenden Funktionen der Geräte stoßen,
schlagen diese Befehlseingaben automatisch zur TV Betriebsart durch, ohne dass auf TV Betrieb
umgeschaltet werden muss.
Die Einstellung der Lautstärke/Stummschaltung, sowie die Technik des Durchschlagens. Jeder
gewählte Betriebstyp muss für die Einstellung der Lautstärke/Stummschaltung, entweder im programmierten oder im
lern Modus ausnahmslos über eine eigenen Lautstärke-/Stummfunktion verfügen, sonst kann keine Befehlübertragung
erfolgen.
6.1.1 Die Begrenzung der Lautstärken Regelung auf nur einer Betriebsart
Diese besteht darin, die Einstellung ¨der Lautstärken aller Geräte auf nur eine Geräteauswahl;
zum Beispiel TV, zu begrenzen. Diese Programmierung führt dazu, dass alle Gerätetypen mit Hilfe der
Durchgriff Technik die Steuerbefehle empfangen ohne, dass die Fernsteuerung von einem Gerätetyp auf
einem anderen umprogrammiert werden muss.
a.
b.
c.
d.
e.
f.
g.
Drücken Sie so lange auf die Taste S bis Das Fenster „CODE EINSTELLEN“ erscheint, (es
dauert ungefähr 3 Sekunden).
Lassen Sie die S Taste los.
Mit Hilfe der Vorwärts- und Rückwärtstasten wählen Sie das Fenster „SYSTEM
EINSTELLEN“. Drücken Sie kurz auf die OK Taste und das Fenster: „VOL/STUMM
EINSTELLEN“ erscheint.
Drücken Sie kurz auf die OK Taste und das Fenster „VOL/STUMM ALLE“ erscheint.
Drücken Sie kurz auf die OK Taste und das Fenster „WAHL 1 GERAETS“ erscheint.
Drücken Sie kurz auf die MODE Taste, zum Beispiel: TV, VCR, DVD, u.a. um die
Lautstärkensteuerung in der gewünschten Betriebsart zu programmieren. Die Steuersignale für
die Regelung der Lautstärke greifen nun automatisch auf die gerade von Ihnen gewählten
Gerätetypen zu.
Das Fenster „BITTE WARTEN“ erscheint und, anschließend, das Fenster „OPERATION
GEGLUEKT“. Die Fernsteuerung kehrt automatisch zur normalen Betriebsart zurück.
Falls in der für die Begrenzung gewählte Betriebsart keine spezifischen
unabhängige Steuerung Befehle vorgesehen sind, erscheint das Fenster:
„FEHLER VOL. KONT.“ und die Steuerung kehrt in die Standardbetriebsart
zurück.
6.1.2 Die Regelung der Lautstärke ohne Auswahl der Betriebsart.
Diese Programmierung dient dazu, dass jeder Betriebstyp nur seine eigene Regelung der
Lautstärke verwendet und die Technik des Durchschlagens der Steuerbefehle somit ausgesetzt wird.
a.
b.
c.
Drücken Sie so lange auf die Taste S bis Das Fenster „CODE EINSTELLEN“ erscheint, (es
dauert ungefähr 3 Sekunden).
Lassen Sie die S Taste los.
Mit Hilfe der Vorwärts- und Rückwärtstasten wählen Sie das Fenster „SYSTEM
EINSTELLEN“. Drücken Sie kurz auf die OK Taste und das Fenster: „VOL/STUMM
EINSTELLEN“ erscheint.
- 29 -
d.
e.
f.
g.
h.
Drücken Sie kurz auf die OK Taste und das Fenster „VOL/STUMM ALLE“ erscheint
Mit Hilfe der Vorwärts- und Rückwärtstasten wählen Sie das Fenster „VOL./STUMM
EINZ.“.Drücken Sie kurz auf die OK Taste und das Fenster „WAHL 1 GERAETS“ erscheint.
Drücken Sie kurz auf die MODE Taste, zum Beispiel: TV, VCR, DVD, u.a. um die Betriebsart
auszuwählen, bei der der Durchgriff der Steuerbefehle ausgesetzt werden soll.
Das Fenster „BITTE WARTEN“ erscheint und, anschließend das nächste „OPERATION
GEGLUEKT“. Die Fernsteuerung kehrt automatisch zur normalen Betriebsart zurück.
Jede verwendete Betriebsart wird ihre eigene Steuerung der Lautstärke verwenden.
6.1.3
Die
Wiedereinstellung
Lautstärkesteuerung.
der
werksmäßigen
Standardeinstellung
der
Mit diesem Programm setzen Sie die Steuerung wieder auf die standardisierte Werkseinstellung zurück.
a.
Drücken Sie so lange auf die Taste S bis Das Fenster „CODE EINSTELLEN“ erscheint, (es
dauert ungefähr 3 Sekunden).
b.
Lassen Sie die S Taste los.
c.
Mit Hilfe der Vorwärts- und Rückwärtstasten wählen Sie das Fenster „SYSTEM
EINSTELLEN“. Drücken Sie kurz auf die OK Taste und das Fenster: „VOL/STUMM
EINSTELLEN“ erscheint.
d.
Drücken Sie kurz auf die OK Taste und das Fenster „VOL/STUMM ALLE“ erscheint
e.
Mit Hilfe der Vorwärts- und Rückwärtstasten wählen Sie das Fenster: “RESET VOL/STUMM“.
Drücken Sie kurz auf die OK Taste.
f.
Das Fenster „DURCH OK BESTÄTIGEN“ erscheint. Drücken Sie kurz auf die OK Taste.
Anzeige „BITTE WARTEN“ erscheint und, sodann das Fenster „OPERATION GEGLUEKT“. Die
Fernsteuerung kehrt automatisch zur normalen Betriebsart zurück.
Die Steuerung der Lautstärke und der Stummschaltung erfolgt nun wie vom Werk eingestellt.
6.2 Die Einstellung der Uhrzeit.
Diese Programmierung dient der Einstellung der Uhrzeit im üblichen Format der LCD
Anzeige.
a.
Drücken Sie so lange auf die Taste S bis Das Fenster „CODE EINSTELLEN“ erscheint, (es
dauert ungefähr 3 Sekunden).
b.
Lassen Sie die S Taste los.
c.
Mit Hilfe der Vorwärts- und Rückwärtstasten wählen Sie das Fenster „SYSTEM
EINSTELLEN“. Drücken Sie kurz auf die OK Taste und das Fenster „VOL/STUMM
EINSTELLEN“ erscheint.
d.
Mit Hilfe der Vorwärts- und Rückwärtstasten wählen Sie das Fenster: „UHRZEIT
EINSTELLEN“. Drücken Sie kurz auf die OK Taste.
e.
Das Fenster „UHRZEIT? EINSTEL.“ erscheint in den üblichen Formaten, (12 oder 24 Stunden)
und die reelle aktuelle Uhrzeit blinkt. Mit Hilfe der Vorwärts und Rückwärtstasten wählen Sie
das gewünschte Format und drücken dann kurz auf die OK Taste.
f.
Nun blinkt das Fenster „STUNDE“. Mit Hilfe der Vorwärts- und Rückwärtstasten legen Sie die
Stundenzeit fest. Sie drücken kurz auf die OK Taste.
g.
Nun blinkt das Fenster „MINUTEN“. Mit Hilfe der Vorwärts- und Rückwärtstasten legen Sie
die Minuten fest. Sie drücken dann kurz auf die OK Taste. Das Fenster „OPËRATION
GEGLUEKT“ erscheint und die Fernsteuerung bleibt in der Betriebsart Einstellung und kehrt
zum Fenster „CODE EINSTELLEN“ zurück.
6.3 Die Einstellung des Datums:
a.
b.
c.
d.
e.
f.
g.
h.
i.
Drücken Sie so lange auf die Taste S bis Das Fenster „CODE EINSTELLEN“ erscheint, (es
dauert ungefähr 3 Sekunden).
Lassen Sie die S Taste los.
Mit Hilfe der Vorwärts- und Rückwärtstasten wählen Sie das Fenster „SYSTEM
EINSTELLEN“. Drücken Sie kurz auf die OK Taste und das Fenster „VOL/STUMM
EINSTELLEN“ erscheint.
Mit Hilfe der Vorwärts- und Rückwärtstasten wählen Sie das Fenster „DATUM EINSTELLEN“
Das Fenster „JAHR“ erscheint und die zwei letzten Jahreszahlen blinken. Mit Hilfe der
Vorwärts- und Rückwärtstasten wählen Sie das Jahr aus und drücken zur Bestätigung kurz
auf die OK Taste.
Das Fenster „MONAT“ erscheint und die Monatszahlen blinken. Mit Hilfe der Vorwärts- und
Rückwärtstasten wählen Sie den Monat und drücken zur Bestätigung kurz auf die OK Taste.
Das Fenster „DATUM“ erscheint und die Datumszahlen blinken. Mit Hilfe der Vorwärts- und
Rückwärtstasten bestimmen Sie das Datum und drücken zur Bestätigung kurz auf die OK
Taste.
Das Fenster „TAG“ erscheint und das Feld der Tage blinkt. Mit Hilfe der Vorwärts- und
Rückwärtstasten bestimmen Sie den Tag und drücken zur Bestätigung kurz auf die OK Taste.
Das Fenster „OPERATION GEGLUEKT“ erscheint und die Fernsteuerung bleibt in der
Betriebsart Einstellung und kehrt zu dem Fenster „CODE EINSTELLEN“ zurück.
6.4 Die Einstellung der Display Beleuchtung:
Dieses Programm legt die Dauer der Displaybeleuchtung nach jedem Tastendruck fest.
a.
Drücken Sie so lange auf die Taste S bis Das Fenster „CODE EINSTELLEN“ erscheint, (es
dauert ungefähr 3 Sekunden).
b.
Lassen Sie die S Taste los.
c.
Mit Hilfe der Vorwärts- und Rückwärtstasten wählen Sie das Fenster: „SYSTEM
EINSTELLEN“. Drücken Sie kurz auf die OK Taste und das Fenster: „VOL/STUMM
EINSTELLEN“ erscheint.
d.
Mit Hilfe der Vorwärts- und Rückwärtstasten wählen Sie das Fenster: „BELEUCHTUNG
EINSTELLEN“. Drücken Sie kurz auf die OK Taste.
- 30 -
e.
f.
Das Fenster “BELEUCHTUNG AKTIV IN SEK?“ und die aktuelle, programmierte Dauer wird
digital angezeigt. Mit Hilfe der Vorwärts- und Rückwärtstasten bestimmen Sie die Dauer,
durch Verlängerung oder Verkürzung der Zeit im 5 Sekunden Takt. Die maximale Länge beträgt
60 Sekunden und die Werkseinstellung liegt bei 10 Sekunden. Um die Option Beleuchtung
außer Betrieb zu setzen, stellen Sie die Dauer auf 00 Sekunden. Drücken Sie zur Bestätigung
kurz auf die OK Taste
Das Fenster „OPERATION GEGLUEKT“ erscheint und die Fernsteuerung bleibt in der
Betriebsart Kodes Einstellung und kehrt zu dem Fenster „CODE EINSTELLEN“ zurück
6.5 Die Einstellung der Sprache
Dieses Programm legt die Display Sprache der Fernsteuerung fest
a.
Drücken Sie so lange auf die Taste S bis Das Fenster „CODE EINSTELLEN“ erscheint, (es
dauert ungefähr 3 Sekunden).
b.
Lassen Sie die S Taste los.
c.
Mit Hilfe der Vorwärts- und Rückwärtstasten wählen Sie das Fenster: „SYSTEM
EINSTELLEN“. Drücken Sie kurz auf die OK Taste und das Fenster: „VOL/STUMM
EINSTELLEN“ erscheint.
d.
Mit Hilfe der Vorwärts- und Rückwärtstasten wählen Sie das Fenster: „SPRACHE
EINSTELLEN“. Drücken Sie kurz auf die OK Taste;
e.
Das Fenster „SPRACHE?“ Erscheint und die aktuelle, programmierte Sprache wird blinkend
angezeigt. Die betrieblich festgelegte Standard Sprache Ist Englisch. Mit Hilfe der Vorwärtsund Rückwärtstasten wählen Sie die gewünschte Sprache aus und bestätigen es durch kurzen
Druck auf die OK Taste.
f.
Das Fenster „BESTAET., (zum Beispiel), ENGLISCH“ erscheint. Drücken Sie kurz auf die OK
Taste.
g.
Das Fenster „OPERATION GEGLUEKT“ erscheint und die Fernsteuerung bleibt in der
Betriebsart Einstellung und kehrt zu dem Fenster „CODE EINSTELLEN“ zurück
6.6 Die Wiedereinstellung der betrieblichen Grundeinstellung
Diese Routine dient dazu die LCD Fernsteuerung in ihrer vom Werk vorgesehenen Grundeinstellung zurückzuführen.
a.
Drücken Sie so lange auf die Taste S bis Das Fenster „CODE EINSTELLEN“ erscheint, (es
dauert ungefähr 3 Sekunden).
b.
Lassen Sie die S Taste los.
c.
Mit Hilfe der Vorwärts- und Rückwärtstasten wählen Sie das Fenster: „SYSTEM
EINSTELLEN“. Drücken Sie kurz auf die OK Taste und das Fenster: „VOL/STUMM
EINSTELLEN“ erscheint.
d.
Mit Hilfe der Vorwärts- und Rückwärtstasten wählen Sie das Fenster: „OPTIONEN
LOESCHEN“. Drücken Sie kurz auf die OK Taste.
e.
Das Fenster „DURCH OK LOESCHEN“ erscheint. Drücken Sie kurz auf die OK Taste.
f.
Das Fenster „BITTE WARTEN“ während die Parameter neu eingestellt werden und die
Fernsteuerung zum normalen Betrieb zurückkehrt.
7. Die Einstellung der Zeitschaltuhr:
Mit der OK Taste in der Routine TIMER EINSTELLEN greifen Sie auf die zur Verfügung stehenden
Optionen des Zeitschalters zu. Es gibt eine Zeitschaltung für den TV, sowie 4 Zeitschalter die im
Arbeitsablauf bis zu 3 Steuerbefehlen simultan ausgeben können.
7.1 Die Einstellung der TV Stand-by Zeitschaltuhr:
Die LCD Fernsteuerung verfügt über eine programmierbare TV
Stand-by
Zeitschaltung. Am Ende der programmierten Zeit überträgt die LCD Fernsteuerung
dem TV Gerät einen Steuerbefehl. Die TV Stand-by Dauer kann in einer Zeitspanne
von 1 bis 90 Minuten festgelegt werden. Wenn Stand by programmiert ist, erscheint
das Symbol „Zzz“ im Display.
Die Einstellung der Stand-by Zeitschaltung ( Im Modus ohne Erscheinen des „Zzz“
Symbols)
a.
b.
c.
d.
e.
Drücken Sie so lange auf die Taste S bis Das Fenster „CODE EINSTELLEN“ erscheint, (es
dauert ungefähr 3 Sekunden).
Lassen Sie die S Taste los.
Mit Hilfe der Vorwärts- und Rückwärtstasten wählen Sie das Fenster: „TIMER EINSTELLEN“.
Drücken Sie kurz auf die OK Taste.
Das Fenster „TV AUF STANDBY STELLEN“ erscheint. Drücken Sie kurz auf die OK Taste.
Das Fenster „TV AUF STANDBY STELLEN“ erscheint. Drücken Sie kurz auf die OK Taste.
- 31 -
f.
g.
h.
Das Fenster „STAND-BY ZEIT? MIN“ erscheint mit blinkender Minutenanzeige. Mit Hilfe der
Vorwärts- und Rückwärtstasten legen Sie die Minuten fest und drücken zur Bestätigung kurz
auf die OK Taste.
Das Fenster „OPERATION GEGLUEKT“ erscheint und die Fernsteuerung bleibt in der
Betriebsart Einstellung und kehrt zu dem Fenster „CODE EINSTELLEN“ zurück.
Drücken Sie kurz auf die Taste Exit um in die normale Betriebsart zurückzukehren. Legen Sie
die Fernsteuerung, auf das TV Gerät zeigend beiseite
Das Löschen der Zeitschaltung („Zzz“ im normalem Display Modus)
a.
b.
c.
d.
e.
f.
g.
Drücken Sie so lange auf die Taste S bis Das Fenster „CODE EINSTELLEN“ erscheint, (es
dauert ungefähr 3 Sekunden).
Lassen Sie die S Taste los.
Mit Hilfe der Vorwärts- und Rückwärtstasten wählen Sie das Fenster: „TIMER EINSTELLEN“.
Drücken Sie kurz auf die OK Taste.
Das Fenster „TV AUF STANDBY STELLEN“ erscheint. Drücken Sie kurz auf die OK Taste.
Das Fenster „TV STANDBY ANNULIEREN “ erscheint. Drücken Sie kurz auf die OK Taste.
Das Fenster „DURCH OK LOESCHEN?“ erscheint. Drücken Sie kurz auf die OK Taste.
Das Fenster „OPERATION GEGLUEKT“ erscheint und die Fernsteuerung bleibt in der
Betriebsart Einstellung und kehrt zu dem Fenster „CODE EINSTELLEN“ zurück.
7.2 Die Einstellung der Zeitschalter:
Die LCD Fernsteuerung kann mit bis zu vier Zeitschaltern programmiert werden, (Zeitschaltung 1,2,3 und
4). Jeder Zeitschaltung können bis zu je 4 stellige Befehlskodes zugeordnet werden im gewählten Zeitpunkt
ausgelöst werden, (zum Beispiel: schalte in der SAT Betriebsart zum Kanal 123 um 22:35 um ). Der erste
Befehlskode muss immer die Betriebsart angeben. Die nachfolgenden Kodes können nicht die Befehle
Vorwärts, rückwärts, links, rechts, OK, Abgang, Makro, Einstellung oder beliebige
Kodes der Betriebsarten enthalten. Die Zeitschaltungen können nur für die gerade
nachfolgenden 24 Stunden Periode festgelegt werden. Die Zeitschaltungen werden
nach Ablauf der programmierten Zeitspanne automatisch gelöscht. Das Symbol
„Zeitschaltung Glocke“
erscheint im Display für jede eingestellte Zeitschaltung.
Das Einstellen einer Zeitschaltung
Zu beachten: Falls die Zeitschaltung zuvor bereits aktiviert war, muss diese, (wie unten beschrieben,
gelöscht werden).
a.
Drücken Sie so lange auf die Taste S bis Das Fenster „CODE EINSTELLEN“ erscheint, (es
dauert ungefähr 3 Sekunden).
b.
Lassen Sie die S Taste los.
c.
Mit Hilfe der Vorwärts- und Rückwärtstasten wählen Sie das Fenster: „TIMER EINSTELLEN“.
Drücken Sie kurz auf die OK Taste. Das Fenster „TV AUF STANDBY STELLEN“ erscheint.
d.
Mit Hilfe der Vorwärts- und Rückwärtstasten wählen Sie das Fenster „TIMER X
EINSTELLEN“, (wobei X die Ziffer 1,2,3 oder 4 sein kann°. Drücken Sie kurz auf die OK Taste.
e.
Das Fenster „TIMER X EINSTELLEN“ erscheint. Drücken Sie kurz auf die OK Taste.
f.
Das Fenster „UHRZEIT EINGEBEN?“ erscheint mit den blinkenden Stundenzahlen. Mit Hilfe der
Vorwärts- und Rückwärtstasten stellen Sie die Uhrzeit ein und Drücken Sie zur Bestätigung
kurz auf die OK Taste.
g.
Die „MINUTEN“ blinken. Mit Hilfe der Vorwärts- und Rückwärtstasten stellen Sie die Uhrzeit
ein und Drücken Sie zur Bestätigung kurz auf die OK Taste.
h.
Das Fenster „WAHL 1 GERAETS“ erscheint. Drücken Sie kurz auf die Taste der gewünschten
Betriebsart (TV, VCR, DVD, u.a.).
i.
Das Fenster „AUSWAHL DER TASTE 1“ erscheint. Falls nur eine einzige Betriebsart gewählt
wird, drücken Sie kurz auf die entsprechende Taste der Betriebsart und gehen Sie zu Schritt 1
weiter unten.
j.
Das Fenster „AUSWAHL DER TASTE 2“ erscheint. Falls nur zwei Betriebsarten gewählt
werden, drücken Sie kurz auf die entsprechende Taste der Betriebsart und gehen Sie zu Schritt
1 weiter unten.
k.
Das Fenster „AUSWAHL DER TASTE 3“ erscheint. Falls nur drei Betriebsarten gewählt werden,
drücken Sie kurz auf die entsprechende Taste der Betriebsart.
l.
Das Fenster „OPERATION GEGLUEKT“ erscheint und die Fernsteuerung bleibt in der
Betriebsart Einstellung und kehrt zu dem Fenster „CODE EINSTELLEN“ zurück.
m. Drücken Sie auf die Taste Exit und kehren Sie in die normale Betriebsart zurück.Legen Sie die
Fernbedingung in Richtung des zu steuernden Gerätes ab.
Das Löschen einer Zeitschaltung (Zeitschaltung Glocke im normalem Display)
a.
b.
c.
d.
e.
f.
g.
Drücken Sie so lange auf die Taste S bis Das Fenster „CODE EINSTELLEN“ erscheint, (es
dauert ungefähr 3 Sekunden).
Lassen Sie die S Taste los.
Mit Hilfe der Vorwärts- und Rückwärtstasten wählen Sie das Fenster: „TIMER EINSTELLEN“.
Drücken Sie kurz auf die OK Taste. Das Fenster „TV AUF STANDBY STELLEN“ erscheint.
Mit Hilfe der Vorwärts- und Rückwärtstasten wählen Sie das Fenster „TIMER X
EINSTELLEN“, (wobei X die Ziffer 1,2,3 oder 4 sein kann°. Drücken Sie kurz auf die OK Taste.
Das Fenster „TIMER X ANNULIEREN“ erscheint. Drücken Sie kurz auf die OK Taste.
Das Fenster „DURCH OK LOESCHEN?“ erscheint. Drücken Sie kurz auf die OK Taste.
Das Fenster „OPERATION GEGLUEKT“ erscheint und die Fernsteuerung bleibt in der
Betriebsart Einstellung und kehrt zu dem Fenster „CODE EINSTELLEN“ zurück
8. Die Lern Funktion von Kodes
- 32 -
Dies ist die Fähigkeit der Universal Fernbedienung die originellen Befehlkode Ihrer ursprünglichen
Fernbedienung zu erfassen und unter jeglicher Betriebsart ihrer Wahl bei sich zu speichern. Die
Fernbedienung kann bis zu 150 originelle Befehlkodes von Fernbedienungen speichern; (Dies hängt vom
Format der zu lernenden Kodes ab). Eine Betriebsart dieser Fernbedienung sollte die Kodes nur einer
einzigen originellen Fernbedienung speichern. Die Fernbedienung kann aber auch vorprogrammierte Kodes
der eigenen Kodebibliothek erfassen. Zum Beispiel kann die Fernbedienung sowohl ihre eigenen
vorprogrammierter Kodes als auch Kodes der originellen Fernbedienungen lernen.
Praktische Hinweise für das Lernen
a.
b.
c.
d.
e.
f.
g.
h.
i.
j.
k.
l.
Nach Möglichkeit für beide Typen der Fernbedienung neue Batterien verwenden
Jede Betriebsart der Fernbedienung kann Daten nur einer originellen Fernbedienung
erfassen
Führen Sie die Programmschritte „Löschen aller gelernter Betriebstarten“ durch bevor Sie
mit dem Lernen einer Betriebsart beginnen. So sichern Sie, dass die erlernte Routinekeine
alten Daten beinhaltet.
Sammeln Sie zuerst Erfahrung mit der Programmierung einer oder zwei Programmtasten
und löschen Sie diese wieder, bevor Sie die gesamte Befehlstastatur Ihrer originellen
Fernbedienung erfassen.
Führen Sie die Programmschritte „Löschen einer gelernter Betriebstart“ durch. So sichern
Sie, dass die erlernte Routine keine alten Daten beinhaltet.
Plazieren Sie die zwei Fernbedingungen so, dass beide IR Enden auf derselben Höhe
liegen. Möglicherweise müssen Sie hierzu eine der Fernbedienung der Höhe nach
anpassen.
Die zwei Fernbedienungen sollen etwa 25 mm voneinander entfernt sein.
Bewegen Sie nicht die zwei Fernbedingungen und verringern Sie nicht deren Entfernungen
während der Lernphasen.
Lernen Sie nicht in der Nähe einer Glühlampe oder einer Schwachstromleuchte; es könnte
das Senden der IR Befehle stören.
Erfassen Sie auf der neuen Fernbedienung die Kodes der Lautstärken/Stummschaltung nur
dann, wenn Sie sicher sind, dass diese Kodes der originellen Fernbedienungen dieselben
Gerätetypen wie die Universal Fernbedienung steuern; zum Beispiel; dass die originelle
DVD Steuerung auch das TV Gerät steuert.
Der Lernprozess einer Befehlseingabe kann 3 Sekunden dauern. Lassen sie die zu
lernende Programmtaste erst dann los, wenn das Fenster „ERFOLGREICH
ABGESCHLOSSEN“ oder „FEHLER IM LERNPROZESS DER PROGRAMMTASTE“
erscheint.
Wenn das Erfassen der ersten oder zweiten Befehl Programms nur zu Fehlermeldungen
führt, versuchen Sie folgendes:
i.
Beenden Sie den Lernprozess indem Sie auf die Taste Abgang drücken.
ii.
Löschen Sie die bereits gelernten Kodes dieser Betriebsart
iii.
Prüfen Sie ob die zwei IR Sender präzise auf derselben Höhe liegen
iv.
Verringern Sie die Entfernung , zum Beispiel auf 15 mm oder erhöhen
Sie diese auf 50 mm
v
Beginnen Sie von neuem den Lernprozess
Falls die Probleme immer noch bestehen, so überprüfen Sie das tatsächliche Funktionieren
der originellen Fernbedienung. Überträgt es tatsächlich die Steuersignale? Steuert es die in
Frage kommenden Geräte? Versuchen Sie diese Funktionstaste unter einer alternativen,
zuvor gelöschten, Betriebsart zu erfassen. Sollte dann der Lernprozess funktionieren, so
bedeutet es wahrscheinlich, dass es sich um andere Kodetypen handelt, die unter dieser
Betriebsart nicht erfasst werden können.
Weitere Praktische Hinweise für das Lernen
a.
b.
c.
Es können keine Kodes für das Heimkino oder für Makrobefehl Tasten erfasst werden.
Alle gelernten Befehlsketten einer Betriebsart werden bei erneuter Eingabe derselben oder
eines neuen, speziell für diese Betriebsart ausgerichteten, vierstelligen Kodes gelöscht.
Dies trifft auch auf die Direkteingabe von Kodes, auf die Kodes- und Markensuche zu.
Während des Lernvorganges wird die Displaybeleuchtung abgeschaltet.
8.1 Die Schritte für das Lernen von Programmfunktionen
15-50mm
- 33 -
a.
b.
c.
d.
e.
f.
g.
h.
i.
Drücken Sie so lange auf die Taste S bis Das Fenster „CODE EINSTELLEN“ erscheint, (es
dauert ungefähr 3 Sekunden).
Lassen Sie die S Taste los.
Mit Hilfe der Vorwärts- und Rückwärtstasten wählen Sie das Fenster „LERNMODUS
EINSTELLEN“ erscheint. Drücken Sie kurz auf die OK Taste.
Das Fenster „MODUS LERNEN“ erscheint. Drücken Sie kurz auf die OK Taste.
Das Fenster „WAHL DES LERNMODUS“ erscheint. Drücken Sie kurz auf die gewünschte
Programmtaste (TV, VCR, DVD, u.a.).
Das Fenster „SPEICHER TASTE“ erscheint. Drücken Sie kurz auf die gewünschte Display
Taste Ihrer Fernbedienung damit diese genau die entsprechende Taste der originellen
Fernbedienung Erfasst.
Das Fenster „BITTE WARTEN“ erscheinT. Drücken Sie so lange auf die entsprechende Taste
Ihrer originelle Fernsteuerung bis das Fenster „OPERATION GEGLUEKT“
oder
„GESCHEITERT“, gefolgt vom Fenster „OK WEITER ODER AUS“ erscheinen; (Siehe hierzu die
Hinweise). Lassen Sie die zu erfassende Programmtaste der originellen Fernsteuerung los.
Das Fenster „OK WEITER ODER AUS“ ist immer noch offen. Um weitere Programmkodes zu
erfassen, drücken Sie kurz auf die OK Taste und beginnen Sie eine neue Routine vom Punkt f.
beginnend. Um diese Betriebsart jetzt abzubrechen, drücken Sie kurz auf die Taste Exit.
Das Fenster „BITTE WARTEN“ erscheint kurz und die Fernsteuerung kehrt zum normalen
Betrieb zurück.
8.2 Das Löschen aller gelernten Programmfunktionen einer Betriebsart
a.
b.
c.
d.
e.
f.
g.
Drücken Sie so lange auf die Taste S bis Das Fenster „CODE EINSTELLEN“ erscheint, (es
dauert ungefähr 3 Sekunden).
Lassen Sie die S Taste los.
Mit Hilfe der Vorwärts- und Rückwärtstasten wählen Sie das Fenster „LERNMODUS
EINSTELLEN“ erscheint. Drücken Sie kurz auf die OK Taste. Das Fenster „MODUS LERNEN“
erscheint;
Mit Hilfe der Vorwärts- und Rückwärtstasten wählen Sie das Fenster: „LOESCHNEN
LERNMODUS“. Drücken Sie kurz auf die OK Taste.
Das Fenster „MODUS TASTE WAEHLEN“ erscheint. Drücken Sie kurz auf die Taste der
gewünschten Betriebsart wie: (TV, VCR, DVD, u.a.).
Das Fenster „DURCH OK LOESCHEN“ erscheint. Drücken Sie kurz auf die OK Taste.
Das Fenster „BITTE WARTEN“ erscheint kurz und die Fernsteuerung kehrt zum normalen
Betrieb zurück.
8.3 Das Löschen aller gelernten Programmfunktionen (Bei der ersten Erfassung gelernter
Funktionen empfohlen)
a.
b.
c.
d.
e.
f.
Drücken Sie so lange auf die Taste S bis Das Fenster „CODE EINSTELLEN“ erscheint, (es
dauert ungefähr 3 Sekunden).
Lassen Sie die S Taste los.
Mit Hilfe der Vorwärts- und Rückwärtstasten wählen Sie das Fenster „LERNMODUS
EINSTELLEN“ erscheint. Drücken Sie kurz auf die OK Taste. Das Fenster „MODUS LERNEN“
erscheint;
Mit Hilfe der Vorwärts- und Rückwärtstasten wählen Sie das Fenster „LOESCHEN ALLES
MODUS“. Drücken Sie kurz auf die OK Taste
Das Fenster „DURCH OH LOESCHEN“ erscheint. Drücken Sie kurz auf die OK Taste.
Das Fenster „BITTE WARTEN“ erscheint kurz und die Fernsteuerung kehrt zum normalen
Betrieb zurück.
9. Makros
Makrobefehle; unter Verwendung der Zahlen 1,2 und 3 ermöglichen Ihnen die Programmierung von drei
simultan abfolgenden unabhängigen Steuerbefehlen Ihrer Wahl. Ein Klick auf die entsprechende
Makrotaste führt dazu, dass eine Abfolge von Steuerbefehlen (IR) gesendet werden. Jede beliebige Anzahl
Ihrer üblichen Tasteneingabe kann auf zwei Tastendrucke reduziert werden. (Ein Klick auf die Makrotaste
gefolgt von einem auf die Zahlentaste 1,2, oder 3).
Zum Beispiel können Sie durch nur einen Klick auf die MAKRO Taste und eine Befehlseingabe Ihr TV
Gerät, Ihren Kabel Demodulator einschalten, Ihren Lieblings Sender aussuchen oder den VCR im
Aufnahme Modus einschalte und anderes mehr. Insgesamt kann jede Makro bis zu zehn unterschiedliche
Befehle speichern.
9.1 Die Programmierung der Makros
a.
b.
c.
d.
e.
Drücken Sie so lange auf die Taste S bis Das Fenster „CODE EINSTELLEN“ erscheint, (es
dauert ungefähr 3 Sekunden).
Lassen Sie die S Taste los.
Mit Hilfe der Vorwärts- und Rückwärtstasten wählen Sie das Fenster: „MAKROS
DEFINIEREN“. Drücken Sie kurz auf die OK Taste.
Das Fenster „MAKRO SCHREIBEN“ erscheint. Drücken Sie kurz auf die OK Taste
Das Fenster „MAKRO-NR ZUTEILEN“ erscheint. Drücken Sie kurz auf eine der numerischen
Tasten 1,2 oder 3 unter welcher Sie die Makro Befehle speichern möchten.
- 34 -
f.
g.
h.
i.
Das Fenster „MAKRO X MODUS?“ erscheint, (wobei X den Zahlen 1,2, oder 3 entspricht),
erscheint. Drücken Sie kurz auf die Taste der gewünschten Betriebsart wie: (TV, VCR, DVD,
u.a.). Die erste Eingabe einer Makro Befehlskette muss immer einer gegebenen Betriebsart
entsprechen.
Das Fenster „BEFEHL X EINGEBEN“ erscheint zusammen mit der Aufzählung der möglichen
Befehlseingaben (beginnend mit 02). Drücken Sie kurz auf die Anzeigen der Befehlseingaben
die Sie in die Makro einbinden und in der von Ihnen gewünschten Abfolge (bis zu 10 Befehlen).
Um die Makro nach der Eingabe der beliebigen Anzahl von Befehlen abzuschließen und zu
speichern, drücken Sie kurz auf die Taste Macro. Zu beachten ist, dass die Makro nach der
zehnten Befehlseingabe automatisch gespeichert wird.
Das Fenster „OPERATION GEGLUEKT“ erscheint und die Fernsteuerung bleibt in der
Betriebsart Einstellung und kehrt zu dem Fenster „CODE EINSTELLEN“ zurück.
9.2 Das Löschen einer Makro
a.
b.
c.
d.
e.
f.
g.
Drücken Sie so lange auf die Taste S bis Das Fenster „CODE EINSTELLEN“ erscheint, (es
dauert ungefähr 3 Sekunden).
Lassen Sie die S Taste los.
Mit Hilfe der Vorwärts- und Rückwärtstasten wählen Sie das Fenster: „MAKROS
DEFINIEREN“. Drücken Sie kurz auf die OK Taste. Das Fenster „MAKRO SCHREIBEN“
erscheint;
Mit Hilfe der Vorwärts- und Rückwärtstasten wählen Sie das Fenster: „MAKROS
LOESCHEN“. Drücken Sie kurz auf die OK Taste.
Das Fenster „MAKRO-NR ENTFERNEN?“ erscheint. Drücken Sie kurz auf die numerischen
Tasten 1,2 oder 3 um den Makrobefehl zu bestimmen, den Sie löschen möchten.
Das Fenster „DURCH OK LOESCHEN?“ erscheint. Drücken Sie kurz auf die OK Taste.
Das Fenster „OPERATION GEGLUEKT“ erscheint und die Fernsteuerung bleibt in der
Betriebsart Einstellung und kehrt zu dem Fenster „CODE EINSTELLEN“ zurück.
Bei normalem Einsatz der Fernbedienung lösen Sie die Makro durch ein
kurzes Drücken auf die Taste Macro und, bis zu 20 Sekunden danach auf die
numerischen Tasten 1, 2 oder3.
Während der Durchführung der Makro erscheint im Display die Anzeige
MAKRO X. Danach kehrt die Fernsteuerung zum Normalbetrieb zurück.
Wenn unter der gedrückten numerischen Taste kein Makro gespeichert ist,
erscheint die Fehlermeldung „Makro X leer“ und die Fernsteuerung kehrt zum
Normalbetrieb zurück.
9.3 Praktische Hinweise für die Makros
1) Sie können eine Verzögerung in der Durchführung einer Makrobefehlskette
einbauen. (Zum Beispiel, die Möglichkeit für Ihr TV Gerät sich, vor
Inbetriebnahme, zu erwärmen). Dies kann, im Schritt d) der obigen Makro
Einstellung, durch Drücken der Taste Pause, gefolgt von der Eingabe der für
die Verzögerung gewünschten Dauer, in Sekunden angegeben, erfolgen. Für eine Verzögerung von 3
Sekunden, zum Beispiel, drücken Sie zuerst auf die Taste Pause, dann auf die Zahl 3. Die maximale Dauer
der Verzögerung beträgt 9 Sekunden. Eine Verzögerung von 0 Sekunden kann nicht eingegeben werden.
2) Zwischen jeder Befehlsabfolge gibt es eine automatisch eingebaute Verzögerung von ½
Sekunde.
3) Bitte die Reihenfolge der Befehleingaben beachten, dass der erste, im Makro gespeicherte
Befehl immer eine Betriebsart bestimmen MUSS, zum Beispiel (TV, VCR, und andere)
4) Eingaben der Betriebseinstellung und der Makros können nicht simultan in einem
Makro gespeichert werden.
5) Drücken Sie auf die Taste Setup um die Makro Einstellung zu verlassen.
10. Probleme und Fehlersuche
Die Fernbedienung funktioniert nicht oder erfasst nicht die eingegebenen Befehle:
Prüfen Sie zuerst mit Hilfe Ihrer originellen Fernbedienung, dass das zu steuernde Gerät
einwandfrei funktioniert.
Prüfen Sie dass Sie wirklich die Betriebsart des Gerätes, das Sie Steuern möchten, eingegeben
haben.
Wenn der aufgelistete Kode nicht durchgreift, versuchen Sie es mittels der Routine der automatischen
Markensuche.
Prüfen sie ob die Batterien richtig polarisiert sind
Legen Sie dann neue 2 AAA Batterien ein, wenn die Fernbedienung bereits eingegebene Kodes innerhalb
von bis zwei Tagen löscht.
Das Abschwächen der Display Anzeige bedeutet im allgemeinen, dass die Batterien gewechselt
Werden müssen.
- 35 -
Mando a distancia universal 8/6/4 en1
1. Advertencia de seguridad
Debido a las exigencias de seguridad queda prohibida cualquier manipulación técnica o cambio del
producto.
Instale el producto correctamente, para ello, consulte este manual de uso. No deje que los niños utilicen
este producto sin la supervisión de un adulto.
Evite la exposición del producto a las siguientes situaciones:
- fricción mecánica excesiva
- temperatura elevada
- fuertes vibraciones
- demasiada humedad
Respete de igual manera todas las advertencias de seguridad que se indican en los apartados que
aparecen en este manual. Para obtener información complementaria, póngase en contacto con los técnicos
de nuestro servicio de asistencia telefónica o con cualquier otro especialista. Para garantizar una
programación correcta, lea atentamente este manual así como las advertencias de seguridad.
1.2 Cambio de pilas:
Este mando a distancia tan sólo puede funcionar con pilas alcalinas del tipo AAA.
Nunca utilice otro tipo de alimentación. Cuando coloque las pilas, respete las indicaciones relativas a la
polaridad.
Retire las pilas si el mando a distancia no va a ser utilizado durante una larga temporada. Tenga cuidado
de que las pilas no sufran ningún cortocircuito y de que no se expongan al fuego (peligro de explosión).
No deje las pilas al alcance de los niños. Un animal o un niño podría ingerirlas. En este caso, consulte
inmediatamente a un médico. Las pilas estropeadas o con fugas pueden provocar lesiones dermatológicas,
tales como quemaduras, principalmente por causa del ácido. Utilice guantes en caso necesario.
1.3 Eliminación de pilas usadas:
En conformidad con las normativas vigentes, las pilas no pueden mezclarse con los desechos de los
hogares. Deposite las pilas en uno de los puntos de recogida más cercanos.
2. Descripción del producto
El Mando a distancia universal cuenta con 4, 6 u 8 teclas de modo (en función del modelo que haya
comprado). Puede remplazar hasta a 8 mandos a distancia (4 en 1, 6 en 1 u 8 en 1).
Dispone de una biblioteca de códigos infrarrojos preprogramados y habilitados para la mayor parte de los
equipos audiovisuales del mercado
Las indicaciones de las teclas de modo propuestas tales como TV, VCR, DVD, SAT, AMP, AUX, tan sólo
dan una idea de lo que se puede realizar con este mando. Excepto en el modo TV, puede asignarle
cualquier periférico de Audio o Video a cualquier tecla de modo.
2.1 Primera colocación de las pilas
Al producto acompañan 2 pilas alcalinas LRO3 nuevas AAA.
¾
¾
¾
¾
¾
¾
¾
¾
Retire la tapa del compartimiento en el que se sitúan las pilas en la parte posterior del mando a
distancia.
Coloque 2 pilas nuevas de la misma marca prestando atención a la polaridad de las mismas
(símbolos + y – grabados en el compartimiento)
Vuelva a colocar la tapa
Elegir el idioma
Aparecerá una pantalla auxiliar para indicarle las teclas que debe
utilizar cuando se encuentra en las pantallas de configuración.
Pulse cualquier tecla, aparecerá la pantalla “Idioma?” en el idioma
preestablecido. Utilice las teclas Arriba/Abajo (, ) para elegir
el idioma que desea utilizar. El idioma preestablecido es el inglés. Pulse la tecla OK.
Aparecerá la pantalla "Confirm Spanish" (si ha elegido el español). Pulse la tecla OK para
confirmar.
Se mostrará la pantalla “Operación realizada con éxito” y el mando a distancia continuará en el
modo de configuración y regresará a la pantalla “Ajuste de códigos”.
2.2 Estado de la memoria después del cambio de pilas
Todos los parámetros definidos por el usuario, excepto los parámetros de Hora, Día, Fecha y Macros se
conservan de manera indefinida, aún cuando se realiza un cambio de pilas. La hora el día, la fecha y las
MACROS se borran y se reestablecen en el valor por defecto.
3. Descripción de las teclas del mando a distancia
[1]
[2]
[3]
[4]
[5]
[6]
[7]
[8]
Power: permite apagar o poner en estado de reposo el último dispositivo seleccionado.
Teletexto: fija la página del Teletexto en la pantalla.
TV, VCR, DVD, SAT…: permite seleccionar el dispositivo que desea controlar. El número de
teclas de modo depende del modelo del mando a distancia (4 en 1, 6 en 1 o 8 en 1).
Teletexto ON: muestra el teletexto; el teletexto aparece en la pantalla.
Teletexto MIX: permite mostrar el teletexto en la imagen presente en la pantalla.
INFO: muestra información sobre el dispositivo seleccionado.
Teletexto OFF: suspende el teletexto.
Menu: muestra el menú.
36
[9]
[10]
[11]
[12]
[13]
[14]
[15]
[16]
[17]
[18]
[19]
[20]
[21]
[22]
REC
Exit: permite abandonar el menú.
Mute: permite silenciar o darle sonido al dispositivo preseleccionado.
Prog +/-: en los modos TV, VCR o SAT: selecciona el canal anterior o siguiente. En el modo DVD:
selecciona el capítulo siguiente o anterior.
Vol +/-: ajuste de volumen de sonido.
Arriba, Abajo, Izquierda y Derecha: teclas de navegación; estas teclas permiten moverse dentro
del menú del dispositivo seleccionado.
OK: permite confirmar una selección del menú.
Guide: permite acceder a la guía electrónica del programa.
S: permite programar el mando a distancia antes de utilizarlo por primera vez. Asimismo le
permite acceder a las funciones secundarias de determinados dispositivos (Shift). Pulse la tecla
"S" y a continuación pulse la tecla de función que desea activar.
Teclas de color: permiten controlar el teletexto (FastText) o las funciones especiales de
determinados equipos.
Macro: la tecla MACRO junto con las teclas numéricas 1, 2, o 3 permite programar y registrar
hasta 3 secuencias de comandos.
Teclas numéricas 0 - 9: funcionan del mismo modo que las del mando a distancia original.
A/V: selección de una fuente externa (euroconector, para visualizar la película del DVD, del
receptor del satélite, del video… en la pantalla de su televisor, por ejemplo).
--/-: en el modo de configuración de búsqueda de código, esta tecla le permite confirmar el código
del dispositivo que desea utilizar junto con la ayuda de las teclas numéricas (19). En determinados
dispositivos permite seleccionar directamente las cadenas superiores a 9.
Play, FF, Stop, Rew, Pause: estas teclas funcionan de la misma manera que las del mando a
distancia original.
(record): esta tecla funciona de la misma manera que la del mando a distancia original de VCR o
DVD... Con el fin de evitar cualquier error, pulse 2 veces la tecla para activar esta función.
4. Pantalla LCD
4.1 Descripción general
La pantalla LCD proporciona un interfaz visual entre el usuario y el mando a distancia. La pantalla LCD
cuenta con 23 caracteres dispuestos en 3 líneas de visualización. 2 de las líneas, la superior y la central,
cuentan con 9 caracteres cada una; así, los 5 caracteres restantes se encuentran en la línea inferior de la
pantalla.
La pantalla también muestra un reloj y determinados símbolos de indicación según
se describe más abajo.
4.2 Visualización de la pantalla en modo normal
Visualización normal: la pantalla estará operativa a partir del momento en el que
se coloquen las pilas. La pantalla muestra el modo seleccionado activado, como
por ejemplo en el caso de DVD, el día de la semana, p.ej. Lun, y la hora del día
p.ej. 23:58, en el formato de 24 horas.
Visualización al presionar la tecla de modo: al pulsar la tecla de modo, la
pantalla muestra el modo en funcionamiento, como por ejemplo DVD y el código
con 4 dígitos programados para dicho modo, p.ej: 0768. En cuanto deje de pulsar la
tecla de modo, la pantalla volverá a la visualización normal.
Visualización al presionar la tecla S (shift): al presionar brevemente la tecla de
Setup (S) y al soltarla la pantalla indica el modo activado en el mando a distancia,
como por ejemplo en el caso de DVD, la fecha p. ej.:9.10 (Día: Mes) e indica que el
modo “Shift” está en funcionamiento al mostrar el símbolo “(S)”. Pulse la tecla EXIT
para regresar a la visualización normal. El modo “SHIFT” permite acceder a
funciones secundarias. Para utilizarlo, pulse la tecla “(S)” y a continuación pulse la
tecla correspondiente a la función deseada.
Indicación para presionar una tecla: se indica cuando hay que presionar una
tecla a través del símbolo "transmisión" que aparece en la pantalla o a través de un
cambio de visualización de la pantalla.
4.3 Navegar con los menús
Para abrir el menú Ajuste de código, pulse y mantenga pulsada la tecla S (Setup) hasta que aparezca la
ventana "Ajuste de códigos" mostrando el símbolo "SET".
Cuando aparezca “Ajuste de códigos”, pulse varias veces la tecla S (Setup) para tener acceso a los demás
Menús:
AJUSTE DE CÓDIGOS Æ AJUSTE DE OPCIONES Æ AJUSTE RELOJ Æ APRENDIZAJE Æ DEFINIR
LAS MACROS Æ SALIR
Presione la tecla OK para confirmar el paso de configuración deseado.
Las opciones de ajustes se utilizan para el aprendizaje, la búsqueda de códigos, etc....
Para abandonar las opciones de ajustes, pulse la tecla EXIT o navegue por las pantallas hasta llegar a la
pantalla “Salir” y pulse la tecla OK.
37
AJUSTE DE CÓDIGOS: sirve para atribuir un código a los dispositivos
AJUSTE DE OPCIONES: permite configurar la hora, la fecha y el control del
volumen
AJUSTE RELOJ: permite acceder a los ajustes del reloj
APRENDIZAJE: permite el acceso al aprendizaje de las teclas
DEFINIR LAS MACROS: define las secuencias de comandos automáticos
SALIR: permite abandonar el modo de configuración al confirmar la tecla OK.
Asimismo, se abandona automáticamente el modo de configuración una vez
transcurridos 15 minutos sin tocar ninguna tecla. Se mostrará la pantalla
“Reposo”.
Cuando el mando a distancia esté realizando la búsqueda de un código o
cuando esté a la espera de una información, aparecerá la pantalla "Espere,
por favor”.
5. Programación del mando a distancia: Ajuste de códigos
Cuando aparezca en la pantalla "REGULAC CÓDIGOS", acéptelo a través de la tecla OK. El ajuste de
códigos se puede realizar a través de 4 métodos diferentes.
5.1 Método A: Programación utilizando una lista de códigos
a.
b.
c.
d.
e.
f.
g.
h.
i.
Ponga en funcionamiento el dispositivo que desea controlar (ej.: encender su TV)
Pulse la tecla S y manténgala pulsada hasta que aparezca la pantalla “Regulac. códigos” (tarda
aproximadamente unos 3 segundos)
Suelte la tecla S
Pulse la tecla OK. Aparecerá la pantalla “Defilar códigos”
Pulse la tecla OK. Aparecerá la pantalla “Asignar la tecla MODO”
Pulse la tecla de modo seleccionada (TV, VCR, DVD, etc.). Se mostrará la pantalla
“Seleccionar aparato? TV”.
Con la ayuda de las teclas Arriba/Abajo (, ), seleccione el tipo de dispositivo que desee
programar: TV, VCR, DVD,... Ver la nota "Seleccionar aparato?" que aparece más abajo.
Pulse la tecla OK para confirmar su selección.
El primer código de la primera marca aparecerá en la pantalla (ej.: Admiral 0000). Utilice las
teclas Arriba/Abajo (, ) para acceder a la marca que desee. Para acceder de manera más
rápida, utilice las teclas numéricas 2 a 9 de su mando a distancia (como en un teléfono móvil
2=abc, 3=def, etc.). Por ejemplo, para acceder a la marca VIETA (Marca de DVD) pulse la tecla
8 (8=tuv) 3 veces y utilice las teclas Arriba/Abajo (, ) para acceder a la marca. Compruebe
el primer código mostrado a través de las teclas Volume +/-, Mute, Prog +/-, Power, AV,
Teletext, Play, Stop, FF, Rewind y Pause. Si el primer código correspondiente a la marca de
su equipo no funciona, seleccione el segundo código a través de las teclas derecha/izquierda,
etc... Una vez que encuentre el código correcto, pulse la tecla OK para memorizarlo.
38
j.
k.
Se mostrará en la pantalla “Por Favor Espere” y a continuación "Operación Lograda”. El mando
a distancia abandona el modo de configuración y regresa al modo de funcionamiento normal.
Compruebe el funcionamiento de su mando a distancia. Actúe del mismo modo con los demás
dispositivos.
Nota “Seleccionar aparato?”: Las opciones posibles son: TV, VCR, LD, DVD, DVR, HDD,
SAT, CABLE, DVBT, STB, AUDIO, AMP, RECR, HTIB, MP3, CD, TAPE, TUNER y PHONO sea
cual sea el modo seleccionado, excepto el modo TV. Para el modo TV, tan sólo se puede
seleccionar TV (el modo TV sólo puede controlar un televisor).
5.2 Método B: Introducir el código
Para introducir el código directamente a través de la lista de códigos.
a.
Ponga en funcionamiento el dispositivo que desea controlar (ej.: encender el TV)
b.
Pulse la tecla S y manténgala pulsada hasta que aparezca la pantalla “Regulac. códigos” (tarda
aproximadamente unos 3 segundos)
c.
Suelte la tecla S.
d.
Pulse la tecla OK. Aparece la pantalla “Defilar códigos”.
e.
Mediante las teclas Arriba/Abajo (, ) navegue hasta la pantalla “Registrar Cod Ver Doc".
Pulse la tecla OK. Se mostrará la pantalla “Seleccionar la tecla de Modo” con el modo y el
código actualmente programados.
f.
A través de las teclas numéricas 0-9 y de la lista de códigos, introduzca el primer código de 4
cifras correspondiente a la marca de su dispositivo. Tras introducir la última cifra aparece la
ventana "Operación realizada con éxito", el mando a distancia abandona el modo de
configuración y regresa al modo de funcionamiento normal.
g.
Compruebe el funcionamiento del mando a distancia. Si no responden algunas funciones,
quiere decir que el código introducido no es el correcto. En dicho caso repita el proceso descrito
anteriormente e introduzca el código siguiente que corresponda a su marca.
h.
Repita este mismo proceso para todos sus demás equipos.
5.3 Método C: Búsqueda de códigos
En el caso de que el conjunto de códigos propuestos en la lista no permitan controlar sus aparatos
audiovisuales (TV, VCR, SAT…), le aconsejamos que siga el proceso que se describe a continuación:
a.
Ponga en funcionamiento el dispositivo que desea controlar (ej.: encender el TV)
b.
Pulse la tecla S y manténgala pulsada hasta que aparezca la pantalla “Regulac. códigos”(tarda
aproximadamente unos 3 segundos)
c.
Suelte la tecla S.
d.
Pulse la tecla OK. Aparece la pantalla “Defilar códigos”.
e.
Mediante las teclas Arriba/Abajo (, ) navegue hasta la pantalla “Búsqueda códigos" .Pulse
la tecla OK. Aparece la pantalla “Asignar la Tecla Modo”
f.
Pulse la tecla de modo deseada (TV, VCR, DVD, etc.). Se mostrará la pantalla “Selecc.
Aparato? TV”.
g.
A través de las teclas Arriba/Abajo, seleccione el tipo de dispositivo que desea programar: TV,
VCR, DVD,... Ver nota "Seleccionar aparato?" que se ha descrito anteriormente. Pulse la
tecla OK para confirmar su selección.
h.
Aparece la ventana “Lanzar la búsqueda con” en la pantalla. Pulse la tecla Power o Prog+ (o
Play, VCR y DVD solamente) varias veces hasta que el dispositivo que desea controlar se
apague o cambie de canal (o inicie la lectura de la tecla que ha pulsado). A continuación pulse
la tecla OK para memorizar el código. Si pasa de largo el código buscado puede volver hacia
atrás mediante la tecla Prog-. Pulse Prog+ (o Power o bien Play) para seguir hacia adelante.
Durante este proceso aparece en la pantalla “Búsqueda para”, así como el modo.
i.
Se muestra en la pantalla "Operación Lograda”, el mando a distancia abandona la configuración
y regresa al modo de funcionamiento normal.
j.
Compruebe el funcionamiento del mando a distancia. Si no responden algunas funciones,
quiere decir que el código introducido no es el correcto. En dicho caso repita el proceso descrito
anteriormente.
k.
Repita este mismo proceso para todos sus demás equipos.
Notas:
1.
Si su equipo no cuenta con la función Prog+, utilice la tecla
(Power) o la tecla Play.
2.
La búsqueda empieza en el último código registrado. Si se trata del código 0030, la
búsqueda empezará en 0031 y seguirá hasta el último código posible, después volverá a
empezar desde 0000 a 0029.
3.
Cuado se hayan probado todos los códigos, aparece en la
pantalla “Búsqueda terminada” y el mando a distancia abandona
el modo de configuración para volver a su modo de
funcionamiento normal.
5.4 Método D: Uso de código conforme a la marca
Si la marca de su equipo se encuentra entre las primeras del folleto de códigos en la lista de marcas,
puede utilizar la búsqueda conforme a la marca (más rápido que la búsqueda manual de códigos):
a.
Ponga en funcionamiento el dispositivo que desea controlar (ej.: encender el TV)
b.
Pulse la tecla S y manténgala pulsada hasta que aparezca la pantalla “Defilar códigos” (tarda
aproximadamente unos 3 segundos)
c.
Suelte la tecla S.
d.
Pulse la tecla OK. Aparece la pantalla “Defilar códigos”.
e.
Mediante las teclas Arriba/Abajo (, ) navegue hasta la pantalla “Código por marca" .Pulse
la tecla OK. Aparece la pantalla “Asignar la Tecla Modo”.
f.
Pulse la tecla de modo deseada (TV, VCR, DVD, etc.). Se mostrará la pantalla “Selecc.
Aparato? TV”.
39
g.
h.
i.
j.
k.
l.
A través de las teclas Arriba/Abajo, seleccione el tipo de dispositivo que desea programar: TV,
VCR, DVD,... Ver nota "Seleccionar dispositivo?" que se ha descrito anteriormente. Pulse
la tecla OK para confirmar su selección.
Se muestra en la pantalla “Código marca 1-8”. Pulse la tecla numérica de 1 a 8 correspondiente
a la marca de su dispositivo (ver la lista de marcas en el folleto de códigos).
Aparece en la pantalla la ventana “Lanzar la búsqueda con”. Pulse la tecla Power o Prog+ (o
Play, VCR y DVD solamente) varias veces hasta que el dispositivo que desea controlar se
apague o cambie de canal (o inicie la lectura de la tecla que ha pulsado). A continuación pulse
la tecla OK para gravar el código. Si pasa de largo el código buscado puede volver hacia atrás
mediante la tecla Prog-. Pulse Prog+ (o Power o bien Play) para seguir hacia adelante.
Durante este proceso aperecen en la pantalla “Búsqueda para”, así como el modo.
Se muestra en la pantalla "Operación Lograda”, el mando a distancia abandona la configuración
y regresa al modo de funcionamiento normal.
Compruebe el funcionamiento del mando a distancia. Si no responden algunas funciones,
quiere decir que el código introducido no es el correcto. En dicho caso repita el proceso descrito
precedentemente.
Repita este mismo proceso para todos sus demás equipos.
5.5 Identificación del código memorizado
Pulse la tecla de modo de la que desea conocer el código memorizado. En la pantalla se muestra el
código, ej.: "DVD Código 0768”.
5.6 Programación de los Combo
Para determinados combos (aparatos que combinan TV/VCR o TV/DVD o DVD/VCR, etc.), deberá activar
dos teclas de modo diferentes para controlar los dos dispositivos integrados en e combo. Por ejemplo, si
tiene un combo TV/DVD, tendrá que programar un código con la tecla TV para el televisor y un código
separado (con otra tecla de modo) para controlar el lector de DVD.
5.7 Control de los Combo
Los mandos a distancia originales de determinados Combos (p.ej.: TV/VCR, TV/DVD, DVD/VCR, etc.)
poseen teclas separadas para seleccionar la parte del combo que debe controlarse. Por ejemplo, si su
combo combina un DVD y un VCR (video), puede que su mando a distancia original cuente con dos teclas
separadas DVD y VCR para seleccionar el dispositivo del combo que desea controlar. La función
equivalente se consigue con las teclas Mode y S.
Si suponemos que su combo combina un DVD y un VCR y que su código se programa con el modo DVD:
Pulse y mantenga pulsada la tecla DVD durante algo más de un segundo para enviar el
comando DVD
Pulse brevemente la tecla S y a continuación la tecla DVD para enviar el comando VCR.
Este método es válido para todo tipo de combos (TV/VCR, TV/DVD, DVD/VCR, etc.) y está disponible para
todos los modos. No todos los códigos soportan esta función.
6. Ajuste de opciones
Pulse OK tan pronto como aparezca la pantalla ”Ajuste de opciones” para programar las funciones de
sistema tales como la hora, la fecha, el idioma, la duración de la retroiluminación, el funcionamiento del
volumen y el reinicio del mando a distancia.
6.1 Ajuste Vol. Mute
Este mando a distancia le permite definir el modo que controlarán las teclas Vol+/- y Mute. El mando a
distancia viene programado de fábrica para que las teclas Volume y Mute controlen el modo en el que se
encuentra el mando a distancia. Si este modo no dispone de control del volumen, las teclas controlarán el
modo TV.
6.1.1 Control Único Vol.
40
Esta función permite gestionar las teclas Vol+/- y Mute en un sólo modo: las teclas Volume y Mute
controlarán siempre el mismo equipo sea cual sea el modo seleccionado. Antes de utilizar esta función,
asegúrese de que el modo deseado cuenta con la configuración del volumen (en el código de origen o por
aprendizaje). En caso contrario, las teclas Vol+/- y Mute no funcionarán.
a.
b.
c.
d.
e.
f.
g.
Pulse la tecla S y manténgala pulsada hasta que aparezca la pantalla “Regulac.
códigos” (tarda aproximadamente unos 3 segundos)
Suelte la tecla S.
Mediante las teclas Arriba/Abajo (, ) navegue hasta la pantalla “Regulac. opciones" .Pulse
la tecla OK. Aparecerá la pantalla “Regulac Vol Apagado”
Pulse la tecla OK. Aparecerá la pantalla “Gestion Única Vol”.
Pulse la tecla OK. Aparecerá la pantalla “Selecc aparato?”.
Pulse la tecla de modo deseado (TV, VCR, DVD, etc.). Las teclas Volume y Mute controlarán
siempre este dispositivo sea cual sea el modo seleccionado en el mando a distancia.
Se mostrará en la pantalla “Por Favor Espere” y posteriormente “Operación Lograda”. El mando
a distancia abandona el modo de configuración para volver a su modo de funcionamiento
normal.
Si el modo seleccionado no dispone de configuración de volumen, se mostrará
en la pantalla “Error Control Vol.” y el mando a distancia abandonará la
configuración para volver a su modo de funcionamiento normal.
6.1.2 Control Vol. según el Modo
Esta función permite gestionar las teclas de control del sonido en cada modo deseado. Por ejemplo, si ha
programado el mando a distancia para que las teclas de control de sonido gestionen siempre su televisor
(ver más arriba), puede decidir que para un (o varios) modo particular (p.ej. AMP), las teclas Vol+/- y Mute
controlen el dispositivo asociado a este modo mientras el mando a distancia se encuentre en dicho modo:
en todos los modos las teclas Vol+/- y Mute controlarán el televisor, salvo si el mando a distancia se
encuentra en el modo AMP, ya que las teclas Vol+/- y Mute controlarán el dispositivo asociado al modo
AMP.
a.
b.
c.
d.
e.
f.
g.
Pulse la tecla S y manténgala pulsada hasta que aparezca la pantalla “Regulac. códigos” (tarda
aproximadamente unos 3 segundos)
Suelte la tecla S.
Mediante las teclas Arriba/Abajo (, ) navegue hasta la pantalla “Regulac. opciones" .Pulse
la tecla OK. Aparecerá la pantalla “Regulac Vol Apagado”
Pulse la tecla OK. Aparecerá la pantalla “Gestion Única Vol”.
Mediante las teclas Arriba/Abajo (, ) navegue hasta la pantalla “Gestion Vol. por Modo”.
Pulse la tecla OK. Aparecerá la pantalla “Selecc. Aparato?”.
Pulse la tecla de modo deseado (TV, VCR, DVD, etc.). Mientras el mando a distancia se
encuentre en este modo, las teclas Volume y Mute controlarán el dispositivo asociado a esta
tecla de modo.
Se mostrará en la pantalla “Espere, por favor” y posteriormente “Operación Lograda”. El mando
a distancia abandona el modo de configuración para volver a su modo de funcionamiento
normal.
6.1.3 Reajuste Vol. Mute Control
Este función permite anular los ajustes efectuados durante los dos apartados precedentes (se regresa al
ajuste preestablecido para el control del volumen).
a.
b.
c.
d.
e.
f.
g.
Pulse la tecla S y manténgala pulsada hasta que aparezca la pantalla “Regulac. códigos” (tarda
aproximadamente unos 3 segundos)
Suelte la tecla S.
Mediante las teclas Arriba/Abajo (, ) navegue hasta la pantalla “Regulac. opciones" .Pulse
la tecla OK. Aparecerá la pantalla “Regulac Vol Apagado”
Pulse la tecla OK. Aparecerá la pantalla “Control Único Vol”.
Mediante las teclas Arriba/Abajo (, ) navegue hasta la pantalla “Reset Vol. Apagado”.
Pulse la tecla OK. Aparecerá la pantalla “Confirmar con OK”.
Pulse la tecla OK, el mando a distancia vuelve a establecer los ajustes de fábrica para el control
del volumen.
Se mostrará en la pantalla “Espere, por favor” y posteriormente “Operación Lograda”. El mando
a distancia abandona el modo de configuración para volver a su modo de funcionamiento
normal.
6.2 Ajuste de Hora
Permite controlar la hora que se muestra en la pantalla LCD.
a.
Pulse la tecla S y manténgala pulsada hasta que aparezca la pantalla “Regulac. códigos” (tarda
aproximadamente unos 3 segundos)
b.
Suelte la tecla S.
c.
Navegue hasta la pantalla “Regulac. opciones " .Pulse la tecla OK. Aparecerá la pantalla
“Regulac Vol Apagado”
d.
Mediante las teclas Arriba/Abajo (, ) navegue hasta la pantalla “Regulac. hora”. Pulse la
tecla OK.
e.
Se mostrará la pantalla “Regulac. hora” con el formato actual de la hora parpadeando (12 horas
o 24 horas). A través de las teclas Arriba/Abajo (, ) seleccione el formato (12 o 24 horas) y
confírmelo con la tecla OK.
f.
Las cifras de las horas empezarán a parpadear. A través de las teclas Arriba/Abajo (, )
ajuste la hora y confírmela mediante la tecla OK.
41
g.
h.
Las cifras de los minutos empezarán a parpadear. A través de las teclas Arriba/Abajo (, )
ajuste los minutos y confírmelos mediante la tecla OK.
Se mostrará en la pantalla “Espere, por favor” y posteriormente “Operación Lograda”. El mando
a distancia regresa a la pantalla “Regulac. códigos”.
6.3 Ajuste de Fecha
Permite configurar el año, el mes, la fecha y el día de la semana que se muestran en la pantalla LCD.
a.
Pulse la tecla S y manténgala pulsada hasta que aparezca la pantalla “Regulac. códigos” (tarda
aproximadamente unos 3 segundos)
b.
Suelte la tecla S.
c.
Mediante las teclas Arriba/Abajo (, ) navegue hasta la pantalla “Regulac. opciones " .Pulse
la tecla OK. Aparecerá la pantalla “Regulac Vol Apagado”
d.
Mediante las teclas Arriba/Abajo (, ) navegue hasta la pantalla “Regulac. Fecha”. Pulse la
tecla OK.
e.
Se mostrará la pantalla “Año?” con las 2 últimas cifras del año parpadeando. A través de las
teclas Arriba/Abajo (, ) seleccione el año y confírmelo con la tecla OK.
f.
Se mostrará la pantalla “Mes?” con las cifras del mes parpadeando. A través de las teclas
Arriba/Abajo (, ) seleccione el mes y confírmelo con la tecla OK.
g.
Se mostrará la pantalla “Fecha?” con las cifras de la fecha parpadeando. A través de las teclas
Arriba/Abajo (, ) seleccione la fecha y confírmela con la tecla OK.
h.
Se mostrará la pantalla “Día?” con el día parpadeando. A través de las teclas Arriba/Abajo (,
) seleccione el día y confírmelo con la tecla OK.
i.
Se mostrará en la pantalla “Espere, por favor” y posteriormente “Operación realizada con éxito”.
El mando a distancia regresa a la pantalla “Regulac. códigos”.
6.4 Ajuste de iluminación
Permite configurar la duración de la iluminación de la pantalla después de pulsar una tecla.
a.
Pulse la tecla S y manténgala pulsada hasta que aparezca la pantalla “Regulac. códigos”(tarda
aproximadamente unos 3 segundos)
b.
Suelte la tecla S.
c.
Mediante las teclas Arriba/Abajo (, ) navegue hasta la pantalla “Regulac. opciones" .Pulse
la tecla OK. Aparecerá la pantalla “Regulac Vol Apagado”
d.
Mediante las teclas Arriba/Abajo (, ) navegue hasta la pantalla “Regulac iluminación”.
Pulse la tecla OK.
e.
Se mostrará la pantalla “Temporiz. Ilumina?.” con la duración actual archivada en la memoria
parpadeando. A través de las teclas Arriba/Abajo (, ) ajuste la duración, esta se
incrementa de 5 en 5 segundos hasta un máximo de 60. El valor preestablecido es 10
segundos. Para que no se ilumine nunca la pantalla LCD, ajuste la duración en 0 segundos.
Confirme la duración con la tecla OK.
f.
Se mostrará en la pantalla “Espere, por favor” y posteriormente “Operación Lograda”. El mando
a distancia regresa a la pantalla “Regulac. códigos”.
6.5 Definir el idioma
Permite escoger el idioma que se mostrará en pantalla.
a.
Pulse la tecla S y manténgala pulsada hasta que aparezca la pantalla “Regulac. códigos”(tarda
aproximadamente unos 3 segundos)
b.
Suelte la tecla S.
c.
Mediante las teclas Arriba/Abajo (, ) navegue hasta la pantalla “Regulac. opciones" .Pulse
la tecla OK. Aparecerá la pantalla “Regulac Vol Apagado”
d.
Mediante las teclas Arriba/Abajo (, ) navegue hasta la pantalla “Definir la lengua”. Pulse la
tecla OK.
e.
Se mostrará la pantalla “Lengua?” con el idioma actual activado parpadeando. A través de las
teclas Arriba/Abajo (, ) seleccione el idioma deseado. La lengua preestablecida es el
inglés. Seleccione el idioma deseado.
f.
Aparece en la pantalla “Validar español” (si ha elegido español). Pulse la tecla OK.
g.
Se mostrará en la pantalla “Operación Lograda”. El mando a distancia regresa a la pantalla
“Regulac. códigos”.
6.6 Borrar Opciones
Esta función permite eliminar toda la configuración (códigos, macros, etc.) realizada con el mando a
distancia y regresar a la configuración de fábrica.
a.
Pulse la tecla S y manténgala pulsada hasta que aparezca la pantalla “Regulac. códigos”(tarda
aproximadamente unos 3 segundos)
b.
Suelte la tecla S.
c.
Mediante las teclas Arriba/Abajo (, ) navegue hasta la pantalla “Regulac. opciones" .Pulse
la tecla OK. Aparecerá la pantalla “Regulac Vol Apagado”
d.
Mediante las teclas Arriba/Abajo (, ) navegue hasta la pantalla “Suprimir opciones”. Pulse
la tecla OK.
e.
Se mostrará la pantalla “Suprimir con OK”. Confírmelo con la tecla OK.
f.
Se mostrará en la pantalla “Espere, por favor” mientras se borran los parámetros. A
continuación, el mando a distancia abandona el modo de configuración para regresar a su
funcionamiento normal.
42
7. Ajuste de reloj
Al pulsar la tecla OK cuando aparece en la pantalla “REGULAC. TEMPORIZ”, accede a la configuración de
los diferentes relojes disponibles: estado de reposo programado del televisor y hasta 4 relojes que le
permitirán enviar una secuencia de 3 comandos a uno de los dispositivos.
7.1 Ajuste de reposo TV
El mando a distancia puede programarse para que la televisión entre en estado de
reposo tras un cierto tiempo; una vez transcurrido ese tiempo, el mando a distancia
envía el comando infrarrojo de estado de reposo al televisor. Este periodo de tiempo
puede ajustarse entre 1 y 90 minutos. Una vez que se ha establecido la duración,
aparece el símbolo "Zzz" en la pantalla.
Z
7.1.1 Para programar los minutos de reposo de TV
a.
b.
c.
d.
e.
f.
g.
h.
i.
Seleccione el modo TV
Pulse la tecla S y manténgala pulsada hasta que aparezca en la pantalla “Regulac. Códigos”
(tarda aproximadamente unos 3 segundos).
Suelte la tecla S.
A través de las teclas Arriba/Abajo (, ) navegue hasta "Regulac. Temporiz". Pulse la tecla
OK.
Se muestra en la pantalla “Regulac.Stand-by TV”. Pulse la tecla OK
Se muestra en la pantalla “Regulac.Stand-by TV”. Pulse la tecla OK
Se muestra en la pantalla “Hora de Stand-by” con el número de minutos parpadeando. Utilice
las flechas Arriba/Abajo (, ) para ajustar los minutos y confirme con la tecla OK.
Se mostrará en la pantalla “Operación Lograda” y el mando a distancia regresa a la pantalla
“Regulac. códigos”.
Pulse la tecla “Exit” 2 veces para regresar al modo normal. Compruebe que el símbolo Zzz se
muestra en la pantalla. Coloque el mando a distancia en frente del televisor, la parte frontal del
mando debe apuntar hacia el televisor.
7.1.2 Para eliminar el reposo programado
a.
b.
c.
d.
e.
f.
Pulse la tecla S y manténgala pulsada hasta que aparezca en la pantalla “Regulac. Códigos”
(tarda aproximadamente unos 3 segundos). Suelte la tecla S.
A través de las teclas Arriba/Abajo (, ) navegue hasta "Regulac. Temporiz". Pulse la tecla
OK.
Se muestra en la pantalla “Regulac.Stand-by TV”. Pulse la tecla OK
Se muestra en la pantalla “Anular Stand-by TV”.Pulse la tecla OK
Se muestra en la pantalla “Suprimir con OK”.Pulse la tecla OK
Aparece en la pantalla “Operación Lograda” y el mando a distancia regresa a la pantalla de "
Regulac. códigos". Desaparece el símbolo Zzz.
7.2 Ajuste de relojes
pueden programarse 4 relojes (Reloj 1, 2, 3 y 4). Pueden atribuirse 4 teclas (comandos) a cada uno de
esos relojes para que se activen a una hora predeterminada (por ejemplo: para que se vea el satélite en la
cadena 123 a las 22h35mn. La primera tecla que debe memorizarse debe ser siempre una tecla de Modo.
No se pueden incluir las siguientes teclas ,,,, OK, Exit, Macro, S o una tecla de
Modo. Los relojes tan sólo pueden configurarse para que se activen en las próximas
24 horas. Los relojes se borran automáticamente una vez que se han activado. Se
muestra el símbolo de la campana del reloj
cuando este se programa.
7.2.1 Ajuste de reloj
Configuración de un reloj (Nota: el reloj debe borrarse si se ha programado previamente – ver el apartado
“Anular reloj X” que aparece a continuación)
a.
Pulse la tecla S y manténgala pulsada hasta que aparezca en la pantalla “Regulac. códigos”
(tarda aproximadamente unos 3 segundos).
b.
Suelte la tecla S.
c.
A través de las teclas Arriba/Abajo (, ) navegue hasta " Regulac. Temporiz". Pulse la tecla
OK. Se muestra en la pantalla “Regulac.Stand-by TV”.
d.
A través de las teclas Arriba/Abajo (, ) navegue hasta "Regulac. Temporiz X" (X
corresponde a uno de los 4 relojes 1, 2, 3 o 4). Pulse la tecla OK.
e.
Se muestra en la pantalla “Regulac. Temporiz”.Pulse la tecla OK
f.
Se muestra en la pantalla “Entrar la hora?” con las cifras de las horas parpadeando. A través de
las teclas Arriba/Abajo (, ) ajuste la hora y confírmela con la tecla OK.
g.
Las cifras de los minutos empiezan a parpadear. A través de las teclas Arriba/Abajo (, )
ajuste los minutos y confírmelos con la tecla OK.
h.
Se muestra en la pantalla “Selecc. aparato”. Pulse la tecla de modo elegido (TV, VCR, DVD,
etc.)
43
i.
j.
k.
l.
m.
Aparece en la pantalla “Seleccionar de la tecla 1”. Pulse brevemente la primera tecla
correspondiente al primer comando que debe enviarse. Si no se necesita ninguna otra tecla,
confirme con OK y vaya directamente al punto I.
Aparece en la pantalla “Seleccionar de la tecla 2”. Pulse brevemente la segunda tecla
correspondiente al segundo comando que debe enviarse. Si no se necesita ninguna otra tecla,
confirme con OK y vaya directamente al punto I.
Aparece en la pantalla “Seleccionar de la tecla 3”. Pulse brevemente la tercera tecla
correspondiente al tercer comando que debe enviarse. Si no se necesita ninguna otra tecla,
confirme con OK y vaya directamente al punto I.
Aparece en la pantalla “Operación realizada con éxito” y el mando a distancia regresa a la
pantalla de "Ajuste de códigos"
Pulse la tecla Exit 2 veces para regresar al modo normal. Compruebe que el símbolo
aparece en la pantalla. Coloque el mando a distancia en frente del televisor, la parte frontal
del mando debe apuntar hacia el televisor
7.2.3 Anular Reloj
Permite eliminar un reloj.
a.
Pulse la tecla S y manténgala pulsada hasta que aparezca en la pantalla “Regulac. códigos”
(tarda aproximadamente unos 3 segundos).
b.
Suelte la tecla S.
c.
A través de las teclas Arriba/Abajo (, ) navegue hasta " Regulac. Temporiz ". Pulse la
tecla OK. Se muestra en la pantalla “Regulac.Stand-by TV”.
d.
A través de las teclas Arriba/Abajo (, ) navegue hasta "Regulac. Temporiz X" (X
corresponde a uno de los 4 relojes 1, 2, 3 o 4). Pulse la tecla OK.
e.
Se muestra en la pantalla “Anular Temporiz”. Pulse la tecla OK
f.
Aparece en la pantalla “Operación Lograda” y el mando a distancia regresa a la pantalla de "
Regulac. códigos"
8. Aprendizaje
El mando a distancia universal cuenta con una biblioteca de códigos que permiten controlar la mayor parte
de los equipos disponibles en el mercado. Sin embargo, si no consigue que su aparato funcione, puede
aprender cuál es su código de funcionamiento, tomando como referencia el mando original. Del mismo
modo, si hay determinadas funciones de control que no funcionan a pesar de haber probado con todos los
códigos disponibles, usted puede enseñarle dichas funciones a su mando a distancia. El mando puede
memorizar hasta 150 teclas (en función del formato del código de infrarrojos de los mandos a distancia de
aprendizaje). Tan sólo se puede memorizar un tipo de control remoto en cada modo.
Consejos para el aprendizaje:a.
b.
c.
d.
e.
f.
g.
h.
i.
j.
k.
En la medida de lo posible, se aconseja encarecidamente el uso de pilas nuevas para cada uno
de los mandos a distancia.
Tan sólo se puede utilizar el aprendizaje completo de un mando a distancia original para un
Modo.
Diríjase a la ventana “Eliminar todos los modos aprendidos” borra todos los comandos
aprendidos antes de iniciar cualquier tipo de aprendizaje.
Al principio practique con el aprendizaje de tan sólo 2 o 3 teclas (para poder familiarizarse y
comprobar la compatibilidad). Después borre todos los códigos aprendidos (“Eliminar todos los
códigos aprendidos”) antes de proceder al aprendizaje completo de su mando a distancia
original.
Confirme “Eliminar un modo aprendido” para garantizar que todos los comandos aprendidos
anteriormente han sido borrados de manera correcta antes de llevar a cabo un nuevo
aprendizaje.
Coloque los mandos a distancia uno en frente del otro, de modo que los LEDs infrarrojos estén
perfectamente alineados entre ellos. También hay que ajustar las alturas de los mandos a
distancia para garantizar que se encuentran en el mismo eje (horizontal y vertical).
Mantenga una distancia aproximada de 25 mm entre los 2 mandos a distancia.
Tenga cuidado de no mover los mandos a distancia durante las fases de aprendizaje de las
teclas.
No realice el aprendizaje cuando se encuentre bajo una iluminación incandescente o de bajo
consumo de energía que podría crear interferencias con las transmisiones de los infrarrojos.
Respete una distancia de al menos un metro de todas las fuentes de luz.
Evite el aprendizaje de las teclas Volume/Mute del mando a distancia original ya que no puede
estar seguro de que controlen correctamente el mismo aparato deseado. Por ejemplo, los
mandos a distancia de DVD utilizan también las teclas de control Volume/Mute de TV y en este
caso es posible que haya 2 tipos diferentes de códigos asociados.
Evite el aprendizaje de teclas de un aparato VCR del mando a distancia original ya que no
puede estar seguro de que controle correctamente el aparato deseado. Por ejemplo, hay
44
l.
m.
mandos a distancia originales del tipo TV que incluyen teclas de control de VCR y en este caso
es posible que haya 2 tipos diferentes de códigos asociados
El aprendizaje de una tecla puede tardar hasta 3 segundos. No active la tecla que está
realizando el proceso de aprendizaje hasta que aparezca el mensaje “Operación realizada con
éxito” o “Error”.
Si al realizar el aprendizaje de la primera y la segunda tecla tan sólo aparecen mensajes de
error, intente lo que se describe a continuación:
i. Detenga el aprendizaje pulsando la tecla Exit
ii. Elimine los comandos aprendidos para ese modo
iii. Compruebe que los LEDs infrarrojos estén alineados correctamente entre los 2
mandos a distancia
iv. Ajuste la distancia entre los 2 mandos, ya sea acercándolos (15mm) o bien alejándolos
(50mm)
v. Intente de nuevo el aprendizaje del mando a distancia original
Si el problema persiste, compruebe si la tecla del mando original transmite correctamente y si
controla al aparato deseado. Intente el aprendizaje de la tecla a través de otro modo. Si el
aprendizaje transcurre con normalidad en el nuevo modo, esto quiere decir que el código
utilizado es diferente de los otros y que no puede aprenderse bajo el mismo modo.
Consideraciones sobre el aprendizaje: a.
No puede aprender las teclas Setup y Macro.
b.
Todos los comandos aprendidos para un Modo se borran si el mismo código o uno nuevo de 4
cifras se introduce en ese Modo (sea cual sea el modo de configuración del código).
c.
La retroiluminación se detiene durante el aprendizaje.
8.1 Aprendizaje de comandos
15-50mm
a.
b.
c.
d.
e.
f.
g.
h.
Pulse la tecla S y manténgala pulsada hasta que aparezca en la pantalla “Regulac. códigos”
(tarda aproximadamente unos 3 segundos)
Suelte la tecla S.
A través de las teclas Arriba/Abajo (, ) navegue hasta "Aprendizaje". Pulse la tecla OK.
Se muestra en la pantalla “Aprender un modo”.Pulse la tecla OK
Se muestra en la pantalla “¿Qué modo aprender?”.Pulse la tecla de modo seleccionada (TV,
VCR, DVD, etc.).
Aparece el mensaje “Tecla de almacena?". Pulse la tecla de control LCD que va a aprenderse
desde el mando a distancia original. Se muestra “Por Favor Espere”. Pulse la tecla del mando a
distancia original y manténgala pulsada hasta que aparezca en la pantalla el mensaje
“Operación Lograda” o “Error” (ver consejo de aprendizaje) seguido del mensaje “
Aparece en la pantalla “OK- Contin o salga”. Pulse la tecla OK si desea aprender más teclas y
realice el proceso del punto “f”, o pulse Exit si ya ha terminado el aprendizaje.
Se muestra brevemente “Espere, por favor” y el mando a distancia abandona el modo de
configuración para regresar al modo de funcionamiento normal.
8.2 Eliminar todos los comandos aprendidos en un Modo
a.
b.
c.
d.
e.
f.
g.
Pulse la tecla S y manténgala pulsada hasta que aparezca en la pantalla “Regulac. códigos”
(tarda aproximadamente unos 3 segundos)
Suelte la tecla S.
A través de las teclas Arriba/Abajo (, ) navegue hasta "Aprendizaje". Pulse la tecla OK. Se
muestra en la pantalla “Aprender un modo”.
A través de las teclas Arriba/Abajo (, ) navegue hasta "Suprima un Modo". Pulse la tecla
OK. .
Se muestra en la pantalla "Escoja la Tecla Modo". Pulse la tecla de modo seleccionada (TV,
VCR, DVD, etc.).
Aparece en la pantalla “Suprimir con OK?” Pulse la tecla OK.
Se muestra brevemente “Por Favor Espere” y el mando a distancia abandona el modo de
configuración para regresar al modo de funcionamiento normal.
8.3 Eliminar todos los comandos aprendidos (se recomienda realizar esta operación antes
del primer aprendizaje)
a.
b.
c.
d.
e.
h.
Pulse la tecla S hasta que aparezca en la pantalla “Ajuste de códigos” (tarda aproximadamente
unos 3 segundos)
Suelte la tecla S.
A través de las teclas Arriba/Abajo (,) navegue hasta "Aprendizaje". Pulse la tecla OK. Se
muestra en la pantalla “Aprender un modo”.
Diríjase a la pantalla “Suprima todos los Modos”. Pulse la tecla OK.
Aparece en la pantalla “Suprimar con OK?” Pulse la tecla OK.
Aparece brevemente “Por Favor Espere” y el mando a distancia abandona el modo de
configuración para regresar al modo de funcionamiento normal.
45
9. Macros
La tecla MACRO junto con las teclas 1, 2 y 3, le permite programar y memorizar hasta 3 secuencias de
comandos (teclas seleccionadas) que usted elija. Al presionar la tecla MACRO y a continuación las teclas
numéricas 1, 2, o 3 se iniciará la transmisión de la secuencia de comandos correspondiente. Puede
simplificar cualquier secuencia de comandos que utilice con frecuencia simplemente con presionar 2 teclas
(MACRO seguido de 1, 2 o 3). Por ejemplo, al pulsar MACRO y después la tecla 1, 2 o 3 puede encender
el televisor, el descodificador satélite, seleccionar su canal favorito, encender el video e iniciar la grabación,
etc. Se pueden memorizar un total de diez teclas (comandos infrarrojos) en cada una de las 3 Macro
disponibles.
9.1 Configuración de una macro
a.
b.
c.
d.
e.
f.
g.
h.
i.
Pulse la tecla S y manténgala pulsada hasta que aparezca la pantalla “Regulac. Códigos” (tarda
aproximadamente unos 3 segundos)
Suelte la tecla S.
Mediante las teclas Arriba/Abajo (, ) navegue hasta la pantalla “Definir las macros". Pulse
la tecla OK.
Aparece l pantalla “Escribir una macro”.Pulse la tecla OK.
Aparece en la pantalla "Asignar un nº de Macro” Pulse la tecla numérica 1, 2, o 3 en la que
desea memorizar la macro.
Se mostrará en la pantalla “Asignar Modo a la Macro”. Pulse la tecla de modo deseada (TV,
DVD, SAT etc.) para seleccionar el dispositivo que desea controlar. La primera tecla de una
secuencia de macro debe ser siempre una tecla de modo.
Aparece en la pantalla “Entrar Mando X” (X= nº de macros programadas 1, 2, o 3) junto con el
número del comando en proceso de programación. Pulse sucesivamente las teclas que desea
incluir en la secuencia de Macro en el orden en el que desea que se transmitan (hasta 10
posibilidades).
Para memorizar la Macro, pulse la tecla Macro. La Macro se memorizará automáticamente la
décima vez que pulse la tecla.
Se mostrará brevemente en la pantalla “Operación Lograda”. El mando a distancia abandona el
modo de configuración para volver a su modo de funcionamiento normal.
9.2 Borrar una macro
a.
b.
c.
d.
e.
f.
g.
Pulse la tecla S y manténgala pulsada hasta que aparezca la pantalla “Regulac. códigos” (tarda
aproximadamente unos 3 segundos).
Suelte la tecla S.
Mediante las teclas Arriba/Abajo (, ) navegue hasta la pantalla “Definir las macros". Pulse
la tecla OK.
Mediante las teclas Arriba/Abajo (, ) navegue hasta la pantalla “Suprimir una macro". Pulse
la tecla OK.
Aparece en la pantalla “Macro a suprimir”. Pulse la tecla 1, 2, o 3 correspondiente
al
número de macro que desea borrar.
Se muestra en la pantalla "Suprimir con OK”. Pulse la tecla OK.
Se mostrará brevemente en la pantalla “Operación Lograda”. El mando a
distancia
abandona el modo de configuración para volver a su modo de
funcionamiento normal.
En un funcionamiento normal, para activar una macro, pulse la tecla Macro y
durante los 20 segundos siguientes pulse la tecla 1, 2 o 3.
Aparece en la pantalla “Macro X” durante el procesamiento de una secuencia
de Macro. A continuación, el mando a distancia regresa a su modo de
funcionamiento normal.
Si no se ha memorizado ninguna macro en la tecla numérica que ha
seleccionado, se muestra brevemente en la pantalla “Macro X incorrecta” (X=
1, 2 o 3) y el mando a distancia regresa a continuación a su modo de
funcionamiento normal.
9.3 Notas sobre las macros
1. Los comandos infrarrojos que forman parte de una macro se envían
cada 0,5 segundos. En algunos casos es necesario establecer un
intervalo de tiempo mayor a 0,5 segundos entre dos comandos (por
ejemplo, para permitir el precalentamiento de un televisor). Se deben
realizar los siguientes para cambiar el intervalo: pulsar la tecla PAUSE seguido del número de
segundos de 1 a 9. No es posible introducir un intervalo de 0 segundos.
2. Para cambiar de dispositivo en medio de una secuencia de comando, pulse la tecla de modo del
nuevo dispositivo que desea controlar.
3. La primera tecla de una secuencia de macro debe ser obligatoriamente una tecla de modo. (TV,
VCR, etc.).
4. Las teclas Setup y Macro no pueden incluirse en una Macro.
5. Pulse la tecla Setup para abandonar la configuración de una Macro.
46
10. Averías y problemas de funcionamiento
El mando a distancia no funciona o tiende a perder los códigos introducidos:
·
Compruebe con el mando a distancia original si el equipo funciona correctamente.
·
Compruebe que ha pulsado la tecla correspondiente al modo (televisor TV, vídeo VCR,
satélite SAT, etc.) del equipo que desea controlar.
·
Si el código de la lista que ha introducido no funciona, pruebe con el código siguiente, o bien
utilice la búsqueda automática.
·
Compruebe la polaridad de las pilas (indicaciones +/-) y que estén colocadas correctamente en
el compartimiento (ver el contacto de las pilas en los resortes del compartimiento).
El funcionamiento del mando a distancia necesita 2 pilas LR 03 alcalinas nuevas.
Si los mensajes de LCD son tenues o inexistentes, generalmente tras varios meses de uso,
esto indica que deben cambiarse las pilas.
47
Telecomando universale 8/6/4 in 1
1. Avvertenze di sicurezza
E' vietato qualsiasi intervento tecnico od alterazione del prodotto per rispetto delle norme di sicurezza e di
conformità.
Per installare correttamente questo prodotto, si prega di consultare la guida per l'utente. Non lasciare i
bambini utilizzare questo prodotto senza la supervisione di una persona adulta.
Non esporre il prodotto alle condizioni seguenti :
- attrito meccanico eccessivo
- alta temperatura
- vibrazioni importanti
- umidità elevata.
Si prega inoltre di rispettare tutte le altre avvertenze di sicurezza riportate nei paragrafi seguenti della
presente guida. Per maggiori informazioni, rivolgersi ai tecnici del nostro servizio di assistenza telefonica
oppure ad uno specialista del settore.
Per garantire una programmazione corretta, si prega di leggere la presente guida e le avvertenze di
sicurezza con la massima cura.
Sostituzione delle batterie
Questo telecomando funziona unicamente con due batterie alcaline di tipo AAA.
Non provare in alcun modo ad utilizzare un altro tipo di alimentazione. Introdurre le batterie rispettando le
polarità indicate.
Togliere le batterie in caso di inutilizzo prolungato del telecomando. Si raccomanda di non mettere le
batterie in cortocircuito e di non esporle alle fiamme libere (rischio di deflagrazione).
Tenere le batterie lontano dalla portata dei bambini. Un animale o un bambino potrebbe ingoiarle. In questo
caso, rivolgersi immediatamente ad un medico.
Le batterie danneggiate o che presentino delle fuoruscite possono provocare varie lesioni sulla pelle, quali
bruciori, per via della presenza di acido al loro interno. Utilizzare guanti in caso di necessità.
Eliminazione delle batterie
Secondo le leggi vigenti, le batterie non devono essere gettate tra i rifiuti domestici. Si prega di avviare le
batterie esauste presso il punto di raccolta differenziata più vicino.
2. Descrizione del prodotto
Il Telecomando universale è dotato di 4, 6 o 8 tasti di modalità (in base al modello comperato). Può
sostituire fino a 8 telecomandi (4 in 1, 6 in 1 oppure 8 in 1).
Possiede una libreria di codici infrarossi preprogrammati che coprono la maggior parte delle
apparecchiature audiovisive presenti sul mercato.
Le etichette di tasti di modalità proposte quali TV, VCR, DVD, SAT, AMP, AUX sono soltanto un
esemplificazione di quanto è possibile fare. Ad eccezione della modalità TV, è possibile assegnare qualsiasi
periferica Audio Video a qualunque tasto di modalità.
2.1Primo inserimento delle batterie
2 batterie alcaline LRO3 nuove di tipo AAA sono fornite a corredo.
¾
¾
¾
¾
¾
¾
¾
Togliere il coperchio dello scomparto delle batterie sul retro del telecomando.
Inserire 2 batterie nuove della stessa marca controllando sempre la polarità (simboli '+' e '-'
stampigliati all'interno dello scomparto).
Rimettere il coperchio in posizione.
Scelta della lingua
Una schermata d'aiuto indica quali tasti utilizzare quando si è nelle
schermate di programmazione.
Premere e rilasciare un tasto qualsiasi, la schermata “Language?”
appare con la lingua di default. Utilizzare i tasti Freccia Su/Giù (,) per scegliere la lingua
che si desidera utilizzare. La lingua di default è l'inglese. Premere e rilasciare il tasto OK per
confermare.
La schermata “Operazione effettuata” appare, il telecomando rimane in modalità
programmazione e torna alla schermata “Impostazione dei codici”.
2.2 Stato della memoria dopo la sostituzione delle batterie
Tutti i parametri definiti dall'utente, tranne i parametri Ora, Giorno, Data e Macro sono salvati a durata
indeterminata anche in caso di sostituzione delle batterie. L'ora, il giorno, la data e le MACRO saranno
cancellati e ripristinati al loro valore di default.
3. Descrizione dei tasti del telecomando
[1]
[2]
[3]
[4]
[5]
[6]
[7]
[8]
[9]
[10]
Power: spegne o mette in standby l'ultimo apparecchio selezionato.
Mantenimento del televideo : blocca la pagina del Televideo sulla schermata visualizzata.
TV, VCR, DVD, SAT… : seleziona l’apparecchio che si desidera comandare. Il numero di tasto di
modalità varia a secondo del modello del telecomando (4in1, 6in1 o 8in1).
Televideo ON: visualizza il televideo: il Televideo appare sulla schermata.
Televideo MIX: permette di visualizzare il televideo sull'immagine presente sulla schermata.
INFO: visualizza di informazioni sull’apparecchio selezionato.
Televideo OFF: cancella il televideo.
Menu: visualizza il menu.
Exit: uscita dal Menu.
Mute: toglie o rimette il volume all'apparecchio preselezionato.
- 48 -
[11]
Prog +/-: in modalità TV, VCR o SAT : seleziona il canale precedente o seguente. In modalità
DVD : seleziona il capitolo seguente o precedente.
[12]
Vol +/-: imposta il volume sonoro.
[13]
Su, Giù, Sinistra e Destra: tasti di navigazione; questi tasti servono a spostarsi all'interno del
menu dell'apparecchio selezionato.
[14]
OK: conferma una selezione all'interno di un menu.
[15]
Guide: permette di accedere alla guida elettronica del programma.
[16]
S: permette di programmare il telecomando prima del suo primo utilizzo. Permette inoltre di
accedere alle funzioni secondarie di alcuni apparecchi (Shift). Premere poi rilasciare il tasto "S"
seguito dal tasto di funzione che si desidera attivare.
[17]
Tasti colorati: permettono di controllare il Televideo (FastText) o certe funzioni speciali su certe
apparecchiature.
[18]
Macro: premere simultaneamente il tasto MACRO con i tasti numerici 1, 2 o 3 per programmare o
memorizzare fino a 3 sequenze di comandi.
[19]
Tastiera numerica 0-9: funziona esattamente come quella del telecomando originale.
[20]
A/V: selezione di una sorgente esterna (presa Scart, per visualizzare il film dal lettore DVD, dal
satellite, dal videoregistratore… sullo schermo del televisore ad esempio).
[21]
--/-: in modalità programmazione per la ricerca del codice; questo tasto permette di confermare il
codice dell’apparecchio che si desidera comandare con i tasti numerici (19); permette inoltre su
alcuni apparecchi di selezionare direttamente i canali superiori a 9.
[22]
Play , FF , Stop, Rew , Pause : questi tasti funzionano allo stesso modo di quelli del telecomando
originale.
REC (record): questo tasto funziona allo stesso modo di quello del telecomando originale VCR o DVD…
Per evitare qualsiasi rischio di errore, viene richiesto di premere 2 volte questo tasto per attivare la
sua funzione.
4. Schermo LCD
4.1 Presentazione generale
Lo schermo LCD serve da interfaccia visiva tra l'utente e il telecomando. Lo
schermo LCD è composto da 23 caratteri su 3 linee di visualizzazione (2 linee di 9
caratteri sulle linee in alto e al centro e una linea di 5 caratteri nella parte bassa
delle schermo).
Lo schermo visualizza anche l'ora e vari simboli d'indicazioni (vedi qui sotto).
4.2 Visualizzazione dello schermo in modalità normale
Visualizzazione di base: lo schermo è sempre attivo a partire dal momento in cui
le batterie sono state inserite. Lo schermo visualizza la modalità selezionata attiva,
come ad esempio nel caso presente DVD, il giorno della settimana (ad es. Lun), e
l'ora del giorno (ad es. 23:58) in un formato 24 ore.
Visualizzazione premendo sul tasto di modalità: premendo sul tasto di modalità,
lo schermo indica la modalità attiva (ad esempio DVD) e il codice con 4 digits
programmati per questa modalità (ad. es. 0768). Lo schermo torna alla modalità di
visualizzazione normale non appena il tasto di modalità viene rilasciato.
Visualizzazione premendo sul tasto S (Shift): premendo brevemente sul tasto di
Setup (S) e rilasciandolo lo schermo mostra la modalità attiva del telecomando,
come ad esempio nel caso presente DVD, la data - ad es.: 9:10 (Giorno:Mese) - e
indica che la modalità “Shift” è attiva con il simbolo “(S)” visualizzato. Premere e
rilasciare il tasto EXIT per tornare alla modalità di visualizzazione normale. La
modalità "SHIFT" permette di accedere a delle funzioni secondarie. Per utilizzarla,
premere e rilasciare il tasto “(S)” poi premere sul tasto corrispondente alla funzione
desiderata.
Indicazione di tasto premuto: qualsiasi tasto premuto viene indicato o dal simbolo
"trasmissione" sullo schermo del telecomando oppure da un cambio di
visualizzazione sullo schermo.
4.3 Navigazione tra i menù
Per aprire il menù Impostazione di codice, premere e mantenere premuto il tasto S (Setup) fino a quando
non appaia la schermata "Impostazione dei codici" con il simbolo “SET” visualizzato.
Quando “Impostazione dei codici” è visualizzato, premere ripetutamente sul tasto S (Setup) per accedere
agli altri menù:
IMPOSTAZIONE DEI CODICI Æ IMPOSTAZIONE DELLE OPZIONI Æ IMPOSTAZIONE TIMER Æ
APPRENDIMENTO Æ DEFINIRE LE MACRO ÆUSCIRE
Premere il tasto OK per confermare la fase di programmazione desiderata.
Le routine d'impostazione servono per l’apprendimento, la ricerca di un codice, ecc…
Per uscire dalle routine d'impostazione, premere il tasto EXIT o navigare da una schermata all'atra fino a
raggiungere la schermata "Uscire" e premere il tasto OK.
IMPOSTAZIONE DEI CODICI: serve ad assegnare un codice agli apparecchi
IMPOSTAZIONE DELLE OPZIONI: permette d'impostare l'ora, la data e il
controllo del volume
IMPOSTAZIONE TIMER: permette di accedere alle impostazioni delle
temporizzazioni
- 49 -
APPRENDIMENTO: permette di accedere all’apprendimento dei tasti
DEFINIRE LE MACRO: consiste a definire delle sequenze di comandi
automatici
USCIRE: permette di uscire dalla modalità di programmazione premendo il
tasto OK.
L'uscita dalla modalità di programmazione avviene in modo automatico dopo
15 secondi d'inattività alla tastiera e la schermata “Timeout superato” viene
visualizzata.
Quando il telecomando è occupato a gestire un compito di ricerca di codice o
aspetta un'informazione, la schermata “Attendere prego” o "Aspetare prego"
viene visualizzata.
5. Programmazione del telecomando: Impostazione dei codici
Impostazione dei codici: quando la schermata "IMPOSTAZIONE DEI CODICI" appare, confermare
premendo il tasto OK. Le impostazioni dei codici possono venire effettuate seguendo 4 metodi differenti.
5.1 Metodo A: Programmazione a scorrimento
a.
b.
c.
d.
e.
f.
g.
h.
i.
j.
k.
Accendere l’apparecchio che si desidera comandare (ad es.: Accendere la TV)
Premere il tasto S fino alla visualizzazione della schermata “Regolaz. Codici” (dopo circa 3
secondi)
Rilasciare il tasto S.
Premere poi rilasciare il tasto OK. La schermata “Fare Scorrere Cod.” viene visualizzata.
Premere poi rilasciare il tasto OK. La schermata “Assegnare Tasto Modal.'” viene visualizzata.
Premere poi rilasciare il tasto di modalità desiderato (TV, VCR, DVD, ecc.). La schermata
“Scelta Perifer.? TV” viene visualizzata.
Tramite i tasti Su/giù (,), selezionare il tipo di apparecchio che si desidera programmare:
TV, VCR, DVD,... Vedi nota "Scelta apparecchio?" qui sotto.
Premere poi rilasciare il tasto OK per confermare la selezione.
Il primo codice della prima marca appare nella schermata (ad es.: Admiral 0000). Utilizzare i
tasti Freccia in Su/Giù (,) per accedere alla marca desiderata oppure per accedere più
velocemente ad essa utilizzare i tasti numerici 2 a 9 del telecomando (come su un telefono
cellulare: 2=abc,3=def, ecc.). Ad esempio, per accedere alla marca VIETA (Marca lettore DVD)
premere il tasto 8 (8=tuv) 3 volte e utilizzare i tasti Freccia in Su/Giù (,) per accedere alla
marca. Provare il primo codice visualizzato tramite i tasti Volume +/-, Mute, Prog +/-, Power,
AV, Televideo, Play, Stop, FF, Rewind e Pausa. Se il primo codice corrispondente alla marca
del vostro apparecchio non funziona, passare al secondo codice tramite i tasti destro/sinistro,
ecc… Dopo aver trovato il codice appropriato, premere il tasto OK per registrare questo codice.
I messaggi “Attendere prego” poi "Operazione eseguita” vengono visualizzati sullo schermo; il
telecomando esce dalla modalità di programmazione e torna alla modalità di funzionamento
normale.
Provare quindi il telecomando. Procedere allo stesso modo per gli altri apparecchi.
Nota “Scelta apparecchio?”: le scelte possibili sono TV, VCR, LD, DVD, DVR, HDD, SAT,
CABLE, DVBT, STB, AUDIO, AMP, RECR, HTIB, MP3, CD, TAPE, TUNER e PHONO
qualunque sia il tasto di modalità selezionato, tranne la modalità TV. Per la modalità TV,
soltanto TV può essere selezionato (la modalità TV può controllare soltanto un televisore).
5.2 Metodo B: Digitare il codice.
- 50 -
Questo metodo consiste a digitare direttamente il codice a partire dalla lista di codici.
a.
Accendere l’apparecchio che si desidera controllare (ad es.: Accendere la TV)
b.
Premere il tasto S fino all'apparizione della schermata “Regolaz. Codici” (dopo circa 3 secondi)
c.
Rilasciare il tasto S.
d.
Premere poi rilasciare il tasto OK. La schermata “Fare Scorrere Cod.” appare.
e.
Tramite i tasti Freccia in Su/Giù (,) far scorrere fino alla schermata “Scegliere Cod. Vedi
Doc". Premere poi rilasciare il tasto OK. La schermata “Assegnare Tasto Modalità” viene
visualizzata con la modalità e il codice attualmente programmati.
f.
Tramite i tasti numerici 0-9 e la lista di codici, comporre il primo codice a 4 cifre corrispondente
alla marca del vostro apparecchio. Dopo aver digitato la quarta cifra il messaggio "Operazione
eseguita” appare sullo schermo, il telecomando esce dalla modalità di programmazione e torna
alla modalità di funzionamento normale.
g.
Provare ad utilizzare il telecomando. Se alcune funzioni non rispondono, questo significa che il
codice digitato è errato. In questo caso ripetere la procedura qui sopra con il codice seguente
corrispondente alla marca del vostro apparecchio.
h.
Ripetere la stessa procedura con gli altri apparecchi in vostro possesso.
5.3 Metodo C: Ricercare il codice.
Nel caso in cui nessuno dei codici presenti nelle lista permetterebbe di controllare i vostri apparecchi
audiovisivi (TV, VCR, SAT…), viene consigliato di procedere con il metodo di ricerca seguente :
a.
Accendere l’apparecchio che si desidera controllare (ad es.: Accendere la TV).
b.
Premere il tasto S fino all'apparizione della schermata “Regolaz. Codici” (dopo circa 3 secondi).
c.
Rilasciare il tasto S.
d.
Premere poi rilasciare il tasto OK. La schermata “Fare Scorrere Cod.” viene visualizzata.
e.
Tramite i tasti Freccia in Su/Giù (,) far scorrere fino alla schermata “Ricerca codici".
Premere poi rilasciare il tasto OK. La schermata “Assegnare Tasto Modalità” appare.
f.
Premere poi rilasciare il tasto di modalità desiderato (TV, VCR, DVD, ecc.). La schermata
“Scelta Perifer.? TV” appare.
g.
Tramite i tasti Su/Giù, selezionare il tipo d’apparecchio che si desidera programmare: TV, VCR,
DVD,... Vedi nota "Scelta apparecchio?" più su. Premere poi rilasciare il tasto OK per
confermare la scelta.
h.
“Avviare ricerca con
" appare sullo schermo. Premere ripetutamente sul tasto
(Power) o
Prog+ (o Play, VCR e DVD soltanto) fino a quando l'apparecchio che si cerca di comandare si
spenga o cambi canale (o si metta in lettura a secondo del tasto premuto). Premere poi su OK
per registrare il codice. In caso di superamento del codice ricercato, tornare indietro premendo il
tasto Prog-. Premere Prog+ (o Power o Play) per far scorrere di nuovo la lista in avanti.
Durante questa procedura, "Ricerca per" e la modalità vengono visualizzati sullo schermo.
i.
Quando il messaggio "Operazione eseguita” viene visualizzato sullo schermo, il telecomando
esce dalla modalità di programmazione e torna alla modalità di funzionamento normale.
j.
Provare quindi il telecomando. Se alcune funzioni non rispondono, questo significa che il codice
digitato è errato. In questo caso ripetere la procedura qui sopra.
k.
Ripetere la stessa procedura con gli altri apparecchi in vostro possesso.
Note:
(Power) o il
1 Se il vostro apparecchio non presenta la funzione Prog+, utilizzare il tasto
tasto Play.
2 La ricerca inizia dall'ultimo codice registrato. Se codesto codice è 0030, la ricerca inizierà da
0031 fino all'ultimo codice possibile, poi riprenderà da 0000 fino a 0029.
3 Quando tutti i codici sono stati provati, "Ricerca terminata"
appare sullo schermo ed il telecomando abbandona la modalità
di programmazione per tornare alla modalità di funzionamento
normale.
5.4 Metodo D: codice per marca.
Se la marca del vostro apparecchio è presente nel listino delle marche che si trova all'inizio dell'elenco dei
codici, è quindi possibile ricorrere alla ricerca per marca (più veloce della ricerca manuale dei codici):
a.
Accendere l’apparecchio che si desidera comandare (ad es.: Accendere la TV).
b.
Premere il tasto S fino all'apparizione della schermata “Regolaz. Codici” (dopo circa 3 secondi).
c.
Rilasciare il tasto S.
d.
Premere poi rilasciare il tasto OK. La schermata “Fare Scorrere Cod.” viene visualizzata.
e.
Tramite i tasti Freccia in Su/Giù (,) fare scorrere fino alla schermata “Codice per Marca".
Premere poi rilasciare il tasto OK. La schermata “Assegnare Tasto Modalità” appare.
f.
Premere poi rilasciare il tasto di modalità desiderato (TV, VCR, DVD, ecc.). La schermata
“Scelta Perfer.? TV” viene visualizzata.
g.
Tramite i tasti Su/giù (,), selezionare il tipo di apparecchio che si desidera programmare:
TV, VCR, DVD,... Vedi nota "Scelta apparecchio?" più su. Premere poi rilasciare il tasto OK
per confermare la scelta.
h.
"Codice Marca 1-8" appare sullo schermo. Premere poi rilasciare il tasto numerico 1 a 8
corrispondente alla marca del vostro apparecchio (vedi la lista delle marche nell'elenco dei
codici).
i.
“Avviare ricerca con
" appare sullo schermo. Premere ripetutamente sul tasto
(Power) o
Prog+ (o Play, VCR e DVD soltanto) fino quando l'apparecchio che si cerca di comandare si
spenga o cambi canale (o si metta in lettura a secondo del tasto premuto). Premere poi su OK
per registrare il codice. In caso di superamento del codice ricercato, tornare indietro premendo il
tasto Prog-. Premere Prog+ (o Power o Play) per far scorrere di nuovo la lista in avanti.
Durante questa procedura, "Ricerca per" e la modalità vengono visualizzati sullo schermo.
j.
"Operazione effettuata” appare sullo schermo, il telecomando esce dalla modalità di
programmazione e torna alla modalità di funzionamento normale.
- 51 -
k.
l.
Provare quindi il telecomando, Se alcune funzioni non rispondono, questo significa che il codice
digitato è errato. In questo caso ripetere la procedura qui sopra.
Ripetere questa procedura per gli altri apparecchi in vostro possesso.
5.5 Identificazione del codice memorizzato
Premere sul tasto di modalità di cui si desidera conoscere il codice memorizzato. Il codice viene
visualizzato sullo schermo, ad es.: "DVD code 0768”.
5.6 Programmazione dei Combo
Per alcuni Combo (cioè degli apparecchi combinati TV/VCR o TV/DVD o DVD/VCR, ecc.), bisognerà
azionare due tasti di modalità diversi per comandare i due apparecchi presenti nel Combo. Ad esempio, nel
caso di un Combo TV/DVD, potrebbe essere necessario programmare un codice con il tasto TV per il
televisore e un codice separato (con un altro tasto di modalità) per comandare il lettore DVD.
5.7 Controllo dei Combo
I telecomandi originali di alcuni Combo (ad es.: TV/VCR, TV/DVD, DVD/VCR, ecc.) sono dotati di tasti
separati per selezionare la parte del combo da controllare. Ad esempio, se il vostro Combo presenta un
lettore DVD e un lettore VCR (videoregistratore) è possibile che il telecomando originale sia dotato di 2 tasti
separati DVD e VCR per selezionare l'apparecchio del combo che si desidera comandare. La funzione
equivalente è disponibile tramite i tasti Modalità e S.
Supponiamo che il vostro Combo sia composto da un DVD e da un VCR e che il suo codice sia
programmato con la modalità DVD:
Premere e mantenere premuto il tasto DVD per più di un secondo per eseguire il comando
DVD.
Premere brevemente sul tasto S poi sul tasto DVD per eseguire il comando VCR.
Questo metodo vale per qualsiasi tipo di combo (TV/VCR, TV/DVD, DVD/VCR, ecc.) ed è disponibile in
tutte le modalità. Questa funzione non viene supportata da tutti i codici.
6. Impostazione Opzioni
Premere su OK quando la schermata "Regolaz. Opzioni" viene visualizzata per programmare le funzioni di
sistema quali l'ora, la data, la lingua, la durata della retroilluminazione, il funzionamento del volume e la
reinizializzazione del telecomando.
6.1 Impostazione Vol. Mute
Questo telecomando permette di definire la modalità che verranno comandate dai tasti Vol+/- e Mute. Come
valore di default, il telecomando è programmato in modo che i tasti Volume e Mute comandino la modalità
nella quale si trova il telecomando. Se questa modalità non prevede la gestione del volume, questi tasti
comanderanno allora la modalità TV.
6.1.1 Gestione Vol. Soltanto
Questa funzione permette di assegnare i tasti Vol+/- e Mute ad un'unica modalità: i tasti Volume e Mute
comanderanno sempre lo stesso apparecchio qualunque sia la modalità selezionata. Prima di utilizzare
questa funzione, assicurarsi che la modalità desiderata presenti effettivamente una gestione del volume
(nel codice di origine o tramite apprendimento); in caso contrario, i tasti Vol+/- e Mute non avranno alcun
effetto.
a.
b.
c.
Premere il tasto S fino all'apparizione della schermata “Regolaz. codici” (dopo circa 3 secondi)
Rilasciare il tasto S.
Tramite i tasti Freccia in Su/Giù (,) far scorrere fino alla schermata “Regolaz. Opzioni".
Premere poi rilasciare il tasto OK. La schermata “Regolaz. Vol. Mute” viene visualizzata.
- 52 -
d.
e.
f.
g.
Premere poi rilasciare il tasto OK. La schermata “Gestione Unica Vol.” viene visualizzata.
Premere poi rilasciare il tasto OK. La schermata “Scelta Perifer.?” viene visualizzata.
Premere poi rilasciare il tasto di modalità desiderato (TV, VCR, DVD, ecc.). I tasti Volume e
Mute controlleranno sempre lo stesso apparecchio qualunque sia la modalità selezionata sul
telecomando.
I messaggi “Attendere prego” poi "Operazione eseguita” verranno visualizzati sullo schermo, il
telecomando esce dalla modalità di programmazione e torna alla modalità di funzionamento
normale.
Se la modalità desiderata non presenta la gestione del volume, il messaggio
"Errore Controllo Vol." viene visualizzato sullo schermo ed il telecomando
esce dalla modalità di programmazione e torna alla modalità di funzionamento
normale.
6.1.2 Gestione Vol. per modalità
Questa funzione permette di assegnare i tasti di gestione del volume ad ogni modalità desiderata. Ad
esempio, se il telecomando è stato programmato di modo che i tasti di gestione del volume comandi
sempre il televisore (vedi qui sopra), è possibile decidere che per una (o più) modalità particolare (ad es.
AMP), i tasti Vol+/- e Mute comandino l'apparecchio associato a questa modalità quando il telecomando si
trova in questa modalità: in tutte le modalità, i tasti Vol+/- e Mute comanderanno il televisore tranne quando
il telecomando si trova in modalità AMP, dove i tasti Vol+/- e Mute controlleranno l'apparecchio associato
alla modalità AMP.
a.
b.
c.
d.
e.
f.
g.
Premere il tasto S fino a quando venga visualizzata la schermata “Regolaz. codici” (dopo circa 3
secondi).
Rilasciare il tasto S.
Tramite i tasti Freccia in Su/Giù (,) far scorrere fino alla schermata “Regolaz. Opzioni".
Premere poi rilasciare il tasto OK. La schermata “Regolaz. Vol. Mute” viene visualizzata.
Premere poi rilasciare il tasto OK. La schermata “Gestione Unica Vol.” viene visualizzata.
Tramite i tasti Freccia in Su/Giù (,) far scorrere fino alla schermata “Gestione Vol. con
Modal.". Premere poi rilasciare il tasto OK. La schermata “Scelta Perifer” viene visualizzata.
Premere poi rilasciare il tasto di modalità desiderato (TV, VCR, DVD, ecc.). Quando il
telecomando si trova in questa modalità, i tasti Volume e Mute controlleranno l'apparecchio
associato a questo tasto di modalità.
I messaggi “Attendere prego” poi "Operazione eseguita” verranno visualizzati sullo schermo, il
telecomando esce dalla modalità di programmazione e torna alla modalità di funzionamento
normale.
6.1.3 Vol. Mute Controllo Reset
Questa funzione permette di annullare le impostazioni effettuate nei due paragrafi precedenti (ripristino
delle impostazione di default per la gestione del volume).
a.
Premere il tasto S fino a quando venga visualizzata la schermata “Regolaz. codici” (dopo circa 3
secondi).
b.
Rilasciare il tasto S.
c.
Tramite i tasti Freccia in Su/Giù (,) far scorrere fino alla schermata “Regolaz. Opzioni".
Premere poi rilasciare il tasto OK. La schermata “Regolaz. Vol. Mute” viene visualizzata.
d.
Premere poi rilasciare il tasto OK. La schermata “Gestione Unica Vol.” viene visualizzata.
e.
Tramite i tasti Freccia in Su/Giù (,) far scorrere fino alla schermata “Vol. Mute Commando
Reset". Premere poi rilasciare il tasto OK. La schermata “Validare con OK” viene visualizzata.
f.
Premere poi rilasciare il tasto OK, il telecomando ripristina le impostazioni di default per la
gestione del volume.
g.
I messaggi “Attendere prego” poi "Operazione eseguita” vengono visualizzati sullo schermo, il
telecomando esce dalla modalità di programmazione e torna alla modalità di funzionamento
normale.
6.2 Impostazione Ora
Permette d'impostare l'ora visualizzata sullo schermo LCD.
a.
Premere il tasto S fino a quando venga visualizzata la schermata “Regolaz. codici” (dopo circa 3
secondi).
b.
Rilasciare il tasto S.
c.
Tramite i tasti Freccia in Su/Giù (,) far scorrere fino alla schermata “Regolaz. Opzioni".
Premere poi rilasciare il tasto OK. La schermata “Regolaz. Vol. Mute” viene visualizzata.
d.
Tramite i tasti Freccia in Su/Giù (,) far scorrere fino alla schermata “Regolaz. Ora ".
Premere poi rilasciare il tasto OK.
e.
La schermata “Regolaz. Ora” viene visualizzata secondo il formato dell'ora attuale (12 o 24 ore)
lampeggiante. Tramite i tasti Freccia in Su/Giù (,) scegliere il formato (12HR o 24HR) e
confermare con il tasto OK.
f.
I numeri delle ore iniziano a lampeggiare. Tramite i tasti Freccia in Su/Giù (,) regolare l'ora
e confermare con il tasto OK.
g.
I numeri dei minuti iniziano a lampeggiare. Tramite i tasti Freccia in Su/Giù (,) regolare i
minuti e confermare con il tasto OK.
h.
I messaggi “Attendere prego” poi "Operazione effettuata” appaiono sullo schermo e il
telecomando torna alla schermata "Impostazione dei codici".
6.3 Impostazione della data
Permette d'impostare l'anno, il mese, la data e il giorno della settimana visualizzati sullo schermo LCD del
telecomando.
- 53 -
a.
b.
c.
d.
e.
f.
g.
h.
i.
Premere il tasto S fino a quando venga visualizzata la schermata “Regolaz. codici” (dopo circa 3
secondi).
Rilasciare il tasto S.
Tramite i tasti Freccia in Su/Giù (,) far scorrere fino alla schermata “Regolaz. Opzioni".
Premere poi rilasciare il tasto OK. La schermata “Regolaz. Vol. Mute” viene visualizzata.
Tramite i tasti Freccia in Su/Giù (,) far scorrere fino alla schermata “Regolaz. Data".
Premere poi rilasciare il tasto OK.
La schermata "Con &OK scegliere Anno" viene visualizzata con gli ultimi 2 numeri dell'anno
lampeggianti. Tramite i tasti Freccia in Su/Giù (,) regolare l'anno e confermare con il tasto
OK.
La schermata "Con
&OK scegliere Mese" viene visualizzata con i numeri del mese
lampeggianti. Tramite i tasti Freccia in Su/Giù (,) regolare il mese e confermare con il tasto
OK.
La schermata "Con
&OK scegliere Data" viene visualizzata con i numeri della data
lampeggianti. Tramite i tasti Freccia in Su/Giù (,) regolare la data e confermare con il tasto
OK.
La schermata "Con &OK scegliere GG" viene visualizzata con il giorno lampeggiante. Tramite
i tasti Freccia in Su/Giù (,) regolare il giorno e confermare con il tasto OK.
I messaggi "Attendere prego” poi "Operazione effettuata” vengono visualizzati sullo schermo ed
il telecomando torna alla schermata "Iregolaz. codici".
6.4 Impostazione illuminazione
Permette d'impostare la durata d'illuminazione dello schermo dopo avere eseguito un'azione con un tasto.
a.
Premere il tasto S fino a quando venga visualizzata la schermata “Regolaz. codici” (dopo circa 3
secondi).
b.
Rilasciare il tasto S.
c.
Tramite i tasti Freccia in Su/Giù (,) far scorrere fino alla schermata “Regolaz. Opzioni".
Premere poi rilasciare il tasto OK. La schermata “Regolaz. Vol. Mute” viene visualizzata.
d.
Tramite i tasti Freccia in Su/Giù (,) far scorrere fino alla schermata “Regolaz. Illumin.".
Premere poi rilasciare il tasto OK.
e.
La schermata "Illuminazione Attiv.Tra Sec.?" viene visualizzata con la durata attualmente
memorizzata lampeggiante. Tramite i tasti Freccia in Su/Giù (,) impostare la durata, che
viene incrementata per passi di 5 s fino ad un massimo di 60 secondi. Il valore di default è di 10
s. Per non accendere mai lo schermo LCD, impostare la durata su 0 s. Confermare con il tasto
OK.
f.
I messaggi "Attendere prego” poi "Operazione eseguita” vengono visualizzati sullo schermo e il
telecomando torna alla schermata "Impostazione dei codici".
6.5 Definire la lingua
permette di scegliere la lingua di visualizzazione.
a.
Premere il tasto S fino a quando venga visualizzata la schermata “Regolaz. codici” (dopo circa 3
secondi).
b.
Rilasciare il tasto S.
c.
Tramite i tasti Freccia in Su/Giù (,) far scorrere fino alla schermata “Regolaz. Opzioni".
Premere poi rilasciare il tasto OK. La schermata “Regolaz. Vol. Mute” viene visualizzata.
d.
Tramite i tasti Freccia in Su/Giù (,) far scorrere fino alla schermata “Scegliere Lingua".
Premere poi rilasciare il tasto OK.
e.
La schermata "Lingua?" viene visualizzata con la lingua attualmente attiva lampeggiante.
Tramite i tasti Freccia in Su/Giù (,) scegliere la lingua desiderata. La lingua di default è
l'inglese. Confermare con il tasto OK.
f.
Il messaggio "Confermare Francese" (se la lingua Francese è stata selezionata) viene
visualizzato. Premere poi rilasciare il tasto OK.
g.
Il messaggio "Operazione eseguita" viene visualizzata sullo schermo ed il telecomando torna
alla schermata "Iregolaz. codici".
6.6 Cancellare Opzioni
Questa funzione permette di cancellare tutta la programmazione (codici, macro, ecc.) effettuata sul
telecomando e di ripristinare i valori di default.
a.
Premere il tasto S fino a quando venga visualizzata la schermata “Regolaz. codici” (dopo circa 3
secondi).
b.
Rilasciare il tasto S.
c.
Tramite i tasti Freccia in Su/Giù (,) far scorrere fino alla schermata “Regolaz. Opzioni".
Premere poi rilasciare il tasto OK. La schermata “Regolaz. Vol. Mute” viene visualizzata.
d.
Tramite i tasti Freccia in Su/Giù (,) far scorrere fino alla schermata “Cancella Opzioni ".
Premere poi rilasciare il tasto OK.
e.
Il messaggio "Cancella con OK" viene visualizzata. Confermare con il tasto OK.
f.
Il messaggio "Attendere prego” viene visualizzato mentre i parametri sono cancellati, poi il
telecomando esce dalla modalità di programmazione e torna alla modalità di funzionamento
normale.
7. Impostazione Timer
Premere sul tasto OK quando "Impostazione Timer" viene visualizzato sullo schermo per poter
accedere alla programmazione delle varie temporizzazioni (Timer) disponibili: messa in
standby programmata della TV fino a 4 temporizzazioni che vi permettono di inviare una
sequenza di 3 comandi a uno dei vostri apparecchi.
- 54 -
7.1 Impostazione Standby TV
Il telecomando può essere programmato per mettere in standby il televisore dopo una
determinata temporizzazione: allo scadere di questa, il telecomando invia il comando
infrarosso di messa in standby verso il televisore. Questa temporizzazione può essere
impostata da 1 a 90 minuti. Il simbolo "Zzz" viene visualizzato quando questa
temporizzazione è attiva.
Z
7.1.1 Programmazione della temporizzazione di messa in standby TV
a.
b.
c.
d.
e.
f.
g.
h.
i.
Selezionare la modalità TV.
Premere il tasto S fino a quando “Regolaz. codici” venga visualizzato sullo schermo (dopo circa
3 secondi).
Rilasciare il tasto S.
Tramite i tasti Freccia in Su/Giù (,) far scorrere fino a " Regolaz. Timer". Premere poi
rilasciare il tasto OK.
“Regolaz. Standby TV” viene visualizzato. Premere poi rilasciare il tasto OK.
“Standby TV Regolaz.” viene visualizzato. Premere poi rilasciare il tasto OK.
“Ora di Standby?” viene visualizzato con il numero dei minuti che lampeggiano. Utilizzare le
Frecce in Su/Giù (,) per impostare i minuti e confermare con il tasto OK.
“Operazione eseguita” viene visualizzato ed il telecomando torna alla schermata Regolaz.
codici”.
Premere poi rilasciare il tasto "Exit" 2 volte per tornare alla modalità normale. Verificare che il
simbolo Zzz appaia sullo schermo. Porre il telecomando davanti al televisore puntando la parte
anteriore in direzione di esso.
7.1.2 Cancellare lo standby programmato
a.
b.
c.
d.
e.
f.
Premere il tasto S fino a quando “Regolaz. codici” non venga visualizzato sullo schermo (dopo
circa 3 secondi). Rilasciare il tasto S.
Tramite i tasti Freccia in Su/Giù (,) far scorrere fino a "Regolaz. Timer". Premere poi
rilasciare il tasto OK.
“Regolaz. Standby TV” viene visualizzato. Premere poi rilasciare il tasto OK.
“Annullare Standby TV ” viene visualizzato. Premere poi rilasciare il tasto OK.
“Cancella con OK?” viene visualizzato. Premere poi rilasciare il tasto OK.
“Operazione eseguita” viene visualizzato ed il telecomando torna alla schermata “Regolaz.
codici”. Il simbolo Zzz sparisce.
7.2 Impostazione dei Timer
E' possibile programmare fino a 4 temporizzazioni (Timer 1, 2, 3 & 4). 4 tasti (comandi) possono venire
attribuiti ad ognuno di questi timer di modo che vengano attivati ad un'ora predefinita (ad esempio per far
passare il SATelitte sul canale 123 alle ore 22:35. Il primo tasto che viene memorizzato deve sempre
essere un tasto di modalità. I tasti seguenti non possono includere , , , , OK, Exit, Macro, S o un
tasto di modalità. I Timer possono venir impostati soltanto per essere attivati durante le
prossime 24 ore. I Timer programmati vengono automaticamente cancellati una volta
che sono stati azionati. Il simbolo
programmato.
viene visualizzato quando un Timer è
7.2.1 Impostazione Timer
Programmazione di un Timer (Nota: il timer deve essere cancellato se è già stato programmato in
precedenza – vedi paragrafo "Annullare Timer X" qui sotto)
a.
Premere il tasto S fino a quando venga visualizzato “Regolaz. codici” sullo schermo (dopo circa
3 secondi).
b.
Rilasciare il tasto S.
c.
Tramite i tasti Freccia in Su/Giù (,), far scorrere fino a " Regolaz. Timer". Premere poi
rilasciare il tasto OK. “Regolaz. Standby TV” viene visualizzato.
d.
Tramite i tasti Freccia in Su/Giù (,), far scorrere fino a "Timer X Regolaz." (dove X
corrisponde a uno dei 4 Timers 1, 2, 3 o 4). Premere poi rilasciare il tasto OK.
e.
" Regolaz. Timer X" viene visualizzato. Premere poi rilasciare il tasto OK.
f.
"Inserire Ora?" viene visualizzato con i numeri delle ore lampeggianti. Tramite i tasti Freccia in
Su/Giù (,) impostare le ore e confermare con il tasto OK.
g.
I numeri dei minuti iniziano a lampeggiare. Tramite i tasti Freccia in Su/Giù (,) impostare i
minuti e confermare con il tasto OK.
h.
"Scelta Perifer." viene visualizzato. Premere poi rilasciare il tasto di modalità desiderato (TV,
VCR, DVD, ecc.).
- 55 -
i.
j.
k.
l.
m.
La schermata “Scelta Tasto 1" viene visualizzata. Premere brevemente sul 1o tasto che
corrisponde al 1o comando da inviare. Se nessun altro tasto viene richiesto, confermare con OK
e passare direttamente al punto l.
La schermata “Scelta Tasto 2" viene visualizzata. Premere brevemente sul 2o tasto che
corrisponde al 2o comando da inviare. Se nessun altro tasto viene richiesto, confermare con OK
e passare direttamente al punto l.
La schermata “Scelta Tasto 3" viene visualizzata. Premere brevemente sul 3o tasto che
corrisponde al 3o comando da inviare.
"Operazione eseguita” viene visualizzato e il telecomando torna alla schermata “Regolaz.
codici”.
Premere poi rilasciare il tasto Exit 2 volte per tornare alla modalità normale. Verificare che il
simbolo
venga visualizzato sullo schermo. Porre il telecomando davanti all'apparecchio
puntando la parte anteriore in direzione di esso.
7.2.2 Annullare Timer
Permette di cancellare una temporizzazione già programmata.
a.
Premere il tasto S fino a quando “Regolaz. codici” non venga visualizzato sullo schermo (dopo
circa 3 secondi).
b.
Rilasciare il tasto S.
c.
Tramite i tasti Freccia in Su/Giù (,) far scorrere fino a "Regolaz. Timer". Premere poi
rilasciare il tasto OK. “Regolaz. Standby TV” viene visualizzato.
d.
Tramite i tasti Freccia in Su/Giù (,), far scorrere fino a "Timer X Regolaz." (dove X
corrisponde alla temporizzazione – 1, 2, 3 o 4 – che si desidera annullare). Premere poi
rilasciare il tasto OK.
e.
"Annullare Timer X " (dove X=1, 2, 3 o 4) viene visualizzato. Premere poi rilasciare il tasto OK.
f.
Il messaggio "Operazione eseguita" viene visualizzato ed il telecomando torna alla schermata
“Impostazione dei codici”.
8. Apprendimento
La libreria di codici del vostro telecomando universale vi permette di comandare la stragrande maggioranza
delle apparecchiature presenti sul mercato. Tuttavia se non riuscite a far funzionare il vostro apparecchio,
potete imparare il suo codice di funzionamento a partire dal telecomando originale. Allo stesso modo, se
alcune funzioni di comando non sono operative dopo aver provato tutti i codici disponibili, è possibile far
imparare queste funzioni al vostro telecomando. Il telecomando può memorizzare fino a 150 tasti (in
funzione del formato del codice infrarosso dei telecomandi da imparare). Un solo telecomando d'origine può
essere memorizzato in una modalità.
Suggerimenti riguardo l’apprendimento:n.
o.
p.
q.
r.
s.
t.
u.
v.
w.
x.
Per quanto è possibile, viene vivamente raccomandato l'uso di batterie nuove per ognuno dei
telecomandi.
Soltanto l’apprendimento completo di un telecomando originale può essere assegnato per una
modalità.
Recarsi alla schermata “Togliere tutte le modalità imparate” per cancellare tutti i comandi
imparati prima di eseguire un qualunque apprendimento.
Esercitarsi in un primo tempo soltanto con l’apprendimento di 2 o 3 tasti (per abituarsi e
verificarne la compatibilità) poi cancellare i codici imparati (“Cancellare tutte le modalità
imparate”) prima di procedere all’apprendimento completo del vostro telecomando originale.
Confermare "Cancellazione di una modalità imparata” in modo da essere sicuro che tutti i
comandi precedentemente imparati siano stati effettivamente eliminati prima di procedere ad
una nuova operazione di apprendimento.
Porre i telecomandi l'uno di fronte all'altro di modo che le LED infrarosse siano perfettamente
allineate. E' inoltre necessario di aggiustare l'altezza dei telecomandi per essere sicuro che
siano sullo stesso asse (verticale ed orizzontale).
Lasciare una distanza di circa 25 mm tra i 2 telecomandi.
Stare attento a non spostare i telecomandi durante le operazioni di apprendimento dei tasti.
Non effettuare l'apprendimento in presenza di un'illuminazione ad incandescenza o a basso
consumo energetico che potrebbe creare delle interferenze con le trasmissioni infrarosse. Stare
ad almeno un metro da ogni tipo di sorgente luminosa.
Evitare di procedere all’apprendimento dei tasti Volume/Mute del vostro telecomando originale
finché non si è sicuro che indirizzino bene lo stesso apparecchio target. Ad esempio, certi
telecomandi di lettori DVD utilizzano anche dei tasti di controllo Volume/Mute di una TV ed in
questo caso è possibile che ci siano 2 diversi tipi di codici associati.
Evitare di procedere all’apprendimento dei tasti di un apparecchio VCR del vostro telecomando
originale finché non si è sicuro che indirizzino bene l'apparecchio target. Ad esempio, esistono
certi telecomandi originali di tipo TV che includono anche dei tasti di controllo di un VCR ed in
questo caso è possibile che ci siano 2 diversi tipi di codici associati.
- 56 -
y.
z.
L’apprendimento di un tasto può richiedere fino a 3 secondi. Non rilasciare il tasto da imparare
prima che il messaggio “Operazione effettuata” o “Errore” non venga visualizzato.
Se durante l'apprendimento del primo o del secondo tasto riscontrate soltanto dei messaggi di
errore, provate allora quanto segue :
i.
Terminare l’apprendimento premendo sul tasto Exit.
ii.
Cancellare i comandi imparati per questa modalità.
iii.
Verificare che i LED infrarossi dei 2 telecomandi siano correttamente allineati.
iv.
Aggiustare la distanza tra i 2 telecomandi avvicinandoli da 15 mm oppure
allontanandoli da 50 mm.
v.
Provare di nuovo l’apprendimento del vostro telecomando originale.
Se il problema si ripete ancora sullo stesso tasto, verificare se il tasto del telecomando originale
emette correttamente. Verificare se si ha o meno un effetto sull'apparecchio target? Se
l'apprendimento si svolge correttamente in questa nuova modalità, questo significa che il codice
utilizzato è diverso dagli altri e che non può essere imparato con la stessa modalità.
Note relative all’apprendimento:
a.
Non è possibile imparare i tasti Setup e Macro.
b.
Tutti i comandi imparati per una modalità sono cancellati se lo stesso codice o un nuovo codice
a 4 cifre viene digitato per questa modalità (qualunque sia la modalità di programmazione del
codice).
c.
La retroilluminazione non è attiva durante l’apprendimento.
8.1 L’apprendimento dei comandi
15-50mm
a.
b.
c.
d.
e.
f.
g.
h.
Premere il tasto S fino a quando “Regolaz. codici” non venga visualizzato sullo schermo (dopo
circa 3 secondi).
Rilasciare il tasto S.
Tramite i tasti Freccia in Su/Giù (,) far scorrere fino a “Apprendimento”. Premere poi
rilasciare il tasto OK.
La schermata “Imparare Modalita” viene visualizzata. Premere poi rilasciare il tasto OK.
La schermata “Modalità da imparare?” viene visualizzata. Premere poi rilasciare il tasto della
modalità desiderata (TV, VCR, DVD, ecc.).
Il messaggio “Tasto Immagazz.” viene visualizzato. Premere poi rilasciare il tasto del
telecomando LCD che sarà imparato a partire dal telecomando originale. Il messaggio
“Attendere prego” viene visualizzato. Premere poi rilasciare il tasto del telecomando originale
fino a quando non venga visualizzato il messaggio “Operazione eseguita” o “Errore” sullo
schermo (vedi Suggerimenti per l’apprendimento) seguito dal messaggio “OK Ancora o Esci"
(questa operazione può richiedere fino a 2-3 secondi). Rilasciare il tasto del telecomando
originale.
“OK Ancora o Esci” viene visualizzato sullo schermo. Premere il tasto OK se avete altri tasti da
imparare e tornate alla procedura a partire dal punto "f". Premere il tasto Exit se avete concluso
la fase di apprendimento.
Il messaggio “Attendere prego” viene visualizzato brevemente, il telecomando esce dalla
modalità di programmazione e torna alla modalità di funzionamento normale.
8.2 Cancellare tutti i comandi imparati in una modalità
a.
b.
c.
d.
e.
f.
g.
Premere il tasto S fino a quando “Regolaz. codici” non venga visualizzato sullo schermo (dopo
circa 3 secondi).
Rilasciare il tasto S.
Tramite i tasti Freccia in Su/Giù (,) far scorrere fino a “Apprendimento”. Premere poi
rilasciare il tasto OK. La schermata “Imparare Modalità” viene visualizzata.
Tramite i tasti Freccia in Su/Giù (,) far scorrere fino a “Elim.Mod. imparata”. Premere poi
rilasciare il tasto OK.
“Scegli Tasto di modal” viene visualizzato. Premere poi rilasciare il tasto della modalità
desiderata (TV, VCR, DVD, ecc.).
“Cancella con OK” viene visualizzato sullo schermo. Premere poi rilasciare il tasto OK.
“Attendere Prego” appare brevemente seguito dal messaggio “Operazione eseguita” dopodichè
il telecomando esce dal menù di impostazione e torna alla modalità di funzionamento normale.
8.3 Cancellare tutti i comandi imparati: (operazione da effettuare preferibilmente prima del
primo apprendimento)
a.
b.
c.
d.
e.
Premere il tasto S fino a quando “Regolaz. codici” non venga visualizzato sullo schermo (dopo
circa 3 secondi).
Rilasciare il tasto S.
Tramite i tasti Freccia in Su/Giù (,) far scorrere fino a “Apprendimento”. Premere poi
rilasciare il tasto OK. La schermata “Imparare Modalità” viene visualizzata.
Far scorrere fino alla schermata “El.Tutte Mod. imparate”. Premere poi rilasciare il tasto OK.
“Cancella con OK” viene visualizzato sullo schermo. Premere poi rilasciare il tasto OK.
- 57 -
f.
“Attendere prego” appare brevemente poi il telecomando esce dal menù di impostazione e torna
nella modalità di funzionamento normale.
9. Macro
Premere il tasto MACRO seguito da una sequenza dei tasti 1, 2 e 3 per programmare e memorizzare fino a
3 sequenze di comandi (pressioni di tasti) a scelta. Premere il tasto MACRO seguito dal tasto numerico 1, 2
o 3 per eseguire la trasmissione della sequenza di comando corrispondente. Le sequenze di comando che
vengono eseguite più frequentemente possono essere richiamate premendo 2 tasti (MACRO seguito da 1,
2 o 3). Ad esempio, premere su MACRO poi sul tasto 1, 2 o 3 per accendere la TV, accendere il decoder
satellitare, selezionare il canale preferito, accendere il videoregistratore ed attivare la registrazione, ecc. Un
totale di dieci tasti (comandi infrarossi) può essere memorizzato per ognuna delle 3 Macro disponibili.
9.1 Programmazione di una macro
a.
b.
c.
d.
e.
f.
g.
h.
i.
Premere il tasto S fino a quando “Regolaz. codici” non venga visualizzato sullo schermo (dopo
circa 3 secondi).
Rilasciare il tasto S.
Tramite i tasti Su/Giù (,) far scorrere fino alla schermata “Definire le macro”. Premere poi
rilasciare il tasto OK.
La schermata “Scrivere una macro” viene visualizzata. Premere poi rilasciare il tasto OK.
"Allocare N° macro" viene visualizzato sul display. Premere poi rilasciare il tasto numerico 1, 2 o
3 sulla quale si desidera memorizzare la macro.
"Allocare Mod. alla Macro" viene visualizzato sul display. Premere poi rilasciare il tasto Mode
desiderato (TV, DVD, SAT…) per selezionare l'apparecchio sul quale il comando va eseguito. Il
primo tasto di una sequenza deve sempre essere un tasto di modalità.
"Validare comando X" (X = N° della Macro in corso di programmazione 1, 2 o 3) viene
visualizzato sul display con il N° del comando in corso di programmazione. Premere poi
rilasciare in sequenza i tasti che si desidera inserire nella sequenza della Macro nell'ordine
secondo il quale si desidera che siano trasmessi (fino ad un massimo di 10)
Per memorizzare la Macro, premere poi rilasciare il tasto Macro. La Macro può inoltre essere
automaticamente memorizzata premendo dieci volte su un tasto.
"Operaz. Eseguita” appare brevemente sur display ed il telecomando esce dal menù
d'impostazione e torna in modalità di funzionamento normale.
9.2 Cancellazione di una macro
a.
Premere il tasto S fino a quando “Regolaz. codici” non venga visualizzato sullo schermo (dopo
circa 3 secondi).
b.
Rilasciare il tasto S.
c.
Tramite i tasti Su/Giù (,) far scorrere fino alla schermata “Definire le macro”. Premere poi
rilasciare il tasto OK.
d.
Tramite i tasti Su/Giù (,) far scorrere fino alla schermata “Cancella una Macro”. Premere poi
rilasciare il tasto OK
e.
"N° macro da Togliere " viene visualizzato sul display. Premere poi rilasciare il tasto 1, 2 o 3
corrispondente al N° della macro da cancellare.
f.
"Cancella con OK" viene visualizzato sul display. Premere poi rilasciare il tasto OK.
g.
"Operaz. eseguita" viene visualizzato brevemente sullo schermo ed il telecomando esce dal
menù di impostazione.
In modalità di funzionamento normale, per attivare una macro, premere poi
rilasciare il tasto Macro e premere poi entro 20 secondi il tasto 1, 2 o 3.
“Macro X” viene visualizzato sullo schermo durante l'esecuzione della
sequenza della Macro; il telecomando torna poi in modalità di funzionamento
normale.
Se nessuna Macro è stata memorizzata con il tasto numerico che è stato
selezionato, il messaggio "Macro X errata" (X = 1, 2 o 3) viene visualizzato
brevemente sul display ed il telecomando torna in modalità di funzionamento
normale.
9.3 Note sulle macro
1. I comandi infrarossi che fanno parte di una macro sono inviati ogni 0,5
secondi. Una temporizzazione superiore a 0,5 secondi tra 2 comandi può
a volte essere necessaria (ad esempio per permettere il preriscaldamento
di un televisore). E' possibile aggiungere una temporizzazione nel modo
seguente: premere il tasto PAUSA seguito dal numero di secondi compreso tra 1 e 9. Non è possibile
inserire una temporizzazione di 0 secondi.
2. Per cambiare apparecchio durante la sequenza di comandi, premere il tasto Mode del nuovo
apparecchio da controllare.
3. Il primo tasto della sequenza di una macro deve sempre essere un tasto di modalità (TV, VCR, ecc.).
4. I tasti Setup e Macro non possono essere inseriti in una Macro.
- 58 -
5. Premere il tasto Setup per uscire dalla programmazione di una Macro.
10. Guasti e anomalie di funzionamento
Il telecomando non funziona o tende a perdere i codici inseriti:
·
Verificare con il telecomando originale che l'apparecchio funzioni correttamente.
·
Verificare di avere prima premuto il tasto corrispondente alla modalità (televisore TV,
videoregistratore VCR, satellite SAT, ecc.) dell'apparecchio che desiderate comandare.
·
Se il codice della liste che avete inserito non funziona, provare il codice seguente oppure
utilizzare la ricerca automatica.
·
Controllare la polarità delle batterie (segni +/-) e verificare se sono state inserite correttamente
nello scomparto (controllare se le batterie sono bene in contatto con le molle dello scomparto).
·
Per effettuare la programmazione del telecomando inserire 2 batterie LR03 alcaline nuove.
Se la visualizzazione sullo schermo LCD è molto debole o inesistente, di solito dopo vari mesi di
utilizzo, questo significa che le batterie devono essere sostituite.
- 59 -
Universele afstandsbediening 8/6/4 in 1
1. Veiligheidsinstructies
1.1 Algemene opmerkingen
Alle ingegrepen of modificaties van deze afstandsbediening zijn verboden op grond van conformiteitseisen
veiligheidsoverwegingen. Wilt deze handleiding zorgvuldig doorlezen en dit apparaat met zorg afstellen.
Laat deze afstandsbediening alleen over aan kinderen onder toezicht van volwassenen.
Stel deze afstandsbediening niet bloot aan :
onnodige gewicht (geen boeken opleggen),
extreme temperaturen,
aan schokken en trillingen,
hoge vochtigheid.
Wilt u de extra opmerkingen in de verschillende hoofdstukken van deze handleiding in acht nemen. Voor
alle vragen die niet in deze handleiding worden behandeld, kunt u zicht tot onze technische hotline of
vakspecialist te wenden.
Wilt u deze handleiding en veiligheidsvoorschriften met zorg door nemen.
Gelieve deze handleiding op een veilige plaats weg te leggen voor eventueel later gebruik .
1.2 Verwisselen van batterijen
U mag alleen maar 2 AAA Alkaline batterijen voor dit apparaat gebruiken-- alle andere voedingsbronnen
zijn verboden. Gelieve bij het inleggen van de batterijen op de polariteit te letten. De batterijen dienen
verwijderd te worden als dit apparaat langere tijd niet gebruikt zou worden. Wilt u er op letten dat u de
batterijen niet kortsluit en op veilige afstand van vuur en andere hittebronnen houdt (explosiegevaar).
Batterijen zijn geen speelgoed voor kinderen. Laat deze dus niet slingeren : kinderen en/of kunnen deze
inslikken ! Bij inslikken dient u onmiddellijk een dokter te waarschuwen !.
Batterijen die lekken of anderszins beschadigd zijn, kunnen brand- en/of chemische wonden veroorzaken.
Wilt u dus aangepaste handschoenen dragen indien nodig.
1.3 Gebruikte batterijen weggooien
De milieunormen verbieden batterijen met het huisvuil weg te gooien. U dient gebruikte batterijen in de
daarvoor bestemde containers de deponeren.
2. Beschrijving van de afstandsbediening
De universele afstandsbediening heeft 4, 6 of 8 functietoetsen (afhankelijk van het model wat u gekocht
heeft). U kunt hiermee maximaal 4, 6, of 8 verschillende apparaten bedienen (4in1, 6in1 of 8in1).
De afstandsbediening heeft in zijn vaste geheugen de voorgeprogrammeerde infrarood-codes voor vrijwel
alle audiovisuele apparatuur welke op dit moment op de markt beschikbaar is.
De labels op de toetsen 'mode' zoals TV, VCR, DVD, SAT, AMP, AUX geven een hint van wat u met deze
afstandsbediening zou kunnen doen. In principe kunt u willekeurig welk audio/video apparaat besturen met
een van deze toetsen 'mode' (met uitzondering van de toets TV die alleen maar de TV kan besturen).
2.1 Batterijen voor de eerste keer inleggen
2 nieuwe alkaline LRO3 AAA batterijen worden meegeleverd.
Batterijklepje op de achterkant van de afstandsbediening wegnemen.
2 nieuwe batterijen van hetzelfde merk inleggen. Wilt u op de juiste polariteit letten ! (let op de
symbolen + en –in het batterijencompartiment).
Klepje terugplaatsen.
Taal kiezen
Wanneer u een programma uitvoert, helpt de display u bij het
kiezen van de juiste toetsen.
Door een keer op eenzelfde toets te klikken, verschijnt op de
display de tekst “LANGUAGE?” met de taal van de voorinstelling.
Met de toetsen Boven/Beneden (,) kunt u een taal naar keuze kiezen. De taal van de
voorinstelling is Engels. Bevestigen door op de toets OK te klikken en los te laten.
De display met de tekst "BEVESTIG NEDERLAND" verschijnt (wanneer u Nederlands zou
hebben gekozen). Een keer op de toets OK klikken om deze keus te bevestigen.
De display met de tekst “KLAAR” verschijnt. De afstandsbediening blijft in de programmeermode
en gaat terug naar de display “CODES INSTELLEN”.
2.2 Vast geheugen en wisselen van de batterijen
Wanneer de batterijen worden verwisseld, blijven alle parameters zoals de gebruiker die heeft ingesteld
bewaard in het vaste geheugen. De enige paramaters die gewist worden zijn Tijd, Dag, Datum en MACROS
welke teruggezet worden naar de fabrieks-voorinstelling.
3. Beschrijving van de toetsen van de afstandsbediening
[1]
[2]
[3]
[4]
[5]
Power : Uitschakelen of in stand-by zetten van het laatst ingestelde apparaat
Teletext maintain : bevriest de teletekstpagina die op het Tv-scherm staat
TV, VCR, DVD, SAT… : Keuze van het apparaat wat u wenst te besturen. Het aantal
functietoetsen is afhankelijk van het model van uw afstandsbediening (4in1, 6in1 of 8in1).
Teletext ON : De teletekst verschijnt op het Tv-scherm.
Teletext MIX : Tv-scherm geeft zowel teletekst als beeld weer.
- 60 -
[6]
[7]
[8]
[9]
[10]
[11]
INFO : Geeft informatie over het geselecteerde apparaat
Teletext OFF : Teletekst wordt uitgeschakeld.
Menu : Tv-scherm geeft menu weer.
EXIT : Tv-scherm geeft geen menu weer.
MUTE : Schakelt geluid van het geselecteerde apparaat aan/uit.
PROG +/- : In mode TV, VCR of SAT : Keuze van volgende of vorig kanaal. In DVD-mode : keuze
van volgende of vorige hoofdstuk.
[12]
VOL +/- : Instelling van het volume.
[13]
Boven, Beneden, Links en Rechts : Navigatietoetsen om zich binnen het menu van het
geselecteerde apparaat te verplaatsen.
[14]
OK : Dient om de selectie binnen een menu te bevestigen.
[15]
Guide : Opent de elektronische gids van een programma.
[16]
S : Dient om de afstandsbediening te programmeren voordat deze de eerste keer wordt gebruikt.
Deze toets geeft ook toegang tot de secundaire functies van sommige apparaten (Shift). Een keer
klikken op de toets S et de toets 'mode' die u wenst te activeren.
[17]
Kleurtoetsen : Dient om de teletekst (FastText) of speciale functietoetsen op sommige apparaten
te besturen
[18]
MACRO : De macrotoets kan in combinatie met de numerieke toetsen 1, 2, en 3 worden gebruikt
om 3 verschillende series toetsaanslagen in het geheugen op te slaan.
[19]
Numeriek toetsenbord 0 - 9 : Heeft precies dezelfde werking als de toetsen op de oorspronkelijke
afstandsbediening.
[20]
A/V : Selectie van een externe signaalbron (Peritel-plug, om op uw TV-scherm een DVD-film,
satelliet, handycam, enz. … te bekijken).
[21]
--/- : Wanneer u een code zoekt in programmeermode, kunt u met deze toets de code bevestigen
van het apparaat wat u wenst te besturen. Op sommige apparaten kunt u hiermee direct kanalen
groter dan 9 kiezen.
[22]
Play , FF , Stop, Rew , Pause : Deze toetsen hebben dezelfde functies als op de oorspronkelijke
afstandsbediening.
REC (record ) : Deze toets heeft dezelfde functie als op de oorspronkelijke VCR- of DVDafstandsbediening. Om vergissingen te voorkomen, moet u 2 keer op deze toets klikken om de
opnamefunctie te activeren.
4. LCD-Display
4.1Algemeen overzicht
De LCD-display is het visuele interface tussen gebruiker en afstandsbesturing. De
LCD-display bestaat uit 23 letters verdeeld over 2 regels met 9 en een lijn met 5 letters.
De display bestaat verder uit een klok en symbolen zoals hieronder beschreven.
4.2 Presentatie van de display in de normale werkstand
Presentatie in de normale werkstand : De display is actief vanaf het moment dat de
batterijen zijn ingelegd. De display geeft aan in welke mode de afstandsbediening op
dat moment werkt (bijv. in dit geval de DVD-mode), de dag van de week (bijv.
Maandag), en de tijd (bijv. 23 : 58, geformatteerd op 24 uur).
Presentatie na klikken op de toets mode : Door kort op een toets mode te klikken,
geeft de display aan welke mode actief is, zoal bijv. DVD en de bijbehorende viercijferige code die bij deze mode hoort zoals bijv. : 0768. Bij loslaten van de toets mode,
keert de display weer terug naar de basispresentie.
Presentatie na klikken op de toets S (shift) : Door kort op de toets S te klikken, geeft
de display aan welke mode actief is zoals bijv. in dit geval : DVD, evenals de datum
zoals bijv. : 9.10 (Dag.Maand) en geeft aan of de mode 'Shift' geactiveerd is door het
laten zien van het symbool “(S)”. Door kort op de toets EXIT te klikken, keert u terug
naar de standaardpresentatie. In de mode 'Shift' heeft u toegang tot de secondaire
functies. Om een secundaire functie te gebruiken, klikt u eerst kort op de toets “(S)”, en
vervolgens op de toets met de door u gewenste functie.
Aangeven of een toets is ingedrukt : Als een toets is ingedrukt, dan verschijnt er op
de display ofwel het symbool "transmissie", ofwel de display zelf verandert.
4.3 Navigeren in de verschillende menu's
Om naar het menu "CODES INSTELLEN" te gaan, moet u de toets S (Setup) ingedrukt houden totdat het
venster "CODES INSTELLEN" met het symbool 'SET' verschijnt.
Wanneer op de display "CODES INSTELLEN" verschijnt, kunt u door op de toets S (Setup) te klikken,
verder zappen naar de volgende menu's :
"CODES INSTELLEN" Æ "OPTIES INSTELLEN" Æ "STANDBY INSTELLEN" Æ " FUNCTIES AANLEREN"
Æ "MACROS INSTELLEN" Æ "AFSLUITEN"
Door op de toets OK te klikken, kunt u een submenu selecteren.
De sequenties voor de instellingen worden gebruikt voor het aanleren, het opzoeken van een code, enz. …
Om de instellingen af te breken kunt u gewoon op de toets EXIT klikken of zappen totdat op de display de
tekst "KLAAR" verschijnt en vervolgens op de toets OK klikken.
"CODES INSTELLEN" : dient om een code te kiezen voor de diverse
apparaten.
"OPTIES INSTELLEN" : dient om de tijd, datum en volume in te stellen.
- 61 -
"TIMER INSTELLEN" : dient om de voor de TV en de verschillende timers de
standbytijd in te stellen.
"FUNCTIES AANLEREN" : dient om bepaalde functies van de oorspronkelijke
afstandsbediening door de nieuwe afstandsbediening over te laten nemen.
"MACROS INSTELLEN" : dient om een serie toetsaanslagen door een
kortkoppeling te laten uitvoeren.
"AFSLUITEN" : dient om de programmeermode te verlaten door op de toets
OK te klikken.
De programmeermode breekt zichzelf af als het toetsenbord 15 sec. inactief
blijft. Op de display verschijnt dan de foutmelding "OVERSCHRIJDEN TIJD"
Op de display verschijnt de tekst "EVEN GEDULD AUB" telkens wanneer de
afstandsbediening een opdracht uitvoert die veel tijd vergt.
5. Programmeren van de afstandsbediening : Instellen van de codes
Instellen van codes : Zodra op de display de tekst "CODES INSTELLEN" verschijnt, moet u om verder te
gaan, op de toets OK klikken ter bevestiging. U kunt de codes op vier verschillende manieren instellen :
5.1 Methode A - Programmeren door de codes een voor een te laten defileren
a.
b.
Zet het apparaat aan wat u wilt besturen (bijv. : Zet uw TV aan)
De toets S ingedrukt houden totdat op de display de tekst "CODES INSTELLEN" verschijnt (dit
duurt ongeveer 3 sec.)
c.
De toets S loslaten.
d.
Op de toets OK klikken. Op de display verschijnt “LYST ALLE CODES”.
e.
Op de toets OK klikken. Op de display verschijnt “KOPPELEN AAN TOETS MODE”
f.
Op een van de functietoetsen klikken (TV, VCR, DVD, enz.). Op de display verschijnt "
APPARAAT KIESEN? TV".
g.
Met de toetsen Boven/Beneden (,), het apparaat kiezen wat u wilt programmeren : TV,
VCR, DVD,... Zie ook hierna " apparaat KIezen?".
h.
Bevestig uw keuze door op de toets OK te klikken.
i.
De display geeft de eerste code van het eerste merk (bijv. : Admiral 0000). Gebruik de toetsen
Boven/Beneden (,) om naar het apparaat van uw keuze te zappen of, --dit gaat meestal
veel sneller-- gebruik het numerieke toetsenbord 2 tot 9 van de afstandsbediening (precies zoals
op uw mobieltje : 2=abc,3=def, enz.). Bijv., om naar het merk Philips te zappen, toetst u 3 maal
op de '7' (7=pqrs) en gebruik de toetsen Boven/Beneden (,) om dit merk te vinden.
j.
Test de eerste code uit met de toetsen VOL +/-, MUTE, PROG +/-, Power, AV, Teletext, Play,
Stop, FF, Rewind en Pause. Als de eerste code niet werkt, probeert u dan de tweede code uit
m.b.v. de toetsen links/rechts, enz. … Wanneer u de juiste de code gevonden heeft, deze in het
geheugen opslaan met de toets OK.
k.
De display verschijnt de tekst “AUB WARTEN” en vervolgens "KLAAR”. De afstandsbediening
verlaat automatisch de programmeermode en keert terug naar de gewone werkstand.
l.
Probeer uw afstandsbediening uit. Ga op dezelfde manier te werk voor alle andere apparatuur.
N.B. “APPARAAT KIESEN” : U heeft voor iedere toets mode (behalve de TV) de volgende
keuzemogelijkheden : TV, VCR, LD, DVD, DVR, HDD, SAT, CABLE, DVBT, STB, AUDIO, AMP,
RECR, HTIB, MP3, CD, TAPE, TUNER en PHONO. Wilt u erop letten dat de toets mode TV alleen
maar de TV bedient.
5.2 Methode B - Code invoeren
U kunt de code direct invoeren met behulp van de lijst met codes.
a.
Zet het apparaat aan wat u wilt besturen (bijv. : Zet uw TV aan)
- 62 -
b.
c.
d.
e.
f.
g.
De toets S ingedrukt houden totdat op de display de tekst "CODES INSTELLEN" verschijnt (dit
duurt ongeveer 3 sec.)
De toets S loslaten.
Op de toets OK klikken. Op de display verschijnt "LYST ALLE CODES”.
Met behulp van de toetsen Boven/Beneden (,) navigeren totdat op de display de tekst
“INVOEREN CODE " verschijnt. Op de toets OK klikken. Op de display verschijnt
"TOEKENNEN AAN TOETS MODE” met de functie en de daarbijbehorende code van dit
moment.
Met het numerieke toetsenbord 0-9 en de lijst met codes, de eerste vier-cijferige code die bij uw
merk hoort inlezen. Na het invoeren van het vierde cijfer, verschijnt op de display de tekst
"KLAAR", De afstandsbediening verlaat automatisch de programmeermode en keert terug naar
de gewone werkstand.
Probeer de afstandsbediening uit. Als bepaalde functies niet reageren, betekent dit dat de code
die u had ingevoerd niet juist was. Herhaal in dat geval de bovenstaande procedure met de
eerstvolgende code die bij uw merk past.
5.3 Methode C - Opzoeken van de code
Wij raden u aan om de onderstaande zoekmethode te proberen als de codes in de lijst uw audiovisuele
apparatuur (TV, VCR, SAT enz.) niet kunnen besturen.
a.
Zet het apparaat aan wat u wilt besturen (bijv. : Zet uw TV aan)
b.
De toets S ingedrukt houden totdat op de display de tekst "CODES INSTELLEN" verschijnt (dit
duurt ongeveer 3 sec.).
c.
De toets S loslaten.
d.
Op de toets OK klikken. Op de display verschijnt de tekst "LYST ALLE CODES”.
e.
Met behulp van de toetsen Boven/Beneden (,) zappen totdat op de display de tekst
“OPZOEKEN CODE " verschijnt. Op de toets OK klikken. Op de display verschijnt de tekst
"TOEKENNEN AAN TOETS MODE”.
f.
Druk even kort op een toets 'mode' naar keuze (TV, VCR, DVD, enz.). Op de display verschijnt "
APPARAAT KIESEN? TV”.
g.
Met de toetsen Boven/Beneden (,), een apparaat kiezen wat u wenst te besturen : TV,
VCR, DVD,... Zie bovenstaand "Apparaat Kiezen?". Bevestig deze keuze door een keer op
de toets OK te klikken.
h.
Op de display verschijnt de tekst “OPZOEKEN STARTEN MET
". Druk verscheidene keren
op de toets
(Power) of PROG+ (of alleen maar op Play en VCR of DVD) totdat het apparaat
wat u wenst te besturen 'vanzelf' uitgaat of van kanaal verandert (of een opname afspeelt
naargelang de door u gemaakte keuze). Druk vervolgens op OK om deze code op te slaan.
Wanneer u de code die u zoekt voorbij zou zijn, dan kunt u terug met de toets PROG-. Klik op
toets PROG+ (of Power of Play) om weer opnieuw voorwaarts verder te zoeken. De display
geeft tijdens het zoeken de tekst "ZOEKEN NAAR" alsmede de functie waar naar gezocht
wordt.
i.
Op de display verschijnt de tekst "KLAAR". De afstandsbediening verlaat de programmeermode
en keert terug naar de gewone werkstand.
j.
Probeer de afstandsbediening uit. Als bepaalde functies niet reageren, betekent dit dat de code
die u had ingevoerd niet juist was. Herhaal in dat geval de bovenstaande procedure met de
eerstvolgende code die bij uw merk past.
k.
Ga op dezelfde manier te werk voor alle andere apparaten.
Opmerkingen :
1.
U kunt de toets
('Power') of de toets 'Play' indien uw apparaat niet over de functie 'PROG+'
beschikt.
2.
De codes worden opgezocht uitgaande van de laats geregistreerde code. Als deze 030 zou zijn,
dan word de code eerst gezocht vanaf 031 tot 999, en vervolgens vanaf 000 tot 029.
3.
wanneer alle codes uitgetest zijn, verschijnt op de display
"ZOEKEN KLAAR". De afstandsbediening verlaat automatisch de
programmeermode en keert terug naar de gewone werkstand.
5.4 Methode D - Code per merk
De brochure met de verschillende codes geeft in het begin een lijst met merken. Als het merk van uw
apparaat in deze lijst staat, dan is het mogelijk om direct per merk te zoeken (dit gaat aanmerkelijk sneller
dan het zoeken per code) : .
a.
Zet het apparaat aan wat u wilt besturen (bijv. : Zet uw TV aan)
b.
De toets S ingedrukt houden totdat op de display de tekst "CODES INSTELLEN" verschijnt (dit
duurt ongeveer 3 sec.).
c.
De toets S loslaten.
d.
Op de toets OK klikken. Op de display verschijnt de tekst "LYST ALLE CODES”.
e.
Met behulp van de toetsen Boven/Beneden (,) zappen totdat op de display de tekst “CODE
PER MERK" verschijnt. Op de toets OK klikken. Op de display verschijnt de tekst
"TOEKENNEN AAN TOETS MODE”.
f.
Op een toets 'mode' naar keuze klikken (TV, VCR, DVD, enz.). Op de display verschijnt de tekst
" APPARAAT KIESEN? TV" ('TV' of anders, al naargelang uw keuze).
g.
Kies met behulp van de toetsen Boven/Beneden (,), het apparaat wat u wenst te besturen :
TV, VCR, DVD,... Zie hierboven " Apparaat Kiezen?". Op de toets OK klikken om uw keus te
bevestigen.
h.
Op de display verschijnt "TOETS 1-8 KOPPELEN". Op het cijfer van 1 tot 8 klikken wat met het
merk van uw apparaat overeenkomt (zie de lijst met merknamen in de brochure met de codes).
i.
Op de display verschijnt “OPZOEKEN STARTEN MET ". Bij herhaling op toets (Power) of
PROG+ (of alleen maar op Play en VCR of DVD) drukken totdat het apparaat wat u wenst te
- 63 -
j.
k.
l.
besturen uitgaat of van kanaal wisselt (of een opname afspeelt naargelang de door u gemaakte
keuze). Druk vervolgens op OK om de code te memoriseren. Wanneer u de code voorbij zou
zijn geschoten, dan kunt u terug met de toets PROG-. Druk op toets PROG+ (of Power of Play)
om weer opnieuw voorwaarts te zoeken. De display geeft tijdens het zoeken zowel de
mededeling "ZOEKEN NAAR" als de functie waar naar gezocht wordt.
Op de display verschijnt de tekst "APPARAAT INSTELLEN KLAAR", De afstandsbediening
verlaat automatisch de programmeermode en keert terug naar de gewone werkstand.
Probeer de afstandsbediening uit. Als bepaalde functies niet reageren, dan betekent dit dat de
code die u had ingevoerd niet juist was. Herhaal in dat geval de bovenstaande procedure met
de volgende code die bij uw merk past.
Ga op dezelfde manier te werk voor alle andere apparatuur.
5.5 Identificeren van de gememoriseerde code
Klik op de functietoets waarvan u de opgeslagen code wilt kennen. De code verschijnt op de display.
Bijv.:"DVD Code 0768”.
5.6 Programmeren van combo's
Voor sommige combo's (2in1-apparatuur die TV/VCR , TV/DVD, DVD/VCR enz. combineren), zult u twee
verschillende functietoetsen moeten gebruiken om de twee apparaten die in de combo verenigd zijn te
kunnen bedienen. Bijv.: als u een TV-DVD-combo zou hebben, dan is het mogelijk dat u een bepaalde code
voor de TV moet programmeren met de toets TV en een ándere code, met een ándere toets 'mode' voor de
DVD-speler.
5.7 Besturen van combo's
De afstandsbediening van sommige combo's (bijv. : TV/VCR, TV/DVD, DVD/VCR, enz.) hebben
afzonderlijke toetsen om slechts een gedeelte van de combo te besturen. Bijvoorbeeld, de
afstandsbediening van een DVD-VCR-combo kan twee verschillende toetsen hebben waarmee om het
DVD en VCR-gedeelte te kunnen besturen. Met de toetsen Mode en S kunt u ook hetzelfde resultaat
bereiken.
We nemen als voorbeeld een DVD-VCR- combo welke in eerste instantie is geprogrammeerd in de de
DVD- mode :
Houdt de DVD- toets minstens een seconde lang ingedrukt om de DVDafstandsbediening te activeren
Klik eerst op de toets S en vervolgens op de toets DVD om de VCR afstandsbediening te
activeren.
Deze methode is geldig voor alle combo-types (TV/VCR, TV/DVD, DVD/VCR, enz.) en voor alle modes
hoewel deze functie niet door alle codes ondersteund wordt.
6. Opties Instellen
De opties die kunnen worden ingesteld, zijn : tijd, datum, taal, duur van de retro-verlichting, volume en
reset van de afstandsbediening. Om een van deze instellingen te veranderen moet u zappen totdat op de
display de tekst "OPTIES INSTELLEN" verschijnt. Vervolgens op OK klikken.
6.1 Instellen Volume/ Mute
De afstandsbediening geeft u de mogelijkheid om de toetsen VOL +/- en MUTE aan een apparaat te
koppelen. De fabrieks-voorinstelling is zodanig geprogrammeerd dat de toetsen VOL+/- en MUTE het
apparaat besturen waarop de afstandsbediening op dat moment op staat afgesteld. Als het apparaat in
kwestie geen eigen volumeregeling zou hebben, dan regelen deze twee toetsen automatisch het
geluidsvolume van de TV.
6.1.1 Instelling koppelen aan een enkele mode
- 64 -
Met deze functie zijn de toetsen VOL+/- et MUTE aan een 'mode' gekoppeld : De toetsen VOL en MUTE
besturen altijd hetzelfde apparaat zelfs indien de afstandsbediening op een ander apparaat ingesteld zou
staan. Wilt u er op letten, voordat u deze functie gaat gebruiken, dat de door u geselecteerde mode wel
degelijk een eigen geluidscontrole heeft (hetzij direct, hetzij een toets aan deze functie te koppelen). Het
heeft uiteraard geen zin om de toetsen VOL+/- en MUTE aan een apparaat zonder geluidscontrole te
koppelen!
a.
b.
c.
d.
e.
f.
g.
De toets S ingedrukt houden totdat op de display de tekst "CODES INSTELLEN" verschijnt (dit
duurt ongeveer 3 sec.)
De toets S loslaten.
Met behulp van de toetsen Boven/Beneden (,) zappen totdat op de display de tekst
“OPTIES INSTELLEN" verschijnt. Op de toets OK klikken. Op de display verschijnt
""INSTELLEN VOL/ MUTE”.
Op de toets OK klikken. Op de display verschijnt "ALLES ZELFDE VOL”.
Op de toets OK klikken. Op de display verschijnt " APPARAAT KIESEN,”.
Klik op een van de functietoetsen (TV, VCR, DVD, enz.). De toetsen VOL en MUTE zullen vanaf
dit moment enkel dit apparaat besturen ongeacht de mode waarop de afstandsbesturing
ingesteld zou staan.
Op de display verschijnt eerst “AUB WACHTEN” en vervolgens "KLAAR", De afstandsbediening
verlaat automatisch de programmeermode en keert terug naar de gewone werkstand.
Als de door u gekozen mode geen volumecontrole zou hebben, dan verschijnt op de display de tekst,
"VOLUME CONTROLE FOUT" en de afstandsbediening zal dan automatisch de programmeermode en
keert terug naar de gewone werkstand verlaten.
6.1.2 Instelling koppelen per mode
Met deze functie kan de volumecontrole aan een willekeurige mode worden gekoppeld. Als de
afstandsbediening zo is ingesteld dat de volumeregeling alleen het volume van de TV regelt (zie hierboven),
dan kunt u, wanneer de afstandsbediening zelf ook in deze mode afgesteld staat, eventueel beslissen dat
de toetsen VOLl+/- en MUTE direct dat apparaat besturen wat aan die mode gekoppeld is (bijv. AMP).
Bijvoorbeeld : de toetsen VOL+/- en MUTE besturen altijd de TV behalve wanneer de afstandsbediening in
mode AMP staat ; in dat laatste geval besturen de toetsen VOLl+/- en MUTE direct het apparaat wat bij de
mode AMP behoort.
a.
b.
c.
d.
e.
f.
g.
De toets S ingedrukt houden totdat op de display de tekst "CODES INSTELLEN" verschijnt (dit
duurt ongeveer 3 sec.)
De toets S loslaten.
Met behulp van de toetsen Boven/Beneden (,) zappen totdat de tekst “OPTIES
INSTELLEN" verschijnt. Op de toets OK klikken. Op de display verschijnt "INSTELLEN VOL/
MUTE”.
Op de toets OK klikken. Op de display verschijnt "ALLES ZELFDE VOL”.
Met behulp van de toetsen Boven/Beneden (,) zappen totdat de tekst “INSTELLEN 1
ENKEL VOL" verschijnt. Op de toets OK klikken. Op de display verschijnt " APPARAAT
KIESEN”.
Op een toets 'mode' naar keuze klikken (TV, VCR, DVD, enz.). Telkens wanneer de
afstandsbediening zich in deze mode bevindt, besturen de toetsen VOL en MUTE het apparaat
waaraan de deze toets gekoppeld is.
Op de display verschijnt “AUB WACHTEN” en vervolgens "KLAAR". De afstandsbediening
verlaat automatisch de programmeermode en keert terug naar de gewone werkstand.
6.1.3 Vol. Mute Controle Reset
Met deze functie kunt u alle instellingen van de voorgaande twee paragrafen wissen (VOLl+/- en MUTE
besturen de TV).
a.
De toets S ingedrukt houden totdat op de display de tekst "CODES INSTELLEN" verschijnt (dit
duurt ongeveer 3 sec.)
b.
De toets S loslaten.
c.
Met behulp van de toetsen Boven/Beneden (,) zappen totdat op de display de tekst
"OPTIES INSTELLEN" verschijnt. Op de toets OK klikken. Op de display verschijnt"INSTELLEN
VOL/ MUTE”.
d.
Op de toets OK klikken. Op de display verschijnt "ALLES ZELFDE VOL”.
e.
Met behulp van de toetsen Boven/Beneden (,) zappen naar totdat op de display de tekst
“VOL/ MUTE CONTROL RESET" verschijnt. Op de toets OK klikken. Op de display verschijnt "
OK+AKKOORD".
f.
Op de toets OK klikken. De geluidsafstelling keert terug naar de fabrieks-voorinstelling.
g.
Op de display verschijnt de tekst “AUB WARTEN” en vervolgens "KLAAR". De
afstandsbediening verlaat automatisch de programmeermode en keert terug naar de gewone
werkstand.
6.2 Instellen Tijd
Dient voor het instellen van de juiste tijd op.
a.
De toets S ingedrukt houden totdat op de display de tekst "'CODES INSTELLEN"' verschijnt (dit
duurt ongeveer 3 sec.)
b.
De toets S loslaten.
c.
Zappen totdat op de display de tekst "OPTIES INSTELLEN" verschijnt. Op de toets OK klikken.
Op de display verschijnt "INSTELLEN VOL/ MUTE".
d.
Met behulp van de toetsen Boven/Beneden (,) zappen totdat op de display de tekst
"INSTELLEN TIJD" verschijnt. Op de toets OK klikken.
- 65 -
e.
f.
g.
h.
De tekst “TIJD ?” verschijnt met de formattering (12 of 24 uur) die opknippert. Met behulp van de
toetsen Boven/Beneden (,) de formattering (12HR of 24HR) kiezen en bevestigen met de
toets OK.
De cijfers die de uren aangeven knipperen op. Met behulp van de toetsen Boven/Beneden
(,) de uren afstellen en bevestigen me de toets OK.
De cijfers die de minuten aangeven knipperen op. Met behulp van de toetsen Boven/Beneden
(,) de minuten afstellen en bevestigen me de toets OK.
Op de display verschijnt de tekst “AUB WACHTEN” en vervolgens "KLAAR". De
afstandsbediening verlaat automatisch de programmeermode en keert terug naar de gewone
werkstand.
6.3 Instellen Datum
Dient voor het instellen van het juiste jaar, maand, dag en weekdag op de display.
a.
De toets S ingedrukt houden totdat op de display de tekst "CODES INSTELLEN" verschijnt (dit
duurt ongeveer 3 sec.) De toets S loslaten.
b.
Met behulp van de toetsen Boven/Beneden (,) zappen totdat op de display de tekst
"OPTIES INSTELLEN" verschijnt. Op de toets OK klikken. Op de display verschijnt de tekst
"INSTELLEN VOL/ MUTE".
c.
Met behulp van de toetsen Boven/Beneden (,) zappen totdat op de display de tekst
“INSTELLEN DATUM" verschijnt. Op de toets OK klikken.
d.
De tekst "JAAR ?" verschijnt met de laatste twee cijfers van het jaar die opknipperen. Stel met
behulp van de toetsen Boven/Beneden (,) het jaar in en bevestig met de toets OK.
e.
De tekst "MAAND ?" verschijnt met de twee cijfers van de maand die opknipperen. Stel met
behulp van de toetsen Boven/Beneden (,) de maand in en bevestig met de toets OK.
f.
De tekst "DATUM ?" verschijnt met de twee cijfers van de datum die opknipperen. Stel met
behulp van de toetsen Boven/Beneden (,) de datum in en bevestig met de toets OK.
g.
De tekst "DAG ?" verschijnt met de dag die opknippert. Stel met behulp van de toetsen
Boven/Beneden (,) de dag in en bevestig met de toets OK.
h.
Op de display verschijnt de tekst “AUB WACHTEN” en vervolgens "KLAAR". De
afstandsbediening verlaat automatisch de programmeermode en keert terug naar de gewone
werkstand.
6.4 Instellen Belichting
Dient voor het instellen van de tijd dat de display blijft oplichten na het indrukken van een toets.
a.
De toets S ingedrukt houden totdat op de display de tekst "CODES INSTELLEN" verschijnt (dit
duurt ongeveer 3 sec.)
b.
De toets S loslaten.
c.
Met behulp van de toetsen Boven/Beneden (,) zappen totdat op de display de tekst
"OPTIES INSTELLEN". Op de toets OK klikken. Op de display verschijnt de tekst "INSTELLEN
VOL/ MUTE".
d.
Met behulp van de toetsen Boven/Beneden (,) zappen totdat op de display de tekst
“INSTELLEN BCKGROUND ". Op de toets OK klikken.
e.
Op de display verschijnt de tekst "BCKGROUND TIJD (SEC)" terwijl de duur van de belichting
opknippert zoals die op dit moment ingesteld staat. Met behulp van de toetsen Boven/Beneden
(,) de lengte van de belichting instellen. U kunt de duur instellen tussen 0 en 60 sec in
stappen van 5 seconden. De fabrieks-voorinstelling is 10 sec. U schakelt de belichting uit door
de tijdsduur op 0 sec in te stellen. Bevestigen door op de toets OK te klikken.
f.
Op de display verschijnt de tekst “AUB WACHTEN” en vervolgens "KLAAR". De
afstandsbediening verlaat automatisch de programmeermode en keert terug naar de gewone
werkstand.
6.5 Instellen Taal
Dient om de taal van de display in te stellen.
a.
De toets S ingedrukt houden totdat op de display de tekst "CODES INSTELLEN" verschijnt (dit
duurt ongeveer 3 sec.).
b.
De toets S loslaten.
c.
Met behulp van de toetsen Boven/Beneden (,) zappen totdat op de display de tekst
"OPTIES INSTELLEN" verschijnt. Op de toets OK klikken. Op de display verschijnt de tekst
"INSTELLEN VOL/ MUTE".
d.
Met behulp van de toetsen Boven/Beneden (,) zappen totdat op de display de tekst
“INSTELLEN TAAL". Op de toets OK klikken.
e.
Op de display verschijnt de tekst "TAAL ?" terwijl de taal opknippert welke op dat moment
ingesteld staat. Met behulp van de toetsen Boven/Beneden (,) de gewenste taal kiezen.
De taal van de fabrieks-voorinstelling is Engels. Bevestigen door op de toets OK te klikken.
f.
"OK+AKKOORD" (als u Nederlands heeft gekozen. Op de toets OK klikken.
g.
Op de display verschijnt de tekst “AUB WACHTEN” en vervolgens "KLAAR". De
afstandsbediening verlaat automatisch de programmeermode en keert terug naar de gewone
werkstand.
6.6 Reset Systeem
Dient om alle parameters (codes, macro's, enz.) te wissen en naar de fabrieks-voorinstelling terug te gaan.
a.
De toets S ingedrukt houden totdat op de display de tekst "CODES INSTELLEN" verschijnt (dit
duurt ongeveer 3 sec.)
b.
De toets S loslaten.
c.
Met behulp van de toetsen Boven/Beneden (,) zappen totdat op de display de tekst
"OPTIES INSTELLEN" verschijnt. Op de toets OK klikken. Op de display verschijnt de tekst
"INSTELLEN VOL/ MUTE".
- 66 -
d.
e.
f.
Met behulp van de toetsen Boven/Beneden (,) zappen totdat op de display de tekst
“RESET SYSTEEM ". Op de toets OK klikken.
Op de display verschijnt de tekst "OK+AKKOORD". Bevestig met de toets OK.
Op de display verschijnt de tekst “AUB WACHTEN” en vervolgens "KLAAR". De
afstandsbediening verlaat automatisch de programmeermode en keert terug naar de gewone
werkstand.
7. Timer Instellen
Door op de toets OK te klikken wanneer "TIMER INSTELLEN" op de display verschijnt, kunt u de
verschillende timers instellen: een timer om de TV na een aantal minuten op non-actief te stellen, plus 4
extra timers om op een gegeven tijd een serie van 3 instructies naar keuze naar een van de andere
apparaten te sturen.
7.1 Instellen Stand-by TV
De afstandsbediening kan worden gebruikt om de TV na een bepaalde tijd in stand-by
te zetten : Zodra de door u ingestelde tijd verstreken is, stuurt de afstandsbediening
een infrarood-signaal naar de TV om deze in stand-by te zetten. De timer kan tussen 0
en 90 minuten worden afgesteld. Terwijl de timer afloopt, verschijnt op de display het
symbool "Zzz".
7.1.1 Instellen Timer TV (programmeren van de stand-by-timer)
a.
b.
c.
d.
e.
f.
g.
h.
i.
De mode TV kiezen.
De toets S ingedrukt houden totdat op de display de tekst "CODES INSTELLEN" verschijnt (dit
duurt ongeveer 3 sec.).
De toets S loslaten.
Met behulp van de toetsen Boven/Beneden (,) zappen totdat de tekst "TIMER
INSTELLEN" verschijnt. Op de toets OK klikken.
Op de display verschijnt de tekst "SETUP SLUIMEREN TV ". Op de toets OK klikken.
Op de display verschijnt de tekst "INSTELLEN SLUIMEREN TV". Op de toets OK klikken.
Op de display verschijnt de tekst “SLUIMEREN INSTELLEN TV (MIN)” met de minuten die
opknipperen. Met de toetsen Boven/Beneden (,) de minuten instellen en bevestigen met
de toets OK.
Op de display verschijnt de tekst "KLAAR" en vervolgens "CODES INSTELLEN".
Twee keer op de toets EXIT klikken om naar de gewone werkstand terug te keren. Controleer
dat het op de display het symbool "Zzz" verschijnt. Leg de afstandsbediening met de voorkant
naar de TV gericht.
7.1.2 Annuleren Timer TV (geen timer voor de standby)
a.
b.
c.
d.
e.
f.
Op de toets S drukken totdat de tekst "CODES INSTELLEN" op de display verschijnt (dit duurt
ongeveer 3 sec.). De toets S loslaten.
Met behulp van de toetsen Boven/Beneden (,) zappen totdat op de display de tekst
"TIMER INSTELLEN" verschijnt. Op de toets OK klikken.
Op de display verschijnt de tekst "SETUP SLUIMEREN TV”. Op de toets OK klikken.
Op de display verschijnt de tekst “WIESSEN SLUIMEREN TV”. Op de toets OK klikken.
Op de display verschijnt de tekst “OK=AKKOORD”. Op de toets OK klikken.
Op de display verschijnt de tekst "KLAAR" en vervolgens "CODES INSTELLEN". Het symbool
"Zzz" verdwijnt.
7.2 Instellen Standby Timer
U kunt voor 4 verschillende apparaten timers programmeren (Timer 1, 2, 3 en 4). Ieder van deze 4 timers
kan aan een eigen toets worden gekoppeld zodat automatisch een instructie op een vooraf bepaald tijdstip
wordt uitgevoerd (bijv: SATelite op kanaal 123 om 22:35 u aanzetten). De eerste toets die gememoriseerd
wordt, moet persé een toets 'mode' zijn. De volgende toetsen mogen niét zijn : ,,,, OK, EXIT,
MACRO, S of een andere toets 'mode'. Timers kunnen alleen voor de eerstvolgende
24 uur geprogrammeerd worden. Een timer wordt automatisch na afloop geannuleerd.
Telkens wanneer u een timer geprogrammeerd heeft, verschijnt op de display het
symbool
;
7.2.1 Instellen Timer
Programmeren van een timer (Let op : Voordat u een timer instelt, moet deze eerst gewist zijn – zie
paragraaf "ANNULEREN TIMER X" hieronder)
a.
De toets S ingedrukt houden totdat op de display de tekst "CODES INSTELLEN" verschijnt (dit
duurt ongeveer 3 sec.).
b.
De toets S loslaten.
- 67 -
c.
d.
e.
f.
g.
h.
i.
j.
k.
l.
m.
Met behulp van de toetsen Boven/Beneden (,), zappen totdat op de display de tekst
"TIMER INSTELLEN" verschijnt. Op de toets OK klikken. Op de display verschijnt de tekst "
SETUP SLUIMEREN TV".
Met behulp van de toetsen Boven/Beneden (,),zappen totdat op de display de tekst
"SETUP TIMER X " verschijnt (met X = timer n° 1, 2, 3 of 4). Op de toets OK klikken.
Op de display verschijnt de tekst "INSTELLEN TIMER X". Op de toets OK klikken.
Op de display verschijnt de tekst "TIMERX TIJD? (T)" met de uren die opknipperen. Met behulp
van de toetsen Boven/Beneden (,) het uur instellen en bevestigen met de toets OK.
De minuten knipperen op. Met behulp van de toetsen Boven/Beneden (,) de minuten
instellen en bevestigen met de toets OK.
Op de display verschijnt de tekst "KIES TIMER X MODE?". Klik op een van de toetsen 'mode'
(TV, VCR, DVD, enz.).
Op de display verschijnt de tekst “KIES TIMER TOETS 1". Kort op de eerste toets klikken die
met de eerste instructie overeenkomt. Zouden er geen andere commando's meer moeten
worden uitgevoerd, dan bevestigt u door op OK te klikken en direct door te gaan naar punt l.
Op de display verschijnt de tekst “KIES TIMER TOETS 2". Kort op de tweede toets klikken die
met de tweede instructie overeenkomt. Zou er geen ander commando meer moeten worden
uitgevoerd, dan bevestigt u door op OK te klikken en direct door te gaan naar punt l.
Op de display verschijnt de tekst “KIES TIMER TOETS 3". Kort op de derde toets klikken die
met het derde instructie overeenkomt.
Op de display verschijnt de tekst "KLAAR” en vervolgens "CODES INSTELLEN".
Twee keer op de toets EXIT klikken om naar de gewone werkstand terug te keren. Controleer
dat het op de display het symbool "
naar de TV gericht.
" verschijnt. Leg de afstandsbediening met de voorkant
7.2.2 Annuleren Timer
Dient voor het wissen van een timer.
a.
De toets S ingedrukt houden totdat op de display de tekst "CODES INSTELLEN" verschijnt (dit
duurt ongeveer 3 sec.).
b.
De toets S loslaten.
c.
Met behulp van de toetsen Boven/Beneden (,) zappen totdat op de display de tekst
"TIMER INSTELLEN" verschijnt. Op de toets OK klikken. Op de display verschijnt de tekst
"SETUP SLUIMEREN TV ".
d.
Met behulp van de toetsen Boven/Beneden (,),zappen totdat op de display de tekst
"INSTELLEN TIMER X " verschijnt (en waar X timer n° 1, 2, 3 of 4 is) verschijnt. Op de toets OK
klikken.
e.
Op de display verschijnt de tekst "WIS TIMER X " (met X=1, 2, 3 of 4)). Op de toets OK klikken.
f.
Op de display verschijnt de tekst “OK=AKKOORD”. Op de toets OK klikken.
g.
Op de display verschijnt de tekst "KLAAR " en vervolgens "CODES INSTELLEN".
8. Functies aanleren :
Met de voorgeprogrammeeerde codes van de universele afstandsbediening kunnen de meeste apparaten
worden bestuurd die op dit moment beschikbaar zijn. Maar u kunt ook, indien uw apparaat niet op de
afstandsbediening zou reageren, de instructie in kwestie direct overnemen van de oorspronkelijke originele
afstandsbediening. Ditzelfde geldt ook wanneer u een code zou hebben overgenomen maar enkele functies
niet zouden werken. De afstandsbediening kan 150 toetsen memoriseren (afhankelijk van de formattering
van de infrarood-code die bij de oorspronkelijke afstandsbediening hoort). Per oorspronkelijke
afstandsbediening hoort een mode.
Tips voor het aanleren van functies - Wilt u er op letten :
a.
b.
c.
d.
e.
f.
g.
h.
dat alleen nieuwe batterijen voor beide afstandsbedieningen gebruikt mogen worden,
dat aan per mode alleen de functies van één oorspronkelijke afstandsbediening kunnen worden
toegewezen,
dat voordat u functies gaat aanleren, u eerst moet zappen totdat de tekst "WIS ALLE
LEERMODES" verschijnt om alle eerdere overgenomen instructies te wissen,
dat u in het begin alleen maar de functies van 2 of 3 toetsen overneemt (om enige ervaring op
doen en te zien of deze inderdaad naar behoren functioneren); Vervolgens, vóórdat u alle
functies van de oorspronkelijke afstandsbediening gaat aanleren, deze functies eerst wist ("WIS
ALLE LEERMODES"),
dat voordat u opnieuw functies overneemt, de display met de tekst "WIS EEN LEERMODE”
bevestigt, om zeker te zijn dat alle voorgaande overgenomen functies wel terdege zijn uitgewist,
dat beide afstandsbedieningen zodanig tegenover elkaar liggen dat de infrarood- LEDs precies
tegenover zijn uitgelijnd; let erop ook de hoogte van beide afstandsbedieningen zodanig is dat
deze zowel horizontaal als verticaal precies zijn uitgelijnd,
dat u een afstand van ongeveer 25 mm tussen beide afstandsbedieningen in acht neemt,
dat u beide afstandsbedieningen niet verplaatst tijdens het aanleren van de functies,
- 68 -
i.
j.
k.
l.
m.
dat gloeilampen en lampen met weinig energieverbruik interfereren met de infrarood- signalen;
de afstand tussen de afstandsbedieningen en de aanwezige lichtbronnen moet minstens een
meter zijn,
dat de functies VOL/ MUTE niet van de oorspronkelijke afstandsbediening over worden
genomen zolang u er niet zeker van bent dat deze hetzelfde apparaat besturen. Bijv:: sommige
DVD- afstandsbedieningen besturen ook de VOL/ MUTE van de TV; in dat geval kunnen er
eventueel 2 verschillende types code geassocieerd zijn,
dat de VCR functies van de oorspronkelijke afstandsbediening niet over worden genomen
zolang u er niet zeker van bent dat deze niet een ander apparaat besturen. Bijv: sommige
afstandsbedieningen van het type TV, besturen ook een VCR; in dat geval is het mogelijk dat er
2 verschillende types code geassocieerd zijn,
dat het aanleren van een functie tot 3 sec. kan duren ; Wilt u dus de toets niet loslaten voordat
op de display de tekst "KLAAR" of “NIET GELUKT” verschijnt,
dat wanneer u alleen maar foutmeldingen krijgt tijdens het aanleren van de eerste of de tweede
toets, u het volgende uitprobeert :
het proces beëindigen door op EXIT te klikken,
de commando's voor deze mode te wissen,
de infrarood- LEDs van beide afstandsbedieningen precies tegenover elkaar uit te
lijnen,
de afstand tussen beide afstandsbedieningen te variëren tussen de 15 en 50 mm,
opnieuw te proberen.
Zou dit voor dezelfde toets het probleem nog steeds niet oplossen, dan dient u te controleren of
de toets correct functioneert : Reageert het doelapparaat naar verwachting ? Probeer de toets in
een andere mode over te nemen. Zou dit werken dan betekent dit dat er twee verschillende
codes geassocieerd zijn en dus niet in dezelfde mode gebruikt kunnen worden (zie punt 'j' en 'k')
Opmerkingen over het aanleren van functies: a.
U kunt de toetsen Setup en MACRO niet aan een functie koppelen.
b.
Door het toekennen van een nieuwe 4-cijferige code aan een toets 'mode', wist u alle functies
die u in deze mode heeft laten aanleren.
c.
De retro-belichting werkt niet wanneer u functies gaat aanleren.
8.1 Het aanleren van functies
15-50mm
a.
b.
c.
d.
e.
f.
g.
h.
De toets S ingedrukt houden totdat op de display de tekst "CODES INSTELLEN" verschijnt (dit
duurt ongeveer 3 sec.).
De toets S loslaten.
Met behulp van de toetsen Boven/Beneden (,) zappen totdat op de display de tekst
“FUNCTIES AANLEREN” verschijnt. Op de toets OK klikken.
Op de display verschijnt de tekst “AANLEREN 1 ANKELE MODE”. Op de toets OK klikken.
Op de display verschijnt de tekst “KIES MODE TOETS”. Klik op een toets 'Mode' naar keuze
(TV, VCR, DVD, enz.).
Op de display verschijnt de tekst “TOEWIJZEN KIESTOETS”. Klik op de LCD toets van de
afstandsbediening waaraan de originele code wordt toegewezen. Op de display verschijnt de
tekst “AANLEREN GEDULD”. Klik op de toets van de originele afstandsbediening totdat op de
display de tekst "KLAAR" of “NIET GELUKT” verschijnt (zie hierboven : Tips voor het aanleren
van functies) gevolgd door “OK=VERDER ZONIET EXIT” (dit kan ongeveer 3 sec. duren). Laat
de toets van de originele afstandsbediening los.
Op de display verschijnt de tekst “OK=VERDER ZONIET EXIT”. Klik op de toets OK als u
andere functies wilt aanleren en ga naar punt "f". Klik op de toets EXIT als u klaar bent met het
aanleren van functies.
Op de display verschijnt de tekst “AUB WACHTEN” en vervolgens "KLAAR". De
afstandsbediening verlaat automatisch de programmeermode en keert terug naar de gewone
werkstand.
8.2 Wissen van een Mode (alle functies voor een enkele mode wissen) a.
b.
c.
d.
e.
f.
g.
h.
De toets S ingedrukt houden totdat op de display de tekst "CODES INSTELLEN" verschijnt (dit
duurt ongeveer 3 sec.).
De toets S loslaten.
Met behulp van de toetsen Boven/Beneden (,) zappen totdat op de display de tekst
“AANLEREN INSTELLEN” verschijnt. Op de toets OK klikken.
Op de display verschijnt de tekst “AANLEREN 1 ANKELE MODE”.
Met behulp van de toetsen Boven/Beneden (,) zappen totdat op de display de tekst “WIS
EEN LEERMODE” verschijnt. Op de toets OK klikken.
Op de display verschijnt de tekst “KIES MODE TOETS”. Op de door u gewenste 'Mode'-toets
klikken (TV, VCR, DVD, enz.).
Op de display verschijnt de tekst “OK=WIS MODE”. Op de toets OK klikken.
Op de display verschijnt de tekst “AUB WACHTEN” en vervolgens "KLAAR". De
afstandsbediening verlaat automatisch de programmeermode en keert terug naar de gewone
werkstand.
- 69 -
8.3 Wissen voor alle Modes (alle functies voor alle modes wissen, u wordt aangeraden dit te
doen voordat u de eerste keer functies gaat aanleren)
a.
b.
c.
d.
e.
f.
De toets S ingedrukt houden totdat op de display de tekst "CODES INSTELLEN" verschijnt (dit
duurt ongeveer 3 sec.).
De toets S loslaten.
Met behulp van de toetsen Boven/Beneden (,) zappen totdat op de display de tekst
"AANLEREN INSTELLEN” verschijnt. Op de toets OK klikken.
Zappen totdat op de display de tekst "WIS ALLE LEERMODES" verschijnt. Op de toets OK
klikken.
Op de display verschijnt de tekst “OK=WIS ALLES” Op de toets OK klikken.
Op de display verschijnt de tekst “AUB WACHTEN” en vervolgens "KLAAR". De
afstandsbediening verlaat automatisch de programmeermode en keert terug naar de gewone
werkstand.
9. Macro's
Met de toets MACRO, te gebruiken met toetsen 1, 2 en 3, kunt u 3 series toetsaanslagen na keuze
opslaan. Door een keer op de desbetreffende macrotoets te klikken, stuurt u in een keer de hele serie
toetsaanslagen (IR -commando's). Een veel voorkomende serie toetsaanslagen kan op deze manier dus
worden vervangen door slechts twee klikken (toets MACRO gevolgd door een van de cijfers 1, 2 of 3).
Bijv., door alleen maar op MACRO en een cijfer te drukken, kunt u in een keer de TV aanzetten, de Adslbox inschakelen, het juiste kanaal instellen, de VCR aanzetten om een programma op te nemen enz. Ieder
van de drie macro's kan maximaal tien toetsaanslagen vervangen.
9.1 Macro's Instellen
a.
b.
c.
d.
e.
f.
g.
h.
i.
De toets S ingedrukt houden totdat op de display de tekst "CODES INSTELLEN" verschijnt (dit
duurt ongeveer 3 sec.).
De toets S loslaten.
Met behulp van de toetsen Boven/Beneden (,) zappen totdat op de display de tekst
“MACROS INSTELLEN” verschijnt. Op de toets OK klikken.
Op de display verschijnt de tekst “SCHRIJF MACRO”. Op de toets OK klikken.
Op de display verschijnt de tekst “TOEWIJZEN MACRO AAN N°”. Klik op de toets waaraan u de
macro wilt toekennen (toets 1, 2 of 3).
Op de display verschijnt de tekst “TOEWIJZEN MODE AAN X” (met “X” = 1, 2 of 3). Klik op een
toets 'mode' naar keuze (TV, VCR, DVD, enz.). De eerste toets in de serie toetsaanslagen,n
moet altijd een 'Mode'-toets zijn.
Op de display verschijnt de tekst “TOEWIJZEN MACRO X AAN 02”. '02' geeft aan dat u nu de
2° toets (in een serie van 10) moet intoetsen.
Om de macro te beëindigen en op te slaan, moet u op de toets MACRO klikken. Na een serie
van tien klikken wordt de macro automatisch opgeslagen.
Op de display verschijnt de tekst “KLAAR”. De afstandsbediening verlaat automatisch de
programmeermode en keert terug naar de gewone werkstand
9.2 Macro Wissen
a.
b.
c.
d.
e.
f.
g.
De toets S ingedrukt houden totdat op de display de tekst "CODES INSTELLEN" verschijnt (dit
duurt ongeveer 3 sec.).
De toets S loslaten.
Met behulp van de toetsen Boven/Beneden (,) zappen totdat op de display de tekst
“MACROS INSTELLEN” verschijnt. Op de toets OK klikken.
Op de display verschijnt de tekst “WIS MACRO”. Op de toets OK klikken.
Met behulp van de toetsen Boven/Beneden (,) zappen totdat op de display de tekst “WIS
MACRO NO” verschijnt. Klik op toets 1, 2, of 3 om aan te geven welke macro u wilt wissen.
Op de display verschijnt de tekst “OK=WIS MACRO”. Bevestig door op de toets OK te klikken.
Op de display verschijnt de tekst “KLAAR”. De afstandsbediening verlaat automatisch de
programmeermode en keert terug naar de gewone werkstand
Om een macro te activeren vanuit de gewone werkstand, moet u op eerst op
MACRO klikken en vervolgens (binnen de 20 sec) op toets 1, 2, of 3.
Tijdens het uitvoeren van een macro, geeft de display de tekst “MACRO X”.
De afstandsbediening keert na afloop terug naar de gewone werkstand.
Als aan de toets geen macro zou zijn toegekend, dan geeft de display een
kort ogenblik de tekst “MACRO X ONGELDIG” en keert terug naar de
gewone werkstand.
- 70 -
9.3 Macro : Opmerkingen
1
Met de toets PAUSE kunt u een pauze in de macro inlassen.
(bijv. om de TV op te laten warmen). U klikt op de toets PAUSE
en vervolgens op het aantal seconden. Bijv.: om een pauze van 3
seconden in te voegen, drukt u op de toets PAUSE en vervolgens
op 3. De maximum pauze is 9 sec. Pauze '0 sec' is uiteraard niet
mogelijk.
2
De verschillende stappen in een macro worden uitgevoerd met een onderlinge pauze van een
halve seconde.
3
De allereerste stap in een macro MOET een toets 'mode' zijn (TV, VCR, enz.).
4
5
De toetsen Setup en MACRO mogen zelf niet in een macro voorkomen.
Op Setup klikken om de Macro Setup te verlaten.
10. Technische problemen
De afstandsbediening werkt niet of neigt de overgenomen codes te verliezen :
Controleer met de oorspronkelijke afstandsbediening of het te besturen apparaat normaal
reageert.
Controleer dat u eerst op de toetst heeft gedrukt die met de door u gewenste mode
overeenkomt en dat deze overeenkomt met het apparaat wat u wilt besturen (TV, video VCR, satelliet
SAT, enz.).
Als de code van de lijst niet zou werken, probeert u dan de eerstvolgende code uit, zoniet, de
code automatisch laten opzoeken.
Controleer de polariteit van de batterijen (let op +/-) en of deze op de juiste wijze in het
batterijvakje zitten ; controleer of de veren goed contact met de batterijen maken.
-·
Om de afstandsbediening te programmeren of om deze functies over te laten nemen, hebt u 2
nieuwe alkalische LR 03 batterijen nodig.
Als de LCD-display slecht of niet meer leesbaar is, dan betekent dat u de batterijen moet
vervangen. Dit is meestal na enkele maanden het geval.
- 71 -
Универсальный пульт дистанционного управления
(ДУ) 8в1
1. Рекомендации по технике безопасности
1.1 Комментарии по общим требованиям безопасности
Запрещается вносить изменения в конструкцию устройства или производить с ним какие-либо
технические операции. Это продиктовано соображениями безопасности и апробацией данного
продукта.
Позаботьтесь о правильной настройке устройства – для справок обращайтесь к руководству
пользователя.
Дети должны пользоваться устройством только под контролем со стороны взрослых.
Избегайте следующего:
сильного механического износа
высоких температур
сильной вибрации
высокой влажности
Также примите во внимание дополнительные примечания, содержащиеся в различных главах этого
руководства пользователя. Если у вас возникли какие-либо вопросы, не освещенные в настоящем
руководстве пользователя, свяжитесь с нашей горячей линией технической поддержки или
обратитесь к другому специалисту.
Внимательно прочтите это руководство и рекомендации по безопасности, чтобы правильно
настроить устройство.
Храните руководство в надежном месте, чтобы иметь возможность обратиться к нему в
последующем, или если у вас возникнет необходимость передать его другому человеку.
1.2 Рекомендации по батареям питания
В этом устройстве можно использовать только две алкалиновые аккумуляторные батареи типа AAA.
Никогда не пытайтесь подсоединить это устройство к другому источнику питания. Устанавливая
батареи, соблюдайте полярность. Если устройство не используется в течение длительного времени,
извлеките батареи. Убедитесь в том, что батареи питания не приводят к короткому замыканию и не
подвергаются действию огня (существует опасность взрыва).
Не разрешайте детям брать в руки батареи питания. Не допускайте, чтобы аккумуляторные батареи
лежали в открытом доступном месте – дети или животные могут их проглотить. Если это произошло,
немедленно обратитесь к доктору за помощью.
Если батареи текут или повреждены, избегайте контакта с кожей, так как это может привести к
ожогам или повреждению кислотой. В этом случае используйте подходящие перчатки.
При утилизации батарей необходимо соблюдать постановления местных органов власти.
2. Описание продукта
Перед вами универсальный пульт ДУ, имеющий четыре, шесть или восемь кнопок переключения
режимов (количество кнопок зависит от модели вашего пульта ДУ), который способен заменить до
восьми обычных пультов ДУ (“функция 4 в1, 6 в1 или 8 в1”). Этими обычными пультами ДУ могут
быть практически любые пульты ДУ для бытовой электроники (см. поставляемый список кодов).
Обозначения “TV” (“ТВ”) “VCR” (“ВКМ”) ”DVD” (“DVD-проигрыватель”) “SAT” (“Спутниковый ресивер”)
“AMP” (“Усилитель”) “AUX” (“Дополнительно”) на кнопках переключения режимов служат для
индикации устройств. За исключением режимной кнопки TV, вы можете закрепить любое устройство
бытовой электроники за любой другой режимной кнопкой.
2.1 Установка батарей питания
Вместе с пультом ДУ поставляются 2 AAA микробатареи LR03.
¾ Откройте крышку отсека для батарей питания на задней части универсального пульта ДУ.
¾
Установите обе батареи питания в отсек, проверьте, чтобы они были установлены
правильно, и чтобы обозначение + на батарее совпадало с такой же маркировкой внутри
отсека для батарей.
¾ Установите крышку отсека на прежнее место.
¾ Выбор языка
¾
Экран помощи будет отображаться на ЖК-дисплее для индикации
кнопок, используемых во время операций Установки.
¾
Нажмите и отпустите любую кнопку, на дисплее появится надпись
“Language?” (“Язык?”) с индикацией текущего выбранного языка. Используйте кнопки
Вверх/Вниз для выбора желаемого языка. Языком по умолчанию является английский.
Нажмите и отпустите кнопку OK.
¾
На экране дисплея появится надпись “confirm language” (“подтвердить язык”). Нажмите и
отпустите кнопку OK для подтверждения выбора.
¾
На дисплее появится надпись “Success” (“Успешно”), и пульт ДУ останется в режиме
Установки, вернувшись к экрану меню “CODE SETUP” (“НАСТРОЙКА КОДОВ”).
2.2 Замена батарей питания и память
В случае замены батарей питания все программируемые пользователем параметры, кроме времени,
дня недели, даты и MACRO команд останутся без изменения. Установки времени, дня недели, даты
и MACRO команды вернутся к заводским установкам.
3. Функции кнопок
[1]
POWER (ВКЛ/ВЫКЛ): Позволяет вам выключать последний выбранный вами прибор.
- 72 -
[2]
[3]
[4]
[5]
[6]
[7]
[8]
[9]
[10]
[11]
[12]
[13]
[14]
[15]
[16]
[17]
[18]
[19]
[20]
[21]
[22]
Teletext Hold (Удержание телетекста): В режиме телетекста приостанавливает смену
страниц.
TV, VCR, DVD, SAT...: Эти кнопки позволяют вам выбирать электронный прибор, которым
вы хотите управлять. Число режимных кнопок зависит от модели вашего пульта ДУ (4 в1,
6 в1 или 8 в1)
Teletext ON (Телетекст ВКЛ): Запускает/останавливает телетекст.
Teletext MIX (Телетекст МИКС): Позволяет совмещать телетекст и картинку выбранного
вами канала
INFO (ИНФО): Отображает информацию о выбранном вами прибора.
Teletext OFF (Телетекст ВЫКЛ): Выключает телетекст.
Menu (Меню): Запускает меню.
Exit (Выход): Выключает меню.
Mute (Выключение звука): Позволяет вам включить/выключить звук.
Prog +/- (Программа +/-): Позволяет выбирать следующий или предыдущий канал ТВ,
спутникового телевидения…, в режиме DVD: следующий или предыдущий фрагмент.
Vol +/- (Громкость +/-): Позволяет настраивать уровень громкости.
Вверх, Вниз, Влево и Вправо: кнопки навигации по меню, позволяют осуществлять
навигацию по меню.
кнопка OK: подтверждает выбор меню.
Guide (Программа каналов): Включает электронную программу каналов.
S: Позволяет запрограммировать пульт ДУ перед первым использованием. Эта кнопка
также дает вам доступ к второстепенным функциям некоторых устройств аудио/видео
(Переключение). Нажмите и отпустите кнопку "S", а затем нажмите кнопку той функции,
которая вам нужна.
Цветные кнопки: осуществляют управление видеотекстом и особыми функциями
устройств.
Macro (Макро): Кнопка MACRO в сочетании с одной из цифровых кнопок 1, 2, или 3
позволяет программировать и запоминать до 3 последовательностей команд.
Числовые кнопки 0 - 9: Выполняют те же функции, что и кнопки вашего первоначального
пульта ДУ.
A/V (Аудио/Видео): Выбор внешнего источника сигнала (вход SCART).
--/-: Если вы находитесь в режиме программирования или автоматического поиска кода, с
помощью этой кнопки вы можете подтвердить код устройства, которым вы хотите
управлять. В сочетании с числовыми кнопками, эта кнопка позволяет вам напрямую
выбирать на некоторых устройствах каналы с числовым значением больше 9.
Play (Воспроизведение), FF (Перемотка в прямом направлении), Stop (Остановка),
Rew (Перемотка в обратном направлении), Pause (Пауза): Эти кнопки выполняют те же
функции, что и кнопки ваших первоначальных пультов ДУ.
REC (Запись): Эта кнопка выполняет ту же функцию, что и кнопка вашего
первоначального пульта ДУ для ВКМ. Во избежание записи по ошибке, для активации
этой функции вам необходимо нажать эту кнопку дважды.
4. ЖК-дисплей
4.1 Общая информация
ЖК-дисплей обеспечивает визуальную связь между пользователем и пультом ДУ. ЖК-дисплей
представляет собой дисплей в 23 символа в 3 строки, по 9 символов в верхней и центральной строке
и 5 символов в нижней строке.
ЖК-дисплей дополнительно включает в себя 4-цифровой индикатор состояния
часов и другие символы индикации.
4.2 Вывод данных по умолчанию в обычном режиме дисплея
Обычный режим дисплея: дисплей всегда включен, когда установлены батареи
питания. Он показывает текущий режим и его код, например, DVD, день недели,
например, Mon (Пн), и время дня в 24-часовом формате, например, 23:58.
Дисплей при нажатии кнопок переключения режимов: при нажатии режимной
кнопки пульт ДУ переходит в режим управления устройством, которое эта кнопка
обозначает, и ЖК-дисплей отображает текущий режим и его код, например, DVD и
запрограммированный 4-цифровой код, например, 0768. При отпускании
режимной кнопки ЖК-дисплей возвращается в обычный режим работы.
Дисплей при нажатии кнопки Setup (shift) (Настройка (переключение): при
коротком нажатии и последующем отпускании кнопки Setup дисплей показывает
текущий режим пульта ДУ, например, DVD, дату, например, 9:10 (формат Число:
месяц), и отображением на экране “(S)” дисплей показывает выполнение функции
“Shift” (“Переключение”). Нажмите и отпустите кнопку Exit, чтобы вернуться в
обычный режим дисплея. Чтобы использовать кнопку Setup для переключения,
нажмите и опустите (обычное нажатие кнопки) кнопку Setup, а затем нажмите
кнопку, отвечающую за выбор второстепенной функции.
Индикация нажатия кнопки: при нажатии кнопок на ЖК-дисплее появляется
либо символ “перехода”, либо на ЖК-дисплее происходит смена индикации.
4.3 Навигация по меню
Чтобы открыть меню настроек, нажмите и удерживайте кнопку S (Настройка), пока на дисплее не
появится надпись CODE SETUP (НАСТРОЙКА КОДОВ) и символ “SET”.
Когда на дисплее появится надпись CODE SETUP, продолжайте нажимать кнопку S (Настройка) для
доступа к другим меню:
CODE SETUP (НАСТРОЙКА КОДОВ) ÆSYSTEM SETUP (НАСТРОЙКА СИСТЕМЫ) ÆTIMER SETUP
(УСТАНОВКА ТАЙМЕРА) ÆLEARN SETUP (НАСТРОЙКА ЗАПОМИНАНИЯ) ÆMACRO SETUP
(НАСТРОЙКА МАКРО) ÆEXIT SETUP (ВЫХОД ИЗ НАСТРОЕК)
- 73 -
Нажмите кнопку OK для выбора того этапа программирования, который вам необходим.
Операции по настройке используются для прямого входа в библиотеку кодов, поиска кодов,
запоминания и т.д.…
Чтобы выйти из операций по настройке, нажмите кнопку EXIT или в меню перейдите к “EXIT SETUP”
(“ВЫХОД ИЗ НАСТРОЕК”), а затем нажмите кнопку OK.
Меню CODE SETUP (НАСТРОЙКА КОДОВ) используется для ввода кодов для
различных устройств
Меню System Setup (Настройка системы) используется для установки времени,
даты и управления уровнем громкости
Меню Timer SETUP (НАСТРОЙКА Таймера) используется для установки операций
по таймеру
Меню
Learn
SETUP
(НАСТРОЙКА
Запоминания)
используется
программирования режима с сохраненными в памяти командами
Меню Macro Setup (Настройка Макро) используется
последовательностей команд с помощью кнопки Macro
для
для
настройки
Меню EXIT SETUP (ВЫХОД ИЗ НАСТРОЕК) используется для выхода из меню
настроек и возврата в обычный режим работы.
Выход из меню настроек также происходит автоматически по истечении
приблизительно 15 секунд, если ни одна кнопка не нажимается. На дисплее
появится надпись “Timeout” (“Время истекло”).
Когда пульт ДУ выполняет обработку операций по настройке, на экране дисплея
отображается надпись “Please Wait” (“Пподождите”).
5. Программирование CODE SETUP (НАСТРОЙКА КОДОВ)
Опции меню Code Setup (Настройка кодов): При нажатии кнопки OK в меню CODE SETUP на
дисплее появляются 4 опции для программирования режима с помощью кодов.
OR
OR
5.1 Прокрутка по списку кодов: первый метод ввода кода
a.
b.
c.
d.
e.
Включите устройство, которым вы собираетесь управлять с помощью пульта ДУ
(например, чтобы управлять ТВ с помощью пульта ДУ, включите ТВ-приемник)
Нажмите и удерживайте кнопку S, пока на ЖК-дисплее не появится надпись “Code Setup”
(“Настройка кодов”) (это произойдет приблизительно через 3 секунды)
Отпустите кнопку Setup (Настройка)
Нажмите и отпустите кнопку OK. На экране дисплея появится надпись “SCROLL A LIST OF
CODES” (“ПРОКРУТКА ПО СПИСКУ КОДОВ”).
Нажмите и отпустите кнопку OK. На экране дисплея появится надпись “SELECT A MODE
KEY?” (“ВЫБРАТЬ РЕЖИМНУЮ КНОПКУ?”)
- 74 -
f.
Нажмите и отпустите нужную режимную кнопку (TV, VCR, DVD, и т.д.). На экране дисплея
появится надпись “SELECT DEVICE? TV” (“ВЫБРАТЬ УСТРОЙСТВО? ТВ”).
g.
Используя кнопки Вверх/Вниз, выберите тип устройства для программирования: TV, VCR,
DVD,... Смотрите ниже примечание "Select Device?" (“Выбрать устройство?).
h.
Нажмите и отпустите кнопку OK для подтверждения выбора.
i.
Теперь на экране дисплея появится первый брэнд из списка кодов и его код (например,
Admiral 0000). Для осуществления более быстрого доступа к названию брэнда вашего
устройства вы можете воспользоваться числовыми кнопками от 2 до 9 (как на мобильном
телефоне: 2=abc,3=def, и т.д.). Например, для быстрого перехода к брэнду VIETA (Брэнд
DVD-проигрывателей) нажмите 3 раза числовую кнопку 8 (8=tuv) и используйте кнопки
Вверх/Вниз для выбора вашего брэнда и кнопки Влево/Вправо для выбора кода. Коды
могут быть протестированы на правильное выполнение функций устройством, которым
вы хотите управлять с помощью пульта ДУ, путем нажатия кнопки регулирования
громкости (Volume), выключения звука (Mute), выбора канала, включения/выключения
питания (Power), выбора аудио/видео сигнала (AV), включения телетекста (Teletext),
воспроизведения (Play), остановки (Stop), перемотки в прямом направлении (FF),
перемотки в обратном направлении (Rewind) и паузы (Pause). Когда правильный код был
найден, нажмите и отпустите кнопку OK для сохранения кода в памяти.
j.
На экране появится надпись “Please Wait” (“Подождите”), а затем надпись "Success”
(“Успешно”), и пульт ДУ выйдет из режима настроек и вернется в обычный режим работы.
k.
Протестируйте пульт ДУ на способность управлять вашими устройствами бытовой
электроники. Повторите процедуру, начиная с шага "a", чтобы настроить управление
другими устройствами.
Примечание: в опции “Select Device?” (“Выбрать устройство?) можно выбрать следующие
устройства TV (ТВ), VCR (ВКМ), LD (Проигрыватель лазерных дисков), DVD (DVDпроигрыватель), DVR (Цифровой видеорегистратор), HDD (накопитель HDD), SAT
(Спутниковый ресивер), CABLE (Кабельное телевидение), DVBT (DVBT-ресивер), STB
(STB-устройство), AUDIO (Аудио-проигрыватель), AMP (Усилитель), RECR, HTIB
(Домашний кинотеатр), MP3 (Проигрыватель MP3), CD (Проигрыватель компакт-дисков),
TAPE (Кассетный проигрыватель), TUNER (Тюнер) и PHONO (Проигрыватель
грампластинок). Для перехода к режиму управления ТВ из списка устройств нужно
выбрать только устройство TV (ТВ).
5.2 Ввод Кодов: для ввода кодов напрямую из таблиц библиотеки кодов необходимо выполнить
следующее.
a.
b.
c.
d.
e.
f.
g.
h.
i.
j.
Включите устройство, которым вы собираетесь управлять с помощью пульта ДУ (чтобы
управлять ТВ с помощью пульта ДУ, включите ТВ-приемник)
Нажмите и удерживайте кнопку S, пока на ЖК-дисплее не появится надпись “Code Setup”
(“Настройка кодов”) (это произойдет приблизительно через 3 секунды)
Отпустите кнопку S.
Нажмите и отпустите кнопку OK. На экране дисплея появится надпись “Scroll a list of
Codes” (“Прокрутка по списку кодов”).
Используйте кнопки Вверх/Вниз, чтобы перейти к опции “Enter codes” (“Ввод кодов”) на
экране дисплея. Нажмите и отпустите кнопку OK. На экране дисплея появится надпись
“Select a Mode Key?” (“Выбрать режимную кнопку?”).
Нажмите и отпустите нужную режимную кнопку (TV, VCR, DVD, и т.д.). На экране дисплея
будет отображаться обозначение режимной кнопки с уже запрограммированным кодом.
Введите кодовое число из 4 цифр, используя числовые кнопки 0-9.
После ввода 4-ой цифры на экране дисплея появится надпись “Success” (“Успешно”), и
пульт ДУ выйдет из режима настроек и вернется в обычный режим работы.
Направьте пульт ДУ на устройство бытовой электроники и нажмите кнопку POWER. Это
устройство должно выключиться. Проверьте другие функции (например, для DVDпроигрывателя: кнопки FF или REW и т.д.). Если некоторые функции не реагируют, это
свидетельствует о том, что введенный код является неправильным. В этом случае
повторите процедуру ввода кода с самого начала, используя код, соответствующий
брэнду вашего устройства.
Повторите процедуру, начиная с шага "a", чтобы настроить управление другими
устройствами (TV (ТВ), VCR (ВКМ), DVD (DVD-проигрыватель, SAT (Спутниковый ресивер)
и т.д.)
5.3 Поиск кодов: позволяет вручную осуществлять поиск кода для определенного устройства по
всей библиотеке кодов, которое по какой-то причине не внесено в библиотеку или находится в
списках под названием другого производителя.
a.
Включите устройство, которым вы собираетесь управлять с помощью пульта ДУ (чтобы
управлять ТВ с помощью пульта ДУ, включите ТВ-приемник)
b.
Нажмите и удерживайте кнопку S, пока на ЖК-дисплее не появится надпись “Code Setup”
(“Настройка кодов”) (это произойдет приблизительно через 3 секунды)
c.
Отпустите кнопку S
d.
Нажмите и отпустите кнопку OK. На экране дисплея появится надпись “SCROLL A LIST OF
CODES” (“ПРОКРУТКА ПО СПИСКУ КОДОВ”).
e.
Используйте кнопки Вверх/Вниз, чтобы перейти к опции “Search for the Codes” (“Поиск
кодов”) на экране дисплея. Нажмите и отпустите кнопку OK. На экране дисплея появится
надпись “SELECT A MODE KEY?” (“ВЫБРАТЬ РЕЖИМНУЮ КНОПКУ?”).
f.
Нажмите и отпустите нужную режимную кнопку (TV, VCR, DVD, и т.д.). На экране дисплея
появится надпись “SELECT DEVICE? TV” (“ВЫБРАТЬ УСТРОЙСТВО? ТВ”).
g.
Используя кнопки Вверх/Вниз, выберите тип устройства для программирования: (TV,
VCR, DVD…). Смотрите вышеприведенное примечание "Select Device?" (“Выбрать
устройство?). Нажмите и отпустите кнопку OK для подтверждения выбора.
- 75 -
h.
i.
j.
k.
На экране дисплея появится надпись “To Search Press P+ or Power" (“Чтобы начать поиск,
нажмите кнопку P+ или кнопку Power”). Нажимайте кнопку Prog+ (или кнопку Power или
кнопку Play (только для ВКМ и DVD-проигрывателей)) до тех пор, пока устройство,
которым вы хотите управлять, не начнет реагировать соответствующим образом на ваши
команды по переключению каналов, выключению или выполнению другой функции. Во
время поиска на экране будет отображаться надпись “Searching for:-“ (“Идет поиск”)
(наряду с выбором устройства). Если нужный код был случайно пропущен, нажимайте
кнопку Prog-, чтобы просмотреть библиотеку кодов в обратном порядке. Нажмите кнопку
Prog+ (или кнопку Power или кнопку Play), чтобы повторно изменить направление поиска.
Нажмите и отпустите кнопку OK, чтобы сохранить код.
На экране дисплея появится надпись “Success” (“Успешно”), пульт ДУ выйдет из режима
настроек и вернется в обычный режим работы.
Направьте пульт ДУ на устройство бытовой электроники и нажмите кнопку POWER. Это
устройство должно выключиться. Проверьте другие функции (например, для DVDпроигрывателя: кнопки FF или REW и т.д.). Если некоторые функции не реагируют, это
свидетельствует о том, что введенный код является неправильным. В этом случае
повторите процедуру ввода кода с самого начала, используя код, соответствующий
брэнду вашего устройства.
Повторите процедуру, начиная с шага "a", чтобы настроить управление другими
устройствами (TV (ТВ), VCR (ВКМ), DVD (DVD-проигрыватель, SAT (Спутниковый
ресивер) и т.д.)
Примечания:
1.
Если устройство не имеет кнопки Prog+, вместо нее воспользуйтесь кнопкой Play (ВКМ,
DVD-проигрывавтель...) или кнопкой Power.
2.
Поиск кода начнется с того 4-значного числа, которое в настоящий момент сохранено в
памяти для определенного режима.
3.
Когда поиск был осуществлен по всем кодам, на экране дисплея
появится надпись “Search End” (“Конец поиска”), и пульт ДУ вернется в
обычный режим работы.
5.4 Использование кодов брэнда: - позволяет вручную осуществлять поиск брэнда
конкретного производителя по библиотеке кодов. Таблица библиотеки поиска брэндов обычно
состоит из 30-40 кодов.
a.
b.
c.
d.
e.
f.
g.
h.
i.
j.
k.
l.
Включите устройство, которым вы собираетесь управлять с помощью пульта ДУ.
Нажмите и удерживайте кнопку S, пока на ЖК-дисплее не появится надпись “Code Setup”
(“Настройка кодов”) (это произойдет приблизительно через 3 секунды).
Отпустите кнопку S.
Нажмите и отпустите кнопку OK. На экране дисплея появится надпись “Scroll a list of
Codes” (“Прокрутка по списку кодов”).
Используйте кнопки Вверх/Вниз, чтобы перейти к опции “Use Brand Codes”
(“Использовать коды брэндов”) на экране дисплея. Нажмите и отпустите кнопку OK. На
экране дисплея появится надпись “Select a Mode Key?” (“Выбрать режимную кнопку?”).
Нажмите и отпустите нужную режимную кнопку (TV, VCR, DVD, и т.д.). На экране дисплея
появится надпись “Select Device? TV” (“Выбрать устройство? ТВ”).
Используя кнопки Вверх/Вниз, выберите тип устройства для программирования: (TV,
VCR, DVD…). Смотрите вышеприведенное примечание "Select Device?" (“Выбрать
устройство?). Нажмите и отпустите кнопку OK для подтверждения выбора.
На дисплее появится надпись “Enter the Brand Key 1-8” (“Введите брэнд кнопкой 1-8”).
Нажмите и отпустите ту числовую кнопку (1-8), которая соответствует необходимому
производителю в отдельной таблице кодов брэнда.
На экране дисплея появится надпись “To Search Press P+ or Power" (“Чтобы начать поиск,
нажмите кнопку P+ или кнопку Power”). Нажимайте кнопку Prog+ (или кнопку Power или
кнопку Play (только для ВКМ и DVD-проигрывателей)) до тех пор, пока устройство,
которым вы хотите управлять, не начнет реагировать соответствующим образом на ваши
команды по переключению каналов, выключению или выполнению другой функции. Во
время процесса поиска на экране будет отображаться надпись “Searching for:-“ (“Идет
поиск”) (наряду с выбором устройства). Если нужный код был случайно пропущен,
нажимайте кнопку Prog-, чтобы просмотреть библиотеку кодов в обратном порядке.
Нажмите кнопку Prog+ (или кнопку Power или кнопку Play), чтобы повторно изменить
направление поиска. Нажмите и отпустите кнопку OK, чтобы сохранить код.
На экране дисплея появится надпись “Success” (“Успешно”), пульт ДУ выйдет из режима
настроек и вернется в обычный режим работы.
Направьте пульт ДУ на устройство бытовой электроники и нажмите кнопку POWER. Это
устройство должно выключиться. Проверьте другие функции (например, для DVDпроигрывателя: кнопки FF или REW и т.д.). Если некоторые функции не реагируют, это
свидетельствует о том, что введенный код является неправильным. В этом случае
повторите процедуру ввода кода с самого начала, используя код, соответствующий
брэнду вашего устройства.
Повторите процедуру, начиная с шага "a", чтобы настроить управление другими
устройствами (TV (ТВ), VCR (ВКМ), DVD (DVD-проигрыватель, SAT (Спутниковый ресивер)
и т.д.)
5.5 Идентификация кода: нажмите соответствующую режимную кнопку в
обычном режиме работы пульта ДУ для отображения на экране дисплея
запрограммированного кода для этого режима, например, “DVD код 0768”.
- 76 -
5.6 Программирование кодов для комбоустройств: - для некоторых комбоустройств
(например, ТВ/ВКМ, ТВ/DVD-проигрыватель, DVD-проигрыватель/ВКМ и т.д.) потребуется настройка
двух разных режимных кнопок для управления обеими частями этого комбоустройства. Например,
если у вас имеется комбоустройство ТВ/DVD-проигрыватель, вам, скорее всего, потребуется
настроить один код с помощью кнопки TV для управления ТВ И отдельный код (с помощью любой
другой режимной кнопки) для управления DVD-проигрывателем.
5.7 Управление комбоустройствами: - пульты ДУ некоторых комбоустройств (например,
ТВ/ВКМ, ТВ/DVD-проигрыватель, DVD-проигрыватель/ВКМ и т.д.) имеют отдельные кнопки для
выбора той части комбоустройства, которой вы хотите управлять. Например, комбоустройство типа
DVD-проигрыватель/ВКМ вполне может иметь пульт ДУ, который будет снабжен отдельными
кнопками для DVD-проигрывателя и ВКМ для выбора той части комбоустройства, которой вы хотите
управлять. Подобные функциональные кнопки могут быть найдены на вашем универсальном пульте
ДУ посредством режимных кнопок и кнопок настройки. Допустим, ваше комбоустройство – это DVDпроигрыватель/ВКМ, и его код запрограммирован режимной кнопкой DVD:
нажмите и удерживайте режимную кнопку DVD в течение более одной секунды,
чтобы отправить команду DVD-проигрывателю,
быстро нажмите и отпустите кнопку S, а затем нажмите и отпустите режимную
кнопку DVD, чтобы отправить команду ВКМ.
Этот метод следует применять в отношении всех остальных комбоустройств (например, ТВ/ВКМ,
ТВ/DVD-проигрыватель, DVD-проигрыватель/ВКМ и т.д.), и он доступен для всех режимов. Эта
функция не поддерживается всеми кодами.
-
6. Опции настройки системы: Нажимая кнопку OK в меню SYSTEM SETUP (НАСТРОЙКА
СИСТЕМЫ), вы можете перейти к следующим опциям настройки системы: настройка управления
громкостью с помощью “сквозных” функций, установка времени, установка даты, настройка
подсветки ЖК-дисплея и сброс системы.
6.1 Настройка управления громкостью/выключением звука - функция управления
громкостью/выключением звука и “сквозная” функция:- Данный пульт ДУ позволяет вам выбрать
режим, который будет управлять кнопками громкость/выключение звука. Этот пульт ДУ (заводская
установка по умолчанию) исходно настроен на то, чтобы все режимы, запрограммированные с
помощью “визуальных” кодов (например, TV, VCR, DVD, PVR, SAT и CABLE) и “аудио” кодов
(например, CD и AUDIO), использовали свое собственное управление громкостью/выключением
звука, если таковые имеются. Если запрограммированный “визуальный” код не имеет своего
собственного управления громкостью/выключением звука, то эта функция позволит управлять
громкостью телевизора без перехода в режим ТВ.
Настройка управления громкостью/выключением звука и “сквозной” функции –
любой режим, выбранный для управления громкостью/выключением звука, ДОЛЖЕН иметь свою
собственную функцию громкости/выключения звука в форме запрограммированного кода или
сохраненную в память; в противном случае, нажатие кнопок регулирования уровня громкости и
выключения звука ни к чему не приведет.
6.1.1 Настройка управления громкостью всех режимов – настраивает управление
громкостью/выключением звука ВСЕХ режимов в одном режиме, например в режиме ТВ:- данные
ниже шаги позволят вам настроить все режимы на “сквозную” функцию, которая даст вам
- 77 -
возможность управлять громкостью/выключением звука любого устройства независимо от того, в
режиме управления каким устройством находится пульт ДУ.
a.
b.
c.
d.
e.
f.
g.
h.
Нажмите и удерживайте кнопку S, пока на ЖК-дисплее не появится надпись “Code Setup”
(“Настройка кодов”) (это произойдет приблизительно через 2-3 секунды).
Отпустите кнопку S.
Используйте кнопки Вверх/Вниз, чтобы перейти к опции “System Setup” (“Настройка
системы”) на экране дисплея. Нажмите и отпустите кнопку OK. На дисплее появится
надпись “Vol/Mute Control Setup” (“Настройка управления громкостью/выключением
звука”).
Нажмите и отпустите кнопку OK. На дисплее появится надпись “Set All Vol. to 1 Mode”
(“Настроить уровень громкости всех режимов на уровень громкости одного режима”).
Нажмите и отпустите кнопку OK. На дисплее появится надпись “Set All Vol. to Mode?”
(“Настроить уровень громкости всех режимов на уровень громкости режима?”).
Нажмите и отпустите режимную кнопку (TV, VCR, DVD, и т.д.) того устройства,
управлению уровнем громкости/выключением звука которого вы выбираете в качестве
основного.
На экране дисплея в течение короткого времени будет отображаться надпись “Please
Wait” (“Подождите”), которая затем сменится надписью “Success” (“Успешно”), и пульт ДУ
выйдет из режима настроек и вернется в обычный режим работы.
С этого момента, находясь в любом режиме управления устройствами, вы сможете
управлять громкостью/выключением звука этих устройств, используя “сквозную” функцию.
Если
выбранный
режим
не
поддерживает
команды
управления
громкостью/выключением звука, на экране ЖК-дисплея появится надпись “Volume
Control Error” (“Ошибка управления громкостью”), и пульт ДУ выйдет из режима
настроек и вернется в обычный режим работы.
6.1.2 Настройка громкости для одного режима: приведенные ниже шаги позволят вам
настроить любой режим на использование только своего собственного управления
громкостью/выключением звука, так как “сквозная” функция отключена для этого режима.
Примечание: перед настройкой этой функции убедитесь в том, что выбранный режим имеет
собственные функции управления громкостью/выключением звука в форме кода или сохраненные в
память; в противном случае, нажатие кнопок регулирования уровня громкости и выключения звука ни
к чему не приведет.
a.
Нажмите и удерживайте кнопку S, пока на ЖК-дисплее не появится надпись “Code Setup”
(“Настройка кодов”) (это произойдет приблизительно через 3 секунды).
b.
Отпустите кнопку S.
c.
Используйте кнопки Вверх/Вниз, чтобы перейти к опции “System Setup” (“Настройка
системы”) на экране дисплея. Нажмите и отпустите кнопку OK. На дисплее появится
надпись “Vol/Mute Control Setup” (“Настройка управления громкостью/выключением
звука”).
d.
Нажмите и отпустите кнопку OK. На дисплее появится надпись “Set All Vol. to 1 Mode”
(“Настроить уровень громкости всех режимов на уровень громкости одного режима”).
e.
Используйте кнопки Вверх/Вниз, чтобы перейти к опции “Set Vol. for one Mode”
(“Настроить уровень громкости для одного режима”) на экране дисплея. Нажмите и
отпустите кнопку OK. На дисплее появится надпись “Set All Vol. to Mode?” (“Настроить
уровень громкости всех режимов на уровень громкости режима?”).
f.
Нажмите и отпустите режимную кнопку (TV, VCR, DVD, и т.д.) того устройства, для
управления уровнем громкости/выключением звука которого вы отключаете “сквозную”
функцию.
g.
На экране дисплея в течение короткого времени будет отображаться надпись “Please
Wait” (“Подождите”), которая затем сменится надписью “Success” (“Успешно”), и пульт ДУ
выйдет из режима настроек и вернется в обычный режим работы.
h.
Выбранный режим с этого момента будет использовать свое собственное управление
громкостью/выключением звука.
6.1.3 Сброс настроек громкости/выключения звука: нижеприведенные шаги позволят вам
сбросить настройки управления громкостью/выключением звука до заводских настроек по
умолчанию.
a.
b.
c.
d.
e.
f.
g.
Нажмите и удерживайте кнопку S, пока на ЖК-дисплее не появится надпись “Code Setup”
(“Настройка кодов”) (это произойдет приблизительно через 3 секунды).
Отпустите кнопку S.
Используйте кнопки Вверх/Вниз, чтобы перейти к опции “System Setup” (“Настройка
системы”) на экране дисплея. Нажмите и отпустите кнопку OK. На дисплее появится
надпись “Vol/Mute Control Setup” (“Настройка управления громкостью/выключением
звука”).
Нажмите и отпустите кнопку OK. На дисплее появится надпись “Set All Vol. to 1 Mode”
(“Настроить уровень громкости всех режимов на уровень громкости одного режима”).
Используйте кнопки Вверх/Вниз, чтобы перейти к опции “Vol/Mute Control Reset” (“Сброс
настроек управления громкостью/выключением звука”) на экране дисплея. Нажмите и
отпустите кнопку OK.
На экране появится надпись “Confirm OK to Reset” (“Нажмите OK для подтверждения
сброса”). Нажмите и отпустите кнопку OK.
На экране дисплея в течение короткого времени будет отображаться надпись “Please
Wait” (“Подождите”), которая затем сменится надписью “Success” (“Успешно”), и пульт ДУ
выйдет из режима настроек и вернется в обычный режим работы.
- 78 -
h.
Настройки управления громкостью/выключением звука вернулись к настройкам по
умолчанию.
6.2 Установка времени: позволяет установить время дня для отображения в обычном режиме
ЖК-дисплея.
a.
b.
c.
d.
e.
f.
g.
Нажмите и удерживайте кнопку S, пока на ЖК-дисплее не появится надпись “Code Setup”
(“Настройка кодов”) (это произойдет приблизительно через 3 секунды).
Отпустите кнопку S.
Используйте кнопки Вверх/Вниз, чтобы перейти к опции “System Setup” (“Настройка
системы”) на экране дисплея. Нажмите и отпустите кнопку OK. На дисплее появится
надпись “Vol/Mute Control Setup” (“Настройка управления громкостью/выключением
звука”).
Используйте кнопки Вверх/Вниз, чтобы перейти к опции “Time Setup” (“Установка
времени”) на экране дисплея. Нажмите и отпустите кнопку OK.
На экране дисплея появится надпись “Time?” (“Время?”), которая будет мигать, показывая
текущий формат времени (12 или 24 часа) и текущее установленное время. Используйте
кнопки Вверх/Вниз, чтобы выбрать формат времени (12ч или 24ч), затем нажмите и
отпустите кнопку OK.
Индикация “часов” будет мигать. Используйте кнопки Вверх/Вниз, чтобы установить
показатель часового времени, затем нажмите и отпустите кнопку OK.
Индикация “минут” будет мигать. Используйте кнопки Вверх/Вниз, чтобы установить
показатель минутного времени, затем нажмите и отпустите кнопку OK. На экране дисплея
появится надпись “Success” (“Успешно”), и пульт ДУ останется в режиме настройки,
вернувшись к экранному меню “Code Setup” (“Настройка кодов”).
6.3 Установка даты: позволяет установить показатели месяца, даты и дня недели.
a.
b.
c.
d.
e.
f.
g.
h.
i.
Нажмите и удерживайте кнопку S, пока на ЖК-дисплее не появится надпись “Code Setup”
(“Настройка кодов”) (это произойдет приблизительно через 2-3 секунды).
Отпустите кнопку S.
Используйте кнопки Вверх/Вниз, чтобы перейти к опции “System Setup” (“Настройка
системы”) на экране дисплея. Нажмите и отпустите кнопку OK. На дисплее появится
надпись “Vol/Mute Control Setup” (“Настройка управления громкостью/выключением
звука”).
Используйте кнопки Вверх/Вниз, чтобы перейти к опции “Date Setup” (“Установка даты”)
на экране дисплея. Нажмите и отпустите кнопку OK.
На экране появится индикация “Year?” (“Год?”), где две последние цифры обозначения
года будут мигать. Используйте кнопки Вверх/Вниз, чтобы установить показатель года,
затем нажмите и отпустите кнопку OK.
На экране появится индикация “Month?” (“Месяц?”), где цифры обозначения месяца будут
мигать. Используйте кнопки Вверх/Вниз, чтобы установить показатель месяца, затем
нажмите и отпустите кнопку OK.
На экране появится индикация “Date?” (“Дата?”), где цифры обозначения даты будут
мигать. Используйте кнопки Вверх/Вниз, чтобы установить дату, затем нажмите и
отпустите кнопку OK.
На экране появится индикация “Day?” (“День недели?”), где обозначение дня недели
будет мигать. Используйте кнопки Вверх/Вниз, чтобы установить день недели, затем
нажмите и отпустите кнопку OK.
На экране дисплея появится надпись “Success” (“Успешно”), и пульт ДУ останется в
режиме настройки, вернувшись к экранному меню “Code Setup” (“Настройка кодов”).
6.4 Настройка подсветки: позволяет настроить продолжительность времени подсветки ЖКдисплея после нажатия любой из кнопок.
a.
b.
c.
d.
e.
f.
Нажмите и удерживайте кнопку S, пока на ЖК-дисплее не появится надпись “Code Setup”
(“Настройка кодов”) (это произойдет приблизительно через 3 секунды).
Отпустите кнопку S.
Используйте кнопки Вверх/Вниз, чтобы перейти к опции “System Setup” (“Настройка
системы”) на экране дисплея. Нажмите и отпустите кнопку OK. На дисплее появится
надпись “Vol/Mute Control Setup” (“Настройка управления громкостью/выключением
звука”).
Используйте кнопки Вверх/Вниз, чтобы перейти к опции “Backlight Setup” (“Настройка
подсветки”) на экране дисплея. Нажмите и отпустите кнопку OK.
На экране появится индикация “Backlight Time?” (“Время подсветки?”), где цифры
обозначения текущей продолжительности подсветки будут мигать. Используйте кнопки
Вверх/Вниз, чтобы установить необходимое вам время подсветки ЖК-дисплея, которое
при нажатии кнопки Вверх может увеличиваться на интервал в 5 секунд и достигать
максимального значения в 60 секунд. Выбранное по умолчанию время подсветки дисплея
составляет 10 секунд. Чтобы выключить функцию подсветки ЖК-дисплея, установите
время подсветки на “00” (нуль). Нажмите и отпустите кнопку OK.
На экране дисплея появится надпись “Success” (“Успешно”), и пульт ДУ останется в
режиме настройки, вернувшись к экранному меню “Code Setup” (“Настройка кодов”).
6.5 Установка языка: позволяет установить язык дисплея вашего пульта ДУ.
a.
b.
c.
Нажмите и удерживайте кнопку S, пока на ЖК-дисплее не появится надпись “Code Setup”
(“Настройка кодов”) (это произойдет приблизительно через 2-3 секунды).
Отпустите кнопку S.
Используйте кнопки Вверх/Вниз, чтобы перейти к опции “System Setup” (“Настройка
системы”) на экране дисплея. Нажмите и отпустите кнопку OK. На дисплее появится
- 79 -
d.
e.
f.
g.
надпись “Vol/Mute Control Setup” (“Настройка управления громкостью/выключением
звука”).
Используйте кнопки Вверх/Вниз, чтобы перейти к опции “Language Setup” (“Установка
языка”) на экране дисплея. Нажмите и отпустите кнопку OK.
На экране появится индикация “Language?” (“Язык?”), где будет мигать текущий язык
дисплея. Используйте кнопки Вверх/Вниз, чтобы выбрать необходимый язык. Английский
язык является языком по умолчанию. Нажмите и отпустите кнопку OK.
На экране появится надпись “Confirm English” (“Подтвердить английский”). Нажмите и
отпустите кнопку OK.
На экране дисплея появится надпись “Success” (“Успешно”), и пульт ДУ останется в
режиме настройки, вернувшись к экранному меню “Code Setup” (“Настройка кодов”).
6.6 Сброс системы: позволяет сбросить настройки пульта ДУ с ЖК-дисплеем обратно к
заводским настройкам по умолчанию. Все запрограммированные пользователем параметры,
например, настройки кодов, сохраненные в памяти команды, макрокоманды и т.д. сбрасываются и
изменяются на соответствующие им настройки по умолчанию.
a.
b.
c.
d.
e.
f.
Нажмите и удерживайте кнопку S, пока на ЖК-дисплее не появится надпись “Code Setup”
(“Настройка кодов”) (это произойдет приблизительно через 3 секунды).
Отпустите кнопку S.
Используйте кнопки Вверх/Вниз, чтобы перейти к опции “System Setup” (“Настройка
системы”) на экране дисплея. Нажмите и отпустите кнопку OK. На дисплее появится
надпись “Vol/Mute Control Setup” (“Настройка управления громкостью/выключением
звука”).
Используйте кнопки Вверх/Вниз, чтобы перейти к опции “System Reset” (“Сброс системы”)
на экране дисплея. Нажмите и отпустите кнопку OK.
На экране появится надпись “Confirm OK to Reset” (“Нажмите OK для подтверждения
сброса”). Нажмите и отпустите кнопку OK.
Пока будет идти процесс сброса параметров, на экране будет отображаться надпись
“Please Wait” (“Подождите”), затем пульт ДУ выйдет из режима настроек и вернется в
обычный режим работы.
7. Установка таймера: нажимая кнопку OK в меню TIMER SETUP (УСТАНОВКА ТАЙМЕРА), вы
можете перейти к имеющимся опциям установки таймера. Ими являются таймер автоматического
выключения ТВ и 4 таймера, которые в заданное время могут посылать последовательность до 3
команд кнопок.
OR
X=1,2,3,4
X=1,2,3,4
Y=1,2,3
OR
7.1 Настройка функции автоматического выключения ТВ: пульт ДУ с ЖК-дисплеем
можно запрограммировать на автоматическое выключение ТВ с помощью таймера. По истечении
установленного периода таймера, пульт ДУ с ЖК-дисплеем посылает устройству,
запрограммированному на режим ТВ, команду на выключение. Таймер
автоматического выключения ТВ может быть установлен на временной
промежуток от 1-90 минут. На экране дисплея отображается символ “Zzz”, когда
установлен таймер автоматического выключения ТВ.
Для установки таймера автоматического выключения ТВ (символ “Zzz” не
отображается в обычном режиме дисплея):
a.
b.
c.
d.
e.
f.
g.
h.
i.
Включите устройство в режиме ТВ.
Нажмите и удерживайте кнопку S, пока на ЖК-дисплее не появится надпись “Code Setup”
(“Настройка кодов”) (это произойдет приблизительно через 3 секунды).
Отпустите кнопку S.
Используйте кнопки Вверх/Вниз, чтобы перейти к опции “Timer Setup” (“Установка
таймера”) на экране дисплея. Нажмите и отпустите кнопку OK.
На экране появится надпись “TV Sleep Setup” (“Установка автоматического выключения
ТВ”). Нажмите и отпустите кнопку OK.
На экране появится надпись “TV Sleep Set” (“Настройка автоматического выключения ТВ”).
Нажмите и отпустите кнопку OK.
На экране дисплея появится индикация “TV Sleep Time?” (“Время автоматического
выключения ТВ?”), где будут мигать “минуты”. Используйте кнопки Вверх/Вниз, чтобы
установить минуты, а затем нажмите и отпустите кнопку OK.
На экране дисплея появится надпись “Success” (“Успешно”), и пульт ДУ останется в
режиме настройки, вернувшись к экранному меню “Code Setup” (“Настройка кодов”).
Нажмите и отпустите кнопку Exit для возврата в обычный режим работы пульта ДУ.
Положите пульт ДУ таким образом, чтобы он был направлен на ТВ-приемник.
- 80 -
Для сброса таймера автоматического выключения ТВ (символ “Zzz” отображается в
обычном режиме дисплея)
a.
b.
c.
d.
e.
f.
Нажмите и удерживайте кнопку S, пока на ЖК-дисплее не появится надпись “Code Setup”
(“Настройка кодов”) (это произойдет приблизительно через 2-3 секунды). Отпустите
кнопку S.
Используйте кнопки Вверх/Вниз, чтобы перейти к опции “Timer Setup” (“Установка
таймера”) на экране дисплея. Нажмите и отпустите кнопку OK.
На экране появится надпись “TV Sleep Setup” (“Установка автоматического
выключения
ТВ”). Нажмите и отпустите кнопку OK.
На экране появится надпись “TV Sleep Clear” (Сброс автоматического выключения ТВ).
Нажмите и отпустите кнопку OK.
На экране появится надпись “Confirm OK to Clear” (“Нажмите OK для подтверждения
сброса”). Нажмите и отпустите кнопку OK.
На экране дисплея появится надпись “Success” (“Успешно”), и пульт ДУ останется в режиме
настройки, вернувшись к экранному меню “Code Setup” (“Настройка кодов”).
7.2 Установка таймера: пульт ДУ с ЖК-дисплеем можно запрограммировать на работу до 4
таймеров (таймер 1, 2, 3 и 4). Каждому таймеру можно назначить задачу по активации до 4 кнопок в
заданное время (например, в режиме SAT (Спутниковый ресивер) переключиться на канал 123 в
22:35). Первой кнопкой всегда должна быть режимная кнопка. Последующие кнопки не могут
включать кнопки вверх, вниз, влево, вправо, OK, выход, макро, настройка или
любую режимную кнопку. Таймеры можно установить для активации только в
пределах последующего 24-часового периода. После активации таймеры
автоматически сбрасываются. Символ таймера в виде “колокольчика” будет
изображен на экране дисплея каждый раз, когда установлен таймер.
Для установки таймера (Примечание – если таймер уже был установлен, его
необходимо сбросить – см. ниже раздел для сброса таймера)
a.
Нажмите и удерживайте кнопку S, пока на ЖК-дисплее не появится надпись “Code Setup”
(“Настройка кодов”) (это произойдет приблизительно через 2-3 секунды).
b.
Отпустите кнопку S.
c.
Используйте кнопки Вверх/Вниз, чтобы перейти к опции “Timer Setup” (“Установка
таймера”) на экране дисплея. Нажмите и отпустите кнопку OK. На экране появится
надпись “TV Sleep Setup” (“Установка автоматического выключения ТВ”).
d.
Используйте кнопки Вверх/Вниз, чтобы перейти к опции “Timer X Setup” (где “X” – это 1, 2,
3 или 4) (“Установка таймера X”) на экране дисплея. Нажмите и отпустите кнопку OK.
e.
На экране дисплея появится надпись “Timer X Set” (“Настройка таймера X”). Нажмите и
отпустите кнопку OK.
f.
На экране дисплея появится индикация “Timer X Time?” (“Время таймера X?”), где будут
мигать “часы”. Используйте кнопки Вверх/Вниз, чтобы установить часовой показатель, а
затем нажмите и отпустите кнопку OK.
g.
На экране будут мигать “минуты”. Используйте кнопки Вверх/Вниз, чтобы установить
минутный показатель, а затем нажмите и отпустите кнопку OK.
h.
На экране дисплея появится надпись “Select Timer X Mode?” (“Выбрать режим таймера
X?”). Нажмите и отпустите нужную режимную кнопку (TV, VCR, DVD, и т.д.).
i.
На экране дисплея появится надпись “Select Timer X Key1?” (“Выбрать кнопку1 таймера
X?”). Нажмите и отпустите первую нужную кнопку. Если требуется только одна кнопка, на
этом этапе настройки нажмите и отпустите OK и перейдите к шагу “l”, описанному ниже.
j.
На экране дисплея появится надпись “Select Timer X Key2?” (“Выбрать кнопку2 таймера
X?”). Нажмите и отпустите вторую нужную кнопку. Если нужны только две кнопки, на этом
этапе настройки нажмите и отпустите OK и перейдите к шагу “l”, описанному ниже.
k.
На экране дисплея появится надпись “Select Timer X Key3?” (“Выбрать кнопку3 таймера
X?”). Нажмите и отпустите третью нужную кнопку.
l.
На экране дисплея появится надпись “Success” (“Успешно”), и пульт ДУ останется в
режиме настройки, вернувшись к экранному меню “Code Setup” (“Настройка кодов”).
m. Нажмите и отпустите кнопку Exit для возврата в обычный режим работы пульта ДУ.
Положите пульт ДУ таким образом, чтобы он был направлен на то устройство, для
которого вы установили таймер.
a.
b.
c.
d.
e.
f.
g.
Для сброса таймера (символ таймера в виде “колокольчика” отображается в
обычном режиме дисплея)
Нажмите и удерживайте кнопку S, пока на ЖК-дисплее не появится надпись “Code Setup”
(“Настройка кодов”) (это произойдет приблизительно через 3 секунды).
Отпустите кнопку S.
Используйте кнопки Вверх/Вниз, чтобы перейти к опции “Timer Setup” (“Установка
таймера”) на экране дисплея. Нажмите и отпустите кнопку OK. На экране появится
надпись “TV Sleep Setup” (“Установка автоматического выключения ТВ”).
Используйте кнопки Вверх/Вниз, чтобы перейти к необходимой опции “Timer X Setup” (где
“X” – это 1, 2, 3 или 4) (“Установка таймера X”) на экране дисплея. Нажмите и отпустите
кнопку OK.
На экране дисплея появится надпись “Timer X Clear” (“Сброс таймера X”). Нажмите и
отпустите кнопку OK.
На экране появится надпись “Confirm OK to Clear” (“Нажмите OK для подтверждения
сброса”). Нажмите и отпустите кнопку OK.
На экране дисплея появится надпись “Success” (“Успешно”), и пульт ДУ останется в
режиме настройки, вернувшись к экранному меню “Code Setup” (“Настройка кодов”).
8. Запоминание кодов: позволяет запоминать и хранить команды IR вашего первоначального
пульта ДУ в том режиме и под той кнопкой универсального пульта ДУ, которые вы выбрали. Этот
- 81 -
пульт ДУ способен хранить в памяти до 150 команд кнопок первоначального пульта ДУ (количество
команд зависит от формата кода IR, который нужно запомнить). Только один тип первоначального
пульта ДУ можно сохранять под одним режимом универсального пульта ДУ (см. Советы по
запоминанию). Данный пульт ДУ можно сначала запрограммировать, найдя соответствующий код в
библиотеке кодов, а затем “наложить сверху” сохраненные в памяти кнопки для выполнения функций
по вашему выбору, то есть данный пульт ДУ можно настроить на выполнение тех функций, которые
необходимы именно вам, используя код для программирования и функцию запоминания кнопок
вашего первоначального пульта ДУ.
OR
Советы по запоминанию:
a.
b.
c.
d.
e.
f.
g.
h.
i.
j.
k.
l.
m.
По возможности рекомендуется использование новых батарей питания для обоих пультов
ДУ.
Только один тип первоначального пульта ДУ можно сохранять под одним режимом
универсального пульта ДУ.
Прежде чем приступить к запоминанию кнопок, выполните “Clear All Learn Modes”
(“Очистка всех сохраненных режимов”) (очистить все сохраненные в памяти команды).
Сначала попробуйте запомнить 2 или 3 кнопки (чтобы убедиться в совместимости и
нормальном функционировании), а затем перед запоминанием всех кнопок вашего
первоначального пульта ДУ, выполните “Clear All Learn Modes” (“Очистка всех
сохраненных режимов”) (очистить все сохраненные в памяти команды).
Перед запоминанием кнопок для отдельного режима выполните “Clear One Learn Mode”
(“Очистка одного сохраненного режима”), чтобы убедиться в том, что для этого режима
все предварительно сохраненные в памяти команды были очищены.
Расположите пульты ДУ по отношению друг к другу таким образом, чтобы инфракрасные
светодиоды на обоих пультах ДУ находились на прямой линии. Возможно, вам придется
отрегулировать высоту одного из пультов ДУ, чтобы добиться этого.
Расстояние между двумя пультами ДУ должно составлять приблизительно 25 мм.
Не двигайте и не меняйте расстояние между двумя пультами ДУ, пока идет процесс
запоминания всех необходимых кнопок для определенного режима.
Не пытайтесь проводить процесс запоминания непосредственно под источником яркого
или тусклого света, так как это может помешать передаче команд IR. Расстояние от такого
источника света должно составлять не менее одного метра.
Прежде чем запоминать кнопки громкости/выключения звука вашего первоначального
пульта ДУ, убедитесь в том, что они регулируют громкость/выключают звук именного того
устройства, которое вам необходимо. Например, некоторые пульты ДУ DVDпроигрывателей также имеют кнопки управления громкостью/выключением звука ТВприемника – а это, в свою очередь, относится к двум разным типам кодов.
Прежде чем запоминать кнопки управления ВКМ вашего первоначального пульта ДУ,
убедитесь в том, что они управляют именно этим устройством. Например, некоторые
пульты ДУ ТВ-приемников также имеют кнопки управления ВКМ, а это, в свою очередь,
относится к двум разным типам кодов.
Запоминание кнопки может занять до 3 секунд. Нажмите и не отпускайте ту кнопку,
которую вы запоминаете, до тех пор, пока на экране ЖК-дисплея не появится надпись
“Success” (“Успешно”) или надпись “Key Learn Error” (“Ошибка запоминания кнопки”).
В случае если сохранение в память первой или второй кнопки для отдельного режима
приводит к непрерывным ошибкам, предпримите следующие шаги:
i.
Завершите процесс запоминания нажатием кнопки Exit.
ii.
Очистите все сохраненные в памяти команды для этого режима.
iii. Убедитесь в том, что направленные друг на друга инфракрасные светодиоды
пультов ДУ образуют прямую линию.
iv. Уменьшите (например, 15 мм) или увеличьте (например, 50 мм) расстояние
между двумя пультами ДУ.
v.
Попытайтесь повторно запомнить кнопки первоначального пульта ДУ для этого
режима.
Если при запоминании той же самой кнопки вновь происходит ошибка, убедитесь в том,
что кнопка первоначального пульта ДУ, которую вы запоминаете, функционирует –
передает сигнал. Можно ли с ее помощью управлять выбранным устройством бытовой
электроники? Попытайтесь запомнить эту кнопку под другим режимом, который
предварительно был очищен. Если запоминание прошло успешно, то, скорее всего, эта
кнопка имеет отличный от всех других кодов тип и не может быть сохранена в память под
тем режимом, под которым вы первоначально пытались ее сохранить.
Примечания относительно процесса запоминания:
- 82 -
a.
Кнопки настройка, домашний кинотеатр или макро не могут быть использованы для
запоминания.
b.
Все команды, сохраненные в память для определенного режима, будут удалены, если для
этого режима будет введен имеющийся или новый код из 4 цифр (это относится также к
прямому вводу кода, вводу кода по результатам поиска кода и брэнда).
c.
При запоминании подсветка ЖК-дисплея отключается.
8.1 Запоминание команд
15-50mm
a.
b.
c.
d.
e.
f.
g.
h.
i.
Нажмите и удерживайте кнопку S, пока на ЖК-дисплее не появится надпись “Code Setup”
(“Настройка кодов”) (это произойдет приблизительно через 2-3 секунды).
Отпустите кнопку S.
Используйте кнопки Вверх/Вниз, чтобы перейти к опции “Learn Setup” (“Настройка
запоминания”). Нажмите и отпустите кнопку OK.
На экране дисплея появится надпись “Learn One Mode” (“Запомнить для одного режима”).
Нажмите и отпустите кнопку OK.
На экране дисплея появится надпись “Select a Mode Key?” (“Выбрать режимную кнопку?”).
Нажмите и отпустите нужную режимную кнопку (TV, VCR, DVD, и т.д.).
На экране появится надпись “Select a Key to Learn?” (“Выбрать кнопку для запоминания?”).
Нажмите и отпустите ту кнопку пульта ДУ с ЖК-дисплеем, которой вы хотите приписать
код первоначального пульта ДУ.
На экране появится надпись “Learning: Please Wait” (“Идет запоминание: подождите”).
Нажмите и удерживайте кнопку первоначального пульта ДУ, пока на экране ЖК-дисплея
не появится надпись “Success” (“Успешно”) или надпись “Key Learn Error” (“Ошибка
запоминания кнопки”) (см. Советы по запоминанию). Затем на экране появится надпись
“OK-Learn More or Exit?” (“OK – Продолжить запоминание или выйти?”) (для завершения
этого процесса потребуется 2-3 секунды). Отпустите кнопку первоначального пульта ДУ.
Надпись “OK-Learn More or Exit?”(“OK – Продолжить запоминание или выйти?”) будет все
еще отображаться на экране дисплея. Для запоминания других кнопок нажмите и
отпустите кнопку OK и повторите все шаги, начиная с шага “f”. Для выхода нажмите и
отпустите кнопку Exit.
На экране в течение короткого времени будет отображаться надпись “Please Wait”
(“Подождите”), затем пульт ДУ выйдет из режима настроек и вернется в обычный режим
работы.
8.2 Очистка всех сохраненных в памяти команд режима :
a.
b.
c.
d.
e.
h.
g.
Нажмите и удерживайте кнопку S, пока на ЖК-дисплее не появится надпись “Code Setup”
(“Настройка кодов”) (это произойдет приблизительно через 3 секунды).
Отпустите кнопку S.
Используйте кнопки Вверх/Вниз, чтобы перейти к опции “Learn Setup” (“Настройка
запоминания”) на экране дисплея. Нажмите и отпустите кнопку OK. На экране появится
надпись “Mode Learn” (“Запоминание режима”).
Используйте кнопки Вверх/Вниз, чтобы перейти к опции “Clear One Learn Mode” (“Очистка
запоминания для одного режима”). Нажмите и отпустите кнопку OK.
На экране дисплея появится надпись “Select a Mode Key?” (“Выбрать режимную кнопку?”).
Нажмите и отпустите нужную режимную кнопку (TV, VCR, DVD, и т.д.).
На экране появится надпись “Confirm OK to Clear” (“Нажмите OK для подтверждения
очистки”). Нажмите и отпустите кнопку OK.
На экране в течение короткого времени будет отображаться надпись “Please Wait”
(“Подождите”), затем пульт ДУ выйдет из режима настроек и вернется в обычный режим
работы.
8.3 Мастер очистки – очистка всех сохраненных в памяти команд (рекомендуется
выполнить перед проведением первого процесса запоминания):
a.
b.
c.
d.
e.
f.
Нажмите и удерживайте кнопку S, пока на ЖК-дисплее не появится надпись “Code Setup”
(“Настройка кодов”) (это произойдет приблизительно через 2-3 секунды).
Отпустите кнопку S.
Используйте кнопки Вверх/Вниз, чтобы перейти к опции “Learn Setup” (“Настройка
запоминания”) на экране дисплея. Нажмите и отпустите кнопку OK. На экране появится
надпись “Mode Learn” (“Запоминание режима”).
Используйте кнопки Вверх/Вниз, чтобы перейти к опции “Clear All Learn Modes” (“Очистка
запоминания для всех режимов”) на экране дисплея. Нажмите и отпустите кнопку OK.
На экране появится надпись “Confirm OK to Clear” (“Нажмите OK для подтверждения
очистки”). Нажмите и отпустите кнопку OK.
На экране в течение короткого времени будет отображаться надпись “Please Wait”
(“Подождите”), затем пульт ДУ выйдет из режима настроек и вернется в обычный режим
работы.
9. Макрокоманды:- кнопка МАКРО в сочетании с цифровыми кнопками 1, 2 и 3, позволяет вам
программировать и сохранять в памяти до 3 последовательностей нажатий кнопок по вашему
- 83 -
выбору. Нажатие соответствующей цифровой кнопки макро заменяет последовательность из
нескольких нажатий кнопок (команды IR), которая отправляется на устройство. Любая
последовательность нажатий кнопок, которую вы постоянно выполняете, может быть сведена до
нажатия всего лишь двух кнопок (кнопки МАКРО, а затем цифровой кнопки 1, 2 или 3). Например,
нажатие кнопки МАКРО, а затем отдельной цифровой кнопки позволит вам включить ТВ, включить
ресивер кабельного телевидения, переключить ТВ-приемник на ваш любимый канал, включить ВКМ
и отдать ему команду на запись и т.д. Под каждой из 3 цифровых кнопок макро можно сохранить
последовательность из 10 нажатий кнопок.
X=1,2,3
X=1,2,3
9.1 Настройка кнопки макро
a.
b.
c.
d.
e.
f.
g.
h.
i.
Нажмите и удерживайте кнопку S, пока на ЖК-дисплее не появится надпись “Code Setup”
(“Настройка кодов”) (это произойдет приблизительно через 3 секунды).
Отпустите кнопку S.
Используйте кнопки Вверх/Вниз, чтобы перейти к опции “Macro Setup” (“Настройка
макро”) на экране дисплея. Нажмите и отпустите кнопку OK.
На экране появится надпись “Macro Key Set” (“Настройка кнопки макро”). Нажмите и
отпустите кнопку OK.
На экране появится надпись “Select a Macro Key” (“Выбрать кнопку макро”). Нажмите и
отпустите одну из цифровых кнопок 1, 2 или 3, на которую вы хотите сохранить
макрокоманду.
На экране появится надпись “Select Macro X Mode” (где “X” – это 1, 2 или 3) (“Выбрать
режим для макро X”). Нажмите и отпустите нужную режимную кнопку (TV, VCR, DVD, и
т.д.). Первой кнопкой в последовательности макро всегда должна быть режимная кнопка.
На экране появится надпись “Select Macro X Key?” (“Выбрать кнопку для макро X?”)
вместе со счетчиком задействованных кнопок (начинается с показателя “02”). Нажмите и
отпустите те кнопки, которые вы хотите включить в последовательность макро, в том
порядке, в котором вы хотите, чтобы они были отправлены на устройство (до “10”).
Чтобы в любой момент сохранить последовательность макро, нажмите и отпустите кнопку
макро. Имейте в виду, что последовательность макро будет автоматически сохранена
после того, как будет нажата 10-ая кнопка.
На экране дисплея появится надпись “Success” (“Успешно”), и пульт ДУ выйдет из режима
настройки, вернувшись к обычному режиму работы.
9.2 Сброс макро
a.
b.
c.
d.
e.
f.
g.
Нажмите и удерживайте кнопку S, пока на ЖК-дисплее не появится надпись “Code Setup”
(“Настройка кодов”) (это произойдет приблизительно через 2-3 секунды).
Отпустите кнопку S.
Используйте кнопки Вверх/Вниз, чтобы перейти к опции “Macro Setup” (“Настройка
макро”) на экране дисплея. Нажмите и отпустите кнопку OK.
Используйте кнопки Вверх/Вниз, чтобы перейти к опции “Macro Key Clear” (“Сброс кнопки
макро”) на экране дисплея. Нажмите и отпустите кнопку OK.
На экране появится надпись “Select a Macro Key” (“Выбрать кнопку макро ”). Нажмите и
отпустите цифровую кнопку 1, 2 или 3 для той последовательности макро, которую вы
хотите удалить.
На экране появится надпись “Confirm OK to Clear” (“Нажмите OK для подтверждения
очистки”). Нажмите и отпустите кнопку OK.
На экране дисплея на короткое время появится надпись “Success” (“Успешно”), и пульт ДУ
выйдет из режима настройки, вернувшись к обычному режиму работы.
Для активации макро в обычном режиме работы пульта ДУ нажмите и отпустите
кнопку МАКРО, а затем (в течение не более 20 секунд) нажмите цифровую кнопку
1, 2 или 3.
В то время как выполняется последовательность макро, на экране дисплея
отображается надпись “Macro X” (“макро X”), а затем пульт ДУ вернется в
обычный режим работы.
Если под нажатой цифровой кнопкой не сохранена последовательность макро, на
экране дисплея на короткое время появится надпись “Macro X Void” (“макро X
недействительна”), и пульт ДУ вернется в обычный режим работы.
9.3 Примечания к макро
1.
Возможно, вы захотите добавить "время задержки" к последовательности макро (например,
для того, чтобы дать вашему ТВ-приемнику разогреться). Время задержки можно добавить во
время выполнения шага “g” в настройке макро, нажав кнопку PAUSE (пауза), а затем цифровую
кнопку в зависимости от количества секунд, необходимых для времени задержки. Например,
чтобы ввести время задержки равное 3 секундам, нажмите и отпустите
кнопку ПАУЗА, а затем цифровую кнопку 3. Максимальное время задержки
составляет 9 секунд. Невозможно ввести цифру "0" после нажатия кнопки
пауза, так как времени задержки равной нулю не существует.
- 84 -
2.
3.
4.
5.
Между каждой передачей команды IR в последовательности макро имеется автоматическая
задержка, равная половине секунды
Первой кнопкой, сохраненной в последовательности макро, ДОЛЖНА быть режимная кнопка
(TV, VCR, и т.д.).
Кнопки настройка и макро не могут участвовать в макро последовательности.
Нажмите кнопку настройка для выхода из настройки макро.
Неполадки и их устранение
Универсальный пульт ДУ не работает или не сохраняет введенные коды
С помощью вашего первоначально пульта ДУ убедитесь в том, что устройство бытовой
электроники функционирует должным образом.
Убедитесь в том, что вы нажали режимную кнопку, соответствующую устройству или
прибору, которым вы хотите управлять с помощью пульта ДУ.
Если код, указанный в списке кодов, не работает, воспользуйтесь методом AUTOSEARCH
(АВТОПОИСК) или введите другой код этого брэнда.
Чтобы найти код, соответствующий вашему устройству, воспользуйтесь автоматическим
поиском.
Убедитесь в том, что батареи питания установлены в соответствии с полярностью.
Для программирования пульту ДУ требуются 2 алкалиновые батареи питания типа AAA
(новые). Если пульт ДУ теряет коды по истечении нескольких дней/недель, эту проблему
можно решить, заменив старые батареи на 2 новые батареи того же самого брэнда.
Если подсветка ЖК-дисплея очень тусклая, в большинстве случаев это свидетельствует о
необходимости замены батарей питания.
- 85 -