1
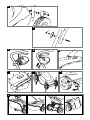
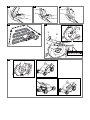
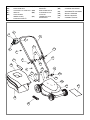
33cm
GB
IMPORTANT INFORMATION
Read before use and retain for future reference
DE
WICHTIGE INFORMATION
Bitte vor dem Benutzen des Gerätes
durchlesen und gut aufbewahren
FR
RENSEIGNEMENTS IMPORTANTS
A lire avant usage et à conserver pour
référence ultérieure
NL
BELANGRIJKE INFORMATIE
Leest u deze informatie voor het gebruik en
bewaar ze voor toekomstige raadpleging
NO
VIKTIG INFORMASJON
Les bruksanvisningen nøye før bruk og
oppbevar den for senere bruk
FI
TÄRKEÄÄ TIETOA
Lue tämä ennen käyttöä ja säilytä myöhempää
tarvetta varten
SE
VIKTIG INFORMATION
Läs anvisningarna före användningen och
spara dem för framtida behov
DK
VIGTIGE OPLYSNINGER
Du bør læse brugsanvisningen før brug og
gemme til senere henvisning
ES
INFORMACIÓN IMPORTANTE
Léase antes de utilizar y consérvela como
referencia en el futuro
PT
INFORMAÇÕES IMPORTANTES
Leia antes de utilizar e guarde para consulta
futura
IT
INFORMAZIONI IMPORTANTI
Leggere prima dell’uso e conservare per
ulteriore consultazione
HU
PL
CZ
SK
SI
Jótállást vállalni csak rendeltetésszerűen
használatba vett gépekre tudunk. Kérjük,
hogy a gép használatba vétele elött
gondosan olvassa el a kezelési utasításokat.
Gwarancja traci ważność w przypadku
używania urządzenia do celów innych niż
wymienione w instrukcji obsługi. Prosimy o
uważne przeczytanie instrukcji oraz o
stosowanie się do zaleceń i wskazówek w
niej zawartych
Záruka se nebude vztahovat na závady
způsobené nesprávným používáním, nebo
jestliže bude výrobek použit pro jiné účely
než pro jaké byl vyroben, nebo také jinak
než je uvedeno v návodu k obsluze. Tento
návod si přečtěte, prosím, velmi pozorně a
uchovejte jej pro možné budoucí odkazy
Záruka na tento produkt nebude uznaná v
prípade porúch spôsobených nesprávnou
obsluhou alebo používaním výrobku na iný
účel alebo iným spôsobom, ako je uvedené.
Pred začatím práce si prosím dôkladne
prečítajte návod na obsluhu a tento si aj pre
prípad potreby uschovajte
Garancija ne velja ob nepravilni uporabi
proizvoda in/ali ob uporabi za drugi namen
kot je izdelan. Prosimo, da pred uporabo,
preverite pazljivo navodila za obratovanje in
jih shranite za kasnejšo rabo.
A
1
B
1
c
D
E
2
F
G
1
7
2
8
1
H
3
9
1
4
5
2
6
3
J
1
K
1
M
L
P
N
1
2
1
Q
3
2
4
5
GB - CONTENTS
1. Switchbox
2. Start/stop lever
3. Lock off button
4. Switchbox screws x 2
5. Upper handle
6. Cable clip x 2
7. Upper Handle Bolt x 2
8. Upper handle Washer x
2
9. Upper Handle Wing Knob
x2
10.Upper Handle Wing
Knob Nut x 2
11. Lower handle x 2
12.Lower Handle Wing
Knob Nut x 2
13.Lower handle Wing Knob x
2
14.Lower Handle Washer
x2
15.Motor Cover
16.Deck
17 Grassbox Handle (if
applicable)
18.Grassbox Upper
19.Grassbox Lower
20.Spanner
21.Instruction Manual
22.Safety Flap
23.Warning Label
24.Product Rating Label
DE - INHALT
1. Schalter
2. Start-/Stopphebel
3. Knopf zur Festsetzung in
Aus-Position
4. Schrauben für
Schaltergehäuse x 2
5. Oberer Griff
6. Kabelhalter x 2
7. Schrauben für oberen
Bügel x 2
8. Unterlegscheibe für
oberen Bügel x 2
9. Flügelknopf für oberen
Bügel x 2
10.Flügelknopfmutter für
oberen Bügel x 2
11. Unterer Griff x 2
12.Flügelknopfmutter für
unteren Bügel x 2
13.Flügelknopf für unteren
Bügel x 2
14.Unterlegscheibe für
unteren Bügel x 2
15.Motorabdeckung
16.Chassis
17.Grasfangbügel (wenn
zutreffend)
18.Oberteil Fangbox
19.Unterteil Fangbox
20.Schraubenschlüssel
21.Bedienungsanweisung
22.Sicherungsklappe
23.Warnetikett
24.Produkttypenschild
FR- TABLE DES MATIÈRES
1. Boîtier de commande.
2. Levier de démarrage/arrêt
3. Bouton de blocage
4. Vis du boîtier de
commande x 2
5. Guidon supérieur
6. Attache câble x 2
7. Boulons de la partie
supérieure de la
poignée x 2
8. Rondelles de la partie
supérieure de la
poignée x 2
9. Boutons de serrage de
la partie supérieure x 2
10.Écrous des boutons de
serrage de la partie
supérieure x 2
11. Guidon inférieur x 2
12.Écrous des boutons de
serrage de la partie
inférieure de la poignée x 2
13.Boutons de serrage de
la partie inférieure x 2
14.Rondelles de la partie
inférieure de la poignée
x2
15.Couvercle du moteur
16.Carter
17.Poignée du bac (le cas
échéant)
18.Partie supérieure du bac
19.Partie inférieure du bac
20.Clé
21.Manuel d’Instructions
22.Volet de sécurité
23.Etiquette d’avertissement
24.Plaquette des
Caractéristiques du Produit
NL - INHOUD
1. Schakelaar
2. Start/stop-hendel
3. Grendelknop
4. Schroeven schakeldoos
2 stuks
5. Bovenstuk van duwboom
6. Snoerklem x 2
7. Bout bovenste
handgreep x 2
8. Borgschijfje bovenste
handgreep x 2
9. Vleugelschroef bovenste
handgreep x 2
10.Moer vleugelschroef
bovenste handgreep x 2
11. Onderstuk van duwboom
x2
12.Moer vleugelschroef
onderste handgreep x 2
13.Vleugelschroef onderste
handgreep x 2
14.Borgschijfje onderste
handgreep x 2
15.Motorkap
16.Dek
17.Handgreep grasbak
(indien van toepassing)
18.Bovenste deel
grasvangbak
19.Onderste deel grasvangbak
20.Sleutel
21.Handleiding
22.Veiligheidsklep
23.Waarschuwingsetiket
24.Product-informatielabel
NO - INNHOLD
1. Bryterboks
2. Start/Stopp hendel
3. Brytersperre
4. Skrue til bryterboks x 2
5. Øvre håndtak
6. Kabelklemme x 2
7. Skrue til øvre håndtak x 2
8. Skive til over håndtak x 2
9. Bolt til over håndtak x 2
10.Vingemutter til øvre
håndtak x 2
11. Nedre håndtak x 2
12.Vingemutter til nedre
håndtak x 2
13.Bolt til nedre håndtak x 2
14.Skive til nedre håndtak
x2
15.Motordeksel
16.Klippedeksel
17.Håndtak til
gressoppsamler (hvis
aktuelt)
18.Øvre del av
gressoppsamleren
19.Nedre del av
gressoppsamleren
20.Skiftnøkkel
21.Bruksanvisning
22 Luke
23.Advarselsetikett
24.Produktmerking
FI
1.
2.
3.
4.
5.
6.
7.
8.
9.
- SISÄLTÖ
Kytkinrasia
Käynnistyskahva
Poislukituspainike
Kytkinkotelon ruuvit x 2
Ylempi kahva
Johdon pidike x 2
Yläkahvan pultti x 2
Yläkahvan aluslevy x 2
Yläkahvan kiristysnuppi
x2
10.Yläkahvan kiristysnupin
mutteri x 2
11. Alempi kahva x 2
12.Alakahvan kiristysnupin
mutteri x 2
13.Alakahvan kiristysnuppi
x2
14.Alakahvan aluslaatta x 2
15.Moottorin suojakansi
16.Kansi
17.Ruohonkerääjän kahva
(jos käytössä)
18.Ruoholaatikon yläosa
19.Ruoholaatikon alaosa
20.Kiintoavain
21.Käyttöopas
22.Suojaläppä
23.Varoitusnimike
24.Ruohonleikkurin
arvokilpi
SE - INNEHÅLL
1. Kopplingsdosa
2. Start/stopp-reglage
3. Låsknapp
4 Skruvar för
kopplingsdosa, 2 st
5. Övre handtag
6. Kabelklämma 2 st
7. Bult för övre handtag, 2
st
8. Mellanläggsbricka för
övre handtag, 2 st
9. Vingratt för övre
handtag, 2 st
10.Mutter för övre
handtags vingratt, 2 st
11. Undre handtag x 2
12.Mutter för nedre
handtags vindratt, 2 st
13.Vingratt för nedre
handtag, 2 st
14.Mellanläggsbricka för
nedre handtag, 2 st
15.Motorskydd
16.Kåpa
17.Handtag för
gräsuppsamlare (om
sådan finns)
18.Gräslådans överdel
19.Gräslådans underdel
20.Skiftnyckel
21.Bruksanvisning
22.Säkerhetsklaff
23.Varningsetikett
24.Produktmärkning
DK - INDHOLD
1. Afbryderkontakt
2. Start/stophåndtag
3. Låseknap
4. Skruer til
afbryderkontakt x 2
5. Øvre håndtag
6. Kabelklemme x 2
7. Bolt til øverste håndtag
x2
8. Pakning til øverste
håndtag x 2
9. Vingegreb til øverste
håndtag x 2
10.Vingegrebsmøtrik til
øverste håndtag x 2
11. Nedre håndtag x 2
12.Vingegrebsmøtrik til
nederste håndtag x 2
13.Vingegreb til nederste
håndtag x 2
14.Pakning til nederste
håndtag x 2
15.Motordæksel
16.Skjold
17.Opsamlerhåndtag (hvis
relevant)
18.Øverste del af
græsboksen
19.Nederste del af
græsboksen
20.Skruenøgle
21.Brugsvejledning
22.Sikkerhedsklap
23.Advarselsmœrkat
24.Produktets mærkeskilt
(GB)
CARTON CONTENTS
(DE)
KARTONINHALT
(FR)
CONTENU DU CARTON
(DK)
KARTONINDHOLD
(NL)
INHOUD
(ES)
(NO)
KARTONGEN
INNEHOLDER
CONTENIDO DEL
CARTON
(FI)
PAKETIN SISÄLTÖ
(SE)
FÖRPACKNINGENS
INNEHÅLL
(PT)
(IT)
LEGENDAS DOS
DESENHOS
CONTENUTO
(HU)
A DOBOZ TARTALMA
(PL)
ZAWARTOŚĆ KARTONU
(CZ)
OBSAH KRABICE
(SK)
OBSAH BALENIA
(SI)
VSEBINA ŠKATLE
2
3
5
1
8
7
4
6
9
11
17
7
10
18
12
23
6
13
12
14
22
24
13
14
15
16
19
20
21
Safety Precautions
If not used properly this lawnmower can be dangerous! This lawnmower can cause serious injury to
the operator and others, the warnings and safety instructions must be followed to ensure reasonable
safety and efficiency in using this lawnmower. The operator is responsible for following the warning
and safety instructions in this manual and on the lawnmower. Never use the mower unless the
grassbox or guards provided by the manufacturer are in the correct position.
Explanation of Symbols on the 33cm
Warning
Read the user instructions carefully to
make sure you understand all the controls
and what they do
Always keep the lawnmower on the ground
when mowing. Tilting or lifting the lawnmower
may cause stones to be thrown out
Keep bystanders away. Do not mow
whilst people especially children or pets
are in the mowing area
Switch off! Remove plug from mains
before adjusting, cleaning or if cable is
entangled or damaged. Keep the cable
away from the blade.
Beware of severing toes or hands.
Do not put hands or feet near a rotating
blade.
STOP
Blade continues to rotate after the
machine is switched off. Wait until all
machine components have completely
stopped before touching them.
Do not mow in the rain or leave the
lawnmower outdoors while raining
General
1. Never allow children or people unfamiliar with these
instructions to use the mower. Local regulations may
restrict the age of the operator.
2. Only use the lawnmower in the manner and for the
functions described in these instructions.
3. Never operate the lawnmower when you are tired, ill
or under the influence of alcohol, drugs or medicine.
4. The operator or user is responsible for accidents or
hazards occurring to other people or their property.
Electrical
1. The use of a Residual Current Device (R.C.D.) with a
tripping current of not more than 30mA is
recommended. Even with a R.C.D. installed 100%
safety cannot be guaranteed and safe working
practice must be followed at all times. Check your
R.C.D. every time you use it.
2. Before use, examine cable for damage, replace it if
there are signs of damage or ageing.
3. Do not use the lawnmower if the electric cables are
damaged or worn
4. Immediately disconnect from the mains electricity
supply if the cable is cut, or the insulation is damaged.
Do not touch the electric cable until the electrical supply
has been disconnected. Do not repair a cut or
damaged cable. Replace it with a new one.
ENGLISH - 1
5. Your extension cable must be uncoiled, coiled
cables can overheat and reduce the efficiency of
your mower.
6. Keep cable away from lawnmower, always work
away from the power point mowing up and down,
never in circles.
7. Do not pull cable around sharp objects.
8. Always switch off at the mains before disconnecting
any plug, cable connector or extension cable.
9. Switch off, remove plug from mains and examine
electric supply cable for damage or ageing before
winding cable for storage. Do not repair a damaged
cable, replace it with a new one. Use only Electrolux
replacement cable.
10. Always wind cable carefully, avoiding kinking.
11. Never carry the product by the cable.
12. Never pull on the cable to disconnect any of the plugs.
13. Use only on AC mains supply voltage shown on the
product rating label.
14. Electrolux products are double insulated to
EN60335. Under no circumstances should an earth
be connected to any part of the product.
Cables
Use only 1.00mm2 size cable up to 40 metres length
maximum.
Maximum rating:
1.00mm2 size cable 10 amps 250 volts AC
1. Mains cables and extensions are available from
your local Electrolux Outdoor Products Approved
Service Centre.
2. Only use extension cables specifically designed for
outdoor use.
Preparation
1. While using your product always wear substantial
footwear and long trousers.
2. Make sure the lawn is clear of sticks, stones, bones,
wire and debris; they could be thrown by the blade.
3. Before using the machine and after any impact,
check for signs of wear or damage and repair as
necessary.
4. Replace worn or damaged blades together with their
fixings in sets to preserve balance.
Use
1. Use the lawnmower only in daylight or good artificial
light.
2. Avoid operating your lawnmower in wet grass,
where feasible.
3. Take care in wet grass, you may lose your footing.
4. On slopes, be extra careful of your footing and wear
non-slip footwear.
5. Mow across the face of slopes, never up and down.
6. Exercise extreme caution when changing direction
on slopes. Walk never run.
7. Mowing on banks and slopes can be dangerous.
Do not mow on banks or steep slopes.
8. Do not walk backwards when mowing, you could trip.
9. Never cut grass by pulling the mower towards you.
10. Switch off before pushing the mower over surfaces
other than grass.
11. Never operate the lawnmower with damaged guards
or without guards in place.
12. Keep hands and feet away from the cutting means at
all times and especially when switching on the motor.
Safety Precautions
13. Do not tilt lawnmower when the motor is running,
except when starting and stopping. In this case, do
not tilt more than absolutely necessary and lift only
the part which is away from the operator. Always
ensure that both hands are in the operating position
before returning the appliance to the ground.
14. Do not put hands near the grass discharge chute.
15. Never pick up or carry a mower when it is operating
or still connected to the mains supply.
16. Remove the plug from the mains :
before leaving the mower unattended for any period;
before clearing a blockage;
before checking, cleaning or working on the
appliance;
if you hit an object. Do not use your lawnmower
until you are sure that the entire lawnmower is in a
safe operating condition.;
if the lawnmower starts to vibrate abnormally.
Check immediately. Excessive vibration can cause
injury.
Maintenance and storage
1. Keep all nuts, bolts and screws tight to be sure the
lawnmower is in safe working condition.
2. Check the grassbox/grassbag frequently for wear or
deterioration.
3. Replace worn or damaged parts for safety.
4. Only use the replacement blade, blade bolt, spacer
and impeller specified for this product.
5. Be careful during adjustment of the lawnmower to
prevent entrapment of the fingers between moving
blades and fixed parts of the machine.
-
Assembly Instructions
Assembly of Lower Handles to Deck
1. Insert the nuts into the lower handle wing knobs. (A1)
2. Place the hole in the lower handle over the end of
the tie rod (A)
3. Place the washer and wing knob onto the end of the
tie rod and firmly tighten. (A)
4. Repeat on the other side.
Assembly of Upper Handles to Lower Handles.
1. Insert the nuts into the upper handle wing knobs. (B1)
2. Ensure the upper handle and the lower handle are
aligned correctly. (B)
3. Fit the bolts, washers and wing knobs..(B)
4. Fit the cable to the handles with the clips provided,
making sure the cables are not trapped between the
upper and lower handles.
Assembly of Switchbox to Upper Handle
1. Insert the studs in the switchbox hinge into the holes
in the upper handle as illustrated in Fig C
2. Firmly secure with the two screws (D).
Grassbox Assembly.
1. Insert the grassbox handle into the grassbox upper, as
illustrated in fig E, and press firmly down until the
handle clicks into place - (if applicable).
2. Align the grassbox upper with the grassbox lower.
3. Locate the clips in the order illustrated in Fig F,
ensuring all the clips are firmly in place.
Adjusting the Cutting Height
Cutting Height Adjustment (G) and (H)
•
Height of cut is adjusted by raising or lowering
the wheels.
•
There are five heights of cut on this product.
•
NOTE
A medium height of cut is recommended for
most lawns.
The quality of your lawn will suffer and
collection will be poor if you cut too low.
HEIGHT OF CUT
Low
WHEELS POSITION
Front position 1
Back position 1
Low to Medium
Front position 1
Back position 2
Medium
Front position 2
Back position 2
Medium to High
Front position 2
Back position 3
High
Front position 3
Back position 3
Grassbox
Fitting Fully Assembled Grassbox to Lawnmower.
See Fig J.
1. Lift safety flap.
2. Make sure the discharge chute is clean and free
from debris.
3. Locate fully assembled grassbox onto the location
point at the rear of the deck (J1)
4. Locate safety flap onto the top of the grassbox.
Ensure the grassbox is securely located.
• IMPORTANT !
AFTER FITTING ENSURE NO GAP REMAINS
BETWEEN THE SAFETY FLAP AND THE
GRASSBOX.
• Removal is the reverse procedure.
• For larger areas of grass where grass collection is
not required you can use your lawnmower without
the grassbox. Ensure the Safety Flap is fully closed.
The design of the safety flap permits the cut grass to
be discharged downward behind the machine.
ENGLISH - 2
Starting and Stopping
To Start your Lawnmower
1. Connect female extension cable connector to the
back of the switchbox.
2. Connect plug to mains and switch on.
3. Tilt the handle downwards to slightly raise the front of
the lawnmower and to reduce the risk of lawn
damage whilst starting.
The switchbox is provided with a lock-off button
(K1) to prevent accidental starting.
4. Press and hold the lock off button on the
switchbox,(K1) then squeeze the Start/Stop lever
towards the upper handle as shown on Fig. L.
5. Continue to squeeze the start/stop lever towards the
upper handle and release the lock-off button.(M)
6. Lower the lawnmower to its proper operating position
and commence mowing.
To Stop your Lawnmower
1. Release the pressure on the Start/Stop lever.
How to Mow
1. For the best results, mow the outside edge of the
lawn in a clockwise direction first.(N1)
2. Then start mowing the edge of the lawn nearest to
the power point so the cable is laid out on the lawn
you have already cut. (N2)
3. For best grass collection, always mow in a straight line,
do not swing the lawnmower from side to side.
Do Not Overload Your Mower
Mowing long thick grass may cause the motor speed to
drop, you will hear a change in the motor sound. If the
motor speed drops you may overload your lawnmower
which may cause damage. When mowing in long thick
grass a first cut with the cutting height set higher will
help reduce the load. See Adjusting the Cutting Height.
Mow twice a week during the growing season, your lawn
will suffer if more than a third of its length is cut at one
time and this may also result in poor collection.
Removing and Fitting the Blade and Fan
P1 - Blade bolt
P2 - Blade
P3 - Fan
• Always handle the blade with care - sharp edges
could cause injury. USE GLOVES.
Removing the Blade and Fan
1. To remove the blade bolt, hold the fan firmly and with
the spanner provided loosen the blade bolt by turning
it anti-clockwise (P).
2. Remove the blade bolt, blade and fan. (P)
3. Inspect for damage and clean as necessary.
• Renew your metal blade after 50 hours mowing
or 2 years whichever is the sooner - regardless of
condition.
• If the blade is cracked or damaged replace it
with a new one.
• Never use a blade bolt if the insulated head is
damaged cracked or missing.
Fitting the Blade and Fan
1. Ensure the fan is located correctly.(P)
2. Fit the blade to the fan with the tilt edges of the blade
(P4) facing towards the mower, ensuring the blade is
located onto the fan location points (P5) correctly
3. Re-assemble blade bolt through blade and fan.
4. Hold the fan firmly and tighten blade bolt firmly with
the spanner provided. Do not over tighten.
5. Do not use a longer spanner.
Caring for your Lawnmower
Cleaning (Q)
• USE GLOVES
• IMPORTANT
It is very important that you keep your lawnmower
clean. Grass clippings left in any of the air intakes or
under the deck could become a potential fire hazard.
1. Remove grass from under the deck with brush.
2. Using a soft brush - remove grass clippings from all
air intakes, the discharge chute and the grass box.
3. Remove the blade, see Figure P, to gain access to
the fan and clean with a soft brush.
4. Wipe over the surface of your lawnmower with a dry
cloth.
• IMPORTANT
Never use water for cleaning your lawnmower. Do
not clean with chemicals, including petrol, or
solvents - some can destroy critical plastic parts.
At the End of the Mowing Season
1. Replace blade, bolts, nuts or screws, if necessary.
2. Clean your lawnmower thoroughly.
3. Make sure that the electric cable is coiled properly.
Storing your Lawnmower
Store in a dry place where your lawnmower is protected
from damage.
Service Recommendations
• Your product is uniquely identified by a silver and black product rating label.
• We strongly recommend that your product is serviced at least every twelve months, more often in a
professional application.
ENGLISH - 3
Environmental Information
Electrolux Outdoor Products are manufactured under
an Environmental Management System (ISO 14001)
using, where practical, components manufactured in
the most environmentally responsible manner,
according to company procedures, and with the
potential for recycling at the end of the products’ life.
• Packaging is recyclable and plastic components
have been labelled (where practical) for
categorised recycling.
• Awareness of the environment must be considered
when disposing of ‘end-of-life’ product.
• If necessary, contact your local authority for
disposal information.
The symbol
on the product or on its packaging
indicates that this product may not be treated as
household waste. Instead it shall be handed over to
the applicable collection point for the recycling of
electrical and electronic equipment.
By ensuring this product is disposed of correctly, you
will help prevent potential negative consequences for
the environment and human health, which could
otherwise be caused by inappropriate waste handling
of this product.
For more detailed information about recycling of this
product, please contact your local council office, your
household waste disposal service or the shop where
you purchased the product.
Fault Finding Hints
Fails to Operate
1. Is the correct Starting procedure being followed?
See ‘To Start your Lawnmower’
2. Is the Power Turned On?
3. Check the fuse in the plug, if blown replace.
4. Fuse continues to blow?
Immediately disconnect from the mains
electricity supply and consult your local
approved Service Centre.
Poor Grass Collection
1. Disconnect from the mains electricity supply.
2. Clean the outside of the air intakes, the discharge
chute and the underside of the deck.
3. Raise to a higher height of cut. See Adjusting the
Cutting Height
4. Clean Fan Blades.
5. If poor collection persists.
Immediately disconnect from the mains
electricity supply and consult your local
approved Service Centre.
Excessive Vibration
1. Disconnect from the mains electricity supply.
2. Check that the blade is fitted correctly?
3. If the blade is damaged or worn, replace it with a
new one.
4. If vibration persists, turn the blade through 180o by
first loosening the blade bolt, turning the blade and
re-tightening the blade bolt.
5. If vibration persists?
Immediately disconnect from the mains
electricity supply and consult your local
approved Service Centre.
Lawnmower becomes heavy to push
1. Disconnect from the mains electricity supply.
2. In long grass or uneven ground, the height of cut
should be raised to a higher position. See Adjusting
the Cutting Height
3. Check that the wheels and rollers can rotate freely.
4. If problem persists?
Immediately disconnect from the mains
electricity supply and consult your local
approved Service Centre.
Guarantee and Guarantee Policy
If any part is found to be defective due to faulty
manufacture within the guarantee period, Electrolux
Outdoor Products, through its Authorised Service
Repairers will effect the repair or replacement to the
customer free of charge providing:
(a) The fault is reported directly to the Authorised
Repairer.
(b) Proof of purchase is provided.
(c) The fault is not caused by misuse, neglect or faulty
adjustment by the user.
(d) The failure has not occurred through fair wear and
tear.
(e) The machine has not been serviced or repaired,
taken apart or tampered with by any person not
authorised by Electrolux Outdoor Products.
(f) The machine has not been used for hire.
(g) The machine is owned by the original purchaser.
(h) The machine has not been used commercially.
*
This guarantee is additional to, and in no way
diminishes the customers statutory rights.
Failures due to the following are not covered, therefore
it is important that you read the instructions contained in
this Operator's Manual and understand how to operate
and maintain your machine:
Failures not covered by guarantee
* Replacing worn or damaged blades.
* Failures as a result of not reporting an initial fault.
* Failures as a result of sudden impact.
* Failures as a result of not using the product in
accordance with the instructions and recommendations
contained in this Operator's Manual.
* Machines used for hire are not covered by this guarantee.
* The following items listed are considered as wearing
parts and their life is dependent on regular maintenance
and are, therefore not normally subject to a valid
warranty claim: Blades, Electric Mains cable.
* Caution!
Electrolux Outdoor Products does not accept liability
under the warranty for defects caused in whole or part,
directly or indirectly by the fitting of replacement parts or
additional parts that are not either manufactured or
approved by Electrolux Outdoor Products, or by the
machine having been modified in any way
ENGLISH - 4
I, the undersigned M. Bowden of
Electrolux Outdoor Products, Aycliffe
Industrial Park, NEWTON AYCLIFFE, Co.
Durham. DL5 6UP. Certify that the
Lawnmower:Category........Electric Wheeled Rotary
Make..............Electrolux Outdoor
Products
Conforms to the specifications of Directive
2000/14/EEC
I, the undersigned M. Bowden of
Electrolux Outdoor Products, Aycliffe
Industrial Park, NEWTON AYCLIFFE, Co.
Durham. DL5 6UP Certify that a sample
of the above product has been tested
using directive 81/1051/EEC as a guide.
The maximum A-weighted sound pressure
level recorded at operator position under
free field semi anechoic chamber
conditions was :-
Type of Cutting Device....Rotary Blade
Identification of Series......See Product Rating Label
Conformity Assesment Procedure....ANNEX VI
Notified Body....................I.T.S., Cleeve Road, Leatherhead,
Surrey. KT22 7SB England
Other Directives:-.............98/37/EEC, 89/336/EEC, 73/23/EEC
& applicable standards:-. EN60555-2:1987, EN60555-3:1987,
EN55014:1993, EN55014:1995, EN836:1997, IEC335-1:1991,
IEC335-2-77:1996
Ich, der Unterzeichner M. Bowden of
Electrolux Outdoor Products, Aycliffe
Industrial Park, NEWTON AYCLIFFE, Co.
Durham. DL5 6UP. bescheinige hiermit,
dass der Rasenmäher:Kategorie.... Elektrorasenmähe
Fabrikat...... Electrolux Outdoor
Products
die Spezifikationen der Direktive
2000/14/EG erfüllt
Je soussigné M. Bowden of Electrolux
Outdoor Products, Aycliffe Industrial Park,
NEWTON AYCLIFFE, Co. Durham. DL5
6UP. certifie que la tondeuse:Catégorie...Rotative à roues électrique
Marque...Electrolux Outdoor Products
est conforme aux spécifications de la
Directive 2000/14/EEC
Ich, der Unterzeichner M. Bowden,
Electrolux Outdoor Products, Aycliffe
Industrial Park, NEWTON AYCLIFFE, Co.
Durham, DL5 6UP, bescheinige hiermit,
daß eine Probe des obigen Produkts
getestet wurde und dabei ISO 5349 als
Richtschnur verwendet wurde. Der
maximale gewichtete
Vibrationseffektivwert, der an der
Handposition des Bedieners gemessen
wurde, betrug:-
Je soussigné M. Bowden, Electrolux
Outdoor Products, Aycliffe Industrial Park,
NEWTON AYCLIFFE, Co. Durham, DL5
6UP, Grande-Bretagne, certifie qu’un
échantillon du produit ci-dessus a été
essayé selon les indications de la norme
ISO 5349. La moyenne quadratique
pondérée des vibrations enregistrées à la
position de la main de l’opérateur était
de:-
Type...................................................................
Largeur de coupe..............................................
Vitesse de rotation de l'outil de coupe..............
Niveau garanti de puissance sonore.................
Niveau mesuré de puissance sonore................
Niveau...............................................................
Valeur................................................................
Poids.................................................................
Ik, ondergetekende M. Bowden,
Electrolux Outdoor Products, Aycliffe
Industrial Park, NEWTON AYCLIFFE, Co.
Durham, DL5 6UP, verklaar hierbij dat
een proefexemplaar van het
bovengenoemde product is getest
volgens richtlijn 81/1051/EEC. Het
maximale A-belaste geluidsdrukniveau dat
is geregistreerd bij de positie van de
bediener in een semi geluiddichte ruimte
bij vrije veld condities bedraagt:-
Type maaier...................... Roterend mes
Identificatie van serie....... Zie Productlabel
Procedure voor het beoordelen van conformiteit......ANNEX VI
Op de hoogte gestelde instantie...I.T.S., Cleeve Road,
Leatherhead, Surrey.
KT22 7SB England
Andere directieven........98/37/EEC, 89/336/EEC, 73/23/EEC
en aan de volgende normen.......EN60555-2:1987, EN605553:1987, EN55014:1993, EN55014:1995, EN836:1997, IEC3351:1991, IEC335-2-77:1996
RE330
33cm
2,800 RPM
86 dB (A)
84 dB (A)
73.5 dB (A)
3.49 m/s2
10.1 kg
Typ............................................................................ RE330
Schnittbreite............................................................. 33cm
Umdrehungsgeschwindigkeit des Schneidwerks.... 2,800 RPM
Garantierter Geräuschpegel.................................... 86 dB (A)
Gemessener Geräuschpegel................................... 84 dB (A)
Höhe ........................................................................ 73.5 dB (A)
Wert.......................................................................... 3.49 m/s2
Gewicht.................................................................... 10.1 kg
Je soussigné M. Bowden, Electrolux
Outdoor Products, Aycliffe Industrial Park,
NEWTON AYCLIFFE, Co. Durham, DL5
6UP, Grande-Bretagne, certifie qu’un
échantillon du produit ci-dessus a été
essayé selon les indications de la
directive 81/1051/EEC. Le niveau
maximum pondéré de pression
acoustique enregistré à la position de
l’opérateur en champ libre en chambre
demi-sourde était de:-
Type d'outil de coupe........... Lame rotative
Identification de la serie....... Voir la Plaquette
D’identification
Procédure d'évaluation de la conformité........ANNEX VI
Organisme notifié.... I.T.S., Cleeve Road, Leatherhead,
Surrey. KT22 7SB England
Autres directives..... 98/37/EEC, 89/336/EEC, 73/23/EEC
et aux normes........ EN60555-2:1987, EN60555-3:1987,
EN55014:1993, EN55014:1995, EN836:1997, IEC335-1:1991,
IEC335-2-77:1996
Ik, ondergetekende M. Bowden of
Electrolux Outdoor Products, Aycliffe
Industrial Park, NEWTON AYCLIFFE, Co.
Durham. DL5 6UP. verklaar dat de
grasmaaimachine:Categorie..Elektrische grasmaaier op
wielen
Merk.....Electrolux Outdoor Products
Voldoet aan de specificaties van directief
2000/14/EEC
Type......................................................................
Width of Cut...........................................................
Speed of Rotation of Cutting Device.....................
Guaranteed sound power level..............................
Measured Sound Power Level...............................
Level.......................................................................
Value......................................................................
Weight....................................................................
Ich, der Unterzeichner M. Bowden,
Electrolux Outdoor Products, Aycliffe
Industrial Park, NEWTON AYCLIFFE, Co.
Durham, DL5 6UP, bescheinige hiermit, daß
eine Probe des obigen Produkts getestet
wurde und dabei Direktive 81/1051/EWG als
Richtschnur verwendet wurde. Der
maximale A-gewichtete Schalldruckpegel,
der an der Bedienerposition unter FreifeldHalbschalltot-Kammerbedingungen
gemessen wurde, betrug:-
Schneidwerktyp.................... Rotierendes Messer
Identifizierung der reihe....... Siehe Produkttypenschild
Konformitätsbestätigungsverfahren..ANNEX VI
Benachrichtigte Behörde.....I.T.S., Cleeve Road, Leatherhead,
Surrey. KT22 7SB England
Andere Direktiven-.............. 98/37/EEC, 89/336/EEC,
73/23/EEC
und Normen:-..........EN60555-2:1987, EN60555-3:1987,
EN55014:1993, EN55014:1995, EN836:1997, IEC335-1:1991,
IEC335-2-77:1996
I, the undersigned M. Bowden of
Electrolux Outdoor Products, Aycliffe
Industrial Park, NEWTON AYCLIFFE, Co.
Durham. DL5 6UP Certify that a sample
of the above product has been tested
using ISO 5349 as a guide. The
maximum weighted root mean square
value of vibration recorded at operator’s
hand position was:-
RE330
33cm
2,800 RPM
86 dB (A)
84 dB (A)
73.5 dB (A)
3.49 m/s2
10.1 kg
Ik, ondergetekende M. Bowden,
Electrolux Outdoor Products, Aycliffe
Industrial Park, NEWTON AYCLIFFE, Co.
Durham, DL5 6UP, verklaar hierbij dat
een proefexemplaar van het
bovengenoemde product is getest
volgens ISO 5349 als richtlijn. De
maximale belaste effectieve waarde van
trilling, geregistreerd bij de positie van de
hand van de bediener, bedraagt:-
Type.................................................................
Maaibreedte.....................................................
Toerental maaier..............................................
Gegarandeerd geluidsvermogen.....................
Gemeten geluidsvermogen..............................
Niveau..............................................................
Waarde............................................................
Gewicht............................................................
RE330
33cm
2,800 RPM
86 dB (A)
84 dB (A)
73.5 dB (A)
3.49 m/s2
10.1 kg
Já, níže podepsaný M. Bowden of
Electrolux Outdoor Products, Aycliffe
Industrial Park, NEWTON AYCLIFFE,
Co. Durham. DL5 6UP.
potvrzuji, že sekačka:Kategorie.......Elektrická rotační kolová
sekačka
Značka..........Electrolux Outdoor
Products
splňuje specifikace Směrnice
2000/14/EEC
Já, níže podepsaný M. Bowden,
Electrolux Outdoor Products, (Aycliffe
Industrial Park, NEWTON AYCLIFFE,
Co. Durham. DL5 6UP) prohlašuji, že
exemplář svrchu uvedeného výrobku byl
odzkoušen za použití směrnice
81/1051/EEC jako vodítka. Maximální Avážená úroveň zvukového tlaku, která
byla zaznamenána pro pozici uživatele
za podmínek volného pole polobezdozvukové komory, byla-
Typ řezného nástroje...... Rotační nůž
Identifikace Série........... Viz Śtítek Technických Údajů
Výrobku
Postup vyhodnocování souladu..........ANNEX VI
Oznámeno orgánu......... I.T.S., Cleeve Road, Leatherhead,
Surrey. KT22 7SB England
Jiné směrnice................. 98/37/EEC, 89/336/EEC,
73/23/EEC
a normy.......................... EN60555-2:1987, EN60555-3:1987,
EN55014:1993, EN55014:1995, EN836:1997, IEC3351:1991, IEC335-2-77:1996
Ja, dolupodpísaný, M. Bowden of
Electrolux Outdoor Products, Aycliffe
Industrial Park, NEWTON AYCLIFFE,
Co. Durham. DL5 6UP. týmto
potvrdzujem, že kosačka:Kategória....Elektrická rotačná
kolesová kosačka
Výroba....... Electrolux Outdoor
Products
Vyhovuje špecifikáciám uvedeným v
Norme 2000/14/EEC
Rotačný nôž
Vid Štítok Parametrov Výrobku
spôsobilosti tovaru.........ANNEX VI
I.T.S., Cleeve Road, Leatherhead,
Surrey. KT22 7SB England
Ďalšie nariadenia......... 98/37/EEC, 89/336/EEC,
73/23/EEC
a normám..................... EN60555-2:1987, EN60555-3:1987,
EN55014:1993, EN55014:1995, EN836:1997, IEC3351:1991, IEC335-2-77:1996
Spodaj podpisani M. Bowden of
Electrolux Outdoor Products, Aycliffe
Industrial Park, NEWTON AYCLIFFE,
Co. Durham. DL5 6UP. potrjujem, da je
kosilnica:kategorija..........Električni aparat z
gibljivimi kolesi
blagovna znamka..Electrolux Outdoor
Products
v skladu z določbami Direktive
2000/14/EEC
Typ......................................................................... RE330
Šířka sekání........................................................... 33cm
Rotační rychlost řezného nástroje......................... 2,800 RPM
Zaručená hladina akustického výkonu.................. 86 dB (A)
Naměřená hladina akustického výkonu................. 84 dB (A)
Úroveň....................................................................73.5 dB (A)
Hodnota................................................................. 3.49 m/s2
Hmotnost............................................................... 10.1 kg
Ja, dopupodpísaný, M. Bowden,
Electrolux Outdoor Products, Aycliffe
Industrial Park, v meste NEWTON
AYCLIFFE, Co. Durham, DL5 6UP,
týmto potvrdzujem, že vzorka hore
menovaného výrobku bola otestovaná v
súlade s predpisom 81/1051/EEC. Pri
maximálnom zaažení úroveň tlaku
zvuku nameraná u operátora za
podmienok voného poového
pôsobenia polo-anechoického priestoru
bola:-
Typ rezného telesa......
Identifikácia série.........
Postupy určenia právnej
Informované orgány.....
Ja, dopupodpísaný, M. Bowden,
Electrolux Outdoor Products Park,
Aycliffe Industrial Park, v meste
NEWTON AYCLIFFE, Co. Durham, DL5
6UP, týmto potvrdzujem, že vzorka hore
menovaného výrobku bola otestovaná v
súlade s predpisom ISO 5349. Pri
maximálnom zaažení základný priemer
druhej mocniny vibrácie nameraný v
operátorovej ruke bol:-
Typ........................................................................ RE330
Šírka skosu........................................................... 33cm
Rýchlost rotácií rezného telesa............................ 2,800 RPM
Garantovaný stupeň sily zvuku............................ 86 dB (A)
Nameraný stupeň sily zvuku................................ 84 dB (A)
Úroveň.................................................................. 73.5 dB (A)
Hodnota................................................................ 3.49 m/s2
Hmotnos.............................................................. 10.1 kg
Spodaj podpisani M. Bowden, Electrolux
Outdoor Products, Aycliffe Industrial
Park, NEWTON AYCLIFFE, Co. Durham
DL5 6UP potrjujem,da je bil primerek
zgornjega proizvoda testiran glede na
pravilnik 81/1051/EEC. Maximalni nivo
pritiska zvoka A-jakosti, ki je bil
zabeležen na poziciji upravnika v
pogojih prostega polja semi-anakoične
komore je bil:-
Vrsta naprave za rezanje...Rotacijsko rezilo
Identifikacija serije..............Glej Etiketo Označbe Proizvoda
Postopek ugotavljanja skladnosti........................ANNEX VI
Obveščeno telo..................I.T.S., Cleeve Road,
Leatherhead,
Surrey. KT22 7SB England
Druge direktive...................98/37/EEC, 89/336/EEC,
73/23/EEC
in po standardih ................EN60555-2:1987, EN605553:1987, EN55014:1993, EN55014:1995, EN836:1997,
IEC335-1:1991, IEC335-2-77:1996
Já, níže podepsaný M. Bowden,
Electrolux Outdoor Products, (Aycliffe
Industrial Park, NEWTON AYCLIFFE,
Co. Durham. DL5 6UP) prohlašuji, že
exemplář svrchu uvedeného výrobku byl
odzkoušen za použití normy ISO 5349
jako vodítka. Maximální vážená
odmocnina střední kvadratické hodnoty
vibrace, která byla zaznamenána v
pozici ruky uživatele, byla:-
Spodaj podpisani M. Bowden, Electrolux
Outdoor Products, Aycliffe Industrial
Park, NEWTON AYCLIFFE, Co.
Durham. DL5 6UP potrjujem, da je bil
primerek zgornjega proizvoda testiran
glede na pravilnik ISO 5349.
Maksimalna povprečna zmerjena
vrednost korena na kvadrat za
vibriranje, zabeležena na poziciji
upravnikove je bila roke je bila:-
Tip..................................................................RE330
Širina reza......................................................33cm
Hitrost rotacije naprave za rezanje................ 2,800 RPM
Zajamčen nivo hrupa.....................................86 dB (A)
Izmerjen nivo hrupa....................................... 84 dB (A)
Nivo............................................................... 73.5 dB (A)
Vrednost........................................................ 3.49 m/s2
Teža............................................................... 10.1 kg
Newton Aycliffe, 22/10/2004
M. Bowden,
Research & Development Director
BELGIQUE/BELGIË
Flymo Belgique/België
Tel: 02 363 0311, Fax: 02 363 0391
ČESKÁ REPUBLIKA
Electrolux, spol. s.r.o., oz Electrolux Outdoor Products,
Dobronická 635, 148 25 Praha 4
Tel: 02/6111 2408-9, Info-linka: 0800/110 220
Internet: www.partner-flymo.cz E-mail: [email protected]
DANMARK
Electrolux Outdoor Products, Flymo/Partner A/S,
Lundtoftegårdsvej 93A, DK 2800 Kgs.Lyngby
Tel: 45 877577, www.flymo-partner.dk
DEUTSCHLAND
Flymo Deutschland
Tel: 097 21 7640, Fax:097 21 764202
ESTONIA
Electrolux Estonia Ltd (Electrolux Eesti AS)
Tel: (372) 6650010
FRANCE
Flymo France SNC
Tel 01 46 67 8141, Fax 01 43 34 2491
FINLAND SUOMI
Flymo Finland Suomi
Tel: 00 39611, Fax: 00 39 612632
ITALIA
McCulloch Italiana s.r.l. - Via Como 72, 23868 Valmadrera
(LECCO) - ITALIA
Tel: 800 017829, Fax: 0341 581671
IRELAND
Flymo Ireland
Tel: 01 4565222, Fax: 01 4568551
MAGYARORSZÁG
Electrolux Lehel Kft
Tel: 00 36 1 251 41 47
NORGE
Flymo/Partner, div. av Electrolux Motor a.s.
Tel: 69 10 47 90
NEDERLAND
Flymo Nederland
Tel: 0172-468322, Fax: 0172-468219
ÖSTERREICH
HUSQVARNA Zentralwerkstätte, Industriezeile 36, 4020 LINZ,
Tel: 0732 770101-60, Fax: 0732 795922
POLSKA
Electrolux Poland Sp. z.o.o. Husqvarna, 01-612 Warszawa
Myslowicka 10/2
Tel:- (22) 8332949
SLOVENIJA
SKANTEH d.o.o.
Tel:- (061) 133 70 68, Fax:-(061) 133 70 68
SLOVENSKA
Hradok
Electrolux Slovakia s.r.o., Borova Sihot 211, 033 01 Lipt.
Tel: 044 522 14 19, Fax: 044 522 14 18, www.flymo-partner.sk
SCHWEIZ/SUISSE/SUIZZERA
Flymo Schweiz/Suisse/Suizzera
Tel 062 889 93 50 / 889 94 25, Fax 062 889 93 60 / 889 94 35
SVERIGE
Electrolux Outdoor Products, Sverige
Tel: 036 – 14 67 00, Fax: 036 – 14 60 70
UNITED KINGDOM
Electrolux Outdoor Products United Kingdom
Tel: 01325 300303, Fax: 01325 310339
Electrolux Outdoor Products
Aycliffe Industrial Park
NEWTON AYCLIFFE
Co.Durham DL5 6UP
ENGLAND
Telephone - (00) 44 1325 300303 Fax - (00) 44 1325 310339
Our policy of continuous improvement means that the specification of products may be altered from time to time without prior notice.
Electrolux Outdoor Products manufacture products for a number of well known brands under various registered patents, designs and
trademarks in several countries.
© Electrolux Outdoor Products Ltd. Registered Office, Electrolux Works, Oakley Road, Luton LU4 9QQ
Registered number 974979 England
The Electrolux Group. The world’s No.1 choice.
The Electrolux Group is the world’s largest producer of powered appliances for kitchen, cleaning and outdoor use. More than 55 million
Electrolux Group products (such as refrigerators, cookers, washing machines, vacuum cleaners, chain saws and lawn mowers) are
sold each year to a value of approx. USD 14 billion in more than 150 countries around the world.
5119452-02