1
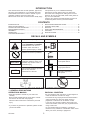
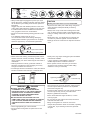
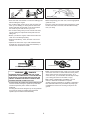
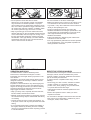
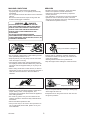
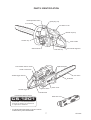
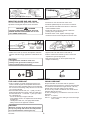
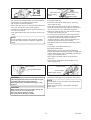
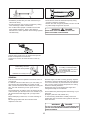
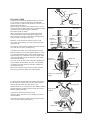
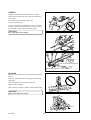
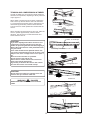
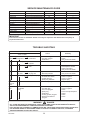
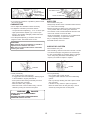
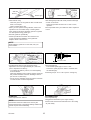
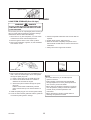
GB ENGLISH
OPERATOR’S MANUAL
CHAIN SAW
CS-1201
WARNING
DANGER
READ INSTRUCTIONS CAREFULLY AND FOLLOW RULES FOR
SAFE OPERATION.
FAILURE TO DO SO COULD RESULT IN SERIOUS INJURY.
© 2003
898 615-6073 2
X750 313-050 2
Printed in Japan 0512A 1099 ES
INTRODUCTION
This manual shows rules of safe operation, proper use,
servicing, and maintenance of your ECHO chain saw.
Follow these instructions in order to maintain a good
operating condition and a long service life.
Misuse of the chain saw can cause serious bodily injury.
It is important for you to understand all safety
precautions correctly before using your chain saw.
This chain saw is designed for cutting wood or wood
products. Do not cut solid metal, sheet metal, plastic or
any non-wood materials.
If there is any clause in this Manual that is hard to be
understood, please contact your ECHO dealer.
CONTENTS
INTRODUCTION ............................................................ 2
DECALS AND SYMBOLS ............................................ 2
RULES FOR SAFE OPERATION .................................. 2
PARTS IDENTIFICATION .............................................. 7
ASSEMBLY .................................................................... 8
OPERATION .................................................................. 8
CUTTING INSTRUCTION ............................................ 10
SERVICE MAINTENANCE GUIDE .............................. 14
TROUBLE SHOOTING ................................................ 14
SERVICE ..................................................................... 15
SAW CHAIN MAINTENANCE ...................................... 17
STORAGE .................................................................... 18
SPECIFICATIONS ....................................................... 19
DECALS AND SYMBOLS
Symbol form/shape
CAUTION
NOTE
Symbol description/application
Symbol form/shape
Symbol description/application
This symbol accompanied by the
words WARNING and DANGER
calls attentions to an act or a
condition which can lead to
serious personal injury or death.
Petrol and oil mixture
Circle and slash symbol means
whatever is shown is prohibited.
Chain oil fill / oil pump
CAUTION indicates a potentially
hazardous situation which, if not
avoided, may result in minor or
moderate injury.
Carburettor adjustment
- Low speed mixture
Carburettor adjustment
- High speed mixture
This enclosed message provides
tips for use, care and
maintenance of the unit.
Carburettor adjustment
- Idle speed
RULES FOR SAFE OPERATION
1. GENERAL PRECAUTIONS
OPERATOR’S MANUAL
PHYSICAL CONDITION
• Do not operate a chain saw when you are fatigued or
under the influence of alcohol or drugs.
• Read the operator’s manual for your chain saw
carefully.
Be thoroughly familiar with the chain saw’s controls
and how to use the chain saw properly.
Failure to follow instructions could lead to personal
injury.
• You should be in good physical and mental health in
order to handle your chain saw safely. Errors in
judgement or execution can be serious or fatal.
If you have any physical condition which strenuous
work could worsen, check with your physician before
using a chain saw.
Do not operate when ill or fatigued, or under the
influence of any substance or medication which could
affect your vision, dexterity or judgement.
• If you have any questions or problems, please contact
your ECHO dealer.
CS-1201
2
1
1
3
2
4
5
6
3
2
4
5, 6
PERSONAL EQUIPMENT
• Always wear approved goggles to protect your eyes.
Wood chips, dust, snapping branches and other debris
can be thrown by the cutting chain into the operator’s
facial area.
Goggles may also offer limited protection in the event
of the cutting chain hitting the operator in the eye area.
If conditions warrant that a ventilated face shield be
worn, goggles must be worn underneath it.
CAUTION
Stuffing ears with cotton is not recommended.
• All persons who make part of their living using chain
saws should be tested periodically for hearing
deterioration.
• Always wear a cap or hat when working with a chain
saw. A safety hard hat is highly recommended when
felling or working under trees, or when objects can fall
on you.
• ECHO recommends wearing hearing protection at all
times.
If not followed, hearing loss can occur.
You should reduce the risk of hearing damage by
wearing either “headset” type protectors or ear plugs
which are approved by an authorized organization.
• Wear heavy duty, non-slip gloves for improved grip,
and also for protection against cold and vibration.
• Safety tip shoes or boots with non-slip sole should be
worn.
Jewery
Ties, Cords, Strings
Fragile or open toed footwear
Loose clothing or open jacket
• Never wear loose clothing, unbuttoned jackets, flared
sleeves and cuffs, scarves, tie-strings, neckties, cords,
chains, jewelry, etc. which could snag the saw chain or
underbrush.
• Safety vests, leg chaps and logger’s pants of ballistic
material are available.
It is the operator’s responsibility to wear such
additional protection if conditions warrant it.
• Clothing should be of sturdy, protective material. It
should be snug-fitting to resist snagging, but roomy
enough for freedom of movement.
• Never operate a chain saw when you are alone.
Arrange to have someone remain within calling
distance in case you need help.
• Trouser legs should not be flared or cuffed, and should
be either tucked into the boot tops or trimmed short.
Tightening
direction
Tightening direction
Fuel tank cap
Oil tank cap
FUEL
WARNING
• The fuel tank may be under pressure. Always loosen
the fuel cap and wait for pressure to be equalized
before removing the cap.
DANGER
• PETROL AND FUEL ARE EXTREMELY
FLAMMABLE. IF SPILLED OR IGNITED BY
IGNITION SOURCE, IT CAN CAUSE FIRE AND
SERIOUS INJURY OR PROPERTY DAMAGE.
EXTREME CAUTION IS REQUIRED WHEN
HANDLING PETROL OR FUEL.
• AFTER REFUELLING, TIGHTEN FUEL CAP
FIRMLY AND CHECK FOR LEAKAGE. IN CASE OF
FUEL LEAKAGE, REPAIR BEFORE STARTING
OPERATION SINCE THERE IS A DANGER OF
FIRE.
• Fill the fuel tank outdoors over bare ground and install
the fuel cap securely. Do not pour fuel indoors.
• Wipe any spilled fuel off the unit.
• Never refuel while the engine is still hot, or fuel a
running engine.
• Do not store the unit with fuel in its tank, because a
fuel leak could start a fire.
• Bring an extinguisher or shovel in case of fire.
Despite the precautions which can be taken, operating
a chain saw, or just working in the forest, presents
dangers.
• Use an appropriate type of fuel container.
• Do not smoke or bring flame or sparks near to fuel
supplies.
3
CS-1201
3m
Guide bar cover
STARTING ENGINE
TRANSPORTATION
• Move the chain saw at least 3 m from the fuelling point
before starting the engine.
• When transporting your chain saw, use the appropriate
guide bar cover.
• Do not allow other persons to be near the chain saw
when you are starting or cutting with the chain saw.
Keep bystanders and animals out of the work area.
Do not let anyone hold wood for you to cut.
• Carry the chain saw with the engine stopped, the guide
bar and saw chain to the rear, and the silencer away
from your body.
• Do not start cutting until you have a clear work area,
secure footing and a planned retreat path from the
falling tree.
• Before you start the engine, make sure that the saw
chain is not contacting anything.
• Keep the handles dry, clean, and free of oil or fuel
mixture.
• Operate the chain saw only in well-ventilated areas.
Exhaust gas, oil mist (from chain saw lubrication) or
saw dust saw is harmful to health.
Rotational kickback
Pinch
Linear kickback
Chain moving downward at impact
2. KICKBACK SAFETY PRECAUTIONS
WARNING
• Either or these reactions may cause you to lose control
of the saw and come in contact with the moving chain,
which could result in serious personal injury. As a
chain saw user, you should take several steps to keep
your cutting jobs free from accident or injury.
DANGER
KICKBACK SAFETY PRECAUTION FOR CHAIN
SAW USERS: KICKBACK MAY OCCUR WHEN THE
NOSE OR TIP OF THE GUIDE BAR TOUCHES AN
OBJECT OR WHEN THE WOOD CLOSES IN AND
PINCHES THE SAW CHAIN IN THE CUT.
• With a basic understanding of kickback, you can
reduce or eliminate the element of surprise.
Sudden surprise contributes to accidents. Understand
that rotational kickback is preventable by keeping an
unshielded bar nose from touching an object or the
ground.
• In some cases, tip contact may cause a lightning-fast
reverse reaction, kicking the guide bar up and back
toward the operator (this is called a rotational
kickback).
Pinching the saw chain along the top of the guide bar
may push the guide bar rapidly back toward the
operator (this is called a linear kickback).
CS-1201
4
Don’t reach far out
• Do not operate a chain saw with one hand!
Serious injury to the operator, helpers or bystanders
may result from one-handed operation. For proper
control, always use two hands when operating a chain
saw, one of which operates the trigger. Otherwise, this
can result in the chain saw “skating” or skidding, which
can result in personal injury due to loss of control.
• Do not overreach or cut above chest height.
• Make sure that the area in which you are cutting is free
from obstructions. Do not let the bar nose contact a
log, branch, or any other obstruction which could be hit
while you are operating the saw.
• Cutting at high engine speeds may reduce the
likelihood of kickback. But cutting at part-throttle or low
engine speeds may be preferable to control the chain
saw in tight situations and may also reduce the
likelihood of kickback.
• Keep a good firm grip on the saw which both hands,
with the right hand on the rear handle and the left hand
on the front handle, when the engine is running. Use a
firm grip with thumbs and fingers enriching the chain
saw handles. A firm grip will help you reduce kickback
and maintain control of the saw. Two hands must be
used to control the saw at all times.
• Follow manufacturer’s sharpening and maintenance
instructions for the saw chain.
• Use only replacement guide bars and chains specified
by the manufacturer, or the acceptable equivalents of
these guide bars and chains.
3. OTHER SAFETY PRECAUTIONS
VIBRATION AND COLD
REPETITIVE STRESS INJURIES
It is believed that a condition called Raynaud’s
Phenomenon, which affects the fingers of certain
individuals, may be brought about by exposure to cold
and vibration.
Accordingly, your ECHO chain saw has shock mounts
designed to reduce the intensity of vibration received
through the handles.
Exposure to cold and vibration may cause tingling and
burning followed by loss of color and numbness in the
fingers. We strongly recommend you take the following
precautions because the minimum exposure which
might trigger the ailment is unknown.
It is believed that over-using the muscles and tendons of
the fingers, hands, arms and shoulders may cause
soreness, swelling, numbness, weakness and extreme
pain to the areas just mentioned.
To reduce the risk of repetitive stress injury, do the
following:
• Avoid using your wrist in a bent, extended or twisted
position. Instead, try to maintain a straight wrist
position. Also, when grasping, use your whole hand,
not just the thumb and index finger.
• Take periodic breaks to minimize repetition and rest
your hands.
• Keep your body warm, especially the head and neck,
feet and ankles, and hands and wrists.
• Reduce the speed and force in which you do the
repetitive movement.
• Maintain good blood circulation by performing vigorous
arm exercises during frequent work breaks and also by
not smoking.
• Do exercises to strengthen the hand and arm muscles.
• See a doctor if you feel tingling, numbness or pain in
the fingers, hands, wrists or arms.
• Limit the number of hours of chain saw operation. Try
to fill a part of each work day with jobs other than chain
sawing.
• If you experience discomfort, redness and swelling of
the fingers, followed by whitening and loss of feeling,
consult your physician before further exposing yourself
to cold and vibration.
5
CS-1201
SERVICES
MACHINE CONDITIONS
• All chain saw service operations, other than items
listed in the operator’s manual maintenance
instructions, should be performed by competent
service personnel.
(For example, if an improper tool is used to hold the
flywheel in order to remove the clutch, structural
damage to the flywheel could occur and subsequently
could cause the flywheel to burst.)
• Do not operate a chain saw that is damaged,
improperly adjusted, or not completely and securely
assembled.
Do not operate the chain saw with a loose or defective
silencer.
Be sure that the saw chain stops moving when the
throttle control trigger is released.
WARNING
DANGER
DO NOT MODIFY A CHAIN SAW IN ANY WAY.
ONLY ATTACHMENTS AND PARTS SUPPLIED BY
KIORITZ CORP. OR EXPRESSLY APPROVED BY
KIORITZ CORP. FOR USE WITH THE SPECIFIC
KIORITZ CORP. CHAIN SAW MODELS ARE
AUTHORIZED.
ALTHOUGH CERTAIN UNAUTHORIZED
ATTACHMENTS ARE USEABLE WITH THE KIORITZ
CORP. POWERHEAD, THEIR USE MAY, IN FACT, BE
EXTREMELY DANGEROUS.
Know how limb
is stressed.
See page 12
Cutting from ladders is dangerous.
CUTTING
• Do not operate a chain saw in a tree unless you have
been specifically trained to do so.
• Cutting while on a ladder is extremely dangerous
because the ladder can slip and your control of the
chain saw is limited.
Working aloft should be left to professionals.
• Keep all parts of your body away from the saw chain
when the engine is running.
• Stop the engine before setting the chain saw down.
• Use extreme caution when cutting small-size brush
and saplings because slender material may catch the
saw chain and be whipped toward you or pull you off
balance.
• When cutting a limb that is under tension, be alert for
spring-back so that you will not be struck by the limb or
chain saw when the tension in the wood fibers is
released.
Stay on the uphill side of logs
Down
Cut only wood or wood products
Keep both feet on the ground
WOOD PRACTICES
• Stay on the uphill side when bucking or limbing logs
which might roll when cut.
• Operating a chain saw safely requires a chain saw in
proper working order, sound judgement, and
knowledge of the methods which should be applied in
each cutting situation.
• Keep both feet on the ground. Do not work from offthe-ground positions.
• Do not let any person use your saw unless he has
read this operator’s manual and fully understands its
instructions.
• Never let children operate the saw.
• Use your saw only to cut wood or wood products. Do
not cut solid metal, sheet metal, plastics or any nonwood materials.
CS-1201
6
PARTS IDENTIFICATION
Decompression button
Spark plug cap
Front handle
Air cleaner cover
Manual oil pump
Oil tank cap
Rear handle
Starter handle
Fuel tank cap
Rear handle supporter
Spiked bumpers
Part Number 890151-60730
Choke control knob
Saw chain
Throttle trigger lockout
Guide bar
Throttle trigger
Ignition switch
Clutch cover
Throttle latch
Part Number 890151-60730
Guide bar cover
CS-1201
CAUTION : For Safe Operation
Follow All Safety Precautions
In Operator’s Manual.
* If a decal cannot be read, a new one can be
ordered from your ECHO dealer.
7
CS-1201
Clutch cover
Clutch
Tension adjuster
Guide bar
Spiked bumpers
Two nuts
Bar holes
ASSEMBLY
MOUNTING GUIDE BAR AND CHAIN
• Unscrew two nuts and remove clutch cover.
The unit is delivered with guide bar and saw chain
separated. Install guide bar and chain as follows.
WARNING
• Install the spiked bumpers on the front of machine.
• Mount the bar and slide toward clutch to make saw
chain installation easier.
DANGER
• Install saw chain as shown. (Ensure cutters are
pointing in the right direction)
FOR YOUR OWN SAFETY, ALWAYS STOP THE
ENGINE BEFORE PERFORMING ANY OF THE
FOLLOWING OPERATIONS.
Proper
tension
• Install the clutch cover, tighten nuts finger tight.
Ensure that chain tension adjuster fits into bar hole.
Improper
tension
• Hold the bar nose up and turn the adjuster clockwise
until the chain fits snugly against the underside of the
bar.
• Tighten both nuts with the bar nose held up.
• Pull the chain around the bar by hand. Loosen the
adjustment if you feel tight spots.
• Start the engine and run at low speed. Stop and
readjust if necessary.
CAUTION
1.All adjustments should be made cold.
2.Always wear gloves when working on chain.
3.Do not operate with a loose chain.
OPERATION
FUEL AND LUBRICANT
CHAIN LUBRICANT
• Fuel is a mixture of regular grade petrol and an aircooled 2-stroke engine oil of reputable brand name.
Minimum 89 Octane unleaded petrol is recommended.
Do not use fuel containing methyl alcohol or more than
10 % of ethyl alcohol.
• Recommended mixture ratio; 50 : 1 ( 2 % ) for ISO-LEGD Standard (ISO/CD 13738), JASO FC grade and
ECHO Premium 50 : 1 oil and 25 : 1 ( 4 % ) for JASO
FA or FB grade oil.
- Do not mix directly in engine fuel tank.
- Avoid spilling petrol or oil. Spilled fuel should always
be wiped up.
- Handle petrol with care, it is highly inflammable.
- Always store fuel in approved container.
Proper lubrication of the chain while in operation
reduces the friction between the chain and the guide bar
to a minimum and assures a longer life time. Use only
special chain oil of high quality for this purpose.
Do not use any waste or reclaimed oil to avoid various
problems with the oil pump.
In case of emergency, it is allowed to use motor oil for a
short time.
SAE 30.... in summer
SAE 10.... in winter or for the cutting of wood with a high
resin content.
CAUTION
Whenever opening up the fuel tank, always loosen
the cap very slowly and wait for the tank pressure
to be equalized before removing the cap.
CS-1201
8
Throttle latch
Manual oil pump
Throttle trigger
lockout
Starter handle
Choke control knob
Ignition switch
Throttle trigger
STARTING THE ENGINE
• Fill the fuel tank with fuel mixture. It is not permitted to
fill fuel above the shoulder level of fuel tank.
• Lift ignition switch up.
• Pull choke control knob all the way out. (Use only
when engine is cold.)
• Fill the chain oil tank with lubricant.
• Place chain saw down on a clear level place where the
saw chain will not be in contact with anything.
• Keep your body to the left of the saw. Hold the saw
down with the left hand on top of the front handle, and
with your right foot on the rear handle supporter.
• Lubricate the chain whenever the chain is mounted on
the saw or remounted.
• Make sure guide bar and saw chain are not touching
anything when starting the saw.
• Push manual oiler button until oil coming onto the saw
chain.
• In order to start engine easily, push decompression
button while pulling starter handle to reduce pressure
in cylinder. Rotate the decompressin button 90
degrees clockwise to latch. When engine starts, turn
back the decompression button to release.
NOTE
Do not pull starter rope out to the maximum position.
Do not allow starter handle to snap back against the
casing.
• Pull starter handle several times until first firing sound
is heard.
• Push choke control knob all the way in.
• Pull starter handle again.
• When engine is hard to start, press throttle trigger
lockout down while squeezing the trigger and push the
latch in. When engine starts, immediately squeeze the
trigger up to release the latch.
• After engine has started, idle for a few minutes to
warm it up.
• Ensure proper acceleration and lubrication of saw
chain and guide bar.
Front handle
Ignition switch
Decompression button
Throttle trigger
Throttle trigger lockout
STOP
STOPPING THE ENGINE
• Release throttle trigger and push ignition switch down.
CAUTION
Clutch engages and chain will rotate when engine
is started with throttle trigger squeezed.
After engine starts release throttle trigger to idle
position.
NOTE
If engine does not stop, pull choke control knob all the
way out to stop engine.
Check and repair ignition switch before starting the
engine again.
CAUTION
When throttle latch is used, saw chain will go into
motion as soon as the engine starts.
Never use throttle latch for cutting.
Use it only when starting the engine.
9
CS-1201
CHECKING CHAIN TENSION
PRE CUTTING TEST
• Familiarize yourself with your chain saw before you
start actual cutting.
• Chain tension should be checked frequently during
work and corrected if necessary.
• For this purpose it may be wise to practice by cutting
some small logs or limbs several times.
• Tension the chain as tight as possible, but so it can still
be pulled easily along the bar by hand.
• Do not allow either people or animals into the work
area. Multiple operators - Keep a safe distance
between two or more operators when working together
simultaneously.
WARNING
DANGER
MAKE SURE THAT THE ENGINE IS SHUT OFF
WHEN CHECKING CHAIN TENSION.
CHAIN LUBRICATION TEST
Hold the chain just above a dry surface and open the
throttle to half speed for 30 seconds.
A thin line of “thrown” oil should be seen on the dry
surface.
Too short a distance to your body
Make felling cuts from
left side when possible
If a felling cut must be made
from the right side, stay out of
the kickback path.
Do not crowed the saw with
your body!
Kickback arc is away from you
CUTTING INSTRUCTION
GENERAL
In all circumstances the operation of the chain saw is a
one-man job.
It is difficult at times to take care of your own safety, so
don’t assume the responsibility for a helper as well.
After you have learned the basic techniques of using the
saw, your best aid will be your own good common
sense.
The accepted way to hold the saw is to stand to the left
of the saw with your left hand on the front handle so you
can operate the throttle trigger with your right index
finger.
Before attempting to fell a tree, cut some small logs or
limbs.
Be thoroughly familiar with the controls and the
responses of the saw.
Start the engine, see that is running properly. Squeeze
the trigger to open the throttle wide open, then start the
cut. It is not necessary to press down hard to make the
saw cut. If the chain is properly sharpened, the cutting
should be relatively effortless.
Pushing the saw too hard will slow the engine and
cutting will actually be more difficult.
Some material may adversely affect the housing of your
chain saw.
(Example: palm tree acid, fertilizer etc.)
To avoid housing deterioration carefully remove all
packed saw dust around clutch and guide bar area and
wash with water.
WARNING
DANGER
DO NOT LET THE NOSE OR TIP OF THE GUIDE BAR
TOUCH ANYTHING WHILE ENGINE IS RUNNING TO
AVOID KICKBACK.
CS-1201
10
Fall
3m
Retreat
45°
FELLING A TREE
45°
A falling tree can seriously damage anything it may hit a car, a house, a fence, a power-line or another tree.
There are ways to make a tree fall where you want it, so
first decide where that is!
Before cutting, clear the area around the tree. You will
need good footing while working and you should be able
to work the saw without hitting any obstacles.
Next select a path of retreat.
When the tree begins to fall you should retreat away
from the direction of fall at a 45-degree angle and at
least 3 m from the trunk to avoid the trunk kicking back
over the stump. (See figure right, top)
Retreat
Not this way
Figure A
Side view
Uncut hinge wood
1/10 of diameter
Backcut
2.5 to 5 cm
Begin the cut on the side to which the tree is to fall.
Notch
1/3 of diameter
Cut a notch approximately 1/3 of the way into the tree.
(See figure A)
The position of this notch is important since the tree will
try to fall “into” the notch. (See figure A)
The felling cut is made on the side opposite the notch.
Top view
Figure B
Make the felling cut by placing spiked bumper 2.5 cm to
5 cm above the bottom of the notch and stop cutting at
approximately 1/10 of diameter to the inner edge of the
notch (See figure B) in order to leave the uncut portion
of the wood as a hinge.
Wedges
(when room)
Notch cuts
Do not try to cut through to the notch with the felling cut.
The remaining wood between the notch cut and felling
cut will act as a hinge when the tree falls, guiding it in
the desired direction.
FALL
When the tree starts to fall, stop the engine, place the
saw on the ground and make your retreat quickly.
Backcut
90°
Leave 1/10 of diameter
Hinge
To fell big trees with a diameter exceeding twice the bar
length, start the notching cuts from one side and draw
the saw through to the other side of the notch.
Top view
Figure C
1
Notching cuts
2
Start the back cut on one side of the tree with the spiked
bumper engaged, pivoting the saw through to form the
desired hinge on that side.
Draw-across
method
Then remove the saw for the second cut.
Insert the saw in the first cut very carefully so as not to
cause kickback.
The final cut is made by drawing the saw forward in the
cut to reach the hinge. (See figure C)
3
Felling cuts
5
4
Wedges
11
CS-1201
LIMBING
Do not cut above chest height
Limbing a fallen tree is much the same as bucking.
Never remove a limb from a tree while it is supporting
your weight.
Be careful of the tip touching other limbs.
Always use both hands.
Don’t cut with the saw overhead or the bar in a vertical
position. If the saw should kickback, you may not have
good enough control to prevent possible injury.
CAUTION
Don’t saw above chest height.
Know how limb is stressed
Leave supporting limbs till last
Slide support logs under trunk
BUCKING
No standing on log
Bucking is the sawing of a log or fallen tree into smaller
pieces.
There are a few basic rules which apply to all bucking
operations.
Keep both hands on the handles at all times.
Support logs if possible.
When cutting on a slope or hillside, always stand uphill.
CAUTION
Stay on the uphill side of logs.
Stay on the uphill side of logs
Down
CS-1201
12
“Hinge”
TENSION AND COMPRESSION IN TIMBER
A length of timber lying on the ground will be subject to
tension and compression, depending at which points the
major support is.
Opened
When timber is supported at its ends the compression
side is at the top and the tension side is at the bottom.
To cut between these support points, make the first cut
downwards approximately 1/3rd the timber diameter.
The second cut is made upwards and should meet the
first cut.
“Hinge”
Closed
When the timber is supported at one end only, make the
first cut upwards approximately 1/3rd the timber
diameter. The second cut is made downwards and
should meet the first cut.
“Hinge”
Heavy stress
1/3 Dia. To avoid sprit
CAUTION
If you have misjudged the effects of tension and
compression, and cut from the wrong side, the
timber will pinch the guide bar and chain, trapping it.
Racing the engine with the chain jammed will burn
out your clutch.
If the chain should become jammed and the saw
can not be removed from the cut do not force it out.
Stop the saw, force a wedge into the cut to open it
up.
Never force the saw when it is jammed.
Do not force the saw into the cut.
A dull chain is unsafe and will cause excessive
wear to the cutting attachments.
A good way to tell when the chain is dull is when
fine saw dust comes out instead of chips.
Weakening cut to finish
Overbuck
DOWNs
Unsupported end
CAUTION
Do not touch hot surfaces of cylinder cover and
silencer after you used the chain saw.
UP
Underbuck
WARNING
DANGER
NEVER USE THROTTLE LATCH FOR CUTTING
JOBS.
Wedge
Make angled cut when one section may settle against
the other
13
CS-1201
SERVICE MAINTENANCE GUIDE
AREA
Air Filter
Fuel Filter
Spark Plug
Carburettor
Cooling System
Silencer
Oil Filter
Sprocket
Starter Rope
Guide Bar
Fuel System
Screws, Bolts and Nuts
MAINTENANCE
Clean/Replace
Inspect/Clean/Replace
Inspect/Clean/Adjust/Replace
Adjust/Replace and adjust
Inspect/Clean
Inspect/Tighten/Clean
Inspect/Clean/Replace
Inspect/Replace
Inspect/Replace
Inspect/Clean
Inspect
Inspect, Tighten/Replace
PAGE
15
15
16
15
16
16
15
16
16
15
-
BEFORE USE
•
•
MONTHLY
•
•
•
•
•
•
•
•
•
•
IMPORTANT
Time intervals shown are maximum. Actual use and your experience will determine the frequency of
required maintenance.
TROUBLE SHOOTING
Trouble
Engine
- hard to start
- does not start
Cause
Engine
cranks
Fuel at
carburettor
No fuel at
carburettor
• Fuel filter clogged
• Fuel line clogged
• Carburettor
• Clean or replace
• Clean
• Ask your ECHO dealer
Fuel at cylinder
No fuel at
cylinder
• Carburettor
• Ask your ECHO dealer
Silencer wet with • Fuel mixture is too rich
fuel
•
•
•
•
Open choke
Clean/replace air filter
Adjust carburettor
Ask your ECHO dealer
Spark at end of
plug wire
No spark at end
of plug wire
• Ignition switch off
• Electrical problem
• Turn switch on
• Ask your ECHO dealer
Spark at plug
No spark at plug
•
•
•
•
•
•
•
•
Engine
does not
crank
Engine
runs
Remedy
Dies or
accelerates
poorly
Spark gap incorrect
Covered with carbon
Fouled with fuel
Spark plug defective
Adjust 0.6 to 0.7 mm
Clean or replace
Clean or replace
Replace plug
• Internal engine problem
• Ask your ECHO dealer
•
•
•
•
•
•
•
•
•
•
•
•
•
•
Air filter dirty
Fuel filter dirty
Fuel vent plugged
Spark plug
Carburettor
Cooling system plugged
Exhaust port/silencer
plugged
WARNING
Clean or replace
Clean or replace
Clean
Clean and adjust/replace
Adjust
Clean
Clean
DANGER
• ALL CHAIN SAW SERVICE OPERATIONS, OTHER THAN ITEMS LISTED IN THE OPERATOR’S MANUAL,
SHOULD BE PERFORMED BY COMPETENT SERVICE PERSONNEL.
• FUEL VAPORS ARE EXTREMELY FLAMMABLE AND MAY CAUSE FIRE AND/OR EXPLOSION. NEVER TEST
FOR IGNITION SPARK BY GROUNDING SPARK PLUG NEAR CYLINDER PLUG HOLE, OTHERWISE
SERIOUS PERSONAL INJURY MAY RESULT.
CS-1201
14
T:Idle speed
adjuster
Cleaner cover knob
Air cleaner cover
L:Low speed
mixture adjuster
Air filter
H:High speed
mixture adjuster
Choke control knob
SERVICE
• If you have any questions or problems, please contact
your ECHO dealer.
AIR FILTER
CARBURETTOR
• Always keep air filter clean to maintain air/fuel mixture
in a correct ratio constantly.
• Check before every use.
• Do not adjust the carburettor unless necessary.
• To adjust the carburettor proceed as follows:
• Before removing air cleaner cover, pull choke control
out to prevent dust from entering into carburetor.
- Low speed mixture adjuster (L): 1¼ to 1¾ turns open
• Turn cleaner cover knob anticlockwise with hand and
remove air cleaner cover and air filter.
- High speed mixture adjuster (H): 1½ turns open
- Screw in the needles until lightly seated and return
indicated turn above.
Brush off dust lightly, or wash it in a non-inflammable
solvent if necessary, or replace the air filter.
• Turn idle speed adjuster (T) clockwise until chain
begins to rotate. Then back screw 1/2 turn.
• Dry it completely before installation.
• Reinstall air filter and cover.
CAUTION
When starting, idle speed adjuster (T) should be
adjusted not to rotate the saw chain.
When there is some trouble with the carburettor,
contact your dealer.
CHECK FUEL SYSTEM
• Check before every use.
• After refuelling, make sure fuel does not leak or exude
from around fuel pipe, fuel grommet or fuel tank cap.
• In case of fuel leakage or exudation there is a danger
of fire. Stop using the machine immediately and
request your dealer to inspect or replace.
Oil filter
Fuel filter
FUEL FILTER
OIL FILTER
• Check periodically.
• Check periodically.
- Do not allow dust to enter fuel tank.
- Do not allow dust to enter oil tank.
- A clogged filter will cause difficulty in starting engine
or abnormalities in engine performance.
- A clogged oil filter will affect the normal lubricating
system.
- Pick up the fuel filter through fuel inlet port with a
piece of steel wire or the like.
- Pick it up through oil filling hole with a piece of steel
wire or the like.
- When the filter is dirty, replace it.
- If the filter is dirty, wash it in petrol or replace it.
- When the inside of the fuel tank is dirty, it can be
cleaned by rinsing the tank out with petrol.
- When the inside of the oil tank gets dirty, it can be
cleaned by rinsing the tank out with petrol.
WARNING
DANGER
PETROL AND FUEL ARE EXTREMELY
FLAMMABLE.
EXTREME CAUTION IS REQUIRED WHEN
HANDLING PETROL OR FUEL.
15
CS-1201
0.5 mm
Sprocket
Stiff wire
Groove
Oil hole
Grease gun
Clutch drum
GUIDE BAR
SPROCKET
• Clean before using.
• The damaged sprocket will cause premature damage
or wear of saw chain.
- Clean the groove of the guide bar with a small screw
driver, for example.
- When the sprocket has worn out 0.5 mm or more,
replace it.
- Clean oil holes with a wire.
• Check sprocket when you install new chain. Replace it
if worn.
• When you use sprocket nose guide bar, check nose
sprocket to see if it rotates freely or needs grease.
Worn guide bar shuld be replaced. Injection of grease
into the sprocket using grease gun.
• Reverse guide bar periodically.
• Check sprocket and the clutch and clean the bar
mount area before installation of the guide bar.
Replace either or both if worn.
NOTE
When replacing guide bar or saw chain, ask your
ECHO dealer.
Oil adjusting screw
INCREASE
Stop fin
DECREASE
0.6 to 0.7 mm
AUTOMATIC OILER
SPARK PLUG
• The discharge volume of the automatic oiler is
adjusted to 10 mL/min approximately at 7,000 r/min,
prior to shipment from factory.
• Check periodically.
- The standard spark gap is 0.6 to 0.7 mm.
- Correct the spark gap if it is wider or narrower than
the standard gap.
- To increase the delivery volume, turn the adjusting
screw clockwise.
When the adjusting screw touches stopper and stops,
this position indicates maximum discharge volume.
(23 mL/min at 7,000 r/min)
• Fastening torque: 15 to 17 N·m (150 to 170 kgf·cm)
- Do not turn the adjusting screw beyond the maximum
or minimum limit of volume adjustment.
SILENCER
CYLINDER FINS
• Clean deposits from silencer.
• Check periodically.
• Clogged fins will result in poor engine cooling.
NOTE
• Remove dirt and dust from between fins to let cooling
air pass easily.
Recommend removal of silencer be done by the
Dealer. Because they need thread locking sealant with
special torques when assembling.
CS-1201
16
4 mm
A
0.76 mm
1/5
B
C
SAW CHAIN MAINTENANCE
• Sharpening
In order to file the chain correctly you need:round file
and file holder (A), flat file (B) and a depth gauge tool
(C).
By using the correct file size (5.6 mm Round file) and a
file holder, it is easier to receive a good result.
Never operate a chain saw with a dull or damaged
chain. If the chain requires excessive pressure to cut or
produces dust instead of wood chips then inspect the
cutters for damage. When sharpening the chain the
objective will be to maintain the same angles and
profiles throughout its life as when it was new.
Inspect the chain for damage or wear every time you
refuel your chain saw.
When the length of the cutting teeth has worn down to
only 4 mm the chain must be replaced.
Consult your ECHO dealer for correct sharpening tools
and sizes.
WARNING
DANGER
SWITCH OFF THE ENGINE BEFORE SHARPENING
THE CHAIN.
ALWAYS WEAR GLOVES WHEN WORKING ON
CHAIN.
3
4
A
30°
B
C
85°
10°
60°
D
0.76 mm
30°
2
Parallel
• Properly filed cutters are shown below.
A : Top plate angle 30°
B : Side plate angle 85°
C : Top plate cutting angle 60°
D : Depth gauge 0.76 mm
1. Lock the chain - push hand guard forward.
To rotate the chain - pull hand guard against front
handle.
2. Your chain will have alternative left and right hand
cutters. Always sharpen from the inside out.
3. Keep the angle lines of the file holder parallel to the
line of the chain and file the cutter back until the
damaged area (side plate and top plate) has been
removed.
4. Hold the file tipped 10° upward.
5. Sharpen the most damaged cutter first and then take
all the other cutters back to the same length.
NOTE
These angles are referred to as Oregon 27 saw chain.
For other branded saw chain, follow it’s chain
manufacturer’s instruction.
1
3
5
4
• Drive link serves to remove sawdust from the groove of
the guide bar. Therefore, keep the lower edge of the
drive link sharp, indicated as 5.
1. The depth control determines the thickness of wood
chip produced and must be maintained correctly
throughout the chain life.
2. As the cutter length is reduced, the depth control
height is altered and must be reduced.
3. Position the depth gauge, and file off any of the depth
control which protrudes.
4. Round off the front of the depth control to allow
smooth cutting.
- When setting of the chain is finished, soak it in oil and
wash away filings completely before using.
- When the chain has been filed on the bar, supply
sufficient oil to it, and rotate the chain slowly to wash
away the filings before using again.
- If the chain saw is operated with filings clogged in the
groove, the saw chain and the guide bar will be
damaged prematurely.
(PRECAUTION)
The following faults will increase the risk of kickback
considerably.
1) Top plate angle too large
2) Side plate angle too small
3) File diameter too small
4) Depth gauge too large
- If the saw chain becomes soiled with resin for
instance, clean it with kerosene and soak it in oil.
17
CS-1201
Ignition switch
STOP
STORAGE
LONG TERM STORAGE (Over 30 days)
WARNING
DANGER
DO NOT STORE IN AN ENCLOSURE WHERE FUEL
FUMES MAY ACCUMULATE OR REACH AN OPEN
FLAME OR SPARK.
Do not store your unit for a prolonged period of time (30
days or longer) without performing protective storage
maintenance which includes the following:
1. Store unit in a dry, dust free place, out of the reach
of children and other unauthorized persons.
4. Perform all periodic lubrication and services that are
required.
2. Place the ignition switch in the “STOP” position.
5. Tighten all the screws, bolts and nuts.
3. Remove accumulation of grease, oil, dirt and debris
from exterior of unit.
6. Drain the fuel tank completely and pull the recoil
starter handle several times to remove fuel from the
carburettor.
7. Always store fuel in approved container.
GB ENGLISH
OPERATOR’S MANUAL
CHAIN SAW
CS-1201
WARNING
898 615-6073 1
X750 313-050 1
© 2003
8. Remove the spark plug and pour 1/2 tablespoon of
fresh, clean, two-stroke engine oil into the cylinder
through the spark plug hole.
NOTE
• For future reference, you should keep this
operator’s manual.
A. Place a clean cloth over the spark plug hole.
B. Pull the recoil starter handle 2 or 3 times to
distribute the oil inside the engine.
• If this operator’s manual has become illegible
through impairment or is lost, please purchase a
new one from your ECHO dealer.
C. Observe the piston location through the spark
plug hole.
Pull the recoil starter handle slowly until the
piston reaches the top of its travel and leave it
there.
• When renting or lending this machine to a person
who will operate it, always include this operator’s
manual, which provides explanation and
instructions.
9. Install the spark plug (do not connect ignition cable).
• When transferring a product, please deliver it
attaching the operator’s manual.
10. Cover the chain and the guide bar with the guide bar
cover before putting them in storage.
CS-1201
DANGER
READ INSTRUCTIONS CAREFULLY AND FOLLOW RULES FOR
SAFE OPERATION.
FAILURE TO DO SO COULD RESULT IN SERIOUS INJURY.
Guide bar cover
18
SPECIFICATIONS
CS-1201
External dimentions : L × W × H
mm
490 × 300 × 320
Mass : Saw without guide bar and chain, empty tanks
kg
10.6
Volume :
Fuel tank
Tank for chain lubrication oil
Fuel ( Mixture ratio )
L
L
1.25
0.65
Regular grade petrol. Minimum 89 Octane
unleaded petrol is recommended. Do not use
fuel containing methyl alcohol or more than 10 %
of ethyl alcohol.
50 : 1 ( 2 % ) for ISO-L-EGD Standard ( ISO/CD
13738 ), JASO FC grade and ECHO Premium
50 : 1 oil and 25 : 1 ( 4 % ) for JASO FA or FB
grade oil.
Special chain oil or motor oil
Oil ( Chain oil )
Cutting length : All specified usable cutting lengths of
guide bar
Chain :
Specified pitch
Specified gauge ( thickness of drive links )
Type of guide bar
Guide bar gauge
Type of chain
Lubrication
Sprocket : Specified number of teeth
Engine :
Type
Carburettor
Magneto
Spark plug
Starter
Power transmission
Decompression device
Engine displacement
cm
*83
mm
mm
cm
mm
10.26 ( 0.404 inch )
1.6 ( 0.063 inch )
*83 ( ECHO 33G63 )
1.6 ( 0.063 inch )
*Oregon 27-100E
Adjustable automatic oil pump and manual
7
Air cooled 2-cycle single cylinder
Diaphragm type
Flywheel magneto, TCI system
CHAMPION CJ-6Y
Recoil starter
Automatic centrifugal clutch
With
mL (cm³) 116.3
Other devices :
Throttle trigger lockout, Chain catcher,
Anti-vibration device, Spiked bumper
*Standard configuration, other lengths are available.
Specifications, descriptions and illustrative material in
this literature are as accurate as known at the time of
publication, but are subject to change without notice.
Illustrations may include optional equipment and
accessories, and may not include all standard
equipment.
19
CS-1201
7-2 SUEHIROCHO 1-CHOME, OHME, TOKYO 198-8711, JAPAN
PHONE: 81-428-32-6118. FAX: 81-428-32-6145.