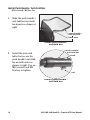
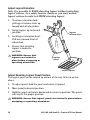
1
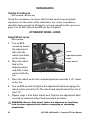
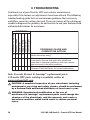
Hospital Transport Chair Manual Wheelchair User Manual 3J01-INS-LAB-RevA12 © GF Health Products, Inc. Read this manual before operating your wheelchair. Save this manual for future use. The most current version of this manual can be found online at www.grahamfield.com. Contents 1INTRodUCTIoN...........................................................................3 2IMpoRTANTSAfeTypReCAUTIoNS..........................................5 3GeTTINGSTARTed......................................................................8 4HANdLINGTIpS..........................................................................9 5ASSeMBLy................................................................................13 6AdJUSTMeNTS.........................................................................17 7MAINTeNANCe.........................................................................23 8TRoUBLeSHooTING..................................................................28 9LIMITedwARRANTy................................................................29 10INdex......................................................................................31 GF Health Products, Inc. is not responsible for typographical errors. All illustrations, specifications, packaging and warranties contained in this catalog are based on the latest product information available at the time of printing. The most current product information, including the most current revision of this manual, can be found online at www.grahamfield.com. Graham-Field, Everest & Jennings, E&J and Traveler are registered trademarks of GF Health Products, Inc. 2 3J01-INS-LAB-RevA12•TravelerHTCUserManual ReAdTHISMANUALBefoReopeRATINGyoURwHeeLCHAIR 1INTRodUCTIoN Important safety, operating, and maintenance instructions that warrant your attention are included in this user manual. Read the entire manual carefully before operating your new wheelchair, and refer to it as often as necessary to help maintain good performance standards. Consult your healthcare professional and Graham-Field authorized distributor for assistance in developing and learning safe and effective techniques for performing your daily activities according to your individual physical abilities and needs, and to make certain that your wheelchair is properly prescribed and adjusted for your use. The safety precautions in this manual are general warnings intended to be used only as basic guidelines. You may find it necessary to develop your own methods for safely solving frequently encountered challenges. Again, consult your professional medical advisors for their recommendations about safety methods, and never hesitate to ask for their assistance. Your wheelchair should receive frequent, regularly scheduled maintenance, including an inspection of the mechanical parts, to ensure proper operation. Some suggested inspection procedures, troubleshooting procedures, and adjustment procedures are included in this manual. When it comes to service and repair, remember that your Graham-Field authorized distributor knows your wheelchair best. All information and specifications in this manual are current at the time of printing. However, because it is Graham-Field policy to continually improve the quality and reliability of all our products, we reserve the right to make changes at any time without notice. Thank you for choosing an Everest & Jennings® product. We at Graham-Field wish to assure you of our continuing commitment to provide innovation and quality in our products. The Traveler HTC, intended for institutional use, provides the ideal solution to the hospital/clinical transport need by incorporating special attendant and inventory control features with a heavy duty frame designed to support up to 500 lb users. 3J01-INS-LAB-RevA12•TravelerHTCUserManual 3 The person performing adjustments on the Traveler HTC has the responsibility of making certain that the user can safely operate the wheelchair with the adjustments selected. This person must evaluate the user's ability, weight, physical condition, the environment in which the wheelchair will be used, and the terrain over which the wheelchair will travel. We recommend the use of anti-tippers at all times. WARNING:Wheninuse,anti-tippersmustbeinstalledinthe downwardposition. Please note the following special statements, used throughout this manual, and their significance: WARNING:Indicatesapotentialhazardsituationorunsafe practicethat,ifnotavoided,couldresultindeathorserious personalinjury. CAUTION:Indicatesapotentialhazardsituationorunsafe practicethat,ifnotavoided,couldresultinminorormoderate personalinjury. s NOTICE:Indicatesapotentialhazardsituationorunsafe practicethat,ifnotavoided,couldresultinproductorproperty damage. Info: Provides application recommendations or other useful information to ensure that you get the most from your product. 4 3J01-INS-LAB-RevA12•TravelerHTCUserManual 2IMpoRTANTSAfeTypReCAUTIoNS IMpoRTANTSAfeTypReCAUTIoNS:ALwAySfoLLowTHeSeSAfeTy pReCAUTIoNSwHeNUSINGyoURwHeeLCHAIR.fAILUReTodo SoCoULdReSULTINpeRSoNALINJURyToyoUoRoTHeRSoR dAMAGeToyoURwHeeLCHAIR. Safety requires the constant attention of the wheelchair user and the attendant. It is extremely important to learn and always use safe methods of performing basic daily activities. Always consult your healthcare professional to determine those methods most suitable for your individual abilities. Protect yourself and your wheelchair by having your Traveler HTC serviced regularly. Whenever any part of your Traveler HTC is not functioning properly, contact your Graham-Field authorized distributor immediately, as a hazardous situation could result, causing personal injury or damage to your wheelchair. ONLY EXCELLENT CONDITION IS ACCEPTABLE WHERE SAFETY IS CONCERNED. Periodic inspection, adjustment, and replacement of worn parts will provide many years of superb performance. wARNINGS WARNING:TravelerHTCmaximumweightcapacityis500lb (227kg),EVENLYDISTRIBUTED. WARNING:Donotoperatethiswheelchaironstreetsor roadways. WARNING:Donotoperatethiswheelchaironhillyorrough terrain,sand,wetoricysurfaces,orsurfaceswithimpaired traction.Ensurethatpathwayisclearofallobstacles. WARNING:Donotturnwheelchairwhilegoingdownhill,as wheelchaircouldtipover. WARNING:Donotattemptinclineswithoutanti-tippersinstalled inthedownwardposition.Donotattemptanyinclineordecline greaterthansixdegrees(10%grade,oronefootofriseorfall pertenfeetoframplength). 3J01-INS-LAB-RevA12•TravelerHTCUserManual 5 WARNING:Thiswheelchairdoesnotofferseatingoroccupant restraintequivalenttotheseatprovidedinamotorvehicle!To increaseyoursafetywhiletravelinginamotorvehicle,always transfertothevehicleseatandusetherestraintprovidedby thevehiclemanufacturer. WARNING:Donottiedownorattachanythingtothewheels. Thiscouldcausetippingandpossiblyresultininjuryordamage tothewheelchair. WARNING:Thefootplates'lowestpointshouldcleartheground byatleast21/2inches,topermitproperclearanceofpotential obstruction. WARNING:Doinga“wheelie”(tiltingthewheelchairbackward untilitreachesitsbalancepoint)isdangerousandcouldresult inpersonalinjurytotheuser. WARNING:Donotplaceyourhandsbetweenseatrailandside panel. WARNING:Donotstandorsteponthefootplateswhile transferringtoorfromyourwheelchair.Thiscouldcausethe wheelchairtotipormaycausepersonalinjuryordamageto yourwheelchair. WARNING:Alwaysengagewheellocksbeforetransferring, usingawheelchairliftorusinganelevator. WARNING:Ensurethatwheelchairisonastable,levelsurface andengagewheellocksbeforeandduringtransfer. WARNING:Operateonlywithanti-tippersinplacewhenleaning ortipping.Wheninuse,anti-tippersmustbeinstalledinthe downwardposition. WARNING:Donotleanoverthetopofthewheelchairback.This couldcausethewheelchairtotipover. WARNING:Toreducetheriskoftippingbeforeleaningor reachingforward,sitbackintheseatandrotatecastersfully towardfrontofwheelchair. WARNING:Unauthorizedmodificationortheuseof non-Everest&Jennings®replacementpartscouldchangethe structureofthewheelchair,voidthewarranty,andcreatea hazardousconditionresultinginseriouspersonalinjury. 6 3J01-INS-LAB-RevA12•TravelerHTCUserManual WARNING:Donotleanonthiswheelchairoruseitasa walker—thesearepracticeswhichcouldresultinlossof balanceandpersonalinjury. WARNING:Donotuseyourwheelchaironescalators. WARNING:Wheellocksarenotbrakes.Donotusethewheel lockstoslowdownyourwheelchair,orwhilethewheelchairis moving.Wheellocksareonlyintendedtokeepthewheelchair inplacewhenitisatacompletestop. WARNING:GFHealthProducts,Inc.specificallydisclaims responsibilityforanypersonalinjuryorpropertydamagewhich mayoccurduringanyusewhichdoesnotcomplywithfederal, state,orlocallawsorordinances. 3J01-INS-LAB-RevA12•TravelerHTCUserManual 7 3GeTTINGSTARTed Please familiarize yourself with main components, identified in Traveler HTC illustration below. back upholstery anti-theft pole push handle / anti-fold bar armpad back post arm attendant wheel lock seat upholstery padded leg panel elevating legrest anti-tipper handrim rear wheel footplate frame crossbrace caster housing caster fork caster wheel 8 3J01-INS-LAB-RevA12•TravelerHTCUserManual 4HANdLINGTIpS The Everest & Jennings® Traveler HTC has been designed and engineered to perform as a stable and well balanced unit when used for its intended purpose. However, it is possible to tip the Traveler HTC over if it is used improperly. We urge you to learn the characteristics of your wheelchair. It is most important to learn safe methods to perform the daily activities basic to your lifestyle. Consult your medical professionals for assistance in developing the skills and proper techniques to perform all activities safely. BALANCe Proper balance is the key to maintaining the stability of your wheelchair. Reaching, bending, and transferring to or from a wheelchair will change the weight distribution and center of gravity of you and your wheelchair. When performing such activities, do so as instructed in the following paragraphs to avoid tipping the wheelchair. TRANSfeRACTIvITIeS WARNING:Alwaysensurethatthewheelchairisonastable, levelsurfaceandengagewheellocksbeforetransfer. WARNING:Donotsteponthefootplates;thiscouldcausethe wheelchairtotip.Foldthemup,andeitherdetachthem,or swingthemaside. WARNING:Thereisacriticalmomentwhenthereislittleorno seatplatformbeneathyou.Takeeveryprecautiontoreducethis unsupporteddistancebeforeyouattempttransfer. Transferring into or out of a wheelchair is a very difficult maneuver. Exercise extreme care when transferring without the aid of either an attendant or a patient lift. Consult your physician, nurse, or physical therapist for assistance in developing your individual technique. Make sure that the wheelchair is stabilized, and will not move or slide during the transfer. Take extra precaution to prevent tipping. Use good body mechanics to prevent personal injury. 3J01-INS-LAB-RevA12•TravelerHTCUserManual 9 ReACHING/BeNdING WARNING:Alwaysturnthecastersfrontwardtoprovide stabilitywhilereaching.Ifindoubt,askforassistanceorusea devicethatwillextendyourreachwithoutrequiringyoutoshift yourweight. Although it is not recommended, you may find it occasionally necessary to lean or reach from your wheelchair. Consult with your healthcare professional for assistance in developing your personal safe reaching or moving techniques suited to your ability and restrictions. forwardorsideward WARNING:Donotattempttoreachobjectsifyouarerequired tomoveforwardintheseat.Donotattempttoretrieveobjects fromthefloorifyoumustreachdownbetweenyourknees. Donotshiftyourweightinthedirectionthatyouarereaching and/orbending;thiscouldcausethewheelchairtotip. 1. Maneuver the wheelchair as close as possible to the object you wish to reach. 2. Rotate both casters fully forward; go forward, and then back the wheelchair toward the object to swing the casters fully forward. 3. Engage both wheel locks. 4. Ensure that the casters are rotated fully forward before reaching. If not, repeat step 2. Backward WARNING:Donotengagethewheellockswhilereaching orbendingbackward.Shouldyourweightsuddenlyshift accidentally,itisbettertorollinthatdirectionthantotipover. WARNING:Donotleanoverthebackupholstery;thiscould causethewheelchairtotip. 1. Maneuver the wheelchair as close as possible to the object; the rear wheels will limit how close you can get. 2. Rotate both casters fully forward; go forward, and then back the wheelchair toward the object to swing the casters fully forward. 3. Reach only as far as your arm will extend without changing your sitting position. If in doubt, reposition the wheelchair or ask for assistance. 10 3J01-INS-LAB-RevA12•TravelerHTCUserManual RAMpSANdINCLINeS WARNING:Duringdescent,thefootplates'lowestpointshould benoclosertothegroundthan21/2inchestopermitproper clearance. WARNING:Donotattemptinclineswithoutanti-tippersinstalled inthedownwardposition.Donotattemptanyinclineordecline ofmorethan6degrees(10%grade,oronefootofriseorfall pertenfeetoframplength). WARNING:Donotusewheellockstoslowyourdescent. Attemptingtousewheellocksislikelytoresultinaccidental lockingthatcouldcausethewheelchairtostopabruptly, suddenlypitchforward,ortipsideways. WARNING:Avoidchangingdirectionwhiledescendingarampor incline,asthiscouldcauseinstability. Most people are capable of negotiating short inclines without assistance, depending upon upper body strength, endurance, and the degree of incline. Know your own capabilities and limitations in terms of strength and endurance before attempting to negotiate an incline or decline. Practice with an attendant or healthcare professional first before attempting any inclines, declines, curbs or ramps. Always inspect the ramp for hazards such as holes, slippery or uneven surfaces, etc. before starting up or down. If you can not see the entire ramp, ask someone to inspect it for you. Ascent Lean the upper part of your body slightly forward as you ascend the incline. If it becomes necessary to stop on the incline, avoid any abrupt or sudden forward movement as you resume climbing, this could cause tipping. descent Always face forward when going down a ramp, but do not lean forward; this could cause tipping. Lean slightly backward to increase stability. It is critical to keep the wheelchair under control at all times. Descent should be made slowly and safely by grasping the handrims; however, use care, as friction heat will be generated. We recommend the use of gloves to reduce the effects of friction heat, but going slower is a better alternative. 3J01-INS-LAB-RevA12•TravelerHTCUserManual 11 CURBSANdSTepS Curbs, steps and stairways are dangerous obstacles that confront the wheelchair user. When you encounter curbs, find a way around, or use the ramps now available in most locations. If you encounter steps and there is no ramp available, avoid the steps by utilizing the disabled designated elevators now required in most locations. WARNING:Neverattempttonegotiatesteps,stairsor escalatorsinyourTravelerHTC. 12 3J01-INS-LAB-RevA12•TravelerHTCUserManual 5ASSeMBLy UNpACkING 1. Check for any obvious damage to the carton or its contents. If damage is evident, notify the carrier or your Graham-Field authorized distributor. 2. Remove all loose packing from the carton. 3. Carefully remove all the components from the carton. Info: Unless the Traveler HTC is to be used immediately, retain boxes, containers and packing material for use in storing until use of Traveler HTC is required. Inspection 1. Examine the wheelchair for nicks, dents, scratches or other damage. 2. Inspect all components. Storage 1. Store the repackaged wheelchair in a dry area. 2. Do not place other objects on top of the repackaged wheelchair. ASSeMBLy Specific tools needed to perform each assembly step are identified in assembly directions. A complete list of tools needed to perform all operations in this section follows: M13 wrench M10 wrench M4 hex key UnfoldTravelerHTC Unfold the Traveler HTC by pushing down with even pressure on the top of the seat upholstery on both sides. WARNING:Donotplaceyourhandsbetweenseatrailandside panel. 3J01-INS-LAB-RevA12•TravelerHTCUserManual 13 InstallpushHandle/Anti-foldBar M10 wrench, M4 hex key 1. Slide the push handle / anti-fold bar over both back posts as shown at right. push handle / anti-fold bar back post install push handle / anti-fold bar 2. Install the nuts and bolts that secure the push handle / anti-fold bar on both sides as shown at right. Use an M10 wrench and M4 hex key to tighten. push handle / anti-fold bar bolt nut secure push handle / anti-fold bar 14 3J01-INS-LAB-RevA12•TravelerHTCUserManual InstallAnti-Theftpole M10 wrench, M4 hex key upper anti-theft pole 1. Attach upper pole section to lower pole section using the included M6 bolt and nut as shown at right. nut bolt 2. Use an M10 wrench and M4 hex key to tighten. lower anti-theft pole attach upper and lower anti-theft poles 3. Attach the pole assembly to the wheel lock bracket using M6 bolt and nut as shown at right. wheel lock bracket bolt 4. Use an M10 wrench and M4 hex key to tighten. nut install anti-theft pole 3J01-INS-LAB-RevA12•TravelerHTCUserManual 15 InstallelevatingLegrests(oroptionalfootrests) M13 wrench WARNING:Thefootplates'lowestpointshouldbenocloserto thegroundthan21/2inches,topermitproperclearance. WARNING:Donotstandonthefootplates;thiscouldcausethe wheelchairtotip. 1. Set legrest on wheelchair frame (so that legrest hinge plates engage hinge pin bolts). swingaway release lever 2. Swing legrest inward. 3. Use an M13 wrench to attach anti-theft nuts. 4. Ensure that legrests are locked in place and that swingaway release levers are locked in a rearward position, toward back of wheelchair. nut hinge plate remove elevating legrest / optional footrest WARNING:Ensurethatfrontriggingislockedinplacebefore occupyingoroperatingwheelchair. 16 3J01-INS-LAB-RevA12•TravelerHTCUserManual 6AdJUSTMeNTS The Traveler HTC offers several adjustments to make it easier and more comfortable to drive. Section 7, MAINTENANCE, offers preventive maintenance suggestions for keeping your wheelchair in excellent condition; ensure that all components are in excellent condition before adjusting. The following are recommended methods; after a few adjustments, you may develop your own. Always consult your Graham-Field authorized distributor for assistance. The person performing adjustments on the Traveler HTC has the responsibility of making certain that the user can safely operate the wheelchair with the adjustments selected. This person must evaluate the user's ability, weight, physical condition, the environment in which the wheelchair will be used, and the terrain over which the wheelchair will travel. All adjustments and their page locations are referenced in the index at the end of this manual. Specific tools needed to perform each adjustment are identified in adjustment directions. A complete list of tools needed to perform all adjustments in this section follows: Hex wrench furnished with wheelchair M13 wrench M10 wrench M5 hex key M4 hex key ReARwHeeLS&CASTeRS We recommend that you do not replace or adjust rear wheel or caster components yourself, since special tools and training are required. Please contact your Graham-Field authorized distributor when your rear wheels or casters need adjustment, or if you wish to change seat height. 3J01-INS-LAB-RevA12•TravelerHTCUserManual 17 ARMS M10 wrench, M4 hex key All Traveler HTC arms are fixed. RemoveArm 1. Use an M10 wrench and M4 hex key to remove bolt and nut that secure arm to front arm socket. right arm nut bolt 2. Hold arm by center of armpad. Lift straight up and off. InstallArm 1. Hold arm by center of armpad. Lower arm straight down into sockets. front arm socket remove arm 2. Install bolt and nut that secure arm to front arm socket as shown above. Use an M10 wrench and M4 hex key to tighten. Ensure nut is tightened and locked in place. WARNING:Ensurethatarmsarelockedinplacebefore occupyingoroperatingwheelchair. 18 3J01-INS-LAB-RevA12•TravelerHTCUserManual fRoNTRIGGING eLevATINGLeGReST,SwINGAwAy WARNING:Thefootplates'lowestpointshouldbenocloserto thegroundthan21/2inches,topermitproperclearance. WARNING:Donotstandonthefootplates;thiscouldcausethe wheelchairtotip. RemoveelevatingLegrest (oroptionalfootrest) swingaway release lever M13 wrench 1. Traveler HTC front rigging (elevating legrests or optional footrests) are equipped with anti-theft nuts, shown at right. Use an M13 wrench to remove them. nut hinge plate remove elevating legrest / 2. To release lock, pull optional footrest swingaway release lever forward, toward front of wheelchair. Legrest will swing outward. 3. To remove, lift legrest straight up off hinge pin bolt. AttachelevatingLegrest(oroptionalfootrest) M13 wrench 1. Set legrest on wheelchair frame (so that legrest hinge plates engage hinge pin bolts). 2. Swing legrest inward. 3. Use an M13 wrench to attach anti-theft nuts. 4. Ensure that legrests are locked in place and that swingaway release levers are locked in a rearward position, toward back of wheelchair. WARNING:Ensurethatfrontriggingislockedinplacebefore occupyingoroperatingwheelchair. 3J01-INS-LAB-RevA12•TravelerHTCUserManual 19 AdjustLegrestelevation Info: It is possible to RAISE elevating legrest without unlocking legrest release. As a safety feature, however, you must unlock legrest release in order to LOWER elevating legrest. 1. To release elevation lock, pull legrest release lever up toward back of wheelchair. 2. Swing legrest up to desired position. legrest release lever 3. Lock legrest elevation level: Pull lever toward front of wheelchair. 4. Ensure that elevating legrest is locked in position. WARNING:Ensurethat legrestsarelockedin placebeforeoccupyingor operatingwheelchair. legrest panel adjust legrest AdjustelevatingLegrestpanelposition The legrest panel can be rotated up and out of the way. Refer to picture above. 1. To adjust panel, hold the panel and rotate it upward. 2. Move panel to desired position. 3. Hold the panel and rotate downward to return to position. The panel will stop at the proper position. WARNING:Ensurethatlegrestpanelsarelockedinplacebefore occupyingoroperatingwheelchair. 20 3J01-INS-LAB-RevA12•TravelerHTCUserManual AdjustfootplateextensionLength(elevatingLegrestor optionalfootrest) See picture at right. 1. Loosen latch to free footplate extension inside hanger. 2. Press down on the locking buttons and adjust the footplate to the desired length. Ensure that the locking buttons are completely extended and securely fastened in the adjustment holes. 3. Fasten latch to secure footplate extension inside hanger. hanger locking button adjustment holes latch footplate 4. Repeat steps 1-3 for the other footplate extension. elevating legrest footplate extension, adjust length 5. Ensure that both footplate extensions are securely fastened and that minimum ground clearance is 2 1/2 inches. WARNING:Ensurethatfootplatesaresecurelyfastenedbefore occupyingoroperatingwheelchair. 3J01-INS-LAB-RevA12•TravelerHTCUserManual 21 CRoSSBRACeS TightenCrossbraces M13 wrench, M5 hex key Check the crossbraces to ensure that the bolt and nut securing both crossbraces in the center of the wheelchair are secure (crossbraces should be loose enough to fold easily, yet snug enough to take up excess play). Use an M13 wrench and M5 hex key to tighten. ATTeNdANTwHeeLLoCkS AdjustwheelLocks M10 wrench 1. Use an M10 wrench to loosen the adjustment bolt until the wheel lock slides on the frame. 2. Place the wheel lock in the locked position and slide it into contact with the tire. lever adjustment bolt shoe right wheel adjust wheel lock 3. Place the wheel lock in the unlocked position and slide it 3/8" closer to the tire. 4. Use an M10 wrench to tighten the adjustment bolt and engage the wheel lock to check the fit. The wheel lock should indent the tire at least 3/8". 5. Repeat steps 1-4 for other wheel lock. Tighten the adjustment bolts securely to eliminate wheel lock movement on frame. WARNING:Ensurethatwheellocksareadjustedsothatthey lockinplaceappropriatelybeforeoccupyingoroperating wheelchair. 22 3J01-INS-LAB-RevA12•TravelerHTCUserManual 7MAINTeNANCe Protect your E&J Traveler HTC by having it serviced regularly. Proper care and maintenance are essential to keep your wheelchair in safe working condition. Periodic inspection, adjustment, and replacement of worn parts will provide many years of superb performance. When you believe that a component or part of your Traveler HTC is not functioning properly, contact your Graham-Field authorized distributor immediately, as a potentially hazardous condition could result. Only excellent condition is acceptable where safety is concerned. ServiceManual There is no service manual for the Traveler HTC. Please contact your Graham-Field authorized distributor with service questions not answered by this manual. Info: We recommend that you have a Graham-Field authorized distributor perform a six month maintenance check, as the dealer may find and correct a problem which might otherwise go undetected and eventually cause more serious problems and / or personal injury. do-It-yourselfMaintenance You can do many of the scheduled maintenance tasks yourself, if you have mechanical ability and a few basic tools. Refer to the maintenance schedule on the next page for the recommended regularity of each procedure. If any maintenance procedure is not clear to you, ask your Graham-Field authorized distributor for assistance. s NOTICE:Impropermaintenancecancauseoperatingproblem andmayaffectyourwarranty. WARNING:Unauthorizedmodificationortheuseof non-Everest&Jennings®replacementpartscouldchangethe structureofthewheelchair,voidthewarranty,andcreatea hazardousconditionresultinginseriouspersonalinjury. 3J01-INS-LAB-RevA12•TravelerHTCUserManual 23 MAINTENANCE SCHEDULE Procedure Perform at least every Week month 3 months 6 months Check tire wear ✔ Check handrims ✔ Check wheel lock engagement ✔ Check anti-tippers (optional) ✔ Wipe off frame with soft cloth ✔ Check upholstery ✔ Check rear wheel adjustment ✔ Check arms ✔ Check backposts / push handle ✔ Check elevating legrests / footrests ✔ Clean frame ✔ Check caster stem rotation ✔ GF distributor maintenance check ✔ Check rear wheel bearings (distributor) ✔ Check caster bearings (distributor) ✔ ListofTools The tools and cleaning supplies listed will assist in the procedures outlined in Section 7. 30 weight oil (available at most auto parts stores) Phillips screwdriver soft cloth mild soap and water solution GeneralCare Always evaluate the overall operation of your wheelchair. It should function with ease and should travel straight without excessive drag or pull to one side. Remember, your Graham-Field authorized distributor knows your wheelchair best when it comes to service and repairs. Contact your dealer with any questions or concerns regarding the safe operation and maintenance of your wheelchair. Regular maintenance is essential for your safety and continued operation of your wheelchair. 24 3J01-INS-LAB-RevA12•TravelerHTCUserManual CheckTirewear Examine tires at least once a week for surface wear and cracks and replace them as needed. Replace tires when they become loose on the rims or cracks appear. CheckHandrims Check handrims at least once a week. Inspect each handrim for rough or sharp edges and, if any are found, replace handrims immediately. Ensure that all hardware is properly aligned and secure. CheckwheelLockengagement Check wheel lock engagement at least once a week. See Adjust wheel locks in Section 6 to adjust wheel lock engagement. If a wheel lock is worn or damaged, replace it immediately. Inspect the hardware for looseness or signs of wear. Ensure that the locking mechanism operates smoothly. The locking assembly should be tight enough so that the wheel can not rotate or the lock slip. Check that the locking shoe does not press against the tire when in the unlocked position. Excessive force should not be required to either engage or release wheel locks. Oil the wheel lock pivot points with one or two drops of 30 weight oil. Remove excess oil and dirt. CheckAnti-Tippers Check the anti-tippers at least once a week. Ensure that the anti-tippers are securely fastened and properly positioned. WARNING:Wheninuse,anti-tippersmustbeinstalledinthe downwardposition. CheckUpholstery Check upholstery at least once a month. Inspect for rips, tears and worn spots. Ensure that all upholstery-attaching screws are present, properly aligned, and well-secured. Use a Phillips screwdriver to tighten upholstery mounting screws. Check attaching screws for sharp edges or stripped screws, and replace if found. WARNING:Wornortornupholstery,orupholsterywithloose hardware,mustbereplacedimmediately.Itmaynotsupport bodyweight. 3J01-INS-LAB-RevA12•TravelerHTCUserManual 25 CheckRearwheelAdjustment Inspect the wheels at least once a month. Check alignment by elevating the rear of the wheelchair on a stable object until the rear wheels clear the ground, or placing the wheelchair upside down in a stable position such that the wheels can spin freely. Spin the wheels; there should be no wobble or sideplay, and the wheels should spin freely without binding. The bearings should be clean and rotate smoothly. Check rim sideplay to verify that bearings are not too loose. If there is a problem, contact your Graham-Field authorized distributor. If adjustment is required, this should be done by your Graham-Field authorized distributor only. CheckArms Check arms at least once a month. Inspect for sharp edges or cracks which could weaken the arm, and replace if found. Ensure that all attaching screws are present and tight. Use a Phillips screwdriver to tighten arm pad mounting screws. Check for burrs on the screw heads and replace if found. Ensure that screws do not extend into the padding. CheckBackposts/pushHandle Check backposts at least once a month. Ensure that all mounting hardware is securely fastened and that the backposts are not bent or damaged. Contact your dealer if you observe cracking or peeling paint or plating. CheckelevatingLegrestsandoptionalfootrests Check elevating legrests and footrests at least once a month. Inspect the locking mechanisms to confirm sure fit. Check for cracks, burrs, or sharp edges, and replace if found. Ensure that the legrest or footrest will automatically lock securely in place and will not accidentally unlock. If equipped with heel loops, ensure the anchor bolts are tight and secure. 26 3J01-INS-LAB-RevA12•TravelerHTCUserManual CleaningyourTravelerHTC Wipe off the frame frequently, at least once a week, using a soft cloth. Dry the wheelchair immediately if exposed to moisture. Clean the frame every three months with a mild soap and water solution. The frame does not need to be waxed. Do not use solvents, abrasive waxes, caustic chemicals or spray silicone. Never use abrasive cleansers; they could scratch the finish. Never use steam or high pressure cleaners. Clean upholstery and plastic components at least once a month with a mild soap and water solution. CheckCasters Check the caster stems for proper rotation at least every three months. The caster forks must swivel freely to facilitate steering and handling. If caster stem adjustment is too loose, the caster will flutter or shimmy; if too tight, the wheelchair will be difficult to steer. If the caster stems require adjustment, or the stem bearings require replacement, contact your Graham-Field authorized distributor. Ensure that stems are firmly attached to forks, and that forks and stems are not bent. Evaluate all threads, locking nuts and bearings. CheckwheelBearings Have your Graham-Field authorized distributor check caster and rear wheel axle bearings at least every six months. 3J01-INS-LAB-RevA12•TravelerHTCUserManual 27 8TRoUBLeSHooTING Continual use of your Traveler HTC necessitates maintenance, especially if the factory-set adjustments have been altered. The following troubleshooting guide lists several common problems that may occur, and offers corrective actions for each. If you are unsure of the solution or unable to diagnose the problem, do not hesitate to ask your Graham-Field authorized distributor for assistance. looseness in wheelchair squeaks / rattles caster flutter sluggish turning chair veers left chair veers right SYMPTOM PROBABLE CAUSE AND CORRECTIVE ACTION Nuts and/or bolts may be loose. If so, tighten. Bolts should be snug. Rear wheels and/or casters may be adjusted improperly. Ensure that both rear wheels are mounted in identical positions, and that casters are mounted in identical positions. Caster stem(s) may be adjusted improperly. See Graham-Field distributor to correct adjustment. Info: Use only Everest & Jennings® replacement parts. A Traveler HTC parts catalog is available online at www.grahamfield.com. CAUTION:Acompleteinspectionofyourwheelchair,including maintenance,servicingandsafetychecks,shouldbeperformed byaGraham-Fieldauthorizeddistributoratleastonceayear. WARNING:Unauthorizedmodificationortheuseof non-Everest&Jennings®replacementpartscouldchangethe structureofthewheelchair,voidthewarranty,andcreatea hazardouscondition,whichcouldresultinseriouspersonal injury. 28 3J01-INS-LAB-RevA12•TravelerHTCUserManual 9LIMITedwARRANTy This warranty has been drafted to comply with the Federal Law applicable to products manufactured after July 4, 1975. This warranty is extended only to the original purchaser/consumer or dealer/non-consumer and to no other purchaser or transferee. GF Health Products, Inc. warrants the Traveler HTC against manufacturing defects in materials and workmanship as listed below: WARRANTY PERIOD 3 mo. 6 mo. 1 yr. 5 yr. TRAVELER® HTC MANUAL WHEELCHAIR Sideframes, crossbraces ....................................................................................... Wheels, handrims, front rigging, forks ....................................................... Upholstered components, plastic parts, painted surfaces, rubber parts, bearings, and any other parts not specifically identified above ................................................................................. REPLACEMENT PARTS* Sideframes, crossbraces ..................................................................... All other components ............................................................... * The warranty period is as designated above. If a part is replaced under warranty, the original warranty period will not be affected. All other replacement parts will be subject to the warranty period specified. The warranty period for the consumer commences on the first date a product is delivered to the consumer by the seller/dealer. If the product is rented or leased, the warranty period commences on the invoice date from GF Health Products, Inc. A copy of the invoice showing date of purchase must be provided when submitting warranty claims. When proof of purchase date is not provided, warranty coverage shall commence upon GF Health Products, Inc.'s invoice date to the dealer/ purchaser. If within the warranty period, the product or component part is proven to GF Health Products, Inc.'s satisfaction to be defective, GF Health Products, Inc. shall provide, at its option, one of the following: (1) repair or replacement of any defective or nonconforming part or product or (2) a credit and / or refund of the original selling price made to GF Health Products, Inc.'s initial customer on a prorated or depreciated basis. GF Health Products, Inc.'s sole obligation and your exclusive remedy under this warranty shall be limited to such repair, replacement, credit and / or refund. This warranty does not include any labor charges incurred in replacement part(s) installation or any associated freight or shipping charges to the manufacturer. 3J01-INS-LAB-RevA12•TravelerHTCUserManual 29 Limitations and exclusions: the foregoing warranty shall not apply to serial numbered products if the serial number has been removed or defaced. Products subjected to negligence, abuse, misuse, improper operation, improper maintenance, improper cleaning, improper storage, or damages beyond GF Health Products, Inc.'s control are not covered by this warranty, and that evaluation shall be solely determined by GF Health Products, Inc. This warranty shall not apply to problems arising from normal wear and tear or failure to follow instructions. The warranty shall also not apply to products modified without GF Health Products, Inc.’s express written consent; nor shall it apply if parts not manufactured by GF Health Products, Inc., or if parts not complying with original equipment specifications are added to GF Health Products, Inc. products; or if the product or part is serviced by an entity not authorized by GF Health Products, Inc. The foregoing warranty is exclusive and in lieu of all other express warranties and implied warranties, including but not limited to the implied warranties of merchantability and fitness for a particular purpose, and shall not extend beyond the duration of the express warranty provided herein, and the remedy for violations of any implied warranty shall be limited to the repair, replacement, credit and / or refund of the defective product or part pursuant to the terms contained herein. GF Health Products, Inc. shall not be liable for any consequential or incidental damages whatsoever. This warranty gives you specific legal rights and you may also have other legal rights which vary from state to state (province to province). Some states (provinces) do not allow the exclusion or limitation of incidental or consequential damage, or limitation on how long an implied warranty lasts, so the above exclusion and limitation may not apply to you. For warranty service, please contact the authorized dealer from whom you acquired your GF Health Products, Inc. product. In the event you do not receive satisfactory warranty service, please contact GF Health Products, Inc. at the address on the back cover. Do not return products to our factory without prior authorization. The warranties contained herein contain all the representations and warranties with respect to the subject matter of this document, and supersede all prior negotiations, agreements and understandings with respect thereto. The recipient of this document hereby acknowledges and represents that it has not relied on any representation, assertion, guarantee, warranty, collateral contract or other assurance, except those set out in this document. 30 3J01-INS-LAB-RevA12•TravelerHTCUserManual 10 Index A Adjustments 17 Anti-theft pole, install 15 Anti-tippers, check 25 Arm, install 18 Arm, remove 18 Arms, check 26 Assembly 13 B Backposts, check 26 Balance 9 C Casters 17 Caster stems, check 27 CAUTION, significance 4 Crossbraces, tighten 22 Curbs and steps 12 E Elevating legrest elevation, adjust 20 Elevating legrest panel position, adjust 20 Elevating legrests, install 16 Elevating legrest, swingaway 19 F Footplate extension length, adjust 21 Front rigging, attach 19 Front rigging, remove 19 G Getting started 8 H Handling tips 9 Handrims, check 25 P Push handle / anti-fold bar, install 14 R Ramps and Inclines 11 Reaching / bending 10 Rear wheel adjustment, check 26 Rear wheels 17 S Safety precautions 5 Storage 13 T Tires, check 25 Tools, for adjustment, list 17 Tools for assembly, list 13 Tools, for maintenance, list 24 Transfer activities 9 Traveler HTC, cleaning 27 Traveler HTC, illustration 8 Troubleshooting 28 U Unpacking 13 Upholstery, check 25 W WARNING, significance 4 Warnings 5 Warranty, limited 29 Wheel bearings, check 27 Wheel lock engagement, check 25 Wheel locks, adjust 22 I Info, significance 4 Inspection 13 Introduction 3 M Maintenance 23 N NOTICE, significance 4 3J01-INS-LAB-RevA12•TravelerHTCUserManual 31 GF Health Products, Inc. (“Graham-Field”) 2935 Northeast Parkway Atlanta, Georgia 30360 USA tel: 770-368-4700 fax: 770-368-2386 www.grahamfield.com Made in China