1
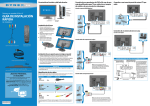
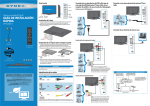
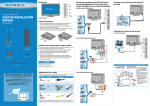
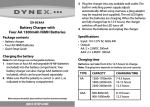
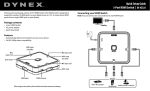
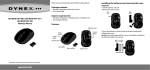
Package contents
Setting up your converter
•
•
•
•
Note: Before you install this device, turn off the audio and video devices that
you will be connecting.
If your digital audio output device has both optical digital and coaxial digital
connections, select the type of connection you prefer. If your output device
only has one or the other, select the connection that works with your
system. Go to the Optical connection or Coaxial connection section,
whichever you select, or whichever is appropriate for your system.
Optical connection
1 Slide the selector switch on the side of the converter to OPTICAL.
Caution: A digital optical cable is fragile. DO NOT BEND THE CABLE.
2 Connect a digital optical cable to the OPTICAL IN port on the audio
converter, then connect it to the OPTICAL OUT port on your audio or
video device.
3 Connect a RCA stereo audio cable to the AUDIO OUT (R and L) jacks on
the audio converter, then connect it to the AUDIO IN (R and L) jacks on
your audio device.
4 Connect the cable from the power adapter to the DC jack of your audio
converter, then plug the power adapter into an AC wall outlet.
5 Turn on the power to the connected devices and begin playback. If you
are unable to hear the audio output from your stereo system, check the
connections and settings to make sure
that they are all correct.
Note: You must change the audio
device’s audio output to “PCM” format.
Refer to the manual you received with
the output device for additional
information.
Optical/Coaxial Digital Audio to Analog Audio Converter
Power adapter
RCA cable
Quick Setup Guide
Features
Optical/Coaxial Digital Audio
to Analog Audio Converter
DX-SF110
• Convert digital audio to analog audio signals
• Optical or Coaxial Digital input selectable. Perfect for connecting audio
devices that only have digital audio outputs, to devices that only have
analog audio inputs
• PCM stereo support
Top view
Side view
Coaxial/Optical
input switch
LED indicator
QUICK SETUP GUIDE
DC jack
Coaxial connection
1 Slide the selector switch on the side of the converter to COAXIAL.
2 Connect a coaxial digital cable to the COAXIAL IN port on the audio
converter, then connect it to the DIGITAL OUT port on your audio or
video device.
3 Connect a RCA stereo audio cable to the AUDIO OUT (R and L) jacks on
the audio converter, then connect it to the AUDIO IN (R and L) jacks on
your audio device.
4 Connect the cable from the power adapter to the DC jack of your audio
converter, then plug the power adapter into an AC wall outlet.
5 Turn on the power to the connected devices and begin playback. If you
are unable to hear the audio output from your stereo system, check the
connections and settings to make sure that they are all correct.
Note: You must change the audio device’s audio output to “PCM” format.
Refer to the manual you received with the output device for additional
information.
Specifications
Digital Audio Format Support
Power
One-year limited warranty
LPCM 44KHz, 48KHz, 96KHz
5 VDC, 600 mA
Visit www.dynexproducts.com for details.
Contact Dynex:
Important safety information
•
•
•
•
Indoor use only.
There are no user serviceable parts. Do not open the housing.
Do not use in a high humidity environment.
Use the attached AC/DC adapter only.
For customer service, please call 1-800-305-2204
www.dynexproducts.com
Distributed by Best Buy Purchasing, LLC
7601 Penn Avenue South, Richfield, MN USA 55423-3645
© 2012 BBY Solutions, Inc., All Rights Reserved. DYNEX is a trademark of BBY Solutions, Inc.
Registered in some countries. All other products and brand names are trademarks of their
respective owners.
ENGLISH 12-0728