1
SAFETY PRECAUTIONS
The lightning flash with an arrowhead symbol, within the
equilateral triangle, is intended to alert the user to the
presence of uninsulated "dangerous voltage" within the
product's enclosure that may be of sufficient magnitude
to cause an electric shock.
The exclamation point within the equilateral triangle is
intended to alert the user to the presence of important
operating and maintenance (servicing) instructions in
this owner manual.
The following mark and symbols are located on
bottom of the unit.
Marking sign is located on bottom of the unit.
WARNING: TO REDUCE THE RISK OF
ELECTRIC SHOCK, DO NOT REMOVE COVER (OR
BACK). NO USER-SERVICEABLE PARTS INSIDE.
REFER SERVICING TO QUALIFIED SERVICE
PERSONNEL.
CAUTION
INVISIBLE LASER RADIATION
WHEN OPEN AND INTERLOCKS
DEFEATED.
AVOID EXPOSURE TO BEAM
WARNING:
TO PREVENT FIRE OR SHOCK HAZARD, DO NOT EXPOSE
THIS APPLIANCE TO RAIN OR MOISTURE.
CAUTION:
TO PREVENT ELECTRIC SHOCK, MATCH WIDE BLADE OF
PLUG TO WIDE SLOT, FULLY INSERT.
DANGER OF EXPLOSION IF BATTERY IS INCORRECTLY
REPLACED. REPLACE ONLY WITH THE SAME OR
EQUIVALENT TYPE.
This
product
contains a low
power laser device.
The symbol for
Class II (Double
lnsulation)
On Placement
• Do not use the unit in places which are extremely hot, cold, dusty, or humid.
• Do not restrict the air flow of the unit by placing it in a place with poor air flow, by covering it with a cloth, or by placing it on carpeting.
On Safety
• When connecting or disconnecting the AC cord, grip the plug and not the cord itself. Pulling the cord may damage it and create
a hazard.
• When you are not going to use the unit for a long period of time, disconnect the AC power cord.
On Condensation
• When left in a heated room where it is warm and damp, water droplets or condensation may form inside the unit. When there
is condensation inside the unit, the unit may not function normally. Let the unit stand for 1 to 2 hours before turning the power
on, or gradually heat the room and dry the unit before use.
FCC Information
WARNING: Changes or modifications to this unit not expressly approved by the party responsible for compliance could void the
user authority to operate the equipment.
NOTE: This equipment has been tested and found to comply with the limits for a Class B digital device, pursuant to Part 15 of the
FCC Rules. These limits are designed to provide reasonable protection against harmful interference in a residential installation.
This equipment, used in accordance with the instructions, may cause harmful interference to radio communications.
However, there is no guarantee that interference will not occur in a particular installation. If this equipment does cause harmful
interference to radio or television reception, which can be determined by turning the equipment off and on, the user is encouraged
to try to correct the interference by one or more of the following measures:
• Reorient or relocate the receiving antenna.
• Increase the separation between the equipment and receiver.
• Connect the equipment into an outlet on a circuit different from that to which the receiver is connected.
• Consult the dealer or an experienced radio/TV technician for help.
Shielded cables must be used with this unit to ensure compliance with the Class FCC limits.
WARNING:
• Should any trouble occur, disconnect the AC power cord and refer servicing to a qualified technician.
Notes on Copyright
It is forbidden by law to copy, broadcast, show, broadcast on cable, play in public or rent copyrighted material without permission.
Apparatus Claims of U.S. Patent Nos. 4,631,603; 4,577,216; 4,819,098 and 4,907,093 licensed for limited viewing uses only.
DVD video discs are copy protected, and any recordings made from these discs will be distorted. This product incorporates
copyright protection technology that is protected by method claims of certain U.S. patents and other intellectual property rights
owned by Macrovision Corporation and other rights owners. Use of this copyright protection technology must be authorized by
Macrovision Corporation, and is intended for home and other limited viewing uses only, unless otherwise authorized by Macrovision
Corporation. Reverse engineering or disassembly is prohibited.
E - 1
IMPORTANT SAFETY INSTRUCTIONS
1) Read these instructions.
2) Keep these instructions.
3) Heed all warnings.
4) Follow all instructions.
5) Do not use this apparatus near water.
6) Clean only with dry cloth.
7) Do not block any ventilation openings. Install in accordance with the manufacturer’s instructions.
8) Do not install near any heat sources such as radiators, heat registers, stoves, or other apparatus (including
amplifiers) that produce heat.
9) Do not defect the safety purpose of the polarized or grounding-type plug. A polarized plug has two blades with
one wider than the other. A grounding type plug has two blades and a third grounding prong. The wide blade
or the third prong are provided for your safety. If the provided plug does not fit into your outlet, consult an
electrician for replacement of the obsolete outlet.
10) Protect the power cord from being walked on or pinched particularly at plugs, convenience receptacles, and
the point where they exit from the apparatus.
11) Only use detachments/accessories specified by the manufacturer.
12) Use only with the cart, stand, tripod, bracket, or table specified by the manufacturer, or sold
with the apparatus. When a cart is used, use caution when moving the cart/apparatus
combination to avoid injury from tip-over.
13) Unplug this apparatus during lightning storms or when unused for long periods of time.
14) Refer all servicing to qualified service personnel, Servicing is required when the apparatus has been damaged
in any way, such as power-supply cord or plug is damaged, liquid has been spilled or objects have fallen into
the apparatus, the apparatus has been exposed to rain or moisture, does not operate normally, or has been
dropped.
E - 2
TABLE OF CONTENTS
Safety Precautions ..................................1
Important Safety Instruction ................. 2
Table Of Contents .................................... 3
Disc Formats ............................................ 4
Accessories ............................................... 5
Remote Control ........................................ 5
Control Reference Guide .................... 6-7
Power Supply ................................... 8-10
Repeat Playback .............................. 21-22
Using the AC adaptor ...................................... 8
VIDEO setting ...................................................... 24-25
Using the car adaptor ............................................ 8
AUDIO setting .................................................... 25-26
Using the rechargeable battery pack .............. 9-10
RATING setting ......................................................... 26
Turning on the unit .............................................. 10
Language Code List for Disc Language
..................................................................... 27
Maintenance .......................................... 28
Repeating a title/chapter (DVD) ............................ 21
Repeating a single track/whole disc (CD) ........... 21
Repeating a specific section (DVD/CD) .............. 22
Playing Picture File Disc ........................ 23
Playing a Picture file disc ....................................... 23
Customizing the Function Settings
............................................................... 24-26
LANGUAGE setting .................................................. 24
Connecting other Equipment ......... 11-13
Connecting the game consoles/
other video equipment ...................................... 11
Cleaning Disc .......................................................... 28
Connecting a TV ................................................. 11
Cleaning the Unit ................................................... 28
Another source connection ................................ 12
Important Note ....................................................... 28
Using headphone/earphones .............................. 13
Trouble Shooting Guide ....................... 29
Carrying Bag installation ..................... 30
Game Pad (Connections) ..................... 31
Adjusting the Sound ............................ 13
Playing a Disc ................................... 14-16
Playing a Disc ....................................................... 14
Pausing playback (still mode) ............................... 14
Stopping playback ................................................. 14
To skip to a different track ...................................... 14
Fast Foward/Fast Reverse ..................................... 15
Zooming into an image ......................................... 15
Angle selection ....................................................... 16
Audio selection ....................................................... 16
Subtitle selection .................................................... 16
Special Functions ............................ 17-19
Display function ........ .......................................... 17
Locating a specific title ......................................... 18
Locating a specific title/chapter/track .................. 18
Locating a specific time ......................................... 19
Angle setting ........................................................... 19
Audio setting .......................................................... 19
Subtitle setting ....................................................... 19
CD / DVD programmable memory ....... 20
DVD programmable memory ................................. 20
CD programmable memory .................................. 20
E - 3
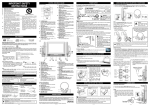
DISC FORMATS
The unit can playback
DVDs
[8cm/12cm disc]
D I G I TAL
PHOTO
Audio CDs
[8cm/12cm disc]
Region Management Information
Region Management Information: This unit is designed and manufactured to respond to the Region Management
Information that is encoded on DVD discs. If the Region number printed on the DVD disc does not correspond
to the Region number of this unit, this unit cannot play that disc.
The region number of this unit is 1.
Disc Function or Operation that is Not Available
When the
symbol appears on the screen, it indicates that the function or operation attempted is not available
at that time. This occurs because the DVD disc manufacturer determines the specific functions. Certain
functions may not be available on some discs. Be sure to read the documentation provided with the DVD.
Icons Used on DVDs
Sample lcons
Language selections for audio
Language selections for subtitles
Screen aspect ratio
Multiple camera angles
Region code indicator
Notes:
• This Unit supports 2-channel (L/R) audio and 5.1ch (Multi-channel) MPEG Audio 1/2 (only when the DIGITAL
AUDIO OUT coaxial jack is used for connection). It does not support 7.1 channel MPEG Audio Version 2.0.
• When playing back a CD-G (Graphics) or CD EXTRA disc, the audio portion will be played, but the graphic
images will not be shown.
Title, Chapter and Tracks
• DVDs are divided into “titles” and “chapters”. If the
disc has more than one movie on it, each movie would
be a separate “title”. “Chapters” are sections of titles.
• Audio CDs are divided into “tracks”. A “track” is
usually one song on an Audio CD.
Note :
• Numbers identify each title, chapter, and track on a disc. Most discs have these numbers recorded on them,
but some do not.
Notes on Unauthorized Discs
You may not be able to play back some DVD discs on this unit if they were purchased from outside your
geographic area or made for business purposes.
E - 4
ACCESSORIES
Please check and identify the supplied accessories.
Use numbers indicated in parentheses when asking for replacement parts.
• To order accessories contact 1-800-252-6123 or wed sits
www.1800customersupport.com)
(http://
Remote control (with battery) (043-R13232-011) .............................................................. x 1
AC adaptor (133-010902-003) ............................................................................................. x 1
AC power cord (134-A13211-20P) ...................................................................................... x 1
Car power adaptor (133-030025-000) .................................................................................. x 1
Rechageable battery pack (Model no.: BATT-2P) ............................................................. x 1
Battery charger (Model no.: CHRR-2) ................................................................................ x 1
Audio/Video cable (122-004020-013) .................................................................................. x 1
Game pad (046-GP600A-N01) ............................................................................................ x 1
Carrying bag (803-P177A0-000) ......................................................................................... x 1
REMOTE CONTROL
Using the Remote Control
• Point the Remote Control at the REMOTE SENSOR located on the unit.
• When there is a strong ambient light source, the performance of the infrared REMOTE SENSOR may be
degraded, causing unreliable operation.
• The recommended effective distance for remote operation is about 16 feet (5 meters).
Take out the PVC sheet before operating the Remote Control.
TO CHANGE REMOTE BATTERY
1. Open the battery door.
2. Insert one CR2025 (3V) size battery.
BATTERY REPLACEMENT
When battery becomes weak, the operating distance of the Remote Control will greatly reduced and
you will need to replace the battery.
NOTE:
• If the Remote Control is not to be used for a long time, remove the battery to avoid damage caused by
battery leakage corrosion.
• WARNING: Do not dispose of batteries in fire, batteries may explode or leak.
GB - 5
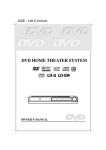
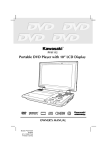
CONTROL REFERENCE GUIDE
Remote Control
1) ZOOM button
Zoom into an image of a DVD.
TV MODE button
In stop mode, select whether to output the
video signal. TV shows "AUTO" means output
signal depends on DVD (either NTSC or PAL).
TV shows "PAL" or "NTSC" which means output
signal fixed to PAL or NTSC.
2)
STOP button
Stop playing a disc.
PLAY button
Press to start or resume playback a disc.
PAUSE button
Pause playback, frame advance.
3)
4)
5)
6)
7)
PREV button
Move reverse through titles, chapters or tracks
on a disc.
/
SEARCH buttons
SEARCH: Fast reverse playback.
SEARCH: Fast forward playback.
Number (0 - 9) buttons
Use when creating programs, and entering a
parental level password. To select a CD/MP3
track directly.
MEM / ANGLE button
In stop mode, enter the number of a selected
chapter or track.
During DVD playing, switch the camera angle
of the video presentation when scenes with
multiple camera angles are recorded on a
DVD.
REPEAT A - B button
Perform point-to-point repeat playback on a
DVD or CD.
8) MENU button
Open and close DVD menu.
NEXT button
9)
Move forward through titles, chapters or tracks on
a disc.
10) Cursor ( , , , ) buttons
Use to highlight selections on a menu screen and
make adjust certain settings.
ENTER button
Confirm selections on a menu screen.
11) AUDIO button
Select one of the audio sound tracks programmed
on a DVD or selects the audio output mode on a
AUDIO CD.
12) SUBTITLE/RETURN button
Select one of the subtitle languages programmed
on a DVD.
Return to the normal operation after using the
SETUP menu of a DVD.
13) GOTO button
Skip directly to a specific location on a DVD disc.
14) DISPLAY button
Change disc status information displayed on the
screen.
15) VIRTUAL button
To obtain expansive virtual surround sound
effects from just two speakers.
16) SETUP/REPEAT-DISC button
In stop mode, Open and close the SETUP menu
of the unit.
Repeat chapter or title of a DVD.
Repeat single track or whole CD.
GB - 6
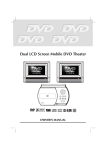
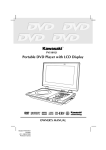
CONTROL REFERENCE GUIDE
Unit
16 17 18
19 20
1
2
15
3
4
5
6
7
14
13 12 11 10
1)
2)
3)
4)
5)
6)
7)
8)
Cursor ( ,
, , ) button
Use to highlight selections on a menu screen and
make adjust certain settings.
ENTER button
Confirm selections on a menu screen.
BRIGHTNESS button
Adjust the relative lightness or darkness of the colour.
DIGITAL OUT jack
AV IN / DVD switch
Turn off to AV IN mode. Turn into DVD mode.
AV IN / OUT jacks
Headphone jacks
VOLUME control
Adjust the volume.
ZOOM button
Zoom into an image of a DVD.
AUDIO button
Select one of the audio soundtracks programmed
on a DVD or selects the audio output mode on a
AUDIO CD.
MENU button
PAUSE/SETUP button
Press to pause playback of disc. Each time you press
the PAUSE button the picture advances one frame.
Press the PLAY button to resume playback.
In stop mode, open and close the SETUP menu
of the unit.
9) Battery low indicator
10) POWER ON indicator
When the POWER ON/OFF button is switched to ON
position, the light will illuminate.
11) Remote sensor
Receive the remote control unit signals.
PLAY button
12)
Press to start or resume playback a disc.
13)
STOP button
Stop playing a disc.
14) Open button
Open the disc door.
15) Disc Door
Close tray by pushing the disc door.
16) Battery in jack
17) DC IN 9V jack
18) POWER ON/OFF switch
19) SCREEN switch
Wide screen
Normal screen
20) COLOUR control
Adjust for colour intensity.
Open and close DVD's menu.
PREV button
PREV button to go back to previous chapters
Press
PREV button to begin fast
/tracks. Press and hold
scan. Four speeds are available.
NEXT button
Press
NEXT button to advance to chapters /
NEXT button to begin fast
tracks. Press and hold
scan. Four speeds are available.
GB - 7
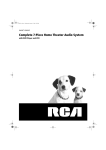
POWER SUPPLY
A. Using the AC adaptor
This AC adaptor operates on AC between 100V and 240V, but
• In the U.S.A. and Canada, the AC power supply cord must be connected to a 120V AC power supply only.
• When connecting to an AC supply outside of the U.S.A. and Canada, use a plug adaptor to suit the AC outlet
configuration.
AC adaptor
SP0902200-W01
AC power cord
Power indicator
2
To AC adaptor
1
To DC IN 9V jack
3
To AC outlet
Left side of unit
Cautions:
• The included AC power supply cord and AC adaptor are for use with this unit only. Do not use them with other
equipment.
• To prevent electrical shock, match wide blade of plug to wide slot, fully insert.
• When the unit is not going to be used for long time, disconnect the AC power supply cord from the AC outlet.
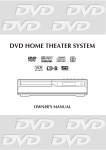
B. Using the car power adaptor
The included 9V car power adaptor is designed for use with vehicles that have a 12V, negative ground
electrical system.
Input: 12V
Output: 9V
Car power adaptor
2
To the cigarette lighter socket
1
To DC IN 9V jack
Left side of unit
Cautions:
• Use this unit only with the included 9V car power adaptor, use with other car adaptor could damage the unit.
• The included 9V car power adaptor are for use with this unit only. Do not use them with other equipment.
• In the interests of the traffic safety, do not perform operations on the unit or view video software while driving
a vehicle.
• Make sure the unit is fastened correctly to prevent from falling in the vehicle in the event of an accident.
• When the inside of the cigarette lighter socket is dirty with ashes or dust, the plug section may become hot
due to poor contact. Be sure to clean the cigarette lighter socket before use.
• After use, disconnect the 9V car power adaptor from both the unit and cigarette lighter socket.
GB - 8
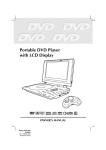
POWER SUPPLY
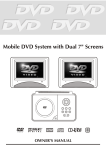
C. Using the rechargeable battery pack
• Charge the rechargeable battery pack before using them for the first time.
• The rechargeable battery pack is suitable when adapting the unit for portable use and when it is convenient for
you to enjoy the unique functions of the unit out of doors.
To recharge the battery
Remove the rechargeable battery pack from the unit (if being used).
RECHARGEABLE BATTERY PACK
(7.4V 3600mAh Li-ion Battery)
CHARGING indicator
POWER indicator
1
To "BATTERY IN" jack
4
BATTERY CHARGER
(DC
9V 2.2A)
3
To wall outlet
2
To "ADAPTOR IN" jack
AC ADAPTOR
To AC ADAPTOR
Cautions:
• The included AC power supply cord and AC adaptor are for use with this unit only. Do not use them with other
equipment.
• To prevent electrical shock, match wide blade of plug to wide slot, fully insert.
• When the unit is not going to be used for long time, disconnect the AC power supply cord from the AC outlet.
• Recharging is complete when charging indicator goes out. Unplug the AC power supply cord from the AC
adaptor, then unplug the battery pack from the battery charge.
To attach rechargeable battery pack
Attach it at the corresponding position at the back of the unit.
Rear of unit
RECHARGEABLE BATTERY PACK
Left side of unit
DIG ITAL
OUT
5
ATTACH
RECHARGEABLE
BATTERY PACK
TO UNIT
6
TO "BATTERY
IN" JACK
RECHARGEABLE
BATTERY PACK
GB - 9
POWER SUPPLY
Disconnecting the Battery Pack to the unit.
Push the button to disconnect the
RECHARGEABLE BATTERY PACK
RECHARGEABLE BATTERY PACK
bottom of the unit
Condition and attention:
• When RECHARGEABLE BATTERY PACK battery is low, player will stop playing.
• During the playback, if the battery is low, the BATTERY LOW indicator on the unit front panel will turns into red and
blink. At this time, please recharge the battery.
• Do not short-circuit the terminals.
• Use only the supplied AC ADAPTOR and BATTERY CHARGER to recharge the rechargeable battery pack.
• Detach the battery pack. (Even if the unit is off, it still uses some power. This can lead to over discharging of the
battery and malfunction.)
• Recharge the battery pack when you are ready to use it again.
• If the rechargeable battery pack is not to be used for a long period of time, discharge it and store it in a place that
is cool, dry and dark.
• While using the rechargeable battery pack, the environmental temperature should be 5°C (41°F) to 35°C (95°F).
• To undertake the longest service life of the rechargeable battery pack, charge it under or close to indoortemperature.
• Never dispose of in fire, water or heat up.
• Do not open the rechargeable battery pack, refer servicing only to qualified service personnel.
Turning on the unit
1. Slide the POWER ON/OFF button to on position on the left side of unit.
2. Slide the FUNCTION button to DVD or AV IN mode on right side of unit.
• If you select DVD the DVD logo (start-up picture) will appear on unit screen.
GB - 10
CONNECTING OTHER EQUIPMENT
A. Connecting the Game Consoles / other Video Equipment
• you can connect your Game Consoles or other Video Equipment to playback through the system.
Right side of unit
(Yellow)
(Red)
AUDIO/VIDEO CABLE
(Yellow)
To AV IN/OUT
Jack
(White)
(Red)
(White)
AUDIO/VIDEO CABLE
(included)
Game Consoles /
other Video Equipment
3.5mm plug description
Watching a Video Equipment
1. Turn on the unit, slide the AV IN / DVD button to select "AV IN".
2. Turn on the video equipment and follow the instructions provided with it to playback.
Note: If you have a mono VCR, the volume level from the speakers will be low.
B. Connecting a TV
• If your TV has Audio/Video inputs, you can also connect the unit to your TV using the Audio/Video cable.
Right side of unit
(Yellow)
AUDIO/VIDEO CABLE
(Yellow)
To AV IN/OUT
Jack
AUDIO/VIDEO CABLE
(included)
VIDEO
IN
(Red)
AUDIO
IN
(White)
(Red)
(White)
TV
Watching a DVD on your TV
1. Turn on the unit, slide the AV IN / DVD button to select "DVD".
2. Turn on the TV and follow the instructions included with it to play the DVD.
Notes: Please use connect Audio/Video cable.
GB - 11
(continued to next page)
CONNECTING OTHER EQUIPMENT
C. Another source connection
This unit can play Dolby Digital, but only in two channels.
Analogue connection
Right side of unit
(No need to connect
the Yellow video plug)
Amplifier of
stereo system, etc.
(Red)
(Yellow)
AUDIO
IN
(White)
(Red)
(White)
AUDIO/VIDEO CABLE
AUDIO/VIDEO CABLE (included)
Digital connection
COAXIAL DIGITAL AUDIO CABLE
Audio equipment with
digital audio input jack
DIGITAL
OUT
Rear side of unit
Listening to another audio equipment
1. Turn on the Unit.
2. Turn on your audio equipment and follow the instructions included with it to select the AUDIO IN or DIGITAL IN
function.
Notes:
• If the external equipment is a television and this audio system is close to it, you may experience interference if
the tuner function is selected while the television is working.
• Make sure to use correct Audio/Video cable, wrong plug connection may cause weak signal.
• If you have a stereo VCR, make sure you set it in stereo mode.
• Due to copyright protection, DVD movies cannot be copied. If you copy a DVD movie onto a videotape, the
resulting copy will be unclear, with poor sound quality. This is NOT caused by a defective DVD system.
GB - 12
CONNECTING OTHER EQUIPMENT
Right side of unit
Using Headphones/Earphones
• Turn down the volume before connection, and then
adjust the level.
• When headphones/earphones are connected, no
sound will be output from the unit's speakers.
Caution:
• Avoid listening to sound at levels which may be harmful
to your ears.
HEADPHONES / EARPHONES
(3.5mm diameter plug)
ADJUSTING THE SOUND
Dolby Digital (for DVD)
Dolby Digital is a sound system developed by Dolby Laboratories Inc. that gives movie theatre ambience to
audio output when the unit is connected to a Dolby Digital 5.1 channel processor or amplifier.
This unit automatically recognizes DVDs that have been recorded with Dolby Digital.
Not all Dolby Digital sources are recorded with 6 channels.
Some sources marked Dolby Digital may be recorded in Dolby Surround, a 2 channel system. Look for this logo
on your unit.
Manufactured under license from Dolby Laboratories.
symbol are trademarks of Dolby Laboratories.
'Dolby' and the double-D
GB - 13
DVD
CD
Basic playback
PLAYING A DISC
This owner’s manual explains the basic instructions of this unit. Some DVD discs are produced
in a manner that allows specific or limited operation during playback. As such, the unit may not
respond to all operating commands. This is not a defect in the unit. Refer to the instruction notes
of discs.
“
” may appear on the screen during operation. A “
is not permitted by the unit or disc.
” means that the desired operation
Playing a Disc
1. Slide the POWER ON/OFF button on the left side of unit into on mode.
2. Slide the FUNCTION button on the right side of unit to select DVD mode.
See CUSTOMIZING THE FUNCTION SETTINGS to step 3.
3. Press the OPEN button to open the disc door.
4. Hold the disc by its sides and carefully make it fit onto the central support of compartment with the label side
facing up until you hear a “click”.
5. Close the disc door.
It takes a short while for your unit to load the disc. After loading, for some discs, the unit will automatically start
playback of the disc.
6. Press the PLAY button.
Pausing playback (still mode)
Press the II PAUSE button. To resume normal playback, press the
PLAY button.
Stopping playback
Press the STOP button at the location where you want to interrupt playback. To resume playback at the position
where the disc was stopped, press the PLAY button.
If you press the STOP button twice, the unit’s memory will be cleared and pressing the PLAY button will reset
the disc to the beginning.
To skip to a different track
• Press the
PREV button repeatedly to skip to the start of the current or previous track.
• Press the
NEXT button to skip to the next track.
• For audio CD disc, use the number buttons (remote control only) to jump straight to that track number.
GB - 14
(continued to next page)
PLAYING A DISC
Fast Forward/Fast Reverse
DVD
CD
1. Press the SEARCH
or
SEARCH button of the remote unit
when a disc is playing.
• The disc begins fast scan at x2 speed.
or
• Four speeds are available. Each time SEARCH
SEARCH button is pressed, the speed of fast scan changes in
the following sequence:
Note :
You also can press and hold
2. Press the
/
(PREV/NEXT) buttons on unit repeatedly to select different fast scan speed.
PLAY button when you reach the desired point to resume playback at normal speed.
Zooming into an image
DVD
While a disc is playing, press the ZOOM button of unit.
• While an image is zoomed, you can use , , and button to shift the view and display the part you want.
• To return to the normal view, press the ZOOM button until the “ off “ symbol shows. The screen will return to
normal.
• When you reach the edge of the image, the display will not shift anymore in that direction.
GB - 15
(continued on next page)
PLAYING A DISC
DVD
Angle selection
Some DVDs contain scenes which have been shot from a
number of different angles. For these discs, the same scene
can be viewed from each of these different angles.
1. While you are playing a DVD with different angles recorded,
press the ANGLE button to view the number of the current
angle.
2. Press the ANGLE button repeatedly to change the scene
to the next angle in those recorded.
• About two seconds later, playback continues from the new
angle you selected.
• If no button is pressed within 10 seconds, playback
continues without changing the current angle.
Sequence of angle shots (Example)
Notes:
• This function can only be used for discs on which scenes shot from multiple angles have been recorded.
• If only one angle is recorded, “
” is displayed.
1/1
Audio selection
On some discs, the sound is recorded in two or more formats.
Follow the directions below to select the type of playback.
1. While a disc is playing, press the AUDIO button to show the
current audio format number.
2. Press the AUDIO button repeatedly to select the desired
audio format.
Notes :
• If only one audio format is recorded, the number does not change.
• About two seconds later, playback continues in the new audio format.
Recorded audio format number changes
sequentially. (The maximum number of possible
audio formats is 8)
Subtitle selection
1. While a DVD is playing, press the SUBTITLE button to display the current language setting, as shown in the
example below.
2. Press the SUBTITLE button repeatedly to select the desired subtitle language.
Notes :
• If only one language is recorded, the language does not change.
• About two seconds later, playback continues with the new subtitle you selected.
• The number of languages recorded differs depending on the disc.
• If no button is pressed within a few seconds, playback continues without changing the current subtitle.
• This function can only be used for discs on which subtitles have been recorded in multiple languages.
• On some DVDs, subtitles are activated from the main menu of the DVD. Press the MENU button to activate the
main menu.
GB - 16
DVD
SPECIAL FUNCTIONS
Basic playback
DISPLAY function
Using DISPLAY, you can check and change the current settings of the following items: ANGLE, AUDIO and
SUBTITLE.
• While the disc is playing, press the DISPLAY button of the remote unit to display the screen shown below.
Elapsed time: Elapsed time from the beginning of the chapter which is currently playing.
Remaining time: Remaining time of the title which is currently playing.
Elapsed Time
Remaining Time
• Press the DISPLAY button twice of the remote unit to display the screen shown as below.
• Press the ANGLE, AUDIO and SUBTITLE button to change the selected item.
Chapter
Time
Title
Audio setting
Subtitle setting
BitRate infomation
DVD
Title 1/10
Audio
Subtitle
BitRate
00:09:29 01:25: 27
Chapter 3/15 Angle
1/3
1/3 Fre
Angle setting
D 6 Ch
2/3 Spa
7.1Mbps
Title skip
• The number of the title currently playing and total titles of disc.
• Press the GOTO button to set your desired title, then press the ENTER button to confirm.
Chapter skip
• The number of the chapter currently playing and total chapters of the currently played title.
• Press the GOTO button to set your desired chapter, then press the ENTER button to confirm.
Time skip
• Elapsed time from the beginning of the currently playing chapter and the remaining time from the beginning of
the currently playing title.
• Press the GOTO button to set your desired point to start playback, then press the ENTER button to confirm.
Angle setting
• The current angle is displayed. When a disc with only one angle is played back, “
• Press the ANGLE button to select the desired angle.
” is displayed.
1/1
Audio setting
• The type of audio currently selected is displayed.
• Press the AUDIO button to select your desired type of audio.
Subtitle setting
• The subtitle number and language currently selected is displayed. When a disc with only one subtitle is played
back, “ 1/1 Eng ” is displayed.
• Press the SUBTITLE button to select your desired language.
GOTO function
This function allows you to skip directly to any part of the disc while a disc is playing.
Note :
• After setting, press the DISPLAY button again of the remote unit to return to the normal screen.
GB - 17
(continued on next page)
SPECIAL FUNCTIONS
Basic playback
Locating a specific title
DVD
If a DVD disc contains title numbers, you can locate a specific title by directly selecting a title number.
1.Press the GOTO button.
2. Press , or button to highlight a specific field and press the corresponding number button(s) for the title you
want.
3. Press the ENTER button to confirm. The unit will start playback about 3 seconds later.
Locating a specific title / chapter / track
DVD
CD
If you know the title / chapter / track number you want to play, you can locate a specifc title / chapter / track by directly
selecting a title / chapter / track number.
1. Press the GOTO button to search your desired title / chapter / track.
2. Press , or button to highlight a title / chapter / track and press the corresponding number button(s) for the
chapter you want.
3. Press the ENTER button to confirm. The unit will start playback about 3 seconds later.
DVD
CD
(continued on next page)
GB - 18
SPECIAL FUNCTIONS
Basic playback
Locating a specific time
DVD
CD
You can move to a specific location by entering its corresponding time (hours, minutes, seconds)
1. Press the GOTO button.
2. Press or button to highlight time.
DVD
CD
3. Press the corresponding number buttons for the setting point you want.
• The first two numbers you entered represent hours.
• The second two numbers you entered represent minutes.
• The third two numbers you entered represent seconds.
4. Press the ENTER button to confirm. The unit will start playback about 3 seconds later.
Notes :
• Some discs may not respond to this process.
• Some scenes may not be located as precisely as you specified.
• This method for accessing specific locations is available only within the current title of the DVD disc.
• You can move through the menu by pressing the and buttons.
Angle setting
DVD
1. Press the DISPLAY button twice of the remote unit. The
FUNCTION menu is displayed on the screen and you can see
how many angles are recorded on the disc.
2. Press the ANGLE button repeatedly to select your desired angle.
3. The unit change to your desired angle at once.
Audio setting
Title 1/10
Audio
Subtitle
00:09:29
01:25: 27
Chapter 3/15 Angle
1/3 Fre
1/3
D 6 Ch
2/3 Spa
DVD
1. Press the DISPLAY button twice of the remote unit. The
FUNCTION menu is displayed on the screen and you can see
how many audio formats are recorded on the disc.
2. Press the AUDIO button repeatedly to select your desired type of
audio.
3. The unit change to your desired type audio at once.
Subtitle setting
DVD
DVD
Title 1/10
Audio
Subtitle
00:09:29
01:25: 27
Chapter 3/15 Angle
2/3 Spa
1/3
D 6 Ch
2/3 Spa
DVD
1. Press the DISPLAY button twice of the remote unit. The
FUNCTION menu is displayed on the screen and you can see
how many subtitle formats are recorded on the disc.
2. Press the SUBTITLE button repeatedly to select your desired
language.
3. The unit change to your desired language about 3 seconds later.
GB - 19
DVD
Title 1/10
Audio
Subtitle
00:09:29
01:25: 27
Chapter 3/15 Angle
2/3 Spa
1/3 Fre
D 6 Ch
1/3
Advanced
playback
CD / DVD PROGRAMMABLE MEMORY
Programmable memory
The two types of programmed playback provided by this unit are title/chapter programmed playback and title
programmed playback.
Title / Chapter programmed playback
DVD
1. Press the MEM (Memory) button while the disc is stopped.
2. Enter the title numbers in
in
--
--
. Use
or
.
button to move the highlight to chapter and enter the chapter numbers
Title
Chapter
3. Use , , or button to move to the other field.
4. Repeat steps 2 to 3.
5. Press the PLAY button to start the programmed playback.
Programmable memory
CD
Track programmed playback
1. Press the MEM (Memory) button while the disc is stopped.
2. Enter the track numbers in
---
.
Track
3. Use , , or button to other field.
4. Repeat steps 2 to 3.
5. Press the PLAY button to start the programmed playback.
GB - 20
Advanced
playback
REPEAT PLAYBACK
You can play a specific title or chapter repeatedly.
(Title repeat, chapter repeat, A-B repeat)
Repeating a title
DVD
You can play the same title repeatedly.
1. While the disc is playing, press the REPEAT DISC button until
the “ Repeat Title ” indicator displays on the screen. The current
title is played repeatedly.
Repeating a chapter
You can play the same chapter repeatedly.
2. While the disc is playing, press the REPEAT DISC button until
the “ Repeat Chapter ” indicator displays on the screen. The current
chapter is played repeatedly.
To resume normal playback
3. While the disc is playing, press the REPEAT DISC button until
the “ Off ” indicator displays on the screen.
You can play a single track and whole disc repeatedly.
Repeating a single track
CD
You can play the same track repeatedly.
1. While the disc is playing, press the REPEAT DISC button until
the “ Repeat Single ” indicator displays on the screen. The current
track is played repeatedly.
Repeating a whole disc
2. While the disc is playing, press the REPEAT DISC button until
the “ Repeat All ” indicator displays on the screen. The whole disc
is played repeatedly.
To resume normal playback
3. Press the REPEAT DISC button until the “ Off ” indicator
displays on the screen.
(continued on next page)
GB - 21
Advanced
playback
REPEAT PLAYBACK
Repeating a specific section
DVD
CD
You can play a specific section repeatedly.
1. While the disc is playing, press the REPEAT A-B button at the
beginning of the section ( Rep A- ) is displayed you want to play
repeatedly.
2. Press the REPEAT A-B button again at the end of the section
( Rep A-B ) is displayed.
3. The Unit will immediately begin replaying your selection.
To resume normal playback
4. While the disc is playing, press the REPEAT A-B button until
the “ Off ” indicator displays on the screen.
Notes :
• A-B repeat can only be used within the same title. If the start and end of the section to be repeated are in different
titles, A-B repeat is cancelled.
• The A-B repeat function does not operate in scenes where different camera angles are recorded.
GB - 22
PLAYING PICTURE FILE DISC
This unit can play Picture files recorded on CD-R and CD-RW discs.
Playing a Picture file disc
1. Press the OPEN button to open the disc door.
2. Hold the Picture disc by its sides and carefully make it fit onto the central support of compartment with the label
side facing up you until you hear a “click”.
3. Push the door to close.
4. The unit will take a short while to load the disc.
PLAY button. The next picture will automatically display after 6 seconds.
5. Press the
Thumbnail
Review
Full-Screen
Review
Notes:
• If you press the MENU button on the remote in full-screen review, the Unit will display a menu of 9 thumbnail
images.
NEXT or
PREV in thumbnail screen and then press the ENTER button
• Use the cursor to highlight
to review other images. If you want to review one image in full-screen, you can use the CURSOR , , or
buttons to highlight the image and then press the ENTER button to confirm. The image you selected will
show on TV in Full-Screen and automatically display one by one again in about 6 seconds intervals.
PLAY button to resume playback.
• You can press the PAUSE button to interrupt playback, and press the
• You also can use GOTO function or use the numbered buttons to enter the number to quickly select any
image.
• You can press the ZOOM button to enlarge the picture in 3 levels.
• Press the ANGLE button on the remote control to rotate the picture orientation by 90°.
GB - 23
CUSTOMIZING THE FUNCTION SETTINGS
LANGUAGE setting
STEP 12
1. Press the SETUP button in stop mode.
2. Use
or
button to one language, then press the ENTER
button. The screen will change to your selected language
wordings immediately.
3. To exit the SETUP MENU and return to the normal screen,
press the RETURN button.
Language
Video
Audio
Rating
English
Deutsch
Français
Español
Italiano
Svenska
Português
VIDEO setting
TV Shape
1. Press the SETUP button in stop mode.
2. Use or button to select Video, then press the ENTER button.
3. Use or button to select TV Shape, then press the ENTER button.
4. Use or button to shift and select the TV type, then press the ENTER button.
5. To exit the FUNCTION SETUP MENU and return to the normal screen, press the RETURN button.
Widescreen
Cut off when a widescreen
video image is played.
Pan Scan
• When widescreen video material is played, this mode clips the right
and left sides of the image so that it can be viewed on a conventional
screen.
• Some widescreen DVDs that do not permit Pan Scan mode playback
are automatically played in letterbox mode (black bands top and
bottom).
Letter Box
• When widescreen video material is played in this mode on a conventional
screen, black bands appear at the top and bottom of the screen.
Widescreen
• This is the correct mode for playing widescreen videos on a widescreen.
Notes :
• The displayable picture size is preset on the DVD disc. Therefore the playback picture of some DVD discs may not
conform to the picture size you select.
• Some DVD discs recorded in widescreen picture format, the playback picture may appear as widescreen mode
regardless of the TV shape setting.
• Pan Scan, letter box and widescreen is about video signal to TV. Actual effect of LCD screen based on both
screen switch position and the video setting.
GB - 24
(continued to next page)
CUSTOMIZING THE FUNCTION SETTINGS
Brightness
1. Press the SETUP button in stop mode.
2. Use or button to select Video, then press the ENTER button.
3. Use or button to select Brightness, and then press the ENTER button.
4. Use or button to shift and select the Off/On, then press the ENTER button.
5. If you want to exit the SETUP MENU and return to the normal screen, press the RETURN button.
On : Picture will be brighter to clarify details.
Off : Picture will have deepened colors.
Edges
1. Press the SETUP button in stop mode.
2. Use or button to select Video, then press the ENTER button.
3. Use or button to select Edges, and then press the ENTER button.
4. Use or button to shift and select the Sharpen / Soften / Off, then press the ENTER button.
5. If you want to exit the SETUP MENU and return to the normal screen, press the RETURN button.
Sharpen : Fine detail will be easier to see.
Soften :
Soft-focus effect.
Off :
Picture will be returned to normal.
AUDIO setting
Digital Out
1. Press the SETUP button in stop mode.
2. Use or button to select Audio, press the ENTER button.
3. Press the ENTER button repeatedly to select Digital Out type.
4. To exit the FUNCTION SETUP MENU and return to the normal screen, press the RETURN button.
Digital Out
Virtual Effect
Off
Raw : Use this setting when the unit is connected to an external Dolby Digital decoder.
PCM : Use this setting when the unit is connected to an external surround decoder or stereo.
GB - 25
(continued to next page)
CUSTOMIZING THE FUNCTION SETTINGS
Virtual Effect (for CD and DVD only)
If you want to obtain expansive virtual surround sound effects from just two speakers.
1. Press the SETUP button in stop mode.
2. Press or button to select Audio, press the ENTER button.
3. Press or button to select Virtual Effect, then press the ENTER button.
4. Press or button to select ON or OFF, then press the ENTER button.
5. Press RETURN button to exit SETUP MENU
STEP 4
Digital Out
Virtual Effect
Digital Out
Off
Virtual Effect
Off
Off
On
RATING setting
Factory Set
If you want to return the initial language setting to the factory default, do the following:
1. Press the SETUP button in stop mode.
2. Use or button to select the Rating, then press the ENTER button.
3. Use or button to shift and select the Factory Set, then press the ENTER button.
4. Use or button to shift and select Yes, then press the ENTER button.
5. To exit the SETUP MENU and return to the normal screen, press the RETURN button.
STEP 2
Language
Video
Audio
STEP 3
Rating
Language
Password
Parental lock
Factory Set
Audio
Video
---8. Adult
No
STEP 4
Rating
Language
Password
Parental lock
Factory Set
Audio
Video
Rating
---8. Adult
No
No
Yes
Note:
When you reset the Unit to the factory default, the Unit will take 3-5 seconds to reset.
GB - 26
LANGUAGE CODE LIST FOR DISC LANGUAGE
Code Language Name Code Language Name Code Language Name Code Language Name
AA
AB
AF
AM
AR
AS
AY
AZ
BA
BE
BG
BH
BI
BN
BO
BR
CA
CO
CS
CY
DA
DE
DZ
EL
EN
EO
ES
ET
EU
FA
FI
FJ
FO
FR
Afar
Abkhazian
Afrikaans
Ameharic
Arabic
Assamese
Aymara
Azerbaijani
Bashkir
Byerlorussian
Bulgarian
Bihari
Bislama
Bengali
Bangla
Tibetan
Breton
Catalan
Corsican
Czech
Welsh
Danish
German
Bhutani
Greek
English
Esperanto
Spanish
Estonian
Basque
Persian
Finnish
Fiji
Faroese
French
FY
GA
GB
GL
GN
GU
HA
HI
HR
HU
HY
IA
IE
IK
IN
IS
IT
IW
JA
JI
JW
KA
KK
KL
KM
KN
KO
KS
KU
KY
LA
LN
LO
LT
LV
Frisian
Irish
Scots Gaelic
Galician
Guarani
Gujarati
Hausa
Hindi
Croatian
Hungarian
Armenian
Interlingua
Interlingue
Inupiak
Indonesian
Icelandic
Italian
Hebrew
Japanese
Yiddish
Javanese
Georgian
Kazakh
Greenlandic
Cambodian
Kannada
Korean
Kashmiri
Kurdish
Kirghiz
Latin
Lingala
Laothian
Lithuanian
Latvian, Lettish
MG
MI
MK
ML
MN
MO
MR
MS
MT
MY
NA
NE
NL
NO
OC
OM
OR
PA
PL
PS
PT
QU
RM
RN
RO
RU
RW
SA
SD
SG
SH
SI
SK
GB - 27
Malagasy
Maori
Macedonian
Malayalam
Mongolian
Moldavian
Marathi
Malay
Maltese
Burmese
Nauru
Nepali
Dutch
Norwegian
Occitan
(Afan) Oromo
Oriya
Panjabi
Polish
Pashto, Pushto
Portuguese
Quechua
RhaetoRomance
Kirundi
Romanian
Russian
Kinyarwanda
Sanskrit
Sindhi
Sangho
SerboCroatian
Singhalese
Slovak
SL
SM
SN
SO
SQ
SR
SS
ST
SU
SV
SW
TA
TE
TG
TH
TI
TK
TL
TN
TO
TR
TS
TT
TW
UK
UR
UZ
VI
VO
WO
XH
YO
ZH
ZU
Slovenian
Samoan
Shona
Somali
Albanian
Serbian
Siswat
Sesotho
Sundanese
Swedish
Swahili
Tamil
Telugu
Tajik
Thai
Tigrinya
Turkmen
Tagalog
Setswana
Tonga
Turish
Tsonga
Tatar
Twi
Ukrainian
Urdu
Uzbek
Vietnamese
Volapük
Wolof
Xhosa
Yoruba
Chinese
Zulu
MAINTENANCE
Cleaning Disc
A defective or soiled disc inserted into the unit can cause sound to drop out during playback.
Handle the disc by holding its inner and outer edges.
• Do NOT touch the surface of the unlabeled side of the disc.
• Do NOT stick paper or tape on the surface.
• Do NOT expose the disc to direct sunlight or excessive heat.
• Clean the disc before playback. Wipe the disc from the center outward with a
cleaning cloth.
• NEVER use solvents such as benzine or alcohol to clean the disc.
• Do NOT use irregular shape discs (example : heart shaped, octagonal, etc.). They may cause malfunctions.
Cleaning the unit
• Be sure to turn the unit off and disconnect the AC power cord before maintaining the unit.
• Wipe the unit with a dry soft cloth.
If the surfaces are extremely dirty, wipe clean with a cloth which has been dipped in a weak soap-and-water solution
and wrung out thoroughly, then wipe with a dry cloth.
• Never use alcohol, benzine, thinner, cleaning fluid or other chemicals. Do NOT use compressed air to remove dust.
Important Note
Before transporting the unit, remove disc from the disc compartment.
GB - 28
(continued to next page)
TROUBLE SHOOTING GUIDE
SYMPTOM
CAUSE (AND REMEDY)
No power.
• Check that the AC adaptor and AC power cord is connected.
• You cannot turn on the unit.
The remote does not
function.
• Remove any obstacles between the remote and the unit.
• Use the remote near the unit.
• Point the remote at the remote sensor on the unit.
• Replace all the batteries in the remote with new ones.
DVD
No sound or only a
very low-level sound is
heard.
• Make sure that you've select DVD mode.
• The system is in pause mode or in Slow-motion Play mode. Press the
to return to normal play mode.
• Fast forward or fast reverse is performed. Press the
play mode.
PLAY button
PLAY button to return to normal
• Make sure that AUDIO output and AV IN input connections are correct.
• The DTS DVD disc cannot be decoded to have speaker output.
• This unit is too hot, shut off the unit for 30 minutes to cool down.
No picture
• The region number of the disc doesn't match the region number of this unit.
• The function is not select DVD mode, ensure select DVD of AV IN/DVD switch.
The picture is not
clear
• Clean the disc.
Severe hum or noise is
heard.
• The plugs and jacks are dirty. Wipe them with a cloth slightly moistened with alcohol.
The disc does not play.
• There is no disc inside ("No Disc" appears on the screen).
• The disc is scratched.
• Clean the disc.
• Insert the disc correctly with the playback side facing toward you.
• Clean the disc.
• A non-NTSC disc has been inserted. The unit and disc region number are incompatible.
• Condensation may have formed inside the unit due to a sudden change in temperature.
Wait about an hour for it to clear and try again.
Need More Help?
DO NOT RETURN THIS TO THE STORE
Please call Customer Service at 1-800-252-6123 (ET)
or visit online help at http://www.1800customersupport.com
GB - 29
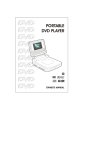
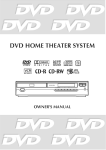
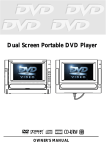
CARRYING BAG INSTALLATION
1. Insert the unit into bag as shown.
4. Take another strap and hook up the upper headrest
of the driver's seat as shown.
2. Insert the straps on carrying bag as shown.
5. Take loop elastic band to around the headrest of the
driver's seat and unit as shown.
3. Take straps and hook up the neck headrest of the
driver's seat as shown.
6. Adjust the straps tightly so that the unit is secured.
GB - 30
GAME PAD (CONNECTIONS)
Connecting the Video game system
Right side of unit
(Red)
(Red)
(White)
(White)
(Yellow)
(Yellow)
TO AV IN/
OUT Jack
White (Audio L )
Red (Audio R )
Yellow
(Video)
Ground
DVD
3.5mm plug description
AUDIO/VIDEO CABLE (included)
Playing a Video game system
1. Turn on the unit, slide the FUNCTION button to select "AV IN".
2. Turn on the video game system and follow the instructions provided with it to play game.
GB - 31
811-P17791-122
Printed in China