1
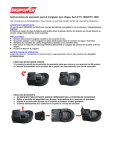
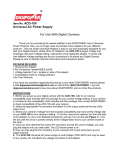
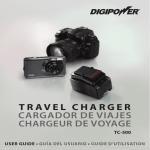
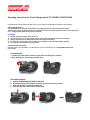
Operating Instructions for Travel Charger Item # TC-1000/RTC-1000/VTC1000 PLEASE READ THE INFORMATION AND FOLLOW ALL INSTRUCTIONS BEFORE USING THIS PRODUCT. IMPORTANT WARNING: This CHARGER is for charging rechargeable Li-Ion digital camera and camcorder batteries ONLY! Attempting to charge any other batteries may damage the device, destroy the batteries and/or cause injury to the user. Charging other batteries will void the warranty. CAUTIONS: Always unplug the charger when not in use. Do not store, place or use the charger where it could come into contact with water or moisture. Always replace frayed or damaged wire and broken plugs immediately. To reduce the risk of electric shock, unplug your charger from the wall outlet before cleaning. Do not open or disassemble the charger unit. OPERATING INSTRUCTIONS: BEFORE USING THE CHARGER, IT IS IMPORTANT TO GET FAMILIAR WITH THE INTERNATIONAL PLUG MECHANISM. FOR USE IN USA: 1. Lift the plug from stored position until it locks in a 90 degrees position. 2. Plug directly into a wall outlet or Power strip. FOR USE IN EUROPE: 1. USA PLUG REMAINS IN STORED POSITION 2. Remove European plug adaptor by lifting up and out of stored position. 3. Slide the EU plug into the stored US plug. 4. Plug directly into a wall outlet or Power strip. . The TC1000 charger is designed to work with changeable battery plates to fit and charge various Li-Ion digital camera and camcorder batteries. Each TC-1000 is packaged with battery plates, to fit the different battery models from the same camera manufacturer. CHOSING THE CORRECT BATTERY PLATE 1. Find the Plate labeled with the battery model for you camera. (Battery plates are inscribed with the OEM battery # as well as the DigiPower battery #) (The battery model can be found on the battery label, or check the camera instruction manual.) 2. Attach the battery plate by sliding it on to the Base Charger. (Contacts on the Plate should slide towards the LED at the bottom of the charger) 3. Slide the battery on to the cradle matching the battery terminals with the Plate contacts. Operating instructions: 1. while the battery is on the charger, connect the base charger to a power source. The LCD panel will light up. The LCD’s charge indicator bars will begin to appear to show the battery charge level. The bars will begin to blink at start of each charging level. st Less than 25% capacity the 1 (25%) bar will blink. nd Less than 50% capacity the 2 (50%) bar will blink. rd Less than 75% capacity the 3 (75%) bar will blink. Less than 100% capacity the 4th (100%) bar will blink. When the battery is fully charged, all four bars will light but stop blinking; and a beeping alarm will sound. After 75 seconds, the LCD will turn off. (Typical charge time is 1-hour for batteries up to 900mAh.) NOTE: The charger or battery may become warm when charging. This is normal. Maintenance: Use a clean, DRY cloth when necessary to keep the metal contacts of both charger and battery clean. (Remove from power outlet before cleaning) LIMITED WARRANTY: This product carries a full one-year warranty from date of purchase against defects in materials and workmanship. This warranty does not cover damage resulting from accidents, misuse, unauthorized repair/alternations to the product or failure to follow operating instructions. Visit our web site www.digipowersolutions.com email: [email protected]