1
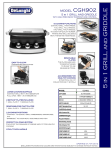
Important safeguards/Description en
INTRODUCTION
Thank you for choosing a De’Longhi product.
Please take a few minutes to read the instructions to avoid
risks or damage to the appliance.
IMPORTANT
SAFEGUARDS
When using electrical appliances, basic
safety precautions should always be
followed, including the following:
- READ ALL INSTRUCTIONS.
- Do not touch hot surfaces; use handles or
knobs.
- To protect against fire, electric shock, and
injury to persons, DO NOT IMMERSE CORD OR
PLUG in water or other liquids.
- Close supervision is necessary when any
appliance is used by or near children.
- Unplug from outlet when not in use and
before cleaning. Allow to cool before putting
on or taking off parts, and before cleaning
appliance.
- Do not operate any appliance with a
damaged cord or plug, or after the appliance
has malfunctioned or has been damaged
in any manner. Return the appliance to an
authorized cervice center for examination,
repair or adjustment.
- The use of accessory attachment not
recommended
by the appliances
manufacturer might cause injuries.
- Do not use outdoors.
- Do not let power cord hang over edge of table
or counter, or touch hot surfaces.
- Do not place on or near hot gas or electric
burner, or in a heated oven.
- Unplug the unit when finished using.
- Do not use appliance for other than intended
use.
- Extreme caution must be exercised when
moving an appliance containing hot oil or
4
other hot liquids.
- To disconnect, turn control to OFF setting,
then remove plug from wall outlet.
- WARNING: TO REDUCE THE RISK OF FIRE
OR ELECTRIC SHOCK, ONLY AUTHORIZED
PERSONNEL SHOULD DO REPAIRS.
SAVE THESE
INSTRUCTIONS
THIS PRODUCT IS FOR HOUSEHOLD USE ONLY
SPECIAL INSTRUCTIONS:
a) A short power-supply cord (or detachable power-supply
cord) is to be provided to reduce the risk resulting from
becoming entangled in or tripping over a longer cord.
b) Longer detachable power-supply cords are available
and may be used if care is exercised in their use.
C) If a long detachable power-supply cord or extension
cord is used:
1) The marked electrical rating of the cord or extension
cord should be at least as great as the electrical rating
of the appliance;
2) If the appliance is of the grounded type, the extension
cord should be a grounding 3-wire cord;
and
3) The longer cord should be arranged so that is does not
drape over the countertop or table top where it can be
pulled on by children or tripped over unintentionally.
Description
1. Base and cover: solid stainless steel structure with
self-adjusting cover.
2. Panini-Style Handle: strong cast metal handgrip to
adjust the cover according to the thickness of the food.
3. Removable plates: non-stick, dishwasher safe, easy
to clean.
a. Grill plates: perfect for grilling steak, hamburger,
chicken and vegetables.
b. Griddle plates: to prepare perfect pancakes, eggs,
bacon and shellfish (model CGH902 only).
4. Mode selector: Choose the Grill/Panini or
Griddle function
5. Grill/Panini thermostat dial: adjusts temperature
from 175°F (80°C) to 450°F (230°C).
First use en
6. Griddle plate thermostat dial: adjusts temperature
from positions warm to sear.
7. ON light.
8. Grill/panini ready light.
9. Griddle plate ready light.
10. Grease drip cups: collect the grease, dishwasher safe.
11. Cleaning tool: helps clean the plates after use.
12. Plate release buttons: press to release and remove
the plate.
13. Hinge release lever: enables the cover to be fully
opened to cook in the flat position.
FIRST use
When using the appliance for the first
time
Remove all packaging and labels from the plate. Before
throwing the packing material away, make sure you have
removed all parts of the new appliance. We recommend you
keep the box and packing to re-use in the future.
Please note: the grease drip cups are outside the polystyrene
insert. Before use, clean the base, cover and dials with a damp
cloth to remove dust accumulated during transport. Clean the
cooking plates, grease drip cups and cleaning tool thoroughly.
The plates, grease drip cups and spatula are dishwasher safe.
Contact grill (use the grill plate)
The contact grill is ideal for cooking hamburgers, deboned meat
and thin meat slices, vegetables and sandwiches. The “contact”
function is perfect to prepare food rapidly and healthily. When
you use the contact grill, the food cooks quickly as it is in
contact with the plates on both side at once (see figure).
The grease from the food is drained and collected by the
grooves on the
plate and the
opening at the
corner.
When
the
appliance is
used in the
“contact” position, we recommend using the grill plates.
Rest the cover evenly on the food until the required cooking
temperature is reached. The appliance has a special handgrip
and hinge allowing the cover to be adjusted according to
the thickness of the food. Thinly sliced potatoes and very
thick steaks can be prepared with equally perfect results.
If you want to cook a number of different types of food
simultaneously using the contact grill, the various foods
should have the same thickness to allow the cover to be
closed evenly.
Panini Press (use grill or griddle plate)
Use the appliance as a Panini Press to grill sandwiches, breads
and quesadillas. The word “Panini” is an Italian term for grilled
sandwich. Panini can include any combination of ingredients
such as vegetables, meat and cheese layered between two
pieces of fresh baked bread. The sandwich is then pressed
between two grill or griddle plates to toast the bread and
warm the sandwich. Experiment to make a variety of savory
or sweet sandwiches for any meal. We recommend using
fresh baked bread to produce the best tasting Panini. Popular
breads used for Panini are focaccia (a flat bread frequently
baked with rosemary, salt and onion on top), michetta (a
small round roll with a crisp crust), ciabatta (a rectangular
bread with a slightly domed crust) and thick slices of classic
Italian bread. When the appliance is used as a Panini Press,
the grill plates are recommended. We recommend the grill
plates because a traditional-style Panini sandwich will have
grill marks on the bread. However, depending upon the
type of sandwich you are preparing, you may wish to use
the griddle plates. The appliance functions as a Panini Press
in the same manner that it functions as a Contact Grill. It
was designed with a unique handle and hinge that allows
the cover to adjust to the thickness of the sandwich you are
preparing, and to rest there evenly. Light pressure can be
applied to the handle to press and heat the sandwich to your
liking. When cooking more than one Panini, it is important
that the thickness of each sandwich is consistent so the cover
will close evenly on the Panini.
Open grill (use the grill plate)
The appliance can be used as a open grill to prepare
hamburgers, steak, chicken (chicken on the bone is not
recommended as it does not cook evenly) and fish.
The open grill mode is the most versatile. The plates are in the
open position, doubling the cooking surface (see figure). You
can prepare a number of different foods on the separate plates
without
mixing the
flavours, or
cook more
of the same
food.
The
5
Use/Cooking positions en
open grill can be used to grill cuts of meat with different
thicknesses, each with the preferred level of cooking. In this
position, the cover is fully open, creating a double flat cooking
surface and you need to turn the food during cooking. To use
the appliance in the open grill, insert the grill plates.
Griddle (model CGH902 only)
The appliance can also be used as a griddle to prepare
pancakes, eggs, cheese, fritters and bacon and sausages for
breakfast (see figure). The griddle function is ideal to prepare
a fantastic breakfast for two or for all the family. The large
cooking surface enables a number of different foods to be
prepared simultaneously, or to cook more of the same food.
When the appliance is used as a griddle, the cover must be
fully opened to create a double flat cooking surface.
In this position, you need to turn the food during cooking.
When using this function, insert the griddle plates.
UsE
When the appliance has been prepared correctly and you are
ready to cook, turn the mode selector to the left to choose
the griddle function with griddle or grill plate, or to the
right to choose the grill/panini function.
After selecting one of the two positions, the red light comes
on to indicate that the appliance is on.
To use the appliance as a contact grill, panini press, turn the
thermostat dial to the required temperature.
You can set a temperature of between 175°F (80°C) to 450°F
(230°C). To use the appliance as a griddle plate or open grill,
turn the griddle thermostat dial to the required temperature.
You can set it from position warm to sear.
The appliance takes up to eight minutes to heat up depending
on the set temperature. When the thermostat reaches the
required temperature, the green light comes on to indicate
the appliance is ready to use. It is normal for the light to
go on and off during use as the thermostat regulates the
temperature.
The thermostat dials adjust the temperature of the cooking
surface. The temperature can be varied at any time during
cooking, depending on the type of food being prepared. Take
6
great care when cooking.
To open the appliance, hold the black part of the handgrip
which remains cold. The die-cast aluminium parts become
very hot, avoid touching them during and immediately after
cooking. If you need to adjust the position of the cover during
cooking, always use an oven mitt to avoid burns.
The upper plate housing is made from plastic and even
though it may become very hot, there is no risk of burns.
Before performing any operation on the appliance, leave to
cool down for at least 30 minutes.
Please note: The first time you use the appliance, it may
give off a slight odour and a little smoke. This is normal
and common to all appliances with non-stick surfaces. The
appliance is supplied with a black cleaning tool to clean the
plates when the appliance has completely cooled down after
use (after at least 30 minutes). If you use the tool for a long
time on plates which are still hot, the plastic may melt.
COOKING POSITIONS
Rest the appliance on a clean flat surface where you want
to cook. The appliance can be used in the three following
positions:
Closed position - The lower plate/cover rests on the upper
plate/base. This is the starting position and also one of the
cooking positions when the appliance is used as a contact
grill.
Open position - The lower plate/cover is open and at 100°
with respect to the base. The cover must be opened to this
position before using the appliance as a contact grill.
To place the cover in this position, just lift by the handgrip
until you hear a click. The cover automatically adjusts to the
thickness of the food on the plate. The cover remains in the
open position until the handgrip is lowered. This releases the
cover which is lowered until it covers the foods to be cooked.
The food will thus be cooked evenly on both sides.
When the handgrip is raised after cooking, the cover remains
parallel to the base.
To bring it back to the vertical, after removing the food, close
and re-open the appliance.
Flat position (fully open) - The lower plate/cover is level
with the upper plate/base. The upper and lower plates are
both at the same level, forming a large cooking surface.
In this position, the appliance can be used in barbecue mode
with either the grill plate or the griddle plate.
To place the appliance in this position, first identify the hinge
Cleaning and maintenance en
release lever on the right. Hold the handgrip with the left
hand and with the right, slide the release lever towards you.
Push the handgrip backwards until the cover rests upside
down on the work surface. The appliance will remain in this
position until the cover is closed again. If the appliance is in
the open position and you want to place it in the flat position,
pull the handgrip gently towards you and lift the hinge
release lever. Push the handgrip backwards until the cover
rests upside down in the flat position.
Lifting the handgrip slightly before pulling the release lever
lightens pressure on the hinge and facilitates the operation.
Inserting the cooking plates
Place the appliance in the flat position (see above) with the
controls in front of you. Insert one plate at a time.
Each plate can be inserted in either the lower or upper
housing only and they are labelled “lower” or “upper”.
Lift the upper grill with the housing for the heating element
facing downwards. Looking at the grill, the grease drain
opening must be in the front right corner. Identify the metal
supports at the centre of the housing. Tilt the back of the
plate and line up the shape on the back of the plate with the
metal supports. Slide the plate on the supports and push the
front of the plate downwards until it clicks into place.
Turn the appliance and insert the lower plate, following the
same procedure.
To remove the plates
Place the appliance in the flat position (see above).
Identify the plate release buttons on one side.
Push the button decisively to eject the plate from the base.
Hold the plate with both hands, slide it along the metal
supports and remove it from the base.
Press the other release button to remove the second plate,
following the same operations.
Remove or change the cooking plates when the appliance has
cooled down.
The grease drip cups are dishwasher safe.
When the appliance is used as a grill/barbecue or griddle
plate, both cups must be used. Place a cup under the grease
drain opening at the end of each of the plates. Once the
appliance has been prepared, plug the appliance into a mains
socket.
You can now start cooking.
CLEANING AND MAINTENANCE
User maintenance
- Never use metal toolings which could scratch the nonstick plates. Use wood or heat-resistant plastic toolings.
- Never leave plastic toolings in contact with the hot
plates, including the cleaning tool supplied.
- Between cooking one food and the next, remove food
residues through the grease drain opening and collect
them in the grease drip cup, then clean with kitchen
paper and move on to the next cooking operation.
- Before cleaning, always leave the appliance to cool
down for at least 30 minutes.
Cleaning and care
Please note: Before cleaning the appliance, make sure it has
cooled down completely.
At the end of cooking, turn the selector to the “0” position and
unplug from the mains. Leave the appliance to cool down for
at least 30 minutes. Use the special tool supplied to remove
any food residues from the plates. The tool can be washed by
hand or in the dishwasher. Empty the grease drip cups. The
grease drip cups can be washed by hand or in the dishwasher.
Press the plate release buttons to remove the plates from the
appliance. Before touching them, make sure they have cooled
down completely (wait at least 30 minutes).
The cooking plates are dishwasher safe.
Do not use metal objects to clean the plates.
Positioning the grease drip cups
When the appliance is used as a contact grill, only one of the
grease drip cups is needed.
During cooking, place the cup directly under the grease drain
opening. The grease coming from the food is drained towards
the opening in the plate and gathered in the cup.
After cooking, dispose of the grease collected appropriately.
7
Limited warranty en
This warranty applies to all products with De’Longhi or Kenwood brand names.
What does the warranty cover?
We warrant each appliance to be free from defects in material and workmanship. Our obligation under this warranty is limited
to repair at our factory or authorized service center of any defective parts or part thereof, other than parts damaged in transit.
In the event of a products replacement or return, the unit must be returned transportation prepaid. The repaired or replacement
model will be returned at the company expense.
This warranty shall apply only if the appliance is used in accordance with the factory directions, which accompany it, and on an
Alternating current ( AC ) circuit.
How long does the coverage last?
This warranty runs for one year (1) from the purchase date found on your receipt and applies only to the original purchaser for
use.
What is not covered by the warranty?
The warranty does not cover defects or damage of the appliance, which result from repairs or alterations to the appliance
outside our factory or authorized service centers, nor shall it apply to any appliance, which has been subject to abuse, misuse,
negligence or accidents. Also, consequential and incidental damage resulting from the use of this product or arising out of any
breach of contract or breach of this warranty are not recoverable under this warranty. Some states do not allow the exclusion or
limitation of incidental or consequential damage, so the above limitation may not apply to you.
How do you get service?
If repairs become necessary, see contact information below:
U.S. Residents: Please contact our toll free hotline at 1-800-322-3848 or log onto our website at www.delonghi.com
Residents of Canada: Please contact our toll free hotline at 1-888-335-6644 or log onto our website at www.delonghi.com
Residents of Mexico: Please contact our toll free number 01-800-711-8805 for assistance or log onto our website at www.
delonghi.com
The above warranty is in lieu of all other express warranties and representations. All implied warranties are limited to the
applicable warranty period set forth above. This limitation does not apply if you enter into an extended warranty with
De’Longhi. Some states/countries do not allow limitations on how long an implied warranty lasts, so the above exclusions may
not apply to you. De’Longhi does not authorize any other person or company to assume for it any liability in connection with
the sale or use of its appliance.
How does country law apply?
This warranty gives you specific legal rights, and you may also have other rights, which vary from state to state/country to
country.
8