1
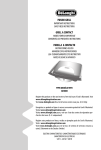
TOASTER
INSTRUCTIONS FOR USE
SAVE THESE INSTRUCTIONS
GRILLE-PAIN
MODE D’EMPLOI
CONSERVEZ CE MODE D’EMPLOI
TOSTADORA
INSTRUCCIONES PARA EL USO
REPASE Y GUARDE ESTAS INSTRUCCIONES
LEA CUIDADOSAMENTE ESTE INSTRUCTIVO ANTES DE USAR SU APARATO
MODEL/MODELE/MODELO
DTT02 series
Register this product on-line and receive a free trial issue of Cook's Illustrated. Visit
www.delonghiregistration.com
Visit www.delonghi.com for a list of service centers near you.
Enregistrez ce produit en ligne et recevez un numéro gratuit de Cook's Illustrated. Visitez
www.delonghiregistration.com
Visitez www.delonghi.com pour y voir une liste des centres de réparation proches de
chez vous.
Registre este producto en línea y reciba un ejemplar gratis de Cook's Illustrated. Visite
www.delonghiregistration.com
Visite www.delonghi.com para ver la lista de centros de servicios cercanos a usted.
ELECTRIC CHARACTERISTICS/ CARACTÉRISTIQUES ÉLECTRIQUES
CARACTERISTICAS ELECTRICAS
120 V~ 60 Hz 900 W
EN
SHORT CORD INSTRUCTIONS
a) A short power-supply cord or detachable power-supply cord is provided to reduce risks resulting from becoming entangled
in or tripping over a longer cord.
b) Longer detachable power-supply cords or extension cords may be used if care is exercised in their use.
c) If a long detachable power-supply cord or extension cord is used:
1. The marked electrical rating of the detachable power-supply cord or extension cord should be at least as great as the
electrical rating of the appliance;
2. Extension cord should be a grounding-type 3-wire cord;
3. The longer cord should be arranged so that it will not drape over the counter top or table top where it can be pulled on
uby children or tripped over.
FR
INSTRUCTIONS POUR CORDON COURT
a) Un cordon d’alimentation court ou un cordon d’alimentation détachable sera fourni pour réduire les risques de s’emmêler
ou de trébucher sur un cordon plus long.
b) Des cordons d’alimentation détachables ou des rallonges sont disponibles et peuvent être utilisés s’ils le sont de façon sécuritaire.
c) Si un long cordon d’alimentation détachable ou une rallonge est utilisé :
1. La puissance nominale du cordon d’alimentation détachable ou de la rallonge doit être au moins égale à la puissance
électrique nominale de l’appareil;
2. Le cordon devra présenter trois conducteurs dont la terre;
3. Le cordon plus long doit être disposé de façon à ne pas pendre du comptoir ou de la table pour éviter qu’un enfant le tire
ou qu’il trébuche.
ES
INSTRUCCIONES CABLE CORTO
a) Se proporciona un cable corto o un cable desmontable de alimentación eléctrica para reducir el riesgo de enredarse o tropezarse con un cable más largo.
b) Los cables desmontables de alimentación eléctrica o cables de extensión largos se pueden utilizar siempre que esto se realice con cuidado.
c) Si se utiliza un cable desmontable de alimentación eléctrica o un cable de extensión largos:
1. El rango eléctrico del cable desmontable de alimentación eléctrica o del cable de extensión debe ser al menos igual al
rango eléctrico del dispositivo;
2. El cable de prolongación tiene que ser un cable de 3 hilos de tipo con con puesta a tierra;
3. El cable más largo se debe disponer de forma que no cuelgue sobre la mesa o el mostrador. De lo contrario los niños
pueden tirar de él o tropezarse.
2
EN
3
DESCRIPTION OF APPLIANCE
A removable warming
rack/toast rack
B warming rack handle
C Peek & View™ carriage
lever
D browning control
E cancel button with indicator
light
F crumb tray
G cord storage
A
B
C
FR
DESCRIPTION DE L’APPAREIL
A grille chauffante/
porte-toasts amovible
B levier de la grille de
réchauffage
C levier de chariot Peek &
View™
D bouton de contrôle du
grille-pain
E bouton ‘annuler’ avec
témoin lumineux
F tiroirs ramasse-miettes
G rangement du cordon
D
E
F
1
G
ES
DESCRIPCIÓN DEL APARATO
A rejilla para tostar o calendar
extraíble
B asa de la resistencia
C palanca de elevación Peek &
View™
D botones de control del
tostado
E botón de “cancelación” con
luz indicadora
F bandejas de migas
G recoge-cables
2
4
3
EN
IMPORTANT SAFEGUARDS
When using electrical appliances, basic safety precautions should always be followed, including the
following:
1. Read all instructions carefully before using
your toaster. Save these instructions for future
reference.
2. Remove all packaging before using this product. We advise to keep the original packaging
until you are satisfied the product is operating
correctly.
3. To protect against electrical shock, do not
place cord, plug or toaster in water or other
liquid.
4. Position the toaster on a firm, level, heat-resistant surface, close to an electrical outlet and
out of the reach of children.
5. A fire may occur if toasters are covered or
touching flammable material, including curtains, draperies and the like, when in operation.
6. The area around the toasting slots will become
hot during use. Do not touch these surfaces
during operation.
7. When using only one toast slot, do not allow
anything to enter the other slot(s), as all slots
are “on” when the lever is lowered.
8. Do not allow the toasting slots to become covered during operation.
9. Do not cover the air inlet on the bottom of the
toaster.
10. Do not toast items with butter or jam or make
toasted sandwiches, as this could cause a fire
hazard.
11. Pita bread and similar food products are
unsuitable for use in an automatic toaster as
they may expel fats onto the heating elements, creating a fire hazard.
12. Do not use torn, curled up, or misshapen slices
of bread, as these may jam the eject mechanism.
13. Should the lever become jammed during the
toasting cycle do not attempt to release it.
Unplug the toaster and allow it to cool down
before carefully removing the bread. Do not use
a knife, fork or other sharp implement as this
may cause damage to the heating elements.
14. Do not let cord hang over edge of table or
counter, or touch hot surfaces.
15. Do not touch hot surface. Use handles or knobs
16. After use, unplug the toaster and let it cool
down fully before cleaning and storing away.
17. Clean the crumbs out of your toaster frequently. This will avoid a build up of crumbs which
could cause a fire hazard (see ”Cleaning and
Maintenance").
18. Do not operate the toaster unless the crumb
tray is correctly fitted.
19. Close supervision is necessary when any appliance is used by or near children.
20. Do not place toaster on or near a hot gas or
electric burner, or in a heated oven.
21. Do not use outdoors.
22. Always plug cord into the electrical outlet
before turning on any controls. To disconnect,
turn the controls "Off" by pressing the Cancel
button, then remove plug from outlet.
23. Oversize foods, metal foil packages, or utensils
must not be inserted into the toaster as they
may cause the risk of fire or electrical shock.
24. The use of accessory attachments not recommended by the appliance manufacturer may
cause injuries.
25. Do not use the toaster for any purpose other
than those described in these instructions.
26. Do not attempt to dislodge food when the
toaster is plugged in.
27. Do not operate this appliance after it malfunctions or if the power cord or plug is damaged.
Return appliance to an authorized service
facility for examination, repair or adjustment.
WARNING – To prevent electric shock, unplug
before cleaning
SAVE THESE INSTRUCTIONS
For Household use only
4
Use the carriage lever to lift the toast to Peek & View™ at
any time without cancelling the toasting cycle.
Before plugging in
- Make sure your electricity supply is the same as the one
shown on the underside of your toaster.
- This appliance conforms to EC directive 2004/108/EC on
Electromagnetic Compatibility and EC regulation no.
1935/2004 of 27/10/2004 on materials intended for contact with food.
Before using for the first time
1 Clip excess cord into the cord storage clips in the base 1.
- Operate the toaster once on a medium setting without
bread. (The lever will not stay down unless the toaster is
plugged in).
- As with all new heating elements, your toaster may emit a
slight burning smell when it is first switched on. This is
normal and not a cause for concern.
To use your toaster
1 Plug the toaster into the power supply.
2 Move the browning control to the desired setting. Use a
low setting
for light toasting and for thin or dry bread.
3 Insert the bread, muffins, bagels etc.
4 Lower the lever until it locks 2. The ‘cancel’ button will illuminate. (The lever will not stay down unless the toaster is
plugged in).
- To toast frozen bread, move the browning control to the
defrost position .
- Use the carriage lever to lift the toast to Peek & View™ at
any time without cancelling the toasting cycle.
- To stop toasting during the cycle, press the ‘cancel’ button,
the toast will pop up and the ‘cancel’ button light will go
off.
5 Your toast will pop up automatically, to raise it higher,
lift the lever.
Hints on using your toaster
- Select a lower setting for light browning, for toasting one
slice only or for dry bread.
- When toasting a single slice of bread, you may notice a
variation in toast color from one side to the other - this is
normal.
- Dry/stale bread toasts more quickly than fresh bread and
thinly sliced bread toasts more quickly than thickly sliced
bread. Therefore, the browning control should be set at a
lower setting than usual.
- For best results ensure that the bread slices are of an even
thickness, freshness and size.
- In order to achieve uniform browning we recommend you
wait a minimum of 30 seconds between each toasting so
that the control can automatically reset.
Alternatively, select a lower setting when additional toasting is carried out.
Warming rack safety
1 Never set the browning control higher than 1 when using
the warming rack.
2 Never completely cover the warming rack.
3 When using the warming rack, never wrap the food up.
Plastic wrapping will melt and could catch fire. Foil will
reflect heat, damaging the toaster.
4 If you’re using the toaster slots, always remove the warming rack so it can’t burn you.
5 Always allow the warming rack to cool before removing
from the toaster. Never place a hot warming rack on a
work surface.
6 Never touch hot surfaces, especially the metal areas of the
warming rack.
To use the warming rack
1 Place the warming rack on top of toaster 3.
2 Put your food on top of the rack (slicing thick items in half
will speed up the warming process).
3 Set the browning control no higher than 1 .
4 Lower the lever.
5 At the completion of the warming cycle the toaster will
switch off automatically. Turn the items over and repeat
the operation. Watch to make sure they don’t burn.
6 To remove the warming rack, allow the toaster to cool and
unplug.
7 Lift off the warming rack.
Hints for the warming rack
- The warming rack can also be used as a toast rack, but
ensure it is cool before removing from the toaster.
Care and cleaning
1 Before cleaning, unplug your toaster and let it cool down.
2 Slide out the crumb tray 4. Clean, then replace. Do this regularly: crumbs can smoke or even burn.
3 Wipe the outside of the toaster and the warming rack with
a damp cloth, then dry. Do not use abrasives.
5
LIMITED WARRANTY
This warranty applies to all products with De’Longhi or Kenwood brand names.
What does the warranty cover?
We warrant each appliance to be free from defects in material and workmanship. Our obligation under this warranty is limited to repair at
our factory or authorized service center of any defective parts or part thereof, other than parts damaged in transit. In the event of a products
replacement or return, the unit must be returned transportation prepaid. The repaired or new model will be returned at the company
expense.
This warranty shall apply only if the appliance is used in accordance with the factory directions, which accompany it, and on an Alternating
current ( AC ) circuit.
How long does the coverage last?
This warranty runs for one year (1) from the purchase date found on your receipt and applies only to the original purchaser for use.
What is not covered by the warranty?
The warranty does not cover defects or damage of the appliance, which result from repairs or alterations to the appliance outside our factory
or authorized service centers, nor shall it apply to any appliance, which has been subject to abuse, misuse, negligence or accidents. Also,
consequential and incidental damage resulting from the use of this product or arising out of any breach of contract or breach of this warranty are not recoverable under this warranty. Some states do not allow the exclusion or limitation of incidental or consequential damage,
so the above limitation may not apply to you.
How do you get service?
If repairs become necessary, see contact information below:
U.S. Residents: Please contact our toll free hotline at 1-800-322-3848 or log onto our website at www.delonghi.com
Residents of Canada: Please contact our toll free hotline at 1-888-335-6644 or log onto our website at www.delonghi.com
Residents of Mexico: Please contact our toll free number 01-800-711-8805 for assistance or log onto our website at www.delonghi.com
The above warranty is in lieu of all other express warranties and representations. All implied warranties are limited to the applicable warranty period set forth above. This limitation does not apply if you enter into an extended warranty with De’Longhi. Some states/countries do
not allow limitations on how long an implied warranty lasts, so the above exclusions may not apply to you. De’Longhi does not authorize
any other person or company to assume for it any liability in connection with the sale or use of its appliance.
How does country law apply?
This warranty gives you specific legal rights, and you may also have other rights, which vary from state to state/country to country.
6