1
instructions
Steam Iron
FHX3
Please keep your instructions for future reference
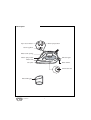
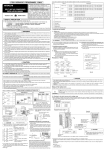
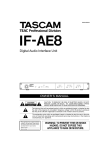
Description
Super steam button
Water spray button
Steam regulator
Water tank opening
Water spray nozzle
Indicator light
Water tank
Cable winder
Sole plate
Thermostat dial
Water filling jug
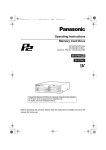
Steam iron
2
Thank you for choosing this steam iron.To get the very best
out of your new appliance it is advisable to read these
instructions before using it.This will ensure that you gain optimum results and use the appliance safely.
About your appliance
The appliance uses normal tap water. If the water in your area is
very hard, mix half tap water with half distilled water.
Do not use chemicals or detergents such as fragrances or scale
removers in the water tank as this could cause damage.
The appliance should be placed for use on a flat, stable, heat resistant surface.
Steam ironing
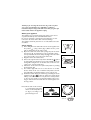
a) Before filling the water tank, make sure the steam regulator is in
the position
("dry" position) (fig. 1). Make sure the power
cable is unplugged from the mains socket.
b) Open the cover of the water tank opening and pour the water
into the iron (fig. 2) keeping the iron in a horizontal position.
It is important that the iron is always unplugged from the mains
every time you fill or top up the water in the tank.
c) Plug the iron into the mains socket.
d) Choose the segment of the temperature dial with the symbol
for steam. Make sure the fabric to be ironed is suitable for steam
ironing.When using the iron for the first time, run the iron over
a spare piece of cloth several times.
e) After these checks, select the required temperature by rotating
the thermostat dial.
f) The indicator light will come on to show the iron is on. After
about a minute in the case of maximum temperature, the indicator light will go off showing that the iron is ready for use.
g) Continuous steam delivery is obtained by positioning the steam
regulator in the or
position (to obtain more steam). Steam
delivery ceases whenever the iron is placed in a vertical position
on the rear rest (position recommended during pauses in ironing) or with the iron horizontal when the steam regulator is in
the dry position.
fig. 1
fig. 2
Note: On the back of the iron there
is a useful guide giving information on the temperature to
set (fig. 3) according to the
garment being ironed:
fig. 3
3
Steam iron
Remember that the steam function can only be used when
the thermostat is in the
position.
Dry ironing
• Plug in the iron and select the temperature, if there is water in
the tank, position the steam regulator on the dry position (fig.
1).
• Wait until the indicator light goes off showing that the required
temperature has been reached.
• If the fabric to be ironed is slightly damp or you iron fast, you can
use a higher temperature. If, on the other hand, the garments
are dry or you iron slowly, use a lower temperature.
F
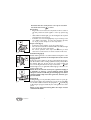
Super steam (fig. 4)
• Position the steam regulator on the dry position (fig. 1).
• Place the thermostat dial on maximum.When the indicator light
goes off, press the super steam button
.
For correct operation of the super steam function, you must
wait a few seconds between one burst of steam and the next.
fig. 4
F
fig. 5
G
Vertical ironing (fig. 5)
Enables delicate garments to be steamed without resting them on the
ironing board: pay attention to the temperature used to steam
hanging fabrics.
Position the steam regulator on the dry position. Rotate the thermostat dial clockwise as far as it will go (maximum steam position).When
the indicator light goes off, place the iron in a vertical position and
move it near the garment. Press the super steam button
until the
indicator light comes on again.Wait until the light goes off before continuing vertical ironing.
Never direct the "vertical" steam jet at a garment hanging in
a wardrobe or worn by a person. Vertical ironing should
always be carried out with the garment hanging on a clothes
stand and always away from other garments, elements, people and animals.
Spray (fig. 6)
If during ironing, you note particularly resistant creases or if your garment requires a higher level of dampness, you can use the spray. Make
sure the tank contains water. Press the spray button
repeatedly (fig.
6), directing the spray jet towards the parts of the garment to be dampened.
Never use the spray when ironing silk as the drops of water
could mark the fabric.
fig. 6
Steam iron
4
After ironing
To extend the working life of the iron, whenever you finish ironing,
you are recommended to empty the tank as follows:
• Unplug from the mains socket.
• Open the cover and empty the iron, holding it point downwards
and shaking it gently over a basin or sink.
• To dry the remaining moisture, turn the iron on again with the
thermostat dial in the maximum position for about two minutes
with the steam regulator in the
position.
• Unplug from the mains socket and allow to cool.
• Clean the plate with a dry cloth as traces of moisture could
mark it.
• Wind the power cable around the cable winder.
• Store the iron in a vertical position.
Maintenance and cleaning
After use, always wait until the iron is cold before putting away.Allow
to cool in a vertical position. Keep the surface of the plate clean. Do
not rest or use the iron on zips, hooks, rings etc to avoid scratching
the plate.
Clean the plate with a damp cloth only, never use abrasives or solvents.
Scale prevention system
The appliance is fitted with a permanent resin scale filter in the tank.
This filters the impurities and eliminates all scale residue, thus enabling you to use normal tap water The resins reduce water hardness,
doubling the working life of the iron.
5
Steam iron
Safety Warnings
• This appliance is designed to iron. Use with extreme care to
avoid burns from the steam and avoid any improper use.
• When in use, do not touch any of the appliance’s hot surfaces.
• After unpacking, make sure that the appliance is complete and
undamaged. In case of doubt, do not use the appliance and seek
the advice of a qualified service professional.
• Packaging materials (plastic bags, foam polystyrene, etc.) should
not be left within the reach of children as this could be a
potential source of danger.
• This appliance is designed for domestic use only. Any other use
is to be considered improper and invalidates the guarantee and
could be dangerous.
• The manufacturer takes no responsibility for damage derived
from improper use.
• Never touch the appliance with wet or damp hands.
• Never allow children or unfit persons to use or play with the
appliance.
• Never leave the appliance unattended.
• In case of breakdown or malfunctioning, turn the appliance off
immediately and do not touch. For repairs, please contact a
Service Centre authorised by the manufacturer and request the
use of original replacement parts only.This is to ensure the safe
use of the appliance.
• The power cable must never be replaced by the user. If the
cable should become damaged, or needs to be replaced, please
contact a Service Centre authorised by the manufacturer.
• When the appliance is not in use, turn off and disconnect the
plug from the socket.
• The use of an extension lead is not recommended, however if it
is necessary then follow carefully the extension lead’s instructions, and most importantly ensure that the extension lead is
correctly rated in accordance with the appliance being used and
NEVER overloaded.
• As with any electrical appliance, whilst the instructions aim to
cover as many eventualities as possible, caution and common
sense should be applied when operating your appliance, particularly in the vicinity of young children.
• The iron must be used on a stable ironing board.
• The iron should be placed on a flat surface extremely resistant
to high temperatures.
• If the iron is dropped causing visible damage to the appliance,
do not use.Take to an authorised service centre.
Steam iron
6
Electrical requirements
Before using this appliance ensure that the voltage indicated
on the product corresponds with the main voltage in your
home, if you are in any doubt about your supply contact your
local electricity company.
The flexible mains lead is supplied connected to a B.S. 1363 fused plug
having a fuse of 13 amp capacity. Should this plug not fit the socket outlets in your home, it should be cut off and replaced with a suitable plug,
following the procedure outlined below.
Note: Such a plug cannot be used for any other appliance and should
therefore be properly disposed of and not left where children might find
it and plug it into a supply socket - with the obvious consequent danger.
N.B. We recommend the use of good quality plugs and wall sockets that
can be switched off when the machine is not in use.
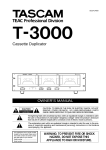
important: the wires in the mains lead fitted to this appliance are
coloured in accordance with the following code:
Green and Yellow to Earth
13 amp
Fuse
Brown
to Live
Blue to
Neutral
GREEN ANDYELLOW EARTH
BLUE
NEUTRAL
BROWN
LIVE
As the colours of the wires in the mains lead of this appliance may not
correspond with the coloured markings identifying the terminals in your
plug, proceed as follows:
The wire which is coloured green and yellow must be connected to the
terminal in the plug which is marked with the letter E or by the earth
symbol
or coloured green or green and yellow.
The wire which is coloured blue must be connected to the terminal
which is marked with the letter N or coloured black.
The wire which is coloured brown must be connected to the terminal
which is marked with the letter L or coloured red.
When wiring the plug, ensure that all strands of wire are securely
retained in each terminal. Do not forget to tighten the mains lead clamp
on the plug. If your electricity supply point has only two pin socket outlets, or if you are in doubt, consult a qualified electrician.
Should the mains lead ever require replacement, it is essential that this
operation be carried out by a qualified electrician and should only be
replaced with a flexible cord of the same size.
After replacement of a fuse in the plug, the fuse cover must be refitted.
If the fuse cover is lost, the plug must not be used until a replacement
cover is obtained. The colour of the correct replacement fuse cover is
that of the coloured insert in the base of the fuse recess or elsewhere
on the plug. Always state this colour when ordering a replacement fuse
cover.
Only 13amp replacement fuses which are asta approved to B.S. 1362
should be fitted.
This appliance conforms to the Norms EN 55014 regarding the suppression of radio interference.
Warning - this appliance must be earthed
7
Steam iron
Cord Clamp
Steam iron
316IDL/02.05