1
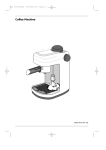
ec5/7 GB
19-11-2002
10:08
Pagina 6
IMPORTANT SAFEGUARDS
When using electrical appliances, basic safety precautions should always be followed, including the
following:
• Read all instructions.
• Do not touch hot surfaces. Use handles and knobs.
• To protect against fire, electrical shock and personal injury, do not immerse cord, plug or
appliance in water or other liquid.
• Never allow the appliance to be used by children or unfit persons.
• Unplug from the outlet when not in use and before cleaning. Allow to cool before fitting or
taking off parts, and before cleaning the appliance.
• Do not operate with a damaged cord or plug, or after the appliance malfunctions, or has been
damaged in any manner. Return the appliance to the nearest authorized service facility for examination, repair or adjustment.
• The use of accessory attachments or spare parts not recommended by the appliance manufacturer may result in fire, electrical shock or personal injury.
• Do not use outdoors.
• Do not let the cord hang over the edge of the table or counter, or touch hot surfaces.
• Do not place on or near a hot gas or electrical burner, or in a heated oven.
• Plug cord into the wall outlet. To disconnect, turn any control to “off”, then remove plug from
wall outlet.
• Do not use the appliance for other than the intended use. This appliance is to be utilised for domestic use only. Any other use is to be considered improper and therefore, dangerous.
• DO NOT unscrew or remove boiler cap while the machine is in operation. Wait until brewing
cycle is completed and all water and steam has been used up.
SAVE THESE INSTRUCTIONS
THIS PRODUCT IS FOR HOUSEHOLD USE ONLY
SHORT CORD INSTRUCTIONS
-
-
6
A short power cord is provided to reduce risks resulting from becoming entangled in or tripping
over a longer cord.
Longer, detachable power supply cords or extension cords are available and may be used if
care is exercised in their use.
If an extension cord is used, the marked electrical rating should be at least as great as the electrical rating of the appliance. If the appliance is provided with 3- wire, grounding type cord, the
extension should be a GROUNDING TYPE 3 - WIRE CORD. The longer cord should be arranged
so that it will not drape over the counter-top or table top where it can be pulled on by children or
tripped over.
Your product is equipped with a polarized alternating current line plug (a plug having one blade
wider than the other). This plug will fit into the power outlet only one way. This is a safety feature. If you are unable to insert the plug fully into the outlet, try reversing the plug. If the plug
should still fail to fit, contact your electrician to replace your obsolete outlet. Do not defeat the
safety purpose of the polarized plug.
ec5/7 GB
19-11-2002
10:08
Pagina 7
Please read this instruction booklet
carefully before installing the appliance and keep it handy for future
consultation. In so doing you will
obtain the best result and maximum
safety in its use.
DESCRIPTION OF THE APPLIANCE
The following terms are used throughout the
instruction manual:
A. Water tank
B. Cap with safety valve
C. Steam knob
D. Steam tube
E. Drip tray
F Cup tray
G. Carafe with lid
H. Cappuccino nozzle
I. Cup adapter (if included)
J. Filter holder
K. Filter
L. Measuring spoon
M. ON/OFF Switch
N. Boiler outlet
O. Vario system (if included)
SAFETY WARNINGS
• This machine has been built to “make coffee”
and to “reheat beverages”; please be careful to
avoid burns from the sprays of hot water or
steam and avoid any improper use.
• When the appliance is in use, do not touch any
of the machine’s hot surfaces.
• After unpacking, make sure that the machine is
complete and undamaged. In case of doubt, do
not use the appliance and seek the advice of a
qualified De’Longhi service professional.
• Packaging materials (plastic bags, foam polystyrene, etc.) should not be left within the reach
of children as this could be a potential source of
danger.
• This appliance is to be utilized for domestic use
only. Any other use is to be considered
improper and therefore, dangerous.
• The manufacturer takes no responsibility for
damage derived from improper use.
• Never touch the appliance with wet or damp
hands.
• The appliance is not intended for use by children without supervision.
• Children should be supervised to ensure that
they do not play with the appliance.
• In case of breakdown or malfunctioning, turn
off the appliance immediately and do not touch
it. For repairs, please contact an authorized
De’Longhi Service Center and request the use of
original replacement parts only. The lack of
respect for this point may compromise the safe
use of the appliance.
• The power supply cable of this appliance must
never be replaced by the user, because its
replacement requires the use of special tools. If
the cord should become damaged, or in case it
needs to be replaced, please go to an authorized
De’Longhi Service Center.
• When the appliance is not in use, turn off and
disconnect the plug from the outlet.
• As with any electrical appliance, the instructions
aim to cover as many eventualities as possible.
Caution and common sense should be applied
when operating your appliance, particularly in
the vicinity of children.
INSTALLATION
• Place the coffee maker on flat work surface at a
safe distance from taps and sinks.
• Check that the voltage corresponds to that indicated on the appliance rating plate. The appliance
must always be connected to a well-grounded
outlet rated at 10 A minimum. The manufacturer
is not liable for damage caused by inadequate
grounding of the appliance.
• In the event of incompatibility between the plug
on the appliance and the outlet, have the plug
replaced with another of the right type by a
qualified De’Longhi professional.
If the cord is damaged or requires replacing,
contact an authorized De’Longhi Service
Center.
• Never install the machine in an environment that
can reach a temperature less than or equal to 0°C
(32°F) (if the water in it freezes, the coffee maker
may be damaged).
• In the event of breakdowns or malfunctioning,
do not tamper with the appliance and switch it
off by unplugging it.
7
ec5/7 GB
19-11-2002
10:08
Pagina 8
HOW TO MAKE A PERFECT ESPRESSO
1 Unscrew the water tank cap by turning it
counter-clockwise.
2 Using the carafe supplied (fig. 1) pour water
into the boiler (fig. 2) according to the
amounts shown in the table at the end of the
text. Do not exceed the amounts
shown as this could cause the appliance to malfunction. While filling the boiler make sure the ON/OFF switch is in the
OFF position.
3 Carefully close the boiler cap by turning it
clockwise.
4 Insert the filter into the filter-holder. (fig. 3).
5 Put the coffee evenly into the filter according
to the amounts shown in the table following
(fig. 4). It is important to use medium ground
coffee. (Avoid using too finely ground coffee
otherwise the filter could become blocked).
6 Remove excess coffee from the filter rim (fig.
5).
7 To attach the filter-holder to the machine
place the filter holder under the heater-faucet
(fig. 6). At this point press filter holder
upwards while at the same time rotating
counter-clockwise all the way. It is important
that the filter holder be firmly set in its housing.
8 The carafe with the lid must be positioned
under the filter holder so that the spout is
inside the opening on the carafe’s lid.
Make sure that the steam knob is turned off.
9. If the machine includes the Vario System,
position the lever within the desired area
according to the type of coffee desired:
“light”, “medium” or “strong” (fig.8).
10 Press the ON/OFF switch (fig.9). The pilot
light will illuminate.
11 About three minutes are required before the
coffee begins to be discharged. Turn off
power switch after coffee has been discharged.
12 Before unscrewing the boiler cap or
removing the filter holder, residual
pressure must be released by slowly
turning the steam knob (fig. 10) so that
the residual steam can escape.
8
Note: For safety reasons, it is not possible to
open the boiler cap when the boiler is hot. If it
has to be removed for any reason, it is always
necessary to let off steam from the boiler using
the steam knob as described immediately
above.
13 To detach the filter holder, turn the handle
from right to left.
To remove coffee grounds from the filter
holder, turn upside down and knock it
repeatedly until all grounds have been
removed (fig. 11), or rinse the filter holder
unit under running water and let drip dry.
NOTE: To eliminate the "new" smell, the
first time you use the appliance, perform the coffee-making cycle a couple
of times without drinking the coffee.
Coffee flows directly into the cups
The carafe can be used to brew 2 or 4 cups of coffee.
If you prefer to brew 2 cups only, fit the adaptor to
the lower section of the filter holder (fig. 12) and
place the cups directly underneath the nozzles. In
this way, the coffee will flow directly into the cups.
MAKING CAPPUCCINO
A cappuccino is an espresso coffee with a froth
topping made by heating milk.
1 Using the following table as a guide, pour
the required amount of milk into carafe. The
best results will be achieved using whole
milk, not skim, which should be at refrigerator temperature.
2 Transfer the milk into a container. The container should be large enough to allow the
milk to expand to triple its volume.
Models with the Vario System
3 Follow steps 1-10 in the section "How to
make Espresso Coffee".
Note that the amount of water needed to
make 2 cups of cappuccino is greater than
that required for 2 cups of normal coffee as
it also necessary to produce the steam to
emulsify the milk. You are recommended to
position the flow regulator on "MEDIUM".
4 Allow the coffee to drip into the carafe until
it reaches the number 2 marked on the side
of the carafe, then select "CAPPUCCINO".
When the coffee starts to drip from the filter
holder, place the steam nozzle in the milk
ensuring that the nozzle opening is just
under the surface of the milk, as shown in
fig. 13 and open the steam valve by turning
the steam knob counter-clockwise.
ec5/7 GB
19-11-2002
10:08
Pagina 9
5 Move the container up and down under the
steam nozzle as in fig. 14 (this will give
maximum froth). Froth the milk until the
steam in the boiler has been completely used up, then turn the steam knob
in a clockwise direction in order to close the
steam valve and set the ON/OFF switch to
“OFF”
Warning: Always empty the boiler of
any residual water or steam after
using the appliance by turning on
the steam knob.
6 Pour gently or preferably spoon the frothy milk
onto the coffee, then sprinkle on a little chocolate powder for perfect cappuccino coffee.
Models without the Vario System
3 Follow steps 1-10 in the section "Making
Espresso".
Note that the amount of water needed to
make 2 cups of cappuccino is greater than
that required for 2 cups of normal coffee as
it also necessary to produce the steam to
emulsify the milk.
4 When the coffee starts to drip from the filter
holder, place the steam nozzle in the milk
ensuring that the nozzle opening is just
under the surface of the milk, as shown in
fig. 13 and open the steam valve by turning
the steam knob counter-clockwise.
5. Move the container up and down under the
steam nozzle as in fig. 14 (this will give
maximum froth). Froth the milk until the
steam in the boiler has been completely used up, then turn the steam knob
in a clockwise direction.
6 Allow the remaining coffee to drip thorugh
the filter holder into the carafe, it takes about
3 minutes,then switch the appliance OFF.
Warning: Always empty the boiler of
any residual water or steam after
using the appliance by turning on
the steam knob.
7 Pour the coffee into cups, gently pour, or
preferably spoon the frothy milk onto the coffee, then sprinkle on a little chocolate powder for perfect cappuccino coffee.
Cleaning the cappuccino nozzle
Clean the steam tube (with the cappuccino nozzle) of milk immediately after use, as dried milk
can be difficult to remove.
Remember: You do this by turning the
steam control knob counter-clockwise.
IMPORTANT: Always clean the milk frother and
steam nozzle immediately after use. Proceed as
follows:
• By turning the steam knob (fig. 15), allow a
little steam to come out for a few seconds.
• Check that the 3 holes shown in fig. 16 are not
blocked. If necessary, clean them with the help
of a pin.
• Wash the cappuccino maker and steam nozzle thoroughly with warm water.
• Re-attach the cappuccino maker.
HINTS
Making good espresso and cappuccino is not
difficult, however it does require practice. The
following tips will help you get the best results
from your machine:
• Warm the cups before filling with coffee.
• Use a dedicated espresso coffee for best
results. They are now widely available from
supermarkets.
• Freshly ground coffee provides the best flavor. To maintain flavor, fresh coffee is best
stored in an airtight container in a cool
place, even in the fridge.
CLEANING AND MAINTENANCE
1.Do not use solvents or detergents in cleaning the
coffee maker. Use a soft, damp cloth.
2. Clean the filter-holder, filter and drip tray reg-
ularly.
ATTENTION: During cleaning, never immerse
the unit in water – it is an electrical appliance.
CLEANING THE FILTER HOLDER
About every 300 coffees, clean the filter holder
for ground coffee as follows:
• Remove the filter
• Clean the inside of the filter holder. Never wash
in a dishwasher.
• Rinse all components and clean the metal filter
thoroughly in hot water using a brush (fig. 17).
Make sure the holes in the metal filter are not
blocked. If necessary, clean with a pin (fig. 18).
9
ec5/7 GB
19-11-2002
10:08
Pagina 10
Failure to clean as described above invalidates
the warranty.
CLEANING THE ESPRESSO BOILER OUTLET
About every 300 coffees, the espresso boiler outlet must be cleaned as follows:
• check that the coffee machine is not warm and
the plug is detached from the mains;
• using a screwdriver, unscrew the two screws that
hold the outlet of the espresso boiler (fig. 19);
• clean the boiler with a damp cloth (fig. 20);
• clean the outlet thoroughly in hot water using a
brush. Make sure the holes are not blocked. If
necessary, clean with a pin.
• rinse the outlet under the tap, still scrubbing it;
• replace the outlet of the espresso boiler.
Failure to clean as described above invalidates
the guarantee.
DESCALING
You are recommended to descale the coffee
machine about every 300 coffees. You should use
a commercially available product specifically for
descaling espresso coffee machines. If you cannot
obtain such a product, you can also follow the
procedure below.
1. First clean the coffee machine, turn off and
unplug from the outlet.
To make
Water quantity in the
carafe
2. Fill the carafe to the brim.
3. Dissolve 1 spoonful (about 10/15 g) of citric
acid;
4. Pour the solution into the boiler.
5. Replace the boiler cap and leave the solution
to work for about 30 minutes.
6. Place the selector in the "LIGHT" position.
7. Put the filter and filter holder in position (without
coffee).
8. Position the carafe on the drip tray.
9. Plug into the outlet.
10.Turn the coffee machine on. After a few minutes, the hot solution will start to flow through
the filter holder into the carafe.
11.Place the steam tube in a glass or cup. Open
the steam knob for a few seconds while the
descaling solution flows through the filter
holder. This cleans all residues of milk from
inside the tube.
12.Close the steam knob (the descaling solution
will continue to flow into the carafe).
13.When the solution stops flowing into the
carafe, turn off and allow the machine to
cool down. Remove the filter holder, filter
and carafe and rinse with hot water.
14.To remove traces of descaler, perform at
least 2 coffee-making cycles without coffee.
Coffee quantity in the filter Milk quantity in the carafe
4
2 espressos
2
Water level must coincide with steam
symbol on the carafe
Use Max. 1 carafe filled to the level
4
4
2 cappuccinos
2
4 espressos
4
2
Water level must coincide with the bottom part of the metal band
Use Max. 2 carafes filled to the
level 4
4 cappuccinos
4
2
10
ec5/7 GB
19-11-2002
10:08
Pagina 11
Limited Warranty
What Does This Warraty Cover? We warrant each Espresso Coffee Machine to be free from defects in material and workmanship. Our obligation under this warranty is limited to replacement or repair, free of charge at our
factory or authorized service centers, of any defective part or parts thereof other than parts damaged in transit,
which shall be returned to us, transportation prepaid. This warranty shall apply only if the Espresso Coffee Machine
is used in accordance with the factory directions which accompany it.
How Long Does The Coverage Last? This warranty runs for one year from the date of delivery and applies
only to the original purchaser.
What Does This Warranty Not Cover? This warranty does not cover defects or damage of the Espresso
Coffee Machine which result from repairs or alterations to the machine outside our factory or authorized service
centers, nor shall it apply to any Espresso Coffee Machine which has been subject to abuse, misuse, negligence or
accidents. Also, consequential and incidental damages resulting from the use of this product or arising out of any
breach of contract or breach of this warranty are not recoverable under this warranty. Some states do not allow the
exclusion or limitation of incidental or consequential damages, so the above limitation may not apply to you.
How Do You Get Service? If repairs become necessary or spare parts are needed, plase write to:
De’Longhi America Inc.
De’ Longhi CANADA
Park 80 West Plaza One, 4th floor
1040 Ronsa Court
Saddle Brook NJ 07663
MISSISSAUGA, ONTARIO
or call Service Tel. No 1-800-322-3848
L4W 3Y4 CANADA
or visit our internet site:
www.delonghiusa.com
The above warranty is in lieu of all other express warranties and representations; All implied warranties are limited
to the applicable warranty period set forth above. This limitation does apply if you enter into an extended warranty
with De’Longhi. Some states do not allow limitations on how long an implied warranty lasts, so the above exclusions
connection with the sale or use of its Espresso Coffee Machine.
How Does State Law Apply? This warranty gives you specific legal rights, and you may also have other rights
which vary from state to state.
11