1
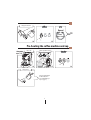
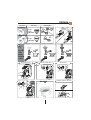
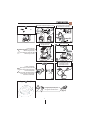
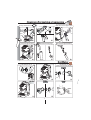
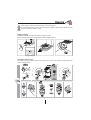
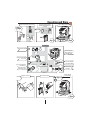
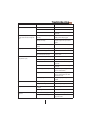
De’Longhi Appliances
via Seitz, 47
31100 Treviso Italia
5713216671/06.11
EC250
Instructions for use COFFEE MAKER
Electrical connection (uk only)
Before using this appliance ensure that the voltage indicated on the product corresponds with the main voltage in your
home, if you are in any doubt about your supply contact your local electricity company.
The flexible mains lead is supplied connected to a B.S. 1363 fused plug having a fuse of 13 amp capacity.
Should this plug not fit the socket outlets in your home, it should be cut off and replaced with a suitable plug, following
the procedure outlined below.
Note: Such a plug cannot be used for any other appliance and should therefore be properly disposed of and not left
where children might find it and plug it into a supply socket - with the obvious consequent danger.
Please note: We recommend the use of good quality plugs and wall sockets that can be switched off when the machine
is not in use.
IMPORTANT: The wires in the mains lead fitted to this appliance are coloured in accordance with the following code:
Green and Yellow to Earth
GREEN AND YELLOW
BLUE
BROWN
13 amp
Fuse
EARTH
NEUTRAL
LIVE
Blue to
neutral
Brown to
live
Cord Clamp
As the colours of the wires in the mains lead of this appliance may not correspond with the coloured markings identifying the terminals in your plug, proceed as follows:
- The wire which is coloured green and yellow must be connected to the terminal in the plug which is marked with
the letter E or by the earth symbol
or coloured green or green and yellow.
- The wire which is coloured blue must be connected to the terminal which is marked with the letter N or coloured
black.
- The wire which is coloured brown must be connected to the terminal which is marked with the letter L or coloured
red.
When wiring the plug, ensure that all strands of wire are securely retained in each terminal. Do not forget to tighten
the mains lead clamp on the plug. If your electricity supply point has only two pin socket outlets, or if you are in doubt,
consult a qualified electrician.
Should the mains lead ever require replacement, it is essential that this operation be carried out by a qualified electrician and should only be replaced with a flexible cord of the same size.
After replacement of a fuse in the plug, the fuse cover must be refitted. If the fuse cover is lost, the plug must not be used
until a replacement cover is obtained. The colour of the correct replacement fuse cover is that of the coloured insert in
the base of the fuse recess or elsewhere on the plug. Always state this colour when ordering a replacement fuse cover.
Only 13amp replacement fuses which are asta approved to B.S. 1362 should be fitted.
This appliance conforms to the Norms EN 55014 regarding the suppression of radio interference.
Warning - this appliance must be earthed
2
Description
!
,
%
'*
,
+
&,
#"#"!-
!-
(
$"!-
)
3
First use
Open the lid and remove the water tank
Fill the tank (do not pass the MAX level)
3
4
MAX
1
Plug the appliance in
2
Switch the appliance on
5
Attach the filter holder
Reposition the tank
Insert the empty filter
6
Place 2 empty containers
7
Wait until light comes on
OK!
8
Push the button
9
Turn the switch
10
STOP
Once emptied
the water tank...
11
12
4
13
Empty the containers
OF
Repeat
Steps 1 to 4
and
Steps 9 to 14
14
Y!
READ
15
Pre-heating the coffee machine and cup
Carry out
steps (1-8)
Place a cup
Fill the cup with hot water
Stop flow
16
17
Empty the cup
Place the required filter in
the filter holder, then
proceed with making an
espresso (page 6)
5
18
Espresso
If you want
filter to use
coffee quantity
1 Espresso
1-cup/
1-pod
coffee filter
2Espresso s
x2
2-cups
coffee filter
19
Press the
coffee
powder
according
to taste
light
al
norm
g
stron
OK!
STOP
FLOW
EspressoReady!
6
Cappuccino
Push the button and wait for the light to come on
M
a serpnak
o
ON!
It is recommended to use semi-skimmed
milk at refrigerator temperature.
5°C
OK!
(page6)
max 1/3
20
21
Position the container under
the cappuccino nozzle
Open the steam switch
Use about 100 grams
of milk for every cappuccino to be prepared.
When choosing the container
bear in mind that the volume of the milk
will increase by 2 or 3 times.
60s Max.
23
22
Pour the frothed milk into the cups
containing the previously
prepared espresso coffee.
STOP
To obtain a creamier froth,
dip the cappuccino nozzle into the milk
and turn the container with slow movements
from the bottom upwards.
When the volume of the milk has doubled,
dip the cappuccino nozzle deep down
and continue to heat the milk.
24
Cappuccino Ready!
For hygiene purposes always clean
the cappuccino nozzle after each use
7
Cleaning
(page 8)
Cleaning after making a Cappuccino
5s
Discharge a small amount of steam
Use one hand to hold the cappuccino tube
and the other to release the cappuccino maker
STOP
1
25
Remove the cappuccino nozzle
26
Wash and clean using a pin
28
2
27
Re-mount the cappuccino maker
29
30
Hot Water
Wait until light comes on
Push the button and
turn the steam dial at the same time
OK!
31
60s Max.
32
STOP
Ready!
35
34
8
33
Cleaning
During cleaning, never immerse the machine in water: it is an electrical appliance.
Before performing any cleaning operations to the external parts of the appliance, switch the machine off, remove the plug
from the socket and let the machine cool down.
Emptying the drip tray
The drip tray is fitted with a level indicator showing the level of water it contains.
Before the indicator protrudes from the cup tray, the drip tray must be emptied and cleaned.
Cleaning filters and boiler outlet
Clean the filter-holder, ground coffee filter and boiler outlet about every 300 coffees or if the coffee drips through the filter-holder
and does not flow unrestricted.
OF
x300
C2
C3
9
Descaling and Rinse
Read the safety warnings of the descaler
x200
Prepare the descaling solution
following the instructions given
on the pack
(fig. 1-2)
Place 2 empty containers
+
IRRITANTE - IRRITANT
REIZEND - IRRITEREND
i
i
(fig. 4)
(fig. 6)
Descaling
1. Push the button
Repeat
MA
X
2
3
4
x3
Repeat this sequence
3 times, until the tank
is completely empty
2. Turn the steam switch
for 5 seconds
5 min
5s
3. Close the steam switch
and allow about
1/4 of the solution
contained in the tank
flow out.
Empty the containers
1
2
3
4
5. Leave the solution to
act for about 5 minutes
4. Push the button
to interrupt
STOP
Fill the tank and
proceed rinsing
Rinse the water tank
(fig. 1-4)
Rinse
10
Descaling and Rinse
Rinse
Y!
1. Push the button
Repeat
2. Turn the steam switch
for 5 seconds
READ
(fig. 1-4)
6. Fill the tank and
repeat rinse once
5. Empty the containers
and put them
back in place
5s
3. Close the steam switch
and allow all the water
in the tank to flow out.
STOP
4. Push the button
to interrupt
Technical data - Disposal
Disposal
Technical data
Mains voltage:
Absorbed power:
Sizes LxHxD:
Pressure:
Water tank capacity:
Power supply cable length:
Weight:
220-240V˜50/60Hz
1100W
208x325x305 (380) mm
15 bar
1L
1.2 m
3.8 kg
The appliance is in compliance with the following CE
Directives:
t 4UBOECZ%JSFDUJWF
t -PX WPMUBHF %JSFDUJWF $& BOE TVDDFTTJWF
amendments;
t &.$%JSFDUJWF$&BOETVDDFTTJWFBNFOENFOUT
t 5IF NBUFSJBMT BOE JUFNT JOUFOEFE GPS DPOUBDU XJUI GPPE
comply with the requirements of European Regulation
1935/2004.
11
Recommendations for the correct disposal of the
product in compliance with the 2002/96/EC European
Directive and Legislative Decree n. 151 dated 25 July
2005. The product must not be disposed of as urban waste at the
end of its working life. It must be taken to appropriate local
authority separate waste collection centres or to dealers
providing this service. Disposing of a household appliance
separately avoids possible negative consequences for the
environment and health deriving from unsuitable disposal and
allows to recover the materials of which it is made in order to
make significant savings of energy and resources. The product
has the crossed-out wheeled bin mark as a reminder of the
obligation to dispose of household appliances separately. The
illegal disposal of the product by the user entails the application
of administrative sanctions envisioned by the Standard in force.
Troubleshooting
Problem
Possible causes
Solution
Espresso coffee does not flow out
There is no water in the tank
Fill the water tank
The holes in the filter-holder are blocked
Clean the holes in the filter-holder spouts
The espresso boiler outlet is blocked
Clean as indicated in the “Cleaning”
paragraph
The filter-holder is not correctly inserted
or is dirty
Attach the filter-holder correctly and turn
it fully until it is firmly engaged
The espresso boiler gasket has lost
elasticity or it is dirty
Contact De’Longhi Customer Experience
in order to replace the espresso boiler
gasket
The holes in the filter-holder spout are
blocked
Clean the holes in the filter-holder spouts
At first use there is air in the system
Carry out the “first use” cycle (see page 4)
The water tank is empty
Fill the tank
The tank is inserted incorrectly and the
valve on the bottom is not open
Press the tank lightly to open the valve
on the bottom
The ground coffee is pressed too tightly
Tamper the coffee less
There is too much ground coffee
Reduce the amount of ground coffee
The espresso boiler outlet is blocked
Clean as indicated in the “Cleaning”
paragraph
The filter is blocked
Clean as indicated in the “Cleaning”
paragraph
The coffee is ground too finely
Only use coffee specifically ground for
espresso coffee machines
The ground coffee is too fine or is moist
Only use coffee specifically ground for
espresso coffee machines. The coffee
should not be moist
Incorrect type of ground coffee
Change the quality of the ground coffee
powder
Coffee is too strong
See notes above
Rinsing after descaling was not sufficient
Repeat rinsing (see page 11)
light is not on when the button
The
is pressed
Wait for the light to switch on
Pre-heating has not been carried out
See page 5.
The milk is not cold enough
Always use milk at fridge temperature
The cappuccino maker is dirty
Thoroughly clean the holes of the
cappuccino maker
Espresso coffee drips from the edges of
the filter-holder instead of through the
holes
Loud pump noise
The coffee crema is dark (coffee flows
slowly from the spout)
The coffee has an acidic flavour
The espresso coffee is cold
The milk does not froth when making a
cappuccino
12
Safety warnings
Symbols used in these instructions
The important recommendations have these symbols. These
recommendations must be followed.
Important:
Do not allow the appliance to be used by persons (also
children) with reduced psycho-physical-sensorial capacities or
that have insufficient experience and knowledge, unless they
are carefully monitored and trained by a person responsible
for their safety. Watch children, do not let them play with the
appliance.
Danger!
Failure to comply can be or is the cause of injury due to lifethreatening electric shocks.
Important!
Failure to comply can be or is cause of injury or damage to the
appliance.
Scalding hazard!
This appliance produces hot water and steam may form when
it is operating.
Pay attention not to come into contact with hot water sprays
or steam.
Do not touch the cup holder, the frothing tube, or the boiler
outlet when the appliance is on because it is hot.
Scalding hazard!
Failure to comply can be or is the cause of scalding or burns.
Please note:
This symbol highlights recommendations and important
information for the user.
Use in compliance with intended use
This appliance is designed and made to prepare coffee and heat
drinks. All other use is considered improper. This appliance is
not suitable for commercial use. The manufacturer is not liable
for damage deriving from improper use of the appliance. This is
an household appliance only. It is not intended to be used in:
t TUBò LJUDIFO BSFBT JO TIPQT PóDFT BOE PUIFS XPSLJOH
environments;
t GBSNIPVTFT
t CZ DMJFOUT JO IPUFMT NPUFMT BOE PUIFS SFTJEFOUJBM UZQF
environments;
t CFEBOECSFBLGBTUUZQFFOWJSPONFOUT
Use in this manner will invalidate the manufacturers warranty.
Fundamental recommendations regarding safety
Danger!
As the appliance operates using electricity, electric shocks can
not be excluded.
Therefore, follow the safety recommendations given:
t %POPUUPVDIUIFBQQMJBODFXIFOZPVIBWFXFUIBOETPS
feet.
t %POPUUPVDIUIFQMVHXJUIXFUIBOET
t .BLF TVSF UIBU UIF TPDLFU VTFE DBO BMXBZT CF FBTJMZ
reached, so that the plug can be removed when required.
t 3FNPWF UIF QMVH GSPN UIF TPDLFU CZ BDUJOH EJSFDUMZ PO
the plug itself. Do not pull the cable as damage could be
caused.
t 3FNPWF UIF QMVH GSPN UIF TPDLFU UP EJTDPOOFDU UIF
appliance completely.
t %P OPU BUUFNQU UP SFQBJS UIF BQQMJBODF JG JU TIPVME
breakdown. Turn it off, unplug from the mains socket and
contact the Technical Assistance service.
t *GUIFQMVHPSQPXFSTVQQMZDBCMFBSFEBNBHFEIBWFUIFN
replaced exclusively by the De’Longhi After-Sales Service,
in order to prevent risks
t %VSJOHDMFBOJOHOFWFSJNNFSTFUIFNBDIJOFJOXBUFSJU
is an electrical appliance.
t #FGPSFQFSGPSNJOHBOZDMFBOJOHPQFSBUJPOTPGUIFFYUFSOBM
parts of the appliance, switch the machine off, remove the
plug from the socket and let the machine cool down.
Instructions for use
Read these instructions carefully before using the appliances.
Failure to comply with these instructions can lead to injury to
persons and damage to the machine.
The manufacturer is not liable for damage deriving from the
failure to comply with the user instructions.
Please note:
Keep these instructions carefully. If the appliance should
be transferred to other persons, these instructions must
accompany it.
Please note: first use
Upon first use, rinse the internal ducts of the device, and
operate the device like one would to make coffee until at least
one water tank has been emptied; then proceed with making
coffee.
Important:
Keep the packaging material (plastic bags, expanded
polystyrene) out of the reach of children.
13