1
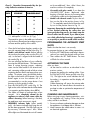
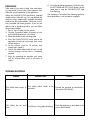
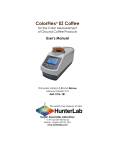
IMPORTANT SAFEGUARDS
When using any electrical appliance, some basic safety precautions should be observed. Specifically:
• Read all instructions carefully.
• Make sure the voltage of your electrical system corresponds to the voltage shown on the bottom of
the machine.
• Do not touch hot surfaces. Use handles or knobs.
• To protect against fire, electrical shock and personal injury, do not immerse cord, plug, or appliance in water or other liquid.
• Keep the appliance out of the reach of children and do not leave appliance unattended while in
operation.
• Disconnect the plug from the power outlet when the machine is not in use and before cleaning.
• Do not operate the machine with a damaged cord or plug, after faulty operation, or when it has
been damaged in any way. Contact the nearest De’Longhi service facility for examination, repair
or adjustment.
• The use of accessories not recommended by the manufacturer may result in fire, electrical shock, or
personal injury.
• Do not use the machine outdoors.
• Make sure the power cord does not hang over the edge of the table or counter-top to avoid getting
accidentally caught or entangled.
• Do not place the machine or its electrical parts on or near electric stoves, cooking surfaces, or gas
burners.
• To disconnect the appliance, turn appliance “OFF”, then remove plug from wall outlet.
• Do not use this machine for any purpose other than its intended use. This appliance is for household
use only. The manufacturer declines all responsibility for any damage caused by improper, incorrect, or irresponsible use.
• For machines with glass carafe:
A. The carafe is an accessory to be used exclusively with this appliance. Never use it on a cooking surface.
B. Do not set the hot container on a damp or cold surface.
C. Do not use the carafe if it is cracked or the handle is not completely sturdy.
D. Do not use abrasive detergents or sponges to clean.
E. Scalding may occur if the lid is opened during the brewing cycles.
WARNING: To prevent the risk of fire or electric shock, never remove the upper part of the
appliance. There are no elements inside that the user needs to access. Any necessary repairs
must be made by an authorized service center.
SAVE THESE INSTRUCTIONS
THIS APPLIANCE IS FOR HOUSEHOLD USE ONLY.
4
SHORT CORD INSTRUCTIONS
A short power cord is provided to reduce the risk resulting from entanglement or tripping over a longer
cord. Longer detachable power supply cords are available and may be used if care is exercised in their
use. If a longer detachable power cord or extension cord is used (1) the marked electrical rating of the
extension cord should be at least as great as the electrical rating of the appliance, and (2) the longer
cord should be arranged so that it will not drape over the countertop or table top where it can be pulled on by children or tripped over unintentionally. The electrical rating of the appliance is listed on the
bottom of the unit. If the appliance is of the grounded type, the extension cord should be a grounded
type 3 wire cord. This appliance has a polarized plug. One blade is wider than the other. To reduce the
risk of electrical shock this plug will fit in a polarized plug only one way. If the plug does not fit, contact
a qualified electrician. Do not attempt to modify the plug in any way.
DESCRIPTION
SAFETY PRECAUTIONS
(see illustration on page 3)
The terminology below will be used throughout the
instructions.
• This appliance is designed to make coffee: be
careful not to burn yourself with sprays of hot
water or steam, or by using the machine improperly.
• This appliance is designed for household use
only. Any other use is considered improper and
therefore dangerous.
• The manufacturer may not be held liable for any
damage caused by improper, incorrect, or
unreasonable use.
• When using the appliance, do not touch the hot
surfaces. Use knobs or handles.
• Never touch the appliance with wet or damp
hands or feet.
• Do not allow children or unfit persons to use the
appliance unsupervised.
• Never allow children to play with the appliance.
• In the event of failure or malfunction, switch off
the appliance and do not tamper with it in any
way. If the appliance requires repair, contact an
authorized De’Longhi service center and ask for
original spare parts to be used. Failure to
observe these safety precautions could jeopardize the safety of the appliance.
A. Water level indicator (inside water tank)
B. Filter holder
C. ON/AUTO/OFF button with light
D. Display
E. SET TIMER button
F. SET CLOCK button
G. FRESHNESS indicator lights (select models
only)
H. AROMA button with light
I.
Non-stick warming plate (for glass carafe
only)
J. Nylon or Gold Tone filter (available in select
models only)
K. Measuring spoon
L. Carafe (glass or thermal, depending on the
model)
M. Chlorine filter (available in select models only)
5
INSTALLATION
SETTING THE CLOCK (FIG. 3)
• After removing the packaging, make sure the product is complete and in perfect condition. If in
doubt, do not use the appliance and contact qualified De’Longhi personnel only.
• The packing elements (plastic bags, Styrofoam,
etc.) should be kept out of the reach of children, as
they are safety hazards.
• Place the appliance on a firm level surface far from
water faucets, sinks, and heat sources.
• When positioning the appliance on the counter,
make sure to leave a space of at least 2 in. (5 cm)
between the appliance and the walls or objects
beside and behind it, and at least 8 in. (20 cm)
above it.
• Never install the appliance in a room where the
temperature may reach 32°F (0°C) or lower (the
appliance may be damaged if the water freezes).
• Check that the voltage of the electrical mains corresponds to the voltage shown on the appliance
rating plate.
Connect the appliance only to an efficiently grounded outlet with a minimum rating of 10A only. The
manufacturer may not be considered liable for possible incidents caused by failure to adequately
ground the outlet.
• If the power socket does not match the plug on the
appliance, have the socket replaced with a suitable
type by a qualified electrician.
• The power cord on this appliance must not be
replaced by the user, as this operation requires the
use of special tools. If the cable is damaged or
needs to be replaced, contact an authorized
De’Longhi service center only in order to avoid all
risks.
When the coffee machine is connected to the outlet
for the first time, “AM 0:00” appears on the
display.
To set the time, press the SET CLOCK button repeatedly. You can scroll through quickly by simply keeping the button depressed.
The time can be set at any moment.
CHLORINE FILTER (available in select
models only)
The filter eliminates the taste of chlorine from the
water. To install the filter, proceed as follows:
• Remove the filter from the plastic bag and rinse
it under running water.
• Lift the water tank lid and remove the holder
from its slot by pulling upward (Fig. 1).
• Open the holder and carefully place the filter
in the housing as shown in Fig. 2.
• Close the holder and place it back in its slot,
pressing downward as far as it will go.
• The chlorine filter should be replaced after 80
cycles, or in any case after six months of operation.
6
HOW TO MAKE DRIP COFFEE
IMPORTANT: When using the appliance for the
first time, all the accessories and the internal circuits must be washed as follows:
Make at least two carafes using only water, without
any ground coffee (follow the instructions below
for making coffee).
• Lift the lid and, by utilizing the carafe, fill the
tank with clean cold water up to the level corresponding to the number of cups you want to
make (Fig. 4).
• Position the nylon or gold tone filter in the filter
holder (Fig. 5).
• Place the ground coffee in the filter using the
measuring spoon supplied and level evenly (Fig.
6). Please refer to the charts below for the recommended quantities. Use good quality medium
grind coffee for drip coffee machines.
Chart 1: Recommended Quantities
N° N° MEASURING
N°
CUPS
SPOONS*
TABLESPOONS**
14
14
18
12
12
16
10
10
13
8
8
10
6
6
8
*1 measuring spoon = 0.26 oz. (7.4 gr.)
**1 tablespoon = 0.20 oz. (5.7 gr.)
Use more or less coffee to suit your taste
The Specialty Coffee Association of America
recommends adding 2 tablespoons of coffee per
6 ounces of water. So, if you want to follow this
standard, please refer to chart 2.
Please note that coffee brewed following SCAA's
recommendation is exceptionally strong.
Chart 2: Quantities Recommended by the Specialty Coffee Association of America
N° N° MEASURING
N°
CUPS
SPOONS*
TABLESPOONS**
14
18
23
12
15
20
10
13
17
8
10
13
6
8
10
*1 measuring spoon = 0.26 oz. (7.4 gr.)
**1 tablespoon = 0.20 oz. (5.7 gr.)
The quantities given in the tables are indicative
only and must be adjusted according to personal taste and the quality of the coffee.
• Close the lid and place the glass carafe on the
non-stick warming plate with the lid on (Fig. 7).
Models with thermal carafe: Before placing
the carafe on the plate, make sure the lid is closed, i.e. the lever is aligned with the handle of
the carafe (Fig. 8)
• You can enhance the flavor of your coffee by
pressing the AROMA button. This feature activates a unique brewing process, releasing
water into the filter basket in 30-second intervals; saturating coffee grounds a little at a time
extracting the best flavor and aroma from your
coffee. To activate, press the AROMA button;
the light on the button will illuminate. Press the
button again to turn the selection off. It is
recommended to use the aroma button if not
brewing a whole carafe of coffee.
• Press the ON/AUTO/OFF switch (Fig. 9). The
light on the switch indicates that the coffee maker
is in operation and the display shows BREW.
• The coffee will begin to emerge after a few
seconds. It is completely normal for the
appliance to release a little steam while the
coffee is brewing. When brewing is finished,
the appliance emits an acoustic signal.
• FRESHNESS indicator lights (select models
only): this feature indicates how long the coffee has been prepared. The LEDs light up one
by one every 15 minutes up to 1 hour. When
all the lights are illuminated the unit will remain
on for an additional 1 hour. After 2 hours, the
machine switches off completely.
• On models with glass carafe, if you leave the
ON/AUTO/OFF button depressed after
brewing is finished, the non-stick warming plate
will keep the coffee at the ideal temperature.
• Models with thermal carafe: To pour the coffee, turn the lid to the position shown in Fig.
11. To completely remove the lid from the carafe, turn it to the position shown in Fig. 12.
Important: Removing the carafe before the machine has finished producing the coffee does not
interrupt the brewing process, but simply stops the
flow of coffee into the carafe. If you want to pour
out a little coffee before brewing is completed, do
so as quickly as possible to avoid coffee overflow.
PROGRAMMING THE AUTOMATIC START
(AUTO)
Make sure that the time is set correctly.
To program the time to start coffee preparation:
• Press the SET TIMER button and keep it depressed until you reach the desired switch-on time.
• Then release the SET TIMER button. The time
will flash for a few seconds.
ACTIVATING THE TIMER
After you have:
- set the time for switch-on as described in the
previous section;
- prepare the machine for making coffee. Press
the ON/AUTO/OFF button quickly twice (Fig.
10). The light on the switch indicates the coffee maker is in operation and the display will
show AUTO.
Coffee dispensing will start a few minutes after
the time set; this interval allows the machine to
pre-heat in order to optimize the temperature of
the coffee.
CLEANING AND MAINTENANCE
Before carrying out any cleaning operations, switch the appliance off, unplug it from the power
outlet, and let it cool down.
1. Do not use solvents or abrasive detergents to clean
the appliance. A soft damp cloth is sufficient.
2. Never immerse the coffee maker in water: it is
an electrical appliance.
7
DESCALING
If the water in your area is hard, lime scale deposits may build up over time. These deposits may
affect the correct operation of the appliance.
When the ON/AUTO/OFF light flashes (selected
models only) or after 60 uses, you can descale the
machine using commercially available descaling
products for drip coffee makers. Follow the instructions provided with these products. If you are not
able to find a descaling product, you can follow
the procedure below:
1. Pour 4 cups of water into the carafe.
2. Dissolve 2 spoonfuls (about 30 grams) of citric
acid (sold at drugstores) in the water.
3. Place the carafe on the warming plate.
4. Press the ON/AUTO/OFF button and let the
equivalent of one cup run through, then switch
off the machine.
5. Let the solution work for 15 minutes, then
repeat steps 4 and 5.
6. Switch the coffee maker back on and run the
solution through until the tank is completely
emptied.
7. Rinse by operating the machine with water
only for at least three cycles (3 full tanks of
water).
8. Once the descaling operation is finished, press
the SET TIMER and SET CLOCK buttons at the
same time to stop the ON/AUTO/OFF light
from flashing.
The warranty is not valid if the cleaning operation
described above is not carried out regularly.
TROUBLE-SHOOTING
Problem
Probable cause
Solution
The coffee maker needs to be
The coffee takes longer to
descaled.
brew.
Descale the machine as described in
the section DESCALING.
The coffee has an acid
taste.
Rinse the machine as described in the
section DESCALING.
8
Insufficient rinsing after descaling.
LIMITED WARRANTY
This warranty applies to all products with De’Longhi or Kenwood brand names.
What does the warranty cover?
We warrant each appliance to be free from defects in material and workmanship. Our obligation
under this warranty is limited to repair at our factory or authorized service center of any defective
parts or part thereof, other than parts damaged in transit. In the event of a products replacement
or return, the unit must be returned transportation prepaid. The repaired or new model will be
returned at the company expense.
This warranty shall apply only if the appliance is used in accordance with the factory directions,
which accompany it, and on an Alternating current ( AC ) circuit.
How long does the coverage last?
This warranty runs for one year (1) from the purchase date found on your receipt and applies only
to the original purchaser for use.
What is not covered by the warranty?
The warranty does not cover defects or damage of the appliance, which result from repairs or alterations to the appliance outside our factory or authorized service centers, nor shall it apply to any
appliance, which has been subject to abuse, misuse, negligence or accidents. Also, consequential
and incidental damage resulting from the use of this product or arising out of any breach of contract or breach of this warranty are not recoverable under this warranty. Some states do not allow
the exclusion or limitation of incidental or consequential damage, so the above limitation may not
apply to you.
How do you get service?
If repairs become necessary, see contact information below:
U.S. Residents: Please contact our toll free hotline at 01-800-322-3848 or log onto our website at
www.delonghi.com.
Residents of Canada: Please contact our toll free hotline at 01-888-335-6644 or log onto our website at www.delonghi.com.
Residents of Mexico: Please contact our toll free number 01-800-711-8805 for assistance or log
onto our website at www.delonghi.com.
The above warranty is in lieu of all other express warranties and representations. All implied warranties are limited to the applicable warranty period set forth above. This limitation does not apply
if you enter into an extended warranty with De’Longhi. Some states/countries do not allow limitations on how long an implied warranty lasts, so the above exclusions may not apply to you.
De’Longhi does not authorize any other person or company to assume for it any liability in connection with the sale or use of its appliance.
How does country law apply?
This warranty gives you specific legal rights, and you may also have other rights, which vary from
state to state/country to country.
9