1
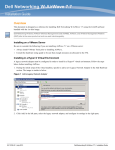
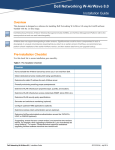
Dell PowerConnect W-AirWave 7.6
Installation Guide
Overview
This document is designed as a reference for installing Dell PowerConnect W-AirWave using the CentOS software
bundled with the .iso disc image.
NOTE: Dell PowerConnect W-Series AirWave Wireless Management Suite (AWMS), AirWave, and AirWave Management Platform
(AMP) refer to the same product set and are used interchangeably.
Installing on a VMware Server
Be sure to consider the following if you are installing AirWave on a VMware server:
l
Always install VMware Tools prior to installing AirWave.
l
Consult the hardware sizing guide to be sure that enough resources are allocated to the VM.
Installing in a Hyper-V Virtual Environment
A legacy network adapter must be configured in order to install in a Hyper-V virtual environment. Follow the steps
below before installing AirWave.
1. During the initial setup of the virtual machine, specify to add a new Legacy Network Adaptor in the Add
Hardware section. The image is similar to below.
Figure 1: Add a Legacy Network Adapter
2. Click Add. In the left pane, select the legacy network adapter, and configure its settings in the right pane.
0511230-01 | Jan 2013
1
Figure 2: Add a Legacy Network Adapter
Installing on a Red Hat Enterprise Linux Server
If you are installing AirWave on a Red Hat Enterprise Linux server, contact Dell support at dell.com/support.
NOTE: AirWave does not support downgrading to older versions. Significant data could be lost or compromised in such a downgrade.
In unusual circumstances requiring that you return to an earlier version of AirWave, we recommend you perform a fresh installation
of the earlier AirWave version, and then restore data from a pre-upgrade backup.
Pre-Installation Checklist
Use this check list to ensure installation goes smoothly.
Table 3: Pre-Installation Checklist
Checklist
Check
Have available the AirWave license key sent to you in an email sent from Dell
Obtain dedicated server meeting Dell sizing specifications
Determine the static IP address for each AirWave server
Firewall provisioning enabling proper ports/protocols
Determine WLAN infrastructure properties (type, quantity, and location)
Determine WLAN infrastructure access credentials (SNMP, telnet, SSH, etc)
Determine WLAN security policy specifications
Set router and switches to monitoring (optional)
Configure upstream NMS applications (optional)
Determine wireless client authentication servers (optional)
Determine AirWave administrative authentication servers like TACACS+, LDAP, or
RADIUS (optional)
2
Dell PowerConnect W-AirWave 7.6 | Installation Guide
Checklist
Check
If upgrading, ensure that your current version is not more than two versions behind.
For example, when upgrading to AirWave 7.6, you must already be using AirWave 7.3
or newer. Contact technical support for assistance with upgrading if you are
upgrading from greater than two versions.
Supported Browsers
Windows (XP, Vista, Windows 7)
l
Internet Explorer 8/9
l
Firefox 3.x
l
Google Chrome 9.x (stable)
Mac OS X (10.5, 10.6, 10.7)
l
Safari 5.x and higher
l
Firefox 3.x
l
Google Chrome 9.x
Hardware Requirements and Installation Media
The AirWave installation CD includes all software (including the Linux OS) required to complete the installation of
AirWave. AirWave supports any hardware that is Red Hat Enterprise Linux 6.2 certified. By default, all installs are
based on a 64-bit operating system.
AirWave hardware requirements vary by version. As additional features are added to AirWave, increased hardware
resources become necessary. For the most recent hardware requirements, refer to the Dell PowerConnect W-AirWave
7.6 Server Sizing Guide at dell.com/support/manuals.
AirWave is intended to operate as a soft appliance. Other applications should not run on the same installation.
Additionally, local shell users can access data on AirWave, so it is important to restrict access to the shell only to
authorized users.
You can create pseudo users in place of root for companies that don't allow root logins. Customers who disallow root
access can give sudo privileges to other user accounts.
Creating the AirWave Installation CD from the .iso Disc Image
A variety of software tool can be used to create an installation CD from the AirWave Installation CD .iso disc
image. You can use a free tool called burnatonce.
NOTE: The CD burning software included with Windows XP does not currently support the ability to create a CD from an .iso disc
image.
1. Download and save the Dell PowerConnect W-AirWave 7.6 Installation CD .iso disc image.
2. Download and install burnatonce from http://www.burnatonce.net/downloads/. Windows 95/ME users will need
to download and install an additional ASPI layer.
3. Insert a blank CD-R into the CD-R drive.
4. Right-click on the AMP Installation CD .iso disc image file and select burnatonce.
Dell PowerConnect W-AirWave 7.6 | Installation Guide
3
5. When the burnatonce program opens, click the Write button. If burnatonce has not automatically associated to
the .iso disc image, run burnatonce manually and select the AirWave install image from the Load menu.
For help with CD burning software other than burnatonce, please refer to the user guide for that product and
reference the option to create a CD from .iso disc image. With Nero, for instance, this option may be found under
File -> Burn Image or Recorder -> Burn Image.
Server Requirements
AirWave runs on a dedicated system and is compatible with most standard PC or rack-mount server hardware. The
AirWave Installation CD will format the hard disk, install the CentOS operating system, and install the AirWave
software.
For minimum hardware requirements, refer to the Dell PowerConnect W-AirWave 7.6 Sizing Guide at
dell.com/support/manuals, or contact Dell support at dell.com/support. The hardware must support Red Hat
Enterprise 5.0.
Installing Linux CentOS 6.2 (Phase 1)
Perform the following steps to install the Linux CentOS 6.2 operating system. The Linux installation is a
prerequisite to installing AirWave on the network management system.
CAUTION: This procedure erases the hard drive(s) on the server.
1. Insert the AirWave installation CD-ROM into the drive and boot the server.
2. Type install and press Enter.
To configure the partitions manually, type manual and press Enter.
Figure 4: AirWave Installation
3. Allow the installation process to continue. Installing the CentOS software (Phase I) takes 10 to 20 minutes to
complete. This process formats the hard drive and launches Anaconda to install all necessary packages. Anaconda
gauges the progress of the installation.
Upon completion, the system will prompt you to eject the installation CD and reboot the system. The
GRUB screen will appear upon reboot.
4. Remove the CD from the drive and store in a safe location.
4
Dell PowerConnect W-AirWave 7.6 | Installation Guide
Installing the AirWave Software (Phase 2)
Getting Started
Perform the following steps when the GRUB screen appears.
1. Press Enter or wait six seconds. The system automatically loads the kernel.
2. When the kernel is loaded, log into the server using the following credentials:
l
login = root
l
password = admin
3. Start the AirWave software installation script by executing the ./amp-install command.
Type./amp-install at the command prompt and press Enter to execute the script.
Step 1: Configuring Date and Time
The following message is displayed, and this step ensures the proper date and time are set on the server.
------------------------ Date and Time Configuration -----------------Current Time: Fri Nov 21 09:18:12 PST 2008
1) Change Date and Time
2) Change Time Zone
0) Finish
Ensure that you enter the accurate date and time during this process. Errors will arise later in the installation if the
specified date varies significantly from the actual date, especially if the specified date is in the future and it is fixed
later. Best practices is to configure NTPD to gradually adjust your clock to the correct time.
1. Select 1 to set the date and select 2 to set the time zone. Press Enter after each configuration to return to the
message menu above.
CAUTION: Changing these settings after the installation can cause data loss, especially for time-series data such as Client and Usage
graphs. Avoid delayed configuration.
2. Press 0 to complete the configuration of date and time information and to continue to the next step.
Step 2: Checking for Prior Installations
The following message is displayed after the date and time are set:
Welcome to AMP Installer Phase 2
STEP 2: Checking for previous AMP installations
If a previous version of AirWave software is not discovered, the installation program automatically proceeds to Step
3. If a previous version of the software is discovered, the following message is displayed on the screen.
The installation program discovered a previous version of the software. Would you like to
reinstall AMP? This will erase AMP's database. Reinstall (y/n)?
Type y and then press Enter to proceed.
CAUTION: This action erases the current database, including all historical information. To ensure that the AMP database is backed up
prior to reinstallation, answer `n` at the prompt above and contact your Value Added Reseller or directly contact Dell support at
dell.com/support.
Step 3: Installing AMP Software
The following message appears while AirWave software is transferred and compiled.
STEP 3:
Installing AMP software
Dell PowerConnect W-AirWave 7.6 | Installation Guide
5
This will take a few minutes.
Press Alt-F9 to see detailed messages.
Press Alt-F1 return to this screen.
This step requires no user input, but you can follow the instructions to monitor its progress and switch back to the
installation screen.
Step 4: Checking the AirWave Installation
After the AirWave software installation is complete, the following message appears:
STEP 4: Checking AMP installation
Database is up.
AMP is running version: (version number)
This step requires no user input. Proceed to the next step when prompted to do so.
Step 5: Assigning an IP Address to the AirWave System
While the AirWave primary network interface accepts a DHCP address initially during installation, AirWave does not
function when launched unless a static IP is assigned. Complete these tasks to assign the static IP address. The
following message appears:
STEP 5: Assigning AMP's address
AMP must be configured with a static IP.
--------------- Primary Network Interface Configuration ------------1) IP Address
: xxx.xxx.xxx.xxx
2) Netmask
: xxx.xxx.xxx.xxx
3) Gateway
: xxx.xxx.xxx.xxx
4) Primary DNS : xxx.xxx.xxx.xxx
5) Secondary DNS: xxx.xxx.xxx.xxx
9)
0)
Commit Changes
Exit (discard changes)
If you want to configure a second network interface, please
use AMP's web interface, AMP Setup --> Network Tab
1. Enter the network information.
NOTE: The Secondary DNS setting is an optional field.
2. To commit the changes, type 9 and then press Enter. To discard the changes, type 0 and then press Enter.
Step 6: Naming the AirWave Network Administration System
Upon completion of the previous step, the following message is displayed.
STEP 6: Naming AMP
AMP is currently set to: New AMP
Please enter a name for your AMP:
At the prompt, enter a name for your AirWave server and press Enter.
Step 7: Generating AMP’s SSL Certificate
Upon completion of the previous step, the following message is displayed on the screen.
STEP 7: Generating AMP's SSL Certificate
Does AMP have a valid DNS name on your network (y/n)?
1. If AirWave does not have a valid host name on the network, type n at the prompt. The following is displayed:
6
Dell PowerConnect W-AirWave 7.6 | Installation Guide
Generating SSL certificate for < IP Address >
2. If AirWave has a valid host name on the network, type y at the prompt. The following is displayed:
Enter AMP's fully qualified domain name:
3. Type the AirWave DNS name and press Enter. The following message is displayed:
Generating SSL certificate for < IP Address >
Proceed to the next step when the system prompts you.
Step 8: Changing the Default Root Password
Upon completion of the prior step, the following message is displayed.
STEP 8: Changing default root password.
It is strongly recommended that you change the default 'root' password.
Please use a password that you consider to be safe, secure, and memorable.
Changing password for user root.
New Password:
Enter the new root password and press Enter. The Linux root password is similar to a Windows administrator
password. The root user is a super user who has full access to all commands and directories on the computer.
This password should be kept as secure as possible because it allows full access to the machine. This password is not
often needed on a day-to-day basis but is required to perform AirWave upgrades and advanced troubleshooting. If
you lose this password, contact Dell support at dell.com/support for resetting instructions.
Completing the Installation
Upon completion of all previous steps, the following message appears.
CONGRATULATIONS! AMP is configured properly.
To access AMP web console, browse to https://<IP Address>
Login with the following credentials:
Username: admin
Password: admin
l
To view the Phase 1 installation log file, type cat /root/install.log.
l
To view the Phase 2 installation log file, type cat /root/amp-install.log.
l
To access the AirWave GUI, enter the AirWave IP address in the address bar of any browser. The AirWave GUI
then prompts for your license key. If you are entering a dedicated Master Console or AirWave Failover license,
refer to "Supporting Dell PowerConnect W-AirWave Servers with the Master Console" in the Dell PowerConnect
W-AirWave User Guide for additional information.
Upgrading AirWave
To upgrade AirWave:
1. Download the latest version from the download page: download.dell-pcw.com.
2. Copy the file to the AirWave /root directory using WinSCP.
3. Run the following command on, where x.x.x.x is the latest AirWave release number:
# start_dell_upgrade -v x.x.x
This version-specific script will deploy all needed files, update the database, perform any data migrations and restart
the AirWave services.
Dell PowerConnect W-AirWave 7.6 | Installation Guide
7
Configuring and Mapping Port Usage for AMP
The following table itemizes the communication protocols and ports necessary for AirWave to communicate with
wireless LAN infrastructure devices, including access points (APs), controllers, routers, switches, and RADIUS
servers. Assign or adjust port usage on the network administration system as required to support these components.
Table 5: AirWave Protocol and Port Chart
8
Port
Type
Protocol
Description
Device Type
21
TCP
FTP
Firmware distribution
>
APs or controllers
22
TCP
SSH
Configure devices
>
APs or controllers
22
TCP
SSH
Configure AMP from CLI
<
Laptop or workstation
22
TCP
VTUN
Support connection (optional)
>
Dell support home office
22
TCP
SCP
Transfer configuration files or FW
<
APs or controllers
23
TCP
Telnet
Configure devices
>
APs or controllers
23
TCP
VTUN
Support connection (Optional)
>
Dell support home office
25
TCP
SMTP
Support email (optional)
>
Dell support email server
49
UDP
TACACS
AMP Administrative Authentication
>
Cisco TACACS+
53
UDP
DNS
DNS lookup from AMP
>
DNS Server
69
UDP
TFTP
Transfer configuration files or FW
<
APs or controllers
80
TCP
HTTP
Configure devices
>
Legacy APs
80
TCP
VTUN
Support connection (optional)
>
Dell support home office
161
UDP
SNMP
Get and Set operations
>
APs or controllers
162
UDP
SNMP
Traps from devices
<
APs or controllers
162
UDP
SNMP
Traps from AMP
>
NMS
443
TCP
HTTPS
Web management
<
Laptop or workstation
443
TCP
HTTPS
WLSE polling
>
WLSE
443
TCP
VTUN
Support connection (optional)
>
Dell support home office
1701
TCP
HTTPS
AP and rogue discovery
>
WLSE
1741
TCP
HTTP
WLSE polling
>
WLSE
1812
UDP
RADIUS
Auth
Authenticate & authorize AMP
administrative users on a RADIUS
server.
>
RADIUS auth server
1813
UDP
RADIUS
account-
Retrieve usernames for
authenticated WLAN clients from
<
RADIUS accounting client
Dell PowerConnect W-AirWave 7.6 | Installation Guide
Port
Type
Protocol
Description
ing
NAS (captive portal, controller,
autonomous AP). Only used when
usernames are not available in the
SNMP MIB of a controller or
autonomous AP.
Device Type
2002
TCP
HTTPS
Retrieve client authentication info
>
ACS
5050
UDP
RTLS
Real Time Location Feed
<
Dell thin APs
8211
UDP
PAPI
Real Time Feed (AMON)
<>
WLAN controllers
ICMP
Ping Probe
>
APs or controllers
AirWave Navigation Basics
Every AirWave page contains the following three basic sections:
l
"Status Section" on page 9
l
"Navigation Section" on page 10
l
"Activity Section" on page 13
The AirWave pages also contain Help links that open the AirWave 7.6 User Guide.
Status Section
The Status section is a snapshot view of overall WLAN performance and provides direct links for immediate access
to key system components. You can customize the contents of the Status section on the Home > User Info page.
Refer to the Configuring Your Own User Information with the Home > User Info Page section in the Dell
PowerConnect W-AirWave 7.6 User Guide.
The table below describes these elements in further detail.
Table 6: Status Section/Top Header Components of the AirWave GUI
Field
Description
New Devices
The number of wireless APs or wireless LAN controllers that have been discovered by AMP but not yet
managed by network administrators. When selected, AMP directs you to a page that displays a detailed
list of devices awaiting authorization.
Up (Wired &
Wireless)
The number of managed authorized devices that are currently responding to AMP requests. When
selected, AMP shows a detailed list of all Up devices.
Up (Wired)
The number of managed authorized, wired devices that are currently responding to AMP requests. When
selected, AMP shows a detailed list of all Up devices.
Up (Wireless)
The number of managed authorized, wireless devices that are currently responding to AMP requests.
When selected, AMP shows a detailed list of all Up devices.
Down (Wired &
Wireless)
The number of managed, authorized devices that are not currently responding to AMP SNMP requests.
When selected, AMP shows a detailed list of all Down devices.
Down (Wired)
The number of managed authorized, wired devices that are not currently responding to AMP requests.
Dell PowerConnect W-AirWave 7.6 | Installation Guide
9
Field
Description
When selected, AMP shows a detailed list of all Up devices.
Down
(Wireless)
The number of managed authorized, wireless devices that are not currently responding to AMP requests.
When selected, AMP shows a detailed list of all Up devices.
Mismatched
The total number of Mismatched devices. A device is considered mismatched when the desired
configuration in AMP does not match the actual device configuration read from the device.
Rogue
The number of devices that have been classified by the RAPIDS rules engine above the threshold defined
on the Home > User Info page. If, for example, the threshold is defined as Suspected Rogue, then the
Rogue count will include Suspected Rogues as well as classifications above Suspected, which include
Rogue and Contained Rogue.
Clients
The number of wireless users currently associated to the wireless network via all the APs managed by
AMP. When selected, AMP shows a list of users that are associated. Prior to version 7.4, this was called
Users.
VPN Sessions
Displays the number of active VPN sessions. When selected, AMP shows a list of active sessions on the
Clients > VPN Sessions page. Note that if this page is empty, then there are no active VPN sessions to
view. You can navigate to the APs/Devices > List page and verify in the table that there are no active VPN
sessions.
Alerts
Displays the number of non-acknowledged AMP alerts generated by user-configured triggers. When
selected, AMP shows a detailed list of active alerts.
Include Device
Types in Header
Stats
You can support statistics for any combination of the following device types:
l Fat APs
l Thin APs
l Controllers
l Routers/Switches
l Others
Refer to the Configuring Your Own User Information with the Home > User Info Page section in the Dell
PowerConnect W-AirWave 7.6 User Guide.
Severe Alert
Threshold
The Severe Alert Threshold determines the severity level that results in a Severe Alert. Specify either
Normal, Warning, Minor, Major, or Critical as the severity alert threshold value. These threshold values
are tied to triggers that are created on the System > Triggers page. For example, if a trigger is defined to
result in a Critical alert, and if the Severe Alert Threshold here is defined as Major, then the list of Severe
Alerts will include all Major and Critical alerts. Similarly, if this value is set to Normal, which is the
lowest threshold, then the list of Severe Alerts will include all alerts.
When a Severe Alert exists, a component named Severe Alerts will appear at the right of the Status field
in bold red font. This field will not display if a Severe Alert does not exist. In addition, only users who are
enabled for viewing Severe Alerts on the Home > User Info page can see severe alerts.
Search
Use the Search field to perform partial string searches on a large number of fields including the notes,
version, secondary version, radio serial number, device serial number, LAN MAC, radio MAC and
apparent IP of all the APs as well as the client MAC, VPN user, LAN IP, VPN IP fields.
Navigation Section
The Navigation section displays tabs for all main GUI pages within AirWave. The top bar is a static navigation bar
containing tabs for the main components of AirWave, while the lower bar is context-sensitive and displays the
subtabs for the highlighted tab.
Figure 7: Navigation section of the Home > Overview Page
10
Dell PowerConnect W-AirWave 7.6 | Installation Guide
Some navigation items may be hidden for users depending on a user’s role. The table below describes the navigation
elements in further detail.
Table 8: Components and Subtabs of AirWave Navigation
Main Tab
Description
Subtabs
Home
The Home pages provide basic AirWave information including system
name, host name, IP address, current time, running time, and software
version.
The Home pages also provide a central point for network status
information and monitoring tools, giving graphical display of network
activity, and links to many of the most frequent tools in AirWave. For
additional information, refer to Monitoring and Supporting AirWave
with the Home Pages in the Dell PowerConnect W-AirWave 7.6 User
Guide.
Overview
RF Performance
Search
Documentation
License
User Info
The Groups pages provide information on the logical groups of devices
that have been established for efficient monitoring and configuration.
For additional information, see Configuring and Using Device Groups in
the Dell PowerConnect W-AirWave 7.6 User Guide.
Some of the focused subtabs will not appear for all groups. Focused
subtabs are visible based on the device type field on the Groups >
Basic page. This subtab is the first page to appear when adding or
editing groups.
NOTE: When individual device configurations are specified, devicelevel settings override the Group-level settings to which a device
belongs.
List
Focused Subtabs:
l Monitor
l Basic
l Templates
l Security
l SSIDs
l AAA Servers
l Radio
l Dell Config
l Cisco WLC Config
l PTMP
l Proxim Mesh
l MAC ACL
l Firmware
l Compare
Groups
APs/Devices
Clients
The APs/Devices pages provide detailed information about all
authorized APs and wireless LAN switches or controllers on the
network, including all configuration and current monitoring data.
These pages interact with several additional pages in AirWave. Refer
to Discovering, Adding, and Managing Devices in the Dell
PowerConnect W-AirWave 7.6 User Guide.
NOTE: When specified, device-level settings override the default
Group-level settings.
The Clients pages provide detailed information about all client devices
and users currently and historically associated to the WLAN, including
VPN users. Prior to 7.4, this tab was called Users. For additional
information, refer to Monitoring and Supporting WLAN Clients in the
Dell PowerConnect W-AirWave 7.6 User Guide.
List
New
Up
Down
Mismatched
Ignored
Focused Subtabs:
l Monitor
l Interfaces
l Manage
l Audit
l Compliance
l Rogues Contained
Connected
All
Rogue Clients
Guest Users
VPN Sessions
VPN Users
Tags
Guest Users Subtabs:
l Client Detail
Dell PowerConnect W-AirWave 7.6 | Installation Guide
11
Main Tab
Description
Subtabs
l
Diagnostics
VPN Users Subtab:
l VPN User Detail
Reports
Generated
Definition
Definition Subtab:
l Detail
The System page provides information about AirWave operation and
administration, including overall system status, the job scheduler,
trigger/alert administration, and so forth.
For additional information, refer to Monitoring and Supporting
AirWavewith the System Pages in the Dell PowerConnect W-AirWave
7.6 User Guide.
Status
Syslog & Traps
Event Log
Triggers
Alerts
Backups
Configuration Change Jobs
Firmware Upgrade Jobs
Performance
The Device Setup pages provide the ability to add, configure, and
monitor devices, to include setting AP discovery parameters,
performing firmware management, defining VLANs, and so forth. For
additional information, refer to Enabling AirWave to Manage Your
Devices in the Dell PowerConnect W-AirWave 7.6 User Guide.
Discover
Add
Communication
Dell Configuration (if global Dell
Configuration is enabled in AMP
Setup > General)
Upload Firmware & Files
Certificate
AMP Setup
The AMP Setup pages provide all information relating to the
configuration of AirWave itself and its connection to your network. This
page entails several processes, configurations, or tools in AirWave.
NOTE: Some AMP Setup pages may not be visible depending on the
role of the logged-in user set in AirWave.
General
Network
Users
Roles
Guest Users
Authentication
MDM Server
Device Type Setup
WLSE
ACS
NMS
RADIUS Accounting
PCI Compliance
RAPIDS
The RAPIDS pages provide all information relating to rogue access
points, including methods of discovery and lists of discovered and
possible rogues. For additional information, refer to Using RAPIDS and
Rogue Classification in the User Guide.
NOTE: The RAPIDS pages may not be visible to the logged-in user,
depending on their role set in AMP.
Overview
List
IDS Events
Setup
Rules
Score Override
Audit Log
VisualRF
VisualRF pages provide graphical access to floor plans, client location,
and RF visualization for floors, buildings, and campuses that host your
network. Refer to Using VisualRF in the Dell PowerConnect WAirWave 7.6 User Guide.
Floor Plans
Setup
Import
Audit Log
System
Device Setup
12
The Reports pages list all the standard and custom reports generated
by AirWave. For additional information, refer to Creating, Running, and
Emailing Reports.
Dell PowerConnect W-AirWave 7.6 | Installation Guide
NOTE: The AMP Setup tab varies with the user role.
Activity Section
The Activity section is the main section of the user interface. This section displays all detailed configuration and
monitoring information. It is where you view activity and implement configuration changes.
Figure 9: Activity section of the Home > Overview Page
Common List Settings
All of the lists in AirWave have some common options. All lists are paginated with a configurable number of items
per page. Selecting the Records Per Page drop down menu (which usually looks like a range such as 1-20 on the
upper left hand side of a list table) enables you select or enter the number of rows that appear at a time in the list.
The next down arrow displays a drop down menu that allows you to select the exact page you would like to view, as
shown in Figure 10.
The Choose Columns option, illustrated on Figure 10, allows you to configure the columns that are presented in the
list and the order in which they are presented. To disable a column, clear its checkbox. To reorder the columns, drag
a row to the appropriate new position. When you are satisfied with the enabled columns and their order, select Save
at the top of the columns list.
Dell PowerConnect W-AirWave 7.6 | Installation Guide
13
Figure 10: Common List Settings Choose Columns Illustration
These settings are user specific. To reset them, select Reset List Preferences on Home > User Info.
Buttons and Icons
Standard buttons and icons are used throughout AirWave as follows:
Table 11: Standard Buttons and Icons of the AirWave pages
Function
14
Image
Description
Acknowledge
Acknowledges and clears an AMP alert.
Add
Adds the object to both AMP’s database and the onscreen display list.
Add Folder
Adds a new folder to hierarchically organize APs.
Alert
Indicates an alert.
Apply
Applies all saved configuration changes to devices on the WLAN.
Audit
Reads device configuration, compare to desired, and update status.
Choose
Chooses a new Helpdesk incident to be the Current Incident.
Clients
Indicates WLAN users. Select this number to see a list of connected
clients.
Create
Creates a new Helpdesk incident.
Customize
Ignores selected settings when calculating the configuration status.
Delete
Deletes an object from AMP’s database.
Down
Indicates Down devices and radios.
Download
Original Floor
Downloads the original VisualRF floor plan drawing. When you click
this button, you have the option of opening the drawing or saving it to a
Dell PowerConnect W-AirWave 7.6 | Installation Guide
Function
Image
Description
Plan
file.
Drag and Drop
Dragging and dropping objects with this icon changes the sequence of
items in relation to each other.
Duplicate
Duplicates or makes a copy of the configuration of an AirWave object.
Edit
Edits the object properties.
Email
Links to email reports.
Filter (Funnel
icon)
Filters list by values of the selected column. To reset all filters in all
columns, click Reset filters link at the bottom of the table.
Google Earth
Views device’s location in Google Earth (requires plug-in).
Ignore
Ignores specific device(s) - devices selected with check boxes.
Import
Updates a Group’s desired settings to match current settings.
Manage
Manages the object properties.
Mismatched
Indicates mismatched device configuration, in which the most recent
configuration in AMP and the current configuration on a device are
mismatched.
Monitor
Indicates an access point is in monitor only mode.
New Devices
Indicates new access points and devices.
Open in New
Window
Opens a VisualRF floor plan in a new browser window.
Poll Now
Polls device (or controller) immediately, override group polling settings.
Preview
Displays a preview of changes applicable to multiple groups.
Print
Prints the report.
Reboot
Reboots devices or AMP.
Refresh
Refreshes the display of interactive graphs when settings have
changed.
Relate
Relates an AP, Group or Client to a Helpdesk incident.
Replace
Hardware
Confers configuration and history of one AP to a replacement device.
Dell PowerConnect W-AirWave 7.6 | Installation Guide
15
Function
Image
Description
Revert
Returns all configurable data on the screen to its original status.
Rogue
Indicates a rogue AP, and links to RAPIDS.
Run
Runs a new user-defined report.
Save
Saves the information on the page in the AMP database.
Save & Apply
Saves changes to AMP’s database and apply all changes to devices.
Scan
Scans for devices and rogues using selected networks.
Schedule
Schedules a window for reports, device changes, or maintenance.
Search
Searches AMP for the specified client, device, rogue, group, folder,
tag, or session.
Set Time Range
Sets the time range for interactive graphs to the range specified.
Up
Indicates devices that are in the Up status.
Upgrade
Firmware
Applies a new firmware image to an AP/device.
Usage
Displays current bandwidth.
View Historical
Graph in New
Window
Displays all data series for the selected graph over the last two hours,
last day, last week, last month, and last year in one new pop-up
window.
VisualRF
Links to VisualRF - real time visualization.
XML
Links to export XHTML versions of reports.
Getting Started with AirWave
This topic describes how to perform an initial launch of the AirWave network management solution on a sessionbased authentication scheme.
When an AirWave URL is accessed either interactively using a browser or programmatically using an API, a sent
cookie may match a session stored in the database, granting authentication (but not necessarily access, depending
on how the user’s role matches the required role for the URL). If the cookie is not present or the session in the
database has expired, the request is denied.
For browser requests, this results in a login form being displayed. When you submit the login form, the supplied
credentials are checked against the AirWave’s user database, an external RADIUS server, an external TACACS+
16
Dell PowerConnect W-AirWave 7.6 | Installation Guide
server, or an external LDAP server, per the AirWave’s configuration. If the credentials are valid, the user’s browser is
sent a session cookie to use in subsequent requests.
Use your browser to navigate to the static IP address assigned to the internal page of the AirWave, as shown in
Figure 12. Enter the User Name and Password as admin/admin for your initial login, and then select Log In.
Figure 12: AirWave Login Form
If desired, you can set one of the available languages for your login. AirWave will remember your selected language
until you log out and select another. You must log out in order to select a different language.
The first page to appear after you initially log in is the Home > License page. Paste the AirWavelicense key you
received into the license field on this page, then click Save to display the Dell PowerConnect W-AirWavelicensing
agreement.
Click I Accept to agree to the terms of the license agreement and apply the license key.
For subsequent logins, your browser launches the AirWaveHome > Overview page.
NOTE: AirWave pages are protected via SSL. Some browsers will display a confirmation dialog for your self-signed certificate.
Signing your certificate will prevent this dialog from displaying. Changing the default login and password on the AMP Setup > Users
page is recommended. Refer to the procedure Creating AirWave User Roles in the Dell PowerConnect W-AirWave 7.6 User Guide for
additional information.
Changing Login Credentials
Dell strongly recommends that you change the system default credentials
l
The password for the default web interface user may be changed using the web interface itself, from the AMP
Setup > Users page. Click the pencil icon to edit the admin user.
l
The password for the root user can be changed by entering the command passwd on the server command line
prompt.
Dell PowerConnect W-AirWave 7.6 | Installation Guide
17
Copyright
© 2013 Aruba Networks, Inc. Aruba Networks trademarks include
, Aruba Networks®, Aruba Wireless Networks®, the registered Aruba the Mobile Edge Company logo, and Aruba Mobility Management System®.
Dell™, the DELL™ logo, and PowerConnect™ are trademarks of Dell Inc.
All rights reserved. Specifications in this manual are subject to change without notice.
Originated in the USA. All other trademarks are the property of their respective owners.
Open Source Code
Certain Aruba products include Open Source software code developed by third parties, including software code
subject to the GNU General Public License (GPL), GNU Lesser General Public License (LGPL), or other Open
Source Licenses. Includes software from Litech Systems Design. The IF-MAP client library copyright 2011
Infoblox, Inc. All rights reserved. This product includes software developed by Lars Fenneberg, et al. The Open
Source code used can be found at this site:
http://www.arubanetworks.com/open_source
Legal Notice
The use of Aruba Networks, Inc. switching platforms and software, by all individuals or corporations, to terminate
other vendors’ VPN client devices constitutes complete acceptance of liability by that individual or corporation for
this action and indemnifies, in full, Aruba Networks, Inc. from any and all legal actions that might be taken against it
with respect to infringement of copyright on behalf of those vendors.
18
Dell PowerConnect W-AirWave 7.6 | Installation Guide