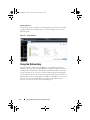
1
esxi5_techsheet.book Page 1 Tuesday, January 24, 2012 3:25 PM Dell OpenManage With VMware ESXi 5.0 Systems Management Guide esxi5_techsheet.book Page 2 Tuesday, January 24, 2012 3:25 PM Notes and Cautions NOTE: A NOTE indicates important information that helps you make better use of your computer. CAUTION: A CAUTION indicates potential damage to hardware or loss of data if instructions are not followed. ____________________ Information in this publication is subject to change without notice. © 2011 Dell Inc. All rights reserved. Reproduction of these materials in any manner whatsoever without the written permission of Dell Inc. is strictly forbidden. Trademarks used in this text: Dell™, the DELL logo, PowerEdge™, and OpenManage™ are trademarks of Dell Inc. Microsoft®, Windows®, and Internet Explorer® are either trademarks or registered trademarks of Microsoft Corporation in the United States and/or other countries. VMware® and vSphere™ are registered trademarks or trademarks of VMware, Inc. in the United States or other countries. Other trademarks and trade names may be used in this publication to refer to either the entities claiming the marks and names or their products. Dell Inc. disclaims any proprietary interest in trademarks and trade names other than its own. 2011 - 12 Rev. A00 esxi5_techsheet.book Page 3 Tuesday, January 24, 2012 3:25 PM Contents 1 Contents . . . . . . . . . . . . . . . . . . . . . . . . . . 3 2 Overview . . . . . . . . . . . . . . . . . . . . . . . . . . 7 Supported Dell OpenManage Components Server Administrator . . . . . . . . 7 . . . . . . . . . . . . . . . . . 8 Dell Systems Build and Update Utility . . . . . . . . DUPs . . . . . . . . . . . . . . . . . . . . . . . . . SUU . . . . . . . . . . . . . . . . . . . . . . . . . 10 . . . . . . . . . . . . . . . . . . . . . . . . . 10 ITA DRAC and iDRAC DMC . 10 . . . . . . . . . . . . . . . . . . . . . . . . 10 Deployment Toolkit . . . . . . . . . . . . . . 10 . . . . . . . . . . . . . . . . . 11 Dell Management Plug-in for VMware vCenter . . 11 . . . . . . . . . . . 12 . . . . . . . . . . . . . . . . . . 12 Dell OpenManage Essentials . Important Information Getting Technical Assistance . . . . . . . . . . . . . . Installing Dell OpenManage Server Administrator . . . . . Before You Begin 12 . . . . . . . . . . 13 . . . . . . . . . . . . . . . . . . . . 13 . . . . . . . . . . . . . . . . . 14 . . . . . . . . . . . . . . . . . . . . . . . . 14 Security Management . RBAC 9 . . . . . . . . . . . . . . . . . . Dell Lifecycle Controller 3 9 ESXi 5.0 Authentication . . . . . . . . . . . . . . . Creating Server Administrator Users for ESXi 5.0 . Contents 16 16 3 esxi5_techsheet.book Page 4 Tuesday, January 24, 2012 3:25 PM Installing Dell OpenManage Server Administrator for ESXi 16 Using the vSphere CLI . . . . . . . . . . . . . . . 17 Using the VMware vSphere Management Assistant 18 Using the VMWare Update Manager (VUM) . Using the Power CLI . . . 18 . . . . . . . . . . . . . . . . 19 Installing the Server Administrator Web Server Configuring the SNMP Agent . . 20 . . . . . . . . . . . . . . 21 Configuring the SNMP Agent on Systems Running ESXi 5.0 21 Uninstalling Managed System Software 4 . . . . . . . . Using Dell OpenManage Server Administrator 25 Starting Your Server Administrator Session. . . . . . . 25 . . . . . . . . . . . 25 . . . . . . . . . . . . . . 26 Distributed Web Server Login Login Failure Scenarios . Unsupported Server Administrator Features With ESXi . . . . . . . . . . . . . . . . . . . . . . . . . 27 . . . . . . . . . . . . 28 . . . . . . . . . . . . . . . . . . . . 29 Server Administrator Home Page System Tree . Action Window . . . . . . . . . . . . . . . . . . . Using the Online Help . . . . . . . . . . . . . . . . . . . . . . . . . . . . . . . . . 34 . . . . . . . . . . . . . . . . . . . 34 Log Window Task Buttons 34 . . . . . . . . . . . . . . . 35 35 . . . . . . . . . . . . . . . . . . . . . . 36 Hardware Log . Contents . . . . . . . . . . . . . . . . . . . . . . . . . . . . . . . . Server Administrator Logs . Alert Log. 32 33 Server Administrator Logs . Integrated Features 30 . . . . . . . . . . . Using the Preferences Home Page 4 22 esxi5_techsheet.book Page 5 Tuesday, January 24, 2012 3:25 PM Command Log . Known Limitation . . . . . . . . . . . . . . . . . . . 36 . . . . . . . . . . . . . . . . . . . . 37 Contents 5 esxi5_techsheet.book Page 6 Tuesday, January 24, 2012 3:25 PM 6 Contents esxi5_techsheet.book Page 7 Tuesday, January 24, 2012 3:25 PM 1 Overview This document provides installation steps, usage guidelines, and support information for running the Dell OpenManage systems management software suite on VMware ESXi 5.0 software for Dell PowerEdge systems. NOTE: To download and install ESXi 5.0, see the relevant Deployment Guide at support.dell.com/manuals. Dell OpenManage systems management software is a suite of applications for your Dell systems. This software enables you to manage your systems with proactive monitoring, diagnosis, notification, and remote access. Dell systems management software comprises of the following media: • Dell Systems Management Tools and Documentation media • Dell Server Updates media • Dell Management Console media Supported Dell OpenManage Components NOTE: For information on the compatibility between Dell OpenManage components and ESXi 5.0, see the Dell Systems Software Support Matrix at support.dell.com/manuals. NOTE: ITA does not support ESXi. The ESXi systems are discovered as unknown. The Inventory will not have any details and the user cannot execute any task on the system. Table 1-1. Supported Dell OpenManage Components Dell OpenManage Component ESXi Server Administrator Yes Dell Systems Build and Update Utility* Yes Overview 7 esxi5_techsheet.book Page 8 Tuesday, January 24, 2012 3:25 PM Table 1-1. Supported Dell OpenManage Components (continued) Dell OpenManage Component ESXi Dell Update Packages (DUPs) No Server Update Utility (SUU) No Dell IT Assistant (ITA) Yes Dell Remote Access Controller (DRAC) and integrated DRAC (iDRAC) DRAC and iDRAC are independent of the operating system and supported in ESXi. Intelligent Platform Management ESXi does not support any consoles, Interface (IPMI) Baseboard Management IPMI tools cannot be executed from Controller (BMC) ESXi. However, IPMI commands can be executed remotely using DRAC or iDRAC. Dell Management Console (DMC) Yes Dell Lifecycle Controller USC/USC-LCE is independent of the operating system and supported in ESXi. Deployment Toolkit Yes Dell OpenManage Essentials Yes * - Not supported in the 6.5 A02 release. Server Administrator Server Administrator provides a comprehensive set of integrated management services designed for system administrators to manage systems locally and remotely on a network. Server Administrator is the sole installation on the managed system and is accessible remotely from the Server Administrator home page. Remotely monitored systems are accessed by dialin, LAN, or wireless connections. Server Administrator ensures the security of its management connections through role-based access control (RBAC), authentication, and industry-standard secure socket layer (SSL) encryption. The Storage Management Service provides enhanced features for managing locally-attached Redundant Array of Independent Disks (RAID) and nonRAID disk storage on a system. 8 Overview esxi5_techsheet.book Page 9 Tuesday, January 24, 2012 3:25 PM Storage Management Service: • Enables you to view the status of local and remote storage attached to a monitored system. • Supports SAS, SCSI, SATA, and ATA, but does not support Fibre Channel. • Lets you perform controller and enclosure functions for all supported RAID and non-RAID controllers and enclosures from a single graphical interface or a CLI, without the use of the controller BIOS utilities. • Protects your data by configuring data redundancy, assigning hot spares, or rebuilding failed drives. Dell uses VMware's VIB mechanism to load Dell OpenManageServer Administrator agent in ESXi. Dell Systems Build and Update Utility You can use the Dell Systems Build and Update Utility to: • Update your system firmware and install an operating system. • Update the firmware and BIOS in a pre-operating system environment on multiple systems. • Configure your system hardware. • Customize the SUU and use it to update your system. DUPs As the central component of the OpenManage systems management family, DUPs help you to update system software on your PowerEdge systems in a scalable, non-intrusive way. DUPs include: • Self-extracting files that allow you to update system software including BIOS, firmware, and drivers • Pre-installation checks for prerequisites, such as system model, operating system version and dependent software, to help you avoid sequencing errors • Intuitive dialogs to help simplify installation • Scriptable and silent capabilities that can enable unattended installation Overview 9 esxi5_techsheet.book Page 10 Tuesday, January 24, 2012 3:25 PM SUU SUU is a media-based application for identifying and applying updates to a Dell system. You can use SUU to update your Dell system or to view the updates available for any system supported by SUU. SUU compares the versions of components currently installed on your system with updated components packaged on the Dell Server Updates media. SUU then displays a comparison report of the versions and provides the option of updating the components. NOTE: SUU is used for system updates and may not work on newly released Dell systems that have not received any system updates. ITA ITA provides an integrated one-to-many management tool for Dell hardware. It provides hardware monitoring, inventory and update for Dell hardware. NOTE: ITA is a legacy software. It is recommended to use Dell Management Console. DRAC and iDRAC DRAC and iDRAC are designed to allow anywhere, anytime Lights Out monitoring, troubleshooting, and system repairs or upgrades independent of the operating system status. DMC DMC together with Altiris server management suite provide a one-to-many management solution that allows customer to manage their hardware, operating systems and application in a single infrastructure. Dell Lifecycle Controller The Unified Server Configurator/Unified Server Configurator-Lifecycle Controller Enabled (USC/USC-LCE) software is built upon the iDRAC6 Express card and the Unified Extensible Firmware Infrastructure (UEFI) system firmware. 10 Overview esxi5_techsheet.book Page 11 Tuesday, January 24, 2012 3:25 PM Features of USC/USC-LCE are: • iDRAC6 works together with the UEFI firmware to access and manage hardware, including component and subsystem management that is beyond the traditional BMC capabilities. • Remote server management uses the network for programed web services. • CLI and GUI are provided by the iDRAC6 card in an environment independent of the operating system and system-power-state. • The UEFI environment provides the local console interface and the infrastructure for locally and remotely managing system components. The remote services functionality enables consoles, such as DMC and partner consoles, to access LC 1.2 features in a pre-operating system environment. • USC/USC-LCE provides an embedded solution on the local system to assist with provisioning in a pre-operating system environment. Deployment Toolkit Deployment Toolkit provides quick and easy configuration of multiple systems from bare metal to the deployment of the operating system. It also provides a framework for updating the BIOS. Dell Management Plug-in for VMware vCenter VMware vCenter is the primary console used by IT administrators to manage and monitor VMware vSphere ESXi hosts. Using the Dell Management Plug-In for VMware vCenter, administrators have new capabilities to manage and monitor Dell hardware within the virtualized environment, such as: • Alerting and environment monitoring • Single server monitoring and reporting • Firmware updates • Enhanced deployment options NOTE: Dell OpenManage Server Administrator Agent is a prerequisite. For more information on Dell Management Plug-in for VMware vCenter, see support.dell.com/support/edocs/software/eslvmwre/plugin/index.htm. Overview 11 esxi5_techsheet.book Page 12 Tuesday, January 24, 2012 3:25 PM Dell OpenManage Essentials Dell OpenManage Essentials is the best option for managing Dell PowerEdge servers and direct attached storage as it provides the easiest and simplest way for system administrators to maximize Dell systems uptime and health. OpenManage Essentials is a Dell hardware element management solution that is optimized on managing customer's entire Dell infrastructure for IT generalist. It is integrated and can be integrated to other point solutions to provide end to end IT Management. Important Information • For documentation on ESXi 5.0, see support.dell.com/manuals. Navigate to Software Virtualization Solutions VMware Software. • For documentation on systems management described in this document, see support.dell.com/manuals. Navigate to Software Systems Management and then select the relevant product for which you seek documentation. • For more information about Dell OpenManage software, see dell.com/openmanage. • VMware documents are available at support.vmware.com. • Dell Technology Center maintains a wiki, which provides a collaborative environment where customers and Dell engineers share knowledge, experiences, and information about Dell technology in customer environments. To access the wiki, see delltechcenter.com. • The Dell Community at en.community.dell.com is an online community for Dell customers for solutions, advice, and general information. Getting Technical Assistance For customers in the United States, call 800-WWW-DELL (800-999-3355). NOTE: If you do not have an active Internet connection, you can find contact information on your purchase invoice, packing slip, bill, or Dell product catalog. For information on technical support, visit dell.com/contactus. Additionally, Dell Enterprise Training and Certification is available at dell.com/training. 12 Overview esxi5_techsheet.book Page 13 Tuesday, January 24, 2012 3:25 PM Installing Dell OpenManage Server Administrator 2 This section helps you install Dell OpenManage Server Administrator on managed systems running VMware ESXi 5.0. Before You Begin • Read the applicable Dell OpenManage readme files and the Dell Systems Software Support Matrix at support.dell.com/manuals. These files contain the latest information about software, firmware, and driver versions, in addition to information about known issues. • Install Server Administrator on each managed system. • The managed system’s requirements are as follows: – Minimum of 3 GB of RAM. – Administrator rights. – TCP/IP connection on the managed and remote system to facilitate remote system management. – Mouse, keyboard, and monitor to manage a system locally. The monitor requires a minimum screen resolution of 1024 x 768 pixels. Installing Dell OpenManage Server Administrator 13 esxi5_techsheet.book Page 14 Tuesday, January 24, 2012 3:25 PM – The Server Administrator Remote Access Controller service requires that you install a remote access controller (RAC) on the managed system. See the relevant Dell Remote Access Controller User’s Guide for complete software and hardware requirements. NOTE: The RAC software is installed as part of the managed system software installation. See the relevant Dell Remote Access Controller User’s Guide for complete software and hardware requirements. – The Server Administrator Storage Management Service requires that you install Server Administrator on the system in order to be properly managed. See the Dell OpenManage Server Administrator Storage Management User’s Guide for software and hardware requirements. Security Management Server Administrator provides security through role-based access control (RBAC), authentication, and encryption for command-line interfaces. RBAC RBAC manages security by determining the operations that are executed by persons in particular roles. Each user is assigned one or more roles, and each role is assigned one or more user privileges that are permitted to users in that role. With RBAC, security administration corresponds closely to an organization's structure. User Privileges Server Administrator grants different access rights based on the user's assigned group privileges. The four user levels are: User, Power User, and Administrator. 14 • Users can view most information. • Power Users can set warning threshold values and configure which alert actions are to be taken when a warning or failure event occurs. • Administrators can configure and perform shutdown actions, configure Auto Recovery actions in case a system has a non-responsive operating system, and clear hardware, event, and command logs. Administrators can also configure the system to send e-mails. Installing Dell OpenManage Server Administrator esxi5_techsheet.book Page 15 Tuesday, January 24, 2012 3:25 PM Server Administrator grants read-only access to users logged in with User privileges, read and write access to users logged in with Power User privileges, and read, write, and administrator access to users logged in with Administrator privileges. Table 2-1. User Privileges User Privileges Access Type View Manage User Yes No Power User Yes Yes Administrator Yes Yes Table 2-2 summarizes which user levels have privileges to access and manage Server Administrator services. Table 2-2. Server Administrator User Privilege Levels Service User Privilege Level Required View Manage Instrumentation U, P, A P, A Remote Access U, P, A A Storage Management U, P, A A Table 2-3 defines the user privilege level abbreviations used in Table 2-2. Table 2-3. Legend for Server Administrator User Privilege Levels U User P Power User A Administrator Installing Dell OpenManage Server Administrator 15 esxi5_techsheet.book Page 16 Tuesday, January 24, 2012 3:25 PM ESXi 5.0 Authentication ESXi authenticates users accessing ESXi hosts using the vSphere/VI Client or SDK. The default installation of ESXi uses a local password database for authentication. ESXi authentication transactions with Server Administrator are also direct interactions with the vmware-hostd process. To make sure that authentication works efficiently for your website, perform basic tasks such as setting up users, groups, permissions, and roles, configuring user attributes, adding your own certificates, and determining whether you want to use SSL. Creating Server Administrator Users for ESXi 5.0 1 Log on to the host using the vSphere Client. 2 Click the Local Users & Groups tab and click Users. 3 Right-click anywhere in the Users table and click Add to open the Add New User dialog box. 4 Type the login, user name, a numeric user ID (UID), and password; specifying the user name and UID are optional. If you do not specify the UID, the vSphere Client assigns the next available UID. 5 To allow a user to access the host through a command shell, select Grant shell access to this user. Users that access the host only through the vSphere Client do not need shell access. 6 To add the user to a group, select the group name from the Group drop-down menu and click Add. 7 Click OK. NOTE: To login to Server Administrator, the user needs to be assigned Administrator role. To assign roles and permissions, refer to the VMware documentation. Installing Dell OpenManage Server Administrator for ESXi To install Server Administrator on systems running VMware ESXi 5.0, download the OM-SrvAdmin-Dell-Web-6.5.0-542907.VIB-ESX50i_A02.zip file. 16 Installing Dell OpenManage Server Administrator esxi5_techsheet.book Page 17 Tuesday, January 24, 2012 3:25 PM Download vSphere Command Line Interface (vSphere CLI) from vmware.com and install it on your Microsoft Windows or Linux system. Alternately, you can import VMware vSphere Management Assistant (vMA) into your ESXi 5.0 host. Install Server Administrator for ESXi 5.0 using any one of the following methods: • Using the vSphere CLI • Using the VMware vSphere Management Assistant • Using the VMWare Update Manager (VUM) • Using the Power CLI Using the vSphere CLI 1 Copy the OM-SrvAdmin-Dell-Web-6.5.0-542907.VIB-ESX50i_A02.zip file to the /var/log/vmware folder on the ESXi5.0 server. 2 Shut down all guest operating systems on the ESXi host and run the ESXi host in maintenance mode. 3 If you are using Windows, navigate to the directory where the vSphere CLI utilities is installed and run the command mentioned in step 4. If you are using vSphere CLI on Linux, run the command in step 4 from any directory. 4 Run the following command: esxcli --server <IP Address of ESXi 5.0 host> software vib install -d /var/log/vmware/<Dell OpenManage file> 5 Type the root user name and password of the ESXi host when prompted. The command output displays a successful update. 6 Restart the ESXi host system. Use esxcli software vib get or esxcli software vib list to get or list the information about the installed VIBs. The VIB contains the following items: • Server Administrator Instrumentation Service Installing Dell OpenManage Server Administrator 17 esxi5_techsheet.book Page 18 Tuesday, January 24, 2012 3:25 PM • Remote Enablement • Server Administrator Storage Management • Remote Access Controller Using the VMware vSphere Management Assistant The vSphere Management Assistant (vMA) allows administrators and developers to run scripts and agents to manage ESXi systems. For more information on vMA, see vmware.com/support/developer/vima. 1 Log on to the vMA with administrator rights and privileges. 2 Copy the OM-SrvAdmin-Dell-Web-6.5.0-542907.VIB-ESX50i_A02.zip file to the /var/log/vmware folder on the ESXi5.0 server. 3 Shut down all guest operating systems on the ESXi host and run the ESXi host in maintenance mode. 4 In vMA, run the following command: esxcli --server <IP Address of ESXi 5.0 host> software vib install -d /var/log/vmware/<Dell OpenManage file> 5 Type the root user name and password of the ESXi host when prompted. The command output displays a successful update. 6 Restart the ESXi host system. The following components are installed on your system after the installation of Server Administrator: • Server Administrator Instrumentation Service • Remote Enablement • Server Administrator Storage Management • Remote Access Controller Using the VMWare Update Manager (VUM) To install Server Administrator using VUM: 1 Install VMware vSphere 5.0 (vCenter Server, vSphere Client, and VMware vSphere Update Manager) on a Windows 2008 R2 SP1 64-bit server. 18 Installing Dell OpenManage Server Administrator esxi5_techsheet.book Page 19 Tuesday, January 24, 2012 3:25 PM 2 On the desktop, double-click VMware vSphere Client and login to vCenter Server. 3 Right-click vSphere Client host and click New Datacenter. 4 Right-click New Datacenter and click Add Host. Provide information for the ESXi 5.0 server per online instructions. 5 Right-click the ESXi host added in the previous step and click Maintenance Mode. 6 From Plug-ins select Manage Plug-ins download VMware Update Manager (The status is enabled if the download is successful.) 7 Select the ESXi 5.0 host. Click Update Manager Admin view Patch Repository Import Patches and follow the online instructions to upload the patch successfully. The offline bundle is displayed. 8 Click Baselines and Groups. 9 Click create, mention baseline name and select Host Extension as baseline type. Complete the rest as per instructions. 10 Click Admin View. 11 Click Add to Baseline (against the uploaded patch name) and select the baseline name that you have created in step 8. 12 Click Compliance view. Select the Update Manager tab. Click Attach and select the Extension Baseline created in step 8 and follow the instructions. 13 Click Scan Scan. 14 Select Baseline from list of baselines in Attached Baseline and then click Stage. 15 Click Remediate once the staging is completed. Server Administrator installation is complete. Using the Power CLI 1 Install the supported PowerCLI of ESXi5.0 on Windows System. 2 Copy the OM-SrvAdmin-Dell-Web-6.5.0-542907.VIB-ESX50i_A02.zip file to the ESXi host. 3 Navigate to the bin directory. Installing Dell OpenManage Server Administrator 19 esxi5_techsheet.book Page 20 Tuesday, January 24, 2012 3:25 PM 4 Run Connect-VIServer and provide the server and other credentials. 5 Log on to the ESXi 5.0 host using supported vSphere CLI of ESXi 5.0 and create a datastore. 6 Create a folder OM-SrvAdmin-Dell-Web-7.0.0-<buildID>.VIB-ESX50i on ESXi 5.0 host under /vmfs/volumes/<datastore_name> directory. 7 Copy the ESXi 5.0 zip file on ESXi 5.0 host to /vmfs/volumes/<datastore_name>/OM-SrvAdmin-Dell-Web-7.0.0<build ID>.VIB-ESX50i directory. 8 Unzip the zip file in the above specified directory. 9 Run the following command in Power CLI Install-VMHostPatch -VMHost 10.94.171.97 HostPath /vmfs/volumes/<datastore_name>/OMSrvAdmin-Dell-Web-7.0.0-<build ID>.VIBESX50i/cross_oem-dell-openmanage-esxi_7.0-0000metadata.zip 10 Reboot the ESXi 5.0 host. 11 Run the following command to check if OpenManage is installed successfully on the host. esxcli software vib list|grep -i open OpenManage is displayed. Installing the Server Administrator Web Server Install the Server Administrator Web Server separately on a management station. Download the Web Server from support.dell.com. For the installation procedure, see the Dell OpenManage Server Administrator Installation guide available on the Dell Systems Management Tools and Documentation DVD or at support.dell.com/support/edocs/software/omswrels/index.htm. NOTE: Make sure that you install only Server Administrator Web Server version 6.5. 20 Installing Dell OpenManage Server Administrator esxi5_techsheet.book Page 21 Tuesday, January 24, 2012 3:25 PM Configuring the SNMP Agent Server Administrator supports SNMP—a systems management standard—on all supported operating systems.You can configure the SNMP agent to change the community name, enable Set operations, and send traps to a management station. To configure your SNMP agent for proper interaction with management applications, perform the procedures described in the following sections. NOTE: The default SNMP agent configuration usually includes a SNMP community name such as public. For security reasons, change the SNMP community names from their default values. For information about changing SNMP community names, see the appropriate section below. Configuring the SNMP Agent on Systems Running ESXi 5.0 Server Administrator supports SNMP traps on ESXi 5.0. Server Administrator does not support SNMP Get and Set operations because ESXi 5.0 does not provide the required SNMP support. Use the vSphere command-line interface to configure a system running ESXi 5.0 to send SNMP traps to a management station. NOTE: See your operating system documentation for additional details about SNMP configuration. Configuring Your System to Send Traps to a Management Station Server Administrator generates SNMP traps in response to changes in the status of sensors and other monitored parameters. Configure one or more trap destinations on the system running Server Administrator for SNMP traps to be sent to a management station. Installing Dell OpenManage Server Administrator 21 esxi5_techsheet.book Page 22 Tuesday, January 24, 2012 3:25 PM To configure your ESXi system running Server Administrator to send traps to a management station: 1 Run the following command: vicfg-snmp.pl --server <server> --username <username> --password <password> -c <community> -t <hostname>/<community> where <server> is the hostname or IP address of the ESXi system, <username> is a user on the ESXi system, <password> is the password of the ESXi user, <community> is the SNMP community name and <hostname> is the hostname or IP address of the management station. 2 Enable SNMP using the following command: vicfg-snmp.pl -server <server> --username <username> --password <password> -E 3 View the SNMP configuration using the following command: vicfg-snmp.pl --server <server> --username <username> --password <password> -s 4 Test the SNMP configuration using the following command: vicfg-snmp.pl --server <server> --username <username> --password <password> -T NOTE: The extension .pl is not required on Linux. NOTE: If you do not specify a user name and password, you are prompted to enter it. The SNMP trap configuration takes effect immediately without restarting any services. Uninstalling Managed System Software You can uninstall managed system software from ESXi using the following command: esxcli software vib remobe -n/--vibname <VIB NAME> where, <VIB NAME> is the name of the VIB bundle. To get the VIB name, use the following command from vSphere CLI or directly on the ESXi 5.0 host: <esxcli software vib list> 22 Installing Dell OpenManage Server Administrator esxi5_techsheet.book Page 23 Tuesday, January 24, 2012 3:25 PM Installing Dell OpenManage Server Administrator 23 esxi5_techsheet.book Page 24 Tuesday, January 24, 2012 3:25 PM 24 Installing Dell OpenManage Server Administrator esxi5_techsheet.book Page 25 Tuesday, January 24, 2012 3:25 PM Using Dell OpenManage Server Administrator 3 Starting Your Server Administrator Session Open your web browser and type one of the following in the address field and press <Enter>: https://hostname:1311 where hostname is the assigned name for the managed node system and 1311 is the default port number or https://IP address:1311 where IP address is the IP address for the managed system and 1311 is the default port number. You should type https:// (and not http://) in the address field to receive a valid response in your browser. NOTE: You must have preassigned user rights to log in to Server Administrator. Distributed Web Server Login You can use the Distributed Web Server (DWS) login to access ESXi systems. For more information about DWS usage, see the Dell OpenManage Server Administrator User’s Guide. NOTE: ESXi supports only DWS login. 1 Open Server Administrator Web Server. 2 Click Manage Remote Node link. 3 Type the IP address, User Name and Password of the managed system. 4 Click Submit. Using Dell OpenManage Server Administrator 25 esxi5_techsheet.book Page 26 Tuesday, January 24, 2012 3:25 PM To end your Server Administrator session, click Log Out on the global navigation bar. The Log Out button is located in the upper-right corner of each Server Administrator home page. NOTE: When you launch Server Administrator using Internet Explorer or Mozilla Firefox, an intermediate warning page may appear displaying the problem with the security certificate. To ensure system security, it is recommended that you either generate a new X.509 certificate, reuse an existing X.509 certificate, or import a root certificate or certificate chain from a Certification Authority (CA). To avoid encountering such warning messages about the certificate, the certificate used must be from a trusted CA. Using the Ignore Certificate Option The login screen has an Ignore certificate check box. CAUTION: Use the Ignore certificate option with discretion. It is recommended that you use it only in trusted Intranet environments. To ensure system security, it is recommended that you import a root certificate or certificate chain from a CA. See the VMware documentation for details. NOTE: If the CA authority on the managed system is valid and if the Server Administrator web server still reports an untrusted certificate error, you can still make the managed system’s CA as trusted by using the certutil.exe file. See your operating system documentation for details on accessing this .exe file. On supported Windows operating systems, you can also use the certificates snap in option to import certificates. Login Failure Scenarios You may not be able to login to the managed system if: 26 • You enter an invalid/incorrect IP address. • You enter incorrect credentials (user name and password). • The managed system is not powered on. • The managed system is not reachable due to an invalid IP address or a DNS error. • The managed system has an untrusted certificate and you do not select the Ignore Certificate Warning in the login page. Using Dell OpenManage Server Administrator esxi5_techsheet.book Page 27 Tuesday, January 24, 2012 3:25 PM • The small footprint CIM broker daemon (SFCBD) service on the ESX/ESXi system is not running. • The web server management service on the managed system is not running. • You enter the IP address of the managed system and not the hostname, when you do not check the Ignore Certificate Warning check box. Unsupported Server Administrator Features With ESXi The following features of Server Administrator are not supported in ESXi 5: • Alert Management—Alert Actions • Network—Physical NIC Interface—Administrative Status • Network—Physical NIC Interface—DMA • Network —Physical NIC Interface—Maximum Transmission Unit • Network —Physical NIC Interface—Operational Status • Preferences—SNMP Configuration • Remote Shutdown—Power Cycle System with Shutdown OS First • About Details—Server administrator component details not listed under Details tab Server Administrator always displays the date in <mm/dd/yyyy> format. Administrator or Power User privileges are required to view many of the system tree objects, system components, action tabs, and data area features that are configurable. Additionally, only users logged in with Administrator privileges can access critical system features such as the shutdown functionality included under the Shutdown tab. Using Dell OpenManage Server Administrator 27 esxi5_techsheet.book Page 28 Tuesday, January 24, 2012 3:25 PM Server Administrator Home Page NOTE: Do not use your Web browser toolbar buttons, such as Back and Refresh, while using Server Administrator. Use only the Server Administrator navigation tools. With only a few exceptions, the Server Administrator home page has three main areas: • The global navigation bar provides links to general services. • The system tree displays all visible system objects based on the user's access privileges. • The action window displays the available management actions for the selected system tree object based on the user's access privileges. The action window contains three functional areas: – The action tabs display the primary actions or categories of actions that are available for the selected object based on the user's access privileges. – The action tabs are divided into subcategories of all available secondary options for the action tabs based on the user's access privileges. – The data area displays information for the selected system tree object, action tab, and subcategory based on the user's access privileges. Additionally, when logged in to the Server Administrator home page, the system model, the assigned name of the system, and the current user's user name and user privileges are displayed in the top-right corner of the window. 28 Using Dell OpenManage Server Administrator esxi5_techsheet.book Page 29 Tuesday, January 24, 2012 3:25 PM Table 3-1 lists the GUI field names and the applicable system, when Server Administrator is installed on the system. Table 3-1. System Availability for the Following GUI Field Names GUI Field Name Modular Enclosure Server module Main System System Main system Chassis Applicable System Modular System Modular System Modular System Non-Modular System Non-Modular System NOTE: Administrator or Power User privileges are required to view most of the system tree objects, system components, action tabs, and data area features that are configurable. Additionally, only users logged in with Administrator privileges can access critical system features such as the shutdown functionality included under the Shutdown tab. System Tree The system tree appears on the left side of the Server Administrator home page and lists the components of your system that are viewable. The system components are categorized by component type. When you expand the main object known as Modular EnclosureSystem/Server Module, the major categories of system/server module components that may appear are Main System Chassis/Main System, Software, and Storage. To expand a branch of the tree, click the plus sign ( ) to the left of an object, or double-click the object. A minus sign ( ) indicates an expanded entry that cannot be expanded further. Using Dell OpenManage Server Administrator 29 esxi5_techsheet.book Page 30 Tuesday, January 24, 2012 3:25 PM Action Window When you click an item on the system tree, details about the component or object appear in the data area of the action window. Clicking an action tab displays all available user options as a list of subcategories. Clicking an object on the system/server module tree opens that component's action window, displaying the available action tabs. The data area defaults to a preselected subcategory of the first action tab for the selected object. The preselected subcategory is usually the first option. For example, clicking the Main System Chassis/Main System object opens an action window in which the Properties action tab and Health subcategory are displayed in the window's data area. Data Area The data area is located below the action tabs on the right side of the home page. The data area is where you perform tasks or view details about system components. The content of the window depends on the system tree object and action tab that are currently selected. For example, when you select BIOS from the system tree, the Properties tab is selected by default and the version information for the system BIOS appears in the data area. The data area of the action window contains many common features, including status indicators, task buttons, underlined items, and gauge indicators. System/Server Module Component Status Indicators The icons that appear next to component names show the status of that component (as of the latest page refresh). Table 3-2. System/Server Module Component Status Indicators Symbol Meaning A green check mark indicates that a component is healthy (normal). A yellow triangle containing an exclamation point indicates that a component has a warning (noncritical) condition. A warning condition occurs when a probe or other monitoring tool detects a reading for a component that falls within certain minimum and maximum values. A warning condition requires prompt attention. 30 Using Dell OpenManage Server Administrator esxi5_techsheet.book Page 31 Tuesday, January 24, 2012 3:25 PM Table 3-2. System/Server Module Component Status Indicators (continued) Symbol Meaning A red X indicates that a component has a failure (critical) condition. A critical condition occurs when a probe or other monitoring tool detects a reading for a component that falls within certain minimum and maximum values. A critical condition requires immediate attention. A blank space indicates that a component's health status is unknown. Task Buttons Most windows opened from the Server Administrator home page contain at least four task buttons: Print, Export, Email, and Refresh. Other task buttons are included on specific Server Administrator windows. Log windows, for example, also contain Save As and Clear Log task buttons. For specific information about individual task buttons, click Help on any Server Administrator home page window to view detailed information about the specific window you are viewing. • Clicking Print prints a copy of the open window to your default printer. • Clicking Export generates a text file that lists the values for each data field on the open window. The export file is saved to a location you specify. • Clicking Email creates an e-mail message addressed to your designated e-mail recipient. • Clicking Refresh reloads the system component status information in the action window data area. • Clicking Save As saves an HTML file of the action window in a .zip file. • Clicking Clear Log erases all events from the log displayed in the action window data area. NOTE: The Export, Email, Save As, and Clear Log buttons are only visible for users logged in with Power User or Administrator privileges. Underlined Items Clicking an underlined item in the action window data area displays additional details about that item. Using Dell OpenManage Server Administrator 31 esxi5_techsheet.book Page 32 Tuesday, January 24, 2012 3:25 PM Gauge Indicators Temperature probes, fan probes, and voltage probes are each represented by a gauge indicator. For example, Figure 3-1 shows readings from a system's CPU fan probe. Figure 3-1. Gauge Indicator Using the Online Help Context-sensitive online help is available for every window of the Server Administrator home page. Clicking Help on the global navigation bar opens an independent help window that contains detailed information about the specific window you are viewing. The online help is designed to help guide you through the specific actions required to perform all aspects of the Server Administrator services. Online help is available for all windows you can view, based on the software and hardware groups that Server Administrator discovers on your system and your user privilege level. 32 Using Dell OpenManage Server Administrator esxi5_techsheet.book Page 33 Tuesday, January 24, 2012 3:25 PM Using the Preferences Home Page The left-hand pane of the Preferences home page (where the system tree is displayed on the Server Administrator home page) displays all available configuration options in the system tree window. See Table 3-3 for available Preferences home page configuration options. Table 3-3. Preferences Home Page Configuration Options General Settings Server Administrator You can view the Preferences tab after you log in to manage a remote system. This tab is also available when you log in to manage the Server Administrator Web server or manage the local system. Like the Server Administrator home page, the Preferences home page has three main areas: • The global navigation bar provides links to general services. – Clicking Back to Server Administrator returns you to the Server Administrator home page. • The left-hand pane of the Preferences home page (where the system tree is displayed on the Server Administrator home page) displays the preference categories for the managed system or the Server Administrator Web server. • The action window displays the available settings and preferences for the managed system or the Server Administrator Web Server. Using Dell OpenManage Server Administrator 33 esxi5_techsheet.book Page 34 Tuesday, January 24, 2012 3:25 PM Server Administrator Logs Server Administrator allows you to view and manage hardware, alert, and command logs. All users can access logs and print reports from either the Server Administrator home page or from its command line interface. Users must be logged in with Administrator privileges to clear logs or must be logged in with Administrator or Power User privileges to e-mail logs to their designated service contact. When viewing Server Administrator logs, you can click Help on the global navigation bar for more detailed information about the specific window you are viewing. Server Administrator log help is available for all windows accessible to the user based on user privilege level and the specific hardware and software groups that Server Administrator discovers on the managed system. Integrated Features Clicking a column heading sorts by the column or changes the sort direction of the column. Additionally, each log window contains several task buttons that can be used for managing and supporting your system. Log Window Task Buttons 34 • Click Print to print a copy of the log to your default printer. • Click Export to save a text file containing the log data (with the values of each data field separated by a customizable delimiter) to a destination you specify. • Click Email to create an e-mail message that includes the log content as an attachment. • Click Clear Log to erase all events from the log. • Click Save As to save the log content in a .zip file. • Click Refresh to reload the log content in the action window data area. Using Dell OpenManage Server Administrator esxi5_techsheet.book Page 35 Tuesday, January 24, 2012 3:25 PM Server Administrator Logs Server Administrator provides the following logs: • Hardware Log • Alert Log • Command Log Hardware Log Use the hardware log to look for potential problems with your system's hardware components. On Dell PowerEdge x8xx, x9xx, and xx1x systems, the hardware log status indicator changes to critical status ( ) when the log file reaches 100 percent capacity. There are two available hardware logs, depending on your system: the Embedded System Management (ESM) log and the System Event Log (SEL). The ESM log and SEL are each a set of embedded instructions that can send hardware status messages to systems management software. Each component listed in the logs has a status indicator icon next to its name. A green check mark ( ) indicates that a component is healthy (normal). A yellow triangle containing an exclamation point ( ) indicates that a component has a warning (noncritical) condition and requires prompt attention. A red X ( ) indicates that a component has a failure (critical) condition and requires immediate attention. A blank space ( ) indicates that a component's health status is unknown. To access the hardware log, click System, click the Logs tab, and click Hardware. Information displayed in the ESM and SEL logs includes: • The severity level of the event • The date and time that the event was captured • A description of the event Maintaining the Hardware Log The status indicator icon next to the log name on the Server Administrator homepage changes from normal status ( ) to noncritical status ( ) when the log file reaches 80 percent capacity. Be sure to clear the hardware log when it reaches 80 percent capacity. If the log is allowed to reach 100 percent capacity, the latest events are discarded from the log. Using Dell OpenManage Server Administrator 35 esxi5_techsheet.book Page 36 Tuesday, January 24, 2012 3:25 PM Alert Log NOTE: If the Alert log displays invalid XML data (for example, when the XML data generated for the selection is not well formed), click Clear Log and then redisplay the log information. Use the Alert log to monitor various system events. The Server Administrator generates events in response to changes in the status of sensors and other monitored parameters. Each status change event recorded in the Alert log consists of a unique identifier called the event ID for a specific event source category and an event message that describes the event. The event ID and message uniquely describe the severity and cause of the event and provide other relevant information such as the location of the event and the monitored component's previous state. To access the Alert log, click System, click the Logs tab, and click Alert. Information displayed in the Alert log includes: • The severity level of the event • The event ID • The date and time that the event was captured • The category of the event • A description of the event NOTE: The log history may be required for future troubleshooting and diagnostic purposes. Therefore, it is recommended that you save the log files. See the Server Administrator Messages Reference Guide for detailed information about alert messages. Command Log NOTE: If the Command log displays invalid XML data (for example, when XML data generated for the selection is not well formed), click Clear Log and then redisplay the log information. Use the Command log to monitor all of the commands issued by Server Administrator users. The Command log tracks logins, logouts, systems management software initialization, and shutdowns initiated by systems management software, and records the last time the log was cleared. The size of the command log file can be specified as per your requirement. 36 Using Dell OpenManage Server Administrator esxi5_techsheet.book Page 37 Tuesday, January 24, 2012 3:25 PM To access the Command log, click System, click the Logs tab, and click Command. Information displayed in the Command log includes: • The date and time that the command was invoked • The user that is currently logged in to the Server Administrator home page or the CLI • A description of the command and its related values. Known Limitation You cannot log on to OMSA installed on ESXi 5.0 when Distributed Web Server (DWS) is installed on Windows Server 2003 and Windows XP. This is due to winhttp limitation on these operating systems and security enhancement on WSMAN on ESXi 5.0. Using Dell OpenManage Server Administrator 37 esxi5_techsheet.book Page 38 Tuesday, January 24, 2012 3:25 PM 38 Using Dell OpenManage Server Administrator