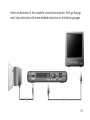
1
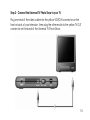
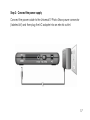
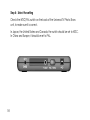
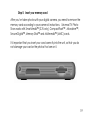
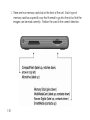
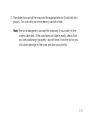
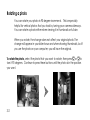
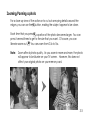
Universal
TV Photo Show
User's Guide
An
Microsystems Brand
www.Dazzle.com
402206
© 2002 SCM Microsystems Inc.
All rights are reserved. No part of this publication may be reproduced, stored in a
retrieval system, or transmitted in any form or by any means, electronic,
mechanical, photocopying, recording, or otherwise, without the prior written
permission of SCM Microsystems Inc.
CompactFlash is a trademark of SanDisk Corporation. Memory Stick is a trademark
of Sony Corporation. Microdrive is a trademark of International Business Machines
Corporation. MultiMediaCard is a trademark of Infineon Technologies AG of
Germany. Secure Digital is a trademark of Toshiba Corporation. SmartMedia is a
trademark of Toshiba Corporation.
Part number: DM-22900
i
Contents
Chapter 1: Setting Up ............................................................... 1-1
Introduction................................................................................................................. 1-1
Setting up Universal TV Photo Show........................................................................ 1-2
Turning off Universal TV Photo Show.......................................................................1-14
Changing the language..........................................................................................1-15
Chapter 2: Viewing Your Photos............................................. 2-1
Viewing a slide show...................................................................................................2-2
Setting slide show transition times ............................................................................2-3
Viewing the photos on your card.............................................................................2-5
Videotaping a slide show ......................................................................................... 2-7
ii
Chapter 3: Working with Your Photos..................................... 3-1
Rotating a photo........................................................................................................ 3-2
Zooming/Panning a photo........................................................................................3-3
Correcting red-eye in a photo .................................................................................3-5
Hiding a photo...........................................................................................................3-10
Moving a photo.........................................................................................................3-12
Deleting a photo.......................................................................................................3-13
Viewing information about a photo......................................................................3-14
Chapter 4: Working with Your Memory Card....................... 4-1
Changing/Removing your card .............................................................................. 4-2
Formatting your memory card..................................................................................4-3
Reclaiming memory card space .............................................................................4-6
Chapter 5: Using Universal TV Photo Show with Your Computer
.................................................................................................... 5-1
Setting up Universal TV Photo Show .........................................................................5-2
Using Universal TV Photo Show..................................................................................5-3
Removing a memory card ....................................................................................... 5-5
iii
Disconnecting Universal TV Photo Show .................................................................5-6
Chapter 6: Troubleshooting .................................................... 6-1
My photos didn’t appear after I connected everything.................................... 6-1
The video cable doesn’t fit/My TV doesn’t have an RCA video jack .............. 6-2
The remote doesn’t seem to be working............................................................... 6-2
The unit is saying that my card is “unreadable.”.................................................. 6-3
Some of my photos didn’t show up........................................................................ 6-3
Photos are loading very slowly .................................................................................6-4
The slide show feature doesn’t work........................................................................6-4
I know I have more than 12 photos on my card but I can’t find them............ 6-4
I’ve mistakenly deleted a photo from my memory card ................................... 6-5
Thumbnail and photo rotations aren’t being saved .......................................... 6-5
The Windows 98 driver won’t install………………… ...…………………………….. 6-5
The removable drive feature isn’t working………………………………… .…..…..6-6
I deleted the “imageinfo.db” file, what does this mean?.................................. 6-6
Chapter 7: Dazzle Technical Support .................................... 7-1
iv
Chapter 1: Setting Up
Introduction
Welcome to Dazzle™ Universal TV Photo
Show, a simple-to-use product that
brings your digital photos to your living
room to share with family and friends.
In just minutes, you can go from
snapping a photo to viewing it full
screen on your TV.
You can even rotate, zoom and pan
images – or see them in an automatic slide show.
And for more versatility, you can also connect the unit to your computer as a
removable drive. Once the images are on your computer, you can print, email or archive them.
1-1
Setting up Universal TV Photo Show
The package includes the following components:
•
•
•
•
•
•
Universal TV Photo Show hardware unit
Power supply
Video cable
Remote control
2 AA batteries for remote control
Universal TV Photo Show User’s Guide
Setting up is quick and easy – just plug in the connections and you’re ready to
go. The rest of this chapter details setting up to view photos on your TV. See
Chapter 5 for instructions on using it with your computer.
1-2
Here is an illustration of the complete connections required. We’ll go through
each step individually with more detailed instructions on the following pages.
1-3
Step 1: Install the remote’s batteries
The remote control requires two AA batteries (included).
1. Slide open the battery compartment cover on the back of the remote.
2. Insert two new batteries, making sure the +/- electrodes are facing the
proper direction (see the diagram inside the battery compartment).
3. Slide the battery compartment cover back, clicking it shut.
Note:
1-4
When you use the remote control, remember to point it at the front of
the Universal TV Photo Show unit, not at the TV. It’s the unit itself that
signals the commands to the TV.
Step 2: Connect the Universal TV Photo Show to your TV
Plug one end of the v ideo cable into the yellow VIDEO IN connector on the
front or back of your television, then plug the other end into the yellow TV OUT
connector on the back of the Universal TV Photo Show.
1-5
Note:
Some older TVs do not have RCA Video In connectors. They use
coaxial cable instead (you’ll know that you have one if the video
cable plug doesn’t fit).
In that case, you will need to connect through an RF modulator
(not included). You can purchase an RF modulator and cable
from your local electronics store.
Follow the instructions included with the RF modulator to connect it to
your TV. Then plug one end of the video cable into the yellow VIDEO
IN connector on the RF modulator, and plug the other end into the TV
OUT connector on the back of the Universal TV Photo Show. Set your
TV to the channel that you set the RF modulator (usually 3 or 4).
1-6
Step 3: Connect the power supply
Connect the power cable to the Universal TV Photo Show power connector
(labeled 6V) and then plug the AC adapter into an electric outlet.
1-7
Step 4: Select the setting
Check the NTSC/PAL switch on the back of the Universal TV Photo Show
unit, to make sure it is correct.
In Japan, the United States and Canada, the switch should be set to NTSC.
In China and Europe, it should be set to PAL.
1-8
Step 5: Insert your memory card
After you’ve taken photos with your digital camera, you need to remove the
memory card according to your camera’s instructions. Universal TV Photo
Show works with SmartMedia™ (3.3V only), CompactFlash™ , Microdrive™,
Secure Digital™, Memory Stick™ and Multimedia™ (MMC) cards.
It’s important that you insert your card correctly into the unit, so that you do
not damage your card or the photos that are on it.
1-9
1. There are two memory card slots on the front of the unit. Each type of
memory card has a specific way that it needs to go into the slot so that the
images can be read correctly. Position the card in the correct direction:
1-10
2. Then slide the card all the way into the appropriate slot (it will click into
place). You can only use one memory card at a time.
Note: The slot is designed to accept the card only if you insert it in the
correct direction. If the card does not slide in easily, check that
you are positioning it properly – do not force it into the slot or you
will cause damage to the card and lose your photos.
1-11
Step 6: Turn on the Universal TV Photo Show
On the side of the unit:
• Slide the POWER switch to ON. Check that the green light on the front of
the unit comes on, ensuring that it is receiving power.
1-12
Step 7: Set up your TV
1. Turn on your TV.
2. Set your TV to the appropriate video input source. Note that television
manufacturers handle this differently, so there are several options. You will
know that you have set it up correctly when your photos begin to appear on
the screen.
You can check the manual that came with your TV for detailed information,
or:
• Your TV or TV’s remote control may have a TV/VCR, TV/VIDEO, SOURCE
or INPUT button that changes the video input. Press that button to
switch between the available video inputs. If your remote has more
than one of these buttons, try them all.
• If you don’t have these buttons, your TV may have a channel called
LINE (frequently found before Channel 2). Click through your TV’s
channels until you find it.
3.
Universal TV Photo Show then displays an automatic slide show of your
photos.
1-13
Turning off Universal TV Photo Show
If you are done with unit for the moment, but expect to use it again soon,
press the Power button on the remote control, leaving everything else
connected. When you are ready to use it again, press the Power button
and it will start.
If you are finished using the unit for some time, press the Power button on the
remote to turn it off and then slide the switch on the side of the unit to OFF. You
can then safely disconnect it and pull out the memory card. If you pull the
card out unexpectedly, you risk damaging your card and losing the photos on
it.
Note:
1-14
Remove the memory card from the unit when not in use or when
you are transporting it.
Changing the language
The pop-up menus and messages in Universal TV Photo Show are available in
several languages. You can change to a different language at any time.
To change the language:
1. Press the Option button on the
remote control.
2. The following menu appears. Press
the down arrow to move the arrow
beside the Setup option and press
OK to select it.
1-15
3. On the Setup menu that appears,
press OK to choose Select
Language.
4. A Select Language screen appears
showing your language options.
Use the arrows to move the arrow
beside the language you prefer.
Then press OK.
5. This returns you to the setup menu,
which will now be in your chosen
language. Select the Close Menu
option and press OK to return to your photos.
1-16
Chapter 2: Viewing Your Photos
Sit back in your favorite chair and get
ready to control your own TV slide show of
your photos.
All you need to navigate is the remote
control included with Universal TV Photo
Show. Notice how the remote has clearly
identified buttons that let you get to a task
quickly.
Note:
Remember to point the remote at
the front of the unit, not at the TV.
It’s the unit itself that signals the commands.
When you start up the unit, you will see your own photos automatically
appearing in a slide show. This slide show is just one way to view your photos.
You can also use the Thumbnails button to display several smaller versions of
your photos at once for easy review and selection.
2-1
And as you will see in the next chapter, you can also work with your photos to
enhance their viewing. Rotate a photo, zoom in or pan to see the action more
clearly, or move or hide photos to customize your own slide show.
Viewing a slide show
In the slide show, Universal TV Photo Show automatically displays each photo
full screen in sequence, beginning with the first photo on your memory card or
the one that you select. Each slide dissolves with a special effect that occurs
randomly.
Although each photo appears on your screen automatically, you can still
control the pace by pressing the
and
buttons. You can also pause by
pressing . An icon then appears in the lower right corner of the screen to
remind you that you have paused. Press
again when you are ready to
restart the show.
When it reaches the end, the slide show will start over so that you can show a
continuous loop of your photos.
2-2
3. The screen on the right appears.
Select the Set Slide Time option and
press OK.
4. Choose the amount of time that
you’d like each photo to stay on the
screen during the automatic slide
show. Press OK.
5. Select the Close Menu option and
press OK to leave the setup menu.
2-4
Viewing the photos on your card
Sometimes it is easier to work with or review your photos if you can see several
of them at one time. This is possible through the thumbnail view, in which your
photos appear on the screen in a smaller version, called thumbnails. The
screen displays up to 12 of your photos at once.
This allows you to quickly scan the photos on your memory card to choose one
to view full size, manipulate, move or delete.
To view thumbnail images:
1. Press the Thumbnails button. The
following screen appears, displaying
the first 12 photos on the card.
Notice that a white border frames
one photo in the set; this is the photo
you last viewed.
Use the arrow buttons to move that
border until it frames the photo that
you want to select.
2-5
If there are more than 12 photos on your card, you can use the arrow
buttons to scroll to more photos or you can press
or
to see the next or
previous set of 12.
2. Press OK when the white border frames the photo you want to view or work
with.
3. The photo appears full screen on your TV. You now have several options:
• Continue to view your photos one by one in full size by pressing
and
. This is an easy way to control a slide show.
• View your photos in an automatic slide show by pressing
.
• Work with your photo as explained in the following chapter.
• Return to the thumbnail view to choose another photo by pressing
Thumbnails.
2-6
Videotaping a slide show
In addition to showing your photos on your TV, you can also videotape that
showing. Now you can share your photos with family and friends by giving
them a videotape copy that they, in turn, can show on their own television. This
gives you another media form in which to store your digital memories.
To videotape a slide show:
1. Connect your VCR to your TV as usual.
2. To add Universal TV Photo Show, plug one end of the video cable to the
yellow VIDEO IN connector on the front or back of your VCR, then plug the
other end to the TV OUT connector on the back of the Universal TV Photo
Show unit.
Note:
Some older VCRs do not have RCA VIDEO IN connectors. They
use coaxial cable instead (you’ll know that you have one if the
video cable plug doesn’t fit).
In that case, you will need to connect through an RF modulator
(not included). You can purchase an RF modulator and cable
2-7
from your local electronics store.
Follow the instructions included with the RF modulator to connect it
to your VCR. Then plug one end of the video cable to the yellow
VIDEO IN connector on the RF modulator, and plug the other end
to the TV OUT connector on the back of the Universal TV Photo
Show unit. Set your TV to the channel that you set the RF
modulator (usually 3 or 4).
3. Set your VCR to record.
4. Watch your slide show on the TV, according to the instructions in the
“Viewing a slide show” section of this chapter.
2-8
Chapter 3: Working with Your Photos
Once you can view your photos on your TV, you may find yourself wanting to
do more with them. Universal TV Photo Show allows you to be more creative
with your photos. You can zoom in to see the action more closely. Then pan
across the photo to change the center of interest or leave out unnecessary
details on the edges. Rotate a photo if the world seems the wrong-way round.
You can also rearrange the order in which the photos appear by moving or
hiding certain ones. You can even delete a photo entirely.
And if your photo captured that annoying red-eye from the flash, you can
correct that too.
3-1
Rotating a photo
You can rotate your photo in 90-degree increments. This is especially
helpful for vertical photos that you took by turning your camera sideways.
You can rotate a photo either when viewing it in thumbnails or full size.
When you rotate, the change does not affect your original photo. The
change will appear in your slide shows and when showing thumbnails, but if
you use the photo on your computer, you will have the original.
To rotate the photo, select the photo that you want to rotate, then press
or
to
turn it 90 degrees. Continue to press these buttons until the photo is in the position
you want.
3-2
Zooming/Panning a photo
For a close-up view of the action or to cut out annoying details around the
edges, you can use the button, making the subject appear to be closer.
Each time that you press , a portion of the photo becomes larger. You can
press it several times to get to the size that you want. Of course, you can
likewise zoom out . You can zoom from 0.5x to 16x.
Note:
Zoom affects photo quality. As you zoom in more and more, the photo
will appear to be blurrier on your TV screen. However, this does not
affect your original photo on your memory card.
3-3
When you have zoomed in on a photo, part of it is obviously not showing on the
screen. You can then use the arrow buttons to move the photo (pan across it)
so that you center the action on the screen.
When you zoom or pan, the change does not affect your original photo. The
change will appear in your slide shows and when showing thumbnails, but if you
use the photo on your computer, you will have the original.
You can do this either when viewing the photo in thumbnail or full size on the
screen.
To zoom and pan:
1. Select the photo so that you are viewing it full size on the screen.
2. Press the
and buttons to zoom.
3. When zoomed in, you can press the arrows to pan in that direction.
Note:
3-4
You cannot zoom or pan photos that are hidden. To work with a
hidden photo, you must first select and unhide it (see the Hiding a
photo section in this chapter).
Correcting red-eye in a photo
Not all photos are perfect. One of the most common disappointments is to see
your friends and family suddenly develop red eyes from the reflection of the
flash in your photos.
Now you can correct that red-eye reflection if it occurs. The process is similar to
adding a colored contact lens over the problem eye.
Note:
Universal TV Photo Show makes this correction on a copy of your
original photo. When you view the photo, the corrected version will
appear. But you can access both the corrected and original files on
a computer if needed.
3-5
To correct red-eye in a photo:
1. Select the photo you want to correct, either full screen or from the
thumbnails.
2. Press the Red-Eye button.
3. Your photo appears with an arrow
added in the center for you to use as
a pointer.
To do the necessary detail work of
correcting an eye image, you need
to focus in on that area.
Use the arrow buttons to move the
arrow so that it points at the eye you
want to correct first. Then press OK.
3-6
4. As in the screen shown here, the photo reappears, zoomed in to that area,
with a corrective eye positioned over the eye that you pointed at.
You then need to fine-tune that correction by resizing, positioning and
coloring that eye image so that it covers the red-eye image. This is easy to
do:
• +/- to Size Eye: Begin by pressing
as the original that is underneath.
or
to make the eye the same size
3-7
• Arrows to position eye: Then use the arrows to move the eye so that it
covers the original eye.
• [Option] to change eye color: Now you can match the color of the iris
(the part of the eye that gives it its color) with the one in your photo.
Press Option to see the following choices.
Use the arrows to select the iris color to use. Press OK when you have
selected your choice and the color will change on the photo. If it
doesn’t seem quite right, try another until it matches the color in the
corresponding eye.
3-8
5. When you have finished making your
changes, as seen here, press OK. (If
you want to leave the red-eye
correction process without saving
your changes, you can press
Cancel.)
6. A menu then appears with choices
for how you want to continue. You
can preview how the changes will
look in the final photo, continue
working or finish. Use the arrows to
position the arrow by your choice and press OK.
7. When you have finished with one eye, go on to the other. Universal TV
Photo Show helps by using the same size and color eye as you specified in
the first one. You just need to position and fine-tune it.
8. When you are done, choose the option to save your corrections. Your
photo reappears in its original size without the red-eye.
3-9
Hiding a photo
You may want to customize your slide show or photo viewing by showing only
certain photos. Yet you might want to keep the other photos on your card for
future use. The answer is to hide them until you once again want them
available for viewing. When you hide a photo, the slide show will skip over it.
To hide a photo:
1. Select the photo that you want to hide, either through the thumbnails or
viewing full size on the screen.
2. Press the Hide button.
3. In the thumbnail view, the photo
becomes dim and an icon of the
button appears below it. In full view,
the photo also dims and then
immediately skips to the next
available and unhidden photo.
3-10
4. To later reveal that photo, select it once again from the Thumbnail View
screen and press Hide.
You can also easily hide or unhide all of your photos at once. This can be
helpful if you are ready to design a new slide show – you can start fresh by
unhiding all the photos and then
choosing which to hide. Alternatively,
you might find it easier to hide
everything and then select which
photos should be displayed while the
others remain hidden.
To hide or unhide all photos:
1. Press the Option button.
2. The box on the right appears. Use
the arrow buttons to position the
arrow beside the Hide All or Unhide
All option and press OK.
3-11
Moving a photo
To create a customized slide show, you may want to rearrange the order in
which photos appear.
To move a photo:
1. Select the photo that y ou want to move, either through the thumbnails or
viewing full size on the screen.
2. Press the Move button.
3. This screen then appears for you to
select a new location for that photo.
4. Use the arrows to position the “Move
Here” mark at the desired new
location. Press OK.
5. The photo moves to the spot to the
right of the “Move Here” marker.
You can then move another photo
or press Cancel if you are done.
3-12
Deleting a photo
You can delete a photo from your memory card. Once you have done so, it is
permanently gone, so be sure.
To delete a photo:
1. Select the photo to delete from
either the thumbnails or when
viewing it full size.
2. Press the Delete button.
3. You have one more chance to
keep your photo. This screen
appears, showing the photo that
you chose, to make sure it is the
one you want to delete.
4. To keep your photo, press the Cancel button. To delete it, press the arrow
button to select “Delete Photo.” Then press OK.
3-13
Viewing information about a photo
Detailed information is available about each photo, including the file name,
creation date and time, file size, resolution and directory.
To view photo information:
1. Select the photo you want
information on, either full screen or
from the thumbnails.
2. Press the Option button.
3. The box on the right appears. Press
OK when the arrow is beside the
Photo Info option.
3-14
4. The following screen appears with information about the photo you
selected.
File name of
your photo
Date and time
the photo was
taken
Size of the photo
file, in kilobytes
Resolution of the
photo in pixels,
width x height
Folder that holds
the photo file
5. Press Cancel to leave the photo info screen.
3-15
3-16
Chapter 4: Working with
Your Memory Card
Universal TV Photo Show works with six different types of memory cards. This
chapter explains the basics of changing and removing your card, as well as
more advanced topics such as formatting a memory card and reclaiming
space on it so that you can take more photos.
4-1
Changing/Removing your card
This option allows you to insert and work with a different memory card. You
should also choose this option whenever you are leaving the unit and need to
remove your memory card.
Note: If you unexpectedly pull out the memory card, you risk damaging the
card and losing some of your photos.
To change your card:
1. Press the Change Card button.
2. A message appears, telling you that it is safe to remove your memory card
and replace it with a new one.
3. When you do so, Universal TV Photo Show starts up again, displaying the
photos on that card.
4-2
Formatting your memory card
Usually memory cards are already formatted when you buy them. But if you do
need to format one, you can do so with this option (except for Memory Stick,
see page 4-5).
You can also reuse a memory card that is full by formatting it. This erases all
photos from the card.
Note: This process will permanently delete all of the photos or files that are on
the card, including read-only ones. Make sure that you are formatting
the right card! If you’re not sure, check the contents of the card before
you begin.
To format your card:
1. Insert the card that you want to format into the appropriate card slot (see
chapter 1 for details).
4-3
2. Press the Option button.
3. The following menu appears. Position the arrow beside the Setup option
and press OK.
4. Select the Format Card option and
press OK.
5. You have another chance to make
sure that you really want to format
this card. A screen appears, asking
you to confirm that you want to
format the card. To format the
card, press OK.
6. When the formatting is complete,
the thumbnails screen appears with a message that there are no photos on
the card.
You can then press Change Card to take the card out of the unit and use it
in your camera.
4-4
Formatting a Memory Stick card
It is not recommended to format a Memory Stick memory card using the
Universal TV Photo Show or a computer. Formatting on either device can
cause damage to the card. Please go to the following web site for more
details:
http://ciscweb.sel.sony.com
When you are at the site:
§
Select “Type a Question”
§
Then select “Memory Stick Devices & Media”
§
Enter the word ‘format’ in the “Type a question or problem description in
the text box” section
§
Select “Find Solution”
More detail will be provided about how to format your Memory Stick media.
4-5
Reclaiming memory card space
When you run a slide show that has many large photos in it, Universal TV Photo
Show creates some duplicate images to help the system run faster when you
display those images again. This uses up a small amount of space on your
card.
If your card is very full with photos and you need to take more, you may want
to reclaim some of that space. However, the tradeoff is that doing so will cause
the unit to run slightly more slowly until it again creates those images.
To reclaim memory space:
1. Press the Option button.
2. Select the Setup option from
the menu and press OK.
3. The setup menu then
appears. Select the Reclaim
Card Memory option and
press OK.
4-6
Note:
If there is no space available to reclaim, the option will appear in
gray and you will not be able to choose it.
4. A screen appears telling you how much space you would free up and
asking you to confirm that you want to reclaim the memory. Position the
arrow beside your selection and press OK.
5. You then return to the Setup menu. Select the Close Menu option and press
OK to return to your photos.
4-7
4-8
Chapter 5: Using Universal TV Photo Show with
Your Computer
You can also connect Universal TV Photo Show to your computer. When you
do so, it becomes a removable drive that works like any other, so that you can
store images, send them via e-mail, print them or format your memory card.
Universal TV Photo Show works on a PC computer running Windows (98SE, ME,
2000 or XP) or on a Macintosh computer running Mac OS 8.6, 9.x or X.
Note:
You must purchase a USB cable in order to connect the unit to your
computer. This USB cable must have a USB Type A connector on one
end and a USB Type B connector on the other.
5-1
Setting up Universal TV Photo Show
Connecting the unit to your computer is even simpler than it was to connect it
to your television. Refer to Chapter 1 for detailed illustrations of the connections
to the unit.
1. If you are running Windows 98SE, you must install a separate driver. This is
available as a free download on the www.dazzle.com web site. You will
also find instructions there for installing the driver. If you are running the 2000,
ME or XP operating system, it will work automatically without a driver.
2. Connect the power supply to the unit’s DC IN socket and then plug the AC
adapter into an electric outlet.
3. Insert your memory card into the unit.
4. On the side of the unit, slide the POWER switch to ON. Check that the
green light on the front comes on, ensuring that it is receiving power.
5. Plug one end of the USB cable (USB Type A connector) into an available USB
port on your computer, then plug the other end (USB Type B connector) into
the USB port on the back of the unit. Your computer can be running while
you do this.
5-2
Using Universal TV Photo Show
Now that it is connected to your computer, you can access your digital photos
on the memory card just as you would access files on a floppy disk or CD-ROM.
Universal TV Photo Show appears as a removable device on your system. You
can drag and drop files or even format your memory card.
To access your files:
1. On a PC:
• Go to the icon “My Computer” on your desktop and double-click on it.
• After a few seconds, you will see a “Removable Disk” icon appear with
a newly assigned drive letter.
On a Macintosh, the icon will appear automatically on your desktop.
2. Double-click on the icon to open the driv e.
3. The content of your media card is listed on the screen. Now you can use
your computer to manipulate, alter, organize and/or rename images that
will be stored on the card for eventual viewing on TV.
5-3
Note:
While Universal TV Photo Show allows you to manipulate your photos
by rotating, zooming and panning, these changes are not done to
the original files and will not show up on your computer.
Red-eye corrections that you made, however, are accessible. You
will see that some files have duplicates with an –RE added to the file
name (for example, files DSCF0001 and DSCF0001-RE). The RE files
contain the red-eye correction for the original photo. You can work
with both versions.
5-4
Formatting a Memory Stick card
It is not recommended to format a Memory Stick memory card while
connected to a computer. This can cause damage to the card. Please go to
the following web site for more details:
http://ciscweb.sel.sony.com
When you are at the site:
§
Select “Type a Question”
§
§
Then select “Memory Stick Devices & Media”
Enter the word ‘format’ in the “Type a question or problem description in
the text box” section
§
Select “Find Solution”
More detail will be provided about how to format your Memory Stick media.
5-5
Removing a memory card
It’s important to make sure that the computer is not busy before you eject your
memory card. If the computer is in the middle of writing information, for
example, you risk damaging the card and losing the photos on it.
Before removing your card:
1. Do not remove the card while your computer is asleep. First wake up your
computer and then remove the card.
2. Close any memory card files that you have open.
3.
5-6
If you are using Windows 98SE, ME, 2000 or XP, right click on the removable
drive and select Eject. If you are using a Macintosh, eject or unmount your
memory card by dragging the card’s disk icon into the trash.
Disconnecting Universal TV Photo Show
When you are done working with Universal TV Photo Show on your computer,
you can disconnect the unit. Make sure that you take out the memory card
before transporting the unit anywhere.
To disconnect Universal TV Photo Show:
1. Close all of the files on the card.
2. Check that the light on the front of the unit is not blinking. It blinks when it is
accessing files.
3. If you are using Windows 98SE, ME, 2000 or XP, right click on the removable
drive and select Eject. If you are using a Macintosh, eject or unmount your
memory card by dragging the card’s disk icon into the trash.
4. Unplug the USB connector cable.
5. Slide the switch on the side of the unit to OFF.
6. Remove your memory card from the unit.
5-7
Chapter 6: Troubleshooting
My photos didn’t appear after I connected everything.
• Check that the green light is lit on the front of the unit. If it is not, check that
the power is connected correctly and the power switch on the side of the
unit is turned to ON.
• Make sure that your TV is set to the correct video input. To do this, turn on
both your TV and Universal TV Photo Show, and then press the button on your
TV or TV remote control that changes the video input source. This button
could be called TV/Video, Input, Source or TV/AV.
If your TV doesn’t have these buttons, it may have a channel called LINE
(frequently found before Channel 2). Click through your TV’s channels until
you find it.
• You may have inserted the memory card incorrectly. See page 1-10 for
specific instructions for your card.
6-1
The video cable plug doesn’t fit into any of my TV’s sockets./
My TV doesn’t have an RCA Video In jack.
• Some older TVs do not have RCA Video In connectors. Instead, you’ll need to
connect with an RF modulator (not included). You can purchase an RF
modulator and cable from your local electronics store.
The remote doesn’t seem to be working.
• The remote control requires two AA batteries. Check that the batteries were
inserted in the right direction and that they are fresh.
• Make sure you are pointing the remote directly at the front of the unit, not at
the TV, and that there is nothing blocking the path.
• Move a little closer to the unit. You need to be within 16 feet (5 meters) or so.
6-2
The unit is saying that my card is “unreadable.”
• There may be a problem with your memory card, perhaps caused by
physical damage or heat. In this case, move your photos to another device
and then reformat the card using your camera or PC and try it again in the
unit. (Note that reformatting the card will erase all of the photos and files on
it, so be sure to save your photos first.)
• You may have inserted the memory card incorrectly. See page 1-10 for
specific instructions for your card.
Some of my photos didn’t show up.
• Universal TV Photo Show reads JPEG files – the most common file format used
for digital cameras. Your photos may be in a format that the unit cannot
display, such as grayscale JPEGs, CMYK, BMP, GIF, EPS, TIFF or other nontypical settings. If this is the case, you might be able to convert them to a
compatible JPEG file format on a computer.
• Make sure there are photos on your memory card – that you did not insert an
empty one.
6-3
Photos are loading very slowly.
• Your photos may be of a higher resolution than necessary. Since the photos will
be shown on TV, Universal TV Photo Show only requires VGA -level resolution of
640 x 480. Try setting your digital camera to a lower resolution mode when
snapping photos to use with the unit.
The slide show feature doesn’t work.
• In the lower right part of the TV, there might be a symbol that looks like “II”,
which indicates that the slideshow is paused. Press the
automatic slide show is started.
button so that the
I know I have more than 12 photos on my card but I can’t find them.
• If you have more than 12 photos on a card, the first screen of the thumbnail
view will only show 12 photos. Be sure to use the arrow buttons to view all your
photos on subsequent screens.
6-4
I’ve mistakenly deleted a photo from my memory card.
• If you delete a photo from the memory card (you get two chances to keep it)
then it is gone permanently.
Thumbnail and photo rotations are not being saved
• Please check to see if your media card is “Write-Protected.” If it is, then any
settings will not be saved. Some photos may appear rotated while the unit is
on, but after a power cycle (turn unit off and then on again) the photos will not
appear rotated.
The Windows 98 driver won’t install.
• We support the Windows 98 second edition only, not the first edition. (The driver
will not install on the Windows 95 version since you can’t run the unit on that
system, or the 2000, ME or XP operating systems, since they don’t require the
driver.)
6-5
The removable drive feature isn’t working.
• Universal TV Photo Show operates as a removable drive on PCs running
Windows 98SE, ME, 2000 or XP and on Macs running Mac OS 8.6, 9.X or X. Make
sure you are using one of these operating systems. Note: if you are using
Windows 98SE you must install a separate driver that is available at
www.dazzle.com.
I deleted the “imageinfo.db” file, what does this mean?
• This file saves the rotation, zoom and pan setting of your photos as you use
Universal TV Photo Show. If deleted, the photos that you “edited” will no longer
have this information saved for future use. However, any further rotation, zoom
or pan of a photo will recreate this file and save the settings.
6-6
Chapter 7: Dazzle Technical Support
Introduction
The Universal TV Photo Show is easy to use and normally should not produce
complications. However, if you need assistance or have questions of any kind,
our trained staff members are ready to help.
We highly recommend that you use the Dazzle Interactive Knowledgebase at
www.Dazzle.com, as this is the fastest method of accessing support resources
for your Dazzle product. Begin by clicking the Support link, then select
Interactive Support from the provided menu. E-mail support is also available via
our Interactive Knowledgebase.
Dazzle’s Technical Resource Center can be reached 24 hours a day, 7 days a
week.
7-1
If you are calling Dazzle Technical Support for the first time, or if you are within
your 30-day free technical support window (includes the date of your first
support call and the 29 days following), contact Dazzle in the US at +(203) 3154230.
If you have extended beyond
your free 30-day technical
support window, contact
Dazzle at (800) 570-9548
(charges apply). We highly
recommend having your
product nearby when calling
to facilitate troubleshooting.
In the UK, please contact
local support at (0) 9062 160
180 (charges apply). A Dazzle
representative will be able to assist you.
7-2
User's Guide
An
Microsystems Brand
www.Dazzle.com