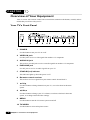
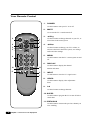
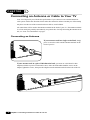
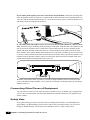
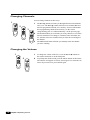
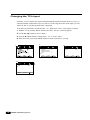
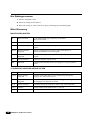
1
INSTRUCTION MANUAL
Color Television
DTQ 20U6SC
S A F E T Y
IMPORTANT SAFEGUARDS
PLEASE READ ALL THESE INSTRUCTIONS REGARDING YOUR TELEVISION EQUIPMENT AND
RETAIN FOR FUTURE REFERENCE. FOLLOW ALL WARNINGS AND INSTRUCTIONS MARKED
ON THE TV RECEIVER.
1
2
Read all of these instructions.
Save these instructions for later use.
3
Unplug this television equipment from the wall
outlet before cleaning. Do not use liquid cleaners or aerosol cleaners. Use a damp cloth for
cleaning.
4
Do not use attachments not recommended by
the television equipment manufacturer as they
may result in the risk of fire, electric shock or
other personal injury.
5
Do not use this television equipment near
water, for example, near a bathtub, washbowl,
kitchen sink, or laundry tub, in a wet basement,
or near a swimming pool, or the like.
6
Do not place this television equipment on an
unstable cart, stand, or table. The television
equipment may fall, causing serious injury to a
child or adult, and serious damage to the equipment. Use only with a cart or stand recommended by the manufacturer, or sold with the
television equipment. Wall or shelf mounting
should follow the manufacturer's instructions,
and should use a mounting kit approved by the
manufacturer.
6A An appliance and cart combination should be
moved with care. Quick stops, excessive force,
and uneven surfaces may cause the appliance
and cart combination to overturn.
7
Slots and openings in the cabinet and the back
or bottom are provided for ventilation and to
ensure reliable operation of the television
equipment; and to protect it from overheating,
these openings, must not be blocked or covered.
The openings should never be blocked by placing the television equipment on a bed, sofa, rug,
or other similar surface. (This equipment should
never be placed near or over a radiator or heat
register.) This television equipment should not
be placed in a built-in installation, such as a
bookcase, unless proper ventilation is provided.
8
This television equipment should be operated
only from the type of power source indicated on
the marking label. If you are not sure of the
type of power supplied to your home, consult
your television dealer or local power company.
9
This television equipment is equipped with a
polarized alternating current line plug (a plug
having one blade wider than the other). This
plug will fit into the power outlet only one way.
This is a safety feature. If you are unable to
insert the plug fully into the outlet, try reversing
the plug. If the plug should still fail to fit, contact your electrician to replace your obsolete
outlet. Do not defeat the safety purpose of the
polarized plug.
10 Do not allow anything to rest on the power
cord. Do not locate this television equipment
where the cord will be abused by persons walking on it.
11 Follow all warnings and instructions marked on
the television equipment.
12 For added protection for this television equipment during a lightning storm, or when it is left
unattended and unused for long periods of time,
unplug it from the wall outlet and disconnect
the antenna or cable system. This will prevent
damage to the equipment due to lightning and
power-line surges.
Important Safeguards
Daewoo Electronics
Corporation of America
120 Chubb Avenue,
Lyndhurst, NJ 07071
1-800-DAEWOO8 (1-800-323-9668)
Fax:201-935-5284
Dear Customer :
Daewoo Electronics Corporation of America would like to thank you for choosing this color television
receiver. It incorporates a host of features designed to give you excellent performance for many years to
come.
We realize that you’re eager to turn it on and begin enjoying the high-quality pictures it delivers just as
quickly as possible, but we ask you to take a few minutes to read the instructions in the booklet to familiarize
yourself with the receiver, its functions and some features which may be new to you. If you follow the
instructions, this unit should give you many years of viewing pleasure.
If for any reason it does not, we want to hear about it. Please write to us at the address above. Daewoo
always welcomes comments and suggestions on this or any of our other products.
On the other hand, when you discover the enjoyment, reliability and ease of use that is built into it, we
hope that you will tell your friends, and consider Daewoo when you make your next purchase of home
entertainment equipment.
In addition to TV receivers, Daewoo produces a full line of audiovisual products built to the same high
design, engineering, and manufacturing standards as this unit.
Here are a few tips that will keep your TV receiver looking great and performing for years to come.
. Avoid putting it in excessively hot locations. Damage to the cabinet or premature component failures
can result.
. There are ventilation holes in the bottom and rear of the cabinet. Make sure that they remain unobstructed. Do not place the receiver on top of a thick cloth.
. If you don’t plan to use the receiver for several days, it’s a good idea to unplug it from the power outlet.
. Many common household cleaning agents, sprays, solvents, and polishes will cause permanent damage to
the surface of the cabinet. The best cleaning agents are mild soap and a damp cloth.
Again, thank you for choosing this Daewoo product. We have employed advanced engineering techniques
in its design, and manufactured it in one of the world’s most up-to-date production facilities. The result is
a TV receiver that we know you will be as proud to own as we were to create.
Very truly yours,
DAEWOO ELECTRONICS
CORPORATION OF AMERICA
CHAPTER
1
Overview of Your Equipment
Your TV comes with a remote control. The section below summarizes the buttons, controls, and terminals that you will use with your TV.
Your TV's Front Panel
1
POWER
Use this button to turn your TV on or off.
2
VIDEO IN jack
Use this jack to receive a video signal from another A/V component.
3
AUDIO IN jack
4
EARPHONE jack
This receiver uses this jack to receive an audio signal from another A/V component.
Use this jack to receive an audio signal from your TV.
5
STAND-BY(red) indicator
This indicator lights up when the power is off.
6
Remote control receiver
This receiver receives a signal from your remote control. Do not block it.
7
WCHV
Use these buttons to change channels on your TV, or to select items in the menu
system.
8
CVOLB
Use these buttons to change your TV's volume, to activate selections in the menu
system, or to change audio and video settings.
9
MENU
Use this button to turn the TV's menu system on and off.
10 TV/VIDEO
Use this button to select main picture source.
2
Chapter 1 : Overview of Your Equipment
Your Remote Control
1.
POWER
Use this button to turn your TV on or off.
2.
MUTE
Use to turn the TV’s sound on and off.
3.
2
Use these buttons to change channels on your TV, or
select items in the menu system.
1
3
4.
4
WCHV
4
CVOLB
Use these buttons to change your TV's volume, to
activate selections in the menu system, or to change
audio and video settings.
5
3
5.
9
MENU
Use this button to turn the TV’s menu system on and
off.
6.
DISPLAY
Use this button to display the channel
10
11
6
8
number and status.
7.
INPUT
Use this button to select the TV’s signal source.
7
8.
VIDEO
Use this button to display video adjustment
items.
9.
0-9
Use these buttons to change channels.
10. SLEEP
Use this button to program the TV to turn off after a
certain time.
11. PREVIOUS
Use this button to return to the previous channel you
were watching.
4
Chapter 1 : Overview of Your Equipment
CHAPTER
2
Connecting an Antenna or Cable to Your TV
Your TV will provide you with the best performance if you connect it to an external antenna or
cable system. Follow the directions below make this connection. Please note that you will normally
only have to make one of the connections shown below, not all of them.
All connections will be made to the antenna terminal on the back of your TV. The antenna terminal
is a silver metal post partially surrounded by two plastic tabs. For help in locating the antenna terminal, see “Your TV’s Back Panel” on page 3.
Connecting an Antenna
If your antenna ends in a single coaxial lead, simply
press or screw the cable onto the antenna terminal on the
back of your TV.
If your antenna ends in a pair of 300 ohm twin leads, you must use a 300-ohm/75-ohm
adapter(available at your local electronics store). Place the leads underneath the screws on the
adapter, tighten the screws, then press the adapter onto the antenna terminal on the back of the TV.
6
Chapter 2 : Connecting an Antenna or Cable to Your TV
If your cable system requires you to use a converter box for all channels, connect the incoming cable
to the IN terminal on the converter box. Connect another cable between the OUT terminal on the converter box and the antenna terminal on the TV. You will need to keep your TV tuned to channel 3 or 4
and change channels using the converter box.
If your cable system only requires you to use a converter box for some channels (i. e. pay-TV channels), follow these steps: Find the primary incoming coaxial cable. Plug this cable into a splitter (available at your local electronics store). Connect one coaxial cable between one OUT terminal on the
splitter and the IN terminal on the converter box. Connect another coaxial cable between the other
OUT terminal on the splitter and the B-IN terminal on an A/B switch (available at your local electronics store.) Connect a third coaxial cable between the OUT terminal on the converter box and the A-IN
terminal on the A/B switch. Finally, connect a coaxial cable between the OUT terminal on the A/B
switch and the antenna terminal on the back of your TV.
When the A/B switch is in the A position, you need to change channels on the converter box (and
your TV should be tuned to channel 3 or 4); when the A/B switch is in the B position you can change
channels on the TV.
Connecting Other Pieces of Equipment
You may want to connect a VCR, laser disc player, satellite receiver, or another type of equipment to
your TV. We recommend that you follow the instructions included with the piece of equipment you
wish to connect.
Safety Note
If you plan on being away from your home for an extended period of time, or if a thunderstorm is
approaching, you should unplug your television, and you may wish to disconnect your TV from a
rooftop or satellite antenna. You do not need to disconnect your TV from a cable system.
8
Chapter 2 : Connecting an Antenna or Cable to Your TV
Changing Channels
You can change channels in three ways:
1
1
The WCHV buttons will take you through all memorized channels,
one by one. The WCHV buttons will not access channels that have
not been programmed into the TV's memory. For more information
about programming channels into memory, see the section
“Programming your TV's Channel Memory” on the previous page.
2
The number buttons (0-9) will take you to any channel, even if it has
not been memorized. To change to a channel, enter its number; the
TV will tune to the new channel when you enter the second digit of
the channel.
3
The PREVIOUS button will take you instantly to the last channel
you were watching.
2
3
Changing the Volume
1
2
10
Chapter 3: Operating Your TV
1
To change the volume of the TV set, use the CVOLB buttons on
the remote conteroller or on the front panel.
2
To quickly turn off the sound, press the MUTE button on the remote.
The ‘MUTE’ will appear on screen, colored green. To return the volume to its previous level, press MUTE again.
Changing the TV's Input
Normally, your TV displays the signal coming through the antenna terminal. However, If you’ve
connected another component to your TV(such as a VCR) using the Video/Audio input, you will
want to be able to view the signal from the component.
To do this, you will need to switch from the ‘ TV ’ input to the ‘Line1, Line2’ Input, as follows.
1 With the TV on, press the MENU button twice, then “ Set-Up ” menu will appear.
2 Use the WCHV buttons to select “ Input ”.
3 Press the CVOLB buttons to change from ‘ TV ’ to ‘Line1, Line2’.
4 Wait 10 seconds, or press the MENU button to return to normal TV viewing.
2
3-1
Set-Up
Set-Up
Language :
English
Reception :
Air
Memorize Channels
Add/Delete Channels
Input :
TV
Select
3-2
Set-Up
Language :
Input :
Select
12
English
Line2
Adjust
Next
Chapter 3: Operating Your TV
Adjust
Next
Language :
Input :
Select
English
Line1
Adjust
Next
Returning to the factory settings
If you would like to return to the original video settings, as they were calibrated at the factory, follow these steps :
1 With the TV on, press the MENU button. then “Video” menu will appear.
2 Press the CVOLB buttons to set the “Settings” to ‘Preset’.
The TV will remember the ‘Custom’ settings you had previously chosen. When you set “Settings”
to ‘Custom’ again, your previous custom settings will be restored.
2
1
Video
Video
Settings :
Contrast
Brightness
Sharpness
Color
Tint
Select
Custom
Adjust
Next
Settings :
Contrast
Brightness
Sharpness
Color
Tint
Select
Preset
Adjust
Next
Descriptions of video settings
The contrast setting controls the relation between the light and black areas of the screen. If the light
areas are too bright and are losing details, press the CVOL button; if the picture is gray and lacks
contrast, press the VOLB button.
The brightness settings controls the overall amount of light in the picture. If the picture is too bright,
press the CVOL button; if the picture is too dark, press the VOLB button.
Sharpness controls how the TV displays edges of objects on-screen. If the TV shows multiple vertical lines at the edges of an object, press the CVOL button; if the vertical edges of on-screen objects
are fuzzy, press the VOLB button.
The color setting controls the intensity of color. If the color is over-saturated, press the CVOL button; if the color is washed out, press the VOLB button.
The tint setting controls the relationship of red and green in a picture. Tint is especially noticeable in
flesh tones. If flesh tones seem too red or purple, press the VOLB button; if flesh tones are too
green, press the CVOL button.
14
Chapter 3: Operating Your TV
Setting the Off Time
If you enter a time in the “Off Time” setting, your TV will automatically turn off at that time.
Follow these instructions to set the “Off Time”.
1 With the TV turned on, press the MENU button until “Time” menu will be displayed.
2 Use the WCHV buttons to select “Off time” item.
3 If you hold down either CVOL or VOL B button, the corresponding numbers will change more
quickly.
4 When the setting is correct, use the WCHV buttons to select another “Time” function, or press
the MENU button to return to normal TV viewing.
1
3
2
Time
Set Clock :
Wake-Up Time :
Off Time :
Sleep Timer :
Select
Time
Time
12 : 00 AM
06 : 30 AM
:
0 min
Adjust
Next
Set Clock :
Wake-Up Time :
Off Time :
Sleep Timer :
Select
12 : 00 AM
06 : 30 AM
:
0 min
Adjust
Next
Set Clock :
Wake-Up Time :
Off Time :
Sleep Timer :
Select
12 : 00 AM
06 : 30 AM
11 : 30 PM
0 min
Adjust
Next
Canceling the Wake-up Time or Off Time
If you would like to cancel the Wake-up Time or the Off Time, Press the CVOLB buttons until the
time settings return to “- -:- -”.
The Wake-up Time and Off Time will not function correctly unless the clock has been set.
16
Chapter 4: Using Timer Functions
CHAPTER
5
Using the Special Features
This section contains descriptions of the more advanced features of your TV.
Changing the Language of the On-screen Menus
You can choose to display the on-screen menus in English, Spanish, French.
To change the on-screen language:
1 With the TV on, press the MENU button twice, then “Set-Up” menu will appear.
2 The “Language” item will be selected. Press the CVOLB buttons to select the language you
want to use: English, Español, Français.
3 To return normal TV viewing, press the MENU button to return to normal TV viewing.
Captioning
Many TV shows contains “Closed Caption”. These captions are hidden words that can be displayed
on your TV screen. There are two types of these words : “captions” usually follow the action
on-screen, providing a written version of the dialogue, narration, and sound effects ; “text” is not
usually related to the action on-screen, often providing information such as news or weather. A TV
program might be providing more than one set of captions or one set of text.
To set your TV to display captions or text.
1 With the TV turned on, press the MENU button until “Special” menu will be displayed.
2 The “Closed Caption” item be selected. To turn captioning on, use the CVOLB buttons to select
Captions (C1 or C2) or Text (T1 or T2).
At the time these instructions were written, only C1 is normally available, but feel free to try the
other selections.
3 Wait 10 seconds, or press the MENU button to return to normal TV viewing.
Your setting will remain intact until you change it.
1
2-1
Special
Special
Closed Caption :
CC on Mute :
Power Restore :
Parental Control
Ch Labels :
Select
18
Adjust
Off
Off
Off
To Press
Next
Chapter 5 : Additional Features
2-2
Special
Closed Caption :
CC on Mute :
Power Restore :
Parental Control
Ch Labels :
Select
Adjust
C1
Off
Off
To Press
Next
Closed Caption :
CC on Mute :
Power Restore :
Parental Control
Ch Labels :
Select
Adjust
T1
Off
Off
To Press
Next
Parental Control Settings
This item helps parents to set the standard for the programs which their children is going to watch.
1 With the TV on, press the MENU button until “Special” menu will appear.
2 Use the WCHV buttons to select “Parental Control” item.
3 Use the CVOLB buttons to enter into “Parental Control” settings.
4 Use the number buttons(0-9) to enter your password, then “Parental Control” menu will be displayed. If this is the first time you are using your “Parental Control” menu, after entering your
password you have to remember it.
5 The Parental Lock feature will be selected. Use the CVOLB buttons to toggle “On” or “Off”.
6 Use the WCHV buttons to select the Parental Control settings you wish to adjust.
Descriptions of the Parental Control settings are on the next page.
7 Use the WCHV buttons to adjust the Parental Control settings.
8 Use the MENU button to return to the one level up menu.
1-1
Special
Closed Caption :
CC on Mute :
Power Restore :
Parental Control
Ch Labels:
Select
Adjust
Off
Off
Off
Next
Parental Control
Parental Lock :
On
TV Guidelines
Movie Ratings
No Rating :
Unblock
Ext. Source:
Unblock
Change Password
20
Adjust
Repeat the Password
----
####
To Press
1-2
Select
Enter a new Password
Prev.
Chapter 5 : Additional Features
0-9 : Adjust
Prev.
0-9 : Adjust
Prev.
No Ratings means
1 When V-chip data is error.
2 When any ratings are not deleted.
3 Received a rating of “None” like news, sports, and emergency broadcast signals.
Mini Glossary
MOVIE RATING SYSTEM
X
Hard Core Films
Not for children under age 17 under any circumstance.
Strong sexual content.
NC-17
Restrictd viewing
Same as X rating.
R
Restrictd viewing
Not for children under age 17. Strong element of sex and/or
violence.
PG-13
Parental Guidance
Suggested
Program is inappropriate for preteens, with a greater degree of
offensive material than a PG rated program.
PG
Parental Guidance
Suggested
Content is such that parents may not want their children to view the
program.
G
General Audience
Content not offensive to most viewers.
NR
Not Rated
A motion picture that chid not receive a rating for a varicty of possible
reasons.
TV PARENTAL GUIDELINE RATING SYSTEM
TV-MA Mature Audience Only Adults only, may contain Strong Dialog. Bad Language. Sex.
TV-14
Parents Strongly
Cautioned
TV-PG Parental Guidance
Suggested
TV-G
TV-Y
Unsuitable for younger childern, may contain Suggestive Dialog.
Bad Language. Sex. and Violence Scenes.
General Audience
Considered suitable for all audiance; children may watch unattended.
Children
Consider suitable for all children under 7 years old.
TV-Y7 Children 7 and over
22
Unsuitable for childern under 14. may contain Strong Dialog. Bad
Language. Sex. and Violence Scenes.
Chapter 5 : Additional Features
Consider suitable for children over 7. may contain Fantasy Violence Scenes.
NOTE
Each time you press the WCHV buttons, the displayed character will change in the following
order.
CHV
A
B
C
D
...
Z
0
1
...
9
WCH
9
8
...
0
Z
Y
...
B
A
-
Cearing Channel Labels
1. Select the channel which has the label you want to clear.
2. 3.4. Follow step 1~3 on the “Ch Labels” to call up the Ch Labels mode display.
5. Enter “-” in first character spaces.
24
Chapter 5 : Additional Features
-
Using Direct button on the remote control
1 You can also change the Audio Mode setting with the remote control. Press the MTS button on
the remote control to select Audio Mode.
2 Use this button to select the Stereo, Mono or SAP.
Present Broadcast
MONO
MONO
STEREO
STEREO and SAP
STEREO and SAP
Your Selection
Stereo
SAP
SAP
Stereo
SAP
Speaker Out
Mono
Mono
Mono
Stereo
SAP
Note
If a broadcast signal is weak, it may cause noise and hum in stereo sound. Please select the Mono
mode, the noise and hum should be reduced.
Adjusting the Bass
1 With the TV turned on, press the MENU button until “Audio” menu will be displayed.
2 Use the WCHV buttons select “Bass” item.
3 Press the CVOL button to decrease the bass volume.
4 Press the VOLB button to increase the bass volume.
5 Press the MENU button twice or wait few seconds to return to normal TV viewing.
6 Your setting will remain intact until you change it. Your TV will then automatically reproduce
either stereo or monaural sound, whichever is broadcast.
1
2
Audio
Audio
Audio Mode:
Bass
Treble
Balance
Select
Mono
Adjust
Audio Mode:
Bass
Treble
Balance
Exit
3
Adjust
Exit
4
Audio
Audio
Audio Mode:
Bass
Treble
Balance
Select
26
Select
Mono
Mono
Adjust
Audio Mode:
Bass
Treble
Balance
Exit
Chapter 6 : Adjusting the Sound
Select
Mono
Adjust
Exit
CHAPTER
7
Troubleshooting
Your Daewoo television is designed to give you trouble-free performance for many years. If you
have a problem with your TV, try the solutions listed below.
If the suggestions listed below do not solve your problem, contact your Daewoo dealer or an authorized Daewoo service center.
There is no picture or sound, or the TV dosen't turn on.
• Make sure the TV is plugged in.
• Make sure the MUTE is not set.
• Make sure the power is on.
• If there is neither picture or sound, unplug the TV for 30 seconds, then plug it in and try again.
There is no picture or sound on some UHF channels.
• Try another station. If the other stations are OK, it may be a station problem.
• Check that the antenna is connected, is in good working order, has no broken wires, and is adjusted correctly.
• See if anything is interfering with the antenna signal.
• Make sure the AIR/CABLE setting is correct.
The sound is OK, but the picture is poor.
• Try another station. If the other stations are OK, it may be a station problem.
• Check that the antenna is connected and is in good working order, has no broken wires, and is
adjusted correctly.
The picture is OK, but the sound is poor.
• Try another station. If the other stations are OK, it may be a station problem.
• Check that the antenna is connected, is in good working order, has no broken wires, and adjusted
correctly.
There is poor reception on some channels.
• Try another station. If the other stations are OK, it may be a station problem.
• Check that the antenna is connected, is in good working order, has no broken wires, and is adjusted correctly.
You cannot tune to a cable channel.
• Make sure the AIR/CABLE setting is correct.
• The channel may not be programmed into memory.
The picture rolls, slants, shows lines, is grainy, has poor color, or has
ghosts.
• Try another station. If the other station are OK, it may be a station problem.
• Check that the antenna is connected, is in good working order, has no broken wires, and is adjusted correctly.
• See of anything is interfering with the antenna signal.
The remote control does not work.
• Make sure the TV is plugged in.
• Make sure there are fresh batteries in the remote control.
• Make sure there is nothing blocking the remote control signal.
28
Chapter 7 : Troubleshooting
This instrument is listed by Underwriter’s
Laboratories, Inc. It is designed and
manufactured to meet rigid U.L. safety
standards against X-radiation, fire, casualty
and electrical hazards.
Daewoo Electronics Corporation of America
120 Chubb Avenue
Lyndhurst, NJ 07071
For more information about this or other Daewoo products, please call 1-800-DAEWOO8.
P/N:48586220E10F-R0