1
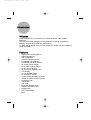
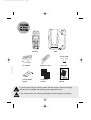
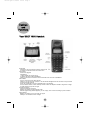
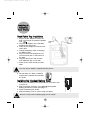
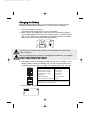
Dectom.qxd 2/09/99 15:58 Page 1 Dectom.qxd 2/09/99 15:58 Page 2 Precautions Before you read anything else, please observe the following: ▼ Rechargeable Nickel Metal Hydride Battery Warning 1) This equipment contains a Rechargeable Nickel Metal Hydride Battery. 2) The Rechargeable Nickel Metal Hydride Battery contained in this equipment may explode if disposed of in a fire. 3) Do not short-circuit the battery. 4) Do not charge the Rechargeable Nickel Metal Hydride Battery used in this equipment in any charger other than the one designed to charge this battery as specified in this guide. 5) Using another charger may damage the battery or cause the battery to explode. The exclamation point within an equilateral triangle is intended to alert the user to the presence of important operating and maintenance (servicing) instructions in the literature accompanying the appliance. Rechargeable Nickel Metal Hydride Batteries must be disposed of properly ▼ Note for use of this device in New Zealand 1) The grant of a Telepermit for any item of terminal equipment indicates only that Telecom has accepted that the item complies with minimum conditions for connection to its network. It indicates no endorsement of the product by Telecom, nor does it provide any sort of warranty. Above all, it provides no assurance that any item will work correctly in all respects with another item of Telepermitted equipment of a different make or model, nor does it imply that any product is compatible with all of Telecoms network services. 2) Immediately disconnect this equipment should it become physically damaged, and arrange for its disposal or repair. 3) This equipment shall not be used in any manner which could constitute a nuisance to other Telecom customers. 4) This device shall be powered by the AS/NZS 3108 compliant plug pack supplied with this phone. This unit is not waterproof. To reduce the risk of fire, electrical shock or damage to the unit, DO NOT expose this unit to rain or moisture. 2 Dectom.qxd 2/09/99 15:58 Page 3 Contents Introduction Welcome .......................................................................................................................5 Features ........................................................................................................................5 Important Safety Instructions Included in your package Controls and Functions Installing and adjusting your phone Desk/Table Top Installation .........................................................................................11 Installing the Handset Battery Pack............................................................................11 Charging the Battery ...................................................................................................12 Cleaning the Battery Contacts ....................................................................................13 Adjusting the Ringer Volume On Handset..................................................................13 Adjusting the Ringer Volume on Base Station ...........................................................13 Adjusting the Handset ring Pattern.............................................................................14 Adjustiing the Base Ring Pattern................................................................................14 Adjusting Base Station Ring Modes ...........................................................................15 Adjusting the Key Beep ..............................................................................................16 Adjusting the Information Displayed During a Call.....................................................16 Adjusting the Receiver Volume...................................................................................16 Using your new phone Making external Calls..................................................................................................17 Receiving Incoming Calls ...........................................................................................17 To Hang Up .................................................................................................................18 Making a Internal Call to Another Handset ................................................................18 Multi-Handset Calling..................................................................................................18 Transferring an External Call to Another Handset .....................................................19 Conference Call ..........................................................................................................19 Call Waiting .................................................................................................................19 Redial ..........................................................................................................................20 Last 10 Number Redial of External Numbers.............................................................20 Last 10 Number Redial of Internal Numbers..............................................................20 Phonebook ..................................................................................................................21 Dialing a Number From the Phonebook .....................................................................21 Mute ............................................................................................................................21 Switching the Handset On/Off ....................................................................................22 3 Dectom.qxd 2/09/99 15:58 Page 4 Keypad Lock ...............................................................................................................23 Dial Out .......................................................................................................................23 Call Barring .................................................................................................................24 Baby Call.....................................................................................................................25 Additional Handset Features Default settings ...........................................................................................................27 Your Handset PIN Number .........................................................................................27 To change your PIN number.......................................................................................28 To Turn PIN On/Off .....................................................................................................29 Registering a Handset to a base ................................................................................29 Deregistering a Handset .............................................................................................30 Selecting a Base Station.............................................................................................30 Automatically Choosing a Base Station .....................................................................31 Resetting a Handset ...................................................................................................31 Additional Base Station Features Changing the Base Station PIN Number....................................................................33 Deregistering a Handset from the Base Station.........................................................33 Resetting the Base Station .........................................................................................34 Using with other Manufacturers Equipment To register a DECT 1900 Handset to a base from another Manufacturer.................35 To Register another Manufacturers Handset to your DECT 1900 Base ...................35 Advanced User Features Access Codes .............................................................................................................36 Main ............................................................................................................................37 Dial Pause...................................................................................................................37 Satellite........................................................................................................................37 Line Setting .................................................................................................................37 Line Mode ...................................................................................................................38 Breaktime (Hook Flash Timing) ..................................................................................38 Special Features .........................................................................................................38 Continuous DTMF.......................................................................................................38 Discontinuous DTMF ..................................................................................................39 DTMF Mode ................................................................................................................39 Show IPEI ...................................................................................................................39 Trouble Shooting Specifications Warranty 4 Dectom.qxd 2/09/99 15:58 Page 5 Introduction Welcome Congratulations on your purchase of the Daewoo DECT 1900 cordless telephone. This phone has been designed and engineered to exacting standards for reliability, long life and outstanding performance. To obtain the full benefit from your new telephone, please read this Operating Guide thoroughly. Features Digital Sound Quality (DECT) Digital Call Security GAP Compatible Advanced PABX Features Extendable to 8 Handsets Extendable to 8 Base Stations Up to 50m Indoor Range Up to 300m Outdoor Range Up to 6 hours Talktime Up to 60 hours Standby Time LCD Display 10 Last Number Redial 10 Phonebook Entries Internal Calling Between Handsets Internal and External Call Transfer Conference Call Call Barring Call Timer 5 Handset Ringing Tones Earpiece Volume Control Keypad Lock Auto Talk/Standby Mute 5 Dectom.qxd 2/09/99 15:58 Page 6 Important Safety Instructions When using your telephone equipment, these basic safety precautions should always be followed to reduce the risk of fire, electrical shock, and injury to persons: 1) 2) 3) 4) 5) 6) 7) 8) 9) 10) CAUTION Read and understand all instructions. Follow all warnings and instructions marked on the product. Unplug this product from the wall outlet before cleaning, and use a dry cloth, without liquid or aerosol cleaners. Do not use this product near water; for example, near a bath tub, wash bowl, kitchen sink or laundry tub, in a wet basement or near a swimming pool. Do not place this product on an unstable cart, stand or table. The telephone may fall, causing serious damage to the unit. This product should be operated only from the type of power source indicated on the marking label. If you are not sure of the type of power supply to your home, consult your dealer or local power company. Do not allow anything to rest on the power cord. Do not locate this product where the cord will be damaged by persons walking on it. Do not overload wall outlets and extension cords, as this can result in the risk of fire or electrical shock. Never push objects of any kind into this product through cabinet slots, as they may touch dangerous voltage points or short out parts that could result in a risk of fire or electric shock. Never spill liquid of any kind on the product. To reduce the risk of electric shock, do not disassemble this product. Take it to qualified service personnel when service or repair work is required. Opening or removing covers may expose you to dangerous voltages or other risks. Incorrect reassembly can cause electric shock when the appliance is subsequently used. In the event of a storm, unplug your cordless phone from the power source and telephone line. A strong power surge may damage your phone. Under power failure, the telephone may not operate. Please ensure that a seperate phone, not dependant on local power is available during emergencies. 11) Unplug this product from the wall outlet and refer servicing to qualified service personnel under the following conditions: A. If the power supply cord is damaged or frayed. B. If liquid has been spilled into the product. C. If the product has been exposed to rain or water. D. If the product does not operate normally when following the operating instructions.(Adjust only those controls that are covered by the operating instructions. Improper adjustment of other controls may result in damage, and will often require extensive repair work by a qualified technician). E. If the product has been dropped, or the cabinet has been damaged. F. If the product exhibits a distinct change in performance. 12) Do not use the telephone to report a gas leak in the vicinity of the leak. To reduce the risk of fire or injury to persons by the battery, read and follow these instructions. CAUTION 6 Dectom.qxd 2/09/99 15:58 Page 7 Included in Your Package Base Handset AC Adaptor Rechargeable Battery TIP NOTE Telephone Cord 2x Memory Stickers Belt Clip This Owners Manual To get the most from your phone, please read this owners manual thoroughly. Also be sure to complete and mail the product registration form. If any of these items are missing or damaged, contact the place of purchase. 7 Dectom.qxd 2/09/99 15:58 Page 8 Controls and Functions Your DECT 1900 Handset Ringer Mute Off: Ringer is active and will sound with an incoming call. On: Ringer is muted and will not sound with a call. Talk Indicator Off: No call in progress Slow Blinking: 1. Either indicates an incoming call or 2. Indicates talk mode is being established Steady On: Handset is in internal or external call-mode and a connection is established. Shift Indicator: Off: The up arrow key hasnt been pressed. Steady On: The up arrow key is pressed. The shift indicator disappears after two seconds if no key activated functions have been pressed. (Note: The shift indicator can only be activated during a conversation). The shift Indicator will be on when a Memory location number and Telephone number is longer than 10 digits or redial number is longer than 12 digits. Programme Indicator Off: No programming in progress Blinking: The Handset is in programming mode. When the programming indicator appears, you can change, store or clear user settings or phone numbers. Signal Indicator Blinking: The Handset is out of coverage. No signal. Steady On: The Handset is within coverage. 8 Dectom.qxd 2/09/99 15:58 Page 9 Your DECT 1900 Base PAGING Key: POWER Indicator: IN-USE Indicator: CHARGER Indicator: Fast Charge: Top Charge: Maintain Charge: Press when paging or registering a handset. Lights up when the power is on. Lights up when HOOK off or registration status. Blinks very shortly when base station pages handset. Lights on when handset is charging. Charging status 084% / Light on without blinking. Charging status 84%99% blinking with 2 sec duration at 2 sec interval. Charging status 100% / blinking with 1 sec duration at 15 sec interval. 9 Dectom.qxd 2/09/99 15:59 Page 11 Installing & Adjusting Your Phone Desk/Table Top Installation 1. Plug in the AC adaptor cord into the plug in the bottom of the base, labelled icon 2. Plug the AC adaptor into a standard 230/240 VAC wall outlet. 3. Place the AC adaptor cord around the strain relief. 4. Charge the battery (refer to Charging the Battery Pack). 5. Plug one end of the telephone cord into the tel line jack on the bottom of the base. 6. Plug the other end of the cord into your telephone jack on the wall. 7. Place the line cord around the strain relief. Telephone Jack Use only the AC Adaptor supplied with this phone. CAUTION 8. Set the base on a desk or tabletop and place the handset into the base as shown. Installing the Handset Battery Pack 1. Press in on the battery cover and slide the cover down until it comes off. 2. Align the plastic connector of the Metal Nickel Hydride battery pack with its socket and plug it in. 3. Place the battery pack inside. 4 Slide the battery cover on until it snaps into place. Be sure to fully insert the battery plug into the socket. NOTE 11 AC Adapter Dectom.qxd 2/09/99 15:59 Page 12 Charging the Battery Before plugging the phone line in to your new phone for the first time, fully charge the rechargeable battery pack for 14 hours without interruption. 1. Place the Handset on the base. (The handset will charge either face up or face down). 2. Make sure the red charge light on the base comes on and the number of your handset appears in the left of the handset display. If the LED doesnt light, check to see that the AC Adaptor is plugged in and that the handset makes good contact with the base charging contacts. NOTE If the belt clip is attached to the handset, you should place the handset face down in the base. NOTE Only use the battery pack supplied or rechargeable AA Batteries (not supplied) DO NOT USE STANDARD BATTERIES. 3. The battery symbol in the display gradually fills up as it is charged. If your battery symbol is empty and flashing and you hear a warning beep every 10 seconds, you will need to recharge your handset before you can use it. Indicator Status Steady outline and 4 blocks more than 80% Steady outline and 3 blocks more than 50% Steady outline and 2 blocks more than 40% Steady outline and 1 blocks more than 20% Steady outline less than 10% Outline Slow blinking low and beep alarm Steady outline and running blocks charging If the battery status is low and in need of recharging, a warning beep will sound at 30 seconds intervals. 4. Once charged, your handset display will be as shown below.... 12 Dectom.qxd 2/09/99 15:59 Page 43 Warranty One-Year Limited Warranty Important: Evidence of original purchase is required for warranty service. WARRANTOR: Uniden New Zealand Limited Warranty is only valid in the country where the product has been purchased. ELEMENTS OF WARRANTY: Uniden warrants to the original retail owner for the duration of this warranty the Dect 1900 (here in after referred to as the Product), to be free from defects in materials and craftsmanship with only the limitations or exclusions set out below. WARRANTY DURATION: This warranty to the original retail owner only, shall terminate and be of no further effect 12 months after the date of original retail sale. This warranty will be deemed invalid if the product is: (A) Damaged or not maintained as reasonable and necessary, (B) Modified, altered or used as part of any conversion kits, subassemblies, or any configurations not sold by Uniden, (C) Improperly installed, (D) Repaired by someone other than an authorised Uniden Repair Agent for a defect or malfunction covered by this warranty, (E) Used in conjunction with any equipment or parts or as a part of a system not manufactured by Uniden. PARTS COVERED: This warranty covers for one (1) year, the Base/Charging Unit and Handset only. All accessories (AC Adaptor, Battery, Belt Clip etc) are covered for 90 days only. STATEMENT OF REMEDY: In the event that the product does not conform to this warranty at any time while this warranty is in effect, the warrantor, at its discretion, will repair the defect or replace the product and return it to you without charge for parts and service. THIS WARRANTY DOES NOT COVER OR PROVIDE FOR THE REIMBURSEMENT OR PAYMENT OF INCIDENTAL OR CONSEQUENTIAL DAMAGES. THIS GUARANTEE IS IN ADDITION TO AND DOES NOT IN ANY WAY AFFECT YOUR RIGHTS UNDER THE CONSUMER GUARANTEE ACT. WARRANTY CARD: If a Warranty Card has been included with this Product, please complete and return to us within 14 days of purchase. Your name and the serial number of the Product will then be registered in our database and this will help us process your claim with greater speed and efficiency should you require warranty service. PROCEDURE FOR OBTAINING PERFORMANCE OF WARRANTY: In the event that the product does not conform to this warranty, the Product should be shipped or delivered, freight pre-paid, with evidence of original purchase (e.g. a copy of the sales docket) to the warrantor at: UNIDEN NEW ZEALAND LIMITED SERVICE DEPARTMENT 150 Harris Road, East Tamaki, Auckland Ph: 0-9-273 8383 Fax: 0-9-274 0009 Toll Free: 0800 4 UNIDEN 4 864336 Customers in other States should ship or deliver the Product freight pre-paid to their nearest Uniden Authorised Repair Centre.(Contact Uniden for the nearest Warranty Agent to you) 43 Dectom.qxd 2/09/99 15:59 Page 44 UNIDEN ©1999 Uniden New Zealand Limited All Rights Reserved.