1
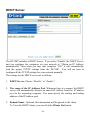
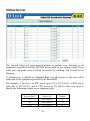
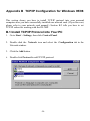
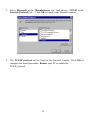
DI-704P
Ethernet Broadband Router
User’s Manual
(Please refer to the Quick Install Guide for installation instructions.)
Table of Contents
Introduction ..................................................................................................4
Functions and Features.........................................................................4
Introduction to Broadband Router Technology....................................6
Introduction to Firewalls ......................................................................6
Introduction to Local Area Networking ...............................................7
Introduction to Virtual Private Networking..........................................7
Contents of Package .....................................................................................9
Panel Layout ...............................................................................................10
Installation Requirements ................................................................... 11
Network Settings ........................................................................................12
Configuring the Ethernet Broadband Router..............................................14
Start- up and Log in .............................................................................14
Device Information.............................................................................16
Useful Tools........................................................................................17
Setup ...................................................................................................18
DHCP Server ......................................................................................21
Virtual Server......................................................................................22
Special Applications ...........................................................................23
Access Control....................................................................................24
Miscellaneous Items ...........................................................................25
MAC Address Control........................................................................26
Configuring on Unix based Platforms ................................................27
Appendix A: Resetting the System Password or the IP Address .............28
Appendix B TCP/IP Configuration for Windows 95/98 ..........................29
-2-
B.1 Install TCP/IP Protocol into Your PC ..........................................29
B.2 Set TCP/IP Protocol for Working with the DI-704P ...................31
Technical Specifications .............................................................................38
Contacting Technical Support ....................................................................40
D-Link Locations Worldwide .....................................................................41
Limited Warranty........................................................................................43
Registration.................................................................................................47
-3-
Configuring the Ethernet Broadband Router
The DI-704P provides Web based configuration. You can configure your DI-704P
through your Netscape Communicator or Internet Explorer browser in MS
Windows, Macintosh or UNIX based platforms.
Start-up and Log in
Activate your browser, and disable the proxy or add the IP address of the
DI-704P into the exceptions . Then, type the IP address of the DI-704P into the
Location (for Netscape) or Address (for IE) field and press “Enter.” For example:
http://192.168.0.1.
After the connection is established, you will see the web user interface. There
are two appearances of web user interface: for general users and for the system
administrator.
To log in as an administrator, enter the system password (the factory setting
-14-
is ”admin”) in the System Password field and click on the Log in button. If the
password is correct, the web appearance will be changed into administrator
configure mode. As listed in its main menu, there are several options for system
administration.
-15-
Device Information
This option allows you to observe the DI-704P’s working status:
A. Modem Status
B. Printer Status. The possible kinds of printer status include “Ready,” “Not
ready,” “Printing…,” and “Device error.”
When a job is printing, there may appear a “Kill Job” button on the
“Sidenote” column. You can click this button to stop the current
printing job manually.
-16-
Useful Tools
This function enables you to change the administrator password, and get
information about the Firmware version and the WAN's MAC Address.
At this window you can:
•
•
•
•
•
•
View the system logs by clicking the View Log button.
Restart the DI-704P by clicking the Reboot button.
Backup your settings by clicking the Backup Setting button and save it as
a bin file. Once you want to restore these settings, please click the
Firmware Upgrade button and use the bin file you saved.
Click the Clone MAC button to copy the MAC address of your PC to be
the MAC address of this device.
Click the Reset to Default button to reset the settings of this device to the
default values.
Upgrade the firmware by clicking the Firmware Upgrade button.
Note: we strongly recommend that you change the system password
for security reasons.
-17-
Setup
Before you begin the Setup, you must choose the correct WAN type.
1. LAN IP Address: the DI-704P’s IP address. The default address is
192.168.0.1. You can change the LAN IP Address if needed.
2. WAN Type: your ISP’s WAN Connection type. Click the Change button to
choose from the following five options:
A. Static IP Address: you manually input the IP Address that your ISP
assigned to you.
B. Dynamic IP Address: Obtain an IP address automatically from the
DI-704P’s DHCP Server function.
C. PPP over Ethernet: Some ISPs require the use of PPPoE to connect to
their services.
D. Dial-up Network: To surf the Internet via PSTN/ISDN (a dial-up
modem.)
E. PPTP: Some ISPs require the use of PPTP to connect to their services.
It is specifically for many European ISPs where Alcatel’s ADSL
Network Termination is deployed.
-18-
Below are the five WAN types and the fields required to implement them:
1.
Static IP Address
Enter the proper setting provided by your ISP for the following fields :
WAN IP Address, Subnet Mask, Gateway, Primary and Secondary DNS
2.
Dynamic IP Address
•
•
3.
PPP over Ethernet
•
•
•
4.
Host Name: optional. Required by some ISPs, for example, @Home.
Renew IP Forever: this feature enables the DI-704P to renew the IP
address automatically when the lease time is expired even if the system
is in an idle state.
PPPoE Account and Password: the account and password your ISP
assigned to you. If you don't want to change the password, leave the
password field blank.
PPPoE Service Name: (optional) Input the service name if your ISP
requires it.
Maximum Idle Time: set the length of “no activity” time at which to
disconnect your PPPoE session. Setting it to “0” will disable this
feature.
Dial-up Network
• Dial-up Telephone, Account and Password: assigned by your ISP. If you
don't want to change the password, keep it empty.
• Primary and Secondary DNS : automatically assigned if they are
configured as "0.0.0.0."
• Maximum Idle Time: the length of “no activity” time at which to
disconnect your dial-up session.
• Baud Rate: the communication speed between the DI-704P and your
MODEM or ISDN TA.
• Extra Setting: needed to optimize the communication quality between
the ISP and your MODEM or ISDN TA
-19-
5.
PPTP
Just follow steps below to configure the PPTP WAN type:
•
Set My IP Address as the IP address that the ISP assigned to your PC,
e.g. 10.0.0.140.
•
Set My Subnet Mask as the mask that the ISP assigned to your PC, e.g.
255.255.255.0.
•
Set Server IP Address as the IP address of the DSL modem, e.g.
10.0.0.138.
•
Input the PPTP Account and Password.
•
Input the Connection ID if your ISP requires it.
•
Save the setting and restart the router.
•
In the Command prompt, type PING 4.0.0.1. If the reply is positive,
the router and your PC have been successfully configured for PPTP
WAN type.
-20-
DHCP Server
The DI-704P includes a DHCP Server. If you select “Enable” the DHCP Server,
and you configure the computers on your network to “Obtain an IP Address
automatically,” then when you turn your computer “ON,” it will automatically
load the proper TCP/IP settings from the DI-704P. You will not have to
configure all the TCP/IP settings for your network manually.
The settings for the DHCP server are as follows:
1. DHCP Server: Choose “Disable ” or “Enable.”
2. The range of the IP Address Pool: Whenever there is a request, the DHCP
server will automatically allocate an unused IP address from the IP address
pool to the requesting computer. You must specify the starting and ending
address of the IP address pool.
3. Domain Name : Optional, this information will be passed to the client.
To View the DHCP clients, you can click the Clients List button.
-21-
Virtual Server
The firewall filters out unrecognized packets to protect your Intranet; so all
computers networked with the DI-704P are invisible to the outside world. If you
wish, you can make some of them accessible by enabling the Virtual Server
Mapping.
A virtual server is defined as a Service Port, and all requests to this port will be
redirected to the computer specified by the Server IP.
For example, if you have an FTP server (port 21) at 192.168.0.1, a Web server
(port 80) at 192.168.0.2, and a VPN server at 192.168.0.6, then you need to
specify the following virtual server-mapping table:
Service Port
Server IP
Enable
21
192.168.0.1
V
80
192.168.0.2
V
1723
192.168.0.6
V
-22-
Appendix B TCP/IP Configuration for Windows 95/98
This section shows you how to install TCP/IP protocol into your personal
computer after you have successfully installed one network card. (If you have not,
please refer to your network card manual.) Section B.2 tells you how to set
TCP/IP values for working with the DI-704P.
B.1 Install TCP/IP Protocol into Your PC
1. Go to Start > Settings , then click Control Panel.
2. Double click the Network icon and select the Configuration tab in the
Network window.
3. Click the Add button.
4.
Double click Protocol to add TCP/IP protocol.
-29-
5. Select Microsoft in the Manufacturers list. And choose TCP/IP in the
Network Protocols list. Click OK to return to the Network window.
6. The TCP/IP protocol will be listed in the Network window. Click OK to
complete the install procedure. Restart your PC to enable the
TCP/IP protocol.
-30-