1
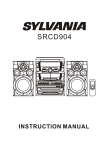
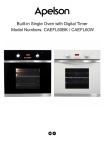
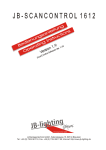
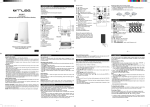
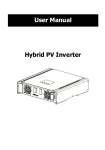
RCD-718
COMPACT
DIGITAL AUDIO
INSTRUCTION MANUAL
TABLE
TABLE OF CONTENTS
CONTENTS
This instruction manual is important to you. Please read it. In a short time it shows exactly how
to connect, operate and adjust this unit for best performance.
It can save you money. It shows simple things to do and check before you call for help and
save the cost of unnecessary service and call out charge.
TABLE OF CONTENTS..............................................................................................................1
WARNINGS................................................................................................................................2
LOCATION OF CONTROLS.......................................................................................................3
REMOTE CONTROL..................................................................................................................4
OPERATING INSTRUCTION................................................................................................5-11
MAINTENANCE AND CARE....................................................................................................12
Pack contents:
1 x main unit
1 x remote control
2 x speaker
1 x instruction manual
1 x AM loop antenna
Please retain all packing material for future transportation of the unit or in the unlikely event
that the unit needs to be returned for service.
WARNINGS
TO Prevent fire or shock hazard, do not use this plug with an extension cord, receptacle or add other
outlet unless the blades can be can be fully inserted to prevent blade exposure. To prevent fire or shock
hazard, do not expose this appliance to rain or moisture.
WARNING
RISK OF ELECTRICSHOCK
DONOT
NOTOPEN
OPEN
DO
The lightning flash with arrowhead symbol,within an equilateral triangle is intented to
alert the user to the presence
of uninsulated' dangerous voltage' within the product's enclosure that may be of sufficient magnitude to constitute a
risk of electric shock to persons.
CAUTION : TO REDUCE THE
The exclamation point within
RISK OF ELECTRIC SHOCK
an equilateral triangle is int-
DO NOT REMOVE COVER (
ended to alert the user to the
OR BACK),NO USER SERV-
presence of important opera-
ICEABLE PARTS INSIDE R-
ting and maintenance (servi-
EFER SERVICING TO QUA-
cing) instructions in the liter-
LIFIED SERVICE PERSON-
ature accompany-ing the ap-
NEL
plicance
IMPORTANT SAFETY INSTRUCTIONS
1 Read these instruction.
2 keep these instructions.
3 heed all warnings.
4 Follow all instructions.
5 Do not use this product near water(swimming pool, beach, lake etc.).
6 Clean only with a dry cloth.
7 Do not block any of the ventilation openings.Install in accordance with the manufacturer's instructions .
8 Do not install near any heat sources such as radiators, heat registers . Stoves or other apparatus
(including amplifiers)that produce heat.
9 Do not defeat the safety purpose of the polarized or grounding-type plug, A polarized plug has two
blades with one wider than the other. A grounding type plug has two blades and a third grounding
prong. The wide blade or the third prong is provided for your safety. If the provided plug does not
fit into your outlet, consult an electrician for replacement of the obsolete outlet.
10 Protect the power cord from being walked on or pinched particularly at receptacles and the point
where they exit from the stereo.
11 Only use attachments/accessories specified by the manufacturer.
12 Unplug this apparatus during lightning storms or when unused for long periods of time
13 Refer all servicing to qualified service personnel. Servicing is required when the system has been
damaged in any way, such as a damaged power-supply cord or plug . Has been exposed to rain or
moisture ,does not operate normally , or has been dropped.
14 This appliance should not be exposed to dripping water or splashing water and objects filled with
water, such as vases, should not be placed on this unit
LOCATION OF CONTROLS
1.Standby button
2.CD button
3.Tuner button
4.Stop button/AM-FM selector
5.Play/Pause button
6.Skip REW button
7.Skip FWD button
8.Mute button
9.Colour button
10.Phones
11. Standby Indicator
12. LCD Display
13.Sensor
14.Volume+/- button
15.CD Eject (Open/Close) button
16. CD Door
4 5
11
12
1
6
2
7
3
8
9
10
13
14
15
16
REMOTE CONTROL
1
2
3
4
5
6
7
8
9
Standby/On Button
Random Button
Intro Button
Sleep Button
Volume+ Button
Stop Button
Track/Tune Forward Button
Mute Button
M-Up/Repeat Button
10
11
12
13
14
15
16
17
Memory/Program Button
Preset EQ Button
Track/Tune REW Button
Play/Pause Button
Volume- Button
Timer Button
Display Button
Function Button
1
17
2
16
3
15
4
14
5
13
12
6
7
11
8
10
9
INSTALLATION BATTERY
The remote control use 1 power source, CELL BATTERY (CR 2025, 3V).
Simply pull out the insulation tag in the battery compartment. The remote control is now functional.
Be sure to observe the polarity makings which are engraved inside the battery compartment,
thenclose the cover.
BATTERY REPLACEMENT
When the batteries become too weak, the operating distance of the remote controller is greatly
reduced and you will need to replace the batteries.
Open the battery compartment cover, use a screwdriver or other tool to push out the battery
(follow the exit direction in pushing out). Push in the new battery in the opposite direction (the
+polarity is faced up.) Put the cover back and secure.
Note:
To maintain the accuracy and long life of the transmitter, do not press two or more buttons simultaneously.
If the remote control is not used for a long time, remove the batteries to prevent possible damage through leaking batteries.
Do not mix different types of batteries, or old batteries with new ones.
USING THE REMOTE CONTROLLER CORRECTLY
Point the remote controller at the Remote Sensor.
The functions of the buttons on the remote control are the same as the corresponding controls
on the main unit.
When there is a strong ambient light source, the performance of the infrared Remote Sensor
may be degraded, causing unreliable operation.
The maximum effective distance for remote control operation is about 15 feet.
PREPARATION FOR USE
Remove the unit carefully from the box, retaining the packaging for future use.
Read these instructions carefully before use.
CONNECTIONS
Connect the speakers to the speaker sockets on the back of the unit.
Connect the right speaker to the right socket and the left speaker to the left socket.
Extend the FM antenna.
AM
This system includes an external AM Loop antenna. Assemble the AM loop antenna and then
connect the wire from the antenna terminal on the back of the set. You may have to vary the position and direction of this AM Loop antenna until you find the position that provides the clearest reception for each of your favorite AM stations.
SPEAKER
Speaker may be placed away from the main unit by unwinding the speaker cable.
AC POWER OPERATION
This unit is designed to operate on 120V, 60Hz current only. Connecting it to other power sources may damage the unit.
Press the STANDBY/ON button to switch the unit on or off.
Disconnect the power cord from the mains supply if the unit is not going to be used for some
time. You may need to reprogram any memory settings.
IMPORTANT
Since movement of the CD mechanism and the sensitive circuitry may cause interference to a
radio tuner nearby, switch this unit off while operating other radio devices.
This product utilizes a laser
Danger - Invisible laser radiation when opened and interlock failed or defeated. Avoid direct
exposure to the beam.
SETTING THE CLOCK
This unit has its own digital clock function in the STANDBY mode. If the unit is Disconnected from the mains, you will need to reset the clock.
The first time you use the unit the clock has to be set.
Press and hold the PROG./MEMORY button for a while on the remote.
"24H" will flash.
Select 12 Hour/24 Hour mode by pressing the TUNE FORWARD/REW buttons.
Press the PROG./MEMORY to confirm the Time mode on the remote.
"HOUR" will flash, press (FWD/REW symbols) to adjust the correct hour, then press
PROG./MEMORY button to confirm.
"MINUTE" will flash, press (FWD/REW Symbols) to adjust the correct minutes,then
press PROG./MEMORY button to confirm.
For 12 Hour mode, be sure the time is set to AM or PM.
Now the display is showing the correct time you have just set.
LISTENING TO THE RADIO
OPERATION
Press the STANDBY/ON button to turn the unit on.
Select the Tuner function by pressing the Tuner button on the panel of the main unit.
Select the desired frequency band that your station is on (FM, AM) with the STOP button on both main unit and remote control.
Tune to the desired radio station by pressing the TUNING FWD/REW buttons on the remote
control.
If you hold the TUNING FWD/REW button for more than half a second ,the unit will begin to automatically scan until a strong signal is found or until the TUNING FWD/REW button is
Pressed again.
To turn off the radio, press the STANDBY/ON button to switch the unit into standby mode.
STORING PRESET STATIONS
Tune either automatically or manually (as described in previous sections) to the station to be stored.
Press the PROGRAM/MEMORY button on remote control once; "MEMORY" will blink on the
display. The display will change for 5 seconds; during this time you must select the desired memory location by pressing the M-UP/REPEAT button.
Press the PROGRAM/MEMORY Button to store the station at that location.
The unit can store up to 10 FM stations, 10 AM Stations.
TUNING TO A PRESET STATION
Select the desired program number by pressing the MEMORY UP/REPEAT button.
ANTENNA
For FM reception there is a built-in one-meter FM Antenna wire at the rear of the unit.
Unravel the wire and move it around to obtain the best reception. For AM reception, the signals
are picked up through the AM loop antenna. You may have to move the loop antenna to obtain
the best reception.
HANDLING COMPACT DISCS
To remove a disc from its storage case, press down on the center of the case and lift the disc
out, holding it carefully by the edges.
Fingerprints and dust should be carefully wiped off the disc's recorded surface with a soft cloth.
Unlike conventional records, compact discs have no grooves to collect dust and microscopic debris so gently wiping with a soft cloth should remove most particles. Wipe in a straight line from the inside to the outside of the disc. Small dust particles and light stains will have absoultely
no effect on reproduction quality.
Never use chemicals such as record sprays antistatic sprays, benzene, or thinners to clean
compact discs. These chemicals can irreparably damage the disc's surface.
Discs should be returned to their cases after use. This avoids serious scratches that could
cause the Laser pickup to skip.
Do not expose discs to direct sunlight, high humidity, or high temperatures for extended
periods. Long exposure to high temperatures can warp the disc.
Do not stick paper or write anything with a ballpoint pen on the label side of the disc.
LOADING AND UNLOADING COMPACT DISCS
Press the STANDBY/ON button to turn the unit on.
Select the CD function by pressing the CD button.
Press the OPEN/CLOSE (Eject) button to open the CD compartment.
When the disc compartment has opened, remove a disc from its case and place it carefully in
the disc compartment with the label side facing up.
Close the disc compartment by pressing the OPEN/CLOSE (Eject) button. When the compartment is fully closed, the disc will start rotating. The total number of tracks will appear
on the CD display.
The disc compartment may be opened at any time by first pressing the STOP button and then
pressing the OPEN/CLOSE (Eject) button. Remove the CD only after the compartment has fully
opened.
CAUTION
Do not put anything except a compact disc into the compartment. Foreign objects can damage
the mechanism.
Keep the disc compartment closed when not in use to prevent dirt and dust from entering the
mechanism.
Never place more than one disc into the disc compartment at any time. If the disc is correctly loaded, the total number of tracks on the disc will be displayed.
Notes: After the disc compartment is fully closed, the disc information may not appear on the display. This means that the disc is improperly loaded (most likely it is upside down). To check,
open the disc compartment again and reload the disc.
DISC PLAY
Insert a CD as described in the previous section and close the disc compartment. The display
will then show the total number of tracks and total playtime.
Press the PLAY/PAUSE button. Disc play will begin from the start of the first track of the disc.
A particular track can be selected using either of the CD SKIP buttons. If this is done before
pressing the PLAY/PAUSE button, disc play will start with the selected track when the PLAY/
PAUSE button is pressed.
At the end of the disc, the unit will switch to stop mode.
Notes:
If the disc is deeply scratched, or too dirty, disc play may not start. If an improperly centered
disc is played, noise can be heard in the mechanism. The use of such discs should be avoided.
If the disc is inserted incorrectly, or the disc is damaged the display will show "No disc".
DISC ERRORS
This compact disc player has built-in error compensation circuits to correct for minor defects in
a disc. There are limits, however, to the amount of correction available.
In some cases, the CD player may skip some tracks, or parts of tracks, on a disc during disc play. This problem may be caused by defects (such as scratches) in the disc being played, which
are too large for the error compensation circuits to handle. If you encounter this problem, check
the CD player's operation as follows, before having the unit serviced: Play a new disc. If the CD
player operates normally, the skipping problem is probably due to a defective disc.
TO STOP A CD PART WAY THROUGH
Press the Stop button. Disc play will stop, and the display will show the total number of tracks.
To temporarily stop disc play (pause mode), press the PLAY/PAUSE button. Disc play will stop
at the current play position. The track playing time will flash .
To resume disc play, press the PLAY/PAUSE button again.
TRACK SKIP
STARTING DISC PLAY FROM THE BEGINNING OF A PARTICULAR TRACK
Press the SKIP Forward or REW TRACK buttons to select the desired track. The number of
the selected track will be shown on the CD display. Press the PLAY/PAUSE button to start play.
TO SKIP TO THE NEXT TRACK
For example, to skip ahead to the beginning of track 5 while track 4 is playing. . Press the SKIP
FWD TRACK button once. Disc play will resume at the beginning of track 5. The CD player will
skip ahead to the next track each time the SKIP FWD TRACK button is pressed.
Repeatedly pressing the SKIP FWD TRACK button makes the CD player skip ahead through
the disc track by track. Once the beginning of the last track is reached the CD player advance
to the first track.
TO SKIP BACK TO THE PREVIOUS TRACK ON A DISC
For example to skip back to the beginning of track 3 while track 4 is playing. Press the SKIP REW TRACK button twice. Disc play will resume at the beginning of track 3. The CD player will
skip back one track each time the Reverse Skip Track button is pressed. If this button is pressed in the middle of a track, the CD player will skip back to the beginning of that track. To make
it skip back to the previous track press the SKIP REW TRACK button twice.
Repeatedly pressing the SKIP REW TRACK button makes the CD player skip back through the
disc track by track. Once the beginning of the first track is reached, the CD player will go to the
last track.
Notes:
The SKIP Forward TRACK buttons can be used to select a desired track to play before disc play starts. In this case the number of the selected track will be display until the PLAY/PAUSE
button is pressed.
TRACK SEARCH
You can search through the track by holding SKIP FWD or REW button down; normal play will
resume when the button is released.
FOR REPEAT DISC PLAY OF A SINGLE TRACK
Press the Repeat button one. The REPEAT will displayed and flash.
Press the Play/Pause button.
The selected track will then begin playing through to its end of the track that you have selected
and then will return to the beginning of that track. This will continue until the Stop button is pressed.
If the Repeat button is pressed twice more, the REPEAT will disappear, repeat play will end;
normal disc play will resume from that point.
When the last track has finished playing, the CD player will then stop.
FOR REPEAT PLAY OF ALL THE TRACKS
Press the REPEAT button twice. The REPEAT will be displayed and steady.
Press the PLAY/PAUSE button.
The disc will then begin playing to end. At will automatically return to the beginning of the first
track. This will continue until the Stop button is pressed.
If the Repeat button is pressed one more, the REPEAT will disappear and repeat play will end,
and normal disc play will resume from that point.
RANDOM PLAY.
The CD player can play tracks in a randomly generated sequence.
Press the RANDOM Button. The RANDOM indicator will appear on the display.
Press the PLAY/PAUSE Button. The player will now select a track from the selected disc, at random, and begin to play that track.
At the end of that track another track is chosen at random and played.
This continues until all the tracks have been played on that disk, the unit will then enter the STOP mode.
It is possible to program, the tracks you wish to play in a sequence of your choice, it is
not possible to enter programs during disc play. Press the STOP Button first, and then
follow the instructions below.
ENTERING A PROGRAM
1.Press the PROGRAM Button. The information will be displayed on the display.
2.Select the desired track using the Forward and Reverse SKIP/SEARCH Buttons.
3.Press the PROGRAM Button.
The first program selection is now stored in program memory.
4.Select the next desired track using the Forward and Reverse SKIP/SEARCH Buttons.
5.Press the PROGRAM Button.
Continue entering tracks in this way until all the desired tracks are stored (up to 20).
Notes: If the PLAY/PAUSE Button is pressed before the PROGRAM Button is pressed to store
a track, the track will not be programmed, and the disc will start playing from the first selected
track.
Any track can be programmed to play more than once.
Repeatedly pressing the PROGRAM button will enable you to check the program if required
LISTENING TO PROGRAMMED TRACKS
1. Enter all tracks you want to program into memory following the procedure above.
2. Press the PLAY/PAUSE Button.
3.Disc play will start at the beginning of the first programmed track.
TO CLEAR THE PROGRAM MEMORY
1.If the disc is playing, press the STOP Button. The MEMORY will disappears.
The program memory will also be cleared if the disc compartment is opened, if the function is changed, or if the power is switched off.
SLEEP FUNCTION
When the disc is playing, press SLEEP button on the remote control. SLEEP will blink and 90 in
dicators will appear. Press SLEEP button to select the time you want (max 90, min 10). Then the
unit will resume playing mode, but SLEEP will display on the screen. And the unit will change to
standby mode at the preset time. For example, you select 10 by SLEEP button; the unit will change to standby mode after 10 minutes.
TIMER ON FUNCTION
This function can be used at either CD mode/Tuner mode. Press TIMER once and then press
PROG./MEMORY button on the remote control about 3 seconds. The hour will flash. Press TRACK/TUNE button preset your desired hours. Press MEMORY/CLOCK button to confirm.Then the
minutes will flash. Press TRACK/TUNE button preset your desired minutes. Press MEMORY/CLOCK button to confirm. The unit will start at your desired time
.
MUTE
Press the MUTE button on the remote control to switch off the sound The MUTE indicator lights
up.
Press MUTE again to restore the sound to the previous level. Mute indicator will go off.
COLOUR
Press COLOUR button,seven colour(green white yellow cyan red purple blue) will cycle slowly
on the display.You can fix a colour that you like by press COLOURbutton once.If need to change
another colour, you need to press COLOUR button again. The colour cycle anew.
PRESET EQUALIZER
This unit is equipped with a preset equalizer which has been added to enhance your listening
pleasure by altering the frequency response of the music to give it a different feel Press the PRESET EQ button repeatedly to cycle through the following equalization modes.
CLASSIC
ROCK
POP
FLAT (EQ OFF)
AC CONNECTION
Plug the power cord into an AC outlet having 120v, 60Hz only. Connecting this unit to
other power sources may damage the unit.
NOTES:
*The AC polarized to help minimize the possibility of electric shock.
If the polarized plug does not fit into a nonpolarized AC outlet,
do not file or cut the wide blade; it is the user`s responsibility
to have an electrician replace the obsolete outlet.
*The power cord should be unplugged from the outlet
when the unit is not going to be used for a long period of time.
MAINTENANCE AND CARE
Electronic products of this kind should never be subjected to extreme temperatures or high humidity. For instance, this set should not be placed in bathing areas or around stoves and
radiators.
Keep this unit away from radiators and other heat sources.
Keep this unit away from naked flame source, such as lighted candle.
Do not expose this unit to dropping or splashing and no objects filled with liquid, such asvase,
shall be placed on it the apparatus.
If necessary, clean the unit with a piece of cloth dampened with water only (Be sure the AC Power Cord is disconnected from the Mains). Never use a polish or a strong detergent, as this will
damage the finish of the cabinet.
This equipment has been designed and manufactured to meet the highest international standards, but, like any electrical apparatus, which is operated at mains voltage, care must be taken
if you are to obtain the best results and safety is to be assured. This is particularly important with audio equipment.
DO . . . read the operating instructions before you attempt to use the equipment.
DO . . . ensure that all electrical connections (including the mains plug, extension leads and
interconnections between pieces of equipment) are properly made and in accordance with the
manufacturer's instructions. Check that the mains fuse rating is correct.
DO . . . always consult your dealer if you are ever in doubt about the installation, operation or
safety of your equipment. He is the best person to advise you.
DO NOT... obstruct the necessary all-round ventilation - especially DON'T stand the set close
to curtains or on soft furnishing such as carpets. Overheating can cause unnecessary damage
and shorten the life of the set.
Remember that to obtain the best performance and lasting satisfaction from your equipment,
have it regularly maintained by a reliable service organization. Ensure that all the family correctly uses it. ABOVE ALL: Never let children push anything into holes or slots in the case - this
could result in an electric shock; Meyer guess or take chances with electrical equipment of any
kind - it is better to be safe than sorry!