1
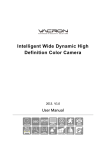
MODEL NO. KCR2609
UNDERCOUNTER CD CLOCK RADIO
OWNER'S MANUAL
IR
FM
MHz
J AZZ
SLEEP
TIMER
PLEASE READ BEFORE OPERATING THIS EQUIPMENT
SAFETY PRECAUTIONS
R
CAUTION
RISK OF ELECTRIC SHOCK
DO NOT OPEN
CAUTION: TO REDUCE THE RISK OF ELECTRIC SHOCK, DO NOT REMOVE
COVER (OR BACK). NO USER-SERVICEABLE PARTS INSIDE. REFER SERVICING TO QUALIFIED SERVICE PERSONNEL.
The lightning flash with arrowhead symbol within an equilateral triangle is intended to alert the user to the presence of
uninsulated 'dangerous voltage' within the product's enclosure that may be of sufficient magnitude to constitute a risk
of electric shock to persons.
The exclamation point within an equilateral triangle is intended to alert the user to the presence of important operating
and maintenance (servicing) instructions in the literature
accompanying the appliance.
DANGER:
Invisible and hazardous laser radiation when open and interlock failed or defeated. Avoid direct exposure to beam.
FCC WARNING:
This equipment may generate or use radio frequency energy. Changes
or modifications to this equipment may cause harmful interference
unless the modifications are expressly approved in the instruction manual. The user could lose the authority to operate this equipment if an
unauthorized change or modification is made.
LASER SAFETY: This unit employs a laser. Only qualified service personnel should attempt to service this device due to possible eye injury.
CAUTION: USE OF CONTROLS, ADJUSTMENTS OR PERFORMANCE PROCEDURE HEREIN MAY RESULT IN HAZARDOUS
RADIATION EXPOSURE.
PLEASE KEEP ALL PACKAGING MA TERIAL FOR AT LEAST 90 DAYS IN
CASE YOU NEED TO RETURN THIS PRODUCT TO YOUR PLACE OF PURCHASE OR CURTIS.
1
PREPARATION FOR USE
Unpacking and Setup
Carefully remove the unit from the display carton and remove all packing
material from the unit itself.
AC Operation
Unwind the AC cord and extend it to its full length. Insert the AC cord into any
convenient AC 120V~60Hz household outlet.
2
L OC A T ION OF C ONT R OL S
18
IR
17 16 15 14 13
FM
MHz
J AZZ
SLEEP
TIMER
1
2 3 4 5
7
6
8 9 21 10 19 20
1.
POWER BUTTON
11. VOL UP BUTTON
2.
SLEEP BUTTON
12. VOL DN BUTTON
3.
TIMER BUTTON
13. OPEN/CLOSE BUTTON
4.
FUNCTION BUTTON
14. BAND BUTTON
5.
REMOTE SENSOR
15. PLAY/PAUSE BUTTON
6.
MEM/CLK SET BUTTON
16. EQ BUTTON
7.
MEM DN BUTTON
17. MEM UP BUTTON
8.
REPEAT BUTTON
18. CD DOOR
9.
SKIP/TUNE DN BUTTON
19. DISPLAY BUTTON
10. SKIP/TUNE UP BUTTON
20. FM ST BUTTON
21. STOP BUTTON
3
12
11
L OC A T ION OF R E MOT E C ONT R OL S
20 19
1
2
18
FUNC
DSIPLAY
TIMER
SLEEP
1
2
3
4
5
6
7
8
9
-/--
0
MUTE
17
16
VOL.
3
TUNER/SKIP/CH
4
5
EQ
ITEM/
ENTER
MENU
PLAY/PAUSE/M-UP
STOP/BAND
15
14
13
12
11
OPEN/CLOSE
FM ST
MEM-DN
MEM/CLK
REP
SET
REMOTE CONTROL
6 7
10
89
1.
FUNCTION BUTTON
11. STOP/BAND BUTTON
2.
DISPLAY BUTTON
12. MENU BUTTON
3.
NUMBERDIAL BUTTONS
13. ITEM/ENTER BUTTON
4.
SKIP/TUNE DN BUTTON
14. EQ BUTTON
5.
OPEN/CLOSE BUTTON
15. VOLUME DN BUTTON
6.
SKIP/TUNE UP BUTTON
16. VOLUME UP BUTTON
7.
FM ST BUTTON
17. MUTE BUTTON
8.
MEM DN/REPEAT BUTTON
18. POWER BUTTON
9.
PLAY/PAUSE BUTTON
19. SLEEP BUTTON
10. MEM/CLK/SET BUTTON
20. TIMER BUTTON
4
P OWE R S OUR C E S
(F OR R E MOT E C ONT R OL)
BATTERIES
NOTE:
The button cell battery contains mercury, don't put in the trash. Recycle or
dispose as hazardous waste.
NOTE:
You may need to remove a protective covering from the remote's battery
compartment before using the remote control.
5
OP E R A T ING INS T R UC T IONS
Setting up your radio
For instructions on mounting your radio, see the mounting template that
came with your radio.
Checking AM Radio reception
Your clock radio has a built-in antenna for AM radio. To improve reception,
you need to rotate your clock radio.
Before you mount your clock radio under a counter, tune to an AM station
and rotate your clock radio until you get the best reception.
This is the orientation you need to use when you mount your clock radio.
For more information, see "Improving reception" on page 10.
Installing the backup batteries
Your clock radio uses two AAA backup batteries that store your settings.
You cannot use the batteries to power your clock radio. If your clock radio
does not save your settings, you may need to replace the batteries.
To install the backup batteries:
1.
2.
3.
Open the battery compartment located on the left side of your radio.
Insert two AAA batteries (not included) into the battery compartment.
Make sure that the + and - symbols on the batteries align with the +
and - symbols in the battery compartment.
Close the battery compartment.
6
OP E R A T ING INS T R UC T IONS
Using your radio
To turn on your radio:
1.
Plug the AC Power cord into a power outlet.
2.
Press the POWER button to turn on the radio.
Setting the time
To set the time on your radio:
1.
2.
3.
4.
5.
6.
With the power off.
Press and hold the MEM/CLK SET Button; "12Hr" will blink.
Press the SKIP/TUNING Button to set the unit to the 24 hour (24Hr) mode
or 12 hour (12Hr) mode.
Press the MEM/CLK SET Button and the hours will blink.
Press the SKIP/TUNING Button to set the current hour, then press the
MEM/CLK SET again; the minute digits will blink. Press the SKIP/TUNING
to set the current minutes.
Press the MEM/CLK SET Button to confirm the time.
To set the kitchen timer:
1.
2.
3.
4.
Press the TIMER button one or more times to select a length of time
in minutes. The initial time is 240 minutes. Each time you press the
TIMER Button, the length of time decreases by 10 minutes.
To increase or decrease the length of time from one to nine minutes,
press one of the SKIP/TUNING Button one or more times. Each time
you press a SKIP/TUNING Button the length of time increase or decrease
by one minute.
When the alarm sounds, press the TIMER Button for five seconds to
turn off the alarm.
To cancel the timer, press the TIMER Button for five seconds.
To activate sleep function:
1.
2.
Press the SLEEP button and "90" will appear and set the unit to turn off after
90 minutes. Each time you press the SLEEP button, the length of time decreases
by 10 minutes.
After five seconds, the Sleep function will activate and the SLEEP indicator will light
solid. Pressing the SLEEP button again until "OFF" appears and turns off the Sleep
feature.
7
OP E R A T ING INS T R UC T IONS
To listen to your radio:
1.
2.
3.
4.
5.
Press the POWER Button to turn on your radio.
Press the FUNCTION Button one or more times until TUNER appears on
the display.
Press the BAND Button to select AM or FM.
Press and hold one of the SKIP/TUNING Buttons to go to an available
radio station.
Press one of the VOLUME Buttons to adjust the volume.
Improving reception:
Your clock radio has an FM antenna on the back. If you are listening to an FM
station and the reception is poor, move the antenna until reception improves.
If you are listening to an AM station and reception is not clear, rotate your radio
slightly until reception improves.
Programming radio station presets:
You can program as many as 10 FM and 10 AM radio station presets. After you
program a station, you can tune to the station by pressing one of the SKIP/TUNE
Buttons.
To program a radio station:
1.
2.
3.
4.
5.
6.
7.
8.
Press the POWER Button to turn on your radio.
Press the FUNCTION Button one or more times until TUNER appears
on the display.
Press the BAND Button to select AM or FM.
Press and hold one of the SKIP/TUNE Buttons to select a radio station.
Press and hold the MEM/CLK SET Button to activate the programming
mode.
Press one of the SKIP/TUNING Buttons to select the preset number you
want to assign the station to.
Press the MEM/CLK SET Button to store the station with the preset number
you selected.
Repeat Steps 4 through 7 to program additional presets.
8
OP E R A T ING INS T R UC T IONS
To tune to a radio station preset:
1.
2.
3.
4.
Press the POWER Button to turn on your radio.
Press the FUNCTION button one or more times until TUNER appears on
the display.
Press the BAND Button to select AM or FM.
Press the MEM DN or MEM UP Button one or more times until the preset
number you want appears on the display.
To select an equalizer mode:
Press the EQ Button one ore more times to select the mode you want
You can select:
* Classic
* Jazz
* Rock
* Pop
To Listen to a CD
Your radio can play audio CDs, CD-Rs and CD-RWs. CD-Rs and CD-RWs
must be finalized before you can play them on your radio.
To listening to a CD:
1.
2.
3.
4.
5.
6.
7.
8.
Press the POWER Button to turn on your radio.
Press the FUNCTION Button one or more times until "--" appears on
the display.
Press the OPEN/CLOSE Button to open the CD tray.
Place a CD with the label side up into the CD tray.
Press the OPEN/CLOSE Button to close the CD tray.
Press the PLAY/PAUSE Button to start playback.
To control the CD during playback:
* Press the PLAY/PAUSE Button to pause playback. Press the button
again to resume playback.
* Press one of the SKIP/TUNING Buttons to go to the next or previous
track on the CD.
* Press and hold one of the SKIP/TUNING Buttons to search for a track
on the CD.
Press the STOP Button to stop playback.
9
OP E R A T ING INS T R UC T IONS
To set up a CD playlist:
1.
2.
3.
4.
5.
6.
7.
8.
Press the POWER Button to turn on your radio, then Press the FUNCTION
Button one or more times until "--" appears on the display.
Insert a CD into the CD tray. If the CD starts playing, press the STOP Button.
Press the MEM/CLK SET Button. "PROG 0" appears on the display.
Press one of the SKIP/TUNING Buttons one or more times to select the first
track you want to program.
Press the MEM/CLK SET Button to confirm your selection.
Repeat Step 4 and 5 to add more tracks to your playlist.
Maximum can store up to 20 tracks.
When you have finished creating your playlist, press the PLAY/PAUSE
Button to start playing your playlist.
To edit a CD playlist:
1.
2.
3.
4.
While the CD is playing, press the STOP Button to stop playback.
Press the MEM/CLK SET Button to select one of the programmed tracks.
Press one of the SKIP/TUNING Buttons one or more times to select a new
track you want to program.
Repeat Steps 2 and 3 to edit aditional track selections.
To cancel a playlist:
While the CD is playing, do one of the following:
* Press the STOP Button twice.
* Press the FUNCTION Button.
* Press the OPEN/CLOSE Button to open the CD tray.
* Press the POWER Button to turn off your radio.
To repeat a track or an entire CD:
1.
2.
3.
4.
5.
Press the POWER Button to turn on your radio.
Press the FUNCTION Button one or more times until "--" appears on
the display.
Press the OPEN/CLOSE Button to open the CD tray.
Place a CD with the label side up in the tracy, then press the OPEN/CLOSE
button to close the tray.
Press the PLAY/PAUSE Button to start playback.
10
OP E R A T ING INS T R UC T IONS
6.
If you want to repeat a single track, press one of the SKIP/TUNING Buttons
one or more times to find the track you want to repeat, then press the
REPEAT button once.
OR
7.
If you want to repeat the entire CD, press the REPEAT Button twice.
To cancel repeat mode, press the REPEAT Button again.
To connect an external audio input device:
1.
2.
3.
4.
5.
6.
Make sure that your radio is turned off and unplugged from the power
outlet.
Plug the left and right audio connectors on an audio cable (not included)
into the L and R AUX IN jacks on the rear side of your clock radio.
Plug the other end of the audio cable into the other equipment Audio out jack
on the audio output device.
Plug the AC power cord into an power outlet, then press the POWER button
to turn on your radio.
Press the FUNCTION Button one or more times until AUX appears on the
display.
Turn on the external audio device and use the device's controls to control
playback.
Maintenance
To clean the exterior
* Use a soft cloth dampened with luke warm water only to clean the exterior
of your radio.
* Make sure that you do not drip water into your radio.
* Do not use solvents, such as benzene, because they may damage the
finish.
Caring for discs
* A dirty, scratched, or warped CD may cause skipping or noise.
.
11
OP E R A T ING INS T R UC T IONS
To clean the lens
* If the lens get dirty, your player may skip or may not play a CD
1.
2.
3.
Open the CD tray.
Use a camera lens blower/brush to blow on the lens once or twice, brush
the dust or particles off the lens, then blow again.
To remove fingerprints, use a dry cotton swab to wipe from the middle to
outer edge of the lens.
12
TROUBLESHOOTING GUIDE
PROBLEM
POSSIBLE CAUSE
SOLUTION
GENERAL
No sound is heard.
No sound is heard.
Power is not on.
Press the POWER button.
VOLUME Control is set
to minimum.
Adjust the VOLUME
Control.
Mute is on.
Press Mute on remote.
RADIO
Station has not been
tuned properly.
Tune station properly
.
FM reception is weak.
Extend the FM cord.
Wrong function is
selected.
Press the FUNCTION
button to the radio
position.
CD
All or part of the CD
will not play.
CD is inserted
incorrectly.
CD is scratched.
Make sure that the CD is
placed in the tray with the
label side up.
Try another CD.
CD is dirty
Clean the CD with
soft cloth
CD is warped
Try another CD.
Condensation has formed
inside your CD player.
Remove the CD and leave
the CD tray open for about
one hour to let the CD player
dry out.
Function swtich is not
set to CD.
Set Function switch to CD
CD compartment not
closed
Close CD compartment
door.
13