1
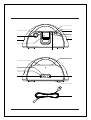
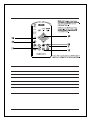
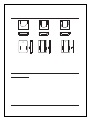
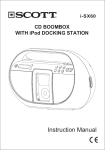
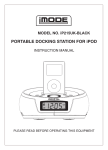
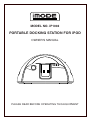
MODEL NO. iP1002
PORTABLE DOCKING STATION FOR iPOD
OWNER'S MANUAL
PLEASE READ BEFORE OPERATING THIS EQUIPMENT
Warnings and Precautions
TO PREVENT FIRE OR SHOCK HAZARDS, DO NOT EXPOSE
THIS UNIT TO RAIN OR MOISTURE.
This symbol, located on back or bottom of the unit, is intended to alert the
user to the presence of uninsulated “dangerous voltage” within the product’s
enclosure that may be of sufficient magnitude to constitute a risk of electric
shock to persons.
This symbol, located on back or bottom of the unit, is intended to alert the
user to the presence of important operating and maintenance (servicing)
instructions in the literature accompanying the appliance.
Any use of the controls or an adjustment to the procedures other than those
specified herein may result in hazardous radiation.
CAUTION: TO PREVENT ELECTRIC SHOCK, MATCH WIDE
BLADE OF PLUG TO WIDE SLOT, FULLY INSERT.
To reduce the risk of electric shock, do not remove cover (or back). There are
no user-serviceable parts inside. Please refer any servicing to qualified service
personnel.
WARNING: Changes or modifications to this unit not expressly approved by
the party responsible for compliance could void the user’s authority to operate
the equipment.
NOTE: This equipment has been tested and found to comply with the limits
for a Class B digital device, pursuant to Part 15 of the FCC Rules. These limits
are designed to provide reasonable protection against harmful interference in
a residential installation. This equipment generates, uses, and can radiate radio
frequency energy and, if not installed and used in accordance with the instructions, may cause harmful interference to radio communications. However, there
is no guarantee that interference will not occur in a particular installation. If
this equipment does cause harmful interference to radio or television reception, which can be determined by turning the equipment off and on, the user is
encouraged to try to correct the interference by one or more of the following
measures:
2
• Reorient or relocate the receiving antenna.
• Increase the separation between the equipment and receiver.
• Connect the equipment into an outlet on a circuit different from that to which
the receiver is connected.
• Consult the dealer or an experienced radio/TV technician for help.
Features
5
6
7
4
8
9
10
3
2
1
11
16
15
14
12
13
17
18
19
3
Features Defined
1 iPod Docking Station Connect your iPod, iPod mini, or iPod nano.
2 VOLUME Press the up arrow to increase the volume, and the down arrow to decrease volume.
3 LCD Display View the Time, AM Indicator, iPod Indicator, and Radio Frequency through this Liquid
Crystal Display.
4 POWER Press the POWER button to turn the radio off or on.
5 RADIO/AUX Press the FUNCTION button to switch between radio and Aux-in control.
6 MEM/CLK SET Press the MEM/CLK SET button to program a radio station into the presets, or to
adjust the clock.
7 FM Antenna The FM Rod Antenna provides flexibility and range when adjusting the FM reception. An
AM Antenna is built into the player.
8 IPOD Press the IPOD button to power on an iPod and enable control through the player.
9 BAND/STOP Press the BAND button to switch between AM or FM radio stations, or stop iPod playing.
10 Tuning/NEXT/PREV. Press the Tuning/NEXT/PREV. button to increase/decrease the radio frequency, or
to increase/decrease the clock time when adjusting the clock. When iPod playing, press this button to skip to
previous/next track or press & hold the button to backwards/forwards through a song.
11 PLAY/PAUSE/M-UP Press the PLAY/PAUSE/M-UP button to play or pause an iPod, or to cycle up
through the preset radio stations.
12 Line-Out Use the Line-Out jack to connect the player to external speakers.
13 Aux-In Use the Aux-in jack to connect an iPod shuffle or other audio device to the player.
14 Video Out Plug the yellow connector of an AV Cord in the Video Output to send a video signal from a
Video iPod to a source (TV) with a Video Input.
15 FM ST Toggle the FM ST switch between FM ST & FM MONO.
16 DBBS Press the DBBS button to switch BBS modes between On/Off.
17 AC Connector Plug in the detechable AC cord here.
18 Battery Compartment (8-C Batteries) The Battery Compartment allows the unit to run DC power.
19 AC Cord (120V / 60 Hz) The attached AC (Alternating Current) Cord provides power to the player.
4
Peripherals
iPOD
MENU
VOL
Peripheral Defined
20 Navigation Controls/SELECT Use the Navigation Controls to move through an iPod menu system, or
change the radio station. Press the SELECT button to select a song, photo, or video on your iPod.
21 ALBUM Press up on the ALBUM button up or down to cycle through the different albums.
22 SHUFFLE Press the SHUFFLE button to randomly play songs on an iPod.
23 PLAYLIST Press up on the PLAYLIST button up or down to cycle through the different playlists.
24 MUTE Press the MUTE button to cancel the volume entirely.
25 SLEEP Press the SLEEP button to set the player to turn off after 0-90 minutes.
26 REPEAT / M- Press the REPEAT button to switch between REPEAT 1,REPEAT ALL or off. Press the
M- button to cycle down through preset radio stations.
5
iPod Inserts
1. iPod nano 2GB/4GB
4. iPod w/video 30GB
2. iPod nano 2GB/4GB/8GB
5. iPod w/video 60GB/80GB
3. iPod mini 4GB/6GB
6. iPod photo & color U2 iPod 20GB/30GB
4G iPod & U2 iPod 20GB
3G iPod 10GB
Notes: Connect your iPod w/o inserts for below version
iPod photo 40GB/60GB
4G iPod 40GB
3G iPod 30GB/40GB
Operations
Setting the Clock
a. Press and hold the CLK SET button.
b. Press the Next/Prev button to toggle between 12HR and 24HR time, and press
the CLK SET button to select either option.
c. Press the Next/Prev button to cycle up/down through the hours. Press the CLK
CLK SET button to select the hour.
d. Press the Next/Prev button to cycle up/down through the minutes. Press the
CLK SET button to select the minute, and finish setting the time.
continued
6
Operations
Viewing Video or Photos from your iPod on an External Device
a. Using a video cable, connect an external device such as a TV to the Video
Out port on the player.
b. Insert your iPod with video or photo capabilities into the iPod Docking
Station with the appropriate insert.
c. You will now be able to control your iPod from the player’s control panel.
Using the PLAY/PAUSE, NEXT/SEARCH, and PREV/SEARCH buttons you
can move from one video or photograph to the next, play, and pause.
Connecting Other Digital Audio Devices
a. Use a line-in cord to connect an iPod shuffle or other audio device to the
line-in port.
b. Press the RADIO/AUX button to activate the Aux-in.
c. The iPod shuffle or other audio device will now play through the speakers of
the player.
7
Operations
How to using radio
1. Plug the AC Power cord into a power outlet and press the POWER button.
2. If necessary, press the RADIO/AUX button to radio mode.
3. Press the BAND button to switch between AM / FM radio station.
4. Automatic Tuning - Press and hold the TUNING UP or DN buttons until the
display begins to move, then release the buttons. The tuner will scan up or down
the band until it finds the first strong station, and then stop on that station. Repeat
this process until the tuner stops on your desired station.
5. Manual Tuning - Press and release the TUNING UP or DN buttons repeatedly
until the display is showing the frequency of your desired station. Use the manual
tuning method to tune to weaker stations that are bypassed during Automatic
Tuning.
Antennas AM - If reception is weak, turn the unit to improve reception. FM - If
reception is weak, adjust FM Rod Antenna length and the angle to improve
reception.
Programming radio station presets
You can program as many as 10 FM and 10 AM radio station presets.
1. During power on mode, press RADIO/AUX button to select AM/FM band.
2. Press the TUNING UP/DN buttons to desire station you want store.
3. Press and hold the MEM/CLK SET button to activate the programming mode.
4. Press the TUNING UP/DN buttons to select the preset number you want to
store.
5. Press and hold the MEM/CLK SET button to store the station.
6. Repeat Steps 2 through 5 to program additional presets.
8
Operations
To recall the radio station preset
1. Plug the AC Power cord into a power outlet and press the POWER button.
2. Press the RADIO/AUX Button on the front panel to radio mode.
3. Press the BAND button on the front panel to select AM/FM band.
4. Press the MEM-DN (button on the remote "M-") or PLAY/PAUSE/M-UP
Button repeatedly until the preset number you want appears on the display.
9
LIMITED PRODUCT WARRANTY
Audio Product
Telecom Product
TV
DVD Player
This quality product is warranted to be free from manufacturerís defects in material and workman-ship,
provided that the unit is used under the normal operating conditions intended by the manufacturer.
Should you have any problem with this product, please and it is highly recommended to visit our website at
www.curtisint.com before you take any other steps as we have additional copies of instruction manuals,
operating manuals and trouble shooting tips on our website which gives you the answer on most of the
questions you could have in operating the unit.
TERMS OF WARRANTY
C.I. Service Dept. warrants this product to be free from defects in materials and workmanship for 1 year on
parts and 90 days on labor.
Nothing within this warranty shall imply that C.I. will be responsible or liable for any damage to any items
placed in this product, whether due to any defect of the product, or its use, whether proper or improper.
EXCLUSIONS
Save as herein provided, C.I. Service Dept. (Canada) or C.I. Service Dept. (USA), there are no other
warranties, conditions, representations or guarantees, express or implied, made or intended by C.I. or its
authorized distributors and all other warranties, conditions, representations or guarantees, including any
warranties, conditions, representations or guarantees under any Sale of Goods Act or like legislation or
statue is hereby expressly excluded. Save as herein provided, C.I. Service Dept. (Canada) or C.I. Service
Dept. (USA), shall not be responsible for any damages to persons or property, including the unit itself,
howsoever caused or any consequential damages arising from the malfunction of the unit and by the
purchase of the unit, the purchaser does hereby agree to indemnify and save harmless C.I. from any claim
for damages to persons or property caused by the unit.
TO OBTAIN REPAIRS UNDER THE TERMS OF THIS WARRANTY
1. The original purchaser must present a copy of the original bill of sale and the service warranty card.
2. Any alterations, abuse, misuse, battery corrosion or accidental damage voids the warranty.
3. The warranty does not cover cabinets and accessories.
4. No warranty or insurance contained or set out shall apply when damage or repair is caused by power
failure; damage in transit or when moving the unit; improper power supply; use for commercial or
industrial purposes; service calls resulting in customer education, etc.
5. The defective product should be taken or mailed to:
Canada
C.I. Service Dept.
315 Attwell Drive
U.S.A
C.I. Service Dept.
181 Cooper Avenue
Etobicoke, Ontario.
Unit 104
M9W 5C1
Tonawanda, N.Y.
14150
5. If mailing the product, the freight must be prepaid and a money order for $7.00 should be included
to cover the cost of insurance and the return of the product.
6. C.I. reserves the right to repair or replace the parts which have become defective.
Model No.
Date Purchased
Serial No.