1
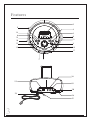
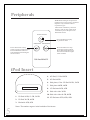
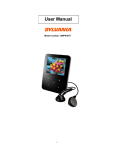
MODEL NO. iP215UK-BLACK
PORTABLE DOCKING STATION FOR iPOD
INSTRUCTION MANUAL
PLEASE READ BEFORE OPERATING THIS EQUIPMENT
Features
2
9
4
14
8
13
5
6
11
10
12
3
15
16
17
7
1
18
22
19
20
23
24
21
3
Features Defined
1
LCD Display View the time, AM Indicator, iPod Indicator, Radio Frequency, though this Liquid
Crystal Display.
2
3
4
IPOD Docking Station Connect your iPod, iPod mini, iPod nano.
PLAY/PAUSE Press the PLAY/PAUE button to play or pause an iPod playing.
REV Press the REV button to skip to previous a track on the iPod playing. Press and hold the REV
button to search backwards though a track on the iPod playing.
FWD Press the FWD button to skip to next track on the iPod playing. Press and hold the FWD
button to search forwards though a track on the iPod playing.
VOLUME Turn the VOLUME dial anti-clockwise to increase the volume and clockwise to decrease
the volume.
TUNING Turn the TUNING dial anti-clockwise to decrease the radio frequency and clockwise to
increase the radio frequency.
POWER Press the POWER button to turn unit on / off.
BUZZER . RADIO . IPOD/AUX Slide the BUZZER . RADIO . IPOD/AUX toggle switch to the
alarm sound wake to Buzzer / Radio / iPod or Aux mode.
AM . FM ST . IPOD/AUX Use the AM . FM ST . IPOD/AUX toggle switch to adjust the unit
between AM radio, FM ST radio, iPod / Aux mode.
CLOCK SET Use the CLOCK SET button in conjunction with the MIN and HOUR buttons to adjust
the clock time.
ALARM Use the ALARM button in conjunction with the MIN and HOUR buttonsto adjust the clock
time.
HOUR The HOUR button is used to adjust the hour when setting the clock.
MINUTE The MINUTE button is used to adjust the minute when setting the clock.
ALARM ON/OFF Press the ALARM ON/OFF toggle between alarm active or deactivate. Press
this button to stop alarm sound when the desired alarm time is reached.
SLEEP Press the SLEEP button to set the sleep timer from 0 ~ 60 minute.
SNOOZE Press the SNOOZE button to delay the alarm for 5 min. after the alarm sound.
AUX IN Use the AUX-IN jack to connect an iPod shuffle or other audio device to the unit .
AUX OUT Use the AUX-OUT jack to connect the player to external speakers.
VIDEO OUT Plug the yellow connector of an AV Cord in the VIDEO OUT to send a video signal
from a Video iPod to a source (TV) with a Video Input.
FM Antenna The FM Antenna is extendable and adjustable. An AM Antenna is built into the unit.
DIMMER Toggle the DIMMER switch between HI and LO to adjust the brightness of the LCD
Display.
AC Cord (120V/60 Hz) The attached AC (Alternating Current) Cord provides power to the unit.
BATTERIES Compartment (AAA size X2) The BATTERIES back-up will save the clock and
alarm settings in case of power outage. The display will not be active without AC Power (batteries
not included). NOTES: DO NOT MIX OLD AND NEW BATTERIES.
5
6
7
8
9
10
11
12
13
14
15
16
17
18
19
20
21
22
23
24
4
Peripherals
WARNING: Danger of explosion
if batteries are incorrectly installed.
Replace only with the same or
equivalent type.
The button cell battery contains
mercury. Do not put in the trash,
instead recycle or dispose of as
hazardous waste.
PLAY/PAUSE
Press the button to play
or pause an iPod.
SKIP/REV SKIP/FWD
Press the button to skip
to the next track on iPod.
Press & hold the button to
search forwards through a
track on iPod.
Press the button to skip
to the previous track on iPod.
Press & hold the button to
search backwards through a
track on iPod.
FOR iPod REMOTE
iPod Insert
4. 4G iPod, U2 iPod 20GB
5. 4G iPod 40GB
6. iPod photo, Color U2 iPod 20 GB, 30GB
7. iPod photo 40GB, 60GB
8. 1G iPod nano2GB, 4GB
9. iPod with video 30GB
10. iPod with video 60 GB, 80GB
1. 3G iPod 10GB, 15 GB, 20 GB
11. 2G iPod nano 2GB, 4GB, 8GB
2. 3G iPod 30 GB, 40GB
3. iPod mini 4GB, 6GB
5
Notes: The number engrave in the backside of the inserts
Operations
Setting the Clock
a. With the power off, press and hold the CLOCK SET button.
b. Press the HOUR and MIN button to set the clocks hour and minute.
c. Once set, release the CLOCK SET button to confirm.
Setting the Alarm
a. With the power off, press and hold the ALARM SET button.
b. Press the HOUR and MIN button to set the clocks hour and minute.
c. Once set, release the ALARM SET button to confirm.
d. Slide the BUZZER . RADIO . IPOD/AUX switch to alarm source.
Viewing Video or Photos from your iPod on an External Device
a. Using a video cable, connect an external device such as a TV to the Video Output
on the unit.
b. Insert your iPod with video or photo capabilities into the iPod Docking Station with
the appropriate insert.
c. You will now be able to control our iPod from the unit control panel.
Using the PLAY / PAUSE, REV / FWD buttons you can move from one video or
photograph to the next, play, and pause.
6
Operations
Connecting Other Digital Audio Devices
a. Use a line-in cord to connect an iPod shuffle or other audio device to the AUX-IN
port.
b. Slide the BUZZER . RADIO . IPOD/AUX switch to activate the AUX-IN.
C. The iPod shuffle or other audio device will now play through the speakers of the
unit.
How to Use Radio
a. Power on the unit, slide the AM . FM ST . IPOD/AUX switch to radio AM/FM ST
mode.
b. Using the TUNING dial to increase/decrease the radio frequency.
c. Using the VOLUME dial to increase/decrease the volume sound.
Antennas AM - If reception is weak, turn the unit to improve reception. FM - If
reception is weak, adjust FM Wire Antenna length and the angle to improve reception.
7
LIMITED PRODUCT WARRANTY
Audio Product / Telecom Product / TV / DVD Product
This quality product is warranted to be free from manufacturerʼs defects in material and workman-ship,
provided that the unit is used under the normal operating conditions intended by the manufacturer.
Should any problems arise with this product, it is highly recommended to visit our website at
www.curtisint.com. To better serve our valued customers, additional copies of operating manuals and trouble shooting
tips have been posted on our website.
If your query remains unresolved, please feel free to email our support team at: [email protected] or call our UK
Customer helpline at: 0 800 032 5264
TERMS OF WARRANTY
Curtis International LTD warrants this product to be free from defects in materials and workmanship for 1 year on parts
and 90 days on labor.
Nothing within this warranty shall imply that Curtis International LTD will be responsible or liable for any damage to
any items placed in this product, whether due to any defect of the product, or its use, proper or improper.
This warranty is in addition to, and in no way impacts upon, your statutory rights.
TO OBTAIN REPLACEMENT / CREDIT / or REPAIRS UNDER THIS WARRANTY
1. The original purchaser must present a copy of the original bill of sale and this service warranty card.
2. Any alterations, abuse, misuse, battery corrosion or accidental damage voids the warranty.
3. The warranty does not cover cabinets and non essential accessories.
4. No warranty or insurance contained or set out shall apply when damage or repair is caused by power
failure; damage in transit by the consumer , or when moving the unit; improper power supply; use for commercial
or industrial purposes; service calls resulting in customer education, etc.
5. The defective product should be taken to your original supplier
6. Curtis International LTD reserves the right to repair or replace the parts which have become defective.
Please record the appropriate information indicated below on this Warranty Card and retain with your proof
of purchase.
Model No……………… Serial No……………………..
Date Purchased……………………………… Supplier / Retailer ………………………..