1
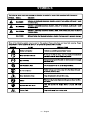
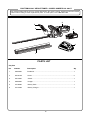
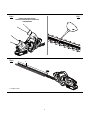
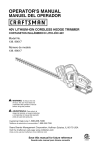
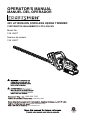
OPERATOR'S MANUAL
MANUEL DEL OPERADOR
40V LITHIUM-ION CORDLESS HEDGE TRIMMER
CORTASETOS INALÁMBRICO LITIO-IÓN 40V
Model No.
138. 99017
Número de modelo
138. 99017
1-888-266-7096
1-888-266-7096
www.craftsman.com
www.craftsman.com
TABLE OF CONTENTS / ÍNDICE DE CONTENIDO
ENGLISH
ESPAÑOL
■■ Warranty...................................................................2
■■ Garantía.............Inlges seccion................................2
■■ Introduction...............................................................2
■■ Introducción..............Inlges seccion..........................2
■■ General Safety Rules................................................3
■■ Reglas de seguridad generales.............................3-4
■■ Specific Safety Rules.............................................4-5
■■ Reglas de seguridad específicas...........................4-5
■■ Symbols................................................................ 6-7
■■ Símbolos................................................................6-7
■■ Features....................................................................8
■■ Características..........................................................8
■■ Assembly...................................................................8
■■ Armado..................................................................... 8
■■ Operation.............................................................9-10
■■ Funcionamiento....................................................9-11
■■ Maintenance............................................................11
■■ Mantenimiento....................................................11-12
■■ Illustrated parts list..................................................12
■■ Figura numeras (ilustraciones).................................i-ii
■■ Figure numbers (illustrations)..................................i-ii
CRAFTSMAN® FOUR YEAR FULL WARRANTY
FOR FOUR YEARS from the date of purchase this product is warranted against any defects in material or
workmanship. FOR TWO YEARS from the purchase date a supplied battery pack or charger is warranted against
material or workmanship defects. With proof of purchase, a defective product will be replaced free of charge.
For warranty coverage details to obtain free replacement, visit the web site: www. craftsman. com
This warranty is void if this product is ever used while providing commercial services or if rented to another person.
This warranty gives you specific legal rights, and you may also have other rights which vary from state to state.
Sears Brands Management Corporation, Hoffman Estates, IL 60179
***
GARANTÍA COMPLETA DE CUATRO AÑOS CRAFTSMAN®
Esta soplador tiene garantía por cualquier defecto en material o mano de obra DURANTE CUATRO AÑOS desde
la fecha de compra. Las baterías y el cargador tienen garantía por cualquier defecto durante dos año desde la fecha
de compra. Los productos defectuosos se remplazarán sin cargo.
Para conocer los detalles sobre la cobertura de la garantía para obtener un remplazo gratuito, visite el sitio
web: www.craftsman.com.
La garantía pierde validez si este producto se utiliza mientras se prestan servicios comerciales o si se alquila a otra persona.
Esta garantía le otorga derechos legales específicos y es posible que también tenga derechos que varían según el estado.
Sears Brands Management Corporation, Hoffman Estates, IL 60179
2 — English
INTRODUCTION / INTRODUCCIÓN
This tool has many features for making its use more pleasant and enjoyable. Safety, performance, and
dependability have been given top priority in the design of this product making it easy to maintain and operate.
***
Esta herramienta ofrece numerosas características para hacer más agradable y placentero su uso. En el
diseño de este producto se ha conferido prioridad a la seguridad, el desempeño y la fiabilidad, por lo cual se
facilita su manejo y mantenimiento.
GENERAL SAFETY RULES
WARNING: Read and understand all
instructions. Failure to follow all instructions
listed below may result in electric shock, fire,
and/or serious personal injury.
READ ALL INSTRUCTIONS
■■ Know your hedge trimmer. Read and understand
the operator’s manual and observe the warnings
and instruction labels affixed to the hedge
trimmer.
■■ Disconnect Hedge Trimmer – remove battery from
hedge trimmer when not in use, before servicing,
when changing accessories, such as blade and
the like.
■■ Do Not Overreach — Keep proper footing and
balance at all times. Proper footing and balance
enables better control of the hedge trimmer in
unexpected situations. Do not use on a ladder or
unstable support.
■■ Do not operate in poor lighting.
■■ Stay alert — watch what you are doing and
use common sense when operating a power
hedge trimmer. Do not use hedge trimmer while
tired or under the influence of drugs, alcohol,
or medication. A moment of inattention while
operating power hedge trimmers may result in
serious personal injury.
■■ Keep hands, face, and feet at a safe distance from
moving parts. Do not touch or try to stop the cutting
blades when they are moving.
■■ Do not allow children or untrained individuals to
use this unit.
■■ Avoid Accidental Starting — Be sure switch is
in the locked or off position before plugging into
power cord. Carrying hedge trimmers with your
finger on the switch or plugging the power cord
into a hedge trimmer with the switch on invites
accidents.
■■ Use Safety Glasses — always wear eye
protection with side shields marked to comply
with ANSI Z87.1.
■■ Protect your lungs. Wear a face or dust mask
if the operation is dusty. Following this rule will
reduce the risk of serious personal injury.
■■ Dress Properly — Do not wear loose clothing or
jewelry. Contain long hair. Loose clothes, jewelry,
or long hair can get caught in moving parts.
■■ Wear heavy long pants, long sleeves, boots, and
gloves. Do not wear loose fitting clothing, short
pants, sandals, or jewelry of any kind. Do not go
barefoot.
■■ Secure long hair so it is above shoulder level to
prevent entanglement in any moving parts.
■■ Keep Children Away — keep all bystanders,
children, and pets at least 50 feet away.
■■ Use Right Appliance – do not use appliance for
any job except that for which it is intended.
■■ Don’t Force Hedge Trimmer. It will do the job
better and less with likelihood of risk of injury at
the rate for which it was designed
■■ Do not use hedge trimmer if switch does not
turn it on or off. A hedge trimmer that cannot be
controlled with the switch is dangerous and must
be repaired.
■■ Avoid Dangerous Environments — Do not use the
hedge trimmer in damp or wet locations. Do not
operate the hedge trimmer in rain.
■■ Maintain Hedge Trimmer with Care — Follow
instructions for lubrication and changing
accessories, keep handles dry, clean and free from
oil and grease. Keep cutting blades sharp and
clean. Properly maintained hedge trimmers with
sharp cutting edges are less likely to bind and are
easier to control and reduce risk of injury.
■■ Check for misalignment or binding of moving
parts, breakage of parts, and any other condition
that may affect the hedge trimmer’s operation. If
damaged, have the hedge trimmer serviced before
using. A guard or any other part that is damaged
should be carefully checked to determine that it will
operate properly and perform its intended function.
Many accidents are caused by poorly maintained
hedge trimmers.
3 — English
GENERAL SAFETY RULES
■■ Keep the hedge trimmer and its handle dry, clean
and free from oil and grease. Always use a clean
cloth when cleaning. Never use brake fluids,
gasoline, petroleum based products, or any strong
solvents to clean your hedge trimmer. Following
this rule will reduce the risk of loss of control and
deterioration of the enclosure plastic.
■■ Hedge trimmer service must be performed only by
qualified repair personnel. Service or maintenance
performed by unqualified personnel may result in
a risk of injury.
■■ When servicing a hedge trimmer, use only
identical replacement parts. Follow instructions in
the Maintenance section of this manual. Use of
unauthorized parts or failure to follow Maintenance
instructions may create a risk of shock or injury.
■■ To avoid the risk of electric shock, do not operate
unit in damp or wet locations.
■■ Use only accessories that are recommended by the
manufacturer for your model. Accessories that may
be suitable for one hedge trimmer may create a
risk of injury when used on another hedge trimmer.
SPECIFIC SAFETY RULES
■■ Before starting the hedge trimmer, make sure
the blade is not in contact with any object.
■■ Stop the unit, remove the battery, and make
sure the blade has stopped before setting the
unit down.
■■ Never cut any material with a diameter larger
than 2/3 in.
■■ DANGER! Risk of cut. Keep hands away from
blades. Do not attempt to remove cut material
or hold material to be cut when blades are
moving. Keep both hands on handles when
power is on. Make sure battery is removed and
the trigger is released when clearing jammed
material from blades. Do not grasp the exposed
cutting blades or cutting edges when picking up
or holding the unit.
■■ Blades coast after unit is turned off.
■■ Always stop the motor when cutting is delayed
or when walking from one cutting location to
another.
■■ Keep unit clean of grass clippings and other
materials. They may become lodged in the
cutting blades.
■■ Store Idle Hedge Trimmer Indoors — When
not in use, product should be stored indoors
in a dry, locked up place—out of the reach of
children.
■■ Remove the battery pack before making any
adjustments, cleaning, storing, or removing material
from the unit, or when not in use.
■■ A battery pack must be recharged only with the
specified charger for the battery pack. A charger that
may be suitable for one type of battery pack may
create a risk of fire when used with another battery
pack. Use battery pack only with charger listed.
■■ To reduce the risk of explosion and possible injury,
DO NOT place battery units or their batteries near
fire or heat.
■■ Do not mutilate the battery pack. Released
electrolyte is corrosive and may cause damage to
the eyes or skin. It may be toxic if swallowed.
■■ Batteries can explode in the presence of a source
of ignition, such as a pilot light. To reduce the risk
of serious personal injury, never use any cordless
product in the presence of open flame. An exploded
battery pack can propel debris and chemical. If
exposed, flush with water immediately.
■■ For use with Craftsman 40 V lithium-ion battery
packs (#29111 2Ah and #29131 4Ah). Refer to your
battery owners manual for further information.
■■ Replace scabbard cover when unit is not in
use.
■■ Never douse or squirt the unit with water or any
other liquid. Keep handles dry, clean, and free
from debris. Clean after each use; see storage
instructions.
■■ Secure the unit while transporting.
BATTERY SAFETY
■■ Battery operated units do not have to be plugged
into an electrical outlet; therefore, they are always in
operating condition. Be aware of possible hazards
even when unit is not operating.
■■ Do not charge unit in a damp or wet location.
Following this rule will reduce the risk of electric
shock.
■■ For best results, your battery unit should be charged
in a location where the temperature is more than
50°F (10°C) but less than 100°F (38°C). Do not store
outside or in vehicles.
4 — English
SPECIFIC SAFETY RULES
■■ Under extreme usage or temperature conditions,
battery pack leakage may occur. If liquid comes
in contact with your skin, wash immediately with
soap and water, then neutralize with lemon juice
or vinegar. If liquid gets into your eyes, flush
them with clean water for at least 10 minutes,
then seek immediate medical attention.
■■ Do not crush, drop or damage battery pack. Do
not use a battery pack or charger that has been
dropped or received a sharp blow. A damaged
battery is subject to explosion. Properly dispose
of a dropped or damaged battery immediately.
■■ When battery pack is not in use, keep it away
from other metal objects like: paper clips, coins,
keys, nails, screws, or other small metal objects
that can make a connection from one terminal
to another. Shorting the battery pack terminals
together may cause sparks, burns, or a fire.
■■ Save these instructions. Refer to them frequently
and use them to instruct others who may use
this hedge trimmer. If you loan someone this
hedge trimmer, loan them these instructions
also.
■■ Do not dispose of batteries in a fire. The cell
may explode. Batteries should be recycled.
Consult your local waste authority for information
regarding available recycling and/ or disposal
options.
CALIFORNIA PROPOSITION 65
WARNING: This product and some dust created by power sanding, sawing, grinding, drilling, and
other construction activities may contain chemicals, including lead, known to cause cancer, birth defects or
other reproductive harm. Wash hands after handling. Some examples of these chemicals are:
• lead from lead-based paints,
• crystalline silica from bricks and cement and other masonry products, and
• arsenic and chromium from chemically-treated lumber.
Your risk from these exposures varies, depending on how often you do this type of work. To reduce your
exposure to these chemicals: work in a well ventilated area, and work with approved safety equipment, such
as those dust masks that are specially designed to filter out microscopic particles.
SAVE THESE INSTRUCTIONS
5 — English
SYMBOLS
6 — English
SYMBOLS
7 — English
FEATURES
PRODUCT SPECIFICATIONS
Motor...................................................................40 V DC
Cutting Speed................................................ 1600 cuts/min
Blade Length.......................................................... 24 in.
Weight(without battery pack).......................5.5 Ibs (2.5 Kg)
Cutting Capacity.................................................... 2/3 in.
KNOW YOUR HEDGE TRIMMER
TRIGGER SWITCH AND LOCK OFF BUTTON
See Figure 1, page i.
The trigger switch, located beneath the rear handle, and
the lock-off button, located behind the front handle, must
be depressed simultaneously to allow blade rotation.
Lock-off switch may be released once hedge trimmer is
running.
The safe use of this product requires an understanding
of the information on the tool and in this operator’s
manual as well as a knowledge of the project you
are attempting. Before use of this product, familiarize
yourself with all operating features and safety rules.
ROTATING HANDLE
GUARD
The guard helps to deflect chips or other debris away
from the operator’s hands.
The handle of your hedge trimmer rotates 90 degrees to
the left or right for control and precision trimming.
ADJUSTABLE AUXILIARY HANDLE
The adjustable auxiliary handle adjusts to 3 positions
for better comfort and control.
ASSEMBLY
UNPACKING
This product requires no assembly.
■■ Carefully remove the product and any accessories
from the box. Make sure that all items listed in the
packing list are included.
■■ Inspect the product carefully to make sure no
breakage or damage occurred during shipping.
■■ Do not discard the packing material until you have
carefully inspected and satisfactorily operated the
product.
■■ If any parts are damaged or missing, please call
1-888- 266-7096 for assistance.
PACKING LIST
Hedge Trimmer
Scabbard
Operator’s Manual
40v Battery
40v Charger
8 — English
WARNING: If any parts are damaged or
missing, do not operate this product until the
parts are replaced. Failure to heed this warning
could result in serious personal injury.
WARNING:
Do not attempt to modify
this product or create accessories not
recommended for use with this product. Any
such alteration or modification is misuse and
could result in a hazardous condition leading to
possible serious personal injury.
WARNING:
Do not connect to power
supply until assembly is complete. Failure to
comply could result in accidental starting and
possible serious personal injury.
OPERATION
WARNING: Do not allow familiarity with this
product to make you careless. Remember that
a careless fraction of a second is sufficient to
inflict serious injury.
WARNING: Always wear safety goggles or
safety glasses with side shields that comply
with ANSI Z87.1 when operating power tools.
Failure to do so could result in objects being
thrown into your eyes, resulting in possible
serious injury.
CAUTION: When placing battery pack in the tool,
be sure raised rib on battery pack aligns with the
bottom of the tool and latches into place properly.
Improper installation of the battery pack can cause
damage to internal components.
To remove:
■■ Place the power switch in the OFF position.
■■ Locate the latch on the front of the battery pack and
depress to release the battery pack from the hedge
trimmer.
WARNING: Do not use any attachments
■■ Remove battery pack from the hedge trimmer.
or accessories not recommended by the
manufacturer of this product. The use of
WARNING: Battery tools are always in
attachments or accessories not recommended
operating condition. Therefore, switch should
can result in serious personal injury.
always be locked with hands free of the lock-out
button when not in use. Remove battery pack
Before each use, inspect the entire product for damwhen transporting or carrying hedge trimmer to
aged, missing, or loose parts such as screws, nuts,
avoid accidental starting, which may result in
bolts, caps, etc. Tighten securely all fasteners and
serious injury.
caps and do not operate this product until all missing
or damaged parts are replaced by qualified repair
personnel. Call 1-888-266-7096 to obtain replaceBATTERY PROTECTION FEATURES
ment parts. Part installation should only be performed
by qualified repair personnel.
Craftsman 40 V lithium-ion batteries are designed with
features that protect the lithium-ion cells and maximize
APPLICATIONS
battery life. Under some operating conditions, these
You may use this product for the purpose listed below: built-in features may cause the battery and the tool it is
powering to act differently from nickel-cadmium batteries. During some applications, the battery electronics
■■ Trimming and shaping hedges and shrubbery
may signal the battery to shut down, and cause the
tool to stop running.
IMPORTANT: For complete charging instructions,
refer to the Operator’s Manuals for the Craftsman 40 To reset the battery and tool, place the power switch in
volt battery pack and charger.
the OFF position; then start the unit and resume normal operation. If placing the power switch in the OFF
position does not reset the battery and tool, the battery
TO INSTALL / REMOVE BATTERY PACK
pack is depleted.If depleted, the battery pack will begin
charging when placed on the lithium-ion charger.
See Figure 2, page i.
WARNING: Always remove battery pack
from the product when you are assembling
parts, making adjustments, cleaning, or when
not in use. Removing battery pack will prevent
accidental starting that could cause serious
personal injury.
To install:
■■ Place the power switch in the OFF position.
STARTING AND STOPPING THE HEDGE TRIMMER
See Figure 3, page i.
To start:
■■ Remove the scabbard.
■■ Press and hold the lock-out button.
■■ Depress the switch trigger.
■■ Place the battery pack in the hedge trimmer. Align ■■ Release the lock-out button. Continue to depress
the switch trigger for extended operation.
raised rib on battery pack with groove in the hedge
trimmer’s battery port.
■■ Make sure the latch on the battery pack snaps in
place and that the battery pack is secured in the
hedge trimmer before beginning operation.
9 — English
OPERATION
CUTTING TIPS
To stop:
■■ Release the switch trigger to stop the hedge
trimmer.
■■ Upon release of the switch trigger, the locked-out
button will automatically reset to the locked-out
position.
USING THE ROTATING REAR HANDLE
See Figure 4, page i.
■■ Place the hedge trimmer on a flat and even
surface and disconnect from the power supply.
■■ Make sure that you released the triggers.
■■ Press the lock button and begin turning the rear
handle. Release the lock button and turn the
handle 90 degrees to either side until it clicks into
place and the button pops out.
DANGER: Never cut near electric cords
or lines. If blade jams on any electrical cord
or line, DO NOT TOUCH THE BLADE! IT
CAN BECOME ELECTRICALLY LIVE AND
VERY DANGEROUS. Continue to hold the
hedge trimmer by the insulated rear handle
or lay it down and away from you in a safe
manner. Disconnect the electrical service to the
damaged line or cord before attempting to free
the blade from the line or cord. Contact with
the blade, other conductive parts of the hedge
trimmer, or live electric cords or lines will result
in death by electrocution or serious injury.
WARNING: Clear the area to be cut before
each use. Remove all objects such as cords,
lights, wire, or loose string which can become
entangled in the cutting blade and create a risk
of serious personal injury.
■■ To turn the handle back to center, press the lock
button again, turn the handle slightly, release the
lock button and continue turning the handle until it
■■ Before starting the hedge trimmer, hold the unit
locks into place.
with both hands with the cutting blades directed
away from you. Always use the hedge trimmer
properly.
USING THE ADJUSTABLE AUXILIARY HANDLE
■■ Do not force the hedge trimmer through heavy
shrubbery. This can cause the blades to bind and
slow down. If the blades slow down, reduce the
■■ Place the hedge trimmer on a flat and even
pace.
surface and disconnect from the power supply.
■■ Do not try to cut stems or twigs that are larger
■■ Make sure that you released the triggers.
than 2/3 in. thick, or those obviously too large to
■■ Press the side lock button on the handle and
feed into the cutting blade. Use a non-powered
begin moving forward or backwards. Release the
hand saw or pruning saw to trim large stems.
lock button and continue moving the handle until
See Figure 5, page i.
it locks into place.
HOLDING THE HEDGE TRIMMER
■■ If blades do become jammed, stop the motor,
allow the blades to stop and remove the battery
pack before attempting to remove the obstruction.
■■ If desired, you can use a string to help cut your
hedge level. Decide how high you want the
hedge. Then, stretch a piece of string along the
■■ The unit has both a front adjustable auxiliary
hedge at this height. Trim the hedge just above
handle and a rotating rear handle. With the blade
this guide line of string. Trim the side of a hedge
directed away from you, hold the unit by both
so that it will be slightly narrower at the top. More
handles.
of the hedge will be exposed when shaped this
way, and it will be more uniform.
WARNING: Always keep both hands on the
hedge trimmer handles. Never hold shrubs with ■■ Always hold hedge trimmer with both hands when
one hand and operate hedge trimmer with the
operating. Use a firm grip on the handles. The
other. Failure to heed this warning can result in
unit is used for cutting in either direction in a slow,
serious injury.
sweeping action from side to side.
See Figures 6, pages ii.
■■ Wear gloves when trimming thorny or prickly
growth.
■■ When trimming new growth, use a wide sweeping
action, so that the stems are fed directly into
the cutting blade. Older growth will have thicker
stems and will be trimmed easiest by using a
sawing movement.
10 — English
MAINTENANCE
WARNING: When servicing, use only
identical replacement parts. Use of any other
parts may create a hazard or cause product
damage.
WARNING: Always wear eye protection
with side shields marked to comply with ANSI
Z87.1. Failure to do so could result in objects
being thrown into your eyes resulting in
possible serious injury.
WARNING:
To avoid serious personal
injury, always remove the battery pack from
the product before inspecting, cleaning or
performing any maintenance.
LUBRICATING THE BLADE
See Figure 7, page ii.
WARNING:
Always allow the blades of the
hedge trimmer to come to a stop and remove
the battery pack before lubricating. Failure to
do so could result in accidental starting causing
possible serious personal injury.
For easier operation and longer blade life, lubricate
the hedge trimmer blade before and after each use.
■■ Remove the battery pack from the hedge trimmer.
■■ Lay the hedge trimmer on a flat surface. Apply light
weight machine oil along the edge of the top blade.
NOTE: If you will be using the hedge trimmer for
an extended time, it is advisable to oil the blade
periodically.
GENERAL MAINTENANCE
Avoid using solvents when cleaning plastic parts.
Most plastics are susceptible to damage from various
types of commercial solvents and may be damaged
■■ Stop the hedge trimmer.
by their use. Use clean cloths to remove dirt, dust,
■■ Remove the battery pack.
oil, grease, etc.
■■ Lubricate the hedge trimmer as described above.
WARNING: Do not at any time let brake
■■ Reinstall the battery pack and resume use.
fluids, gasoline, petroleum-based products,
penetrating oils, etc., come in contact with
CLEANING THE HEDGE TRIMMER
plastic parts. Chemicals can damage, weaken
■■ Remove the battery pack.
or destroy plastic which may result in serious
■■ Slide the scabbard over the blade.
personal injury.
dirt and debris from the body of the hedge
Replacement parts should only be installed by quali- ■■ Clean
trimmer, using a damp cloth with a mild detergent.
fied repair personnel.
NOTE: Do not use any strong detergents on the
plastic housing or the handle. They can be damaged
BATTERY PACK REMOVAL AND PREPARATION by certain aromatic oils such as pine and lemon, and
by solvents such as kerosene.
FOR RECYCLING
WARNING:
Upon removal, cover the
battery pack’s terminals with heavy-duty
adhesive tape. Do not attempt to destroy or
disassemble battery pack or remove any of
its components. Batteries must be recycled
or disposed of properly. Also, never touch
both terminals with metal objects and/ or body
parts as short circuit may result. Keep away
from children. Failure to comply with these
warnings could result in fire and/or serious
injury.
TRANSPORTING AND STORING
■■ Always place the scabbard on the blade before
storing or transporting the hedge trimmer. Use
caution to avoid the sharp teeth of the blade.
■■ Clean the hedge trimmer thoroughly before
storing. Store the hedge trimmer indoors, in a dry
place that is inaccessible to children. Keep away
from corrosive agents such as garden chemicals
and de-icing salts.
■■ Moisture can cause a shock hazard. Wipe off any
moisture with a soft dry cloth.
■■ Use a small brush or the air discharge of a small
vacuum cleaner brush to clear dust or debris from
the air vents on the motor housing.
STORING THE HEDGE TRIMMER
See Figure 8, page ii.
■■ Clean the hedge trimmer thoroughly before storing.
Store the hedge trimmer in a dry, well-ventilated
place that is inaccessible to children. Keep away
from corrosive agents such as garden chemicals
and de-icing salts.
■■ Always place the scabbard on the cutting blades
before storing.
11 — English
CRAFTSMAN 40 V HEDGE TRIMER – MODEL NUMBER 138. 99017
The model number will be found on a label attached to the motor housing. Always mention the model
number when calling to order replacement parts. To order parts, call 1-888-266-7096
4
3
2
5
6
1
PARTS LIST
Key Part
No.
Number
Description
Qty
1
34991887
Scabbard..............................................................................................1
2
3221675A
Screw...................................................................................................2
3
34101887
Guard...................................................................................................1
4
34981887
Hedger................................................................................................ 1
5
31103996
Battery Pack........................................................................................1
6
31101998
Battery Charger...................................................................................1
12
See this section for all of the figures referenced in the
operator’s manual.
Consulte esta sección para ver todas las figuras a las que se hace
referencia en el manual del operador.
D
Fig. 1
A
E
F
C
G
B
A - Blades (hojas)
B - Scabbard (funda)
C - Guard (protección)
D - Adjustable auxiliary handle
(Mango auxiliar ajustable)
E - Lock button for rotating handle
(Botón de bloqueo para la manija giratoria. )
F - Lock-out button (botón del seguro)
G - Rear Handle with overmold
(mango trasero con sobremoldeado)
H - Switch trigger (gatillo)
I - Side lock button (Botón de bloqueo lateral)
H
I
Fig. 2
Fig. 3
A
B
A
C
B
A - Battery pack (paquete de baterías)
B - Battery port (receptáculo para baterías)
C - Latches (pestillos)
A - Lock-out button (botón del seguro)
B - Switch trigger (gatillo del interruptor)
Fig. 4
Fig. 5
A
A - Lock button for rotating handle
(Botón de bloqueopara la manija giratoria)
A
A - Side lock button (Botón de bloqueo lateral)
i
Fig. 6
Fig. 7
PROPER OPERATING POSITION
POSICIÓN CORRECTA PARA EL MANEJO DE
LA HERRAMIENTA
Fig. 8
A
A - Scabbard (funda)
ii