1
Save This Manual'
For Future Reference
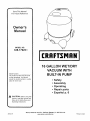
Owner's
Manual
MODEL NO.
338.17923_
CRAFT.TMFIN
Model Number
The model number may be found
on the nameplate. You should
record the model number in a safe
place for future use.
_,
16 GALLON WET/DRY
VACUUM WITH
BUILT-IN PUMP
o-Safety
• Assembly
• Operating
QRepair parts
° EspaSol p. 6
CAUTION:
Before using this
vacuum, read this manual and
follow all its Safety Rules and
Operating Instructions.
Sears,
87523-71
Roebuck
and Co., Hoffman Estates,
www.sears.com/craftsman
IL. 60179 U.S.A.
Printed in USA
•
Item
Page
Warranty Information ...........................
Safety Instructions
............................
Unpacking Carton Contents
.....................
Assembly
...................................
Operation
...................................
Storage .....................................
Troubleshooting
..............................
Repair Parts ...........................
2
2,3
3
3
4,5
6
6
See Insert
FULL ONE YEAR WARRANTY ON
CRAFTSMAN
WET/DRY VACUUM
If this Craftsman Wet/Dry Vacuum fails due to a defect in matedals or workmanship within one year from the date of purchase,
Sears will repair or replace it, at Sears option, free of charge. For
warranty service, return the Wet/Dry Vacuum to your nearest
Sears Service Center or Sears Store in the United States.
Keep hair, loose clothing, fingers and all parts of body
away from openings and moving parts.
•
Do not pick up anything that is burning or smoking, such
as cigarettes, matches or hot ashes.
•
Turn off all controls before unplugging.
Do not use without dust bag and/or filters in place.
Use extra care when cleaning
on stairs.
Do not use to pick up flammable or combustible liquids
such as gasoline or use in areas where they may be present.
Do not use your vacuum cleaner as a sprayer of flammable liquids such as oil base paints, lacquers, household
cleaners, etc.
•
Do not vacuum toxic, carcinogenic, combustible or other
hazardous materials such as asbestos, arsenic, barium,
beryllium,
materials.
If this Craftsman WetJOry Vacuum is used in a commercial enterpdse of any sort, including rental use, this warranty coverage
applies for only 90 days from the date of purchase.
lead, pesticides or other health endangering
Specially designed units are available for these
purposes.
Do not pick up soot, cement, plaster or drywall dust without cartridge filter and collection filter bag in place. These
are very fine particles that may pass through the foam
and affect the performance of the motor or be exhausted
back into the air. Additional collection filter bags are avaiF
able from Sears.
This warranty applies only while this product is used in the United
States.
This warranty gives you specific legal rights, and you may also
have other rights which vary from state to state.
Sears, Roebuck and Co., Dept. 817WA, Hoffman Estates,
IL 60179
Do not put any object into openings. Do not use with any
openings blocked; keep free of dust, lint, hair and anything that may reduce air flow.
•
Do not leave the cord lying on the floor once you have finished the cleaning job. It can become a tripping hazard.
Use special care when emptying
To avoid spontaneous
When using an electrical appliance, basic precautions
should always be followed, including the following:
Read all instructions
before using this product.
WARNING:
To reduce the risk of fire, electric
shock or injury.
Do not leave vacuum cleaner when plugged in. Unplug
from outlet when not in use and before servicing.
Connect to a properly grounded outlet only. See
Grounding Instructions.
•
empty tank after each
use.
•
The operation of a utility vacuum cleaner can result in foreign objects being blown into eyes, which can result in
eye damage. Always wear safety goggles when operating
vacuum.
STAY ALERT. Watch what you are doing and use common sense. Do not use vacuum cleaner when you are
tired, distracted or under the influence of drugs, alcohol or
medication causing diminished control.
GROUNDING
INSTRUCTIONS
DO not expose to rain - store indoors.
Do not allow to be used as a toy. Close attention
essary when used by or near children.
Use only as described in this manual.
Craftsman attachments.
•
heavily loaded tanks.
combustion,
is nec-
Use only
Do not use with damaged cord or plug. If vacuum cleaner is not working as it should, has been dropped, damaged, left outdoors or dropped into water, return it to a
Sears service center.
Do not pull or carry by cord, use cord as a handle, close
a door on cord or pull cord around sharp edges or corners. Do not run vacuum cleaner over cord. Keep cord
away from heated surfaces,
Do not unplug by pulling on cord. To unplug, grasp the
plug, not the cord.
Do not handle plug or vacuum cleaner with wet hands.
This vacuum cleaner is equipped with a cord having an
equipment-grounding
conductor and grounding plug. If vacuum cleaner should malfunction or breakdown, grounding
provides a path of least resistance for electric current to
reduce the risk of electric shock. The ptug must be inserted
into an appropriate outlet that is properly installed and
grounded in accordance with all local codes and ordinances.
WARNING:
Improper
connection
of the equip-
ment-grounding
conductor and grounding plug can
result in a risk of electric shock. Check with a qualified electrician or service person if you are in doubt
as to whether the outlet is properly grounded. Do not
modify the plug provided with the vacuum cleaner if it will not fit the outlet, have a proper outlet
installed by a qualified electrician.
© Sears, Roebuck
and Co.
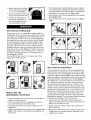
This vacuum cleaner is for use on a nominal 120-volt circuit, and has a grounded plug that looks like the plug illustrated in sketch A. A temporary _dapter that looks like the
adapter illustrated in sketches B and C may be used to connect this plug to a 2-pole receptacle as shown in sketch B if
a properly grounded outlet is not available. The temporary
adapter should be used only until a properly grounded outlet
(sketch A) can be installed by a qualified electrician. The
green colored rigid ear, lug or the like extending from the
adapter must be connected to a permanent ground such as
a properly grounded outlet box cover. Whenever the
adapter is used, it must be held in place by a metal screw.
tank cover and any accessories which may have been
shipped in the tank. (Figure 1)
Before replacing tank cover,
refer to Dry Pick-Up or Wet
Pick-Up Operation in this manual to ensure you have
the proper filters installed and inlet deflector is positioned correctly for your cleaning operation,
2.
NOTE: In Canada, the use of a temporary adapter is not
permitted by the Canadian Electrical code.
GROUNDING
Pull tank cover latches in an
outward motion and remove
1.
.
GROUNDED
OUTLET
_
GROUNDING
_
METHODS
(_'M
(A)
A _ApTIERETAL_ 1_%
(B]
5,
You will find two casters (a), two large wheels (b), two
axles (c), and six screws with your wet/dry pump vacuum.
6.
With cord disconnected
_¢)
CORDS
Volts
TotalJength ofcordin
_et
120V
25
100
50
Rating
Not More
Than
0..
Be sure inlet deflector
(Figure 2) is in proper
position. Opening up for wet, down for dry vacuuming.
ft._
When using the vacuum cleaner at a distance where an
extension cord becomes necessary, a 3-conductor
grounding cord of adequate size must be used for safety, and to
prevent loss of power and overheating. Use the table below
to determine A.W.G. wire size required. To determine
ampere rating of your vacuum, refer to nameplate {ocated
on rear of motor cover.
Before using vacuum cleaner, inspect power cord for loose
or exposed wires and damaged insulation. Make any needed repairs or replacements
before using your vacuum
cleaner. Use only three-wire outdoor extension cords which
have three-prong grounding-type
plugs and three-pole
receptacles which accept the extension cord's plug. When
vacuuming liquids, be sure the extension cord connection
does not come in contact with the liquid.
Ampere
Mere
Than
with the
GROUNDED
OUTLET
BOX
PIN
EXTENSION
comes
filters already installed for dry
pick-up. For filters recommended for wet pick-up refer
to wet pick-up operation.
4,
_
Your vacuum
6
6 ...................
10
10 .................
12 .................
12
16
AWG
18
18
16
14
16
16
16
12
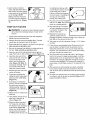
bottom is facing up.
7. Take one axle and insert it
into the center of the smooth
side of the wheel.
8.
16
14
14
12
14
!2
Notrecommended
NOTE: Static shocks are common in dry areas or when
the relative humidity of the air is low. This is only temporary and does not affect the use of the appliance. To
reduce the frequency of static shocks in your home, the
best remedy is to add moisture to the air with a console or
installed humidifier.
(Figure
3)
Install the axle and wheel
assembly into the underside of
the rear wheel dolly. (Figure
4) Apply pressure to the axle
and wheel assembly,
until the axle is tight against
the axle stop.
9.
150
from
receptacle, remove tank
cover and invert tank so that
Secure the axle to the rear
wheel dolly with screw
ed. (Figure 5)
provid-
10. Repeat steps 8 and 9 to
attach the other side of the
wheel assembly.
11. Insert casters
into the under-
side of front caster
(Figure 6)
supports,
12. Replace tank cover and apply
pressure with thumbs to
each latch until it snaps tightly
in place. Make sure both lid
latches are clamped securely.
(Figure 7)
13.Inserthoseendwithlockingnutintoinletof tankandtightennut.Donotover-tighten.
14.Attachtheextension
wandsto
theaccessory
endofthehose.
15.Attachoneofthecleaning
accessories
(depending
on
yourcleaningrequirements)
ontotheextension
wands.
5.Withtheopeningoftheinletdeflector
facingthebottom
of thefilterbag,slidecollectionbagcollaroverdeflector,
matching
notchesof bagcollarto tabsoninletdeflector.
Bagwillonlyfit properlyoneway.(Figure15b)
6.Slidedeflector
withcollectionbagattached
intodeflector
guide(Figure15c)
7.Reinserthoseintoinletandtightenlocking-nut.
(Figure
15d)
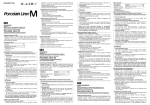
DRY PICK-UP OPERATION
With the tank cover in an upside down position, slide the
cartridge filter down over the lid cage, pushing until the filter
seals against cover (Figure 8). Foam sleeve will remain in
place. Place filter retainer into the top of the cartridge filter,
and holding the tank cover with one hand, turn the handle
on the filter retainer clockwise to tighten, locking the filter
into place (Figures 9 & 10). To remove the filter for cleaning, again hold the tank cover and turn the filter retainer
counterclockwise
to loosen and remove, then slide the cartridge filter off the lid cage (Figures
11 & 12}. To clean the
cartridge filter, shake or brush off excess dirt or rinse (from
the inside of the filter) with water. Dry completely and reinstall (Figures 13 & 14).
Your vac filter is color coded with a black stripe. When
replacing, just match the color.
F"
TIGHTEN
WET
INSTALLING
DISPOSABLE
THE
FILTER
1. Use for dry pick-up
installed on wet/dry
BAG
only. Use only when cartridge
vacuum.
filter is
2. With cord disconnected
from receptacle, pull latches
an outward motion and remove tank cover.
in
3. Unscrew hose locking-nut
and remove hose from inlet.
(Figure 15)
4. Remove inlet deflector from deflector guide. (Figure 15a)
NOTE: Hose must be removed before inlet deflector can
be taken out.
PICK-UP
OPERATION
For best results for wet pick-up remove cartridge filter and
utilize the foam sleeve (already in place over the lid cage).
For wet pick-up remove inlet deflector from deflector guide
sliding in an upward motion. NOTE: Hose must be removed
before inlet deflector can be taken out. Be sure the opening
of the inlet deflector is facing the top of the tank (Figure
16). Misting may occur if inlet deflector is not inserted properly. Misting in exhaust air may occur if the foam sleeve
becomes saturated during wet pick-up. If misting occurs,
remove and dry the saturated foam sleeve or replace with
another dry foam sleeve to eliminate the misting and possible dripping of liquid around the lid. Turn the unit off immediately upon completing a wet pick-up job, or when tank is
full and ready to be emptied, raise the hose to drain any
excess liquid into the tank. The interior of the tank should
be periodically cleaned. The foam sleeve should be cleaned
periodically as described in the following steps:
1. Always disconnect the plug from the wall receptacle
before removing the tank cover. Remove foam sleeve by
sliding it up and off the lid cage.
2. Shake excess dust off foam
down movement.
sleeve with a rapid up and
3. Hold sleeve under running water, rinsing from the inside.
A water wash is not always required, depending on the
condition of the sleeve.
4.
Gently wring out excess
water, and blot sleeve with a
clean towel. The foam sleeve'
not attempt wet pick-up without the elbow in place. Do not
cover bleed hole in elbow.
is now ready to be reinstalled
on the lid cage. NOTE:
Bottom of sleeve should be
TUCKED in groove between
lid cage and tank lid. (Figure
16)
Failure to follow these precautions will result in overfilling of
the vacuum and misting
through the exhaust port.
13. Plug vacuum into wall receptacle
and turn on. Note: The on/off switch will automatically
return to a neutral position.
PUMP-OUT
_,
FEATURE
WARNING:
To reduce the risk of electrical shock,
do not direct the discharge stream of water at the
vacuum.
1. Always disconnect the plug from the wall receptacle
before removing the tank cover.
2. Remove the tank cover and cartridge filter. The tank
should also be cleaned of any dirt or debris.
3. Ensure that the foam sleeve is in place for wet pick-up.
(See wet pick-up operation, p.4)
4. Be sure the opening inlet deflector is facing the top of
the tank. (See wet pick-up operation, p.4)
5. Insert one end of the tube provided into the pick-up
cage. Push tube in until it comes to a stop. (Figure 17)
6. Insert the other end of the
tube into the hole on the bottom of the lid cage. Push
tube in until it comes to a
stop (Figure 18). Note: To
avoid pump damage, never
pump without the pick-up
cage and screen in place.
7. Replace the tank cover and
secure lid latches.
8. To prevent unwanted discharge of water, leave cap in
place over the outlet fitting.
(Figure 19)
9. If pumping out during wet
pick-up, remove the outlet fitting cover and connect a
standard garden hose (not
supplied) to the outlet fitting.
(Figure 20)
10.Attach the 2-!/2" hose to the
tank inlet.
11.Your wet/dry vacuum is supplied with a wet pick-up
elbow. (Figure 21)
12. Place the elbow onto the 21/2" hose end, and attach
the desired 2-1/2" accessory
to the elbow. (Figure 22)
Elbow must be in place during wet pick-up to prevent
overfilling of the vacuum. Do
14. Start wet pick-up. The pump
will start operating once there
is at least 4" of water in the
bottom of the tank.
15. Because
speed is
pumping
tank fills
the wet pick-up
greater than the
out speed, the tank will likely fill up. When the
up, the vacuum will shut off.
16.The pump out unit will net prime if using a 1-1/4" diameter hose.
17. If the vacuum automatically
shuts off because it is full,
you will need to empty the tank by pumping. Do not
empty the water that is in the vacuum hose back into
the tank. This will cause the unit to overfill, and misting
will occur through the exhaust port.
18, The ON switch must be manually held in the ON position for the vacuum to begin pumping again. It will take
approximately
10 to 15 seconds for the water level in
the tank to be reduced sufficiently enough for the pump
to continue automatically.
The vacuum will continue to
pump water out until there is about 4" of water left in the
tank.
19. After wet pick-up and pumping have been completed,
the remaining liquid should be emptied from the tank
and the pump pick-up assembly should be removed and
cleaned.
20. To utilize your vacuum as a non-pump dry pick-up vacuum cleaner, refer to dry pick-up operation (See p. 4) for
proper installation of filters.
EMPTYING
TANK
COMPLETELY
Your Craftsman Wet/Dry VacuUm can be emptied of liquid
waste by removing the drain cap. To empty, turn unit off
and remove plug from wall receptacle. Remove the drain
cap and deposit the liquid waste contents into a suitable
drain. After the tank is empty, return the drain cap to its
original position. To continue use, plug the cord into the
wall receptacle and turn unit on.
ATTACHING
14" FLOOR
SQUEEGEE
NOZZLE
TO
Align one side of squeegee with brush
side of nozzle. Push them together,
starting at one end and working toward
the other. Repeat process to attach
other side of squeegee to front side of
nozzle. (Figure 24).
STORAGE
AUTOMATIC
SHUT-OFF
This vacuum cleaner is equipped with an automatic shut
off feature when picking up liquids. As the level of liquid
rises an internal float electronically shuts the unit off when
liquid reaches tank capacity. At this point, the liquid must
be emptied to altlow vacuuming to continue. Refer to sections above.
BLOWER
Before storing your vacuum cleaner the tank should be emptied and cleaned. The power cord can be wrapped around the
cord wraps provided on the rear of the tank (Figure 25). A
hose holder has been provided for easy storage of the hose.
Install hose holder end with fastener onto hose, Slide or snap
fastener into notch, securing it in place. Remove extension
wands and/or accessory from end of hose. Place hose end
into open end of hose holder to secure hose in place for easy
storage (Figure 26).
FEATURE
This vacuum cleaner can be used as a powerful blower. To
use your unit as a blower unscrew blower port cover located on the backside of the motor housing (Figure 23). The
blower port cover is equipped with a retaining strap to prevent loss of the port cover while blower is in use. Insert
hose end with locking-nut into blower port of tank and tighten. Be cautious when using as a blower due to the powerful force of air.
SYMPTOM
Dust discharging
1. Properly install
thefiller
2. Replace the filter
3. Use e more efficient filler
4. Clean or replace the filter
Loss of suction/
3erformance
WARNING:
Always wear eye protection to prevent rocks or debris from being blown or ricocheting into the eyes or face which can result in serious injury. Do not direct airflow at or near people,
animals or property. Wear a dust mask.
CORRECTIVEACTION
1. Checkin tank
from the exhaust
_,
POSSIBLECAUSE (S)
Parts/accessories 1. Packedin thetank
are missing
1. Filter not installed/
not installed properly
2. Filter is damaged
3. Dust is too fine
4. Filter is not functional
I. Loose hose
aonnecfion.
2. Lidlmotor air leak
3. Drain air leak
(net all models)
4. Filter clogged
5. Full tank
6. Hole in hose
7. Obstruction in
hose or nozzle
1.Tighten hose connection
2. Checklid latches
3. Tightendrain cap
4. Clean or replacefilter
5. Empty tank
6. Replacehose
7. Removeobstruction
if present
1. Check thatfoam sleeve
is in place or replace
with a clean dry filter
Water misting out
exhausted air
1. Saturated or missing
foam sleeve
Waterspraying
out exhausted air
1. Inlet deflector shield
1. Check to make sure
the inlet deflector is
is not installed properly
installedproperly. Facing
upfor ;vet pick-up.
Facing downfor dry
pick-up.
Static shoGk
1. Dry environment
2. Relative humidityof
air is low
Will not pump
1. Pick-up cage clogged.
2. Vacuum hose.
3. Not primed.
1, Add moistureto air (if
practical, use a console
or installed humidifier.)
2.This skuation is
temporaryand does not
effect theuse of the
vacuumcleaner.
1. Clean mesh screen on
pick-up.
2.2-!12 in.hose must be
attached to unit.
3. Need at least 4in. of
water inthe tank.
ome or ours!
For repair of major brand appliances
in your own home...
no matter who made it, no matter who sold it[
1-800-4-MY-HOME ®
Anytime, day or night
(U.S.A. and Canada
(1-800-469-4663)
www.sears.com
For repair of carry-in
and electronics,
Sears
www.sears.corn
products like vacuums,
lawn equipment,
call for the location of your nearest
Parts and Repair Center.
1-800-488-1222
Anytime, day or night (U,S.A. only)
www.sears.com
For the replacement
parts, accessories
and owner's manuals
that you need to do-it-yourself,
call Sears PartsDirectsMT
?
_i¸ ii:!]
!7 _
1-800-366-PART
6 a.m.-
11 p.m. CST, 7 days a week
(1-800-366-7278)
(U.S.A. only)
www.sears.com/partsdirect
To purchase
or inquire about a Sears Service
or Sears Maintenance
Agreement:
1-800-827-6655
7 a.m.• ,y
_5
;?
1-800-361-6665
5 p.m. CST, Mon. - Sat.
Para pedir servicio
domicilio,
(u.S.A.)
de reparaci6n
y para ordenar
9 a.m.-
Au Canada
a
Dour service
1-800-LE-FOYER
s_'
en francais:
Mc
(1-800-533-6937)
www.sears.com
(1-888-784-6427)
1: 2i
(Canada)
8 p.m. EST, M - F, 4 p.m. Sat.
piezas:
1-888-SU-HOGAR
Agreement
?k
HomeCentral°
_h,..
® Registered
® Marca
uc Marque
Trademark
Registrada
/
TM
Trademark
/ T_ Marca
de commerce
t su Service
de F_brica
/ uu Marque
/ _UMarea
d_pos_e
Mark
of Sears,
de Servicio
de Sears,
Roebuck
Roebuck
de Sears,
and Co.
and Co.
Roebuck
and Co.
© Sears,
Roebuck
and Co.