1
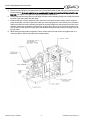
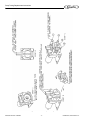
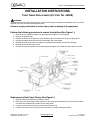
Pump Tubing Replacement Instructions
INSTALLATION INSTRUCTIONS
PUMP TUBING REPLACEMENT (KIT PART NO. 45098)
! WARNING:
TDisconnect power to the unit before servicing. Follow all lock out/tag out procedures established by the user. Verify
all power is off to the unit before performing any work.
Failure to comply could result in serious injury, death or damage to the equipment.
Perform the following procedure to remove the platform (See Figure 1.):
1.
2.
3.
4.
5.
6.
7.
Remove the concentrate container from the dispenser and place it in a refrigerator.
Remove the product shelf.
Depress the button on the water line quick disconnect and lift the water line away from the platform.
Unplug the platform electrical connector at the inside rear of the cabinet.
Release the catch at the front of the platform by pulling the tab toward yourself with one finger.
Remove the nozzle and static mixers.
Carefully lift and pull the platform from the dispenser and place it in a clean and well lit area for service.
Figure 1. Front View of Pump Assembly
Replacement of the Pump Tubing. (See Figure 2.)
1. Remove platform as described in procedure above.
2. Remove the two white plastic tubing clamps from the pump tube connections, then remove the two stainless steel concentrate delivery tubes from the tubing ends.
3. Loosen and remove the four thumb screws from the pump body.
4. Carefully remove the rear half (only) of the pump body to reveal the tubing and rollers.
Release Date: December 15, 2010
© 1999-2010, IMI Cornelius Inc.
www.cornelius.com
-1-
Revision: B
Publication Number: 7285285
Pump Tubing Replacement Instructions
5. Remove the old tubing from the pump body. If any of the rollers come out with the tubing, place them back
into the housing. Be sure to align the roller assembly shaft keyway to the motor shaft key so that the two
interlock. (see Figure 3 or Figure 4 for step by step pictorial instructions).
6. Firmly press the new tubing into the pump body around the roller assembly, being sure to keep the protruding ends of the tubing even with each other.
7. Once the tubing is in place, replace the outer half of the pump body. Hold the tubing in place inside the
pump housing with one hand, capture the lower part of the tubing with the outer housing, then proceed to
capture the shaft of the roller assembly and push the housing straight onto the pump/motor portion of the
assembly. Make sure to capture the tubing within the body cavity. Do not pinch it between the halves. Do
not use any tool other than your finger tips to manipulate the tubing into the housing or damage to the tubing may result.
8. While holding the pump halves together by hand, reinsert the four thumb screws and tighten them in a
crisscross pattern until the two halves are pressed together.
Figure 2. Rear View of Pump Assembly
Publication Number: 7285285
-2-
© 1999-2010, IMI Cornelius Inc.
Pump Tubing Replacement Instructions
Figure 3. Three Roller Pump Assembly
© 1999-2010, IMI Cornelius Inc.
-3-
Publication Number: 7285285
Pump Tubing Replacement Instructions
Figure 4. Two Roller Pump Assembly
Publication Number: 7285285
-4-
© 1999-2010, IMI Cornelius Inc.