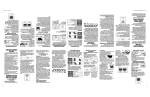
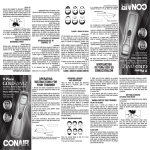
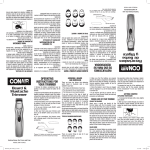
1
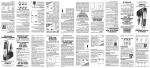
Turn unit on. Gently insert trimmer head into
nostril. Gently move trimmer in
and out of the nostril using a
circular motion while rotating
the trimmer around the nostril
opening. Avoid inserting the
trimmer more than 1" to ensure
safe trimming. For added
convenience, when using the
nose/ear trimmer blade the light on the unit will
automatically turn on when the trimmer is in
use. NOTE: There is no light when using beard/
mustache trimmer
TO TRIM YOUR NOSE HAIR
1.) Your NE158CS features a 3 position pivoting
head for easy access when trimming delicate
and hard to reach areas.
To use this feature:
2.) Pick up your NE158CS with
the front of the trimmer facing
towards you, and simply push
on the pivoting head. There
are 3 different positions, so set
it to the one most comfortable
for you (the unit comes
prepackaged at the first
setting, but you can adust your groomer to either
one of the other two settings.) It will take some
time to get used to your own personal setting, so
try each one until you find a setting that works
for you. As you try each setting, you will notice
how comfortable this unit makes trimming your
nose/ear hairs or general grooming.
3. If you do not wish to use the pivoting head
feature, just leave the trimmer as it was when it
was removed from the packaging.
NOW YOU’RE READY TO OPERATE YOUR
TRIMMER
P
R
O
F
E
S
S
I
O
N
A
L
RECORTADORA
PERSONAL
MEDIDAS DE
SEGURIDAD
IMPORTANTES
Cuando se usan aparatos eléctricos, especialmente
en la presencia de niños, siempre se deben tomar
precauciones básicas de seguridad, entre las
cuales las siguientes:
Patent Pending
Storage Pouch
This product is equipped with a turbo boost
button. When activated, this will provide 15%
more cutting power. This is especially useful for
cutting through thicker hair.
To activate the turbo feature:
1. Turn the Power switch to the “on” position.
2. Press the Turbo button.
3. Continue to press the Turbo button for as long
as you need the extra power.
4. Release the Turbo button to return to
normal power.
TURBO FEATURE
1. To insert batteries, remove compartment cover.
Insert two AA alkaline batteries,
Positive (+) Terminal
positive end up as indicated in
(Fig. 1). (Alkaline batteries will
insure the best performance and
longest life for your appliance.)
If you are not going to use the
unit for a long period of time,
Fig. 1
or if batteries are dead, remove
batteries from the unit. This will increase the life of
your trimmer.
2. After inserting the batteries, close the battery
compartment.
3. Now your unit is ready to be used.*
4. Slide the On/Off switch upward to turn the
unit on.
*Do not use in the shower or submerse unit
in water. To clean, simply rinse trimmer blade
under faucet as illustrated under how "to clean
your trimmer”.
TO OPERATE PERSONAL GROOMER
LEA TODAS LAS
INSTRUCCIONES ANTES DE
USARLO
MANTENGA EL APARATO
ALEJADO DEL AGUA
Adjustable
Attachment
Comb
3/4" Grooming
Attachment
Battery
Compartment
Cover
On/Off Switch
Turbo Button
Battery
Compartment
Turbo "On"
Indicator
Pivoting
Head
Light
Nose/Ear
Trimmer Blade
Model NE158CS
PERSONAL GROOMER
PELIGRO–
Conair service center for examination and repair.
4. Never drop or insert any object into any
opening of the appliance.
5. Do not place the appliance on any surface
while it is operating.
6. Do not use the appliance with a damaged
or broken comb or with teeth missing from the
blades, as injury may result. Before each use,
make certain the blades are aligned properly.
7. Do not use the appliance outdoors or operate
where aerosol (spray) products are being used or
oxygen is being administered.
en o cerca de niños o personas con alguna
discapacidad.
2. Use este aparato únicamente con el propósito
para el cual fue diseñado y tal como se
describe en este manual. Sólo use accesorios
recomendados por el fabricante. Sólo use
accesorio recomendados por el fabricante.
3. Nunca use el aparato si no funciona
correctamente, si ha caído, si está dañado o si
ha caído al agua. Llévelo a un centro de servicio
autorizado para que lo examinen y lo reparen.
4. Nunca deje caer ni inserte un objeto en
ninguna de las aberturas.
5. No coloque este aparato en ninguna superficie
mientras está funcionando.
6. No use este aparato si el peine accesorio está
roto o dañado, o si faltan dientes a la cuchilla.
Esto podría provocar una herida. Antes de cada
uso, verifique que las cuchillas estén alineadas
correctamente.
7. No lo utilice al aire libre, ni donde se están
usando productos en aerosol (spray) o donde se
está administrando oxígeno.
RECORTADORA PERSONAL
Modelo NE158CS
Recortadora
para nariz y oídos
Luz
Cabezal
oscilante
Indicador de la
función Turbo
Compartimiento
de las pilas
Botón Turbo
Botón de
encendido/apagado
Cubierta del
compartimiento
de las pilas
IMPORTANT SAFETY
INSTRUCTIONS
Cualquier electrodoméstico permanece eléctricamente activo, incluso cuando el interruptor está
apagado. Para reducir el riesgo de muerte o herida
por descarga:
1. Siempre desconecte el aparato inmediatamente
después de usarlo.
2. No lo use mientras se está bañando o tomando
una ducha.
3. No coloque el aparato ni lo deje caer al agua u
otro líquido.
CÓMO OPERAR LA RECORTADORA
1. Para introducir las pilas, quite la cubierta del
compartimiento para las pilas. Polo positivo (+)
Introduzca dos pilas alcalinas de
tipo AA con los polos positivos
tal como se indica (Fig.1). Las
pilas alcalinas aseguran un
mejor rendimiento y mayor vida
útil para su aparato. Si se han
Fig. 1
acabado las pilas o no va a
usar la unidad por un largo período, saque las pilas
de la unidad. Esto aumentará la vida útil de su
recortadora.
2. Después de introducir las pilas, cierre el
compartimiento de las pilas.
3. Su recortadora ya está lista para utilizarse.
4. Deslice el botón de encendido/apagado hacia
arriba para encender la unidad.
* No use su recortadora en la ducha y no la ponga
en el agua. Para limpiarla, sólo enjuague la cuchilla
en el chorro de agua, como se indica en la sección
“Instrucciones de limpieza” de este manual.
L
™
AHORA ESTÁ LISTO PARA USAR SU
RECORTADORA
1. Su recortadora está dotada de un cabezal
oscilante ajustable con 3 posiciones, lo cual
facilita el recorte en las zonas
más delicadas y difíciles
de alcanzar. Para usar esta
opción:
2. Coja la recortadora con la
parte delantera hacia usted y
simplemente ponga el cabezal
en la posición deseada. Su
recortadora viene con el
cabezal en la posición central, pero usted puede
escoger cualquiera de las 2 otras posiciones.
Pruebe cada posición hasta encontrar la que
le parezca más confortable. Con tiempo, usted
encontrará la posición que mejor le conviene.
A medida que prueba las varias posiciones,
se dará cuenta de lo confortable que es esta
recortadora para todas su necesidades.
3. Si usted no desea usar la opción oscilante,
deje el cabezal en la posición original, como la
encontró al sacar la recortadora de la caja.
FUNCIÓN TURBO
Cuchilla para
barba y bigote
de 19 mm
A
®
N
ADVERTENCIA–
O
de
I
Su recortadora está equipada con un botón
Turbo. La función Turbo ofrece un 15% más
fuerza, lo cual facilita el cortado del pelo grueso.
Para activar la función Turbo:
1. Encienda el aparato.
2. Oprima el botón Turbo.
3. Siga oprimiendo el botón Turbo mientras
necesite más fuerza.
4. Afloje el botón Turbo para regresar al poder
normal.
S
Bolso de almacenamiento
S
Patente en trámite
E
Peine
accesorio con
5 posiciones
F
Para reducir
el riesgo de quemaduras, electrocución, incendio
o lesiones personales:
1. Este aparato no debería ser usado por,
O
Modelo NE158CS
Model NE158CS
Use and Care
Instruction Manual
®
™
To reduce the risk of burns, fire, or injury to
persons:
1. This appliance should not be used by, on,
or near children or individuals with certain
disabilities.
2. Use appliance only for its intended use as
described in this manual. Only use attachments
recommended by the manufacturer.
3. Never operate the appliance if it is not working
properly, has been dropped or damaged,or
dropped into water. Return the appliance to a
WARNING–
1. Do not place or store appliance where it can fall
or be pulled into a tub or sink.
2. Do not use appliance while bathing or in the
shower.
3. Do not place appliance in, or drop into water or
other liquid.
DANGER–
To reduce the risk of injury:
READ ALL INSTRUCTIONS
BEFORE USING
KEEP AWAY FROM WATER
When using electrical appliances, especially when
children are present, basic safety precautions
should always be taken, including the following:
Personal
Groomer
R
Instrucciones y
Mantenimiento
P
CÓMO RECORTAR LOS PELOS EN LA NARIZ
Encienda la unidad. Inserte
lentamente el cabezal en la
nariz y deslícelo despacio hacia
arriba y abajo mientras gira
la unidad con un movimiento
circular. Para evitar lastimarse,
no inserte el cabezal más de
25 mm (1 pulgada) en la nariz.
Para mayor conveniencia al
recortar el pelo de la nariz y de los oídos, la
luz se encenderá automáticamente al poner la
unidad en marcha. NOTA: La luz no funciona con
la cuchilla para barba y bigote.
07NG9004 IB-7247
Centro de Servicio:
Conair Corporation
Service Department
7475 Glen Harbor Blvd.,
Glendale, Arizona 85307
©2007 CONAIR CORPORATION
TO TRIM YOUR EAR HAIR
Turn unit on. Gently insert
trimmer head no more than
1" into outer ear canal. Gently
move trimmer in and out of the
outer ear and rotate trimmer
in a circular motion around
the ear canal opening. Guide
the trimmer around the outer
surface of ear to trim protruding hairs. Never
insert trimmer more than 1" into ear canal.
GETTING STARTED
TO SWITCH TRIMMER HEADS
Begin with trimmer in normal pivot position.
Hold the handle of the trimmer while turning the
trimmer head counterclockwise until the arrow
mark is aligned properly with the circle mark
(Fig. 2). At this point you should be able to easily
lift the nose/ear trimmer head from the handle.
To use a new trimmer head on the unit, properly
install the head into position making sure the
arrow mark is aligned with the circle mark,
turn clockwise until the two arrows are aligned
(Fig. 3) and lock into position.
Fig. 8
Fig. 7
Fig. 3
Nota: La cuchilla para barba y bigote se
puede limpiar en agua de la misma manera.
4. Para instalar el cabezal
sobre la manija: ensarte
el cabezal sobre la
manija y gírelo en el sentido horario hasta que
los dos triángulos coincidan (Fig.8).
3. Después de limpiar
el cabezal, séquelo bien
antes de regresarlo en la
unidad.
Fig. 7
Conair reparará o remplazará (a su opción) su
aparato sin cargo por un período de 36 meses a
partir de la fecha de compra si presenta defectos de
mano de obra o en los materiales.
Para obtener servicio técnico bajo esta garantía,
lleve o mande su aparato al Centro de Servicio
indicado a continuación, junto con su recibo de
compra y un cheque de $3,00US por gastos de
envío y manejo. Los residentes de California sólo
necesitan dar una prueba de compra y deben llamar
al 1-800-366-0937 para recibir instrucciones de
envío. En ausencia del recibo de compra, el período
de garantía será de 36 meses a partir de la fecha
de fabricación.
CUALQUIER
GARANTÍA,
OBLIGACIÓN
O
RESPONSABILIDAD IMPLÍCITAS, INCLUYENDO
PERO NO LIMITADAS A LA GARANTÍA IMPLÍCITA DE
COMERCIABILIDAD Y APTITUD PARA UN PROPÓSITO
ESPECÍFICO, ESTARÁN LIMITADAS POR LOS 36
MESES DE LA PRESENTE GARANTÍA ESCRITA.
Algunos Estados no permiten limitaciones sobre la
duración de una garantía implícita, de modo que
las limitaciones mencionadas pueden no regir para
usted.
CONAIR NO SERÁ RESPONSABLE EN NINGÚN
CASO POR ALGÚN DAÑO ESPECIAL, INCIDENTAL O
CONSECUENTE DEBIDO AL INCUMPLIMIENTO DE
ESTA O DE CUALQUIER OTRA GARANTÍA, EXPRESA O
IMPLÍCITA. Algunos Estados no permiten la exclusión
o limitación de daños especiales, incidentales
o consecuentes, de modo que las limitaciones
mencionadas pueden no regir para usted.
Esta garantía le otorga derechos legales específicos
y usted puede tener otros derechos que varían de
un Estado a otro.
Fig. 2
CORTAR SU BIGOTE
2. Enjuague el cabezal solamente bajo el
chorro de agua (Fig.7). Para que su unidad
siga funcionando correctamente, asegúrese
que la manija nunca entre en contacto con
el agua.
Fig. 6
GARANTÍA LIMITADA POR
TRES AÑOS
TYPES OF BEARDS/MUSTACHES
GROWING A BEARD OR MUSTACHE
Cuando haya terminado, saque el peine accesorio
y déle forma a la parte inferior de su bigote.
SIEMPRE CORTE SU BIGOTE DESDE
ARRIBA HASTA ABAJO
1. Se le hará más fácil cortar su bigote si está
limpio y ligeramente humedecido.
2. Peine su bigote en la dirección del crecimiento
natural del pelo.
3. Ensarte el peine accesorio con 5 posiciones
sobre las cuchillas. Empiece con la posición más
larga (siempre podrá volver a acortar el bigote).
Fig. 5
1. Para extraer el cabezal,
gire el mismo en el
sentido antihorario hasta
que el triángulo y el
círculo coincidan y jale el
cabezal lentamente hacia
arriba (Fig.6).
Asegúrese que la unidad esté apagada.
INSTRUCCIONES DE LIMPIEZA
Make sure trimmer is off.
1. To use the adjustable attachment comb, slide
it over the trimmer blade and snap down into
position (Fig 4). At first, until you become familiar
with the adjustments, use the longest trim setting
(3/8”). (You can always go back and make your
beard a little shorter.) (Fig. 5)
TO CLEAN YOUR TRIMMER
NOW YOU’RE READY TO TRIM YOUR BEARD
Fig. 4
Fig. 5
2. Begin trimming your beard using smooth,
even strokes. Start with your sideburns and work
downward toward your chin. (Never attempt to
trim against the natural growth of your beard,
because the hair will be cut too short.)
3. If you decide you want a closer trim, you can
now adjust the 5-position comb to a shorter
setting and go over your beard again until you
achieve the desired length.
1. To remove the trimmer
head for cleaning, turn the
head counter-clockwise
until the arrow mark
aligned with the circle
mark, then lift the head
gently (Fig 6).
Fig. 6
2. Only rinse the head under water (Fig 7).
For proper functioning of the unit, the handle
can not touch or be immersed in water.
TO TRIM YOUR MUSTACHE
OUTLINING YOUR BEARD
1. For best results, start with a clean, slightly
damp mustache.
2. Comb through your mustache in the direction
it grows.
3. Place the 5-position comb over the trimmer
blades and snap it into position. It is a good idea
to start with the longest trim setting adjustment.
(You can always go back and cut your mustache
more closely with a shorter setting.)
ALWAYS TRIM YOUR MUSTACHE
FROM THE TOP DOWN
After your mustache has been trimmed to the
desired length, remove the 5-position trimming
attachment and, using the blades only, define the
outline of the bottom of your mustache.
DELINEAR SU BARBA
Fig. 4
1. Ensarte el peine accesorio con 5 posiciones
encima de la cuchilla para la barba (Fig.4). Le
recomendamos que utilice la posición más larga
(10 mm) hasta acostumbrarse a lo largo del
recorte (siempre podrá volver a acortar la barba).
(Fig.5)
CORTAR SU BARBA
1. It is always best to begin with a clean, slightly
damp beard.
2. After you have combed through your beard in
the direction it grows naturally, you will want to
outline the desired shape, beginning under your
jawline.
3. Attach the 3/4" trimmer head. Begin defining
your beard’s shape under your chin and work
upward on each side of your face toward your
ears. Then define the upper outline of your beard
across your cheeks, past your sideburns and
toward your hairline.
1. Se le hará más fácil el contorneo y el recorte si
su barba está limpia y ligeramente humedecida.
2. Peine su barba en la dirección del crecimiento
natural del pelo antes de empezar a darle
forma.
3. Déle forma a su barba empezando por debajo
de la quijada y subiendo hacia la oreja por cada
lado del rostro. Siga dando forma al área de la
mejilla, a las patillas y al nacimiento del pelo.
2. Empiece a cortar su barba con movimientos
parejos y suaves, desde las patillas hasta la
quijada. Nunca corte en la dirección opuesta a
la del crecimiento natural del pelo. El recorte
resultaría demasiado corto.
3. Si desea un recorte aún más corto, escoja un
largo de recorte más corto, y siga acortando su
barba hasta conseguir el tamaño deseado.
Fig. 3
CÓMO CAMBIAR EL CABEZAL
Ponga el cabezal en la posición central. Coja
la cortadora firmemente con una mano y gire
el cabezal en el sentido antihorario con la
otra mano, hasta que el triángulo y el círculo
coincidan (Fig.2). Jale el cabezal hacia arriba.
Instale la cuchilla para la barba y el bigote sobre
el cabezal y gírela en el sentido horario hasta que
los dos triángulos coincidan (Fig.3).
There are three key factors that determine which
beard or mustache style is most suitable for
your face:
1. The shape and dimensions of your face.
2. The natural growth of your beard/mustache.
3. The thickness of your beard/mustache.
If you are unsure of the type of beard or
mustache that most suits your face, speak with
a professional hair stylist and ask for an opinion
on what style would be best. Once your beard
or mustache has been styled, it is essential that
you maintain its appearance. To do this, use your
shaper to trim your beard/mustache weekly.
For the best trimming results, your beard should
be slightly damp (not wet) before using the
trimmer. This will prevent the trimmer from
removing more hair than desired.
Fig. 7
Fig. 7
3. After cleaning, make sure to shake dry the
head before replacing it to the body.
4. To reassemble the head
onto the body, align the
arrow on the head with
the circle on the body and
then, turn clockwise until
the arrow on the body is
aligned (Fig 8)
Fig. 8
El tipo de barba o de bigote que más conviene a
su rostro depende de:
1. La forma y el tamaño de su rostro.
2. La forma del crecimiento natural de su barba
o de su bigote.
3. El espesor de su barba o de su bigote.
Si no está seguro del tipo de barba o bigote que
le conviene, busque el consejo de un estilista
profesional. Después de darle forma a su barba
o a su bigote, tendrá que mantener su aspecto,
usando la cortadora una vez por semana.
Para lograr resultados óptimos, humedezca
ligeramente (no moje) su barba o su bigote antes
del recorte. Esto logrará un cortado más preciso.
TIPOS DE BARBAS Y DE BIGOTES
BARBAS Y BIGOTES
Fig. 2
CÓMO RECORTAR LOS PELOS EN LOS OÍDOS
Encienda la unidad. Inserte
lentamente el cabezal en el
oído, no más de 25 mm (1
pulgada). Deslícelo despacio
hacia adentro y afuera
mientras gira la unidad con
un movimiento circular. Guíe
el cabezal alrededor de la
superficie externa de la oreja para cortar pelos
exteriores. Nunca inserte el cabezal más de 25
mm (1 pulgada) en el canal del oído.
LIMITED THREE YEAR WARRANTY
Conair will repair or replace (at our option)
your unit free of charge for 36 months from
the date of purchase if the appliance is
defective in workmanship or materials.
To obtain service under this warranty, return
the defective product to the service center
listed below that is nearest you, together with
your purchase receipt and $3.00 for postage
and handling. California residents need only
provide proof of purchase and should call
1-800-366-0937 for shipping instructions.
In the absence of a purchase receipt, the
warranty period shall be 36 months from the
date of manufacture.
ANY IMPLIED WARRANTIES, OBLIGATIONS,
OR LIABILITIES, INCLUDING BUT NOT
LIMITED TO THE IMPLIED WARRANTY OF
MERCHANTABILITY AND FITNESS FOR A
PARTICULAR PURPOSE, SHALL BE LIMITED
IN DURATION TO THE 36 MONTH DURATION
OF THIS WRITTEN, LIMITED WARRANTY.
Some states do not allow limitations on how
long an implied warranty lasts, so the above
limitations may not apply to you.
IN NO EVENT SHALL CONAIR BE LIABLE
FOR ANY SPECIAL, INCIDENTAL, OR
CONSEQUENTIAL DAMAGES FOR BREACH OF
THIS OR ANY OTHER WARRANTY, EXPRESS
OR IMPLIED, WHATSOEVER. Some states do
not allow the exclusion or limitation of special,
incidental, or consequential damages, so the
above limitation may not apply to you.
Note: The trimmer head attachment can also
be cleaned by rinsing under water.
©2007 CONAIR CORPORATION
Service Center:
Conair Corporation
Service Department
7475 Glen Harbor Blvd.,
Glendale, Arizona 85307
07NG9004 IB-7247