1
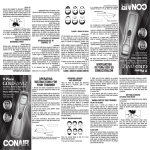
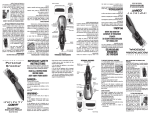
08PG096_GMT170ACS_IB.indd
1
5/19/08
4:55:30 PM
Model GMT170ACS
Instructions for Care and Use
alkaline batteries in your trimmer because they last longer.
*Requires 2 AA batteries (not included). We recommend using
There are several things to look for if your
trimmer fails to operate:
1. Be sure the trimmer is turned ON.
On/Off Switch
Because the trimmer blades are precision made
for a very special use, they should always be
handled with care. Each time you finish using the
trimmer, take the cleaning brush provided and
brush away any loose hair that has collected in
the blades. Then store the trimmer in its storage
pouch until the next use.
Blade Care
3. Begin defining your beard’s shape under
your chin and work upward on each side of
your face toward your ears. Then define the
upper outline of your beard across your cheeks,
past your sideburns and toward your hairline.
1. It is always best to begin with a clean, slightly
damp beard.
2. After you have combed through your beard in
the direction it grows naturally, you will want to
outline the desired shape, beginning under your
jawline.
Outlining Your Beard
Getting Started
Be especially careful when changing or adjusting blades. When you have your trimmer serviced, be sure that all blades are sharpened or
replaced at the same time.
To promote the long life of the appliance, use
your trimmer only for the purpose intended
by the manufacturer—to trim your beard and
mustache.
Recortadora
de Barba
y Bigote
INSTRUCCIONES
DE USO PARA SU
RECORTADORA
Types of Beards/Mustaches
About once a month you should oil the
trimmer blades with the oil provided in your
kit. It is best to do this over a piece of newspaper. Turn the trimmer on and hold it so that the
blades are pointed downward. Spread one drop
of oil across the blades, then turn the trimmer off
and wipe away the excess oil with a soft cloth.
Be careful not to use too much oil and don’t oil
your trimmer more than necessary, as that could
damage the motor. (Never attempt to oil the
motor bearing as it is permanently lubricated.)
After oiling the blades, replace the trimmer and oil
packet in the trimmer storage pouch.
Oiling the Blades
Taking Care of Your Trimmer
2. Make sure that the batteries are properly
placed in the battery compartment. Test the batteries to be sure they are working. (For optimum
trimmer operation, always replace all two AA
batteries at the same time.)
3. Check the blades to see if they are clogged
with hair clippings; if so, use the cleaning brush
to remove hair.
4. If the trimmer still fails to operate, take or
send it to a Conair Service Center (see warranty
procedure and addresses).
DEJANDO CRECER SU BARBA Y BIGOTE
Hay tres factores que determinan cuál es el
estilo de barba y bigote que son más acordes
a su cara:
1. La forma y las dimensiones de su cara.
2. La forma natural en que crece su barba o
bigote.
3. El grueso de su barba y bigote. Si usted no
está seguro del tipo de barba o bigote que va
más acorde con su cara, hable con un estilista
de un salón profesional y pregúntele su opinión
de qué estilo puede ser el mejor. Una vez que
su barba o bigote ha sido estilizado, es esencial
que usted mantenga su apariencia. Para hacer
esto, use su recortador y recorte su barba y bigote
semanalmente.
Para mejores resultados de recorte, su barba
debe estar limpia y ligeramente húmeda (no
mojada) antes de usar su recortador. Esto le
va a prevenir que recorte más cabello del que
usted desea.
TIPOS DE BARBA Y BIGOTE
Posición para las pilas
Encendido/Apagado
Instrucciones de uso
y mantenimiento
* Requiere de 3 pilas “AA” de 1,5 volts (se incluyen).
Nosotros recomendamos usar pilas alcalinas en su
recortador porque duran más.
1. Remove the battery compartment cover by
pushing in and down toward the bottom of the
trimmer.
2. Align the two AA batteries with the positive and
negative positions indicated inside the battery
compartment. Being careful not to bend the clips,
insert the negative end of each battery first so it
will slip easily into position.
3. Return the battery cover to its original position
by pushing it in and up until you hear a small
springs as it locks into place.
4. To use your trimmer, push ON/OFF switch
upwards to ON position.
5. After you finish using your trimmer, push
down on the ON/OFF switch to turn the trimmer off.
6. For your convenience, the trimmer comes
with a storage pouch to hold the trimmer and
accessories.
There are three key factors that determine
which beard or mustache style is most
suitable for your face:
1. The shape and dimensions of your face.
2. The natural growth of your beard/mustache.
3. The thickness of your beard/mustache.
If you are unsure of the type of beard or
mustache that most suits your face, speak with
a professional hair stylist and ask for an opinion
on what style would be best. Once your beard
or mustache has been styled, it is essential
that you maintain its appearance. To do this,
use your shaper to trim, edge and line up your
beard/mustache weekly.
For the best trimming results, your beard should be
slightly damp (not wet) before using the trimmer.
This will prevent the trimmer from removing more
hair than desired.
Growing a Beard
and Mustache
1. Remueva la tapa del compartimiento de las
pilas apretando y empujando hacia abajo del
recortador.
2. Alinee las 3 pilas “AA” (no incluidas)
con los indicadores de positivo y negativo
indicados en el compartimiento de las pilas.
Primero inserte el polo negativo de cada pila
para que entre fácilmente en su posición. Tenga
cuidado de no doblar los clips.
3. Vuelva la tapa a su posición original apretándola hacia arriba hasta que oiga un pequeño clic
y quede asegurada en su lugar.
4. Para usar su recortador, presione el botón
de encendido hacia arriba a la posición de
ENCENDIDO.
5. Después de que termine de usar su
recortador, presione hacia abajo el interruptor
ENCENDIDO/APAGADO para apagar el recortador en la posición off.
6. Para su conveniencia el recortador viene con
una base guardatodo para el recortador y sus
accesorios.
Battery Position
Hay varias cosas que controlar si su recortador
falla en la operación:
1. Asegúrese de que esté prendido en la
posición ON.
2. Asegúrese de que las pilas estén colocadas
correctamente en su compartimiento. Pruebe
que las pilas estén funcionado. (para una óptima
operación de su recortador, siempre reemplace
las 3 pilas al mismo tiempo).
3. Controle que las cuchillas no estén congestionadas con recortes de cabello, si es así, use el
Cepillo Limpiador para limpiarlas.
4. Si el recortador sigue fallando, tómelo y envíelo
a un Centro de Servicio Conair para su servicio y
reparación.
EL CUIDADO
DE SU RECORTADOR
ACEITANDO LAS CUCHILLAS
Aproximadamente una vez al mes usted debe
lubricar las cuchillas del recortador con el aceite
que está provisto en el juego. Es mejor aceitarlo
sobre un papel periódico. Prenda el recortador y
deténgalo con las cuchillas hacia arriba. Ponga
una gota de aceite a través de las cuchillas,
apague el recortador y limpie el exceso de aceite
con un trapo suave.
Tenga cuidado de no usar mucho aceite y de no
aceitarlo más de lo necesario pues esto puede
dañar el motor. (Nunca trate de aceitar el motor,
ya que éste se encuentra permanentemente
lubricado).
Después de aceitar las cuchillas, ponga su recortador y el aceite en su base guardatodo.
Beard &
Mustache
Trimmer
Operating
Instructions for
Your Trimmer
CUIDADO DE LAS NAVAJAS.
Las navajas han sido hechas con precisión para
un uso muy especial, siempre deben ser tratadas
con cuidado. Cada vez que termine de usar su
recortador tome el Cepillo Limpiador provisto y
limpie todo el cabello suelto que queda en las
cuchillas. Guárdelo en su base guardatodo hasta
su próximo uso.
Tenga cuidado cuando cambie o ajuste las navajas. Cuando usted le haga servicio a su recortador
asegúrese de que las navajas estén afiladas o
cambiadas al mismo tiempo.
Para promover la larga vida de su aparato,
use su recortador sólo para el propósito para el
que está hecho por el fabricante – para recortar
su barba y bigote.
PARA COMENZAR
DELINEANDO SU BARBA
1. Siempre es mejor empezar con una barba limpia y ligeramente húmeda.
2. Después de haber cepillado su barba en la
dirección que crece naturalmente, usted va a
querer alinear la forma deseada, empezando por
la parte baja de su mandíbula.
3. Empiece definiendo la forma de su barba debajo
de su barbilla y trabaje hacia arriba con cada lado
de su barba hasta sus orejas, después defina la
alineación de la parte alta de su barba cruzando
sus mejillas, empareje sus patillas hasta la línea
del cabello.
ModelO GMT170ACS
After your mustache has been trimmed to the
desired length, remove the 5-way trimming
attachment and, using the blades only, define the
outline of the bottom of your mustache.
08PG096
©2008 Conair Corporation
Service Center
Conair Corporation
Service Department
7475 North Glen Harbor Blvd.
Glendale, AZ 85307
8. Storage pouch
7. Mustache comb
Blending the Jawline
6. Lubricating oil
3. Place the 5-position comb over the trimmer blades and snap it into position. It is a
good idea to start with the longest trim setting adjustment. (You can always go back
and cut your mustache more closely with a
shorter setting.)
5. Cleaning brush
4. 3 Jawline combs
3. 5-position attachment comb
2. Stainless steel hair trimming blade
1. Multi-use trimmer
7
6
5
4
1
To Trim Your Mustache
GMT170ACS
Beard/Mustache Trimmer
To use the attachment, press it down over
the trimmer blades, one side at a time, until it
clicks into position.
2. Hold the trimmer in an upright position and
begin trimming under your jawline, using short,
even strokes.
3. After your beard is blended, turn off the
trimmer and remove the attachment by gently
pulling up one side at a time.
GMT170ACS
recortadora barba/bigote
2
8
SIEMPRE RECORTE SU BIGOTE DE
ARRIBA HACIA ABAJO
8
Limited Two Year Warranty
2
1
Para usar el aditamento, presione hacia arriba,
encima de las cuchillas de la recortadora, un
lado cada vez, hasta que se oiga un clic y
quede en posición.
2. Detenga el recortador en una posición derecha
y empiece a recortar debajo de su mandíbula
usando caricias cortas y constantes.
3. Una vez que su barba está recortada, apague
su recortador y remueva el aditamento jalando
gentilmente un lado cada vez.
PARA RECORTAR SU BIGOTE
1. Para mejores resultados, empiece con el
bigote limpio y ligeramente húmedo.
Una vez que su bigote ha sido recortado
al largo deseado, remueva el peine de 5
posiciones y, usando las navajas solamente,
defina la línea exterior de la parte baja
del bigote.
4
3
5
6
7
1. Recortadora multiuso
2. Cuchilla de acero inoxidable
3. Guía de 5 posiciones
4. 3 guías para la quijada
5. Cepillo de limpieza
6. Aceite lubricante
4. Si usted decide que quiere un recorte más corto,
ahora puede usted ajustar el Peine de 5 posiciones
a un ajuste más corto (como 1/2” ó 3/8”) y volver
a pasar sobre su barba otra vez hasta que usted
logre el largo deseado.
08PG096_GMT170ACS_IB.indd
2
2. Cepíllelo en la dirección en que su bigote
crece.
3. Coloque el peine de 5 posiciones sobre
las navajas del recortador y asegúrelo en su
posición. Es una buena idea empezar con el
7. Peine para el bigote
8. Estuche
Now You’re Ready
to Trim Your Beard
3
ajuste más largo de corte. (Siempre podrá
regresar y recortar el bigote con un ajuste
más corto).
1. Your trimmer adjusts to five positions so you
can have a beard length from 1/8” (shortest) to
5/8” (longest).
2. To use the 5-position comb, slide it over
the trimmer blades and snap down into position. At first, until you become familiar with
the adjustments, use the longest trim setting
(5/8”). (You can always go back and make your
beard a little shorter.)
1. For best results, start with a clean, slightly
damp mustache.
2. Comb through your mustache in the direction it grows.
Conair will repair or replace (at our option) your unit free
of charge for 24 months from the date of purchase if the
appliance is defective in workmanship or materials.
To obtain service under this warranty, return the defective
product to the service center listed below that is nearest
you, together with your purchase receipt and $3.00 for
postage and handling. California residents need only provide proof of purchase and should call 1-800-366-0937
for shipping instructions. In the absence of a purchase
receipt, the warranty period shall be 24 months from the
date of manufacture.
ANY IMPLIED WARRANTIES, OBLIGATIONS, OR
LIABILITIES, INCLUDING BUT NOT LIMITED TO THE
IMPLIED WARRANTY OF MERCHANTABILITY AND
FITNESS FOR A PARTICULAR PURPOSE, SHALL BE
LIMITED IN DURATION TO THE 24 MONTH DURATION
OF THIS WRITTEN, LIMITED WARRANTY. Some states
do not allow limitations on how long an implied warranty lasts, so the above limitations may not apply
to you.
IN NO EVENT SHALL CONAIR BE LIABLE FOR
ANY SPECIAL, INCIDENTAL, OR CONSEQUENTIAL
DAMAGES FOR BREACH OF THIS OR ANY OTHER
WARRANTY, EXPRESS OR IMPLIED, WHATSOEVER.
Some states do not allow the exclusion or limitation of
special, incidental, or consequential damages, so the
above limitation may not apply to you.
This warranty gives you specific legal rights, and you
may also have other rights, which vary from state
to state.
1. El aditamento para el área de la mandíbula
le va a ayudar a lograr un acabado elegante,
desbastando finamente debajo de su barbilla.
ALWAYS TRIM YOUR MUSTACHE
FROM THE TOP DOWN
1. El Peine Aditamento de su recortador está
ajustado a 5 posiciones, usted puede tener
una barba de 1/8” (la más corta) hasta 5/8”
(la más larga).
2. Para usar el peine de 5 posiciones enfúndelo
en las cuchillas del recortador y métalo hacia
abajo hasta su posición. Primero, hasta que
usted se familiarice con los ajustes, use
el ajuste para el recorte más largo (5/8”).
(Siempre puede volver a recortar su barba un
poco más si lo desea).
3. Begin trimming your beard using smooth,
even strokes. Start with your sideburns and
work downward toward your chin. (Never
attempt to trim against the natural growth
of your beard, because the hair will be cut
too short.)
4. If you decide you want a closer trim, you
can now adjust the 5-position comb to a
shorter setting (such as 1/2” or 3/8”) and go
over your beard again until you achieve the
desired length.
ADITAMENTO PARA EL ÁREA DE
LA MANDÍBULA
3. Empiece a recortar su barba usando ligeras
y suaves caricias. Empiece con sus patillas y
trabaje hacia abajo hacia el cuello. (Nunca trate
de recortar en contra del crecimiento natural
de su barba, ésto va a causar que el cabello se
corte de más).
1. The Jawline Attachment will help you to
achieve a neat, finished trim under your chin.
IB-8599
AHORA USTED YA ESTÁ LISTO
PARA RECORTAR SU BARBA
GARANTÍA LIMITADA
DE DOS AÑOS
Conair reparará o remplazará (a su opción) su
aparato sin cargo por un período de 24 meses a
partir de la fecha de compra si presenta defectos de
materiales o fabricacioñ.
Para obtener servicio técnico bajo esta garantía, lleve
o mande su aparato al Centro de Servicio indicado
a continuación, junto con su recibo de compra y un
cheque de $3.00US para gastos de manejo y envío. Los
residentes de California sólo necesitan dar una prueba
de compra y deben llamar al 1-800-366-0937 para
recibir instrucciones de envío. En ausencia del recibo de
compra, el período de garantía será de 24 meses a partir
de la fecha de fabricación.
CUALQUIERA GARANTÍA, OBLIGACIÓN O
RESPONSABILIDAD IMPLÍCITAS, INCLUYENDO
PERO NO LIMITADAS A LA GARANTÍA IMPLÍCITA DE
COMERCIABILIDAD Y APTITUD PARA UN PROPÓSITO
ESPECÍFICO, ESTARÁN LIMITADAS POR LOS 24
MESES DE LA PRESENTE GARANTÍA ESCRITA.
Algunos Estados no permiten limitaciones sobre la
duración de una garantía implícita, de modo que las
limitaciones mencionadas pueden no regir para usted.
CONAIR NO SERÁ RESPONSABLE EN NINGÚN
CASO POR ALGÚN DAÑO ESPECIAL, INCIDENTAL O
CONSECUENTE DEBIDO AL INCUMPLIMIENTO DE
ESTA O DE CUALQUIER OTRA GARANTÍA, EXPRESA
O IMPLÍCITA. Algunos Estados no permiten la
exclusión o limitación de daños especiales, incidentales
o consecuentes, de modo que las limitaciones
mencionadas pueden no regir para usted. Esta garantía
le otorga derechos legales específicos y usted puede
tener otros derechos que varían de un Estado a otro.
Centro de Servicio
Conair Corporation
Service Department
7475 North Glen Harbor Blvd.
Glendale, AZ 85307
08PG096
IB-8599
5/19/08
4:55:33 PM