1
®
Assembly and Instruction Sheet
Dome Fireplace
Model 5055-710
Follow these instructions for assembly and read carefully, particularly the
safety statements. The safety alert symbol,
is a universally recognized
symbol used to identify safety information about hazards that can result in
personal injury. When this symbol is used you should pay very close
attention to what is written. Review these instructions before beginning
assembly or using your fireplace.
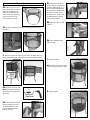
1.
2.
3.
4.
5.
6.
• Check package for all parts needed for assembly.
■ 7. Leg Support Ring
■ 8. Screen Support Rings (2)
■ 9. Hardware Kit
■ 10. Leg Assemblies
■ 11. Grates
Firebowl
4 Pc. Screen Assembly
Handle
Dome Lid
Protective Cover
Top Ring
2
1
3
WARNING
• Outdoor use only. Never use in enclosed area. Use in unventilated areas
will endanger your life.
• Keep away from all combustible materials including gasoline and other
flammable liquids and vapors.
• Use on a level, noncombustible surface only. Keep away from house,
garage, balconies, or eave overhangs.
• Keep out of the reach of children.
• Be sure screen is in place while in use and do not use in windy conditions.
• Do not overfill firebowl or use to burn leaves and trash.
• Exercise the same care you would with an open fire.
• Never leave unit unattended when hot or in use.
• Completely extinguish fire before leaving.
• Use gloves when handling or moving. Ashes can remain warm for a long
time after extinguishing.
• Dispose of cold ashes properly.
• Do not modify in any way nor use with parts not expressly approved by
Coleman.
• Combustion by-products produced when using this product contain
chemicals known to the State of California to cause cancer, birth defects,
or other reproductive harm.
Contact local authorities regarding possible burn restrictions before using product.
Assembly (cont.)
Fireplace Parts Check List
■
■
■
■
■
■
FOLLOW INSTRUCTIONS AND WARNINGS TO AVOID FIRE,
SERIOUS INJURY OR DEATH.
3a. Assemble Leg Support Ring to the four leg assemblies.
Fasten to Leg Brackets with one small screw per leg
(see arrows). Tighten all fasteners.
5
4
11
6
9
8
7
10
• Check all items for shipping damage. Call Coleman at 1-800-835-3278 or
TDD: 316-832-8707 if you have any problems.
3b. Install four foot pads, one into each leg.
NOTE: In some models, the foot pads are
pre-installed by the factory.
Assembly
1. Carefully unpack all parts from shipping box.
NOTE: In Steps 2 and 3, the stand is assembled up side down
for ease of assembly. Use a ground cloth to protect the finish.
2. Align holes in Leg Assembly Brackets with holes in Top
4a. To assemble screen, align holes in the 3 screen panels with the holes
on outside edge of screen support ring. Attach with small screws and hex
nuts but do not tighten at this time.
NOTE: Make sure latch bracket panel and hinge panel are positioned as
shown for proper installation.
Ring. Attach with two small screws per leg. Hand tighten.
Latch Bracket pointing up
Top
Ring
(Large)
Hinge Panel
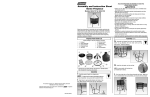
6c. Slip latch bar onto handle
threads. Align “D” slot in latch bar
with flat on handle threads. The
latch bar should point toward the
left. Assemble the second hex nut
to finish the assembly. This hex
nut functions as a “jam nut”, and
will tighten against the first hex
nut assembled in Step 5b.
Assembly (cont.)
4b. Align holes in the 3 screen
panels with the holes on outside
edge of the remaining screen
support ring. Attach with small
screws and hex nuts. Tighten all
screws and hex nuts on the
screen assembly at this time.
6d. Tighten the “jam nut” with
a wrench.
4c. Install screen door by inserting pins into hinge slots on the screen
hinge panel
6e. Proper installation of the
latch assembly.
5. Turn frame right side up. Place Screen Assembly into frame. Make sure
door is centered between two Leg Assemblies, and can open and close properly.
7. Install the firebowl.
NOTE: An inch or two of sand should
be used in firebowl beneath the grate.
NOTE: Two hex nuts and latch bar
will assemble on the inside of the
screen door.
Latch
Bar
(See Note)
6b. Insert handle from outside.
Loosely assembly one hex nut.
The handle should freely turn.
Point the handle downward to
begin the next step.
Handle
8. Install two grates.
{
6a. Assemble screen door latch.
Assembly (cont.)
Repair Parts List
Model 5055-710
9. Attach handle to lid using 2
screws and hex nuts. Tighten
fasteners.
Part No.
Description
5055-5011
5055-1001
5055-1101
5055-5301
5055-1501
5055-4001
5055-5001
5055-1551
5055-1051
5055-1121
5055-1171
Screen Panels (4 pcs.)
Protective Cover
Top Ring
Hardware Kit
Leg Support Ring
Grates (2 pcs.)
Leg Assembly (1 pk.)
Foot Pads (4 pk.)
Lid Handle
SS Dome Lid
Screen Support Rings (2 pcs.)
Limited One Year Warranty
Set Up and Use
WARNING
Never leave unit unattended when hot or in use. Keep out of reach of children. For
outdoor use only. Never use in enclosed area. Use in unventilated areas will
endanger your life.
1.
Place unit on a level, noncombustible surface. Keep well away from
house, garage, balconies or eave overhangs. Do not use on wooden decks.
.
2 Be sure grate is placed in firebowl. Add newspaper, kindling & wood on
top of grate.
3. Ignite newspaper & kindling with match or butane lighter.
4. Once fire is lit, close and latch the screen door.
5. Screen door handle is hot when in use. Take care when opening and
closing the screen door.
After Use
WARNING
To avoid burns – use heavy gloves when handling hot surfaces.
1. Completely extinguish fire before leaving.
2. Do not use water to douse the fire as this may warp the firebowl.
3. Dispose of cold ashes properly.
4. Be careful – fire may be out but firebowl can still be hot. Handle carefully.
5. Store in covered enclosure.
6. Only place vinyl cover on unit after unit is completely cooled to touch.
The Coleman Company, Inc. (“Coleman”) warrants that for a period of one year from the date of original retail
purchase, this product will be free from defects in material and workmanship. Coleman, at its option, will repair or
replace this product or any component of the product found to be defective during the warranty period. Replacement
will be made with a new or remanufactured product or component. If the product is no longer available, replacement
may be made with a similar product of equal or greater value. This is your exclusive warranty.
This warranty is valid for the original retail purchaser from the date of initial retail purchase and is not transferable.
Keep the original sales receipt. Proof of purchase is required to obtain warranty performance. Coleman dealers, service
centers, or retail stores selling Coleman® products do not have the right to alter, modify or in any way change the
terms and conditions of this warranty.
What This Warranty Does Not Cover
This warranty does not cover normal wear of parts, parts that are not genuine Coleman® parts, or damage resulting
from any of the following: negligent use or misuse of the product; use on improper voltage or current; commercial use
of the product; use contrary to the operating instructions; disassembly, repair or alteration by anyone other than
Coleman or an authorized service center. Further, the warranty does not cover Acts of God, such as fire, flood,
hurricanes and tornadoes. Warranty void if damage to product results from the use of a part other than a genuine
Coleman® part.
COLEMAN SHALL NOT BE LIABLE FOR DEFECTS THAT ARE CAUSED BY THE USE OF UNAUTHORIZED PARTS OR
SERVICE. COLEMAN SHALL NOT BE LIABLE FOR ANY INCIDENTAL OR CONSEQUENTIAL DAMAGES CAUSED BY
THE BREACH OF ANY EXPRESS OR IMPLIED WARRANTY OR CONDITIONS. EXCEPT TO THE EXTENT PROHIBITED
BY APPLICABLE LAW, ANY IMPLIED WARRANTY OF MERCHANTABILITY OR FITNESS FOR A PARTICULAR
PURPOSE IS LIMITED IN DURATION TO THE DURATION OF THE ABOVE WARRANTY OR CONDITIONS. SOME
STATES, PROVINCES, OR JURISDICTIONS DO NOT ALLOW THE EXCLUSION OR LIMITATION OF INCIDENTAL OR
CONSEQUENTIAL DAMAGES OR LIMITATIONS ON HOW LONG AN IMPLIED WARRANTY LASTS, SO THE ABOVE
LIMITATIONS OR EXCLUSION MAY NOT APPLY TO YOU. THIS WARRANTY GIVES YOU SPECIFIC LEGAL RIGHTS,
AND YOU MAY ALSO HAVE OTHER RIGHTS THAT VARY FROM STATE TO STATE OR PROVINCE TO PROVINCE.
How to Obtain Warranty Service
Take the product to an authorized Coleman service center. You can find the nearest authorized Coleman service
center by visiting www.coleman.com or calling 1-800-835-3278 or TDD 316-832-8707 in the United States. If a
service center is not conveniently located, attach to the product a tag that includes your name, address, daytime
telephone number and description of the problem. Include a copy of the original sales receipt. Carefully package the
product and send either by courier or insured mail with shipping and insurance prepaid to:
For products purchased in the United States:
The Coleman Company, Inc.
3600 North Hydraulic
Wichita, KS 67219
The costs of transporting the product to Coleman or an authorized service center for warranty service is the
responsibility of the purchaser.
Do not mail products with fuel in tanks, or with disposable propane cylinders. Remove glass globes from lanterns
and wrap separately.
DO NOT RETURN THIS PRODUCT TO THE PLACE OF PURCHASE.
If you have any questions regarding this warranty please call 1-800-835-3278 or TDD 316-832-8707 in the
United States.
The Coleman Company, Inc. • 3600 N. Hydraulic • Wichita, KS 67219
1-800-835-3278 • TDD: 316-832-8707
© 2006 The Coleman Company, Inc. All rights reserved. Coleman® and
trademarks of The Coleman Company, Inc.
®
are registered
5055-051 (10/11/06)