1
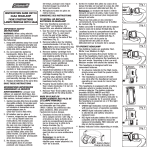
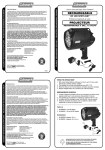
3 Year Limited Warranty
The Coleman Company, Inc. (“Coleman”) warrants that for a period of three (3) years from the date
of purchase, this product will be free from defects in material and workmanship. Coleman, at its
option, will repair or replace this product or any component of the product found to be defective
during the warranty period. Replacement will be made with a new or remanufactured product or
component. If the product is no longer available, replacement may be made with a similar product
of equal or greater value. No warranty is provided for batteries and lightbulbs. This is your
exclusive warranty.
This warranty is valid for the original retail purchaser from the date of initial retail purchase and is
not transferable. Keep the original sales receipt. Proof of purchase is required to obtain warranty
performance. Coleman dealers, service centers or retail stores selling Coleman® products do not
have the right to alter, modify or in any way change the terms and conditions of this warranty.
This warranty does not cover normal wear of parts or damage resulting from any of the following:
negligent use or misuse of the product, use on improper voltage or current, use of non-Coleman
accessories or parts, use contrary to the operating instructions or failure to follow maintenance
instructions, commercial, in profit or non-profit instructional or rental applications, disassembly,
repair or alteration by anyone other than Coleman or an authorized service center. Further, the warranty does not cover Acts of God, such as fire, flood, hurricanes and tornadoes.
PACK/BIKE
LIGHT
3AAA LED
How to Use and Enjoy Your Coleman®
THINGS YOU SHOULD KNOW
COLEMAN SHALL NOT BE LIABLE FOR ANY INCIDENTAL OR CONSEQUENTIAL DAMAGES
CAUSED BY THE BREACH OF ANY EXPRESS OR IMPLIED WARRANTY, BREACH OF CONTRACT
OR OTHERWISE. EXCEPT TO THE EXTENT PROHIBITED BY APPLICABLE LAW, ANY IMPLIED
WARRANTY OF MERCHANTABILITY OR FITNESS FOR A PARTICULAR PURPOSE IS LIMITED IN
DURATION TO THE DURATION OF THE ABOVE WARRANTY. SOME STATES, PROVINCES OR
JURISDICTIONS DO NOT ALLOW THE EXCLUSION OR LIMITATION OF INCIDENTAL OR CONSEQUENTIAL DAMAGES OR LIMITATIONS ON HOW LONG AN IMPLIED WARRANTY LASTS, SO THE
ABOVE LIMITATIONS OR EXCLUSION MAY NOT APPLY TO YOU. THIS WARRANTY GIVES YOU
SPECIFIC LEGAL RIGHTS, AND YOU MAY ALSO HAVE OTHER RIGHTS THAT VARY FROM STATE
TO STATE OR PROVINCE TO PROVINCE.
How to Obtain Warranty Service
1. On a new set of alkaline
batteries, approximate run
time: 5 hrs. on high; 20 hrs.
on low; 40 hrs. on strobe.
2. This light may not light at
temperatures below 20ºF
(-7ºC).
3. When the LED is not lit to
full brilliance, batteries
should be replaced.
Take the product to an authorized Coleman service center. You can find the nearest authorized
Coleman service center by visiting www.coleman.com or calling 1-800-835-3278 or
TDD 316-832-8707 in the United States or 1 800 387-6161 in Canada. If a service center is
not conveniently located, attach to the product a tag that includes your name, address, daytime
telephone number and description of the problem. Include a copy of the original sales receipt.
Carefully package the product and send either by courier or insured mail with shipping and
insurance prepaid to:
For products purchased in the United States:
The Coleman Company, Inc.
3600 North Hydraulic
Wichita, KS 67219
For products purchased in Canada:
Sunbeam Corporation (Canada) Limited
DBA Jarden Consumer Solutions
20B Hereford Street
Brampton (Ontario) L6Y 0M1
©2007 The Coleman Company, Inc.
All rights reserved. Coleman®,
,
and exponent® are registered trademarks of
The Coleman Company, Inc.
Made in China • Printed in China
09/07
DO NOT RETURN THIS PRODUCT TO THE PLACE OF PURCHASE.
DO NOT SHIP PRODUCT WITH THE BATTERIES INSTALLED.
If you have any questions regarding this warranty please call 1-800-835-3278 or
TDD 316-832-8707.
TO INSTALL OR REPLACE BATTERIES
Carefully read all instructions before use and save for future
reference.
Your new light operates on 3 “AAA” cell batteries. For longest life,
use alkaline batteries.
1. Remove 3 screws from back of light, with a small Phillipshead screwdriver, and lift off back cover. (Fig. 1)
2. Install 3 “AAA” cell batteries in the correct orientation as
shown on the battery housing. Make certain all 3 batteries are
installed correctly. (Fig. 2)
3. Replace back cover on light, then install and tighten the 3
screws. (Fig. 3)
Fig. 2
Fig. 3
Fig. 1
OPERATING THE LIGHT
1. Your Pack/Bike Light turns on by pushing the button located on top of the light
(Fig. 4). The number of times you push the button will let you choose your
lighting preference:
• Once for “HIGH” setting. All four LED’s will be lit for maximum light output.
• Twice for “LOW” setting. The three outside LED’s will be lit for more
subdued lighting.
• Three times for “Emergency” setting. Bright flashing signal strobe light will be activated.
• Fourth time will turn the light off.
Fig. 4
ATTACHING LIGHT TO PACK OR BELT
Your light can easily be attached to a backpack strap or belt for “handsfree” operation while navigating at night or during low-light conditions.
1. Choose the best location for the light on the backpack or belt. Push
down on light to secure metal clip to strap or belt. (Fig. 5)
MOUNTING LIGHT TO BIKE
IMPORTANT: Always bike safely, especially at night or during lowlight conditions. Always wear a helmet and proper protective gear.
Bracket
ar
le B
nd
Ha
Included with your light is a mounting bracket and 3 rubber adaptors.
These adaptors allow the light bracket to be attached to a variety of
bike handle bar sizes.
1. Select appropriate sized rubber adaptor to fit the bike’s handle bar.
Install the rubber adaptor into light bracket (shown in Fig. 6) to
ensure orientation is correct for proper fit.
2. Loosen screw on the bracket completely, then spread open the
bracket/rubber adaptor sub-assembly wide enough to slip over the
handle bar in the desired position (Fig. 6). Bracket must be
installed as shown for light to attach properly.
3. Align metal clip over opening in bracket, then push down to lock
light into place. (Fig. 7)
4. Adjust light up or down until you reach the desired angle for best
lighting of the road or trail, then tighten the screw on the bracket
to secure. (Fig. 8)
Fig. 5
Rubber
Adaptor
Fig. 6
Fig. 7
Fig. 8