1
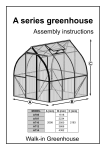
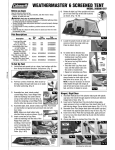
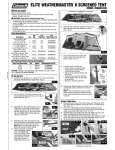
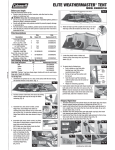
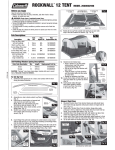
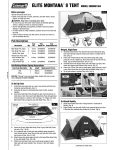
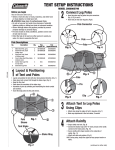
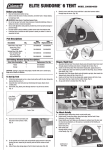
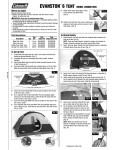
WEATHERMASTER 8 TENT
®
Before you begin
Read all instructions before set up.
• Select a level site clear of rocks, branches, and other hard or
sharp objects, to install your tent.
WARNING: Keep clear of overhead power lines.
• Do not set up your tent under trees because of potential
lightning strikes or falling tree limbs in inclement weather.
• Secure with all stakes and guylines provided to prevent
property damage or personal injury.
• For best results in windy conditions, position narrow end of
tent into the wind.
• Enlist the help of at least one other person to assist you when
it is time to assemble the tent.
MODEL 2000001596
6. Rotate all six Leg Poles upright and insert
pin on each web loop at the side locations
as shown. (Fig. 7 & 7A)
7A
Pin
Pole Descriptions
Description
Long Leg Pole, steel
(w/ red marking)
Short Leg Pole, steel
Curved Ridge Pole, steel
(w/ red marking)
Curved Ridge Pole, steel
Window Vent Pole,
black, fiberglass
Qty.
Pole
Dia.
Pole
Repair Kit
Pole
Replacement Kit
2
4
19mm
19mm
N/A
N/A
5010000612
5010000622
1
2
19mm
19mm
N/A
N/A
5010000617
5010000616
Fig. 7
Metal Tip
Sleeve
Window Pole
2
8.5mm 5010000541
5010000547
To Set Up Tent
1. Unfold tent and spread out on a clean, level surface with the
door facing the desired direction. Unzip doors. (Fig. 1)
Fig. 1
STITCH LINE
7B
Door
2. Pull four corners of tent taut, then secure
by driving stakes through web loops at an
angle for better anchoring. (Fig. 2)
Fig. 2
3. Assemble three, steel, shock-corded,
curved Ridge Poles. Insert Ridge Pole
(with red marking) into center sleeve
on top of tent with the red trim (Fig. 3).
Insert the remaining curved Ridge Poles
into the other two sleeves on top of tent.
Fig. 3
Ridge Pole
with Red
Marking
Sleeve
with Red
Trim
4. Assemble six, steel, shock-corded,
Leg Poles. Push down on steel button
on tapered end and insert into end
Button in third hole
with four holes.
Fig. 4
NOTE: Make sure steel button locks
into third hole on pole as shown. (Fig.4)
5. Insert curved end of Leg
Ridge Pole with
Poles (with red dot) into
Red Marking
the ends of the RidgePole
(with red dot). Insert
curved end of remaining
Sleeve
Curved End of
short Leg Poles into the
with Red
Long Leg Pole
Trim
ends of the remaining
Fig. 5
Ridge Poles. (Fig. 5 & 6)
Hole in
Leg Pole
7C
6. Assemble the two, shock-corded, black Window Poles,
then insert one into sleeve located at each end of tent.
(Fig. 7 & 7B)
7. Insert tapered metal tip on Window Pole into Leg Pole.
NOTE: It may be necessary to gently rotate Leg Pole so the
hole will line up with the Window Pole.
8. Go to opposite end of each window pole and gradually apply
pressure to the pole forming an arch. Insert the pin into the
leg pole end at the corners of tent. (Fig. 7 & 7C)
9. Locate the plastic hooks at sides and corners of tent, then
snap onto Leg Poles to attach. (Fig. 8)
10. Locate web strap
Fig. 8
Fig. 9
with plastic hook on
Corner
the sides of each
Leg Pole
end panel Window
Vent, then snap onto
the corner Leg Pole.
Window Vent
(Fig. 9)
Web Tent Strap
11. To stretch tent to finished size:
• Push in button on Leg Pole while
twisting lower Leg Pole section
counterclockwise (Fig.10);
• Pull up on top Leg Pole section
until tent is taut;
• Twist the lower Leg Pole clockwise until the button locks into
the center or lowest hole;
• Repeat on remaining Leg Poles.
Fig. 10
Upper
Leg Pole
Section
Button
Center Hole
Lower Hole
Lower
Leg Pole
Section
12. Insert plastic stakes through
web straps located on both sides
of tent, then drive in to secure.
(Fig. 11)
Fig. 11
Fig. 6
(continued on other side)
To Attach Rainfly
Electrical Cord Access
1. Drape Rainfly over tent. Make sure seams on Rainfly are
facing down and centered over poles of the tent. (Fig. 12)
NOTE: Hook and loop fasteners, located on seams of under side of rainfly, should be centered over black and gray poles.
1. Unzip access panel in the lower
left corner of tent and bring in
electrical cord.
NOTE: Use only UL approved cords
rated for outdoor usage. (Fig. 20)
Rainfly
Cooler Access
The smaller zippered opening at the side
of tent is designed for added ventilation
and easy access to your beverage cooler.
1. To use as a vent, unzip flap to expose
screen. (Fig. 21)
2. To use as a cooler access, unzip
other flap to make an avenue to bring
beverages into tent. (Fig. 22)
Fig. 21
Fig. 22
Fig. 12
Door & Window Flaps/Vents
2. Locate all hook & loop
fasteners on underside of
rainfly and wrap around
each Leg Pole and Window
Vent Pole locations.
(Fig. 13)
1. For better ventilation, unzip door flaps, roll, and insert
toggle into fabric loop to secure.
2. To open back and side window vents for more ventilation,
unzip, then roll up and insert toggles through fabric loops.
Fig. 13
3. Insert metal hook on elastic straps on Rainfly into the hole
on each Leg Pole. (Fig 14 & 15)
Center Leg
Pole
Location
End Leg
Pole
Location
Fig. 15
4. Loop ends of guylines over stakes,
stretch tight, then hammer into
ground at an angle as shown.
(Fig. 16 & 17)
To Store
1. All metal poles and stakes must be placed in the storage
bag to prevent damage to the fabric items placed in the
carry case.
2. Make sure tent is clean and dry before placing in carry case.
3. Remove rainfly, spread out on floor of tent, then unzip
door & vents before taking tent down for storage.
4. Neatly fold tent to width of pole storage bag, place on tent,
roll tightly, and place in carry case.
5. Store in a clean, dry area.
Things You Should Know:
Fig. 16
Fig. 17
• Under certain conditions (cold weather, high humidity, etc.) condensation will form on the inside of your tent. Condensation is caused by water
vapor from your breath, perspiration, or any wet clothing inside the tent.
It is NOT LEAKAGE through the tent fabric. It can be minimized by
removing wet clothing from your tent and by providing good ventilation through the tent.
• Tree limbs, tree sap, bird droppings, or moisture steadily dripping off
tree limbs can cause damage to the tent fabric and its coating resulting
in leaks or loss of flame-resistant properties.
• Never store tent, even for a short period of time, without drying it
thoroughly and brushing off caked dirt. Do not pack stakes or poles
inside your tent. Use a separate storage bag.
• Stakes should be removed by pulling on the stake itself. NEVER PULL ON
THE TENT TO REMOVE STAKES AS THIS COULD RESULT IN PROPERTY
DAMAGE OR PERSONAL INJURY.
• Tent poles should not be left telescoped together during storage.
• Do not leave your tent set-up for weeks at a time. Be aware that exposure
to ultraviolet rays from the sun can seriously damage material and/or
cause it to become discolored.
WARNING: Keep all flame and heat sources away from
this tent fabric.
Attaching Room Divider
This tent meets the flammability requirements of CPAI-84. The
fabric may burn if left in continuous contact with any flame source.
The application of any foreign substance to the tent fabric may
render the flame-resistant properties ineffective.
1. Divider Panel can be installed
through center of the tent by
inserting toggles through the
top and bottom fabric loops as
shown. (Fig. 18 & 19)
Top
Fabric
Loops
Divider
Panel
The Coleman Company, Inc. • 3600 N. Hydraulic • Wichita, Kansas 67219
1-800-835-3278 • www.coleman.com
MADE IN CHINA • PRINTED IN CHINA
© 2008 The Coleman Company, Inc.
Coleman®,
Fig. 18
,
, and Weathermaster® are registered trademarks of
The Coleman Company, Inc.
Fig. 19
4010004004 (20081113)
STITCH LINE
Fig. 14
Fig. 20