1
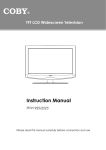
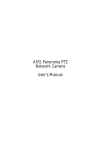
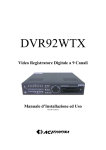
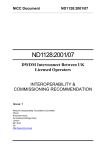
TF-TV3709 TF-TV4209 LCD TV A Wide Array of Screen Settings You can choose different screen settings depending on the type of program you are watching or the surrounding conditions (the lighting or the outside weather conditions). You can switch between the Sport, Movie, Music and Normal options, or you can configure the screen settings yourself. A Wide Array of Sound Settings You can choose an optimal sound setting for the type of program you are watching. You can switch between the Music, Movie, News and Normal options, or you can configure the settings yourself. Favorite Channel Memory You can store your favorite channels in order of preference for easy channel selection. Closed Caption When you watch a closed-captioned TV broadcast, turn the caption option on to see the English transcript on the screen. This feature also works with video CDs or videotapes with captions. CAUTION RISK OF ELECTRIC SHOCK DO NOT OPEN WARNING AVERTISSEMENT ´ RISQUE DE CHOC ELECTRIQUE-NE PAS OUVRIR. WARNING HIGH-VOLTAGE TO PREVENT FIRE OR SHOCK HAZARD DO NOT REMOVE COVER. NO USER SERVICEABLE PARTS INSIDE. REFER ALL SERVICE QUERIES TO QUALIFIED PERSONNEL. DO NOT EXPOSE THIS RECEIVER TO RAIN OR MOISTURE. REMOVE MAIN PLUG FROM WALL SOCKET WHEN NOT IN USE. CARE SHOULD BE TAKEN WHEN REMOVING BACK CABINET FOR SERVICING; SUB CHASSIS MAY BE DAMAGED IF ALLOWED TO BECOME UNSUPPORTED. This symbol is intended to alert the user to the presence of uninsulated “dangerous voltage” within the product’s enclosure that may be of sufficient magnitude to constitute a risk of electric shock to persons. This symbol is intended to alert the user to the presence of important operating and maintenance (servicing) instructions in the literature accompanying the appliance. WARNING - To reduce the risk of fire or shock hazard, do not expose the TV to rain or moisture. NOTICE If the same pattern is continuously displayed on the Monitor / TV for a long period of time, a residual image may be "burned in" to the screen. This apparatus should not be exposed to moisture and no object filled with liquids, such as vases, should be placed on the apparatus. ENGLISH FCC Compliance Statements Note : This equipment has been tested and found to comply with the limits for a Class B digital device, pursuant to part 15 of the FCC Rules. These limits are designed to provide reasonable protection against harmful interference in a residential installation. This equipment generates, uses and can radiate radio frequency energy and, if not installed and used in accordance with the instructions, may cause harmful interference to radio communications. However, there is no guarantee that interference will not occur in a particular installation. If this equipment does cause harmful interference to radio or television reception, which can be determined by turning the equipment off and on, the user is encouraged to try to correct the interference by one or more of the following measures: Reorient or relocate the receiving antenna Increase the separation between the equipment and receiver. Connect the equipment into an outlet on a circuit different from that to which the receiver is connected. Consult the dealer or an experienced radio / TV technician for help. Warning: Any change or modification to the equipment not expressly approved by the party responsible for compliance could void your authority to operate such equipment. 3 Important Safety Instruction 1) Read these instructions. 2) Keep these instructions. 3) Heed all warnings. 4) Follow all instructions. 5) Do not use this apparatus near water. 6) Clean only with a dry cloth. 7) Do not block any ventilation openings. Install in accordance with the manufacturer's instructions. 8) Do not install near any heat sources such as radiators, heat registers, stoves, or other apparatus (including amplifiers) that produce heat. 9) Do not defeat the safety purpose of the polarized or grounding-type plug. A polarized plug has two blades with one wider than the other. A grounding type plug has two blades and a third grounding prong. The wide blade or the third prong are provided for your safety. If the provided plug does not fit into your outlet. Consult an electrician for replacement of the obsolete outlet. 10) Protect the power cord from being walked on or pinched particularly at plugs, convenience receptacles, and the point where they exit from the apparatus. 11) Only use attachments/accessories specified by the manufacturer. 12) Use only with the cart, stand, tripod, bracket, or table specified by the manufacturer, or sold with the apparatus. When a cart is used, use caution when moving the cart/apparatus combination to avoid injury from tip-over. 13) Unplug this apparatus during lightning storms or when unused for long periods of time. 14) Refer all servicing to qualified service personnel. Servicing is required when the apparatus has been damaged in any way, such as power-supply cord or plug is damaged, liquid has been moisture, does not operate normally, or has been dropped. 15) The apparatus shall not be exposed to dripping or splashing and no objects filled with liquids, such as vases, shall be placed on the apparatus. 16) The socket-outlet shall be installed near the equipment and shall be easily accessible. 4 ENGLISH Precaution External Television Antenna Grounding If an outside antenna or cable system is connected to the television equipment, be sure the antenna or cable system is electrically grounded to protect against voltage surges and built-up static charges. Section 810 of the National Electrical Code provides information about proper electrical grounding of the mast and supporting structure, grounding of the lead-in wire to an antenna discharge unit, size of grounding conductors, location of antenna-discharge unit, connection to grounding electrodes, and requirements for the grounding electrode. Antenna Lead-in Wire Ground Clamp Electric Service Equipment Antenna Discharge Unit (NEC Section 810-20) Grounding Conductors (NEC Section 810-21) Ground Clamps Power Service Grounding Electrode System (NEC Art 250, Part H) An outdoor antenna system should not be located in the vicinity of overhead power lines or other electric light or power circuits, or where it can fall into such power lines or circuits. When installing an outdoor antenna system, extreme care should be taken to keep from touching such power lines or circuits as contact with them could be fatal. Disposal of this unit may be regulated due to environmental considerations. For disposal or recycling information, please contact your local authorities or the Electronic Industries Alliance at www.eia.org. For information regarding disposal and recycling in the state of California, please visit the eRecycle website at www.eRecycle.org. Notice The LCD panel used in this television contains millions of thin film transistors that have been manufactured using a high-technology process to deliver a crisp, clear, and detailed picture. Occasionally, a few of these transistors may become stuck or non-active; please note that this does not affect the performance of the television. 5 Precaution The unit should not be placed in an enclosed installation such as a bookcase or limited-space rack unless proper ventilation is provided. Do not use the unit near water, oil or inflammables. Do not use a damaged plug and do not let the power cord touch a heat source. Place the unit on a flat and stable surface. Do not place anything (vase, etc) on top of the unit. 6 Do not use the unit in direct sunlight and keep it away from heaters, stoves, and other sources of heat. During storm conditions (especially when there is lighting) unplug your TV set from the main electrical outlet and antenna. Do not connect too many extension cords or plugs to an outlet. Do not attempt to service the unit. Contact an authorized dealer or repair service. If there are any unusual sounds or smells coming from the unit, unplug it immediately and contact an authorized dealer or repair service. ENGLISH Precaution Do not use or store inflammable substances near the unit. Place the antenna away from the electric wire, not to touch even though it falls down by wind. Place the unit away from the wall for well ventilation. Do not touch the plug with wet hands. Be sure to insert the plug tightly. Hold the plug, not the cord, when disconnecting the plug from the wall outlet. If an outside antenna is connected to the unit, do not let the rain water get into the unit by bending or antenna wire sealing. Unplug the unit from the wall outlet before cleaning. Use a smooth cloth. Do not use industrial chemicals. If the connector between the plug and the pin is dusty or dirty, clean it. Do not spray detergent directly on the unit. Do not touch the antenna wire and disconnect the plug from the electrical outlet during storms or lightening. Disconnect the plug from the outlet if it is not used for a long period of time. 7 Table of Contents Precaution . . . . . . . . . . . . . . . . . . . . . . 5 Sound Mode Settings . . . . . . . . . . . . . . . . 28 Unpacking your TV . . . . . . . . . . . . . . . . . . 9 Custom Sound Mode Settings . . . . . . . . . . . . 28 Inserting Batteries in the Remote Control . . . . 9 Viewing the Control Panels (Front View) . . . . . . 10 Viewing the Control Panels (Rear View) . . . . . . 11 Remote Control . . . . . . . . . . . . . . . . . . . . 12 Connecting an Antenna . . . . . . . . . . . . . . 13 Sound Balance Settings . . . . . . . . . . . . . . 28 SRS TruSurround XT Mode Settings . . . . . . . . 29 Digital Audio Output Settings . . . . . . . . . . . . 29 Automatic Volume Control Settings . . . . . . . . 30 Connecting a VCR . . . . . . . . . . . . . . . . . . 14 Sound (Digital Broadcasting) Settings Connecting a DVD Player . . . . . . . . . . . . . . 14 Sound (Analog Broadcasting) Settings . . . . . . 30 Connecting an HDMI Connection . . . . . . . . . . 15 Connecting a DVI Connection . . . . . . . . . . . . 15 Connecting a PC . . . . . . . . . . . . . . . . . . 16 Automatic Time Settings . . . . . . 30 . . . . . . . . . . . . . . 31 Manual Time Settings . . . . . . . . . . . . . . . . 31 . . . . . . . . . . . . 16 Time and Date Settings. . . . . . . . . . . . . . . . 32 Automatic Channel Settings . . . . . . . . . . . . 17 Time Zone Settings . . . . . . . . . . . . . . . . . . 32 TV/ External Input Settings Antenna Settings . . . . . . . . . . . . . . . . . . 18 Adding or Removing Channels . . . . . . . . . . 18 Adding favorite channels . . . . . . . . . . . . . . 19 Current Program Information . . . . . . . . . . . . 20 Checking the strength of the digital signal . . . . 21 TV Activation Time Settings . . . . . . . . . . . . 33 TV Deactivation Time Settings. . . . . . . . . . . . 33 Auto TV Deactivation Time Settings . . . . . . . . 33 Entering a PIN . . . . . . . . . . . . . . . . . . . . 34 Menu Transparency Settings . . . . . . . . . . . . 21 TVPG Rating. . . . . . . . . . . . . . . . . . . . . . 35 Power Saving Mode Settings . . . . . . . . . . . . 21 MPAA Ratings . . . . . . . . . . . . . . . . . . . . 36 Screen Mode Settings . . . . . . . . . . . . . . . . 22 Canadian English Ratings . . . . . . . . . . . . . . 36 Screen Custom Mode Settings . . . . . . . . . . 22 Screen Color Settings . . . . . . . . . . . . . . . . 23 Unstable Screen . . . . . . . . . . . . . . . . . . 23 Canadian French Ratings . . . . . . . . . . . . . . 36 Captions Settings . . . . . . . . . . . . . . . . . . 37 Film Mode Settings . . . . . . . . . . . . . . . . . . 24 Analog Mode. . . . . . . . . . . . . . . . . . . . . . 37 Adjusting the Screen Size . . . . . . . . . . . . . . 24 Digital Mode . . . . . . . . . . . . . . . . . . . . . . 38 PIP (Picture-in-Picture) Settings . . . . . . . . . . 25 Digital Font Options . . . . . . . . . . . . . . . . . . 38 Adjusting the Sub-Screen Contents . . . . . . . . 25 Checking Items before Connecting to a PC . . . . 39 Switching the Main and Sub-Screen . . . . . . . . 26 Adjusting the Sub-Screen Size . . . . . . . . . . 26 PC Settings . . . . . . . . . . . . . . . . . . . . . . 39 Troubleshooting Guide . . . . . . . . . . . . . . . . 40 Adjusting the Sub-Screen Position . . . . . . . . 26 Adjusting the Sub-Screen Channel . . . . . . . . 27 Specifications (TF-TV3709) . . . . . . . . . . . . 42 Capturing a Still screen. . . . . . . . . . . . . . . . 27 Specifications (TF-TV4209) . . . . . . . . . . . . 43 8 Unpacking your TV ENGLISH Please make sure the following items are included with your TV set. If any items are missing, contact your dealer. Accessories Remote Control & Batteries (AAA x 2) Operating Instructions Power Cord Inserting Batteries in the Remote Control You must insert or replace the batteries in the remote control when you purchase the TV or when you find that the remote control is no longer operating correctly. 1 Push the “▽” mark at the back of the remote control and pull forward slightly. 2 Insert two AAA 1.5V batteries ensuring the correct polarity (+/-). 3 Close the lid. ■ Handle the remote control with care; avoid dropping it, getting it wet, placing it direct sunlight, near a heater, or where the humidity is high . ■ Remove the batteries to avoid damage from possible battery leakage whenever you anticipate that the remote control will not be used for an extended period. 9 Viewing the Control Panels Front View Bottom Side 1 3 2 1 2 3 4 5 6 4 MENU selection Input TV/AV selection Channel selection Volume adjustment Remote control sensor Power Power Indicator Status Indicator 10 Status Red Stand-by Green Power on 5 6 ENGLISH Viewing the Control Panels Rear View Connection Cables (Optional : not included) HDMI Connector 4 DVI/PC Sound Cable 3 8 HDMI/DVI Connector 4 Component Signal Cable 11 Digital Sound Connector 6 Sound Cable 10 S-Video Connector 7 AV Cable 9 PC Cable 5 Coaxial Cable 12 Bottom Side 1 2 3 4 5 6 AC Power Input Terminal Service Port DVI Sound Input Terminal HDMI/DVI Input Terminal PC Input Terminal Optical Digital Sound Output Terminal 7 8 9 10 11 12 S-Video Input Terminal PC Sound Input Terminal External Terminals 1, 2 Component Sound Input Terminals 1, 2 Component Video Input Terminals 1, 2 AIR, CABLE Antenna Input Terminal 11 Remote Control - Make sure there are no objects between the remote control and its sensor. - Do not place the remote control near a heater or in damp place. 1 INPUT 15 POWER - Displays a menu of all available input sources. - Also used to confirm your choice in the on-screen menu. 16 CH-LIST - Press to see the channel list 17 AIR/CABLE 2 S.MODE - Press to select AIR/CABLE channels - Press to change to a preset sound mode 18 FAV 3 P.MODE - Watch your favorite channels - Press to change to a preset picture mode 19 CHANNEL 4 MUTE - Press to change channels - Press to temporarily switch the sound off 20 INFO 5 VOLUME - Check the current program information, screen status, multi-sound status and time - Press to increase or decrease the volume 21 EXIT 6 GUIDE - Exit from a menu or the program guide to the main TV screen - Press to view the DTV program information 7 MENU 22 UP/DOWN/LEFT/RIGHT/ENTER - Press to display the main on-screen menu - Press to select on-screen menu items and change menu values 8 E.SAVING - Press to save power 23 SLEEP - Press to select a preset time interval to automatically shut the TV down 9 ASPECT - Press to adjust the screen size 24 MTS 10 Numeric Keypad - Press to select your favorite language for digital broadcasting. You can select your favorite mode Mono/Stereo/SAP. - Press to change the channel directly using the numeric buttons 11 [- ] Button 25 STILL - When selecting a digital broadcast channel, press the Main channel number > [-] > sub channel number. Analog channels can be viewed when the sub channel is zero - Press to pause the current scene 26 CAPTION - Press to activate closed-captioning 12 PIP 27 SRS - Picture-in Picture ON/OFF - Press to activate the 3-D surround sound system and 'live' sound as in a music concert hall 13 POSITION - Press this button to change the location of the Sub-Screen in PIP mode 28 ADD/DEL - Press to add or delete a channel to/ from your channel list 14 SWAP - Press to switch the channels in the main screen and Sub-Screen or vice versa in PIP mode 29 PRE-CH - Press to view the previous channel 30 PIP INPUT - Press to display other sources connected to the TV in the Sub-Screen Remote Control Instructions 31 CH -, CH + - Press to change the channel in the Sub-Screen Press to move up in the menu 12 Press to move down in the menu Press to move right in the menu Press to move Press to select the Press to return to left in the menu on-screen menu item the previous menu Connecting an Antenna ENGLISH There are internal and external types of antennas. Rear of the TV Cable Television Network or Air Connecting an Antenna 1 Caution Use a coaxial cable to connect the rear panel of the TV's [AIR] or [CABLE] terminals and the wall mount or external antenna. ☛ lIf the signal is too weak to be received by the TV, purchase an additional wavelength amplifier for better reception. 2 When an Air signal is required, connect to the [AIR] terminal. ☛ Setting up an UHF antenna will receive a digital broadcast signal. If a Cable signal is required, connect to the [CABLE] terminal. If both Air, Cable are available, then connect both [AIR] and [CABLE] terminals. 3 Connect the TV power cord when connecting everything else. Avoid bending the copper tip at the center of the coaxial cable. ☛ For apartments and condos, check with related parties or your landlord for UHF receiver availability. ☛ Some areas can receive digital broadcasts via cable companies, therefore check with your local cable operator. Viewing Air Channels 1 Turn on the TV and follow the steps in <Auto Memorizing>. Currently all broadcast Air (Analog, Digital) and Cable (Analog, Digital) channels have been memorized. 2 Change the channel you wish to watch! ■ Selecting channels directly via the numeric keypad. ex) To watch channel 4: Press ‘4’ ➔ Press OK. ■ To change channels using the [CHANNEL] button. ex) Change from Channel 4 to 11: Keep pressing the [CHANNEL] button until you get to Channel 11. 13 Connecting a VCR External devices may have different terminals for the same functions. VCR Rear of the TV Sound Cable Video Cable or S-Video Connector Useful Tips ☛ If there is a terminal called [S-Video Output], connect the TV [S-Video Input] terminal to the VCR [S-video output] terminal. Connect the sound cable to the [Video2 / S-Video Input left / right] (white / red). VIDEO1 Connecting the video / sound cables 1 Connect the antenna cable to the Antenna input of the rear panel of the VCR. 2 Use the video cable to connect the [AV1 video input] or [AV2 video input] (yellow) terminal at the back of the TV to the [video Output] (Yellow) of the VCR. 3 Use the sound cable to connect the [AV1 sound input left / right] or [AV2 sound input left / right] (white/red) terminal at the back of the TV to the [sound output] (white/red) of the VCR. Watching a VCR Useful Tips ☛ When connecting a TV and VCR with an S-Video cable, press the [INPUT] button to select <S-VIDEO>. 1 Turn on the TV and press the [INPUT] button, then select <AV1> or <AV2>. If <external input> mode is not selected, check your video connection. 2 Turn on the VCR and press the play button. Connecting a DVD Player External devices may have different connecting terminals. DVD Rear of the TV Audio Cable Component Cable Useful Tips ☛ Component output terminals may be labeled either "YUV" or "Y, Pb/Cb, Pr/Cr". ☛ If the DTV receiver supports DVI, it may be connected via an HDMI or DVI cable instead of a component cable. HDMI Connecting to a DVD player 1 Use the component video cable to connect the [COMPONENT 1 video input] or [COMPONENT 2 video input Y, Pb, Pr] (Green/Blue/Red) terminal at the back of the TV to the [Component output] on the DVD player. 2 Use the sound cable to connect the [COMPONENT1 sound input left/right] or the [COMPONENT2 sound input left/right] (white/red) input terminal to the [sound output] (white/red) output terminal of the DVD player. Viewing a DVD Useful Tips ☛ When connecting the [TV] and the [DVD] with the HDMI cable, press the [INPUT] button and select <HDMI>. 14 1 Turn on the TV, press the [INPUT] button, then select <COMPONENT 1> or <COMPONENT 2>. (If <component> mode is not selected, check if the component connectors are connected.) 2 Turn on the DVD player and press the play button on the DVD player. ENGLISH Connecting an HDMI Connection DVD (Home Theater) Rear of the TV HDMI Connector What is HDMI ? Connecting via HDMI 1 Connect the [HDMI/DVI input] terminal at the back of the TV and the [HDMI] terminal of the external device. 2 Connect the TV and the external device after all other connections are done. Watching HDMI 1 ☛ HDMI (High-Definition Multimedia Interface) : A next generation interface that connects the digital audio and video signals using only one cable without compression. The sound signal also carries multi-channel (55:1 Channel) so that it isproperly called a multimedia interface rather than a video terminal. The difference between HDMI and DVI is that the size is smaller; HDCP has an embedded cipher function and supports multi channel audio. Turn on the TV and press [INPUT], then select <HDMI>. 2 Place a DVD title into an external device connected via HDMI and press play. HDMI Useful Tips ☛ You can watch by connecting AV devices such as a set-top-box, a DVD player, an AV receiver, or DTV that supports the HDMI connection. Connecting a DVI Connection DVD (Home Theater) Rear of the TV HDMI/DVI Connector DVI Sound Cable Connecting via DVI 1 Connect the [HDMI/DVI Input] terminal and the [DVI] output terminal of the external device. 2 Connect the [DVI Audio input] using the DVI audio cable (sold separately). Useful Tips ☛ When connecting equipment using a DVI connection cable, use a DVI-HDMI gender (ssold separately) or on one side HDMI other HDMI/ side DVI type of connection cable (H DVI connecting cable - not included in packet - sold separately) 3 After this is completed, turn on the power of the TV and the external device. Watching via the DVI connector 1 HDMI Turn on the TV and press [INPUT], then select <HDMI>. 2 Operate the external device connected via DVI. 15 Connecting a PC PC Rear of the TV PC Sound Cable PC Cable Useful Tips ☛ Audio output is only available for PCs with a sound output terminal Connecting a PC 1 Connect the [PC input] and the PC monitor output using a PC video cable. 2 Connect the [PC sound input] and the PC audio output using a PC sound cable. 3 After this is completed, turn on the power of the TV and the PC. Watching a PC screen on a TV 1 PC Turn on the PC and check if your PC settings are correct. ■ If they are not correct, your screen will be doubled or distorted. 2 Turn on the TV and press [INPUT], then select <PC>. 3 Adjust the PC screen. TV/ External Input Settings You can change the signal of the TV or of the external device connected to your TV. Main Source 1 Press [INPUT]. The external input list will appear. 2 Press [] to move to an input mode, then press [OK]. Move to the selected external input screen. Useful Tips ☛ Check if the connecting cables are properly connected if the input mode is gray ed ou t. 16 Automatic Channel Settings 1 ENGLISH Any receivable channels can be memorized automatically. Press [MENU]. -The menu will appear. 2 Press [] and move to <Channel>, then press [OK]. -The <Channel> menu will appear. 3 Press [] and move to <Auto Memorizing>, then Press [OK]. -The <Auto Memorizing> menu will appear. 4 Press [] to move to the type of Antenna connection, and press [OK]. -The <Auto Memorizing> menu will appear. 5 Press [] to check the status, then press [OK]. -The <Auto Memorizing> menu will appear. 6 After memorizing all receivable channels, a menu appears with the number of channels that have been memorized. 7 Press [EXIT] to exit the menu. Useful Tips ☛ When < Air + Cable> is selected, the TV searches for channels (both Analog and Di gi t al) f rom t h e an t en n a i n pu t . ☛ When selecting < Air> only, only Air channels are scanned (Analog, Digital). ☛ When selecting <Cable> only, only Cable channels are scanned (Analog, Digital). ☛ If any antenna connection status is changed, please perform automatic channel m em o r i z a t i o n a g a i n . ☛ When stopping the automatic channel scan, the automatic channel selection will not be completed. Only channels used in the menu will be set up. Checking memorized channels Press the [CHANNEL] buttons. -Pressing the [CHANNEL] buttons will select only the memorized channels sequentially. 17 Antenna Settings 1 Press [MENU]. -The menu will appear. 2 Press [] and move to <Channel>, then press [OK]. -The <Channel> menu will appear. 3 Press [] to move to <Antenna>, then press [OK]. -The <Antenna> menu will appear. 4 Press [] to select Air or Cable. 5 Press [EXIT] to exit the menu. Useful Tips ☛ A n a i r s i g n a l i s t r a n s m i t t e d v i a V H F / U H F o v e r t h e a i r . A n a l o g i s N T S C , wh i l e d igital is ATSC w ith a VSB mod ulated signal. ☛ A cable signal is a cable-transmitted signal. Analog is NTSC, while digital is SCTE with a QAM modulated signal. Adding or Removing Channels After memorizing the channels, you may add more channels not added due to a weak signal, or you may remove unwanted channels. Adding or deleting the current channel 1 Press the number of the channel to add or delete, then press the [ADD/DEL] button. ■ For example, to add a channel, press the number of the channel, then press [ADD/DEL]. ■ When the [ADD/DEL] menu appears, press [OK] to either add or remove. Adding or deleting all memorized channels 1 Press [MENU]. -The menu will appear. 2 Press [] to move to <Channel>, then press [OK]. -The <Channel> menu will appear. 3 Press [] to move to <Channel List>, then press [OK]. -The <Channel List> menu will appear. 4 Press [] to move to the channel you wish to add and then press the Red [ ] Button. -If the channel has the mark, the channel is added. -Press it again and the channel is removed. will disappear and the memorized 5 Press the [EXIT] button to exit the menu. Useful Tips ☛ T o c o n f i rm t h e ad d ed c h an n el af t er t h e m en u d i sappears, press [ C HA N N E L ] . 18 Adding favorite channels ENGLISH This function is to help users to select their favorite channels as quickly as possible. Press [FAV]. Go to Menu-Favorite channels and press the [FAV] button to check your favorite channels in the list. Adding a channel to the favorite channel list 1 Press [MENU]. -The menu will appear. 2 Press [] and move to <Channel>, then press [OK]. -The <Channel> menu will appear. 3 Press [] to move to <Channel List>, then press the [OK] button. -The <Channel List> menu will be selected. 4 Press [] to move to the favorite channels, then press the Green [ ] Button. Make sure that the selected channel has been checked. -To exit from the favorite channel set-up, press the green button again. 5 Press the [EXIT] button to exit the menu. Useful Tips ☛ At least one channel must be memorized before setting your favorite channel list. ☛ A deleted channel cannot be added to your favorite channel list. 19 Current Program Information You can check the current time and channel information. (This is only available for digital broadcasts) Press [GUIDE]. Press [GUIDE] to view the program guide for the current channel. The default for the basic broadcasting guide should be set to <Current Guide>. (The Program Guide may change without notice by the broadcast station.) 1 Press [GUIDE]. -The Current Guide will appear. 2 Press [] to move to <Current Guide>, then press [OK]. -The menu will disappear and information about the current channel will appear. 3 Press [] to move to a digital broadcast program, then press [OK]. -Detailed information about the selected digital broadcast program will appear. (This is available only when the original program supplies the relevant information.) 4 Press [EXIT] to exit the menu. Useful Tips ☛ D e t ai le d i n f o r m at i o n abo u t t h e c h an n e l w i ll n o t appe ar u n le ss i t i s pr o vi d e d by the broadcast station. Current Program Guide Pressing [OK]: The current channel will be reserved. Pressing the button again will cancel the reservation. Reserving a Program is only possible for future programs that are NOT on-air at the moment. Press the RED button to see the next viewing list. Press the Green Button to see the previous page. Press the Yellow Button to see the next page. Press the [GUIDE] Button to see detailed information for the selected digital program. 20 Checking the strength of the digital signal ENGLISH This shows the current digital signal strength of a channel. Before Starting ☛ Keep the digital TV receiving mode as is. 1 Press [MENU]. -The menu will appear. 2 Press [] to move to <Channel>, then press [OK]. -The <Channel> menu will appear. 3 Press [] to move to <Signal Strength>, then press [OK]. -The reception sensitivity will be shown in the menu. 4 Press the [EXIT] button to exit the menu. Menu Transparency Settings Menu Transparency sets the background transparency of the menu. 1 Press [MENU]. -The menu will appear. 2 Press [] to move to <Setup>, then press [OK]. -The <Setup> menu will appear. 3 Press [] to move to <Menu Transparency>, then press [OK]. - <Menu Transparency> will be selected. 4 Press [] to select the transparency, then press [OK]. -There are 4 options in menu transparency: <Opaque>, <Semi Opaque>, <Semi Trans> and <Transparent>. 5 Press [EXIT] to exit the menu. Power Saving Mode Settings Press [E.SAVING]. - Each time [E.SAVING] is pressed, <Standard> and <Saving> modes are switched. <Saving> mode conserves power. 21 Screen Mode Settings Press [P.MODE] to recall a pre-set screen type Press [P.MODE]. Each press of the button changes the picture mode from <Standard> ➔ <Dynamic> ➔ <Mild> ➔ <Manual>. 1 Press [MENU]. -The menu will appear. 2 Press [] to move to <Picture>, then press [OK]. -The <Picture> Menu will appear. 3 Press [] to move to <Mode>, then press [OK]. -The <Mode> Menu will appear. 4 Press [] to select a screen mode. <Standard>, <Dynamic>, <Mild>, <Manual> can be selected 5 Press [EXIT] to exit the menu. Screen Mode Standard : The manufacturer default for the optimal conditions, status. Dynamic : Select this for a brighter screen. You will be able to see the screen more clearly. ■ Mild : Select this for a darker screen. It has the advantage of saving power and making your eyes less tired. ■ Manual : You can select your own defined screen setting conditions. ■ ■ Screen Custom Mode Settings Screen Adjustment Menu Brightness : Brightens or darkens the screen. Contrast : Adjusts the difference in brightness between objects and the background. ■ Sharpness : Controls blurring and transparency. ■ Color : Controls the color signal strength. ■ Tint : Adds red or green to the picture. ■ ■ Adjusting the user screen 1 < Before Starting > The <Mode> needs to be changed to <Manual> in the menu. 2 Press [] and move to a menu, then press [OK]. Useful Tips ☛ Adjusted values will be saved as a <Manual> mode value. ☛ Screen mode and custom value adjustments will be saved individually (TV, External Inputs 1 and 2, S-Video, etc.) 22 -An additional adjustment bar will appear. 3 Press [] and move to a location, then press [OK]. -Press [] to move to <Brightness>, <Contrast>, <Sharpness>, <Color> or <Tint>. 4 Press [EXIT] to exit the menu. 1 ENGLISH Screen Color Settings Press [MENU]. -The menu will appear. 2 Press [] to move to <Picture>, then press [OK]. -The <Picture> Menu will appear. 3 Press [] to move to <Color Temperature>, then press [OK]. -The <Color Temperature> Menu will appear. 4 Press [] to move to a menu. -Press [] to move to <Normal>, <Cool> or <Warm>. 5 Press [EXIT] to exit the menu. Useful Tips ☛ The PC and HDMI inputs support both screen color mode and RGB custom mode functions. ☛ The screen color mod e and custom ad justment value (PC, HDMI) are saved individually (TV, AV 1 and 2, S-Video, etc.) Unstable Screen If the screen is unstable (dashed line or no color) try adjusting the channel. (This is only available for analog broadcasts.) 1 Press [MENU]. -The menu will appear. 2 Press [] to move to <Channel>, then press [OK]. -The <Channel> Menu will appear. 3 Press [] to move to <Fine Tune>, then press [OK]. -The <Fine Tune> Menu will be selected. 4 Press [] to adjust. 5 Press [EXIT] to exit the menu. Undoing a channel adjustment 1 From step 4 above, pressing number ‘0’ [ ] will change the value to ‘0’ and automatically make minor channel adjustments. 2 If channel adjustment mode is on manual, then changing to the current channel will not perform automatic channel adjustment. 23 Film Mode Settings Set your selection to <ON> to watch your movie titles at the best quality. You will be able to watch with a more realistic movie screen. 1 Press [MENU]. -The menu will appear. 2 Press [] to move to <Picture>, then press [OK]. -The <Picture> Menu will appear. 3 Press [] to move to <Film Mode>, then press [OK]. -The <Film Mode> Menu will appear. 4 Press [] to move to <On>. -Press [] to toggle <Film Mode> between <Off> and <On>. 5 Press [EXIT] to exit the menu. Useful Tips ☛ Even if film mode is activated, the signal status may take precedence. Adjusting the Screen Size You can select the size of the screen depending on the type of program. 1 Press [MENU]. -The menu will appear. 2 Press [] to move to <Picture>, then press [OK]. -The <Picture> Menu will appear. 3 Press [] to move to <Screen Format>, then press [OK]. -The <Screen Format> Menu will appear. 4 Press [] to select a <Screen Format>. -The screen size will be selected. 5 Press [EXIT] to exit the menu. Useful Tips ☛ Depending on the input signal, some screen sizes may not be selectable. ☛ The screen size may be saved individually according to the input signal (digital TV, analog TV, External Input 1 and 2 , S-Video, etc.) Press [ASPECT] Each press switches between <16: 9>, <Panorma>,<Zoom1>, <Zoom2> and <4: 3>. Useful Tips ☛ Some screen modes may not be selectable depending on the input signal. ☛ When watching digital broadcasts or when the input mode is HDMI or PC, only the 4:3 and 16:9 screens can be selected. ☛ For HDMI input, the screen size selection can be either PC or TV mode. They differ by the ratio of the amount cut on the left, right, top, and bottom of the screen. 24 Screen Size Menu 16 : 9 : The screen size for widescreen DVDs or broadcast programs. ■ Panorama : A 16:9 screen shown naturally as a 4:3 screen. ■ Expansion : Expands a 4:3 screen sideways and shows only the center area. ■ Caption Expansion : A 16:9 screen shown naturally as a 4:3 screen. ■ 4: 3 : The screen size for video and current broadcast programs. ■ If you force a still picture or use the basic (4:3) screen over a long period of time, the LCD TV may show some residual images. These problems are not covered by the warranty. Use the native widescreen (16:9) mode whenever possible. PIP (Picture-in-Picture) Settings ENGLISH Two channels can be viewed from one screen. Press [PIP]. You will only hear sound from the main screen. 1 Press [MENU]. -The menu will appear. 2 Press [] to move to <Setup>, then press [OK]. -The <Setup> Menu will appear. 3 Press [] to move to <PIP>, then press [OK]. -The <PIP> Menu will appear. 4 Press [] to move to <Mode>, then press [OK]. -The <Mode> Menu will appear. 5 Press [] to select the Sub-Screen (Sub) mode. -The PIP screen will be selected. -Selecting <Cancel> cancels the PIP screen. 6 Press [EXIT] to exit the menu. O : Available. Main to sub switchable. X : Unavailable. PIP Screen Selection Table ([PIP] also main to sub switchable.) Main Sub DTV Analog TV External Input 1 External Input 2 S-VIDEO Component 1 Component 2 PC HDMI DTV Analog TV X X O O O O O O O X X O O O O O O O External External Component Component input 1 input 2 S-VIDEO 1 2 O O X O O O O O O O O O X O O O O O O O O O X O O O O O O O O O O X O O O O O O O X O O O PC HDMI X X X X X X X X X X X X X X X X X X Adjusting the Sub-Screen Contents You can select which external device will be displayed in the Sub-Screen . 1 Press [MENU]. -The menu will appear. 2 Press [] to move to <Setup>, then select [OK]. -The <Setup> Menu will appear. 3 Press [] to move to <PIP>, then press [OK]. -The <PIP> Menu will appear. 4 Press [] to move to <Source>, then press [OK]. -The <Source> Menu will appear. 5 Press [] to select the input to the Sub-Screen. -You can view your selection on the Sub-Screen. 6 Press [EXIT] to exit the menu. Useful Tips ☛ The selected devices of the Sub-Screen depend on the main screen. ☛ [PIP INPUT] can also be switched. 25 Switching the Main and Sub-Screen You can switch the main and Sub-Screen with each other. 1 Press [MENU]. -The menu will appear. 2 Press [] to move to <Setup>, then press [OK]. -The <Setup> Menu will appear. 3 Press [] to move to <PIP>, then press [OK]. -The <PIP> Menu will appear. 4 Press [] to move to <Swap>, then press [OK]. -The <Swap> Menu will appear. 5 Press [OK]. -Each press will toggle the screens. 6 Press [EXIT] to exit the menu. Useful Tips ☛ [SWAP] can also be used to switch the screens. Adjusting the Sub-Screen Size You can adjust the size of the Sub-Screen. 3 Press [] to move to <PIP>, select [OK]. -The <PIP> Menu will appear. 4 Press [] to move to <Size>, then press [OK]. -The <Size> Menu will appear. 5 Press [] to select the size of the Sub-Screen. -The size of the Sub-Screen will be selected. Useful Tips ☛ Adjusting the Sub-Screen size can only be done in PIP mode. 6 Press [EXIT] to exit the menu. Adjusting the Sub-Screen Position You can adjust the position of the Sub-Screen (all 4 corners). 3 Press [] to move to <PIP>, then press [OK]. -The <PIP> Menu will appear. 4 Press [] to move to <Position>, then press [OK]. -The <Position> Menu will appear. 5 Press [] to select the size of the Sub-Screen. Useful Tips ☛ Adjusting the position of the Sub-Screen can only be done in PIP mode. ☛ 26 Th e [ POSI TI ON ] c an also t o g g led . -The size of the Sub-Screen will be selected. 6 Press [EXIT] to exit the menu. Adjusting the Sub-Screen Channel 1 ENGLISH You can adjust the channel in the Sub-Screen. Press [MENU]. -The menu will appear. 2 Press [] to move to <Setup>, then press [OK]. -The <Setup> Menu will appear. 3 Press [] to move to <PIP>, then press [OK]. -The <PIP> Menu will appear. 4 Press [] to move to <Channel>, then press [OK]. -The <Channel> Menu will appear. 5 Press [] to select the channel in the Sub-Screen. The channel in the Sub-Screen will be selected. 6 Press [EXIT] to exit the menu. Useful Tips ☛ Only use the channel function when the Sub-Screen is analog TV. ☛ [CH + / - ] can also be toggled. Capturing a Still screen You can pause a scene on the screen. Press [STILL]. Each press of the button will advance the scene one frame. Useful Tips ☛ Audio will continue to operate while the screen is paused. ☛ Pressing a channel number or input signal will automatically cancel the function. 27 Sound Mode Settings You can adjust the mode to Music, Movie, Sports, or News depending on the type of program you are watching. 1 Press [MENU]. -The menu will appear. 2 Press [] to move to <Sound>, then press [OK]. -The <Sound> Menu will appear. 3 Press [] to move to <Mode>, then press [OK]. -The <Mode> Menu will appear. 4 Press [] to select a sound mode. -Pressing [] will change the settings to <Standard>, <Music>, <Movie>, <News>, <Sports> or <Manual>. 5 Press [EXIT] to exit the menu. Sound mode Standard : Basic sound mode. Music : Experience live and natural sound. ■ Movie : Experience the marvels of surround sound as in a movie theater. ■ Sports : Experience the passion of a real stadium. ■ News : You can hear the sound of the newsanchor clearly. ■ Manual : You can create your own sound mode. ■ ■ Custom Sound Mode Settings You can create your own audio equalizer settings as desired. 3 Press [] to move to <Mode>, then press [OK]. -The <Mode> Menu will appear. 4 Press [] to select <Manual> mode. -The <Manual> menu will appear. 5 Press [] to select either bass, midrange, or treble as Useful Tips ☛ You can use the equalizer to adjust <Standard>, <Music>, <Movie>, <Sports>, <News> mode to change the <Mode> to <Manual>. desired, then press [¥] to change the levels. -Adjust to low or high levels. 6 Press [EXIT] to exit the menu. Sound Balance Settings You can balance your speakers for better sound quality. 3 Press [] to move to <Balance>, then press [OK]. -The <Balance> Menu will appear. 4 Press [¥] to change the left/right output levels. -You can adjust the output of the left/right speaker. 5 Press [EXIT] to exit the menu. 28 SRS TruSurround XT Mode Settings ENGLISH SRS TruSurround XT allows you to experience marvelous 'live' multi-channel surround sound using only two speakers. Press [SRS]. Each press toggles between <Off>, <3D Mono> and <Stereo>. 1 Press [MENU]. -The menu will appear. 2 Press [] to move to <Sound>, then press [OK]. -The <Sound> Menu will appear. 3 Press [] to move to <SRS TSXT>, then press [OK]. -The <SRS TSXT> Menu will appear. 4 Press [] to select a SRS TruSurround mode. - <3D Mono> or <Stereo> will be selected. - Selecting <Off> will cancel SRS TruSurround XT mode. 5 Press [EXIT] to exit the menu. TRADEMARK & LABEL LICENSE NOTICE TruSurround XT, SRS and the mark are registered with SRS Lab, Inc. All rights about TruSurround XT are under license to SRS Labs, Inc. SRS TruSurround XT ■ ■ ■ Off : Cancels SRS TruSurround XT mode. 3D Mono : Sets SRS TruSurround XT to 3D mono. Stereo : Sets SRS TruSurround XT to stereo. Digital Audio Output Settings You can select your digital audio output as <Dolby Digital> or <PCM>. 1 Press [MENU]. -The menu will appear. 2 Press [] to move to <Sound>, then press [OK]. -The <Sound> Menu will appear. 3 Press [] to move to <Digital Output>, then press [OK]. -The <Digital Output> Menu will appear. 4 Press [] to move to <Dolby digital> or <PCM>, then press [OK]. -With Digital sound, <Dolby digital> or <PCM> will be output. 5 Press [EXIT] to exit the menu. Dolby Digital This product is under license of Dolby Laboratories. Dolby and the Dolby-D symbol are registered trademarks of Dolby Laboratories. Useful Tips ☛ <Dolby digital> can be selected while a digital broadcast is on or HDMI is connected. ☛ HDMI can only be used when Dolby Digital audio is allowed. If not, PCM audio will be output regardless of what mode has been set. ☛ PCM (Pulse Coded Modulation): A digital audio signal without compression. With optical output, your sound output will be used for AV amplifiers that do not support Dolby Digital 5.1 Channel sound. 29 Automatic Volume Control Settings You can automatically adjust the sound level of different channels to the proper volume level to make each channel audibly distinct. 1 Press [MENU]. -The menu will appear. 2 Press [] to move to <Sound>, then press [OK]. -The <Sound> Menu will appear. 3 Press [] to move to <Auto Volume>, then press [OK]. -The <Auto Volume> Menu will appear. 4 Press [] to move to <On> or <Off>, <then press [OK]. 5 Press [EXIT] to exit the menu. Sound (Digital Broadcasting) Settings Press [MTS] to listen to other languages. When English is set as the primary language, pressing [MTS] will change between <English>, <Spanish>, and <French> in this order. (Languages are only available when provided by a broadcasting station.) ■ ■ When changing the channel, the set language will be selected. 3 Press [] to move to <Multi-Track>, then press [OK]. -The <Multi-Track> Menu will appear. 4 Press [] to select <English>, <Spanish>, or <French>, then press [OK]. -The sound settings primarily set up the language. But in the menu, you can select your favorite language settings no matter what the broadcasting status. 5 Press [EXIT] to exit the menu. Sound (Analog Broadcasting) Settings ■ Press [MTS]. You can select your favorite settings <Mono>, <Stereo> or <SAP>. 3 Press [] to move to <Multi-Track>, then press [OK]. -The <Multi-Track> Menu will appear. 4 Press [] to move to <Mono>, <Stereo> or <SAP>, then press [OK]. While Mono is on air ■ All modes will have mono sound. While Stereo is on air -The selected sound will be set. 5 Press [EXIT] to exit the menu. Mono : Mono sound is selected. Stereo : Stereo sound is selected. ■ SAP : Mono sound is selected. ■ ■ While SAP is on air Mono : Mono sound is selected. ■ Stereo : Mono sound is selected. ■ SAP : SAP sound is selected. ■ 30 Useful Tips ☛ The sound settings are only supported in TV (analog broadcast) mode. ☛ <Stereo>, <SAP> will only operate when a network signal is available. Automatic Time Settings 1 ENGLISH The auto time setting will receive time information from the digital broadcast station. Press [MENU]. -The menu will appear. 2 Press [] to move to <Setup>, then press [OK]. -The <Setup> Menu will appear. 3 Press [] to move to <Time>, then press [OK]. -The <Time> Menu will appear. 4 Press [] to move to <Clock>, then press [OK]. -The <Clock> Menu will appear. 5 Press [] to select <Auto>. 6 Press [EXIT] to exit the menu. Useful Tips ☛ The time w ill be set automatically by the d igital broad casting inf ormation. ☛ Th ere m ay be a sli gh t error i n t h e t i m e d epen d i n g on t h e broad c ast st at i on . ☛ Pressing [ INFO] w ill show the current time. Manual Time Settings Setting the year, month, day, hours and minutes can be done by pressing the numeric buttons. 1 Press [MENU]. -The menu will appear. 2 Press [] to move to <Setup>, then press [OK]. -The <Setup> Menu will appear. 3 Press [] to move to <Time>, then press [OK]. -The <Time> Menu will appear. 4 Press [] to move to <Clock>, then press [OK]. -The <Clock> Menu will appear. 5 Press [] to move to <Manual>, then press [OK]. -The <Manual Clock> item can be selected. 6 Press [] to move to <Manual Clock>, then press [OK]. 7 Press [], [¥] to change the year, month, day, am/pm, hours and minutes. 8 Press [EXIT] to exit the menu. 31 Time and Date Settings Users can select Daylight Saving. 1 Press [MENU]. -The menu will appear. 2 Press [] to move to <Setup>, then press [OK]. -The <Setup> Menu will appear. 3 Press [] to move to <Time>, then press [OK]. -The <Time> Menu will appear. 4 Press [] to move to <Daylight Saving>, then press [OK]. -The <Daylight Saving> Menu will appear. 5 Press [] to move to <Yes>, then press [OK]. -Select <Yes> for Daylight Saving, and <NO> to cancel Daylight Saving. 6 Press [EXIT] to exit the menu. Time Zone Settings Users can select the time zones. 1 Press [MENU]. -The menu will appear. 2 Press [] to move to <Setup>, then press [OK]. -The <Setup> Menu will appear. 3 Press [] to move to <Time>, then press [OK]. -The <Time> Menu will appear. 4 Press [] to move to <Time Zone>, then select [OK]. -The <Time Zone> Menu will appear. 5 Press [] to move to your local area, then press [OK]. 6 Press [EXIT] to exit the menu. 32 TV Activation Time Settings 1 Press [MENU]. -The menu will appear. 2 Press [] to move to <Setup>, then press [OK]. -The <Setup> Menu will appear. 3 Press [] to move to <Time>, then press [OK]. -The <Time> Menu will appear. ENGLISH You can set a time for the TV to automatically turn-on. 4 Press [] to move to <On Time>, then press [OK]. -The <On Time> Menu will appear. 5 Press [], [¥] to set the <AM/PM>, <hours>, <minutes>, <channel>, <volume> and <time period to turn-on>. 6 Press [EXIT] to exit the menu. Useful Tips ☛ The turn on period can be set to < C ancel> , < Every d ay > or < Once> . ■ <Cancel> : A u t omat i c t u rn -on w i ll be d eac t i vat ed . ■ <Once> : The TV automatically turns on ONCE at the set time. ■ < Every d ay > : The TV w i ll turn on every d ay at the set ti me. TV Deactivation Time Settings You can select the time to turn off the TV. 4 Press [] to move to <Off Time>, then press [OK]. -The <Off Time> Menu will appear. 5 Press [], [¥] to set the <AM/PM>, <hours>, <minutes> and <turn-off period>. 6 Press [EXIT] to exit the menu. Useful Tips ☛ The turn-of f period can be set to < Cancel> , < Every d ay > or < Once> . ■ <Cancel> : The TV t urn-of f t i me i s d eac t i vat ed . ■ <Once> : The TV w ill turn of f Once at the set time. ■ < Everyd ay> : The TV w ill turn of f everyd ay at the set time. Auto TV Deactivation Time Settings If there is no signal on the TV for 15 minutes or more, or if no button is pressed for more than 3 hours, this function turns off the TV automatically. 4 Press [] to move to <Auto Off>, then press [OK]. -The <Auto Off> Menu will appear. 5 Press [] to select <On>. 6 Press [EXIT] to exit the menu. Useful Tips ☛ If <automatic turn-off> is active, then the TV will turn off when there is no signal on the TV or there is no external input signal for 15 minutes or more. ☛ If <automatic turn-off> is active and the TV is turned on by the <turn-on> option and no button is pressed for 3 hours, the TV will automatically turn off. 33 Entering a PIN This option sets up or changes the password for blocking specific channels. 1 Press [MENU]. -The menu will appear. 2 Press [] to move to <Setup>, then press [OK]. -The <Setup> Menu will appear. 3 Press [] to move to <V-Chip>, then press [OK]. -The <Password Dialog Box> Menu will appear. When first accessing the V-Chip menu, no password is set up. When no password is set up, channels cannot be blocked. You need to set the password of the <V-chip> then go to <Changing PIN> and set it to <ON>. If a User loses the password, the Master Password needs to be used. 4 Enter the 4-digit password (0~9) using the remote control. -The <V-Chip> Menu will appear. 5 Press [] to move to <Changing PIN>, then press [OK]. -The <Changing PIN> Menu will appear. 6 Use the keypad to set up the new password. 7 Please confirm your password by entering your 4-digit password again using the remote control. -The password is set or changed. 8 Press [] to move to <On/Off>, then press [OK]. -The <On/Off> Menu will appear. 9 Press [] to move to <On>, then press [OK]. -You can block specific channels or select: <TVPG Rating>, <MPAA Rating>, <Can.English Rating>, <Can.French Rating>. Pressing <Off> will unblock the channels. 10 Press [EXIT] to exit the menu. 34 TVPG Rating 1 ENGLISH You can block programs based on the TV program rating. Press [MENU]. -The menu will appear. 2 Press [] to move to <Setup>, then press [OK]. -The <Setup> Menu will appear. 3 Press [] to move to <V-Chip>, then press [OK]. -The <Password Dialog Box> Menu will appear. 4 Enter your 4-digit password using the keypad (0~9). -The <V-Chip> Menu will appear. 5 Press [] to move to <TVPG Rating>, then press [OK]. -The <TVPG Rating> Menu will appear. 6 Press [], [¥] to move to a rating, then press [OK]. -The lock symbol will be marked, and the rating will be set. Pressing [OK] will display the Unlock symbol and cancel the setting. 7 Press [EXIT] to exit the menu. Useful Tips ☛ Description of the TV (FCC) Rating Codes: TV (FCC) Age Categories ■ ■ ■ ■ ■ ■ TV-MA : Mature audiences only. This program may contain mature themes, profane language, graphic violence and explicit sexual content. TV-14 : Parents strongly cautioned. This program may contain sophisticated themes, sexual content, strong language and more intense violence. TV-PG : Parental guidance suggested. The program may contain infrequent coarse language, limited violence, some suggestive sexual dialog and situations. TV-G : General audience. This contains little or no violence, no strong language, and little or no sexual dialog or situations. TV-Y7 : Directed for older children. Themes and elements in this program may include mild physical or comedic violence, or may frighten children under the age of seven. TV-Y : All children. The themes and elements in this program are specifically designed for a very young audience, including children from ages two - six. TV (FCC) Content Sub-Categories: V : Violence. S : Sexual content. L : Offensive language. D : Dialog...sexual innuendo. FV : Fantasy or cartoon violence. TV (FCC) Guidelines: Suppose, for example, the TV-PG rating and all of its V, S, L and D sub-categories are locked. In that case, all of the “more restrictive” ratings (TV-14 and TV-MA) and all of their V, S, L and D sub-categories are automatically locked out as well. The two groups (TV-Y/TV-Y7 and TV-G/TV-PG/TV-14/TV-MA) are controlled independently. 35 MPAA Ratings Restricting movies by their rating. 1 Press [MENU]. -The menu will appear. 2 Press [] to move to <Setup>, then press [OK]. -The <Setup> Menu will appear. 3 Press [] to move to <V-Chip>, then press [OK]. -The <Password Dialog Box> Menu will appear. 4 Enter your 4-digit password (0~9) using the remote control. The <V-Chip> Menu will appear. 5 Press [] to move to <MPAA Rating>, then press [OK]. -The <MPAA Rating> Menu will appear. 6 Press [], [¥] to move to a rating, then press [OK]. -The lock symbol will be marked, and the rating will be set. Pressing [OK] once more will display the Unlock symbol, and will cancel the rating. 7 Press [EXIT] to exit the menu. Useful Tips ☛ Description of the MPAA and TV (FCC) Rating Cod es: The MPAA Rating System (Movies) ■ ■ ■ ■ ■ ■ G : General Audience. No restrictions. PG : Children under 13 should be accompanied by an adult. PG-13 : Parental guidance suggested. Children under 13 should be accompanied by an adult. R : Restricted. Viewers should be 17 or older. NC-17 : Not classified. Viewers should be 17 or older. X : Adults only. Canadian English Ratings 5 Press [] to move to <Can.English Rating>, then press [OK]. -The <Can.English Rating> Menu will appear. 6 Press [], [¥] to move to a rating limit, then press [OK]. -The lock symbol will be marked, and the rating will be set. Pressing [OK] will display the Unlock symbols, and limit the view. 7 Press [EXIT] to exit the menu. Canadian French Ratings 5 Press [] to move to <Can.French Rating>, then press [OK]. -The <Can.French Rating> Menu will appear. 6 Press [], [¥] to select a rating, then press [OK]. -The lock symbol will be appear, and the rating will be set. Pressing [OK] again will display the Unlock symbol and cancel the rating. 7 36 Press [EXIT] to exit the menu. 1 ENGLISH Captions Settings Press [MENU]. -The menu will appear. 2 Press [] to move to <Caption>, then press [OK]. -The <Caption> Menu will appear. 3 Press [] to move to <On/Off>, then press [OK]. -The <On/Off> Menu will appear. 4 Press [] to move to <On>, then press [OK]. -Captions will be activated. -Selecting <Off> will cancel the captions. 5 Press [EXIT] to exit the menu. Useful Tips ☛ If captions are <Off> and you cannot use <Analog Mode>, <Digital Mode>, or <Digital Font Option> to set up the Caption, you may choose a setting of <On>. Analog Mode The Analog Caption function operates in either analog RF channel mode or external input mode (Depending on the broadcasting signal, the Analog Caption function may operate for digital channels.). 1 Press [MENU]. -The menu will appear. 2 Press [] to move to <Caption>, then press [OK]. -The <Caption> Menu will appear. 3 Press [] to move to <Analog Mode>, then press [OK]. -The <Analog Mode> Menu will appear. 4 Press [] to move to <CC1~TEXT4>, then press [OK]. -Analog Caption may be selected. -Selecting <Off> will cancel the Captions. 5 Press [EXIT] to exit the menu. Useful Tips ☛ If a caption source is not provided by the broadcasting station or by the videotape, subtitles will not be displayed. 37 Digital Mode The Digital Caption function operates for digital channels. 1 Press [MENU]. -The menu will appear. 2 Press [] to move to <Caption>, then press [OK]. -The <Caption> Menu will appear. 3 Press [] to move to <Digital Mode>, then press [OK]. -The <Digital Mode> Menu will appear. 4 Press [] to move to <Service1~Service6>, then press [OK]. -Digital Caption may be set. -Selecting <Off> will cancel Digital Captions. 5 Press [EXIT] to exit the menu. Useful Tips ☛ If the broadcasting station or videotape does not provide subtitles, there are no viewing captions. ☛ Alternate method to the above method: Simply press the <CAPTION> button on the remote control. ☛ The availability of captions depends on the particular program being broadcast. Digital Font Options 1 Press [MENU]. -The menu will appear. 2 Press [] to move to <Caption>, then press [OK]. -The <Caption> Menu will appear. 3 Press [] to move to <Digital Font Option>, then press [OK]. -The <Digital Font Option> Menu will appear. 4 Press [] to select <Size~Edge Style>, select the font type mode, then press [OK]. Size: Adjust the digital caption font size to default, small, standard or large. ■ Style: Either default or style0 through style7 can be selected. ■ Background/Foreground Color: Either default or from white to cyan can be selected. ■ Background/Foreground Opacity: Either default or Solid to Flashing can be selected. ■ Edge Style: Either default or none to Right Drop Shadow. ■ 5 Press [EXIT] to exit the menu. 38 Checking Items before Connecting to a PC ENGLISH Check the list below before connecting a PC to the TV. Precautions Set your resolution and frequency to a resolution supported by the TV. Refer to the instructions when connecting a PC (graphics and sound cards). ■ Do not connect the power unless all connections have been completed. Severe damage can be caused if the power is on while devices are being connected. ■ Check the terminal of the PC Graphics Card. ■ ■ Standard Display Settings If the signal from the computer is the same as one of the following standards, then your monitor can be set up automatically. But if it is different, only the power light will be on or the screen will be blank. Please refer to your instruction manual and adjust the frequency accordingly. Vertical Frequency [Hz] Resolution (dot X line) 640 640 720 640 800 1024 1280 1360 X 350 X 400 X 400 X 480 X 600 X 768 X 768 X 768 85 Hz 85 Hz 70 Hz 60 Hz 56 Hz 60 Hz 60 Hz 60 Hz / / / / 85 Hz 72 Hz 60 Hz 70 Hz / / / 75 Hz 72 Hz 72 Hz / / / 85 Hz 75 Hz 75 Hz / / 85 Hz 85 Hz PC Settings 1 First, click on Settings on the Windows Start menu and click on “Control Panel”. 2 Double click on the Display icon. 3 Click the “Settings” tab, and select the correct TV-supported screen resolution. You do not need to adjust the color quality. 4 Click the “Advanced” button. A new window will appear. 5 Select the “Monitor” tab, and select the correct screen frequency. You can select the vertical & horizontal frequency if you cannot use the screen frequency. 6 Press “OK”, close the window, and press “OK” in the Display Properties window. 7 Turn off the PC and connect to the TV. Useful Tips ☛ This may differ depending on your PC and Windows version. ☛ The TV can support up to 32 bit color when used as a computer monitor. ☛ Th e d i splay m ay d i f f er d epen d i n g on t h e m an u f ac t u rer an d t h e W i n d ow s versi on . ☛ You must select a display resolution that is supported by the TV when connecting to a PC (DVI included) otherwise a "Display Mode Not Supported" message will appear. 39 Troubleshooting Guide If you are having problems with using the TV, please consult this guide below. If this guide does not help resolve the problem, please contact Technical Support by phone at 1-800-681-2629 or 718-416-3197, or by email at [email protected]. Our hours are Monday to Friday, 8:30 AM–8:30 PM EST and Saturday to Sunday, 9:00 AM–5:30 PM EST. Setup and Connection Problems Solve The TV won't turn on. ■ Check your power cable connection. I can't view the Basic channels. ■ Check the connection of the antenna cable. I want to view cable channels. ■ Register with your local cable company then connect their receiver to your TV. I want to view satellite channels. ■ Set up your parabolic satellite antenna then connect your satellite receiver to the TV. Digital broadcasting is not functioning. ■ Check your antenna cable connection. Check if the digital channel selection is correctly connected to your antenna cable. ■ Menu and Remote Control Problems Solve Press [input selection] to select the device to play. Change the batteries. ■ Check the polarity of the batteries. ■ Check the angle of the remote control from the product or if there are any obstacles between the remote control and the product. ■ Check if you have pressed the correct key for the correct option. ■ Avoid positioning bright lights near the TV that shine a strong light on the TV remote sensor. ■ ■ The Remote Control isn't functioning well. ■ Press [input selection] and select <TV>. Try to use the remote control for the cable or satellite receiver to change the channel. External input channels cannot be selected. ■ Check your external input connection cable. A Menu cannot be selected. ■ If a menu option is grayed out then the option is currently not applicable. I cannot change channels with the remote control. ■ Sound Problems Solve ■ Poor quality sound ■ Check if the program is in stereo. Stereo may not work well in areas with bad reception. Try using Mono for these areas. Check your sound connecting cable. Check if other channels also have no sound. ■ If there are images but no sound, press the volume buttons to increase the sound. ■ Press the volume buttons to increase the sound. ■ Try watching a video (if the video has sound, check your cable company). If there is no problem with the cable receiver, then call our customer service. ■ Check if the internal speakers are <OFF>. ■ ■ Sound is malfunctioning while using a cable. Try to adjust the external devices connected to the TV (Digital channel receiver, DTV, DVD, Cable channel receiver, video) ■ If you can adjust your sound, try to balance the volume of the TV and the external device. ■ There is a malfunction after the volume is increased 40 Troubleshooting Guide Problems Poor picture Black picture Lined and flickering picture. Disfunctioning channels. Solve ■ Is the power cord unplugged? Make sure the power cable is plugged in correctly, then press the power of the remote control. ■ Check if external input mode is selected Press [external input selection] and select TV ■ ■ ■ ■ ■ Picture with white and black dots. ■ Only certain channels are in black and white ■ The Sub-Screen is black. ENGLISH Screen ■ ■ ■ ■ ■ Automatic turn-on is inactive. Try to use the "Fine Tune" channel adjustment. Avoid using cordless phones, hair dryers or electrical drills near the TV. Check if the channel has been selected correctly. Try changing the position of the antenna. Check if your antenna is damaged or any connections are broken. Replace your antenna. Check if the program is being broadcast in “black and white”. Check the color hue or contrast settings. Check the power of the external device connected to the TV. If the power cord is disconnected, the screen will be black. When turning off your TV, you need to use the remote control or press the power button on the TV. (If you pull the plug on the TV, the settings will be deleted.) Channel Problems The channels are not functioning. Solve Connect the antenna connectors again. Set to memorize channels in the automatic channel setting again. ■ Query the particular broadcasting station. ■ ■ Change the location or direction of the antenna. Try to select a few channels using numbers and memorize them using the add/delete button. ■ Query the broadcasting station. ■ A limited number of channels are not functioning. Only UHF (14 ~ 69) Channels are unavailable. ■ ■ Check if the antenna is able to receive UHF. Monitor Problems The PC Screen continually appears and disappears. Solve ■ Check the connection between the TV and the computer and see if the connector is locked. This happens if the signal from the video card is too much for the maximum resolution or frequency of the TV. Try to set the maximum resolution or frequency for the TV. ■ See if the PC is in power save mode. (This is deactivated when any key is pressed or the mouse is moved) ■ A “There is no signal” message appears. The screen is unclear and blurry. ■ ■ Change the frequency and phase adjustment. Change the Resolution and frequency to the standard limit. (1024x768 @ 60Hz) 41 Specifications TF-TV3709 Model name Size Display Size Pixel Number 0.20 mm (H) x 0.60 mm (V) 1366 x 768 (WXGA) Type a-Si TFT active matrix Brightness 500 cd / m2 Contrast Ratio Viewing Angle 600 : 1 176 (H) / 176 (V) Air 2 ch ~ 69 ch Cable Pixel Pitch LCD RF TV VIDEO Component 37” Diagonal 819.6 mm (H) x 460.8 mm (V) Video System 1 ch ~ 139 ch ( NTSC-M Analog), ATSC (Digital) Sound System MTS Color System NTSC-M Video System CVBS, S-VHS Video Input 480i, 480p, 720p, 1080i Audio Input 500 mVrms Frequency Horizontal 30 ~ 60 kHz Vertical 60 ~ 75 Hz Display Colors PC Resolution Input Signal 16.7 million Maximum 1280 x 1024, 60 Hz Optimum 1360 x 768, 60 Hz Sync. H/V Separate, TTL, P or N Video Signal VHF, UHF : 75 ohm unbalanced 15W + 15W (2-Way, 4 Speaker) Audio Output Power Supply Power Consumption Stand-by Mode Internal Type AC 110 ~ 240V, 50 / 60Hz Max. 190W < 3W Dimensions (WxHxD) 37.1” x 28.5” x 5” Weight 70.6 lbs Accessories Remote Control, 2 "AAA" Batteries, Operating Instructions Power Cord ☛ Design and specifications are subject to change without notice. 42 ENGLISH Specifications TF-TV4209 Model name Size Display Size Pixel Number 0.227 mm (H) x 0.681 mm (V) 1366 x 768 (WXGA) Type a-Si TFT active matrix Brightness 500 cd / m2 Contrast Ratio Viewing Angle 500 : 1 176 (H) / 176 (V) Air 2 ch ~ 69 ch Cable Pixel Pitch LCD RF TV VIDEO Component 42” Diagonal 930.25 mm (H) x 523.01 mm (V) Video System 1 ch ~ 139 ch ( NTSC-M Analog), ATSC (Digital) Sound System MTS Color System NTSC-M Video System CVBS, S-VHS Video Input 480i, 480p, 720p, 1080i Audio Input 500 mVrms Frequency Horizontal 30 ~ 60 kHz Vertical 60 ~ 75 Hz Display Colors PC Resolution Input Signal 16.7 million Maximum 1280 x 1024, 60 Hz Optimum 1360 x 768, 60 Hz Sync. H/V Separate, TTL, P or N Video Signal VHF, UHF : 75 ohm unbalanced 15W + 15W (2-Way, 4 Speaker) Audio Output Power Supply Power Consumption Stand-by Mode Internal Type AC 110 ~ 240V, 50 / 60Hz Max. 210W < 3W Dimensions (WxHxD) 43” x 31.9” x 5.5” Weight 83.8 lbs Accessories Remote Control, 2 "AAA" Batteries, Operating Instructions Power Cord ☛ Design and specifications are subject to change without notice. 43 P/N : 941262P1CB01