1
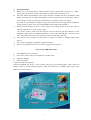
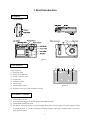
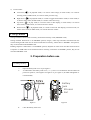
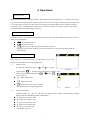
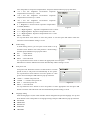
Cobra DC4330 Digital Camera
User’s Guide
Preface
Please read this manual carefully before any operation
This Manual covers all proper way of operation of the camera and relevant important notes. We sincerely
hope that you read this manual carefully so as to operate the camera properly. 20 minutes’ reading may save
you a lot of time.
Special attention: Taking compatibility of SD/MMC card into consideration, you must carry this camera to
test the SD/MMC card should you need to buy extra SD/MMC card from thirty parties. Buy SD/MMC card
that is compliant with this camera only.
A. Working condition
Temperature: 0°~45°
Relevant humidity: 45%~80%
Air Pressure: 56Kpa~106Kpa
B. Security Precaution
Please do not attempt any method to modify the camera. Otherwise fire, hurt, electric shock or
damage to the camera may be caused.
When working under sharp light, do not point the lens straight to sharp light or take a photo,
otherwise the image sensor component may be damaged.
Never fire the flash while it is too close to the subject’s eyes. Intense light from the flash can
cause eye damage if it is fired too close to the eyes. This is especially true with young children.
When using the flash, the camera should be at least one and a half meters from the eyes of the
subject.
Do not take photos where there is explosive, which may increase the danger of explosion.
Keep the small parts and accessories of this camera out of reach of small children to prevent
accidents.
Keep away from moisture to prevent damage caused by short circuit.
Never load leaking or wet battery into the camera. Any accessory attached to camera should not
carry water. In case that any liquid goes into the camera, please stop using and power off the
camera immediately.
Do not touch the camera with wet hands to avoid electric shock.
Operation in high electromagnetic condition is prohibited.
Try not to store the camera for too long time. Battery should be taken off for storage.
Do not place the camera under high temperature (such as well-closed car or under sharp sunlight)
or under unstable temperature. Exposure to high temperature may do harm to the internal
components and may cause fire to camera.
Try not to unplug the USB cable when transfer of file is in progress, otherwise data lose may be
caused. Furthermore, the USB port may be damaged or hang of computer may be caused.
When the camera is working, please place the camera in a closed space because over-heated
environment may damage the shape of camera or cause fire.
Before putting the camera into package, please make sure that all accessories like cables are
detached, otherwise damage may be caused to cable, and fire or electric shock may be caused.
We are not responsible for any damage or loss caused by illegal operation.
1
C.
a)
b)
c)
d)
e)
f)
Special Attention:
Before you can use MP3 player function, please let the camera build a directory of “MP3”.
Simply move the function switch to the position of “MP3” when the camera is on.
You must follow the installation steps of this manual to complete the driver installation. Then
follow the instruction of “Image downloading” section of this manual to set the driver mode to
“mass storage”. Please store MP3 files under directory of “MP3” of the mass storage.
The name of song should be in English or digit, or the name in the LCD might not be readable for
wrong encoding. (Notes: some non-standard MP3 format might not be playable)
During camera setting, you have to set the proper driver setting. Please set it to “PC camera”
mode, and then set it to “mass storage” mode.
“PC camera” mode is used to set the camera to web cam function; the driver directory in the
CDROM is either “Driver-dsc\WIN98_WIN2K” or “Driver-dsc\WINME_XP”. You can use the
web cam function with some video programs, such as Net Meeting, AMCAP.
The contents of the package and the design of camera are subject to changes without prior
notices.
The contents of package might differ for different region.
We are not responsible for any errors that may appear in this manual
Notes for the CDROM contents
1.
The CDROM consists of 3 parts:
a)
Drivers for camera. They are under directory of Driver-dsc.
b)
Manual in English
c)
Web cam utilities
2. Web cam utilities installation:
Insert the CDROM into driver; a main window will pop up as following figure. Click “Web cam
utilities” button to install AMCAP program. When the installation is finished, please click “Exit”
button to close the window.
2
Contents
1. Brief Introduction ……………………………………………………………… 4
Outlook
TFT Screen
Definition of buttons
Storage medium
2. Preparation before use ………………………………………………………… 5
Loading battery
Loading SD/MMC card
3. Features and specifications …………………………………………………..… 6
Image / video clips
Main Menu
Playback image / video clips
MP3
Others
4. Operations ……………………………………………………………………..…7
Power on / off
Battery level Inspection
Take photos / video clips
Setting of main menu
5. Software Installation …………………………………………………………... 12
6. Image downloading …………………………………………………………… 14
7. Specification …………………………………………………………………… 14
8. Maintenance …………………………………………………………………… 15
3
1. Brief Introduction
1. Outlook
As per Figure-1
Lens
Flash lamp
Figure-1
2. TFT Screen
As per Figure-2
1) Shooting mode
2) Battery level Indicator
3) Image resolution mode
4) Flash mode
5) Self-timer mode
6) Focus Frame
7) White balance mode
8) Indicator of free space left in number of image
AWB
Figure-2
3. Definition of buttons
1)
2)
3)
4)
Power button: On/Off
Function button: toggle of capture, playback and MP3 function.
Menu button: Start/close menu
OK button: In preview mode, it is used to toggle flash mode; In menu mode, it is used to confirm menu;
In playback mode , it is used to start/stop recording and play video clips ; In MP3 mode, it is used to
play / pause of music
4
5) Arrow button:
Left arrow (“
”): In playback mode, it is used to select image; In menu mode, it is used for
selecting menu; In MP3 mode, it is used to select previous song.
Right arrow (“ ”): In playback mode, it is used to toggle white-balance mode; in menu mode, it
is used to select menu; In MP3 mode, it is used to select next song.
Up arrow (“ ”): In play mode, it is used to zoom in TFT display; in menu mode, it is used to
select menu; In MP3 mode, it is used to increase volume.
Down arrow (“ ”): In playback mode, it is used to zoom out TFT display; In menu mode, it is
used to select menu; In MP3 mode, it is used to decrease volume.
4. Storage Medium
Storage medium includes built-in memory and external memory cards (SD/MMC cards)
Storage method: When there is no SD/MMC present, images, video clips and files transferred into the
camera through USB cable are all stored inside built-in memory; When there is SD/MMC card present,
they are all stored inside SD/MMC card.
Reading Sequence: When there is no SD/MMC present, Playback on TFT screen and files browsed from
Computer via USB cable are all read from built-in memory; when there is SD/MMC present, they are all
read from SD/MMC card.
2. Preparation before use
1. Loading of battery
i.
ii.
Open the battery tank cover as per figure-3
As indicated in the battery tank cover (“+/-”), load 3 x AAA batteries into the tank with
positive-to-positive, and negative-to-negative as per figure-4. (Ni-HM rechargeable is
recommended).
Batter y
tank
SD card
Slot
Figure-3
iii.
Figure-4
Close the battery tank cover.
5
2. Loading SD/MMC
1)
2)
3)
Open the battery tank cover
Insert the SD/MMC card into the slot in the indicated direction
Close the battery tank cover
3. Feature and specifications of camera
1. Shoot of images / video clips
1)
2)
3)
4)
Single Shoot: Shoot of single image
Video Shoot: Shoot of video clips
Continuous Shoot: Continuous shoot of 3 images
Flash: Force no flash, force flash, auto flash
2. Main menu
1)
2)
3)
4)
5)
6)
White balance: Auto, Sunny, Cloudy, Fluorescent, Tungstenic
Exposure mode: Auto
Exposure compensation: manual, –1.5 ~ +1.5 6 level compensation
Self-timer: 10s delay
Auto shut off: Manual setting
Multi-language: English, French, German, Spanish and Chinese
3. Playback of images / video clip
1) Playback display: Single and 9 piece of simultaneous display
2) Delete and format: Delete current image / all, format built-in memory or SD/MMC card
3) Image brightness Adjustment: -1~+1 2 level adjustment
4、MP3 function
MP3 play, navigation and volume
5. Others
1)
2)
Support image manipulation software such as PHOTOSHOP and ACDSEE
Support Win98/Me, Win2000, WinXP operation system
6
4. Operations
1. Power on/off
Make sure that you have loaded the batteries. Press and hold the power button for 1~2 seconds, the camera
is powered on with flash of power indicator and TFT screen on. Please press and hold the power button for
1~2 seconds again to power off. The camera will be powered off with flash of power indicator and TFT
screen off. (Notes: you should get the batteries out of camera for long time storage, otherwise the camera
may be damaged by possible leakage of battery)
2. Inspection of battery level
When TFT screen is on, a battery level indicator icon will show on the left bottom of the screen. 3 level of
battery can be displayed:
: Normal battery level
: Low battery level
: Out of power and will power off automatically soon
When the camera is out of power, it will alert you that it is out of power and shut itself off
automatically.
OFF
3. Capture of images / video
After power-on, a browser interface will be shown on the TFT
screen, press menu button will pop up main menu
1)
Capture mode:
Use left and right arrow button (“
” and “
”) to select
Figure-5
”, and then press OK button to confirm. TFT
capture mode “
screen will pop up extended menu: “
”, “
”, and “ ”
(as per figure-6)
OFF
: Single image mode
:Video clips mode
: Continuous image mode (3 images)
The default mode is single image mode
2)
Figure-6
Image quality mode
In browse mode, “S”, “H”, “F”, “B” and “E” indicate image quality. The switching of image
quality mode is controlled by main control menu.
S: image xize is 2432 X 1824
H: image size is 2048 X 1536
F: imgae size is 1600 X 1200
B: image size is 1280 X 960
E: imgae size is 640 X 480
The default mode is F.
7
3)
Flash Mode
Under browser mode, press “OK” button to toggle flash mode (“
”, “ ”and “ ”):
: Force No Flash
: Auto Flash
: Force Flash
The default mode is Force No Flash
4)
White Balance Mode
Under Browser mode, press arrow button (“
white balance mode:
AWB: Auto White Balance
”) to toggle
SETUP
QUALITY
EXPOSURE
SOUND
AUTO OFF
LANGUAGE
DRIVER
EXIT
: Sunny
: Cloudy
Figure-7
: Fluorescent
: Tungstenic
The default mode is AUTO
4. Main menu setting
Press menu button, a main control menu will be displayed on the TFT screen
Shooting mode
Operation is the same as 3
Advanced setting
Use arrow button to select the icon of the main control menu, then press “OK” button to confirm,
or press up and down arrow button to pop up advanced setting menu.
Image Quality
Owning to different image compressed level, the resolution and disk space occupied are different
according to different image quality selected. Use up, down arrow button to move the pointer of
the menu to “image quality” and then press confirm button to pop up sub-menu:
S → image size is 2432 X 1824, browse interface display is “S”
H → image size is 2048 X 1536, browse interface display is “H”
F → image is 1600 X 1200, browse interface display is “F”
B → image is 1280 X 960, browse interface display is “B”
E → image is 640 X 480, browse interface display is “E”
EXIT →exit sub-menu
Use up and down button to move the pointer to “Exit” and press confirm to exit. By then the
setting is saved.
Exposure compensation
It allows you to tune the default exposure level based on experience. Use up and down button to
8
move the pointer to “Exposure compensation” and press confirm button to pop up sub-menu:
+1.5 → For low brightness environment.
compensation increases by 1.5 units
Exposure
+1.0 → For low brightness environment.
compensation increases by 1.0 units
Exposure
+0.5 → For low brightness environment.
compensation increases by 0.5 unit
Exposure
0 → Brightness is normal and no exposure compensation
is needed (Default)
-0.5 → High brightness. Exposure compensation less 0.5 units.
-1.0 → High brightness. Exposure compensation less 1 unit.
-1.5 → High brightness. Exposure compensation less 1.5 units.
Figure-8
EXIT →Exit menu
Use up and down arrow button to move the pointer to exit and press OK button. Then the
sub-menu is closed and the setting is saved.
Audio setting
In audio setting section, you can open or mute audio. Use up
and down arrow button to move the pointer to “Audio setting”
and then press OK button to pop up sub-menu:
ON
→Open buzzer
OFF
→Close buzzer
EXIT →Exit sub-menu
Figure-9
Use up and down arrow menu to choose the appropriate item and press
OK button to confirm. Submenu will close automatically and the setting is saved.
Auto power off
Auto-power-off: When the camera is in idle mode for a certain
period of time, it will power off automatically to save power.
Use up and down arrow button to move the pointer to “auto
power off” item and press OK button to pop up sub-menu:
1 MIN → 1 minute auto power off
3 MINS → 3 minutes auto power off
Figure-10
OFF → Close auto power off
EXIT → Exit sub-menu
Use up and down arrow button to move the pointer to select appropriate item and press OK
button to confirm. The sub-menu will close automatically and the setting is saved.
Language setting
After the language is set, the entire interface will be changed to the specific language. Use up and
down button to move the pointer to “Language setting” and press OK button to pop up sub-menu:
ENGLISH
FRANCEIS
DEUTSCH
ESPANOL
CHINESE
9
EXIT
Use up and down button to move the pointer to select the desired language and press OK button
to confirm. The sub-menu will close automatically and the setting is saved.
Driver Setting
Digital camera driver: 2 different download methods are
available to download the images from the camera. Use
“ ” or “ ” to move the pointer to select “Driver setting”:
PC CAMERA → Downloading is done via image
manipulation software
MASS STORAGE →Images or files are be copied directly
from or to computer
Figure-11
EXIT →Exit sub-menu
Use up and down arrow button to move the pointer and select appropriate item then press OK
button to confirm. The sub-menu will be closed automatically and the setting is saved.
Self-timer
OFF
Use“
”or“
” to select“
”,and use “up” and
“down” button to select “self-timer”. (As per figure-12)
:Start “Self-timer”
:Close: Self-timer
Figure-12
Default mode is set as self-timer closed.
Use “ ” or “ ” button to select icon of menu, and confirm. Submenu will be closed
automatically, and setting is saved.
5. Playback / review
Switch function key to“
”,TFT screen will display playback.
LCD
0
1)Display:
Use “left” and “right” key to select“
”, and press
confirm. Please refer to figure-13 for TFT screen displays.
:Display single picture
Figure-13
:Display nine pictures
Default is
Use “ ” or “ ” button to select icon form menu, and confirm it. Setting is saved. When
reviewing single image , press “OK” button and “Voice record ” alert will be displayed in the
TFT screen . Then it is ready for you to record sound . Press “OK” button to terminate recording
again . Once a voice recording is done , a speaker icon will be shown on the image . To playback
the recorded voice to the image , press “OK” button . Alert of “Playing voice…” will be
displayed in the TFT screen . You can listen the recorded sound by inserting the earphone in the
Audio output of the camera .
10
Notes: Video clip can not record voice .
2)Delete and Format:
Use “left” and “right” key to select“ ”,and press OK
button or “down” button,TFT screen display interface as per
figure-14:
Delete method
DELETE THIS → Delete the current file in memory or
SD/MMC card.
DELETE ALL → Delete all files in memory or SD/MMC
card.
Figure-14
FORMAT → Format EMS memory or SD/MMC card.
EXIT → Exit menu
Use “ ” 、 “
automatically.
” button to move pointer, and confirm. Submenu will be closed
3)TFT screen light compensation:
Use “left” and “right” key to select“
LCD
0
LCD
+1
LCD
-1
”,and confirm.
TFT screen will display interface as picture 15:
:Add 1 unit
:0 Light compensation
Figure-15
:Reduce 1 unit
Default setting is 0
Use“
”、“
”button to select icon, and confirm. Setting is saved.
6、MP3
Switch function to MP3, and TFT screens display MP3 interface.
1)If there is no music files in camera; MP3 interface displays “no files”
First line displays “Track:”、“**(Song track number)”
Second line displays“**.MP3”(name of songs)
Use “
”or“
”button to select song. Plug earphone into audio port to listen to songs.
Press“ ”、“ ”button to adjust volume.
2)If there is no music files in built-in memory, SD or MMC.
No Files
Figure-16
Figure-17
11
5. Software Installation
1. WIN98/2000
1)Driver for PC camera mode
Connect with power, and turn it on.
On the menu screen, select “driver settings”, press menu button to trigger main menu. Use
up and down button to select “driver settings” from the advanced setting menu. Then select
“PC camera mode” in the sub-menu. The camera has been set to PC camera mode.
Connect camera to PC through USB cable.
Figure-18
Figure-19
A window pops up. Click “Next” continue.
The Wizard prompts you to either display a list of drivers, or search for the best driver.
Select the option “Search for the best drivers for your device (Recommended)”, and click
“Next” to continue.
Figure-20
Figure-21
The Wizard shows where to locate the driver. Select “Specify a location”, and then click
“Browse”
Select driver for WIN98-2K, and confirm.
Click “Next” to continue till system finishes installing driver for camera automatically.
Click “Finish”.
12
Figure-22
Figure-23
2)Driver of removable disk
Set driver of camera as removable disk, and rest operation is same as above.
Note:WINME, WIN2000 and XP can upgrade driver for removable disk automatically, so
it does no need driver.
2. WINME/XP
1)Driver for PC camera mode
Turn on camera.
“Main menu”
“advance settings”
“driver settings”
“PC camera mode”, the camera
has been set to PC camera mode.
Connect camera to PC through USB cable.
A dialogue window will pop up. Please select from specified places option and click “next”
to pop up another dialogue window.
Figure-24
Figure-25
Browse for the specified location from the CDROM.
Select driver for WINME-XP, and confirm it.
Click “Next” to continue. And System will install the driver automatically.
Click “Finish”.
13
Figure-26
Figure-27
Figure-28
2)Driver of removable disk
Set driver as removable disk driver, and rest operation is same as point 1.
Note:WINXP system can upgrade driver for removable disk automatically. So it does not
need driver under WINXP.
6. Image downloading
1. Select “driver settings” from menu by arrow buttons and confirm, then submenu will appear
2. On submenu screen, select driver and click “YES” to close menu. Connect camera to computer
via USB cable.
2. If “PC Camera” mode is selected,then download picture through PHOTOSHOP、ACDSEE;
If “Removable disk” is selected, then copy pictures directly.
14
7. Features and specification
1. Maximum pixels: 2432 X 1824
2. Actual pixels: 1600 X 1200
3. Color: 24 Bits
4. Sensitivity of Light: ISO100-400
5. Shutter: 1/10~1/1000
6. Self-timer: 10s
7. Digital zoom: 4X
8. Flash index: GN4
9. Flash restore time: 5s
10. Focus of lens: 9.8mm(Equal to 43.3mm focus of 35mm camera lens)
11. F number: F/2.8
12.
13.
14.
15.
16.
17.
18.
19.
20.
21.
22.
23.
Field: 55°
Range: 1.2m~∞
Optical capture rate: 0.6X
View finder field range: over 70% of the field
LCD field range: over 95% of the field
Image format: JPEG
Memory: 16M
External storage: SD / MMC card (8, 16, 32, 64, 128, 256 and 512MB)
Image file size: 2432 X 1824, 2048 X 1536, 1600 X 1200; 1280 X 960; 640 X 480
Power source: 3 X AAA batteries
Dimensions: 88mm X 60mm X 17.9mm
Weight: 110g
8. Maintenance
1.
2.
3.
4.
Camera should be stored in case and remove all batteries when is not in use
Wear the strap in wrist firmly to avoid drop and damage when operating in outdoors, cars or boats.
Clean the lens, viewfinder, LCD etc with non-dust handkerchief after using.
Do not use the camera in conditions beyond the tolerance limit of the camera
15