1
Citrix NetScaler 10.1 Quick Start
Guide: MPX
8005/8015/8200/8400/8600/8800
Platform
Citrix NetScaler 10.1
Copyright and Trademark Notice
Copyright © 2013 Citrix Systems, Inc. All rights reserved. NO PART OF THIS DOCUMENT MAY BE REPRODUCED
OR TRANSMITTED IN ANY FORM OR BY ANY MEANS OR USED TO MAKE DERIVATIVE WORK (SUCH AS
TRANSLATION, TRANSFORMATION, OR ADAPTATION) WITHOUT THE EXPRESS WRITTEN PERMISSION OF
CITRIX SYSTEMS, INC.
ALTHOUGH THE MATERIAL PRESENTED IN THIS DOCUMENT IS BELIEVED TO BE ACCURATE, IT IS
PRESENTED WITHOUT WARRANTY OF ANY KIND, EXPRESS OR IMPLIED. USERS MUST TAKE ALL
RESPONSIBILITY FOR THE USE OR APPLICATION OF THE PRODUCT(S) DESCRIBED IN THIS MANUAL.
CITRIX SYSTEMS, INC. OR ITS SUPPLIERS DO NOT ASSUME ANY LIABILITY THAT MAY OCCUR DUE TO THE
USE OR APPLICATION OF THE PRODUCT(S) DESCRIBED IN THIS DOCUMENT. INFORMATION IN THIS
DOCUMENT IS SUBJECT TO CHANGE WITHOUT NOTICE. COMPANIES, NAMES, AND DATA USED IN
EXAMPLES ARE FICTITIOUS UNLESS OTHERWISE NOTED.
This equipment has been tested and found to comply with the limits for a Class A digital device, pursuant to part 15 of
the FCC Rules. These limits are designed to provide reasonable protection against harmful interference when the
equipment is operated in a commercial environment. This equipment generates, uses, and can radiate radio-frequency
energy and, if not installed and used in accordance with the instruction manual, may cause harmful interference to radio
communications. Operation of this equipment in a residential area is likely to cause harmful interference in which case
the user will be required to correct the interference at his or her own expense.
Pursuant to the rules and regulations of the Federal Communications Commission, changes or modifications to this
product not expressly approved by Citrix Systems, Inc., could void your authority to operate the product. Note the FCC
rules and regulations are not included for software products, such as virtual appliances.
AppCache, AppCompress, AppDNA, App-DNA, AppFlow, AppScaler, Apptitude, Citrix, Citrix Access Gateway, Citrix
Application Firewall, Citrix Cloud Center, Citrix Systems, Citrix XenApp, CloudGateway, CloudBridge, CloudPortal,
CloudStack, EdgeSight, Flex Tenancy, HDX, ICA, MPX, nCore, NetScaler, NetScaler App Delivery Controller, NetScaler
Access Gateway, NetScaler App Firewall, NetScaler CloudConnector, NetScaler Gateway, NetScaler SDX, Netviewer,
Network Link, SecureICA, VMLogix LabManager, VMLogix StageManager, VPX, Xen, Xen Source, XenApp,
XenAppliance, XenCenter, XenClient, XenDesktop, XenEnterprise, XenServer, XenSource, Xen Data Center, and
Zenprise are trademarks of Citrix Systems, Inc. and/or one of its subsidiaries, and may be registered in the U.S. and
other countries. Other product and company names mentioned herein may be trademarks of their respective
companies.
All rights reserved.
Last Updated: November 2013
Document code: January 21 2014 08:50:21
Quick Installation and Configuration
Welcome to the Citrix NetScaler Application Delivery product line.
Please review the following information before proceeding with installation of the MPX
appliance.
Before you Begin
Verify that the following components and accessories are included:
w One NetScaler MPX appliance
w One accessory kit that contains:
• One RJ-45 to DB-9 adapter
• One 6 ft RJ-45/DB-9 cable
• One power cable
Note: For Brazilian customers, Citrix does not ship a power cable. Use a cable that
conforms to the ABNT NBR 14136:2002 standard.
w One standard 4-post rail kit
Note: If the kit that you received does not fit your rack, contact your Citrix sales
representative to order the appropriate kit.
Note: 1G SFP and 10G SFP+ transceivers are sold separately. Contact your Citrix
sales representative to order transceivers for your appliance. Only transceivers
supplied by Citrix are supported on the appliance.
Citrix NetScaler MPX 8005, MPX 8015, MPX
8200, MPX 8400, MPX 8600, and MPX 8800
The Citrix NetScaler models MPX 8005, MPX 8015, MPX 8200, MPX 8400, MPX 8600, and
MPX 8800 are 1U appliances. Each model has one quad-core processor and 32 gigabytes
(GB) of memory. The MPX 8005/8015/8200/8400/8600/8800 appliances are available in
two port configurations:
w Six 10/100/1000Base-T copper Ethernet ports and six 1G SFP ports
(6x10/100/1000Base-T copper Ethernet ports + 6x1G SFP)
3
Quick Installation and Configuration
w Six 10/100/1000Base-T copper Ethernet ports and two 10G SFP+ ports
(6x10/100/1000Base-T copper Ethernet ports + 2x10G SFP+)
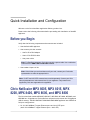
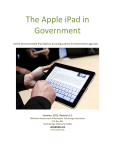
The following figure shows the front panel of the MPX
8005/8015/8200/8400/8600/8800 (6x10/100/1000Base-T copper Ethernet ports + 6x1G
SFP) appliance.
Figure 1-1. Citrix NetScaler MPX 8005/8015/8200/8400/8600/8800
(6x10/100/1000Base-T copper Ethernet ports + 6x1G SFP), front panel
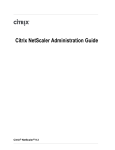
The following figure shows the front panel of the MPX
8005/8015/8200/8400/8600/8800 (6x10/100/1000Base-T copper Ethernet ports +
2x10G SFP+) appliance.
Figure 1-2. Citrix NetScaler MPX 8005/8015/8200/8400/8600/8800
(6x10/100/1000Base-T copper Ethernet ports + 2x10G SFP+), front panel
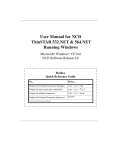
The following figure shows the back panel of the MPX 8005/8015/8200/8400/8600/8800
appliance.
Figure 1-3. Citrix NetScaler MPX 8005/8015/8200/8400/8600/8800 appliance, back
panel
4
Citrix NetScaler 10.1 Quick Start Guide: MPX 8005/8015/8200/8400/8600/8800 Platform
Configuration Requirements
Determine the following information for performing the initial configuration.
w NetScaler IP address (NSIP): The management IP address of the appliance. The
default NSIP address is 192.168.100.1.
w Subnet IP address or Mapped IP address: The IP address used by the appliance to
represent the client when communicating with a server.
w Default gateway: The IP address of the router that forwards traffic out of the
appliance’s subnet. The default gateway should be in the same subnet as the NSIP
address.
w Root password: The root user (nsroot) has full administrative privileges on the
appliance. The root password is used to authenticate the root user. The default root
password is nsroot. You can change this password during initial configuration of the
appliance.
Installation
Installation involves rack-mounting the appliance, installing transceivers (if available),
and connecting the appliance to the network and a power source.
Note: The appliances illustrated in the installation instructions might not represent the
actual NetScaler appliance.
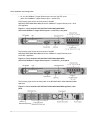
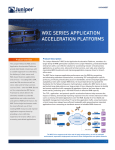
Rack Mounting the Appliance
The appliance is shipped with rack-rail hardware. This hardware consists of two inner
rails that you attach to the appliance, one on each side, and a rack-rail assembly that
you attach to the rack. The following figure illustrates the steps involved in mounting
the Citrix NetScaler appliance to a rack.
5
Quick Installation and Configuration
Figure 1-4. Rack Mounting the Appliance
Appliance Precautions
w Determine the placement of each component in the rack before you install the rail.
w Install the heaviest appliance first, at the bottom of the rack, and then work
upward. Distribute the load on the rack evenly. An unbalanced rack is hazardous.
w Allow the power supply units and hard drives to cool before touching them.
w Install the equipment near an electrical outlet for easy access.
w Mount equipment in a rack with sufficient airflow for safe operation.
w For a closed or multiple-unit rack assembly, the ambient operating temperature of
the rack environment might be greater than the ambient temperature of the room.
Therefore, consider the lowest and highest operating temperatures of the
equipment when making a decision about where to install the appliance in the rack.
Rack Precautions
w Make sure that the leveling jacks on the bottom of the rack are fully extended to
the floor, with the full weight of the rack resting on them.
w For a single-rack installation, attach a stabilizer to the rack.
w For a multiple-rack installation, couple (attach) the racks together.
w Always make sure that the rack is stable before extending a component from the
rack.
w Extend only one component at a time. Extending two or more simultaneously might
cause the rack to become unstable.
6
Citrix NetScaler 10.1 Quick Start Guide: MPX 8005/8015/8200/8400/8600/8800 Platform
w The handles on the left and right of the front panel of the appliance should be used
only for extending the appliance out of the rack. Do not use these handles for
mounting the appliance on the rack.
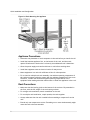
Connecting a NetScaler Appliance to the Network
Connect the interfaces on the appliance to the network ports on the appropriate
switches by using Ethernet/fiber optic cables.
Figure 1-5. Connecting a Citrix NetScaler appliance to the network
Warning: Connecting multiple network ports to the same switch or VLAN can
result in a network loop.
Note: By default, the NetScaler MPX appliance is configured to use auto-negotiation.
When you install a NetScaler appliance for the first time, be sure to configure your
other equipment to use auto-negotiation for the ports that are connected to the
NetScaler appliance. After initial logon and configuration, you can choose to disable
auto-negotiation.
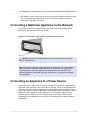
Connecting an Appliance to a Power Source
Connect the power cable to one of the inlet receptacles on the back of the appliance
and connect the other end of the power cable to a power outlet. If your appliance has
more than one power supply, repeat this process. All models function properly with a
single power supply, except the MPX 22040/22060/22080/22100/22120 platform which
needs two power supplies for proper operation. The extra power supply on some
models serves as a backup. The Citrix logo and LCD on the front of the NetScaler
illuminate after the appliance starts, and the LCD indicates the operational status of
the appliance.
7
Quick Installation and Configuration
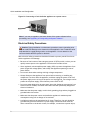
Figure 1-6. Connecting a Citrix NetScaler appliance to a power source
Note: If you want to upgrade to the latest release of the system software before
proceeding, see "Upgrading or Downgrading the System Software."
Electrical Safety Precautions
Caution: During installation or maintenance procedures, wear a grounding wrist
strap to avoid ESD damage to the electronics of the appliance. Use a conductive wrist
strap attached to a good earth ground or to the appliance. You can attach it to the
connector beside the ESD symbol on the back.
Basic electrical safety precautions should be followed to protect yourself from harm
and the appliance from damage.
w Be aware of the location of the emergency power off (EPO) switch, so that you can
quickly remove power to the appliance if an electrical accident occurs.
w Use a regulated, uninterruptible power supply (UPS) to protect the appliance from
power surges and voltage spikes, and to keep the appliance operating in case of
power failure.
w Do not work alone when working with high voltage components.
w Always disconnect the appliance from power before removing or installing any
component. First shut down the appliance, and then unplug the power cords of all
the power supply units. As long as the power cord is plugged in, line voltages can be
present in the power supply, even when the power switch is OFF.
w Do not use mats designed to decrease static electrical discharge as protection from
electrical shock. Instead, use rubber mats that have been specifically designed as
electrical insulators.
w Make sure that the power supply cords include grounding plugs and are plugged into
grounded electrical outlets.
w Make sure that the power source can handle the appliance's maximum power
consumption rating with no danger of an overload.
w A reliable ground must be maintained at all times. Therefore, the rack should be
grounded. Pay particular attention to power supply connections other than the
direct connection to the branch circuit (for example, connections to power strips).
8
Citrix NetScaler 10.1 Quick Start Guide: MPX 8005/8015/8200/8400/8600/8800 Platform
Setting Up Connectivity
Connect the appliance to a management workstation or the network by using the
NetScaler configuration utility, the command-line interface (CLI), or the LCD keypad.
Log on to the appliance as nsroot. For initial configuration, use nsroot as the
administrative password. For subsequent access, use the password assigned during
initial configuration.
Configuration Utility Setup
To set up the appliance by using the configuration utility, you need a management
workstation or laptop configured on the same network as the appliance. To run the
configuration utility, the Java RunTime Environment (JRE) version 1.4.2_04 or later
must be installed on the workstation or laptop.
Note: The Setup Wizard automatically opens upon logon when the appliance is
configured with the default IP address, when licenses are not installed on the
appliance, and when either a mapped IP address or subnet IP address is not
configured.
To configure the NetScaler by using the configuration utility
1. Connect the NetScaler to a management workstation or network.
2. Open a browser and type: http://192.168.100.1
Note: The NetScaler is preconfigured with the IP address 192.168.100.1.
3. In User Name, type nsroot.
4. In Password, type nsroot.
5. In Deployment Type, select NetScaler ADC.
6. In the Setup Wizard, click Next and follow the instructions in the wizard to
configure the basic parameters, such as IP address, netmask, and gateway.
7. To confirm that the NetScaler is configured correctly, you can either ping the new
NetScaler IP address (NSIP) or use the new NSIP to open the configuration utility in
a browser.
CLI Setup
To set up the appliance by using the command-line interface (CLI), connect the 6-foot
RJ-45/DB-9 serial cable to the console port. Access the command line with a terminal
or terminal emulator with the following settings:
w Baud rate: 9600
9
Quick Installation and Configuration
w Data bits: 8
w Parity: None
w Stop bits: 1
w Flow control: None
Log on to the NetScaler with the following credentials:
User name: nsroot
Password: nsroot
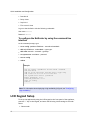
To configure the NetScaler by using the command line
interface
At the command prompt, type:
w set ns config -ipaddress<IPAddress> -netmask<subnetMask>
w add ns ip<IPAddress> <subnetMask> -type<type>
w add route<network> <netmask> <gateway>
w set system user <userName> -password
w save ns config
w reboot
Example
set ns config -ipaddress 10.102.29.60 -netmask
255.255.255.0
add ns ip 10.102.29.61 255.255.255.0 -type snip
add route 0.0.0.0 0.0.0.0 10.102.29.1
set system user nsroot -password
Enter password: *****
Confirm password: *****
save ns config
reboot
Note: For information about deploying a high availability (HA) pair, see "Configuring
High Availability."
LCD Keypad Setup
To set up the appliance by using the LCD keypad on the front panel of the appliance,
press the "<" key on the keypad, and enter the following initial settings in the order
shown:
1. Subnet mask
10
Citrix NetScaler 10.1 Quick Start Guide: MPX 8005/8015/8200/8400/8600/8800 Platform
2. NSIP address
3. Gateway
The subnet mask, NSIP, and gateway values are saved in the configuration file. You can
then use the NSIP to connect to the appliance remotely. For more information, see
"Hardware Installation."
Note: For information about deploying a high availability (HA) pair, see "Configuring
High Availability."
Changing the Administrative Password
The default user account is the administrative account, which provides complete
access to all features of the Citrix NetScaler appliance. Therefore, to preserve security,
the administrative account should be used only when necessary, and only individuals
whose duties require full access should know the password for the administrative
account. Citrix recommends changing the administrative password frequently.
In the configuration utility, you type the password. In the NetScaler command line, you
are prompted to enter the password.
To change the administrative password by using the
NetScaler configuration utility
1. On the Configuration tab, in the navigation pane, expand System, and then click
Users.
2. In the Users pane, click the default user account, and then click Change
Password.
3. In the Change Password dialog box, in Password and Confirm Password, type the
password of your choice.
4. Click OK.
To change the administrative password by using the
NetScaler command line
At the NetScaler command prompt, type: set system user <userName> {-password }
Configuring the LOM Port
For initial configuration of the lights-out management (LOM) port, connect to the port's
default IP address and change it to the address that you want to use for remote
monitoring and management. Also specify the administrator credentials and the
network settings.
11
Quick Installation and Configuration
Note: The LEDs on the LOM port are unoperational by design on all MPX platforms,
except MPX 22040/22060/22080/22100/22120.
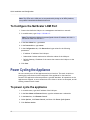
To Configure the NetScaler LOM Port
1. Connect the NetScaler LOM port to a management workstation or network.
2. In a web browser, type: http://192.168.1.3.
Note: The NetScaler LOM port is preconfigured with the IP address 192.168.1.3
and subnet mask 255.255.255.0.
3. In the User Name box, type nsroot.
4. In the Password box, type nsroot.
5. In the Configuration tab, click Network and type values for the following
parameters:
• IP Address—IP address of the LOM port.
• Subnet Mask—Subnet mask used to define the subnet of the LOM port.
• Default Gateway—IP address of the router that connects the LOM port to the
network.
6. Click Save.
Power Cycling the Appliance
You can remotely turn off the appliance and turn it back on. The result is similar to
pressing the power button on the back panel of the appliance for less than four
seconds. The appliance's software performs a graceful shutdown. All operations on the
appliance are stopped, no new connections to the client or server are accepted, and all
existing connections are closed.
To power cycle the appliance
1. In a web browser, type the IP address of the LOM port.
2. In the User Name and Password boxes, type the administrator credentials.
3. In the Menu bar, click Remote Control.
4. Under Options, click Power Control, and then click Power Cycle System.
5. Click Perform Action.
12
Citrix NetScaler 10.1 Quick Start Guide: MPX 8005/8015/8200/8400/8600/8800 Platform
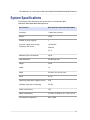
System Specifications
The following table summarizes the specifications of the NetScaler MPX
8005/8015/8200/8400/8600/8800 appliances.
Specifications
MPX 8005/8015/8200/8400/8600/8800
Processors
1 quad-core processor
Memory
32 GB
Number of power supplies
1
AC power supply input voltage,
frequency, and current
100-240 VAC
50-60 Hz
2.5 A
Maximum power consumption
450 W
Heat dissipation
630 BTU per hour
Weight
32 lbs
Height
1U
Width
EIA 310-D for 19-inch racks
Depth
61 cm
Operating temperature (degree Celsius)
0-40
Humidity range (non-condensing)
5%-95%
Safety certifications
TUV
EMC & susceptibility
FCC (Part 15 Class A), CE, C-Tick, VCCI-A
Environmental compliance
RoHS, WEEE
13
Quick Installation and Configuration
Additional Information
A complete set of NetScaler documentation is available on Citrix eDocs at http://
support.citrix.com/proddocs/topic/netscaler/ns-gen-netscaler-wrapper-con.html.
To contact Citrix Support, call 1-800-4-CITRIX (1-800-424-8749), or log on to MyCitrix at
http://www.citrix.com. You will be asked for your hardware serial number as part of
the support process.
Detailed instructions for contacting support can be found at: http://citrix.com/site/
resources/dynamic/sup2nd/Citrix_HWS_SerialNO.pdf.
If you have comments or feedback on this documentation, please send email to
[email protected].
14