1
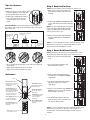
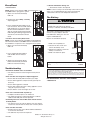
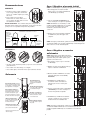
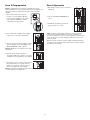
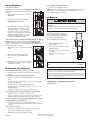
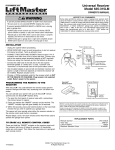
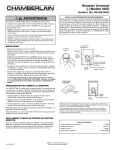
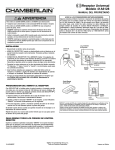
Model 942FP
WARNING
®
WARNING
Fingerprint Keyless Entry
Overview
CAUTION
WARNING
The system uses biometric technology that enables an
authorized user to gain access by scanning their fingerprint.
The sensor strip on the unit makes a numeric template of the
fingerprint that is unique to that user. The unit’s memory can
store up to four fingerprints.
• The term “enroll” refers to scanning the fingerprint so the
device will recognize the user.
• The term “swipe” refers to the movement of the finger across
the sensor strip.
• The term “LED” stands for Light Emitting Diode. There are
6 LEDs located on the Fingerprint Keyless Entry.
When unit is on, it is programmed to shut off after a short
period of time. The unit’s sensor strip is sensitive so it is
important to read the Tips for Success before attempting to
use the Fingerprint Keyless Entry.
To prevent possible SERIOUS INJURY or DEATH from electrocution:
• Be sure power is not connected BEFORE installing the receiver.
To prevent possible SERIOUS INJURY or DEATH from a moving
gate or garage door:
• Install Keyless Entry Control within sight of the garage door, out of
reach of children at a minimum height of 5 feet (1.5 m), and away
from all moving parts of door.
• ALWAYS keep remote controls out of reach of children. NEVER
permit children to operate, or play with remote control
transmitters.
• Activate gate or door ONLY when it can be seen clearly, is properly
adjusted, and there are no obstructions to door travel.
• ALWAYS keep gate or garage door in sight until completely closed.
NEVER permit anyone to cross path of moving gate or door.
Carton Inventory
NOTICE TO U. S. CONSUMERS:
Some states prohibit the service or repair of garage door openers which
cannot be made to comply with the safety standards contained in UL 325
(1988 revision). In order to comply with both the letter and the spirit of
these laws, this universal radio control should not be used with any
LiftMaster®, Chamberlain®, or Sears Craftsman® garage door opener
manufactured prior to April 1, 1982. To find out if your Chamberlainmade garage door opener was manufactured prior to or after April 1,
1982, please call 1-800-528-9131 before installing this universal radio
control.
Receiver
Fingerprint Keyless
Entry
ENROLL
SEND
ENROLL
PASS
FAIL
READY
RETRY
Step 2 Install the Keyless Entry
1. Remove cover.
2. Fasten bottom screw to mounting surface. Allow 1/8"
(3 mm) to protrude above surface. Position unit on screw
head and adjust for snug fit.
3. Fasten top screw. Replace cover.
Step 1 Install the Receiver
1. Unplug the opener before proceeding.
2. OPEN RECEIVER: Insert a small screwdriver in slot on
receiver front panel as shown. Twist up actuator cover.
3. CONNECT RECEIVER AND OPENER: Remove about 1/4"
(6 mm) of insulation from each end of the 2-strand bell wire.
Connect one end to the receiver screw terminals (polarity is
NOT required). Route wire along the channels and out the
bottom as shown.
4. Connect the other end of the bell wire to the two opener
terminals labeled “2” (white) and “1” (red), “common” and
“command” or the terminals used for the push button control.
5. Use insulated staples to secure bell wire between receiver
and opener. Length of bell wire depends on where the
receiver will be installed. Replace actuator cover.
6. Choose a 120Vac polarized outlet for the receiver which is
OUT OF THE REACH OF CHILDREN. Plug receiver into
selected outlet. Return power to the opener.
Actuator Cover
1
3
Power Indicator Light
Terminals
Bell Wire
Channels
"SMART"
Indicator
Light
Connect Bell Wire
To Garage Door
Opener Terminals
"SMART"
Actuator
2
Bell Wire
1
Tips for Success
Step 3 Enroll Initial User
CORRECT
NOTE: The unit requires 3 passed swipes to enroll a user.
1. Open cover to turn unit on. Wait until
1
Enroll LED and Ready LED are lit (not
flashing).
1. Make sure finger is clean and dry. Place
finger flat above the sensor strip with
the top knuckle above the sensor.
2. Swipe finger straight down keeping
firm contact with the sensor. The
swipe should be a slow, constant
speed.
ENROLL
SEND
2. Swipe finger slowly and firmly down the
sensor strip until three passed swipes are
made.
NOTE: The Pass LED will light for a passed
swipe. The Retry LED will light if another
swipe is needed. Swipe slowly and with
more pressure if this occurs.
SPECIAL NOTES: Use the same finger for every swipe. It is
important to swipe finger slowly and firmly as this is the reason
most swipes fail.
Start swipe with
the top knuckle
above the
sensor strip.
Swipe finger straight down
keeping firm contact with
the sensor.
ENROLL
PASS
FAIL
READY
RETRY
2
3
ENROLL
3. After the third passed swipe, the Enroll
and Pass LED will flash. Enrollment is
complete.
SEND
ENROLL
PASS
FAIL
READY
RETRY
Sensor Strip
Sensor Strip
The scan
should end
at the tip of
finger.
NOTE: If cover is already open, press either the Resend or the
Enroll button to turn unit on. If the Ready LED is lit refer to
Factory Reset in the Erase/Reset section.
INCORRECT
Step 4 Enroll Additional User(s)
NOTE: The device can store up to four fingerprints at a time.
An enrolled user must swipe finger first to enroll new user.
1. Open cover and wait until Ready LED
1
is lit.
ENROLL
SEND
• Do not bend finger during swipe as this will only scan the tip
of your finger.
• Swipe finger straight down, not at an angle.
• Swipe flat, not tilted or rolled to one side.
2. Press and hold Enroll button until
Enroll LED starts to flash.
Reference
3. While the Enroll LED is flashing an
enrolled user must slowly and firmly
swipe finger.
3
4. The Enroll LED and Ready LED will
light when ready for new user to
swipe finger.
4
Cover
Resend button: When
pressed the door will stop if
moving up or reverse if
moving down.
Send LED (yellow): Lit
after a passed fingerprint
scan and indicates that the
Resend button is active
and can be used to stop
or reverse door travel.
Pass LED (green): Lit when
a scanned fingerprint
matches a stored print.
Ready LED (green): Lit
when unit is ready to scan
fingerprint.
Enroll button: When
pressed the unit will go
into Enroll mode.
ENROLL
SEND
ENROLL
PASS
FAIL
READY
RETRY
5. New user should swipe finger slowly and
firmly down the sensor strip until three
passed swipes are made.
Enroll LED (yellow):
Lit when the unit is in
Enroll mode.
Fail LED (red): Lit when
a scanned fingerprint
does not match a
stored print.
6. The Enroll LED and Pass LED will
flash when new user is enrolled. Unit
will return to Ready mode.
Sensor Strip
Retry LED (yellow): Lit
when another swipe is
required.
ENROLL
PASS
FAIL
READY
RETRY
2
ENROLL
SEND
ENROLL
PASS
FAIL
READY
RETRY
5
6
ENROLL
SEND
ENROLL
PASS
FAIL
READY
RETRY
NOTE: If cover is already open, press either the Resend or the
Enroll button to turn unit on. The Pass LED will light for a
passed swipe. The Retry LED will light if another swipe is
needed.
Extra directions are located
on the inside of cover.
2
Step 5 Programming
Step 6 Operation
1. Open cover and wait until Ready LED
is lit.
NOTE: The unit must have an enrolled user before it can be
programmed to the receiver. Due to the 30 second time
interval, a second person may be needed to press the
“SMART” actuator.
1. Remove the front panel of the receiver
case. Press and release the “SMART”
actuator on the receiver. The “SMART”
indicator light will glow steady for 30
seconds.
1
ENROLL
SEND
2. Swipe finger slowly and firmly down the
sensor strip.
2
3. The Pass LED will flash and garage door
will either open or close.
3
FAIL
RETRY
ENROLL
SEND
2. Open the Fingerprint Keyless Entry cover
and wait for Ready LED to light.
ENROLL
3. Within 30 seconds of pressing the
“SMART” actuator, slowly and firmly
swipe enrolled finger.
NOTE: The Retry LED will light if another
swipe is needed.
ENROLL
PASS
FAIL
READY
RETRY
FAIL
READY
RETRY
While the door is traveling the Send LED will be lit. During this
time the only way to reverse or stop the door is to press the
Resend button.
3
4
4. After a passed swipe the Pass LED will
light followed by a lit Send LED.
Programming is complete.
5. If the opener does not operate, press and
release the Resend button at 1 second
intervals for up to 5 seconds until the door
moves. Programming is complete.
NOTE: If unit will not program to opener
repeat the steps above or refer to
Troubleshooting.
ENROLL
PASS
NOTE: If cover is already open, press either the Resend or the
Enroll button to turn unit on. The Fail or Retry LED will light if
another swipe is needed. If this occurs, swipe slowly and with
more pressure. It may require multiple swipes to get a passed
swipe.
2
SEND
ENROLL
PASS
READY
ENROLL
SEND
ENROLL
PASS
FAIL
READY
RETRY
5
3
Erase/Reset
• If the Fail LED flashes during use:
— The batteries need to be replaced.
• To erase users:
NOTE: Erasing a user will erase ALL stored fingerprints. User
does NOT need to reprogram to opener.
1
1. Open cover and wait until Ready
LED is lit.
NOTE: If sensor is dirty, user should wipe sensor with a clean
finger. It is recommended that the sensor be periodically
cleaned with a lint-free cloth dampened with alcohol.
ENROLL
SEND
2. Enrolled user must slowly and firmly
swipe fingerprint.
ENROLL
PASS
FAIL
READY
RETRY
The Battery
WARNING
2
To prevent possible SERIOUS INJURY or DEATH:
3. Press and hold the Enroll button for at
least 6 seconds. The Pass LED and Fail
LED will flash for 15 seconds. During
this time the Resend button is active.
After 15 seconds the Enroll and Ready
LEDs will light indicating fingerprints are
erased. The unit will return to Enroll
mode.
• To return unit to Factory Reset state:
CAUTION
• NEVER allow small children near batteries.
• If battery is swallowed, immediately notify doctor.
3
The batteries should produce power for
at least one year. Replace when the
Fail LED flashes during use. The unit
requires 4 AAA batteries.
Dispose of old batteries properly.
NOTE: Factory reset state will erase ALL stored fingerprints.
This method should be used ONLY when an enrolled user is
not available as it requires user to reprogram unit to opener.
1. Open cover and wait until Ready
LED is lit.
1
ENROLL
SEND
2. Press and hold the Enroll button
until all LEDs turn off. Release
button.
3. Again press and hold the Enroll
button until the Ready and Enroll
LEDs are lit and not flashing.
ENROLL
PASS
FAIL
READY
RETRY
2
1. Slide cover completely off.
2. Unscrew the two screws and
remove the battery cover.
3. Replace the batteries. Screw the
battery cover back on.
4. Slide cover back into place.
Cover
Battery
Cover
Screws
ENROLL
SEND
FAIL
RETRY
3
Replacement parts:
Cover . . . . . . . . . . . . . . . . . . . . . . . . . . . . . . . . . . . .41A6481
Troubleshooting
• If no known enrolled users are available:
— The memory must be erased using the Factory Reset
process.
NOTICE: To comply with FCC and or Industry Canada (IC) rules, adjustment or modifications of
this receiver and/or transmitter are prohibited, except for changing the code setting or replacing
the battery. THERE ARE NO OTHER USER SERVICEABLE PARTS.
Tested to Comply with FCC Standards FOR HOME OR OFFICE USE. Operation is subject to the
following two conditions: (1) this device may not cause harmful interference, and (2) this device
must accept any interference received, including interference that may cause undesired operation.
• If the unit does not recognize a swiped fingerprint:
— Ensure that the Ready LED is lit before you swipe.
— Ensure that fingerprint is swiped correctly (See Tips for
Success).
FOR SERVICE DIAL OUR TOLL FREE NUMBER:
1-800-528-9131
— Ensure that fingerprint is enrolled.
— Ensure that sufficient pressure is being applied to sensor
strip (do not press too hard).
— Ensure that the sensor and finger are not wet.
• If the unit is in Enroll mode at power up:
— Complete enrollment process for initial user.
— The initial enroll process failed (signalled by a lit Enroll
LED and Fail LED) and must be repeated.
• If enrolling new user and all LEDs flash and unit returns
to Ready mode:
— The memory is full. In order to add new user, the memory
needs to be erased. Refer to Erase User or Factory Reset.
• If the unit does not wake:
— A button may be stuck. Press Enroll and Resend buttons
to ensure free movement.
— The batteries may need to be replaced.
114A3408
ENROLL
PASS
READY
© 2007, The Chamberlain Group, Inc.
All Rights Reserved
Modelo 942FP
®
ADVERTENCIA
LlaveADVERTENCIA
digital de huella digital
Generalidades
ADVERTENCIA
La sistema usa tecnología biométrica que permite a un usuario
autorizado tener acceso escaneando su huella digital. El sensor de la
unidad forma una plantilla numérica de la huella digital que es exclusiva
del usuario. La memoria de la unidad puede almacenar hasta cuatro
huellas digitales.
• El término “registrar” se refiere a escanear la huella digital de modo
que el dispositivo reconozca al usuario.
Para evitar una LESION GRAVE posible o LA MUERTE por electrocución:
• Asegúrese que la electricidad no está conectada ANTES de instalar el
receptor.
Para evitar una LESION GRAVE posible o LA MUERTE de una compuerta o
puerta de garaje, móvil:
• Instale la llave digital que quede a la vista desde la puerta de la cochera,
fuera del alcance de los niños a una altura mínima de 1.5 m
(5 pies), y alejado de las partes móviles de la puerta.
• SIEMPRE mantenga los controles remotos fuera del alcance de los niños.
NUNCA permita que los niños operen, o jueguen con los transmisores de
control remoto.
• Active la compuerta o puerta SOLO cuando pueda verse claramente, está
bien ajustada y no hay obstrucciones al recorrido de la puerta.
• SIEMPRE mantenga la compuerta o puerta del garaje a la vista hasta que
esté completamente cerrada. NUNCA permita que nadie cruce la trayectoria
de una compuerta o puerta móvil.
PRECAUCIÓN
• El término “pasar” se refiere al movimiento del dedo a través del
sensor.
• El término “LED” significa diodo emisor de luz. Hay 6 LED en el llave
digital de huella digital.
Cuando se enciende la unidad, está programada para apagarse
después de un período corto. El sensor de la unidad es sensible, por lo
que es importante leer las Recomendaciones antes de tratar de usar el
llave digital de huella digital.
ADVERTENCIA
Inventario de la caja
AVISO A LOS CONSUMIDORES ESTADOUNIDENSES:
Algunos estados prohiben el servicio o reparación de abridores de
puertas de cochera que no pueden cumplir las normas de seguridad
contenidas en UL 325 (revisión de 1988). A fin de cumplir con el texto
y la intención de estas leyes, este control de radio universal no debe
utilizarse con ningún abridor de puertas de cochera Master Mechanic ®,
Lift-Master ®, Chamberlain® o Sears Craftsman® fabricado antes del 1 de
abril de 1982. Para saber si el abridor de puerta de cochera
Chamberlain fue fabricado antes o después del 1 de abril de 1982,
llamar al 1-800-528-9131 antes de instalar este control de radio
universal.
Receptor
Llave digital de huella digital
ENROLL
SEND
ENROLL
PASS
FAIL
READY
RETRY
Paso 2 Instale la unidad llave digital
Paso 1 Instalar el receptor
1. Quite la tapa.
1. Desenchufar el abridor antes de proceder.
2. Enrosque el tornillo inferior a la superficie de montaje. Deje que
sobresalga 3 mm (1/8 de pulg.) de la superficie.
2. ARBIR EL RECEPTOR: Inserto un destornillador entre el abertura en
el panal frontal de receptor como demostrar. Torcedura arriba el
cubierta de actuador.
3. Enrosque el tornillo superior. Vuelva a colocar la tapa.
3. CONECTAR EL RECEPTOR Y EL ABRIDOR: Quitar 6 mm
(1/4 de pulg.) de aislamindo de los extremos del cable de timbre.
Conectar un extremo al los tornillos terminados de receptor
(polaridad NO es requerida). Recorrido el cable entre los canals y
fuera de bajo como demonstrar.
4. Conectar los otros extremos en los dos terminales del abridor
marcado “2” (blanco) y “1” (rojo), “común” y “mando” o los terminales
usado para los controles de botones.
5. Usar broches aislados para asegurar el cable del timbre entre el
receptor y el abridor. Longitud de alambra son dependiente de
adonde el receptor es instalada. Reconectar el cubierta de actuador.
1
6. Componer un tomacorriente de 120 Vca polarizadora el receptor que
es FUERA DEL ALCANCE DE LOS NIÑOS. Enchufar el receptor al
un tomacorriente de 120 voltios. Reconectar la electricidad al abridor.
3
Tapa de Actuador
La Luz Indicadora de Electricidad
Terminales
Canals de Cable
de Timbre
La Luz
Indicadora “SMART”
Conectar el alambre
de timbre a los
terminados del abridor
Actuador
“SMART”
2
Cable de Timbre
1
Recomendaciones
Paso 3 Registre al usuario inicial
CORRECTO
NOTA: La unidad requiere 3 pasadas para registrar a un usuario.
1. Abra la tapa para encender la unidad.
Espere a que se enciendan el LED Enroll
y el LED Ready (sin destellar).
1. Asegúrese de que el dedo esté limpio y
seco. Ponga el dedo plano encima del
sensor con el nudillo superior por encima
del sensor.
1
ENROLL
SEND
2. Pase el dedo recto hacia abajo
manteniendo un contacto firme con el
sensor. El paso del dedo debe ser a una
velocidad lenta constante.
2. Pase el dedo lenta y firmemente por el
sensor hasta que se acepten tres pasadas.
NOTAS ESPECIALES: Use el mismo dedo para cada pasada. Es
importante pasar el dedo lenta y firmemente, ya que ésta es la razón
por la que no son aceptadas la mayoría de las pasadas.
2
3
3. Después de la tercera pasada, destellarán
los LED Enroll y Pass. El registro está
completo.
Encima del
sensor
El escaneo
debe terminar
en la punta
del dedo.
Encima del
sensor
FAIL
RETRY
NOTA: El LED Pass se encenderá por cada
pasada aceptada. El LED Retry se encenderá
si se necesita otra pasada. Pase el dedo
lentamente y haciendo más fuerza si
ocurre esto.
Pase el dedo recto hacia abajo
manteniendo un contacto firme con el sensor.
Empiece a
pasar el dedo
con el nudillo
superior
por encima
del sensor.
ENROLL
PASS
READY
ENROLL
SEND
ENROLL
PASS
FAIL
READY
RETRY
NOTA: Si la tapa ya está abierta, oprima el botón Resend o Enroll para
encender la unidad. Si se enciende el LED Ready consulte Reajuste de
fábrica en la sección de Borrar/Reajustar.
INCORRECTO
Paso 4 Registre a usuarios
adicionales
NOTA: El dispositivo puede almacenar hasta
cuatro huellas dactilares de una vez. Un usuario
registrado debe pasar el dedo primero para
registrar a un usuario nuevo.
1
ENROLL
1. Abra la tapa y espere a que se encienda
el LED Ready.
• No doble el dedo durante la pasada, ya que esto sólo escaneará la
punta del mismo.
• Pase el dedo recto hacia abajo, no en ángulo.
SEND
2. Oprima sin soltar el botón Enroll hasta que
empiece a destellar el LED Enroll.
2
3. Mientras destelle el LED Enroll, el usuario
registrado debe pasar el dedo lenta y
firmemente.
3
ENROLL
PASS
FAIL
READY
RETRY
• Pase el dedo plano, sin inclinar ni hacer que ruede hacia un lado.
Referencía
Tapa
Botón Enroll (Registrar):
Cuando se oprime, la unidad
se pondrá en la modalidad de
Registro.
Botón Resend (Reenviar): Cuando se
oprime este botón, la puerta se parará
si está subiendo o cambiará de sentido
de desplazamiento si está bajando.
LED Send (Enviar) (amarillo): Se
enciende después de escanear una
huella dactilar aceptada e indica que
el botón Resend está activo y que
puede usarse para detener o cambiar
de sentido el movimiento de la puerta.
LED Pass (Aceptada) (verde):
Se enciende cuando una huella
dactilar escaneada coincide con
una huella almacenada.
4. El LED Enroll y el LED Ready se
encenderán cuando la unidad esté
lista para que el nuevo usuario pase
el dedo.
LED Enroll (Registrar) (amarillo):
Se enciende cuando la unidad está
en la modalidad de Registro.
ENROLL
SEND
ENROLL
PASS
FAIL
READY
RETRY
LED Fail (No aceptada) (rojo):
Se enciende cuando una huella
dactilar escaneada no coincide
con otra almacenada.
Encima del sensor
LED Retry (Repetir) (amarillo):
Se enciende cuando se requiere
otra pasada.
4
ENROLL
SEND
5. El nuevo usuario debe pasar el dedo lenta
y firmemente por el sensor hasta que se
efectúen tres pasadas aceptadas.
5
6. El LED Enroll y el LED Pass destellarán
cuando se registre el nuevo usuario. La
unidad volverá a la modalidad Lista.
6
FAIL
READY
RETRY
ENROLL
SEND
LED Ready (Lista) (verde): Se
enciende cuando la unidad esté lista
para escanear la huella dactilar.
ENROLL
PASS
ENROLL
PASS
FAIL
READY
RETRY
NOTA: Si la tapa ya está abierta, oprima el botón Resend o Enroll para
encender la unidad. El LED Pass se encenderá después de una
pasada aceptada. El LED Retry se encenderá si se necesita otra
pasada.
Hay instrucciones adicionales en el
interior de la tapa.
2
Paso 5 Programación
Paso 6 Operación
1. Abra la tapa y espere a que se encienda el
LED Ready.
NOTA: La unidad debe tener un usuario registrado antes de que
pueda programarse el receptor. Debido al intervalo de 30 segundos, tal
vez sea necesaria una segunda persona para oprimir el botón de
“SMART”.
1
ENROLL
SEND
1. Quite el panel delantro de la caja del
receptor con un destornillador. Oprimir y
soltar el actuador “SMART” en el receptor.
La luz indicadora “SMART” se ilumina
continuamente por 30 segundos.
2. Pase el dedo lenta y firmemente por el
sensor.
3. El LED Pass destellará y la puerta del
garaje se abrirá o se cerrará.
FAIL
RETRY
2
ENROLL
3
SEND
2. Abre la tapa de llave digital de huella digital y
espere a que se encienda el LED Ready.
ENROLL
3. Antes de que transcurran 30 segundos después
de haber oprimido el botón de “SMART”, pase
lenta y firmemente el dedo registrado.
ENROLL
PASS
FAIL
READY
RETRY
3
5. Si el abridor no operer, oprima y suelte el botón
Resend a intervalos de 1 segundo hasta un
máximo de 5 segundos, hasta que mueva la
puerta. La programación está completa.
4
ENROLL
SEND
FAIL
READY
RETRY
Mientras la puerta se mueva, estará encendido el LED Send. Durante
este tiempo la única forma de invertir el movimiento o detener la puerta
es oprimir el botón Resend.
NOTA: El LED Retry se encenderá si se necesita
otra pasada.
4. Después de una pasada aceptada, se
encenderá el LED Pass y después se encender
á el LED Send. La programación está completa.
ENROLL
PASS
NOTA: Si la tapa ya está abierta, oprima el botón Resend o Enroll
para encender la unidad. El LED Fail o Retry se encenderá si se
necesita otra pasada. Si ocurre esto, pase lentamente y haciendo más
fuerza. Tal vez sean necesarias múltiples pasadas para obtener una
pasada aceptada.
2
SEND
ENROLL
PASS
READY
ENROLL
PASS
FAIL
READY
RETRY
5
NOTA: Si la unidad no programa el abridor, repita los pasos de arriba
o consulte Resolución de problemas.
3
Borrar/Reajustar
• Si el LED Fail destella durante el uso:
— Es necesario reemplazar las pilas.
• Para borrar usuarios:
NOTA: Al borrar un usuario se borrarán TODAS las huellas digitales
almacenadas. El usuario NO necesita reprogramar
1
el abridor.
1. Abra la tapa y espere a que se encienda el
LED Ready.
ENROLL
SEND
2. El usuario inscrito debe registrar lenta y
firmemente una huella dactilar.
3. Oprima sin soltar el botón Enroll durante al
menos 6 segundos. Los LED Pass y Fail
destellarán durante 15 segundos. Durante
este tiempo el botón Resend estará activo.
Después de 15 segundos se encenderán los
LED Enroll y Ready indicando que se han
borrado las huellas dactilares. La unidad
volverá a la modalidad de Registro.
NOTA: Si el sensor está sucio, el usuario debe limpiar el sensor con un
paño limpio. Se recomienda limpiar el sensor periódicamente con un
paño sin fibras empapado en alcohol.
ENROLL
PASS
FAIL
READY
RETRY
La Batería
Para evitar la posibilidad de LESIONES GRAVES o INCLUSO
LA MUERTE:
• NUNCA permita que los niños pequeños estén cerca de las baterías.
• Si alguien se traga una batería, llame al médico de inmediato.
3
Las pilas deben producir corriente al
menos durante un año. Reemplácelas
cuando el LED Fail destelle durante el uso.
La unidad requiere 4 pilas AAA.
• Para volver a poner la unidad en el estado de reajuste de fábrica:
NOTA: El estado de reajuste de fábrica borrará TODAS las huellas
dactilares almacenadas. Este método debe usarse SOLAMENTE
cuando no se disponga de un usuario registrado, ya que requiere que
el usuario reprograme el abridor.
1. Abra la tapa y espere que se encienda el LED 1
Ready.
2
3. Oprima nuevamente sin soltar el botón Enroll
hasta que se enciendan y dejen de destellar
los LED Ready y Enroll.
3
SEND
ENROLL
PASS
FAIL
READY
RETRY
1. Quite la tapa deslizándola
completamente.
Tapa de
batería
3. Reemplace las pilas. Enrosque la tapa
de la pilas.
4. Deslice la tapa de entrada en
posición.
Tornillos
ENROLL
SEND
ENROLL
PASS
FAIL
READY
RETRY
Partes de repuesto:
Tapa . . . . . . . . . . . . . . . . . . . . . . . . . . . . . . . . . . . . . . . . . . .41A6481
Resolución de problemas
• Si no se dispone de usuarios inscritos conocidos:
— Se debe borrar la memoria usando el proceso de reajuste de
fábrica.
• Si la unidad no reconoce una huella dactilar pasada:
AVISO: Para cumplir con las reglas de la FCC y/o de Canadá (IC), las reglas, ajustes o modificaciones
de este receptor y/o sensor están prohibidos, excepto por el cambio de la graduación del código o el
reemplazo de la pila. NO HAY OTRAS PIEZAS REPARABLES DEL USUARIO.
Se ha probado para cumplir con las normas de la FCC para USO DEL HOGAR O DE LA OFICINA. La
operación está sujeta a las dos condiciones siguientes:(1) este dispositivo no puede causar interferencia
perjudicial, y (2) este dispositivo debe aceptar cualquier interferencia recibida, incluyendo la interferencia
que puede causar una operación no deseable.
— Asegúrese de que se encienda el LED Ready antes de pasar el
dedo.
— Asegúrese de que la huella digital se haya pasado correctamente
(vea Recomendaciones).
— Asegúrese de que la huella digital esté registrada.
PARA SERVICIO, LLAME NOSOTROS SIN COSTO:
1-800-528-9131
— Asegúrese de hacer suficiente fuerza sobre el sensor (no haga
demasiada fuerza).
— Asegúrese de que el sensor y el dedo no estén mojados.
• Si la unidad está en la modalidad de Registro al encenderse:
— Complete el proceso de registro del usuario inicial.
— No se ha aceptado el proceso de registro inicial (indicado por un
LED Enroll LED y un LED Fail encendidos) y debe repetirse.
• Si se va a registrar a un usuario nuevo, destellan todos los LED y
la unidad vuelve a la modalidad Lista:
— La memoria está llena. Para añadir un nuevo usuario, es
necesario borrar la memoria. Consulte Borrar usuario o Reajuste
de fábrica.
• Si la unidad no se activa:
— Puede haber un botón atascado. Oprima los botones Enroll y
Resend para asegurar un movimiento libre.
— Es posible que haya que reemplazar las pilas.
114A3408
PR
Tapa
Deseche debidamente las pilas viejas.
2. Desenrosque los dos tornillos y quite
la tapa de las pilas.
ENROLL
2. Oprima sin soltar el botón Enroll hasta
que se apaguen todos los LED. Suelte
el botón.
A
ADVERTENCIA
2
©2007, The Chamberlain Group, Inc.
Todos los Derechos Reservados